
Lesson 1. Setting Up Your Library
Lesson Files
Desktop > APTS iPhoto Book Files > APTS iPhoto Library
Time
This lesson takes approximately 15 minutes to complete.
Goals
Understand the iPhoto library
Download project files
Navigate the iPhoto window
Switch between iPhoto libraries
iPhoto helps manage all your photos and allows you to enjoy them in a variety of ways. Whether you use iPhoto on a Mac or an iOS device (iPhone, iPad, or iPod touch), this book will teach you how to create a library where you can quickly find specific photos when you want them. You’ll also master special one-click effects as well as more traditional editing tools such as crop, exposure, and saturation to bring out your photos’ very best.
Most importantly you’ll uncover a range of fun ways to share your photos with others. Let’s get started with the iPhoto library.
Understanding the iPhoto Library
iPhoto uses a library concept to store all your photos in one location. On OS X the library is created in the Pictures folder when you first open iPhoto. On an iOS device, the “library” is the Photos app.
You can open iPhoto on OS X two primary ways:
![]() In the Dock, click the iPhoto icon.
In the Dock, click the iPhoto icon.
![]() Insert a memory card or attach a camera to your Mac.
Insert a memory card or attach a camera to your Mac.
Let’s start by opening iPhoto from the Dock.
1. In the Dock, click the iPhoto icon.

When you open iPhoto for the first time, you’ll see the iPhoto window with a helpful “note” displayed in the main viewing area. The note briefly outlines how to get started with iPhoto.
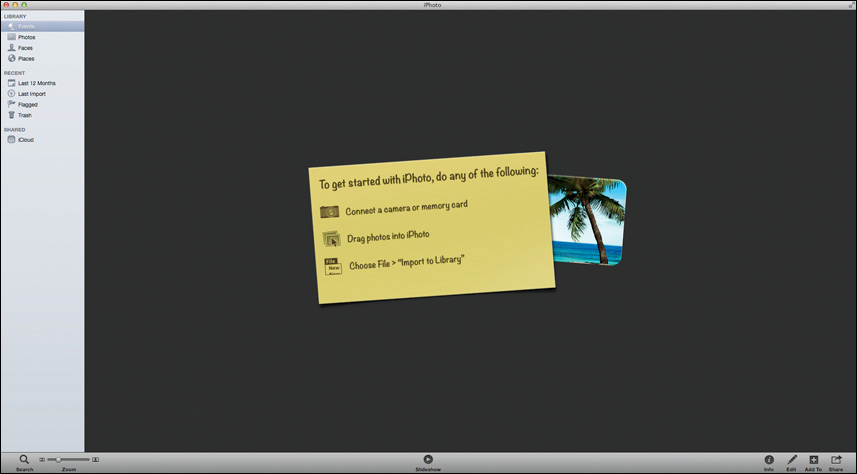
Note
If you’ve previously opened iPhoto, this note may not appear and you may already have an iPhoto library with personal photos stored in it.
2. Unlike most OS X applications, closing the iPhoto window quits the iPhoto application. But a more standard method is to choose iPhoto > Quit iPhoto.
You now have an iPhoto library for your personal use, but to follow along with the lessons in this book, you’ll need to download our library and lesson files.
Downloading an iPhoto Library
This book includes step-by-step instructions built around a specific iPhoto library and accompanying media files.
The Apple Pro Training Series: iPhoto lesson files you download in this exercise include all the library and media files you’ll need to complete the lessons in this book. After you save the files to your hard disk, each lesson will instruct you in their use.
To download these files, you must have your book’s access code—provided on a card in the back of the printed editions of this book or on the “Where Are the Lesson Files?” page in electronic editions of this book. When you have the code:
1. Connect to the Internet, navigate to www.peachpit.com/redeem, and enter your access code.
Note
If you redeem a code for the electronic version of this guide, the lesson file link will automatically appear on the Lesson & Update Files tab without the need to redeem an additional code.
2. Click Redeem Code, and sign in or create a Peachpit.com account.
3. Locate the downloadable files on your Account page under the Lessons & Update Files tab.
4. Click the lessons file link and download the APTS iPhoto Book Files.zip file to your Downloads folder.
Note
Once you enter the redeem code, you can download the APTS iPhoto Book Files.zip file as many times as you like for your account.
5. After downloading the file, open your Downloads folder, and double-click APTS iPhoto Book Files.zip to unzip it.
6. Drag the APTS Book Files folder to your Desktop.
The APTS iPhoto Book Files folder contains the APTS iPhoto Library and the lesson files used in this course, each in its own folder. Note that several lessons use files from a previous lesson; in those cases, the start of the lesson will identify the event and any existing content used in that lesson.
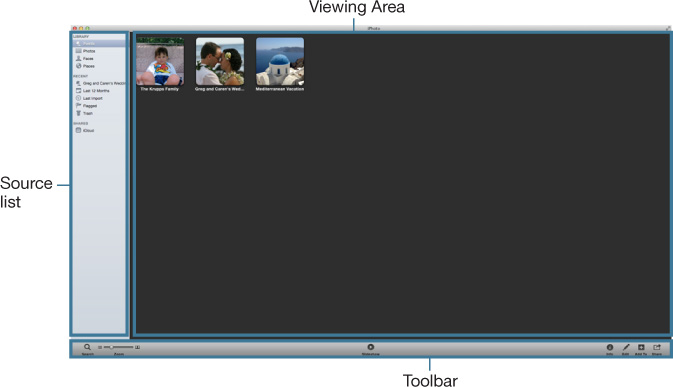
Navigating the iPhoto Window
The iPhoto window has three main sections, as shown in the following figure:
Switching Between Your Library and Ours
If you have previously imported photos into iPhoto, you will already have a personal iPhoto library in your Pictures folder because iPhoto automatically creates it. Learning to switch between separate iPhoto libraries is important not only for this book, but also if you ever decide to organize your pictures into separate libraries.
Note
iOS devices have only one “library,” located in the Photos app.
1. In the Dock, click the iPhoto icon to open iPhoto, if necessary.
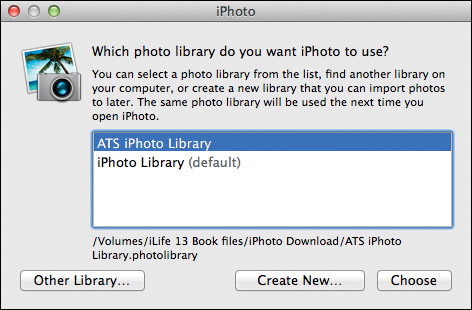
2. Choose File > Switch to Library.
Every previously opened iPhoto library on your hard drive appears in the window, including the APTS iPhoto library.
3. Select the APTS iPhoto library and click Choose.
A warning dialog appears asking if you want to switch from the current iPhoto library to the APTS library
4. Click Relaunch.
Note
On Macs with Retina displays, a dialog may appear requiring you to generate high-resolution thumbnails for the Retina display.
You are now looking at the APTS iPhoto library that accompanies this book. Every time you open iPhoto from the Dock or the Applications folder, you will now also open the APTS iPhoto library. When you complete the lessons in the book, you can return to your personal library by choosing File > Switch to Library.
Lesson Review
1. Where is the iPhoto library located?
2. How do you acquire the library that accompanies this book?
3. Once you finish the lessons in this book, how do you return to your personal iPhoto library?
Answers
1. In the Pictures folder
2. Download it from your Accounts page on peachpit.com, double-click the APTS iPhoto Book Files.zip file from the Downloads folder, and then drag the APTS Book Files folder to the Desktop.
3. Choose File > Switch to Library. Then, select iPhoto Library, and click Choose.