
Lesson 14. Sharing Photos with iCloud on iOS
Lesson Files
None
Time
This lesson takes approximately 50 minutes to complete.
Goals
Understand and get started with iCloud
Add and remove items from My Photo Stream
Save photos to the Camera Roll
Set up iCloud Photo Sharing
Create a shared photo stream
Add and remove items from a shared photo stream
Comment on a shared photo stream
In this lesson, you’ll set up and use iCloud for iPhoto on an iOS device. Then you’ll use iCloud to deliver your photos to the devices you own and out to friends and family. Although this lesson is dedicated to iCloud for iOS devices, it covers many of the same setup requirements and technology descriptions found in Lesson 10.
As in the previous iOS lessons, you are encouraged to use your own photos to follow along with the step-by-step instructions.
What Is iCloud?
iCloud is an Apple web service that includes My Photo Stream and iCloud Photo Sharing, two web services designed to automatically distribute the photos you choose to the devices you choose.
Like many people, if you own multiple devices then you probably have had the problem of taking a photo with your iPhone and wishing you could see it on your larger iPad or Mac screen. You probably resorted to emailing the photos to yourself or connecting your phone to your computer and transferring them. But the easiest and most effortless solution is to use iCloud.
iCloud offers My Photo Stream to share all your recent photos with all your personal devices and iCloud Photo Sharing to share photos with friends and family.
Getting Started with iCloud
To use iCloud with iPhoto, you must have an Apple ID (iTunes account) and at least an iOS 5 device. Some features such as iCloud Photo Sharing require iOS 7.
And since it is a web service, it does require a Wi-Fi or Ethernet connection with Internet access.
iCloud includes 5 GB of cloud-based storage to keep track of all of your content on all of your devices. Your iTunes or App Store purchases as well as the 1000 most recent photos that you shared are not counted against that 5 GB. So the storage is primarily used for mail, documents, contacts, calendars, and iOS backups. If you need additional storage, you can purchase it from Apple.
Share Using My Photo Stream
When you take a photo on your iPhone, the photo is uploaded to iCloud (assuming you are connected to a Wi-Fi or Ethernet network) for 30 days. If your iOS mobile devices or your portable MacBooks don’t connect to a Wi-Fi network for a week or two, iCloud can still push that photo to those devices. iCloud can push up to 1000 photos into your My Photo Stream album. When iCloud tries to push the 1001st photo, photo number 1 is removed to make room. To keep those photos you must manually save them from your My Photo Stream album and into the Camera Roll on your iOS device.
Set Up iCloud and My Photo Stream
To get started, you need to set up iCloud on your iOS devices.
After setting up My Photo Stream, any new photos you take using your iOS device will automatically appear on your other devices on which My Photo Stream is enabled.
Note
Only photos can be uploaded to My Photo Stream. It does not work with video clips.
To set up My Photo Stream on your iOS device, you use the iOS Settings.
1. On your personal iOS device, go to Settings, and tap iCloud.
2. If you didn’t set up your Apple ID and iCloud the first time you started your iOS device, you can do so now.
3. Once you enter your Apple ID and password, tap Sign In.
A popover asks to use your current location for the Find My iPad feature.
4. Tap Don’t Allow or OK based on your preference.
That completes the iCloud portion of the setup process. Now you can set up My Photo Stream.
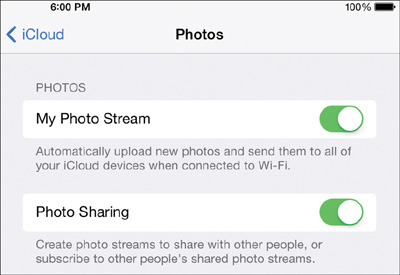
5. In the iCloud pane, tap Photos, and verify that My Photo Stream is turned on.
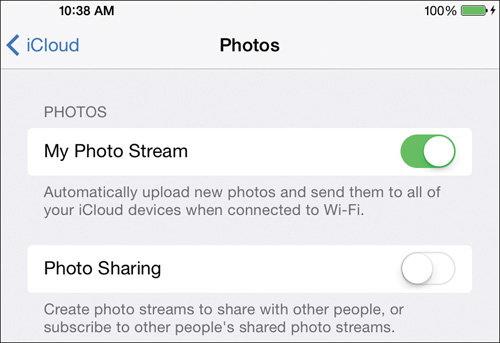
Note
This exercise has Photo Sharing turned off for simplicity. If you already have shared photo streams on your device, you can leave this option turned on.
6. Press the Home button on your iOS device to return to the home screen.
With My Photo Stream turned on, new photos taken with your iOS device are uploaded to iCloud, and any new photos imported into iPhoto on your Mac will appear in the My Photo Stream album in iPhoto for iOS.
Remove Photos from My Photo Stream
When you remove photos from My Photo Stream, they are removed from all your personal devices that have access to the My Photo Stream album.
To remove a photo in the My Photo Stream album, you must use the Photos app and not iPhoto.
1. Open the Photos app.
2. Tap Albums, and then tap My Photo Stream.
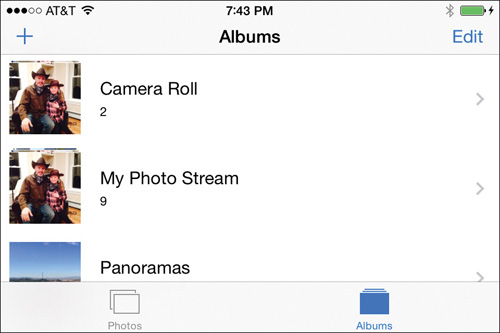
Up to 1000 photos added to iCloud within the past 30 days are displayed in My Photo Stream. You may take many photos on your iPhone that you don’t need to distribute to all your devices. You can delete those you choose not to share.
3. Tap the photo you want to remove.
The selected photo is displayed larger.
4. Tap the Trash icon, and then tap Delete Photo.

You can also select and delete multiple photos from My Photo Stream.
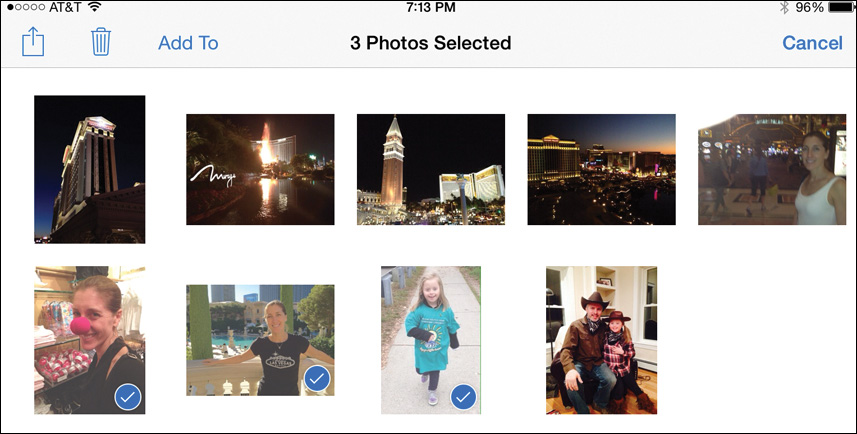
5. While viewing the My Photo Stream album, in the upper right, tap Select.
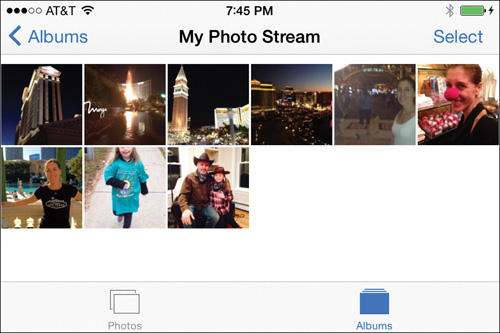
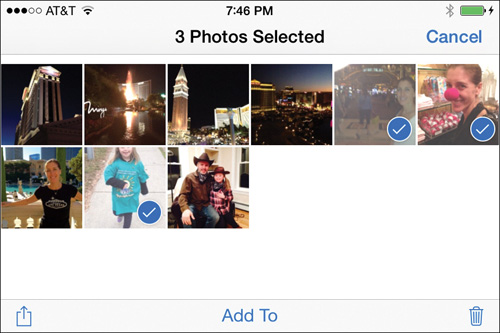
6. Tap each photo you want to delete.
The selected photos have a blue checkmark applied to their thumbnails.
iPhone iOS 7
iPad iOS 7
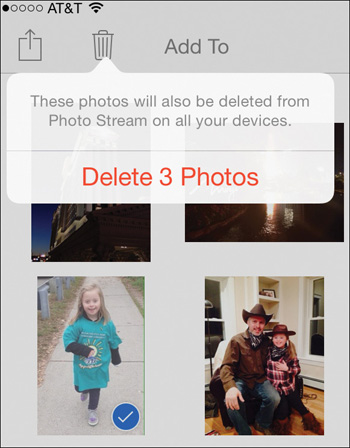
7. Tap the Trash icon (lower right on iPhone, upper left on iPad).
8. Tap Delete (number) Photos.

iPhone iOS 7
iPad iOS 7
Unlike deleting a photo from your Camera Roll, removing a photo from My Photo Stream does not necessarily erase the photo everywhere. The photo is removed from My Photo Stream on all your Mac computers and iOS devices, but the original photo remains in the library into which it was imported, or on the iOS device Camera Roll that took it.
Saving Photos to the Camera Roll
My Photo Stream is an album that temporarily stores the most recent 1000 photos on your iCloud storage. When iCloud pushes that 1001st photo, the first photo in your album is deleted to make room. If you want to keep that first photo and any others, you need to save them from the My Photo Stream album into the Camera Roll.
1. Open iPhoto.
2. Tap Albums, and then tap My Photo Stream.
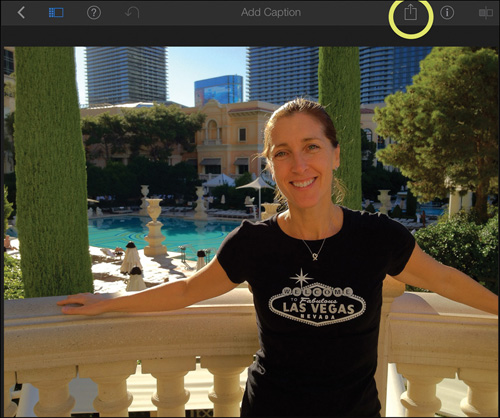
3. Tap the photo you want to save.
The selected photo is displayed larger.
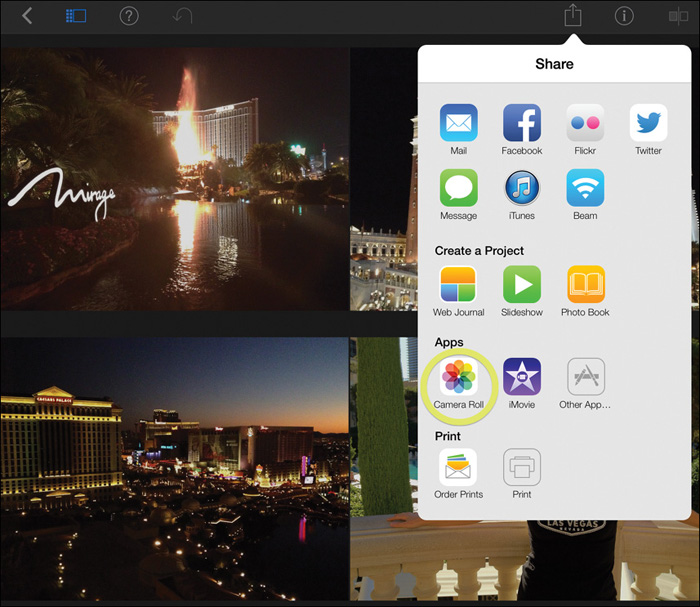
4. At the top of the screen, tap the Share button.
5. Tap Camera Roll to save the photo into the Camera Roll.

You can save more than one photo at a time by selecting multiple photos or a range of photos.
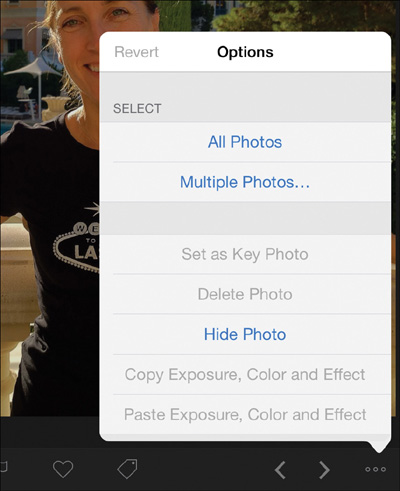
6. While viewing the My Photo Stream album, tap the Options button ![]() (upper right on iPhone, lower right on iPad).
(upper right on iPhone, lower right on iPad).
7. From the Options popover, choose Multiple Photos.
8. At the top of the screen, tap Range.
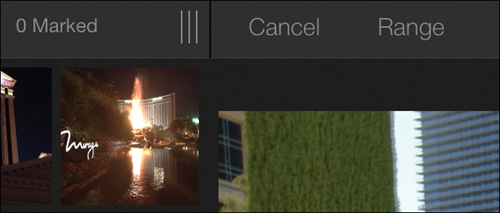
You can now tap the first photo and last photo from the thumbnail grid to save them, and all the photos between them, to the Camera Roll.
9. In the thumbnail grid, tap the first photo you want to save.
10. In the thumbnail grid, tap the last photo you want to save.
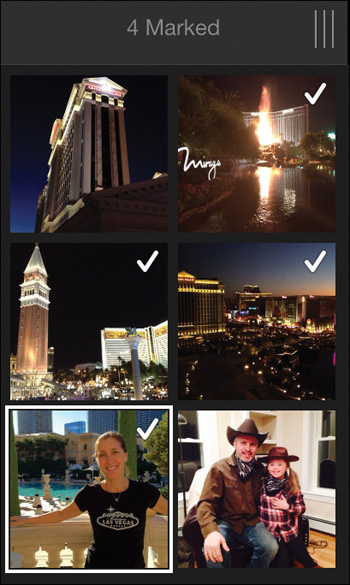
The first and last photos, as well as all the photos between, get a white checkmark placed on their thumbnails to indicate that they are selected.
11. Tap Done, and then tap the Share button.
12. Tap Camera Roll to save the photos into the Camera Roll.
The photo(s) will still remain in the My Photo Stream album until a newer photo kicks them out.
Setting Up iCloud Photo Sharing
The iCloud Photo Sharing service lets you share your photos and videos with your friends and family. In return, friends and family can post their own photos and videos to your streams. Shared photos and videos appear automatically on everyone’s devices.
For better or worse, your friends and family on iCloud can even comment on the shared photos and videos. For those friends and family members who don’t use iCloud, you can invite them to view your publicly shared streams on the web.
Set Up iCloud Photo Sharing
Setting up iCloud Photo Sharing is almost identical to the process for setting up My Photo Stream.
To set up iCloud Photo Sharing on your iOS device with iPhoto, you use the iOS Settings.
1. On your personal iOS device, go to Settings, and tap iCloud.
2. Tap Photos, and then turn on Photo Sharing.
You now can close the Settings and return to your home screen. With iCloud Photo Sharing turned on, you can create photo streams for people to view, and others can invite you to view their shared photos streams.
Creating a Shared Photo Stream
Creating a shared photo stream is an easy way to share only specific photos and video clips with specific people. Only invited friends and family who have iCloud can view and comment on your photos and videos. They can also add their own photos and videos to your stream. To create a shared photo stream, you once again must use the Photos app.
Tip
Videos cannot be any longer than five minutes.
1. Open the Photos app.
2. Tap Photos to view all the photos on your iOS device.
You can choose to create the shared photo stream based on an entire “moment,” or individual photos from that moment.
Tip
You can also choose photos to share from albums and events by tapping Albums at the bottom of the screen.
3. On the right side of the screen, tap Share next to the moment you want the photos to come from.
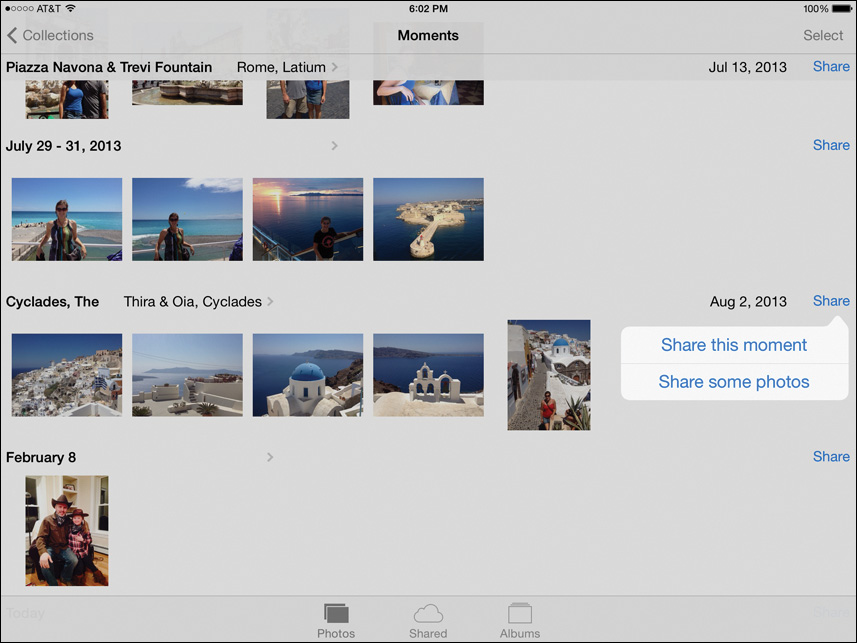
A popover appears allowing you to share the entire moment or just a few select photos.
4. Tap “Share this moment.”
Another popover appears displaying your share options.
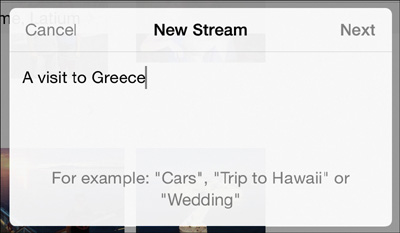
5. Tap iCloud to open the New Stream popover.
6. Enter the stream name you want people to see, and tap Next.
Note
If you have already created a shared photo stream, you will need to tap the Add button to add a new stream instead of adding photos to an existing stream.
The same popover displays a To field where you can add the people you want to invite to this stream.
7. Tap the Add button on the right of the To field to open your contact list.
8. In your contact list, select each name you want to add, and tap Create.
The same popover displays a Comment field in which you can add a comment, and then choose to cancel or post the stream.
9. To send the invitation and create the stream, tap Post. Otherwise, tap Cancel to return to the Photos screen.

You can create up to 100 shared photo streams with up 100 invitees in each of them. The shared photo stream has a larger limit than My Photo Stream. A total of 5000 items (photos and videos) will remain in iCloud until you delete them manually. There’s no 30-day limit with shared photo streams.
Add Photos to a Shared Stream
You’ll need to remain in the Photos app for this exercise. In fact, anything except viewing the shared photo stream must be done within the Photos app instead of iPhoto. You’ll be happy to know that adding photos to an existing shared stream is straightforward.
1. Open the Photos app.
2. Tap Photos to view all the photos on your iOS device.
As when creating the shared photo stream, you can choose to add photos based on an entire “moment,” or individual photos from that moment.
3. On the right side of the screen, tap Share next to the moment you want the photos to come from.
Again, you can share the entire moment, or just a few select photos.
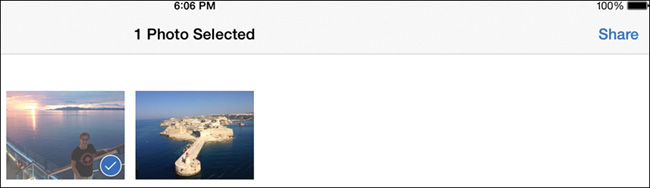
4. In the popover, tap “Share some photos” to select the photos you want to add.
The screen changes to show just the photos from the moment you selected. You can tap one or multiple photos to add them.
5. Tap the photo you want to add to the shared stream, and then tap Share.
6. From the Share popover, tap iCloud.
The iCloud pane shows a thumbnail of the shared photo stream you will add to, along with the name and a place for you to add a comment.
7. To change to a different shared stream, tap the stream’s name under the thumbnail.

In the “Add to Shared Stream” pane, you can select a new stream or create a new one.
8. Tap a different stream to switch the stream to which you will add the photo.

After tapping the new stream, the iCloud pane returns, where you can add a comment and tap Post.
You can also add to a shared stream by tapping Shared and then selecting the shared photo stream you want to add to.
Deleting a Stream
From the Photos app, you can remove a shared stream you’ve created or subscribed to.
1. At the bottom of the Photos app screen, tap Shared to see all the shared albums you have created or subscribed to.

2. In the upper right of the screen, tap Edit.
Delete buttons are added to the upper left of all your shared streams. Tapping this button deletes shared photo streams you’ve created, but unsubscribes you from shared streams to which you were invited.
3. Tap the Delete button on the shared stream you want to delete or unsubscribe from.

The shared stream is removed from the Shared screen on your iOS device. If you were the creator of the shared stream, it is also removed from every subscriber’s Shared screen. If you were invited, the Shared stream still exists for the other subscribers.
Adding and Removing Items from a Shared Photo Stream
In the Photos app, you can add and remove photos and videos to and from a shared stream that you created. Subscribers have similar capabilities to add and remove photos, but they are limited to removing only those photos they have added.
Adding Photos to a Shared Photo Stream
You and your subscribers can add a total of 5000 items (photos and videos) to a shared photo stream. You can add photos and video clips to a shared photo stream you created, or one you have subscribed to.
1. In the Photos app, tap Shared to view all the shared streams you’ve created or subscribed to.
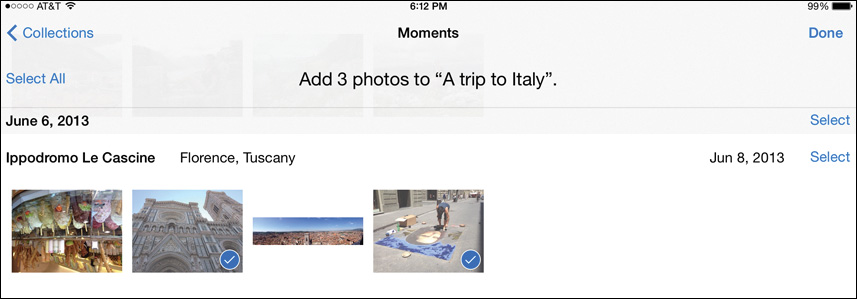
2. Tap the shared photo stream to which you want to add a photo.
3. Tap the New Shared Stream thumbnail to view all the photos on your iOS device.

4. Tap each photo you want to add to the shared photo stream.
A blue checkmark is added in the lower-right corner of each photo you select.
5. Tap Done in the upper right of the screen when you have finished selecting the photos.
The iCloud pane opens with a Comment field for you to enter a comment on the selected photos.
6. Add a comment and tap Post to send the photos to the shared photo stream.
The screen returns to the shared photo stream where your posted photos will appear.
Removing Items from a Shared Photo Stream
At any time, you can remove photos and videos from a shared stream if you are the creator of that photo stream. If you are an invited subscriber, you can only remove photos and videos you have posted.
1. In the Photos app, tap Shared to view all the shared streams you’ve created or subscribed to.
2. Tap the shared photo stream from which you want to remove a photo.
3. Tap Select.

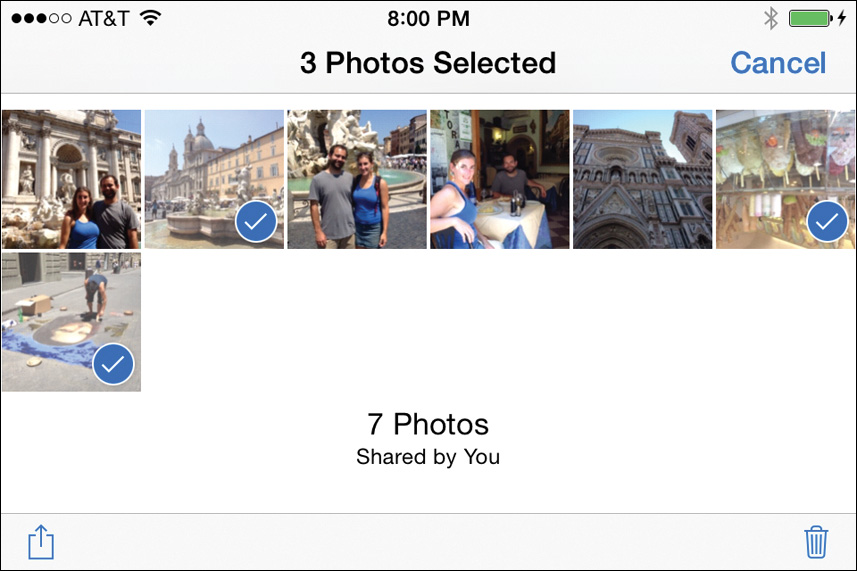
4. Tap each photo you want to remove from the photo stream.
A blue checkmark is added to the lower-right corner of each photo you select.
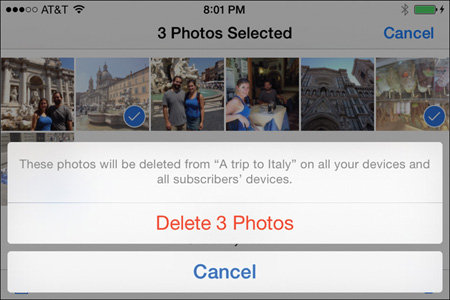
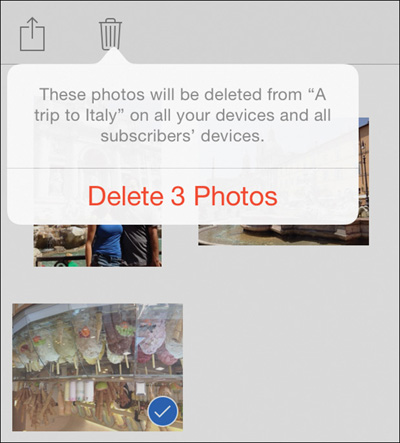
5. When you are done selecting photos, tap the Trash icon (lower right on iPhone, upper left on iPad).
iPhone iOS 7

6. From the popover, choose Delete (number) Photos.
iPhone iOS 7
Once a photo or video clip is removed, anyone subscribed to that shared photo stream no longer has access to that photo, unless he previously imported it into the iPhoto library or saved it to his iPhone Camera Roll.
If you took the photo on your iOS device, the original photo remains in your Camera Roll.
Commenting on a Shared Photo
Any of your friends and family can comment on any photo in a shared stream from the Photos app. Don’t worry. If you are the creator of the shared stream, you can also delete their comments.
1. In the Photos app, tap Shared to view all the shared streams you’ve created or subscribed to.
2. Tap the shared photo stream that contains the photo you want to comment on.
3. Tap the photo you want to comment on to display it larger on the screen.
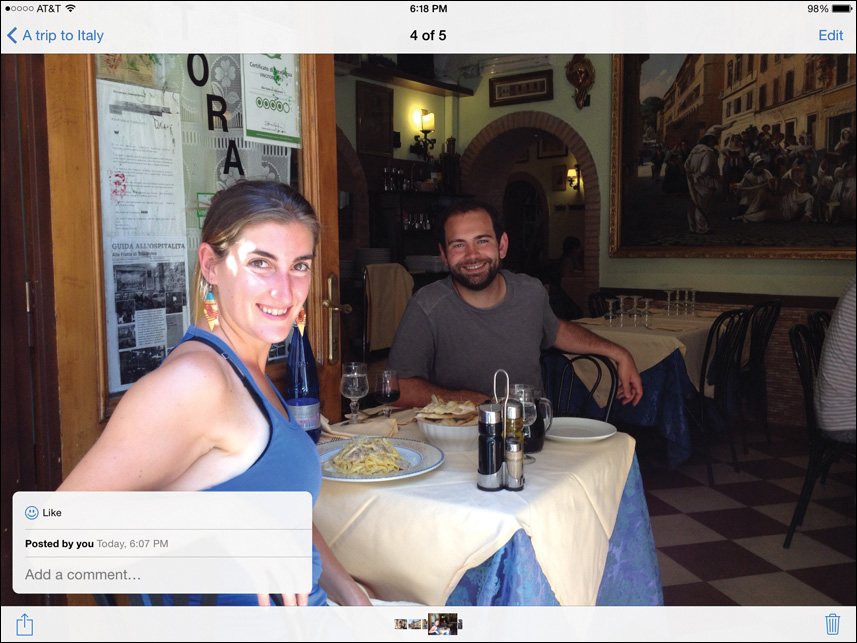
In the lower-left corner, a comment window appears showing existing comments on this photo, as well as an area for you to type in your comments.
4. Tap “Add a comment” and type your comment. To post it, tap Send.

As soon as comments are posted, everyone subscribed to the shared photo stream receives a notification that comments were added.
A lot of fun is to be had just sitting back and viewing your photos in full screen in the Faces and Places views, while you’re on the go on your mobile device, and in slideshows. But nothing will bring you more joy than sharing those moments with the important people in your life (and your dog).
Lesson Review
1. How do you set up iCloud?
2. What’s the main difference between My Photo Stream and iCloud Photo Sharing?
3. What do you need to do to make sure all the photos from the My Photo Stream album are being saved to your iPhoto Camera Roll?
4. How many shared photo streams can you create?
5. True or false? Videos can be added to My Photo Stream and a shared photo stream.
6. Within iPhoto where can you add a comment to a photo in a shared photo stream?
Answers
1. From the iOS Settings, tap iCloud, and then sign in with your Apple ID.
2. My Photo Stream shares all your recent photos to all your personal devices. iCloud Photo Sharing shares photos and videos with friends and family.
3. You must manually save them to your Camera Roll.
4. You can create up to 100 shared photo streams from within the Photos app.
5. False. Videos can only be added to a shared photo stream.
6. You cannot add comments to a photo in a shared photo stream from within iPhoto. You must do that from within the Photos app.