Chapter 15. CloudVision
CloudVision is the name for a group of software products that allow control and management of Arista devices. Though designed to manage Arista devices, there’s no reason that it couldn’t support other vendors’ devices through the application of a common interface such as OpenConfig, but for this chapter I’m going to include only Arista devices because it’s a book about Arista, after all.
One of the reasons this book was delayed was because I struggled with CloudVision. When it first came out, I was not a fan, and with CloudVision being a big deal for Arista, I wanted to write about it in a positive light, but I just didn’t believe in the product. That has changed in a big way, and the fact that it has is kind of a big deal to me. Allow me a brief digression as to why.
I was hired by Arista because of my ability to write about the company and its products (remember, I wrote the first edition when I was not an employee) and because I was clearly a fan. Arista’s President and CEO Jayshree Ullal actually considered not hiring me directly because my independent views actually had a fair bit of impact in the market and she didn’t want to lose that. I made a deal with the executives who hired me: the minute I stop believing, I’m gone. Additionally, I said that I would tell only what I felt to be the truth. If you’ve seen me speak, you know that I can be quite passionate about the topic at hand, but that passion evaporates if I have to tell marketing stories that vary from the truth. Simply put, I can’t lie to make a sale (I can, but I’m really quite bad at it), which has been both my greatest strength and my biggest failing depending on who you ask. To Arista’s credit, that’s kind of how it operates, as well, so I was hired.
When CloudVision first came out, it was far from perfect, and I could not in good conscience recommend it. That has changed and over the past year or two (this being 2019 as I write), CloudVision has improved dramatically in every way. Not only that, but it continues to improve both in functionality and in features. I do not necessarily recommend every feature for every customer, because every customer is different, but I do recommend the product now without reservation. I can absolutely say that there is something in CloudVision for everyone, even this old networking curmudgeon who will never give up his CLI access.
The CloudVision Family
There are two products currently that belong under the umbrella of CloudVision. They are CloudVision eXchange and CloudVision Portal.
CloudVision eXchange
CloudVision eXchange (CVX) is really nothing more than a vEOS instance running with more memory and processor than would normally be seen in a physical switch. Chapter 21 presents an example of CVX in action, in which I use it as a controller of sorts for VTEP Flood-List automation. CVX does not require the other aspects of CloudVision (often abbreviated as CV, but here, I prefer to use the full name) to work.
CloudVision Portal
CloudVision Portal (CVP) is the web-based tool that allows you to do an increasing variety of things to an Arista-based network in a graphical user interface (GUI) environment. You install CVP as a server, and you can install it in a cluster for resiliency, as well. You can order it as a standalone appliance, as well.
CVP is a pretty deep topic and is deserving of a large book unto itself, so there’s no way I can cover all of its topics here. I will not cover how to install it or how to configure clustering or how to set it up because there just isn’t room. With CVP being a graphical application, screenshots consume a lot of page space, so in a book that’s about Arista, but primarily about EOS, there’s only so much I can cover, especially when the desire is to cover it all.
Quick Things to Know
Without diving into how to install and configure everything in CVP, here are a couple of items that will help you in doing so.
CVP really likes to work with Authentication, Authorization, and Accounting (AAA) set up because the username accessing the portal will be the username making changes to the switches. It can work without AAA, but it’s happier with it enabled and working.
The install image for CVP is quite large (more than 6 GB for version 2018.2.2), so be prepared for that if you have download access and want to try and run this on your laptop. Keep the next bullet in mind, though.
When installing CVP as a virtual machine (VM), the following minimum requirements should be met:
CPU: 16 cores
RAM: 22 GB (up to 250 devices)
Disk: 1 TB
As you can see, this is not really a “run it on your laptop” kind of application.
If you’re running CVP on VMware, the CVP server does not support vMotion. Seriously, don’t vMotion the CVP server. You have been warned. Actually, as I understand things, if installed in a single server, the server can be vMotioned, but if installed as a cluster, it cannot. When in doubt, open a TAC case and ask because TAC is much better informed than I am and details like this can change over time.
There are switch EOS version restrictions when using CVP. For example, version 2018.2.2 of CVP requires the switches it manages to be running at least EOS 4.17. That’s not an unfair requirement, because the current version at the time of this writing is 4.21, but just understand that this is a requirement. Also, if you have switches running versions of EOS older than 4.17, you really should upgrade them, anyway.
You might need to install something called TerminAttr on the switches being monitored depending on the rev of EOS in use. It is included in EOS 4.17 and above, but you can always download the latest version as a SWIX and install/upgrade it using the EOS extension system or, as you’ll see, CVP itself.
Technically the only supported browsers (as of 2018.2.2) are Firefox (v56+) and Chrome (v59+). I’ve used Safari, and it works, but you’ll get a “Safari is out of date” message. I can’t speak for Internet Explorer, because, seriously, stop using Internet Explorer.
eAPI needs to be enabled on the EOS devices if you’re adding them manually. Discovered devices learned through Zero-Touch Provisioning (ZTP) will have this taken care of automatically.
Note
CVP has gone through some pretty significant changes over the years and as of this writing continues to do so. As a result, please accept my sincere apologies if some of the screenshots or sections I talk about seem out of place or have changed since this book was published. There are some very valid reasons for such changes that are far (far!) outside the scope of this book, but so far as I’ve seen, the changes have been either powerful backend changes or slight user interface changes such as moving sections around or changing the first page a user sees when they log in. The fundamental principles generally remain the same, though, so hopefully the impact of any discrepancies should be small.
Sometimes, book deadlines and software releases overlap in a way that makes me unable to make all the images match, and I assure you that I have lost the appropriate amount of sleep obsessing over this fact.
As always, check the release notes before installing any software because these requirements can change as versions progress.
CloudVision Portal
When people say CloudVision, they generally mean CVP. At Arista, you might hear people refer to the suite of products as CV, but even then, I’ve heard people refer to CVP as CV, so don’t get too caught up in semantics.
What CVP Is
When CVP was first released, it was primarily a tool that allowed the management of device configurations (including initial and replacement configuration) in an automated way that does not require scripting or programming knowledge. That’s not to say that you can’t script CVP, because you can, but you don’t need to, and that flexibility is a hallmark of Arista that you’ll find almost everywhere. This configuration management aspect of CVP is called Network Provisioning.
As CVP grew it gained additional capabilities including, but not limited to, workflow automation, State Streaming Telemetry, Network-Wide Rollback, Compliance, and so on. CVP also has the ability to integrate with other vendors’ products such as those from ServiceNow, VMware, Check Point, and PaloAlto, just to name a few, and CVP apps can be added to further expand the functionality.
What CVP Isn’t
CVP is not a traditional Simple Network Management Protocol (SNMP)–based network-monitoring tool. Though you might be quick to compare it to old-school tools like HP OpenView or Solarwinds given a quick look at the GUI, that’s not what CVP is about. CVP is different. How? Hopefully that will become clear as you read on, but the biggest thing in my opinion is that it does not use SNMP.
Some of the older marketing material talked about CVP being a single pane of glass into the network, a description that Arista has rightfully moved away from, in my opinion. Honestly, if the company had been the first to come up with that term, it might have worked, but so many products have promised to be a single pane of glass that it’s developed a reputation that’s sure to garner eye-rolls from anyone who’s been through one of those sales meetings from any vendor.
CVP gives a serious amount of visibility into your network, unlike any other tool that I’ve ever seen, and it deserves to be checked out for that reason alone.
How CVP Works
There are a few aspects of CVP that bear discussion of the underlying mechanisms by which they work.
Configuration management
Configuration changes to switches are done through eAPI (Chapter 30) and a form of the configure session capability of EOS (Chapter 9). Believe it or not, even if only a single line of configuration is changed through CVP, the entire configuration of the switch is written each time through the use of configuration sessions. This isn’t some lame “use SSH to simulate a user applying a command” type of solution. This is using the EOS tools to accomplish something better.
Streaming Telemetry
Streaming Telemetry is accomplished through a relatively recent addition to EOS called TerminAttr (pronounced term-in-ate-er). Because the minimum version of EOS that ships with TerminAttr installed is 4.17, if you’re running 4.17.x or later, TerminAttr can be installed or upgraded as an extension (Chapter 16) or through CVP itself. If you’re running a version prior to 4.17.x, you should really upgrade, but you can still install TerminAttr the same way. With TerminAttr streaming to CVP, the live state of the switch is streamed from SysDB to the CVP database in real time. Remember when we used to poll SNMP every five minutes? Well, CVP telemetry reports in real time, and it includes everything you could possibly care about from every device being monitored without you having to figure out things like interface indexes and the object identifiers (OID) of some obscure bit of data. Did I mention that it’s in real time, because it’s in real freaking time. As someone who used to build network operations centers (NOCs) for a living and who spent way too much time configuring SNMP collection, the real-time aspect of Streaming Telemetry blows my mind.
CVP apps
CVP can also have CloudVision applications added to it, which means that you can expand it to do things outside the original scope of the design. Integration with ServiceNow is one such application that allows change controls to integrate with that vendor’s solution. I hate to say things like the possibilities are endless, so how about the possibilities are limited only by your imagination? No, that’s awful, too. Look, there are a lot of possibilities.
Let’s look at some screenshots.
Login Page
I just had to include a screen capture of the wonderful new CloudVision login page because, as you can see in Figure 15-1, it has clouds. Although that in and of itself might not be all that exciting, the old one was a stock photo of a data-center rack that was nice and all, but not befitting the CloudVision name. Now there are clouds!

Figure 15-1. The CVP login page
That’s all. I just wanted to highlight the new login page because it’s so pretty. Call me shallow, but I’m a man who appreciates a sexy login page. The page that opens after you log in varies on different revs of CVP, so I’m going to just show some examples from the most commonly used sections in the order in which they appear in the menu for the latest version at my disposal.
Devices
The first page you’ll probably find yourself in with an existing CVP installation is the Inventory page on the Devices tab, an example of which is shown in Figure 15-2.

Figure 15-2. Device inventory in CVP
On the Device Inventory page, you can select individual devices to view detailed information about each, from the running-config right down to current real-time interface counters, much of which was formerly found in what Arista originally called Telemetry. Figure 15-3 shows an example of a device selected by clicking the Processes link on the left side, which shows real-time scalable graphs.
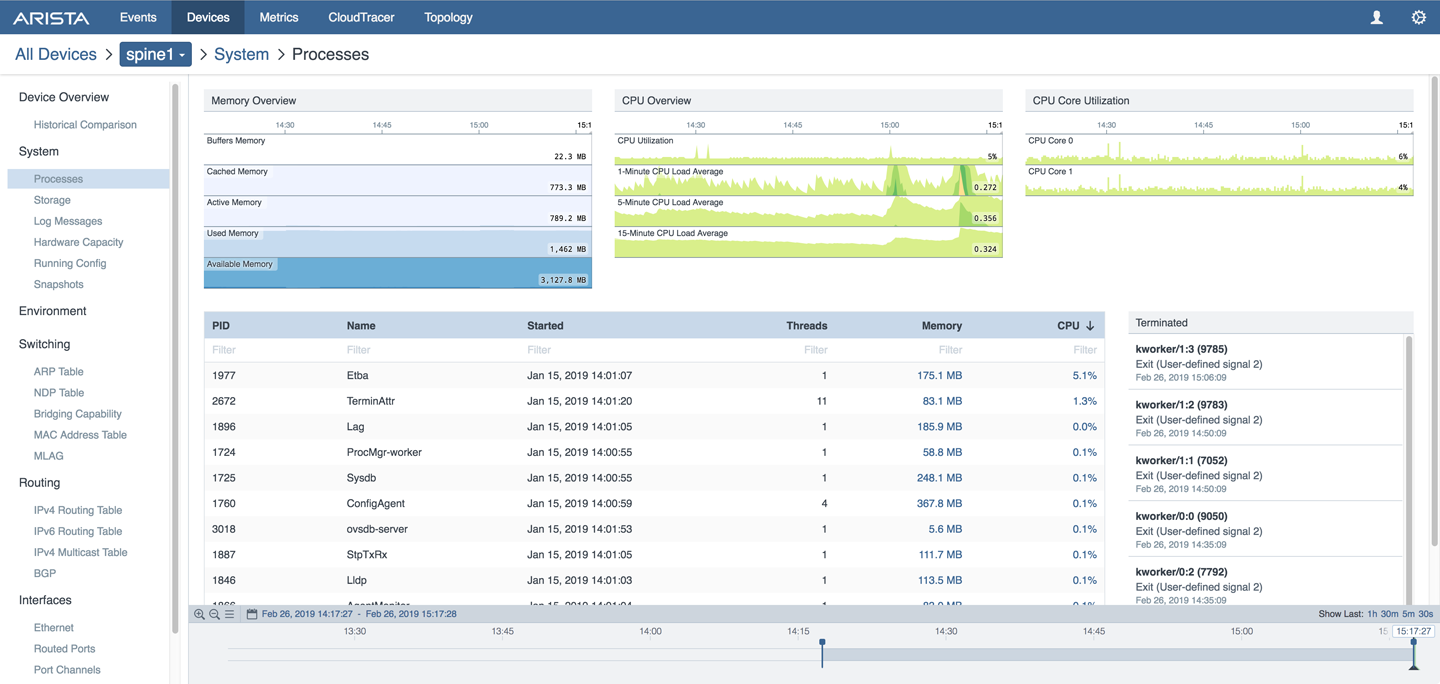
Figure 15-3. CVP device inventory CPU stats
The other option on the Devices tab is Compliance. The Compliance page shows some terrific information such as whether your installed versions of EOS have outstanding bugs or security alerts, as shown in Figure 15-4. It is also worth mentioning that CVP will alert you to bugs through a feature called Bug Alerts and that Arista has a bug portal on its website so that the customers can look up bugs. That portal is right on the Arista.com support page and requires a customer login. This is just one more example of the openness that Arista seems to embrace.
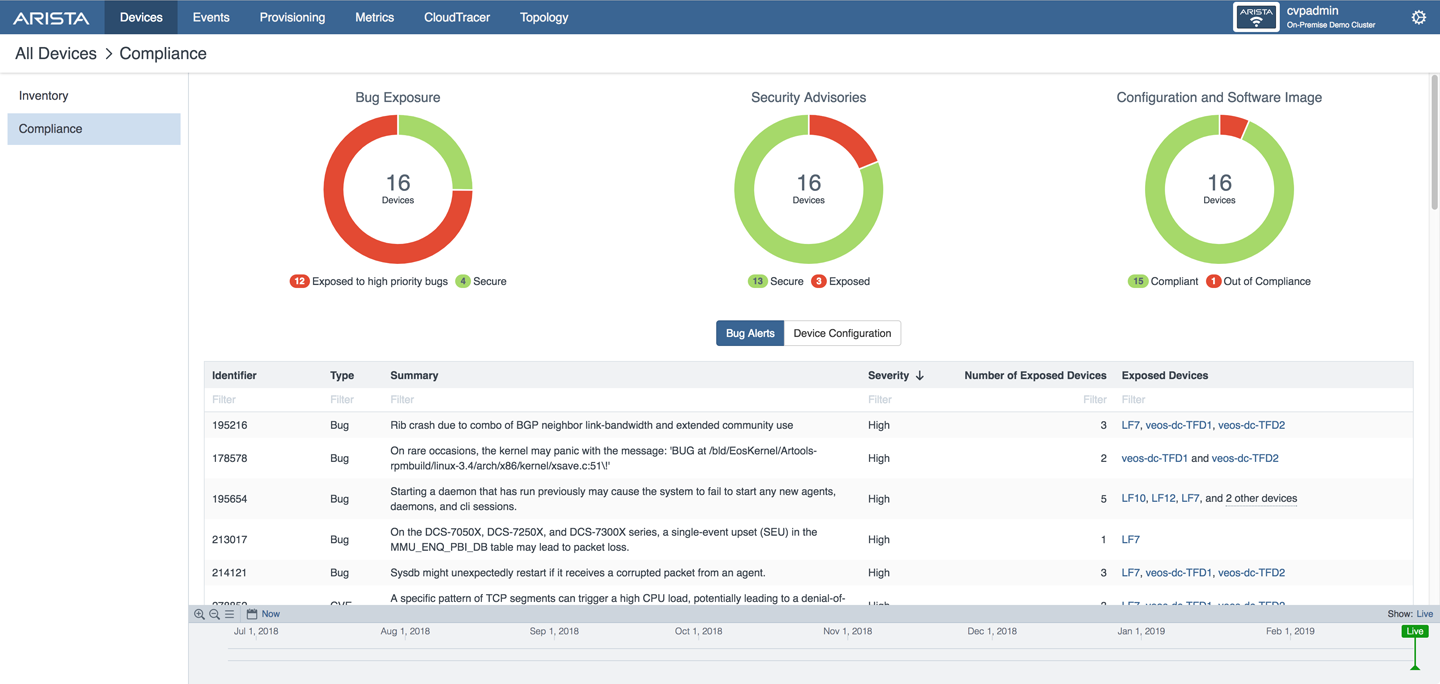
Figure 15-4. Device compliance in CVP
In previous versions of CloudVision, CVX was necessary for this functionality, but this has been folded into CVP in early 2019 so that the installation can be simpler for those who don’t otherwise require CVX.
Looking at pages like this, it’s easy to see why Arista is so tempted to use the single pane of glass description. Hell, this is only the tip of the iceberg of what CVP can do, but perception trumps reality, and the sad truth is that other vendors long ago ruined the phrase.
Though I’ve shown only a couple of screenshots, both of these pages are pretty darn powerful. The fact that I can look at a single pane of…<grumble>…a single page that shows me any and all outstanding security and bug alerts for all of my devices is a pretty nice feature, and you really must play around with the real-time telemetry page to truly appreciate it. Yes, the graphs are pretty, but as soon as you begin getting used to the real-time nature of this tool, you will be forever ruined for other vendors’ tools.
Network Provisioning
I like to describe Network Provisioning in CVP as a hierarchical network configuration tool. Basically, devices are placed into containers, and you can place containers into other containers in a hierarchy, as shown in Figure 15-5. Thus, it’s a hierarchical configuration tool. See? I don’t just make stuff up! Well, I totally made that up, but it’s logical, so I’m keeping it.

Figure 15-5. The Network Provisioning page
There is a root container named Tenant, under which all other devices and containers are located. If you look at the Tenant container in Figure 15-5, you’ll see that it’s labeled Tenant (7). The seven in parentheses is not the number of objects within the container, and it’s not the number of containers within the container; rather, it’s the number of nodes (generally switches) total within that container, including all nodes in all subcontainers. And, yes, you can rename the Tenant container.
Note
When using CVP, you can zoom into any section of the hierarchy with the scroll wheel on your mouse. Double-clicking a container shows its included devices on the left side of the window, whereas double-clicking the name of the container allows you to rename it.
The way to think of containers is, again, as a hierarchy, but what’s cool about this is the fact that it’s a configuration hierarchy. Arista accomplishes this through something called configlets. Configlets are pieces of a configuration that are common to the container and I’ll show them in more detail in a minute. Think about all of your network device configurations. Assuming that they’re all EOS devices and further assuming that you’re using TACACS+ or Radius, they probably all have the same AAA configuration commands. They might all have the same useful aliases configured. They might all have the same eAPI configuration, as well. By creating configlets with those common CLI commands and applying those configlets to a container, every device within that container will have the same configuration applied, but only from the applied configlets.
Now, think for a minute that you have a subset of devices that are all spine switches. Those spine switches might have common configurations that are not shared by leaf switches. Similarly, the leaf switches have configurations that are common to one another but are not shared by the spines. By putting the leaf switches into a container and the spine switches into a different container, this can be accomplished with ease.
It is important to understand that the view shown in the Network Provisioning section is not a network topology, but a configuration hierarchy. That comes as second nature after using CVP for a while, but it can confuse people who aren’t used to the tool. CVP does have a topology view, which I cover in a bit.
How does CVP learn about a device? It can be done manually, which is boring, or it can be learned dynamically, which is cool and exciting. Can you guess which one I’m going to cover?
If you’ve read about ZTP (Chapter 13), you know how powerful a tool it can be. CVP can actually use Arista switches’ default ZTP capabilities to its benefit by becoming a ZTP server. To allow this, you must first enable Dynamic Host Configuration Protocol (DHCP), which is outside the scope of this chapter (you can also use a separate DHCP server), but as soon as the CVP server is aware of new DHCP-configured devices, it can act as the ZTP server.
Switches learned through the ZTP server are put into the Undefined container, which is attached to the Tenant root container, as illustrated in Figure 15-6.

Figure 15-6. Undefined container
A ZTP-discovered switch is added to the undefined container, which means it will have whatever configuration the Tenant container has associated with it, but no others. Move the device to another container and that container’s configlets will be applied. To do so, right-click the device and choose Move.
A quick message about Network Provisioning
Here’s the message: you don’t have to use it. Although this is a very powerful capability, some networks just aren’t built in such a hierarchical fashion. Should they be? That’s not for me to decide, because it’s not my network. There are options, though, and Arista loves to give you options.
First, you don’t need to use Network Provisioning at all. You can configure all of your switches manually, like you’ve always done, or you can use another tool like Chef or Puppet or Ansible. Personally, I’m a fan of anything hierarchical if for no other reason than I get to walk around saying hierarchical all day. Really, though, I’m a fan of logical designs, and if you can design your network to take advantage of such a tool, that’s great! The simple truth is that a lot of networks just might not fit into this model today, and that’s fine because CloudVision has a bunch of other tools that are so freaking useful it’s difficult to ignore them.
Configlets
A configlet is a snippet of configuration that can be applied to every device within a container or to individual devices as desired. Because of the latter capability and the ZTP-learning capability for new devices, it is possible to completely configure a network without actually logging into a switch through CVP. Indeed, I have seen customers who have designed new networks in such a way as to keep network engineers from needing to use CLI, instead relying on the use of CVP to manage the devices. Personally, I think that’s a tad excessive, but then I’ve always been a CLI control-freak kind of guy. I also acknowledge that some network managers might well want to keep CLI control freaks away from their switches.
Back to the hierarchical model, the configlet in Figure 15-7 shows an example of a CVX configuration that would be applied to all switches (nodes, technically) within a container. Of course, if you had different parts of the network with different AAA requirements, you could have different configlets assigned to different containers as needed.
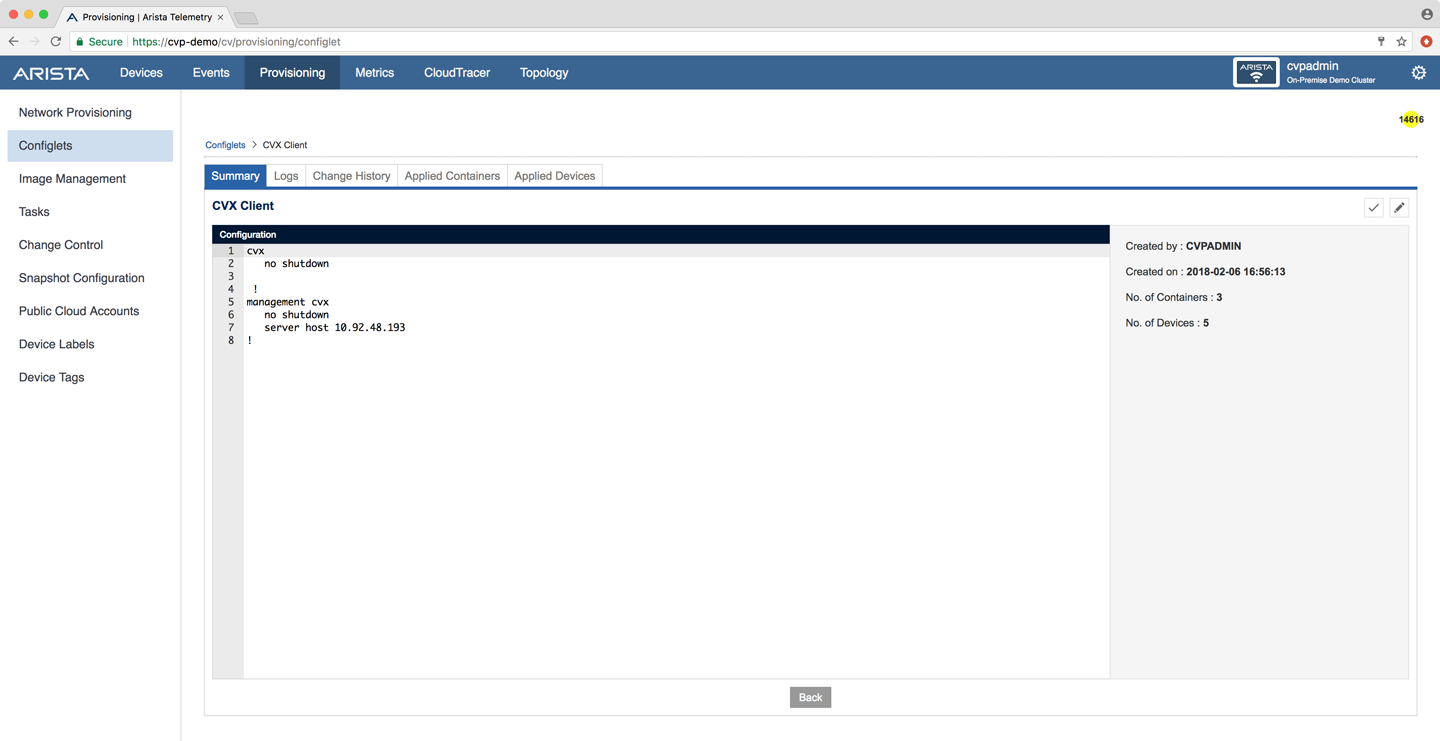
Figure 15-7. A configlet
The cool thing about almost everything Arista related is that there are options, and as I wrote earlier, you don’t even need to use the configuration management part of CVP. As you’re about to read, there are a lot of other very powerful aspects of CVP that many people are drawn to that can be used alongside of other configuration management tools, such as Ansible.
Configlet builder
Configlets don’t need to be static. They can actually be built dynamically using Python scripting or even a webform-based tool, both of which can be built using the configlet builder. When adding a configlet, you can write (or more likely paste) one from scratch, or you can use the configlet builder tool to help. Figure 15-8 depicts the configlet builder showing a script from a lab environment.

Figure 15-8. Configlet builder
The configlet builder is a very powerful tool that is far beyond the scope of this chapter, but the sample in Figure 15-8 is a nice example that shows how you can configure IP addresses by filling in a form on the CVP configlet builder tool. These configlets can be as small as one line of CLI configuration or thousands of lines of Python code. That’s the beauty of the system: you’re not tied into either. The system is designed such that it’s up to you how to use it.
Tasks
A task is something that needs to be done or has been done. You know, like a task in real life. Tasks are what get done during change controls (which we discuss in the next section) and can be configuration changes, image pushes, or anything else that you might think of as a job to be done. Figure 15-9 shows an example task highlighting the configuration change (the changing of the IP address in the ip name-server command).
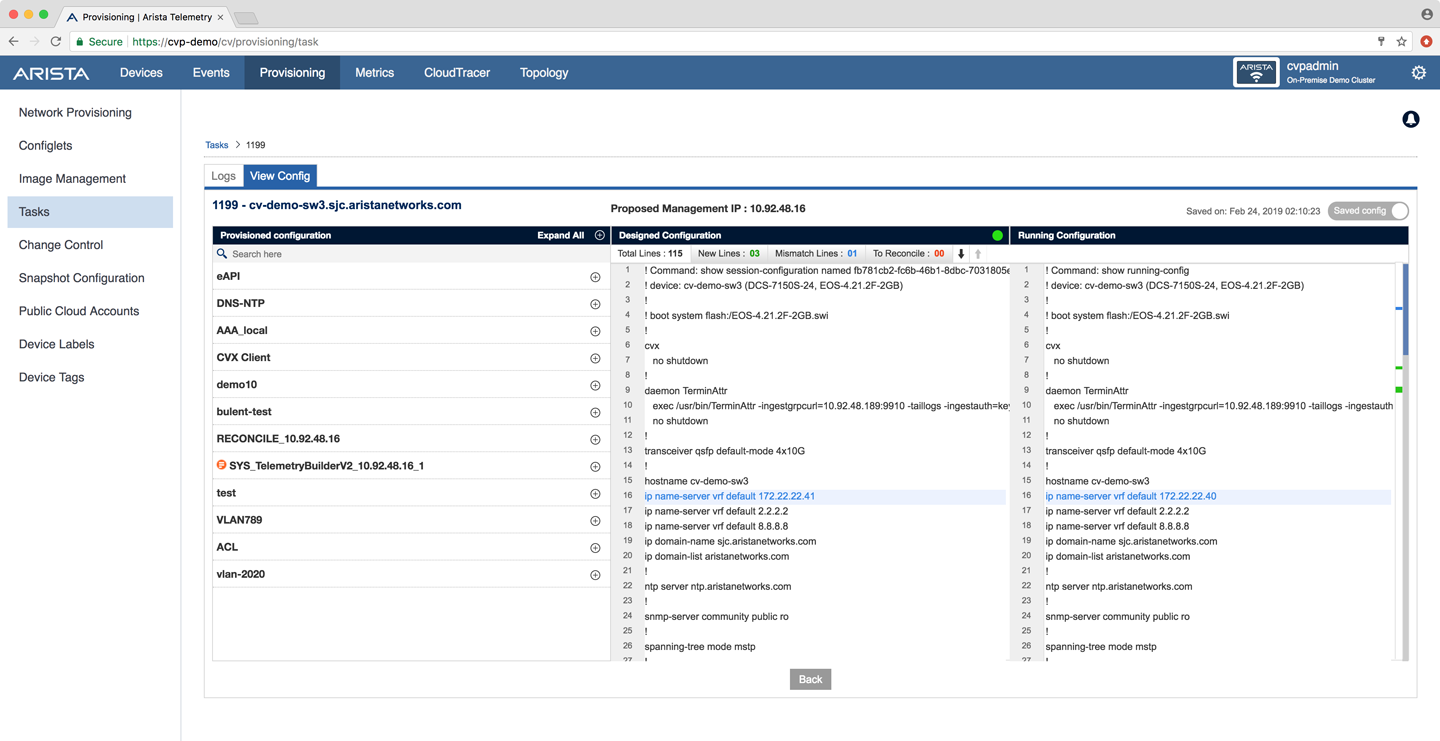
Figure 15-9. A CVP task
CVP keeps tasks available for viewing after they’ve been run, and you can see log entries associated with the tasks by selecting that tab on the top of the task.
You don’t really create a task directly. Instead, suppose that you right-click a node or container and apply a configlet. When you do that, you change the status of the selected object and, when saved, they will update on the Network Provisioning page, displaying a yellow T, as shown in Figure 15-10. At this point CVP has created a separate task per node within the container.

Figure 15-10. Pending tasks in Network Provisioning
In this case, I had right-clicked the Spine container and applied a configlet to it. That change isn’t committed, though, until I either run the task manually or process a change control.
Change control
Change control is where tasks are committed to nodes or group of nodes. In Figure 15-11, I’ve created a change control with which I’m pushing a configlet to a container. This page updates every few seconds to show continued status updates while the task is running. Change controls allow users to push individual or groups of tasks that have been created. You can run them in a specific order, if desired, and push them automatically based on a schedule.
CVP takes a snapshot (see the next section) of the node before and after the change because it’s always a good idea to do so.

Figure 15-11. Change control being pushed in CVP
When the change control completes, the pending tasks will also be completed, and the yellow Ts will disappear from the Network Provisioning page.
You may notice a slight difference in the layout of this page in my examples, which was sourced from a slightly older version of CloudVision. The biggest cosmetic difference is that the tabs (Devices, Events, Provisioning, etc.) are not there on the top, instead showing a small Rubik’s Cube–looking square of squares that served as the main navigation for the older versions.
If you’re curious why I would include a screenshot from an older version, I could say something like I wanted to show an example of the older interface, but the simple truth is that it’s quite difficult to build a suitably impressive CVP environment due to the sheer number of devices (or VMs) required to do so, and this shot is from one of the demo solutions available to me at Arista, whereas the other screenshots are from a different demonstration solution. Also, I already had the screenshot, and re-creating it in a new version seemed like real work when I had already enjoyed the sensation of missing about 38 deadlines.
Back to the example in Figure 15-11, if you look above and below the progress bar, you can see Pre Snapshot and Post Snapshot sections. That’s a great way to segue into snapshots.
Snapshots
A snapshot is a collection of data about one or more devices at a single point in time. By default, a snapshot is more than just the running configuration, and a snapshot can be taken for a node or a container. Additionally, you can create custom snapshots to record whatever you want. Figure 15-12 shows an example Snapshot Configuration screen in CVP, and you can see the example selected showing a custom snapshot that’s recording the output of the show ip bgp command.
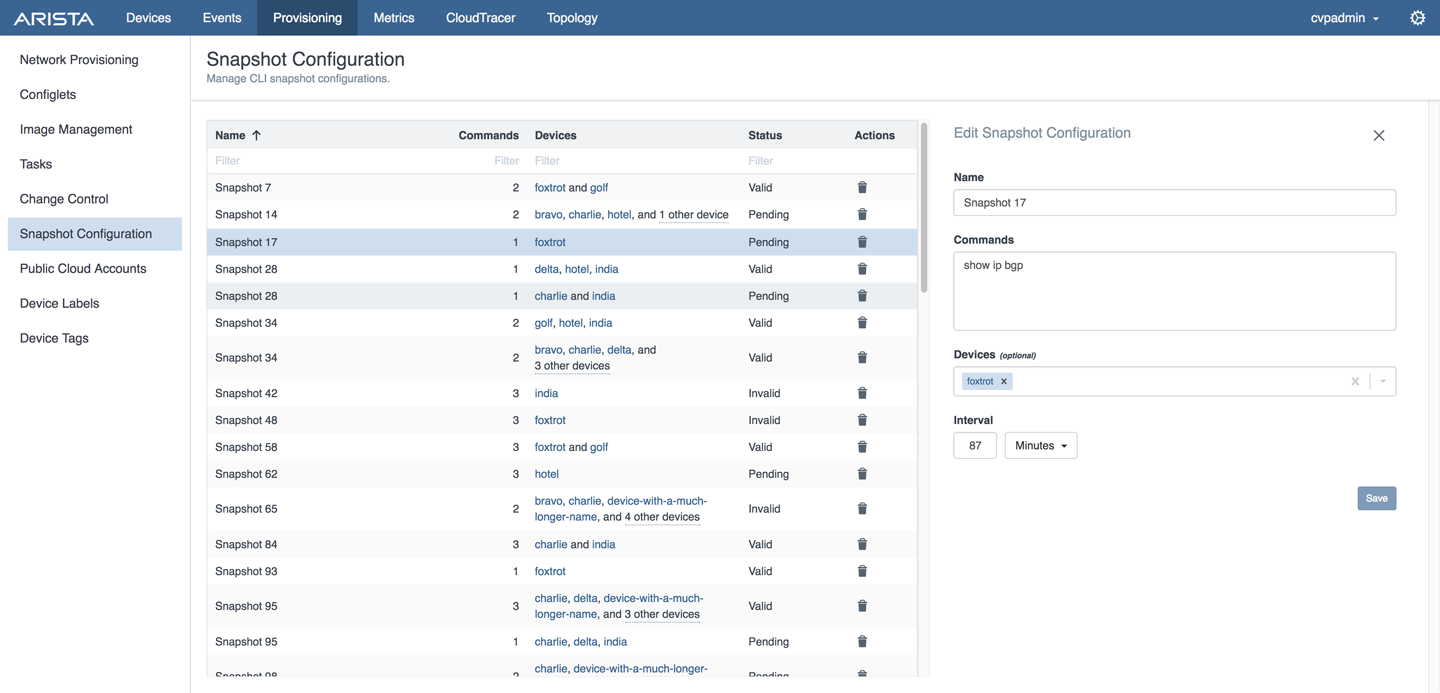
Figure 15-12. Snapshots
Think about how you might have done change controls in the past. Have you ever issued a show command, performed the change, and then did the same show command to see the results of the change? Of course you have! CVP allows that to be automated, and between snapshots and the fact that they are executed before and after change control submits a task, CVP has a wealth of current and historical information that can be incredibly useful, especially when the need for rolling back changes occurs. You can even compare between the pre- and post-change snapshots.
Image management
Part of CVP’s power lies in the ability to manage images such as the EOS SWI images used on Arista switches. Figure 15-13 presents an example of the Image Management page.

Figure 15-13. CVP image management
This is not really all that complicated, but something that I see that can be confusing is that the images you see on the Image Management page are not necessarily a single image; they might be a collection of images to be installed as a set called an image bundle. What makes this confusing is both the name images and the fact that a lot of people name the images the same as the software image contained within them. If that makes your head spin, consider the detail of the image named EOS-4.21.2F-2GB shown in Figure 15-14.
In this CVP image, there are two software images: EOS-4.21.2F-2GB.swi and TerminAttr-1.5.4-1.swix. Even though this is perfectly reasonable from a logistical point of view (I want to make sure that version 1.5.4-1 of TerminAttr is always installed when EOS 4.21.2F-2GB is deployed), I find the use of the term image to describe a collection of images confusing. Just remember that when you push an image (using a Task submitted through a Change Control), the image you’re pushing might, in fact, be multiple images (an image bundle).

Figure 15-14. Detail of a CVP image
One of the useful parts of the Image Management page is the fact that you can see what containers or devices an image is applied to. Honestly, the fact that you can bundle software images together is very powerful. I just wish it was called something else because I’m a pedantic pain in the ass.
Rollback
Rollback is the ability to revert to not only a previous configuration, but also a previous image. You can roll back a device or a container, and remember that a container can contain other containers, so the flexibility is pretty significant.
There are two major types of rollback: device and network. Device rollbacks are pretty obviously named as they affect only one device, but network rollbacks aren’t really network-specific but rather container-specific.
You roll back by right-clicking a node on the Network Provisioning page. Then, on the menu that appears, choose Manage, and then click Rollback. Figure 15-15 shows a device rollback for the node named veos-dc-TFD2. The icon for selected object on the Network Provisioning page is a bit larger than other objects and has a subtle glow effect applied to it. The right-click menus appear where there is room for them like most contextual menus that you’re used to seeing.

Figure 15-15. CVP device rollback
If you right-click a container and follow the same steps, you’ll see the option for Network Rollback instead of simply Rollback, like you did for a device. Figure 15-16 shows an example of this in which I have selected the main tenant container.
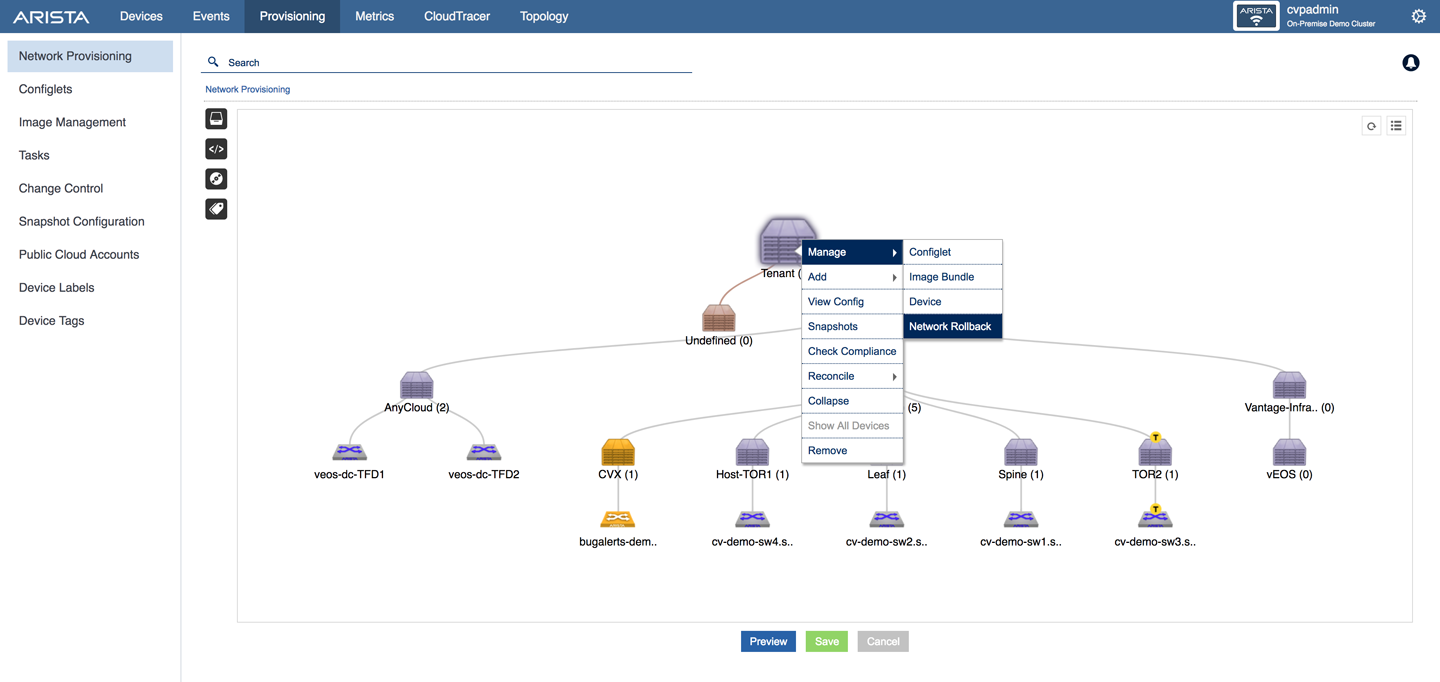
Figure 15-16. CVP network rollback
With either of these selected, you are then taken to the rollback page, which shows you the current point in time. At the top of that page, there is a slider with which you can select dates and times in the recent past, as demonstrated in Figure 15-17, but there is also a pull-down menu that will allow you to choose from previous checkpoints, as well.

Figure 15-17. Network rollback detail
In this example, I’ve selected network rollback from the main tenant container. I then moved the slider on the top to the left until I arrived at one of the green bars (February 20), which then showed me the images and configuration that will be applied. I should note that because I chose the main tenant container that there are multiple devices that will be affected. The list of devices is on the left of the pane, and the image and configuration that will be applied to the selected device is on the right.
I cannot overstate the power of this feature. With a couple of careful selections on the CVP Provisioning page (and, of course, a change control to make it happen), you can return the entire network to its state an hour, week, or month ago (or any other time period for which snapshots have been saved). Did a change-control go horribly wrong? Just roll it back. And what’s particularly amazing is that you don’t need to roll back the entire network. You can roll back devices, as previously covered, or any container that might or might not have other containers as children. How long would it take you to do that by hand?
Is rollback fool-proof? More important, is it GAD-proof? I don’t think there’s any such thing, but I can say that I’ve seen this used to great effect, and this feature alone would make me consider using CVP to manage configurations because it’s just that good.
Don’t forget that CVP isn’t doing the old-fashioned SSH to a device and pretend to be a user way of configuring nodes. It’s using eAPI and the power of config sessions (Chapter 9), so it works much better than other vendors’ tools that you might have used from years gone by.
Events
The Events page is one of my favorite parts of CVP because it shows data in real time and the interface is terrifically easy to use and (I’ll admit it) play with.
An event is triggered when something unexpected happens. Events are categorized with the severities Info, Warning, Error, and Critical. At the bottom of the Events page, there is a timeline, as shown in Figure 15-18, that marks events and when they occurred as colored dots. The color of the event reflects its severity.

Figure 15-18. CVP events
Selecting an event on the left changes the main part of the screen to show details about that event. What I really like about this feature is the fact that CVP shows you the important part of the data for each alert type. For example, in Figure 15-19, I’ve selected an event for which output errors were detected, and you can see all of the relevant graphs for that type of data. By the way, this error condition was occurring as I watched, so those pretty graphs were updating in real time. Real time! Did I mention that this is all in real time? That still blows me away.
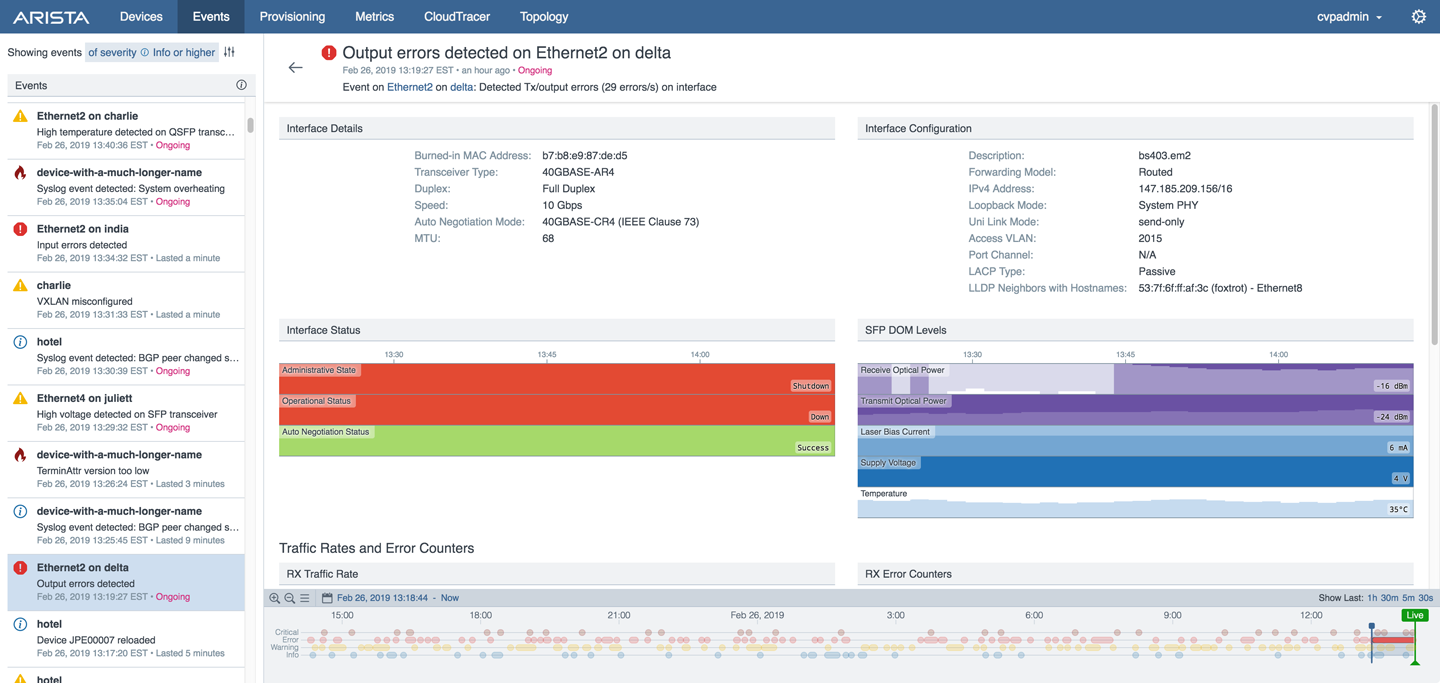
Figure 15-19. CVP event—output errors
On the bottom of the screen, that timeline has a couple of slideable bars on it that default to the time of the event. By sliding those bars, you can expand the graphs (again, in real time) to show information for a longer period so that you can get a better feel for trends as needed. There is a third bar in the middle of the other two that you can slide, which puts an indicator line on all of the graphs to show the detailed information for the data collected at that instant in time. Talk about visibility!
Moving on to another event type, Figure 15-20 shows a high-CPU event. Of course, if the CPU is high, we care about different data, so this event defaults to showing us things like CPU utilization for each core along with different load averages and memory utilization.

Figure 15-20. CVP event—high CPU
I know I’ve written this repeatedly, but as someone who has spent a lot of time in NOCs working with old-school network management tools, this is a game changer. The ability to see current information in real time along with the crazy level of historical detail that’s available makes all the other tools out there pretty darn obsolete. I think this is like some of the CLI tools available in EOS in that the more you use them, the more you’ll find yourself utterly frustrated when using other vendors’ tools.
Cloud Tracer
Cloud Tracer, shown in Figure 15-21, presents a colorful matrix of latency information between the devices under CloudVision’s purview and some devices in various cloud service providers. This single snapshot into the overall delay of the network from points in the local network to remote points in the cloud (or clouds, in this case) can give a great way to know whether complaints like “the network is slow” are a result of local or remote issues.

Figure 15-21. Cloud Tracer
As you can see on the left of Figure 15-21, the current chosen metric is Latency, but HTTP Response Time, Jitter, and Packet Loss are also selectable options.
In the ever-expanding work of cloud-attached networks, this can be a terrific tool for not only diagnosis but also simple status.
Topology
Topology is the section I find myself most drawn to as someone who spent far too long using tools like HP OpenView. That’s because it shows a network layout in a way that makes sense to me from years of looking at similar screens.
This view is probably not correct by default, and you might need to massage it, instructing CVP what type of node type each entry is, along with its Datacenter, Pod, Flock, and Rack, in order to make the output look pretty. When you’ve done this, though, the output is terrifically useful, so it’s worth the energy to make it look the way it should. By the way, I’d never heard of the term Flock before, so I asked the developers who told me that it’s a grouping of devices within a rack.
To give you an idea of what I mean, Figure 15-22 shows a simple lab layout with all of the devices left untagged, in which case they should all remain in the Untagged cluster.

Figure 15-22. Untagged cluster in network topology
A cluster is a collection of nodes. Double-click a cluster to see its nodes. After double-clicking the Untagged cluster, you see the results shown in Figure 15-23.
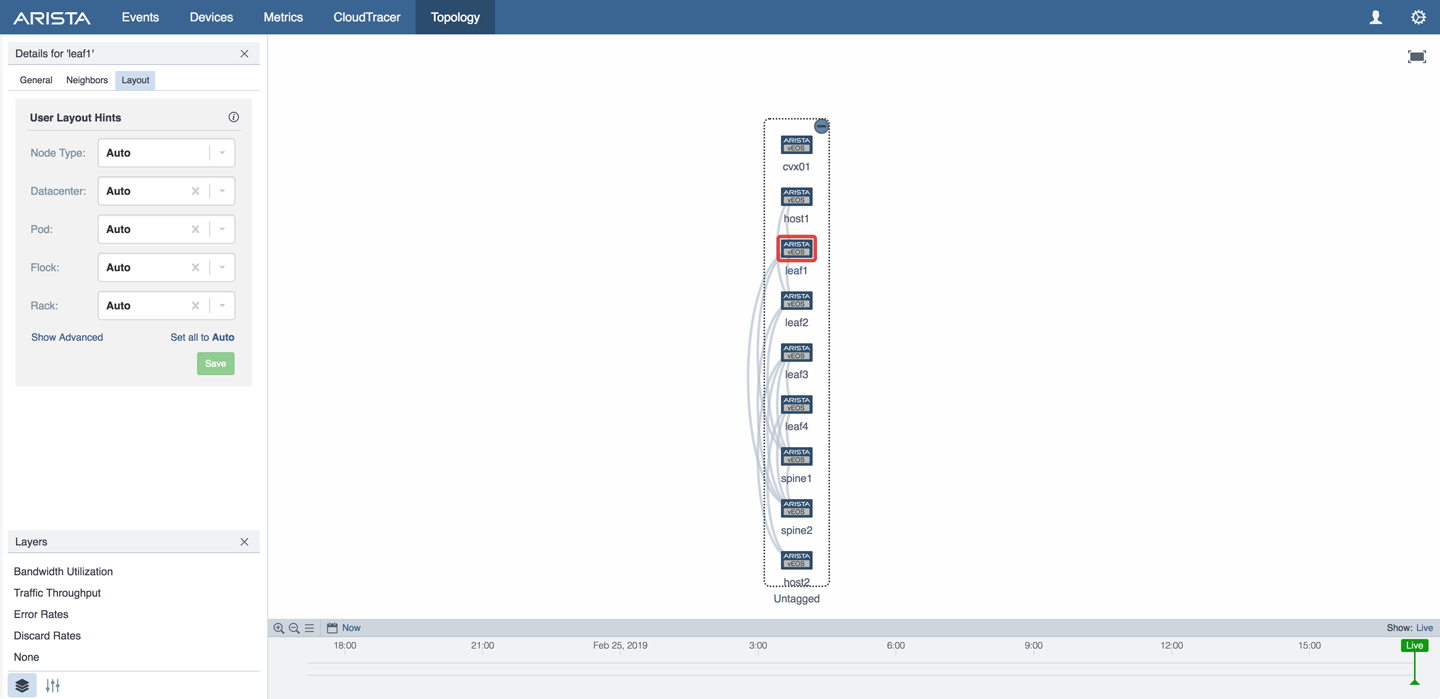
Figure 15-23. Untagged cluster expanded
Note that in Figure 15-23 I was holding the mouse pointer over the cluster, which highlights the nodes within and gives the option for collapsing it via the little minus sign in the upper right. I have also selected the leaf1 node, which is why it’s highlighted.
At this point I’m going to use that dialog on the left and set each of the devices to their proper purpose such as spine, leaf, edge, core, management, or endpoint device. Between doing this and the connections learned via LLDP, the topology will begin to form. In fact, as you can see in Figure 15-24, CVP has assumed some things based on the network connectivity of the leaf switches and has put them into their own rack clusters. All I did was apply the layout of Spine to the spine switches and Leaf to the leaf switches—CVP did the rest. Don’t worry, you can override those labels.
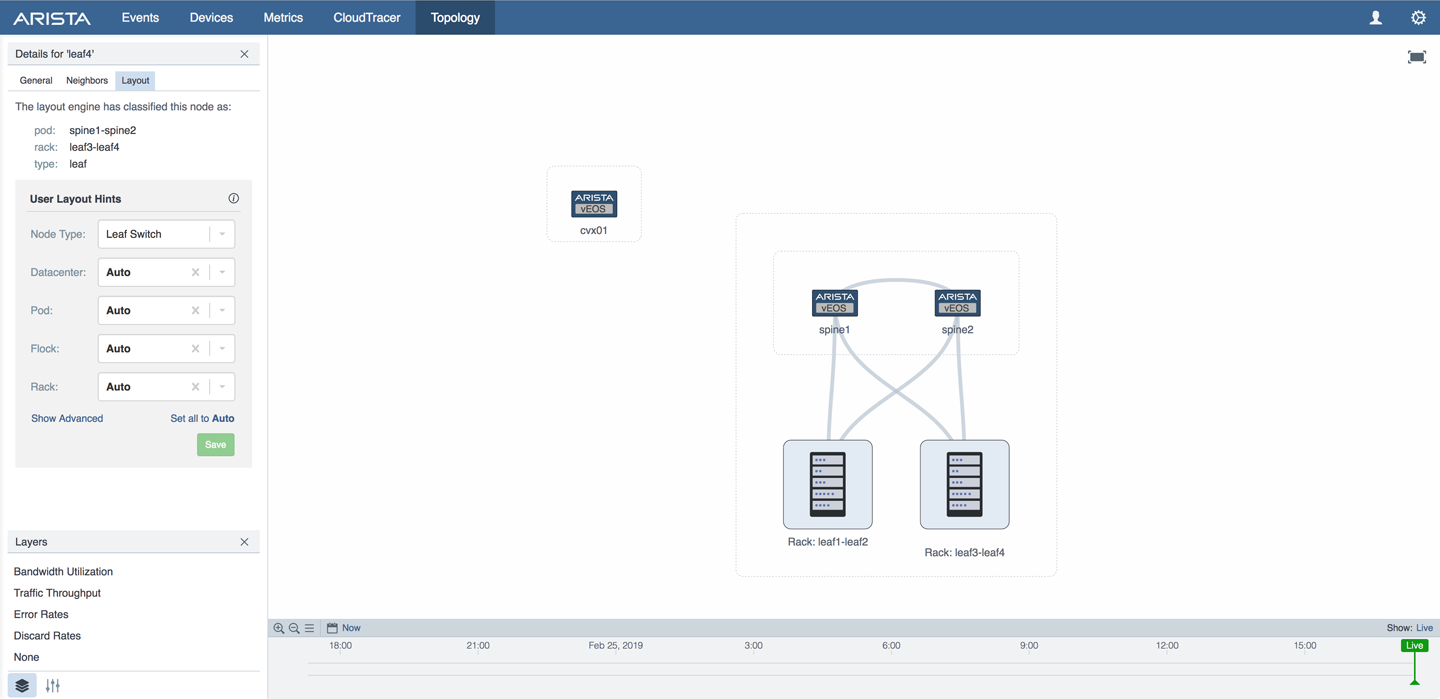
Figure 15-24. Spine and leafs put into racks automatically
As a matter of fact, CVP has gone a step further. If you look back, you’ll see that there were Host1 and Host2 nodes that seem to have disappeared. CVP has figured out that they were attached to leaf switches and put them into the proper racks for us based on the rack configured on those leafs (leaves?). Figure 15-25 illustrates that the highlighted node, Host1, has been placed into the Rack1 cluster even though the layout on the left of the screen shows that the node is set to auto for all settings. Why wasn’t the CVX node placed anywhere? Because it’s not directly connected to any of the other devices.

Figure 15-25. CVP places hosts into racks automatically
That floating CVX node actually brings me to one of my frustrations with Topology view, which is that the absolutely obsessive part of my brain doesn’t like it there and wants to move it, but if you click it with the mouse and move it, the entire topology moves. In fact, if you’re used to working with tools like OpenView with which you can place any object anywhere, you’ll need to get used to CVP placing nodes and clusters where it thinks they belong. That might change, but as of this writing I just need to learn to adapt, and as anyone who knows me will tell you, that’s an uphill climb of Sisyphusian scale. Even sitting here looking at the image, I want to move that node.
How big can these topologies be? Pretty darn big. Figure 15-26 shows a fairly large network, but what’s really more interesting about that figure is that the internode links are highlighted. That can be difficult to discern in a black-and-white book (here’s where you soft-copy buyers get your money’s worth!), but the majority of the links in Figure 15-26 are colored green, whereas a couple near the bottom are highlighted in red. These colors are providing a quick glance of bandwidth utilization.

Figure 15-26. Topology view with bandwidth utilization
The colored links can show other information, as well. Figure 15-27 shows a CVP Topology with links in red indicating network errors that have been discovered. Remember, CVP doesn’t use SNMP to gather data, so this information was learned and displayed in real time.
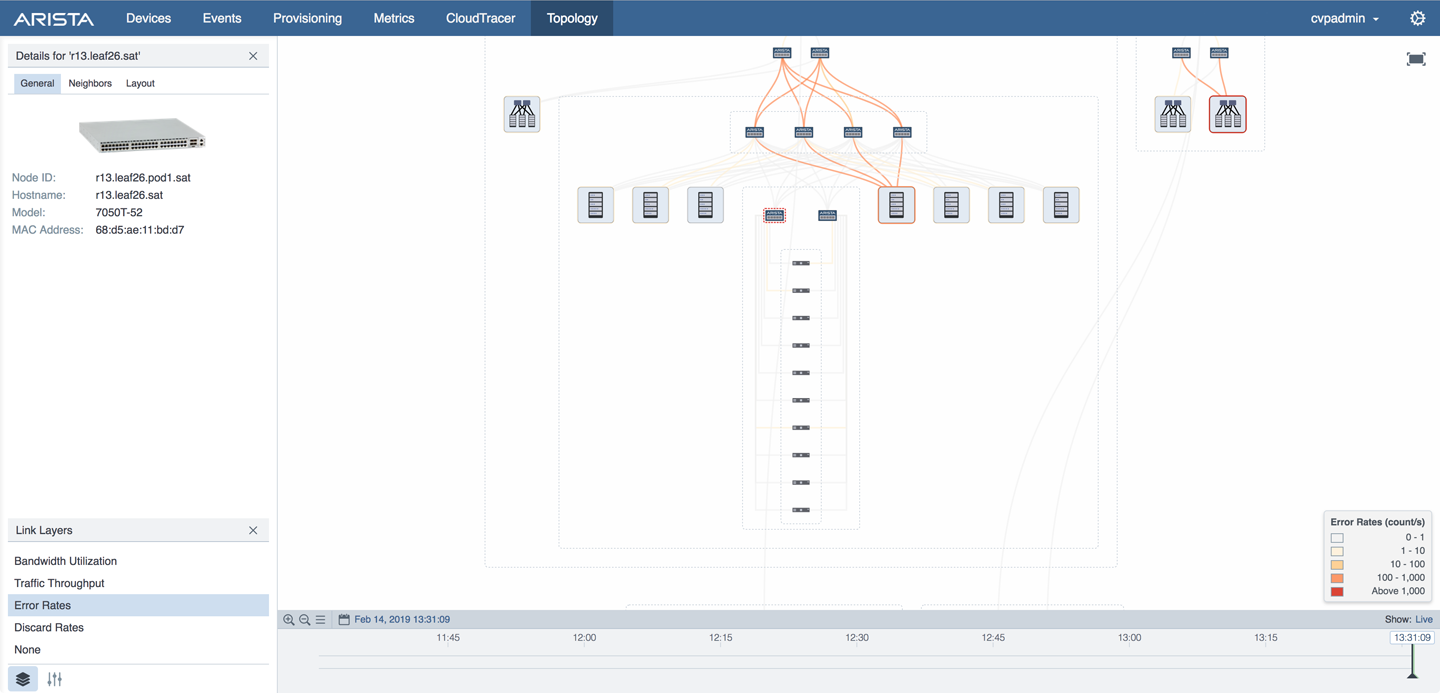
Figure 15-27. Topology view zoomed in with errors highlighted
Back to how large the topology can be, Figure 15-28 shows an even larger network. Take a good look at that image, though, and see how many of those objects are actually clusters that have more nodes inside them.
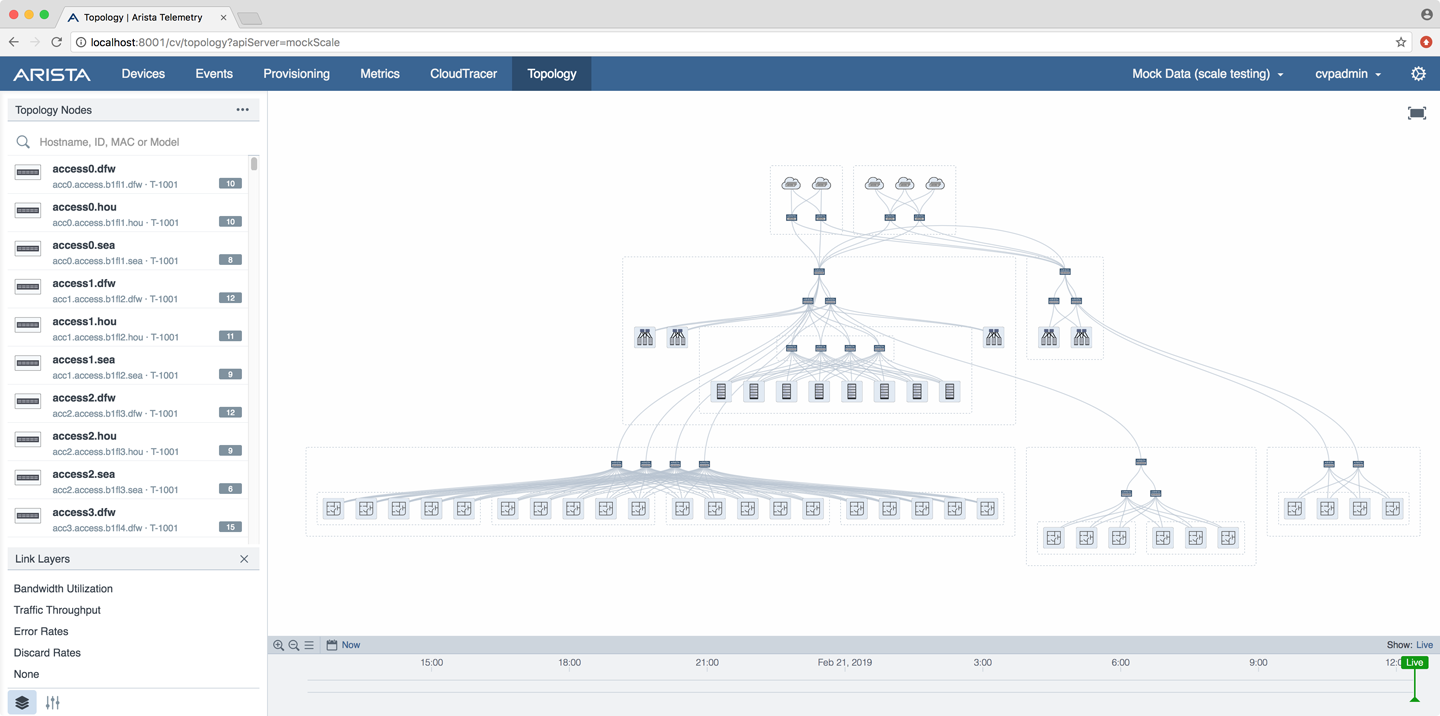
Figure 15-28. A large CloudVision deployment
When it comes to number of devices that CVP can support, those numbers are changing too often for me to publish here, but I will say that every time the numbers do change, they change in a positive direction, and usually the published scale numbers double, so if CVP doesn’t scale to fit your needs today, please talk to your sales team, because it likely will in the near future.
Conclusion
CloudVision is a next-generation tool that is absolutely not a single pane of glass, because that would be a terrible thing to call this tool that gives you so much visibility into a single…well, window.
As someone who is a die-hard CLI-mangler, the Network Provisioning side of it doesn’t interest me as much as the Network Topology and Events parts do, but even if I’m not necessarily drawn to the provisioning aspect, I must say that I do like the Tasks and Change Control features, and that could be enough to get me to convert, especially in a larger-scale enterprise environment.
As someone who prefers to write his own automation scripts, I can manage my networks without Network Provisioning, but that’s for me and my labs. When it comes to a larger network, and to me this tool really shines in the enterprise space, CloudVision is a gem.
What really excites me, if you haven’t gotten the message yet, is that all of the Events and Telemetry data is streamed in real time. Add to that the real-time ability to see bandwidth utilization and error indicators in the Topology view and there’s absolutely something for everyone in CloudVision.