
Chapter 30. eAPI
As you’ve likely figured out by now, I think most all of the features of EOS are pretty darn cool. The EOS Application Programmable Interface (eAPI), though, has a special place in my heart. Yes, people like me have special places in our hearts for features in network operating systems.
Simply put, eAPI is a means whereby command-line interface (CLI) commands can be executed either via a web interface or, more importantly, through a program or script. Given the power of EOS and the many other means by which the switch can be controlled via custom programs, that might not seem like a big deal, but it is for reasons that should soon become clear. To explain, allow me to begin with a story of pain.
But first, a rant.
GAD’s Rant About the Fear of Scripting
I’ve been a lot of things in my professional career. I went to school to be a programmer back before the job title changed to developer, and I’ve been a Unix administrator, a generic IT guy, and of course, a network guy. I need to hit you up with some cold-hard truth here, so take it with the understanding that I’ve seen the industry unfold since the 80s and I have a fair bit of insight into how things are changing. Ready? Here it is:
Warning
Learn to code or I will script you out of a job.
The networking world is changing, and I’ve been preaching for the past six years that there’s only 10 years left. Well, do the math as that’s no longer enough time. Time for what, you might ask? Time for you to adapt.
I meet a lot of networking professionals in my job, and the number of networking people who don’t want to program is staggering. If you are one of those people, learn to code or I will script you out of a job. If you do not adapt, you will be replaced. It’s that simple. What’s even more surprising to people who can’t accept this truth is that they might very well be replaced by automation. That automation can be something as simple as a script. If you can’t write those scripts, it will be someone else’s script that replaces you. If you can write scripts, it might well be your code that scripts someone else out of their job. Adapt or die. Too harsh? How about adapt and overcome, because if you don’t adapt, you will be overcome with the cold-hard truth that someone has replaced you with a script.
In my experience, networking engineers are mostly behind the curve in regard to automation, though this greatly depends on the environment in which they find themselves. When I work with the big tech companies, I see much more acceptance of automation than I do in the enterprise. This became painfully evident to me at a client site when, after showing the networking engineers all of the automation possibilities built into Arista’s EOS, they begged me not to show them to the systems teams. They knew at their core that the systems teams would take to the automation tools instantly because systems admins love automation and have been doing it for decades. Those systems engineers were proficient in a new way of thinking that’s commonly called DevOps: a portmanteau of development and operations.
If you still don’t believe me, consider this: if I walk into a meeting with your CEO and tell her that I can replace 10 of her network engineers with automation, do you think she would pay me one engineer’s salary for a month of writing and implementing that automation? You bet she would. Learn to code so you still have value in a DevOps world. Don’t think that DevOps is a real threat? Well, guess what, now there’s NetOps to worry about, too. If your reaction is “my job is too specialized to be replaced by a script,” you’re in for a rude awakening. If the cloud titans (Google, Amazon, Microsoft, etc.) can automate their environments, your company can, too.
The good news is that, in my opinion, eAPI is a tool that lends itself very well to network engineer adoption because it uses the same CLI commands that we’ve all spent years learning and understanding. To understand how that all works, I need to take a quick detour into a couple of topics that are commonly called expect scripting and screen scraping.
Expect Scripting
In another life, I was fervently pursuing the Cisco Certified Internetwork Expert (CCIE) certification in an effort to inflate my own self-worth (not to mention my wallet). To that end, I had spent a fair amount of time and money on a rack of routers and switches in my garage. By “fair amount,” I mean 12 routers and four switches, all in a 19-inch telecom rack that’s properly grounded, has backup power, and is properly bolted to the cement floor in my garage. No, we can’t fit a car in the garage, and yes, my wife hates me.
Spousal friction aside, my rack of gear was great for studying, but since I travel so much, I needed to be able to control it all remotely. Naturally, that meant more equipment, so I added a nice web-enabled power distribution unit and a terminal server. I also had a management switch connecting all of the devices together along with a Linux server where I could store versions of code for all the devices along with copies of various configurations I had created. For those keeping track at home, that’s now 12 routers, four switches, a management switch, a terminal server, and a Linux machine, all totaling 19 rack units (RUs) of space, not including the UPS, firewalls, other servers, and various other devices, all of which work together to make me have to explain why the NSA doesn’t need to be called every time the cable guy comes in for a service call.
The problem with all this gear, especially in a lab/training scenario, is that I often need to load different versions of code, not to mention completely different sets of configurations on the entire rack. For example, if I’m working on the intricacies of OSPF, I might have completely different configurations on every device than I would if I were working on, say, a multicast lab. I needed a way that I could bulk-load configurations on 16 networking devices with minimal interaction. Sure, I could copy a configuration from flash: into the startup-config and reboot, but remember, I’d have to do that 16 times. There had to be a better way.
To accomplish what I needed to do, I wrote a special frontend using Perl and the module Net::Telnet. Well, to be painfully accurate my good friend Adam Levin wrote the base script for me, and I added literally thousands of lines of code to bend it to my will. I’m not a huge fan of Perl, but Adam is, so I used what he gave me and didn’t complain. Much.
On my Linux box, that 20,000-line script would telnet to the terminal-server and then through a complex set of interactions on each device; it would issue commands, wait for the proper response, and thereby control the devices in my lab programmatically. I was thrilled with my solution, but it was clunky. Remember, because my script was essentially controlling each device from the console, I had to write logic that would not only test for each command’s output, but also take into consideration that different devices, and even different versions of code, produce potentially different output. My script simulated a user sitting at a terminal.
In its simplest form, this method is called expect scripting because your script expects to see output, after which it responds. There is a programming language called Expect, but the term is generically used for any similar functionality. A script sends a command, waits for an expected result, and when it gets that result, continues. For example, the task of issuing a write mem command would go something like this:
First, I would need to connect to the proper device through the terminal server. Remember, though, that because this is the console, we would need to consider the state of that port. What if someone had used it and left it logged in? What if they did a show run and left it at a --more-- prompt? Sending a write mem to the console while it was sitting at a --more-- prompt would do nothing other than break out of the --more-- prompt, thus rendering the rest of the script useless. So, I needed to get the console into a known good state (this script was actually altered for use with EOS, which is why you see reference to an admin user):
# $device is the device name on the

$ld->print("$device");
$ld->print('');

# Assumes Cisco TermServ with User/Pass configured
$ld->waitfor("/Username: /");
$ld->print('Script');
$ld->waitfor("/Password: /");
$ld->print('ClearTextGoodness');
$ld->print('');

# send Control-C to get back to command prompt
# Control-C breaks --more-- prompts in CLI
# Also breaks running pings in both CLI and BASH
$ld->print("cC");

# If in BASH, two "exit"s will get us back to CLI and logged out
# If in CLI, two "exit"s will get us trying to login with user "exit"
# Extra CR breaks us out of login and doesn't hurt if we're not there
$ld->print("exit");
$ld->print("exit");
$ld->print("");

$ld->waitfor("/in:/");
$ld->print("admin");

# If there is a password, this will break. There must be no PW!
$ld->waitfor("/(>|#)/");
$ld->print('en');
$ld->waitfor("/#/");
All of that code is just to get a single device to a known-good state, which is enable mode. Remember that different devices might respond differently, which means that I needed different routines for every class of device in my lab. Now we can send a write mem command:
$ld->print('write mem');
$ld->waitfor("/#/");
print "<I>Done</I><br>
";
Don’t forget that I’d connected through a terminal server, so I’d also needed the following bit of code after I was done, to properly disconnect (assuming a Cisco console server):
# Exit from TermServ connection for this device
$ld->print("c^x");
$ld->print("disco");
$ld->waitfor('/[confirm]/');
$ld->print('y');
That page of code accomplished one thing: sending the write mem command to a device. Not only that, but it worked on a device that used only that exact sequence of commands. What if instead of Username: the device responded with Login:? Well, in that case, the code $ld->waitfor(“/Username: /”); would wait forever (or until a timeout expired) and the script would hang or error out. I managed to code around that by having a routine for every class of device, and because I bought all of my devices used on eBay, there was a variety of devices. Just think about what happens when you boot an older Cisco device with no configuration. You might get any of the following prompts:
router#
localhost#
switch#
pix#
Would you like to enter the initial configuration dialog?
Every one of those possibilities had to be accounted for. After I’d done that, I had a script that would run serially (remember, this was over console ports) across 16 or more networking devices at 9600 baud. When the script ran properly, it would sometimes take 45 minutes to complete! But it did complete, and it was magnificent. Until some idiot left device number nine in the following state:
rommon#
When that happened, I’d need to go get the switch out of rommon and then start the process all over again. It was not efficient, but remember this was the 1990s when things like automation and APIs were a foreign concept in the networking world.
Screen Scraping
If you think the whole expect scripting thing sounds like a pain, imagine that you finally got all of that to work, and you now wanted to retrieve the version from the show version command. Not only would you need to go through all of that expect scripting stuff, but you’d then need to strip out the interesting information from the output of the command. Getting more advanced results from the output is colloquially called screen scraping. Let’s see what that means:
Here’s the output of show version from an Arista switch:
Arista(config)#sho ver
Arista DCS-7280SR-48C6-M-F
Hardware version:    21.05
Serial number:       SSJ17290598
System MAC address:  2899.3abe.9f92

Software image version: 4.21.1F
Architecture:           i386
Internal build version: 4.21.1F-9887494.4211F
Internal build ID:      1497e24b-a79b-48e7-a876-43061e109b92

Uptime:                 0 weeks, 0 days, 1 hours and 0 minutes
Total memory:           32458980 kB
Free memory:            30501332 kB
Why might I need this in my lab? Suppose that I want to make sure that all the switches were on the same revision of code. I might want to get the currently installed version so that I upgraded only devices that needed to be upgraded (or downgraded as the case may be). I could make that simpler with CLI tools, which is a great first step:
Arista(config)#sho ver | grep image
Software image version: 4.21.1F
That’s certainly better, but how can I get only the information I care about, which in this case is the 4.18.1F portion of the output? In a Python script (I’m changing to Python because Perl makes my teeth itch), I would likely resort to something like this, where foo contains the string retrieved through the previous command:
print foo.split()[3]
This bit of Python takes foo, splits it where there’s white space, and prints the third field (remember we count from zero). Here’s the result:
>>> foo = "Software image version: 4.21.1F"
>>> print foo.split()[3]
4.21.1F
This has serious limitations, though. What if the next version of EOS changes that line from Software image version: 4.21.1F to just Version: 4.22.0F? Our line of code that references field 3 of the split output will break and the script won’t work. And, yes, that sort of thing happens all the time.
>>> foo = "Version: 4.21.1F"
>>> print foo.split()[3]
Traceback (most recent call last):
  File "<stdin>", line 1, in <module>
IndexError: list index out of range
If you think this all sucks, welcome to the club, but before networking equipment had things like Application Programmable Interfaces (APIs), expect scripting and screen scraping were the only way to automate tasks. We’re well into the twenty-first century now, and there has to be a better way. Enter Arista’s EOS API—eAPI.
eAPI lets you issue CLI commands from a script (or web page, as you’ll see) and get the results in a format designed to be read by a program. That format is called JSON, which stands for the JavaScript Object Notation. Don’t worry, there’s no JavaScript involved. Let’s take a look.
From the command line, when I issue the show version command, I get this output:
Arista#sho ver
Arista DCS-7280SR-48C6-M-F
Hardware version:    21.05
Serial number:       SSJ17290598
System MAC address:  2899.3abe.9f92

Software image version: 4.21.1F
Architecture:           i386
Internal build version: 4.21.1F-9887494.4211F
Internal build ID:      1497e24b-a79b-48e7-a876-43061e109b92

Uptime:                 0 weeks, 0 days, 1 hours and 8 minutes
Total memory:           32458980 kB
Free memory:            30520652 kB
But check this out. Since about EOS 4.14, you can view most commands by using a json modifier, which takes the output and presents it to you in JSON format:
Arista#sho ver | json
{
    "uptime": 4111.17,
    "modelName": "DCS-7280SR-48C6-M-F",
    "internalVersion": "4.21.1F-9887494.4211F",
    "systemMacAddress": "28:99:3a:be:9f:92",
    "serialNumber": "SSJ17290598",
    "memTotal": 32458980,
    "bootupTimestamp": 1546895161.0,
    "memFree": 30520076,
    "version": "4.21.1F",
    "architecture": "i386",
    "isIntlVersion": false,
    "internalBuildId": "1497e24b-a79b-48e7-a876-43061e109b92",
    "hardwareRevision": "21.05"
}
JSON generally presents data in a format that works well with most programming languages, and in the case of Python, the data types use the same format, which is nice. Why not use XML? Because XML is very verbose and generally causes a lot of work to get to the data you’re looking for. JSON is much more concise. The biggest plus in my opinion is that JSON presents data in key–value pairs where appropriate. To understand why that’s such a good thing, let’s take another brief detour, this time into the world of Python data types.
Python Data Type Primer
Before we proceed, let’s have a quick lesson on data types using Python as our language of choice. Apologies for shifting from Perl to Python, but all of the examples from now on will be in Python. Why? Because Arista doesn’t use Perl (I did at the time because Adam agreed to help me, and Adam likes Perl). Stay with me while I take a step back and explain Python data types, and that should help make clear why eAPI is so darn cool.
Scalar variables are defined and used as you’d expect a simple variable to work. They can hold only one value and are said to be atomic because of that fact.
foo = 3.14foois type floatfoo = 'GAD'foois a stringfoo = 6foois an integer
Storing single values is certainly useful, but oftentimes we need to store multiple values in a single variable. This type of variable is generically called an array in programming, and there are many types of arrays.
Note
A quick note is in order with regard to the Python print command. Python 2 uses the print statement, whereas Python 3 uses the print() function. Because I learned on Python 2, I loathe using print(), and, as such, I refuse to do things like import __future__ to make my code work with Python 3 syntax. I am definitely a loudmouth, opinionated curmudgeon if you haven’t figured that out yet. Python 2 print rules!
- List
-
In Python, an array of values stored in a single variable in which each variable is referenced by its position in the array is called a list. Elements within a list can be of any data type. Lists are defined using square brackets with each element separated by a comma:
foo = [ 3.14, 'GAD', 6 ]
Lists are referenced using the position of the element starting at zero with the element position in square brackets. To print the string
‘GAD’in this example, you would use the following format (remember we count from zero):print foo[1]
- Tuple
-
In Python, a read-only (or immutable) list is called a tuple. Tuples are defined just like lists but with parentheses instead of square brackets:
foo = ( 3.14, 'GAD', 6 )
Tuples are referenced using the position of the element starting at zero with the element position in square brackets. To print the string ‘GAD’ in this example, you would use the following format:
print foo[1]
If that seems confusing, you’re not alone in thinking so. The reason the format is a square bracket even though a tuple is defined with parentheses is because you’re not referencing the position in a tuple or a list, but in what Python calls a sequence. In Python, lists, tuples, strings, and even dictionaries (stay tuned) are sequences, and all sequences have positions referenced within square brackets. For example, to print just the first (the zeroth, remember) character in the string ‘Arista,’ you could do this:
>>> foo = 'Arista'
>>> print foo[0]
A
- Dictionary
Lists and tuples are really cool, but they’re all pretty limited because they are ordered and therefore positional (which is often the main benefit). To reference an element in either, you must know its position. In Python, a dictionary is non-ordered, and each element is given a name, which is how you reference that element. The name of the element is its key, and the data contained within that element is its value. Hence, a dictionary contains key–value pairs. A dictionary is defined using curly braces and the elements are still separated by commas, but each element now has a key and value to worry about. The key comes first and is followed by a colon and then the value associated with that key. The key must be unique within the dictionary. Let’s take a look:
foo = { 'pi': 3.14, 'name': 'GAD', 'age': 6 }Python allows all sorts of flexibility when it comes to white space, so I will often write that same line of code like this, which I find far easier to read, and code that’s easy to read is code that’s easy to debug:
foo = {  'pi'  : 3.14,
         'name': 'GAD',
         'age' : 6      }
The thing to remember about this being a dictionary is that
foohas elements and that the elements are referenced by name, not position. In fact, you cannot reference the elements by position, because they are strictly non-ordered. Like the other arrays mentioned, we reference elements with square brackets, only now we need to give the key for that element instead of its position:print foo['name']
Got it? I hope so, because it’s about to get complicated. Python allows data types to be nested, which means that we can create a list of dictionaries or a dictionary full of lists. Hell, we can have a list with a dictionary, a tuple, a string, and a list of dictionaries that contains 19 lists of dictionaries within it! Just because you can doesn’t mean you should, though. Still, this has huge benefits as the needs of a script become more complex, and you’ll see this nesting with eAPI. The trick to understanding all of this nesting is that each level of nesting is referenced in order from left to right, though it can be easier to think about the references as being from outside-in. Huh? Let’s look at an example. Consider this pile of Python:
foo = {   'name': {'first': 'Frederick', 'last': 'Smith'},
        'skills': ['singing', 'pilot', 'pirate'],
           'DOB': '02-29-1888',
           'age': 5 }
In this example, foo is a dictionary with the keys ‘name’, ‘skills’, ‘DOB’, and ‘age’. To reference the age key within the dictionary foo, we use the following:
print foo['age']
Simple! But what about the first name? Because there’s a dictionary nested within the 'name' element of foo (keep in mind, dictionaries are not ordered—the elements are named), we must reference the elements from the top level down, left to right. Remember, here’s the entire nested array with the data we’re trying to get to in bold:
foo = {   'name': {'first': 'Frederick', 'last': 'Smith'},
        'skills': ['singing', 'pilot', 'pirate'],
           'DOB': '02-29-1888',
           'age': 5 }
And here’s how we would reference that data:
print foo['name']['first']
By the way, if you think the age is wrong, it means you don’t get the joke, so please don’t email me the errata. It’s not my fault that Frederick’s nursemaid had a hearing problem.
Note
If you still don’t get the joke it’s from the Gilbert and Sullivan Operetta The Pirates of Penzance, in which Frederick is determined to have been born on February 29 on a Leap Year and is thus only five years old:
And so, by a simple arithmetical process, you’ll easily discover that even though you’ve lived 21 years, yet, if we go by birthdays, you’re only five, and a little bit over, and, yes, I did the math to figure out a leap year from the reign of Queen Victoria.
This data nesting quickly can get out of hand, and that’s not what we’re here to learn. I just wanted you to be able to understand what’s going on with JSON and eAPI, so let’s get back to that. Imagine this output from the CLI again:
Arista#sho ver | json
{
    "uptime": 4111.17,
    "modelName": "DCS-7280SR-48C6-M-F",
    "internalVersion": "4.21.1F-9887494.4211F",
    "systemMacAddress": "28:99:3a:be:9f:92",
    "serialNumber": "SSJ17290598",
    "memTotal": 32458980,
    "bootupTimestamp": 1546895161.0,
    "memFree": 30520076,
    "version": "4.21.1F",
    "architecture": "i386",
    "isIntlVersion": false,
    "internalBuildId": "1497e24b-a79b-48e7-a876-43061e109b92",
    "hardwareRevision": "21.05"
}
Look at that output with your newfound Python data-type knowledge. Now imagine that all of that is contained with the variable response. How might we print the version?
print response['version']
That’s it! The position of the data is irrelevant because it’s not an ordered array (list or tuple), and the position of the data in the string is irrelevant because the output shows only the data we care about. Cool! Actually, that’s beyond cool because assuming there’s an easy way to get to this data programmatically (there is), this means that there is no need for expect scripting or screen scraping. Oh, dry the glistening tear!
Note
That’s another Pirates of Penzance reference in case you spend all your time reading RFCs and don’t ever manage to get to the opera.
Now how do we use this in the real world? More importantly, how do we get this output into a script? First, we need to turn on eAPI.
Configuring eAPI
Normally, eAPI communicates over HTTP or HTTPS (default), which facilitates the sending of CLI commands, the output of which is delivered to us in JSON format. To make that happen, we need to configure eAPI on the switch. We do this primarily through the management api http-commands section:
Arista(config)#management api http-commands
Arista(config-mgmt-api-http-cmds)#
Now that we’re here, the minimum configuration required is the act of enabling the feature:
Arista(config-mgmt-api-http-cmds)#no shutdown
The feature will function after we add a username and password, but first let’s look at some other options within this section.
By default, the feature uses HTTPS for security. This is wise, and I don’t recommend using HTTP, but if you feel the need, you can change to the insecure clear-text mode with the protocol http command. You can even change the port, just as you can with HTTPS:
Arista(config-mgmt-api-http-cmds)#protocol ?
  http   Configure HTTP server options
  https  Configure HTTPS server options

Arista(config-mgmt-api-http-cmds)#protocol http ?
  port  Specify the TCP port to serve on
  <cr>

Arista(config-mgmt-api-http-cmds)#protocol http port ?
  <1-65535>  TCP port
You cannot enable HTTP without first disabling HTTPS:
Arista(config-mgmt-api-http-cmds)#protocol http port 80
% Cannot enable HTTP and HTTPS simultaneously
To disable HTTP, just negate the protocol https command. Then we can add HTTP:
Arista(config-mgmt-api-http-cmds)#no protocol https
Arista(config-mgmt-api-http-cmds)#protocol http port 80
If you are using HTTPS, it will work without further configuration (though we will need to add a secure username), but if you so desire, you can add your own certificate:
Arista(config-mgmt-api-http-cmds)#protocol https certificate
Enter TEXT certificate. Type 'EOF' on its own line to end.

This is not a real certificate

EOF

Enter TEXT private key. Type 'EOF' on its own line to end.

This is not a real private key

EOF
Note that you do not need to use the web interface. You can also use a couple of nifty features that allow you to connect to the eAPI interface direct from Linux on the switch itself. This is cool because it’s faster not adding the web server overhead, and it also allows you to use eAPI without a username and password. How is that safe? When configured in this mode, the only way that eAPI scripts can run is from the switch itself, generally from Bash. To configure eAPI this way, use the unix-socket protocol option:
Arista(config-mgmt-api-http-cmds)#protocol unix-socket
You can also set up the system to use the web interface but respond only from localhost. Note that using this will limit access to port 8080 by default:
Arista(config-mgmt-api-http-cmds)#protocol http localhost
Let’s get this back to a simple state that we know will work for our purposes:
Arista(config-mgmt-api-http-cmds)#protocol https
We’ve gone back and forth a lot, so let’s exit the mode (thus saving the configuration) and finish up:
Arista(config-mgmt-api-http-cmds)#exit
Arista(config)#
Earlier, I said that we also needed to add a secure username. eAPI will not function over HTTP/HTTPS without a username with a password configured (unless using localhost or Unix sockets). This is a very good thing, as we’ll see, because eAPI allows for a significant amount of control over the switch. Note that this does not need to be a local user and can absolutely be an Authentication, Authorization, and Accounting (AAA) user controlled through RADIUS or TACACS+. Here, I create a local user named Script with a password of Arista:
Arista(config)#username Script secret Arista
eAPI is now ready to be used.
To see the status of eAPI on your switch, issue the show management api http-commands command from the CLI (yes, you can run this command through eAPI as well):
Arista(config)#sho management api http-commands
Enabled:            Yes
HTTPS server:       running, set to use port 443
HTTP server:        shutdown, set to use port 80
Local HTTP server:  shutdown, no authentication, set to use port 8080
Unix Socket server: running, no authentication
VRFs:               default
Hits:               1
Last hit:           13 seconds ago
Bytes in:           90
Bytes out:          455
Requests:           1
Commands:           1
Duration:           0.219 seconds
SSL Profile:        none
FIPS Mode:          No
QoS DSCP:           0
Log Level:          none
CSP Frame Ancestor: None
TLS Protocols:      1.0 1.1 1.2
   User         Requests       Bytes in       Bytes out    Last hit
------------ -------------- -------------- --------------- --------------
   Script       1              90             455          13 seconds ago

URLs
--------------------------------------------
Management1 : https://10.0.0.1:443
Unix Socket : unix:/var/run/command-api.sock
In this output, we can see that the feature is enabled, that HTTPS is enabled and HTTP is shutdown, that the ports are set to defaults, the last time it was hit, what username was used, how many times that username was used, and so on.
Finally, watch out for Virtual Routing and Forwarding (VRF) changing how you connect to eAPI. If you’ve put your management interface into a VRF (see Chapter 33) like this
interface Management1
   vrf forwarding Manage
   ip address 10.0.0.1/24
and then you enable eAPI, as discussed earlier
management api http-commands
   no shutdown
with this configuration you will not be able to connect to eAPI over that management interface, because you will get a connection refused message when trying to do so. To make eAPI work over that interface, you’d need to add eAPI into the VRF in use on the management interface:
Arista#conf
Arista(config)#management api http-commands
Arista(config-mgmt-api-http-cmds)#vrf Manage
An added benefit of doing this is the ability to apply an IP access-list to eAPI within the VRF:
Arista(config-mgmt-api-http-cmds-vrf-Manage)#ip ?
  access-group  Configure access control list
I’m going to keep it simple here and leave it open, though. Note that you must enable eAPI within the VRF. After you do that, you can exit, and you should be able to hit eAPI as you’d expect:
Arista(config-mgmt-api-http-cmds-vrf-Manage)#no shut
Arista(config-mgmt-api-http-cmds-vrf-Manage)#exit
Arista(config-mgmt-api-http-cmds)#
You can run eAPI in multiple VRFs, too. Here, I have the switch running with eAPI in two VRFs, named Manage and GAD:
Student-20(config)#sho run section api
management api http-commands
   no shutdown
   !
   vrf GAD
      no shutdown
   !
   vrf Manage
      no shutdown
eAPI Web Interface
So how do we use eAPI? There are two ways. The first way is to hit it with a web browser. Simply point your browser to your switch’s management IP address using HTTPS. In my lab, I have a switch configured with a management interface numbered as 10.0.0.1. I would then hit it using the URL https://10.0.0.1/explorer. The /explorer at the end can be optional depending on what else you have running on the switch, but I’d add it just to be safe. Note that you might get an untrusted certificate error due to the certificate being self-signed. You will need to acknowledge this on your browser unless you added a valid certificate.
Figure 30-1 shows what I get after entering the username and password. Note that this output changed dramatically around EOS 4.14, so older versions have much different output, but then you shouldn’t be running code that old, anyway. The older interface was simpler but also not as powerful.
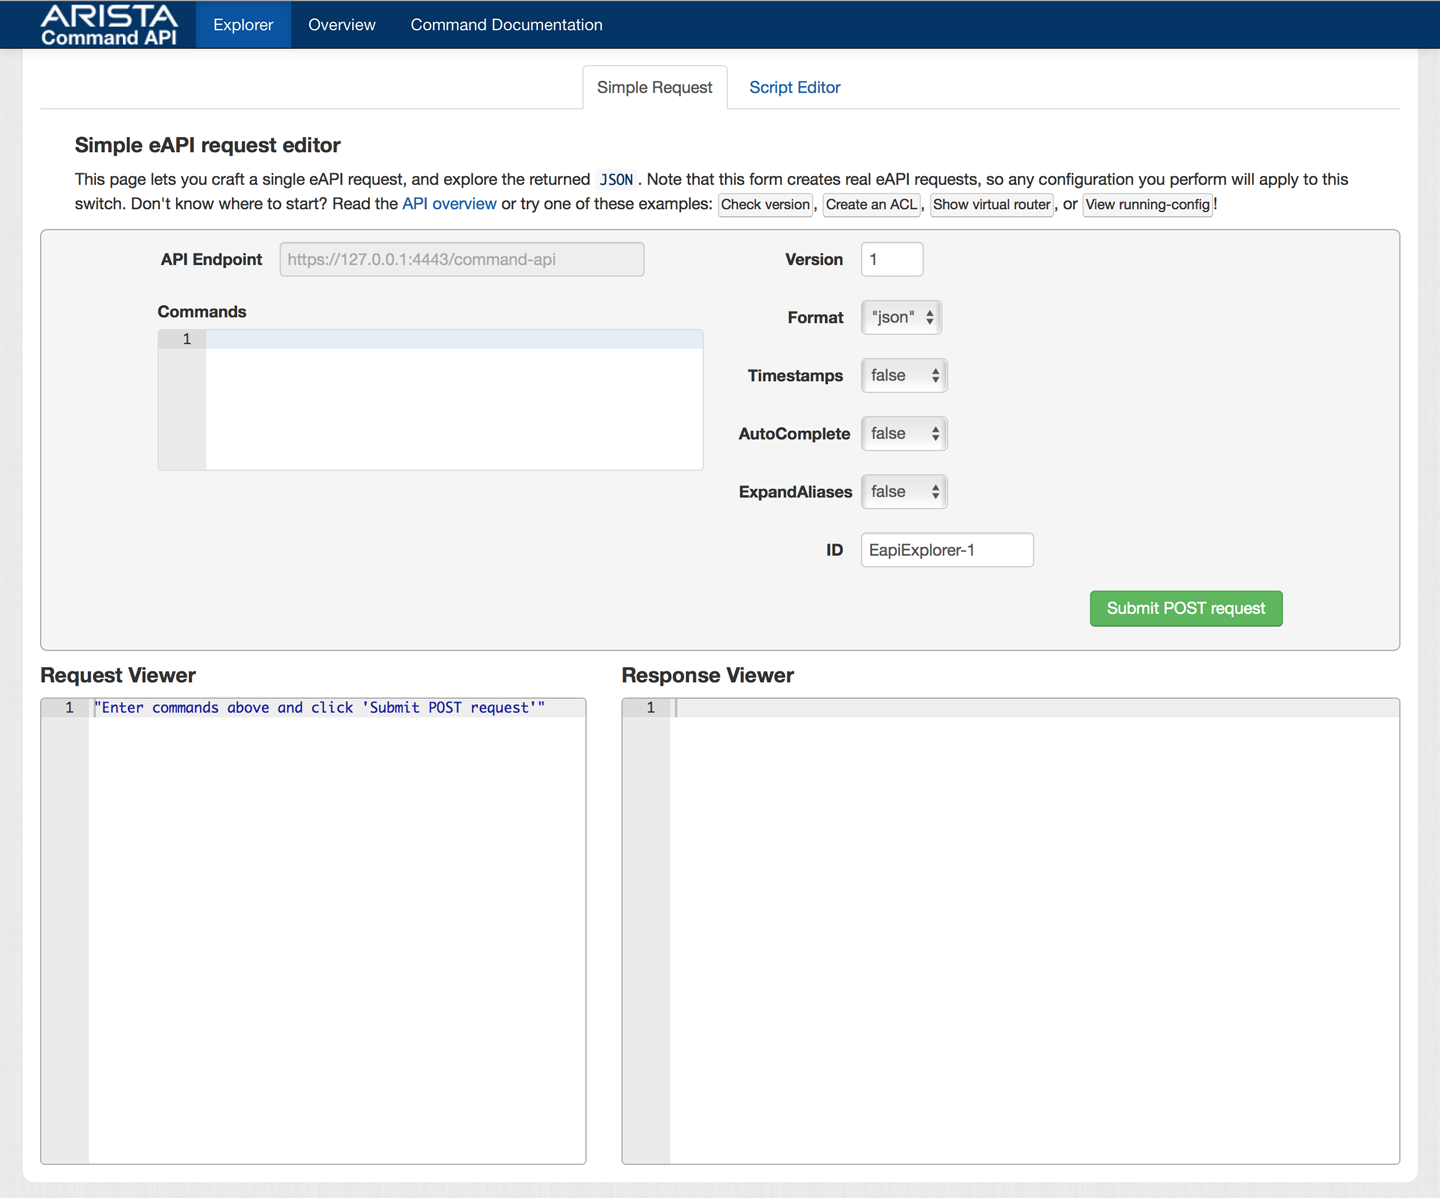
Figure 30-1. The eAPI request editor
There’s a lot of very complicated stuff here, so let’s begin with the easy bits. I enter the command show version into the text field labeled Commands. After clicking Submit POST Request, the Explorer Response Viewer opens, as shown in Figure 30-2.
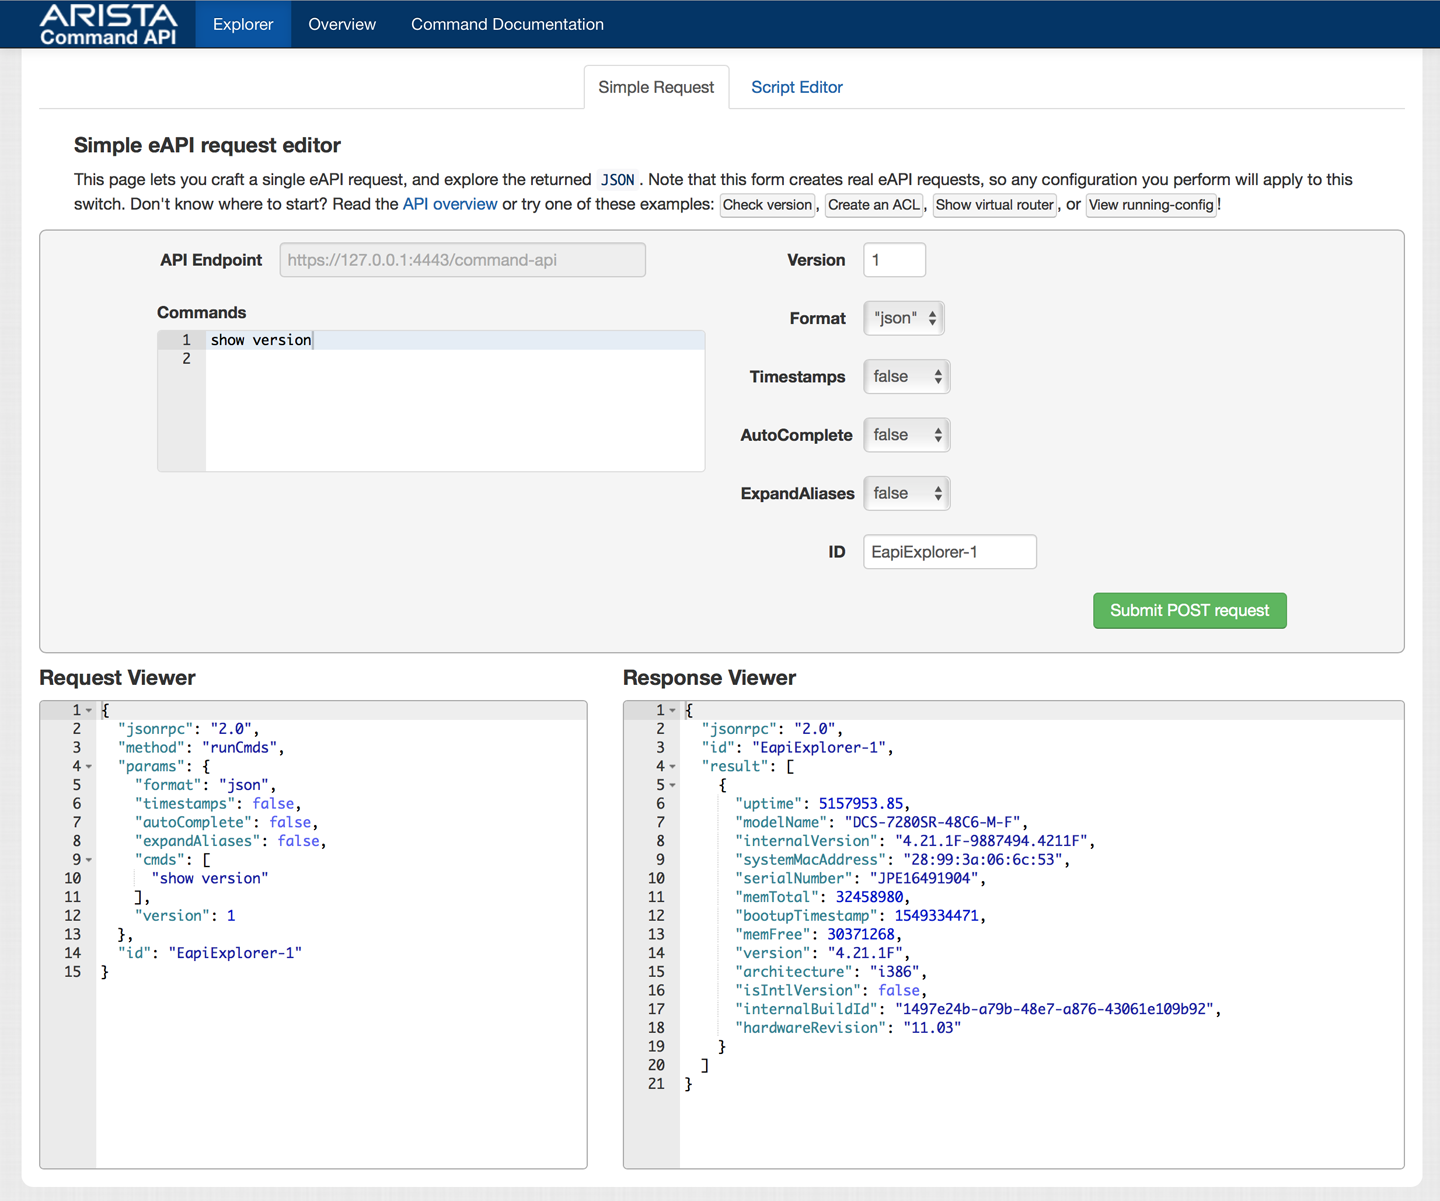
Figure 30-2. eAPI Explorer Response Viewer
In the pane on the right, you should see output similar to what I showed you earlier in the chapter.
Warning
In older revisions of EOS (pre-4.14) commands sent through the eAPI could not be abbreviated. If you attempted to send sho ver, it would fail. In this example, the command must be the entire string show version. There is now an option to AutoComplete, which is a very welcome addition, though using it adds a small bit of complexity to the process, which I’m not going to cover right now.
A quick note about the web page is in order. First, it’s awesome, so kudos to the eAPI development team. Second, it contains some of the best documentation ever to come out of Arista, and it’s right there on the top, available by clicking the Command Documentation menu item. If you have any deeper questions about eAPI, I recommend you start there because this is a well-documented feature.
Another new feature of the eAPI web interface is the fact that you actually build and test scripts on it (Figure 30-3), though due to the limitations of it being a web-based environment, the scripts that you can build on it are limited to JavaScript.
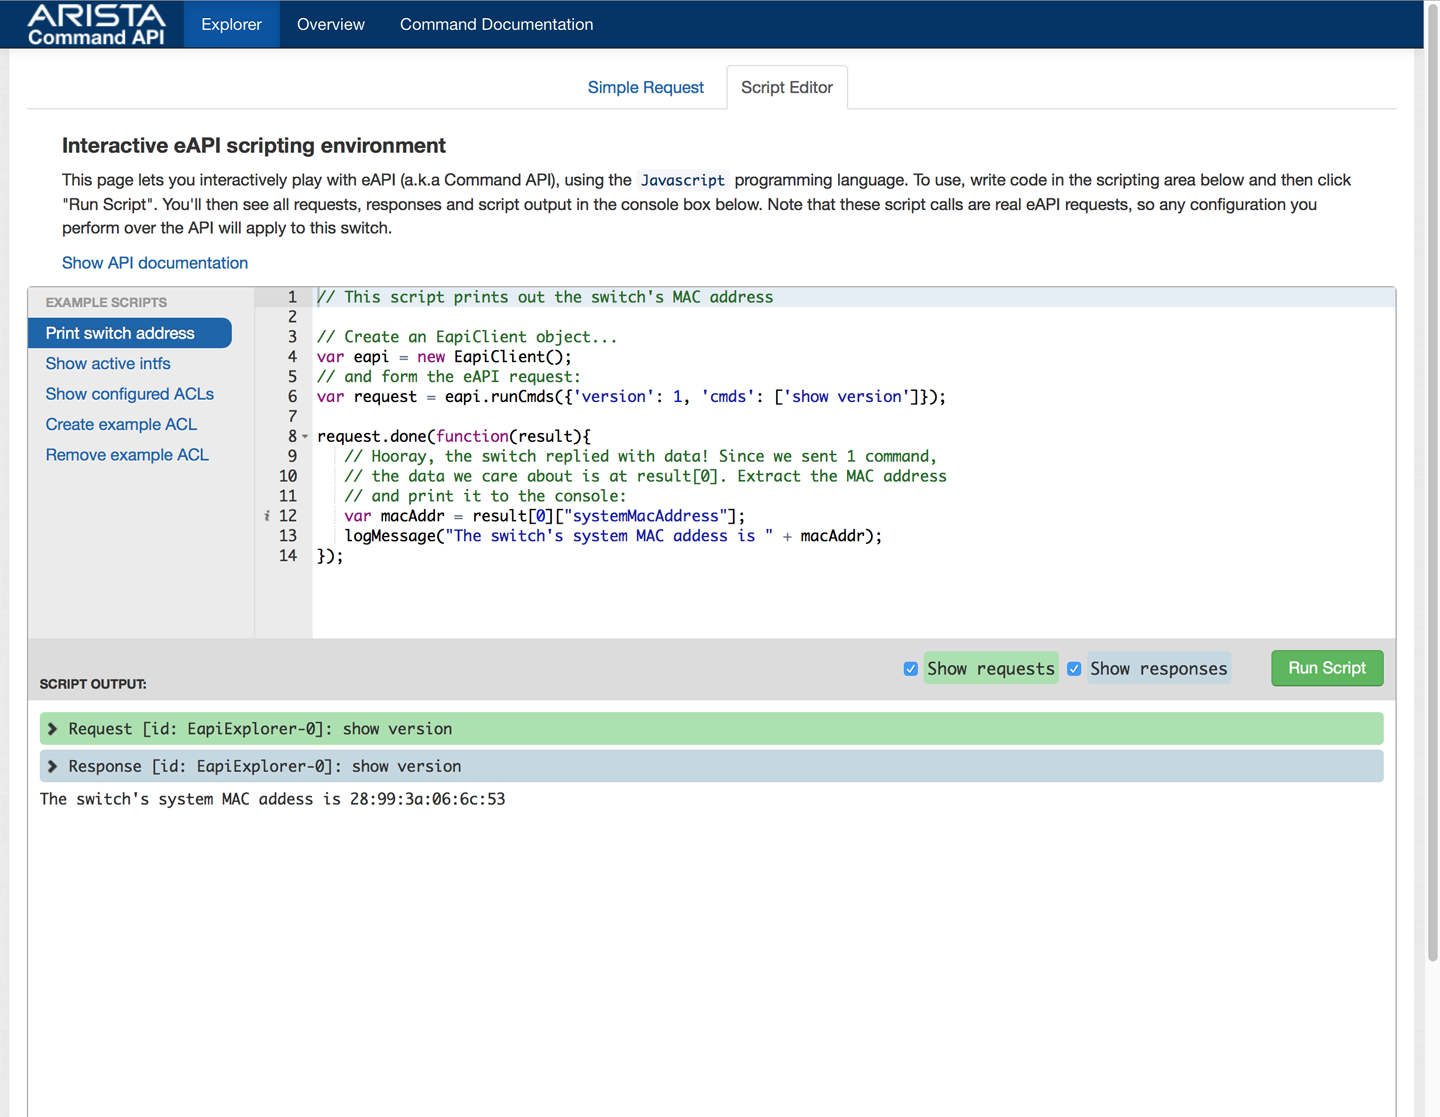
Figure 30-3. eAPI Explorer Script Editor
I know, I said there wouldn’t be any JavaScript, but I’m showing this because it’s so darn cool. If you’re a JavaScript person, this is extra cool, but the main thing I like about this is that it’s like a little learning environment that shows you what’s happening every step of the way, and it even includes a pile of sample scripts that you can use to learn from.
For me, though, I script my Arista devices using Python, so that’s what we’re going to do next.
Scripting with eAPI
This web-page feature is nice and all, but it’s not very useful in the day-to-day sense. You probably wouldn’t use this page to actually control the switch, although you could. This page is there to help you see what the output of a command would be so that you can test your scripts. To that end, let’s go ahead and learn the second and more commonly used method of using eAPI, which is scripting.
Let’s begin by running the script from Bash on the switch itself. It’s easy, and I don’t need to do anything special. We need to start with a couple of special lines. First, the line that informs us where to find the interpreter for this script. I’m using Python, so this is what the first line looks like. Yes, I know this can be different, and I know there are decades-long arguments about what it should be. I’m using this format because I’m the guy with the keyboard. I look forward to your angry letters about my lack of /usr/bin/env sensibilities.
#!/usr/bin/python
Next, we need to import the JSON library so that the script can read the output:
from jsonrpclib import Server
Note
If you’re running this script from a non-Arista EOS device, you might need to install the JSON libraries. For example, on Ubuntu, I needed to run the following commands:
sudo apt-get install python-pip
sudo pip install jsonrpclib
The commands would change based on your flavor of Linux. This is not necessary if you’re running your script from Bash on your Arista switch (as I am in this example) because the JSON libraries are already included in the EOS build.
Next, I add a line so that I can reference the URL by using the object switch. Note the format and the inclusion of the username and password in the URL. Notice also that the URL does not end in /explorer, but rather /command-api. Finally, because I’m in Bash on the switch itself, I can use the loopback address:
switch = Server( "https://Script:[email protected]/command-api" )
If I had configered eAPI to listen on unix-sockets, the format of this line would be as follows:
switch = Server( "unix:/var/run/command-api.sock" )
Here’s the same line when configured for http localhost:
switch = Server( "http://localhost:8080/command-api" )
This line sets up what I call the target. For a simple script like the one we’re building, this is set once and pretty much forgotten. For a complex script that hits multiple switches, there would need to be a target set for each switch, though you could do this through a loop or any other means that you might devise. I show an example of just that in a couple of pages.
The next line actually performs the action of sending the command and collecting the results. The format is important, and we see some variations in a bit. For now, just copy it exactly (feel free to put in other commands to play around):
response = switch.runCmds( 1, [ "show version" ] )
In this line, response is a new variable that will contain the output of the command, switch is the object we created in the last line, runCmds is a method from the switch object (if object-oriented computing hurts your head, feel free to just nod and keep reading), 1 is the version of eAPI, and everything within the square brackets is an array of CLI commands that will be sent to the switch.
Do you remember what Python data type uses square brackets when being created? That is a Python list, which means it’s an ordered array that can contain multiple values. The fact that it’s ordered is important because the commands will be sent in order. Clever, huh?
Finally, a simple line to print out the results:
print response
I’ve saved this script in my home directory with the name ShowVersion.py. To make it executable, I need to change the file mode:
[admin@Arista ~]$ chmod 755 ShowVersion.py
Warning
Remember, anything you put into your home directory on an Arista switch will vanish when you reboot the switch!
Here’s the script in its entirety:
[admin@Arista ~]$ cat ShowVersion.py
#!/usr/bin/python

from jsonrpclib import Server
switch = Server( "https://Script:[email protected]/command-api" )
response = switch.runCmds( 1, [ "show version" ] )
print response
Let’s see what we get when it runs:
[admin@Arista ~]$ ./ShowVersion.py
[{'modelName': 'DCS-7280SR-48C6-M-F', 'internalVersion':
'4.20.1F-6820520.4201F', 'systemMacAddress': '28:99:3a:be:a0:ba',
'serialNumber': 'SSJ17290599', 'memTotal': 32459704,
'bootupTimestamp': 1525109082.15, 'memFree': 30229568, 'version':
'4.20.1F', 'architecture': 'i386', 'isIntlVersion': False,
'internalBuildId': '9a79f1b5-d296-4478-b127-a31835922e5e',
'hardwareRevision': '21.05'}]
Well, that doesn’t look very useful, but remember, this is the raw JSON output.
Warning
The behavior of hitting HTTPS targets via Python has changed and is different when using Python locally on EOS 4.21.1F and later.
If you’re playing along at home (or work) and doing this on an Arista switch running EOS 4.21.0F or later, running this script will result in a traceback complaining thusly:
[-- lots of ugly stuff removed --]
[SSL: CERTIFICATE_VERIFY_FAILED] certificate verify failed
This is a result of EOS 4.21.1F now using Python version 2.7.14, which is enforcing the idea that self-signed certificates are bad. Because EOS uses a self-signed certificate by default, this simple script will no longer work on post EOS-4.21.0F code. This also means that if you’re running your script from a server or client that uses a newer version of Python, you’ll get the same results. Here are some options to get it working again:
- Add a valid certificate in EOS
- This is probably the right way to go but seems an awful lot like real work to me. Plus, I probably need to talk to the security team, and that always ends with me wishing I’d never done that.
- Instruct Python to allow self-signed certs
- This has the benefit of working locally and remotely but is probably frowned upon in today’s “Certificate Authorities need more money” world. In the Python script, add the following lines just after the shebang:
import ssl
ssl._https_verify_certificates( False )
Note that in the strictest security sense, this is probably a bad idea, but because we’re running the script locally, this is not a big deal. This is a bigger deal if you’re accessing the switch remotely, but I’ll leave it up to you to decide how bad it is to use self-signed certificates.
- Enable
http localhostin the eAPI configuration -
Note that this will bypass encryption altogether, but will work only when running the script from the switch itself. In EOS, configure the following within the
management api http-commandssection:Arista(config-mgmt-api-http-cmds)#protocol http local
Then, change the target line in the script to the following:
switch = Server( "http://127.0.0.1:8080/command-api" )
- Enable
unix socketsin the eAPI configuration -
This, too, will work only when running scripts from localhost. In EOS, add the following in the
management api http-commandssection:Arista(config-mgmt-api-http-cmds)#protocol unix-socket
Then change the target line in the script to the following:
switch = Server( "unix:/var/run/command-api.sock" )
For each of these solutions, the only things that change are the lines listed in each example. The rest of the script should not need to change at all.
Let’s add some lines to our script to make it more useful. Remember how I showed that this jumble of text was actually a set of key–value pairs? Here’s an easy way to print that same output in an easy-to-read manner similar to what’s seen in the CLI with the | json modifier: use the Python pretty-print library.
#!/usr/bin/python

import pprint

from jsonrpclib import Server
switch = Server( "https://Script:[email protected]/command-api" )
response = switch.runCmds( 1, [ "show version" ] )
pprint.pprint(response)
By adding the import pprint line in the beginning and changing print response to pprint.pprint(response), we now get a more readable output:
[admin@Arista ~]$ ./ShowVersion.py
[{'architecture': 'i386',
  'bootupTimestamp': 1546976871.0,
  'hardwareRevision': '21.05',
  'internalBuildId': '35b4398c-100e-45ff-aae4-857ac15fbff4',
  'internalVersion': '4.21.2F-10430819.4212F',
  'isIntlVersion': False,
  'memFree': 30434720,
  'memTotal': 32458984,
  'modelName': 'DCS-7280SR-48C6-M-F',
  'serialNumber': 'SSJ17290598',
  'systemMacAddress': '28:99:3a:be:9f:92',
  'uptime': 8896.37,
  'version': '4.21.2F'}]
One of the nice things about tools like pprint is that the output is sorted. Dictionaries in Python have no order, but sorting the keys can make it easier to find them for us pathetic humans.
Note
If you’re wondering why the new line says pprint.pprint(response) instead of just pprint(response), that’s because we’re referencing the function pprint() from within the pprint module. If the module had been called gad, the line would say gad.pprint(response).
There is another option for showing the output of JSON-encoded data in Python, and that’s using the json library:
#!/usr/bin/python
import json
from jsonrpclib import Server
switch = Server( "unix:/var/run/command-api.sock" )
response = switch.runCmds( 1, [ "show version" ] )
print json.dumps(response, indent=3)
This will result in a similar but more configurable output that lets you do things like change the number of spaces used for indents:
[admin@Arista ~]$ ./ShowVersion.py
[
   {
      "uptime": 8594.43,
      "modelName": "DCS-7280SR-48C6-M-F",
      "internalVersion": "4.21.2F-10430819.4212F",
      "systemMacAddress": "28:99:3a:be:9f:92",
      "serialNumber": "SSJ17290598",
      "memTotal": 32458984,
      "bootupTimestamp": 1546976871.0,
      "memFree": 30434612,
      "version": "4.21.2F",
      "architecture": "i386",
      "isIntlVersion": false,
      "internalBuildId": "35b4398c-100e-45ff-aae4-857ac15fbff4",
      "hardwareRevision": "21.05"
   }
]
Regardless of how you print, the entire output is stored in the variable response, but more specifically, we can pull out keys and values within response. For example, the version has the key name of (surprisingly) version. To reference it, I would write the following line, replacing the simple print response line:
print response[0][ 'version' ]
Let’s examine that for a second. First, I went back to print because I only needed pretty-print for the full output and that’s rarely needed when referencing single elements. Second, why does the line have response[0] in it? Isn’t the output a dictionary? It is, but if you look at the full output, the dictionary is within a list—note the square brackets at the beginning and end. This is because the output includes the output of every command (sent as a dictionary) with each of those dictionaries sent as an element within a list. The list is the output of each command you sent in the order in which you sent the commands while the dictionaries within each element are the outputs of those commands. Because we sent only one command, the output is in element [0]. Within element zero (the output of the command show version), we want the key named version. Thus:
print response[0][ 'version' ]
Now let’s see what we get when we run the script:
[admin@Arista ~]$ ./ShowVersion.py
4.21.1F
That’s certainly more manageable, but let’s dress it up a bit, like this:
print "The system version is: ", response[0][ "version" ]
If you’re not up on your Python (specifically Python 2.7), this is printing a literal string followed by the output from the show version command.
Now when we run the script, we get the following, much more useful result:
The system version is: 4.21.1F
Let’s pull out some more information. Let’s add the following lines:
print
print "The system MAC addess is:   ", response[0][ "systemMacAddress" ]
print "The system version is:      ", response[0][ "version" ]
print "The system architecture is: ", response[0][ "architecture" ]
Now when we run the script, we get the following results:
[admin@Arista ~]$ ./ShowVersion.py

The system MAC addess is:    28:99:3a:be:a0:ba
The system version is:       4.21.1F
The system architecture is:  i386
If you’re wondering where I got the key names (systemMacAddress, version, architecture), they are all keys in the preceding JSON output. Take a look again and see for yourself. Also, this is where the web page comes in handy because it shows you all the keys and their values without having to write a script to figure out what they are (command | json in CLI is even better!). Finally, watch out for camel case. Look at the key names and pay attention to the capital letters in the middle of some of them. They matter, so if your script isn’t working, check there first.
Here’s the final script:
[admin@Arista ~]$ cat ShowVersion.py
#!/usr/bin/python

from jsonrpclib import Server
switch = Server( "https://Script:[email protected]/command-api" )
response = switch.runCmds( 1, [ "show version" ] )

print
print "The system MAC addess is:   ", response[0][ "systemMacAddress" ]
print "The system version is:      ", response[0][ "version" ]
print "The system architecture is: ", response[0][ "architecture" ]
I could do this from any machine that can reach the switch using HTTPS (or HTTP if so configured). Think about that for a minute: I could write scripts on my Mac at home that could control my Arista switches at work! Of course, I should need to go through a VPN or have some other sort of security in place, but the fact remains that I could absolutely control remote switches from machines elsewhere. In my training classes I control 24 switches with eAPI scripts just like this one. Let’s see how.
Suppose that I have a rack full of switches and they’re numbered 10.0.0.1 through 10.0.0.10 and I want to poll them from a server. To issue the same command on all of them, I alter my eAPI script and put in a loop:
#!/usr/bin/python

from jsonrpclib import Server

print "Switch#   System Mac         Version  Architecture"
print "--------------------------------------------------"

for x in range(1,11):
   x = str(x)

   switch = Server( "https://Script:[email protected]." + x +
                    "/command-api" )
   response = switch.runCmds( 1, [ "show version" ] )

   print "Switch-" + x.ljust(3) +
                    response[0][ "systemMacAddress" ].ljust(19) +
                    response[0][ "version" ].ljust(9) +
                    response[0][ "architecture" ]
I’ve added some lines, most of which have to do with formatting:
print "Switch#   System Mac         Version  Architecture"
print "--------------------------------------------------"
All they do is print a header. The next two lines create a loop that iterates through the range of 1 to 10. The reason it looks like it’s 1 to 11 is because Python counts from 0, so the range(1,11) statement is actually saying “create a list of 11 numbers (0 to 10) and start at 1. Thus, 1–10.” The line after the for statement just converts the number from an integer to a string because we’ll be concatenating to a string later on, and you cannot concatenate an integer and a string:
for x in range(1,11):
   x = str(x)
The next line has been altered so that the variable x is now injected into the fourth octet of the IP address. This will have the result of the IP address being 10.0.0.1, 10.0.0.2, and so on, until we get up to 10.0.0.10:
   switch = Server( "https://Script:[email protected]." + x +
                    "/command-api" )
Finally, the last few lines look like this:
   response = switch.runCmds( 1, [ "show version" ] )

   print "Switch-" + x.ljust(3) +
                    response[0][ "systemMacAddress" ].ljust(19) +
                    response[0][ "version" ].ljust(9) +
                    response[0][ "architecture" ]
The first line in that block is the same as our previous example. The last line (those four physical lines of code are one logical line thanks to the backslash line-continuation character at the end of the first three) just prints each of the fields: systemMacAddress (left justified in 19 spaces), version (left justified in 9 spaces, and architecture (no justification).
Here’s what that script looks like when it runs:
gad@[ALab]:~/eAPI$ ./eAPI-Loop.py
Switch#   System Mac         Version  Architecture
--------------------------------------------------
Switch-1  28:99:3a:be:9f:92  4.20.3F  i386
Switch-2  28:99:3a:be:9d:d6  4.20.3F  i386
Switch-3  28:99:3a:be:9e:20  4.20.1F  i386
Switch-4  28:99:3a:be:a0:70  4.20.1F  i386
Switch-5  28:99:3a:be:a1:04  4.20.3F  i386
Switch-6  28:99:3a:be:9f:48  4.20.3F  i386
Switch-7  28:99:3a:be:9c:1a  4.20.3F  i386
Switch-8  28:99:3a:be:9c:ae  4.20.3F  i386
Switch-9  28:99:3a:be:9b:3c  4.20.3F  i386
Switch-10 28:99:3a:be:9a:5e  4.20.3F  i386
Because I put the commands into a loop, I’ve hit 10 switches and retrieved some useful (and some not-so-useful) information from each and then reported it all into a nice concise report.
But what about commands that require additional input? For example, if I want to run a privileged command? Here’s an example:
#!/usr/bin/python

from jsonrpclib import Server

switch = Server( "https://Script:[email protected]/command-api" )

response = switch.runCmds( 1, [ "reload now" ] )
Everything we’ve done so far you can do without entering the enable command, but if we try to issue the reload now command (which requires a privilege level higher than the default level of 1) via the eAPI, we get the following:
[GAD@Server ~]$ ./SimpleReloadNow.py
Traceback (most recent call last):
  File "./SimpleReloadNow.py", line 7, in <module>
    response = switch.runCmds( 1, [ "reload now" ] )
  File "/usr/local/lib/python2.7/dist-packages/jsonrpclib/jsonrpc.py",
 line 288, in __call__
    return self.__send(self.__name, args)
  File "/usr/local/lib/python2.7/dist-packages/jsonrpclib/jsonrpc.py",
 line 238, in _request
    check_for_errors(response)
  File "/usr/local/lib/python2.7/dist-packages/jsonrpclib/jsonrpc.py",
 line 567, in check_for_errors
    raise ProtocolError((code, message))
jsonrpclib.jsonrpc.ProtocolError: (1002, u"CLI command 1 of 1
 'reload now' failed: invalid command")
The last line indicates that we’ve issued an invalid command because we didn’t have the proper privilege level to execute the reload now command (it’s invalid because it doesn’t exist in disabled exec mode). To issue the reload now command, we first need to enter enable mode. To do that within a script, simply stack the commands into a list within the runCmds line like this:
response = switch.runCmds( 1 , [ "enable" , "reload now" ] )
Now when I execute this from Bash on the switch, I get the following output:
[GAD@Arista ~]$ ./ReloadNow.py

Broadcast message from root@Arista
        (unknown) at 11:01 ...

The system is going down for reboot NOW!
Note that on some versions of code (circa 2018), running this script remotely will result in an odd traceback error:
gad@[ALab]:~/eAPI$ ./SimpleReloadNow.py
Traceback (most recent call last):
  File "./SimpleReloadNow.py", line 8, in <module>
    response = switch.runCmds( 1, [ "enable" , "reload now" ] )
  File "/usr/local/lib/python2.7/dist-packages/jsonrpclib/jsonrpc.py",
 line 288, in __call__
    return self.__send(self.__name, args)
  File "/usr/local/lib/python2.7/dist-packages/jsonrpclib/jsonrpc.py",
 line 237, in _request
    response = self._run_request(request)
  File "/usr/local/lib/python2.7/dist-packages/jsonrpclib/jsonrpc.py",
 line 255, in _run_request
    verbose=self.__verbose
  File "/usr/lib/python2.7/xmlrpclib.py", line 1273, in request
    return self.single_request(host, handler, request_body, verbose)
  File "/usr/lib/python2.7/xmlrpclib.py", line 1306, in single_request
    return self.parse_response(response)
  File "/usr/lib/python2.7/xmlrpclib.py", line 1462, in parse_response
    stream = GzipDecodedResponse(response)
  File "/usr/lib/python2.7/xmlrpclib.py", line 1213, in __init__
    self.stringio = StringIO.StringIO(response.read())
  File "/usr/lib/python2.7/httplib.py", line 549, in read
    return self._read_chunked(amt)
  File "/usr/lib/python2.7/httplib.py", line 603, in _read_chunked
    raise IncompleteRead(''.join(value))
httplib.IncompleteRead: IncompleteRead(50 bytes read)
On older code I would simply not get any output because the reload now command does not offer any output to print, but something changed and now the switch reloads before eAPI can send a response back, so the script pukes. You can handle this with exception handling, but that’s kind of outside the scope of this book.
This is a fabulous feature, but be aware of the danger of leaving it open, especially if, like far too many installations I’ve encountered, you have a well-known username and password on your devices. Why? Here’s a script that reboots a switch. The script is written such that the IP address of the switch is entered at the command line:
#!/usr/bin/python

import sys
from jsonrpclib import Server
target = "https://Script:Arista@" + str(sys.argv[1]) + "/command-api"
switch = Server(target)

response = switch.runCmds( 1, [ "enable" , "reload now" ] )
print "Response:", response
Let’s assume that I have enabled eAPI on all of my switches and that I have enabled the username Script on all of my switches, as well. I wrote the previous script on my Linux box, and I named it RebootNow.py. From my Unix box, I type ./RebootNow.py 10.0.0.1 and the switch at 10.0.0.1 reboots. I could just as easily write a loop so that my little script reboots 100 (or 1,000) switches at a time. Yeah, don’t do that. Note that this script works only if the switch has no enable secret password. More on that in a minute.
Note that you cannot use interactive commands, so things like top, watch, and anything that asks for input will not work. eAPI is not an interactive tool; you must send all of the commands needed to accomplish something in one session. It’s easy because those commands are sent in a list. Here’s an example of a script that changes the description on Ethernet 5. Note that all of the commands are sent at once:
#!/usr/bin/python

from jsonrpclib import Server
switch = Server( "https://Script:[email protected]/command-api" )
response = switch.runCmds( 1, [ "enable" ,
                                "configure" ,
                                "interface ethernet 5" ,
                                "description I like pie!" ] )
print response
When I run this script, I get this weird output:
[GAD@Arista ~]$ ./ILikePie.py
[{}, {}, {}, {}]
What’s up with that? We sent four commands, so there is a list (square brackets) that contains four dictionaries (curly braces) in the order in which we sent the commands. The four commands we sent produce no output, though, so each of those dictionaries is empty. Let’s see if it worked (the script would have thrown an error if it did not). Note also that we’re running this script locally on an Arista switch, which is why this next command works:
[GAD@Arista ~]$ Cli -p15 -c "sho run int e5"
interface Ethernet5
   description I like pie!
Nice!
I mentioned that interaction is not allowed, and that’s why I used reload now instead of the normal reload command—reload is interactive; therefore, it asks, “are you sure?” whereas reload now is not. Sometimes, though, you need to interact. Consider the enable command. If you need to enable like we did in the last example, what happens if there’s an enable secret password?
In this case, the enable command has an eAPI non-interactive mode. To use it, we send the command within a dictionary with two keys, like this:
#!/usr/bin/python
from jsonrpclib import Server
switch = Server( "https://Script:[email protected]/command-api" )
response = switch.runCmds( 1, [ {  "cmd": "enable",
                                 "input": "SuperSecret"} ,
                                "configure" ,
                                "interface ethernet 5" ,
                                "description GAD" ] )
print response
Let’s run it:
[admin@Arista ~]$ ./ILikePie.py
[{'messages': ['Warning: Password input may be echoed.
Password:

']}, {}, {}, {}]
This is an example of a warning message being returned via eAPI. Note that the command still worked:
[admin@Arista ~]$ Cli -p15 -c "sho run int e5"
interface Ethernet5
   description GAD
A warning message is a noncritical message that you might see if you entered the command from the CLI. Managing these messages is outside the scope of this book, but if you’d like to learn more, I suggest reading the excellent documentation or taking an Arista programming class. Even better, convince O’Reilly that the world needs an Arista network programming book!
The last quick-and-dirty example I include is the ability to save the running-config. Although you can output the running-config in JSON format, I find that to not be terribly useful, because you can’t use that output to reconfigure a switch (at least not as of this writing). To get the output of a command as you would see it on the CLI, use the text mode. Normally, eAPI outputs in json mode, and because it’s the default, I haven’t included it in my scripts. If I did, it would look like this:
#!/usr/bin/python

from jsonrpclib import Server
switch = Server( "https://Script:[email protected]/command-api" )
response = switch.runCmds( 1, [ {  "cmd": "enable",
                                 "input": "SuperSecret"} ,
                                 "show running-config" ] ,
                                 "json")
print response
Changing that field to text gives us this script:
#!/usr/bin/python

from jsonrpclib import Server
switch = Server( "https://Script:[email protected]/command-api" )
response = switch.runCmds( 1, [ {  "cmd": "enable",
                                 "input": "SuperSecret"} ,
                                 "show running-config" ] ,
                                 "text")
print response
Note that the “text” string is outside of the list containing the commands being sent. This changes the output to simple text mode:
[admin@Arista ~]$ ./ShowRun.py
[{'output': 'Warning: Password input may be echoed.
Password:
'},
 {'output': "! Command: show running-config
! device: Arista
 (DCS-7280SE-72, EOS-4.18.3.1F)
!
! boot system flash:/EOS-
4.18.3.1F.swi
!
alias conint sh interface | i connected
alias
 senz show interface counter error | nz
alias shmc show int | awk
 '/^[A-Z]/ { intf = $1 } /, address is/ { print intf, $6 }'
alias
 snz show interface counter | nz
alias spd show port-channel %1
 detail all
alias sqnz show interface counter queue | nz
alias
 srnz show interface counter rate | nz
!
alias intdesc
   !!
 Usage: intdesc interface-name description
  [--output truncated--]
What the heck? Oh yeah, how many commands did we send? Two. Even though the output is in text mode, the output is still in a list and the output of the show running-config command is in element [1]. Note also that each element contains a single key with the name output. The output is still a dictionary for each command in a list; it’s just that we need to reference the right element and then the output key. Let’s fix that:
#!/usr/bin/python

from jsonrpclib import Server
switch = Server( "https://Script:[email protected]/command-api" )
response = switch.runCmds( 1, [ {  "cmd": "enable",
                                 "input": "SuperSecret"} ,
                                 "show running-config" ] ,
                                 "text")
print response[1]["output"]
Now, when we run the script, we get this:
 [GAD@Arista ~]$ ./ShowRun.py
! Command: show running-config
! device: Arista (DCS-7280SE-72, EOS-4.18.3.1F)
!
! boot system flash:/EOS-4.18.3.1F.swi
!
alias conint sh interface | i connected
alias senz show interface counter error | nz
alias shmc show int | awk '/^[A-Z]/ { intf = $1 } /, address is/
 { print intf, $6 }'
alias snz show interface counter | nz
alias spd show port-channel %1 detail all
alias sqnz show interface counter queue | nz
alias srnz show interface counter rate | nz
!
alias intdesc
   !! Usage: intdesc interface-name description
   10 config
   20 int %1
   30 desc %2
   40 exit
[--output truncated--]
Nice! This easily could be converted to a script that writes that output to a file with a timestamp.
Conclusion
eAPI is a tremendously powerful tool, and honestly, I could write an entire book on it, but in the interest of space I need to stop here so that this chapter doesn’t overwhelm this book. (Tell O’Reilly that you want a book on Arista eAPI, and I’ll write one!) There are a whole host of topics that can make your scripts better, from error handling at the network level to dealing with eAPI errors to just making your scripts useful with easy to read output. I heartily recommend that you just play around with this feature (though not on a live switch!) to see just how powerful it can be. I easily automate hundreds of switches with eAPI, and you can, too.
You know what else is cool about eAPI? The software tool CloudVision Portal uses eAPI to communicate with Arista switches. All the cool stuff that CloudVision does in regard to sending and validating configurations, updating switch configurations, and just about everything else that involves communicating with the physical switches is done through eAPI. It’s that powerful.