Chapter 32. vEOS
When a software system is designed from the ground up to be flexible, scalable, and extensible, wonderful benefits occur. One of the marvelous things about EOS is that it can run without a physical switch, and with vEOS, we can build a functioning lab on our own laptops. We could also build labs with VMware or Fusion or Parallels or Virtual Box. In fact, I’m going to show you how to do just that, but first, let’s talk about what vEOS is and, perhaps just as importantly, what it is not.
vEOS is EOS, but built as a package for use as a virtual machine (VM). Though it would be wonderful for vEOS to support every feature that EOS can deliver, that is currently not possible, and the reason for that is simple: many of EOS’s features are dependent on the Application-Specific Integrated Circuits (ASICs) used in the switches. That’s why a feature like tap aggregation is available only on certain platforms. Although it is technically feasible to write emulators that would give the appearance of the same functionality, that’s not what vEOS is about. Remember, vEOS is the same code as EOS—it’s just compiled for a VM environment. Remember, too, that Arista prides itself on the idea that all devices in the Arista lineup can use the same binary, so if vEOS were to be a separate code image, disparities would begin to surface, and that’s not how Arista likes to operate.
In reality, the limitations center around hardware, so think of it this way: If you had an Arista 7150 switch, you wouldn’t be able configure Direct Flow because it’s not supported on that switch’s ASIC. So it is with vEOS. Don’t despair, though, because there are so many features that do work in vEOS that you’ll likely not even care about the limitations. Any software-based feature will work, so features like Link Layer Discovery Protocol (LLDP), Multichassis Link Aggregation (MLAG), Zero-Touch Provisioning (ZTP), Spanning Tree, Bash, tcpdump, Python, Extensions, VMTracer, email, Event Manager, Scheduler, routing, Event Monitor, and so on, all work in vEOS. That makes vEOS a great tool for testing control-plane functionality and interoperability.
Additionally, as of 2019, there are two versions of vEOS, which are vEOS-Lab and vEOS-Router. Here are the differences:
- vEOS-Lab
- vEOS-Lab is designed to be used as a simulation tool in a lab environment. vEOS-Lab is free to use, and all you need to do to get it is have a login to the Arista.com website. Even as a simple guest account, you can now download vEOS!
- vEOS-Router
- vEOS-Router is designed for use in cloud services such as Amazon Web Services (AWS), Google Cloud platform (GPC), and Microsoft Azure. The idea behind vEOS-Router is that you can use an Arista-supported EOS device to connect your network to the cloud instead of some generic virtual router solution from the cloud provider. vEOS-Router has a couple of advantages over vEOS-Lab, the most important being a vastly improved packet forwarding capability and the ability to support Virtual Private Network (VPN) and IP Security (IPSec). vEOS-Router is also a licensed product, so you need to pay for its use. If you have Azure or AWS, you can actually install and pay for vEOS-Router directly through those services’ marketplaces.
One of the really cool things that Arista has done in the past few years is to combine the Aboot and vEOS images into a single combined image that makes building VMs a whole lot simpler. Back in 2012, I wrote a blog post called “Building a Virtual Lab with Arista vEOS and VirtualBox,” which is one of the most popular blog posts on my site, but it’s a bit outdated at this point, so I’m going to write a completely new updated version here.
VEOS in VirtualBox
Let’s build a real usable lab in VirtualBox. First, you need VirtualBox if you don’t already have it. It’s free, and you can get it from the VirtualBox website. I’m using a Mac, but the company has images for Windows, Linux, and Solaris, too. With VirtualBox installed, the next thing we need is a vEOS image. You need to have a login to the Arista web page to download this, and it’s available under Support on the Software Downloads page. I’ve gone ahead and downloaded both and installed VirtualBox on my Mac, so you’re on your own for those two steps. From here on in I’ll assume that you’ve done both, as well. To whet your appetite, Figure 32-1 shows the lab that we’re going to build.

Figure 32-1. Our super-cool vEOS lab
After you’ve installed VirtualBox, fire it up and click the “new” button. A dialog box opens in which you must name your new VM. I’m going to create a base example called vEOS-Base that we’ll replicate in later steps. Make sure you choose Linux and Fedora 64-bit for the Type and Version, as shown in Figure 32-2, and then click Continue.
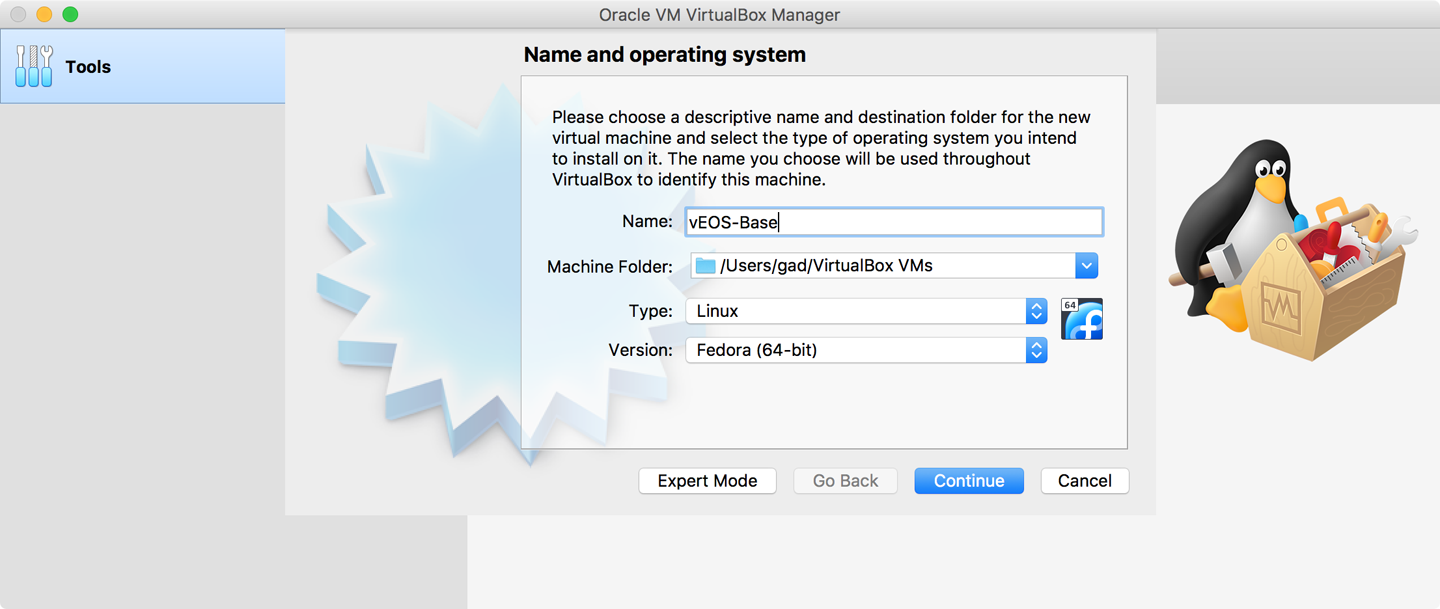
Figure 32-2. The new VM dialog box
Creating the Base VM
Next, select the amount of memory for the VM. More is better, of course, but because I’m going to create a few and my Mac has only 16 GB of RAM, I’m going to stick with 2048 MB, as shown in Figure 32-3.

Figure 32-3. Selecting the memory size
Click Continue. You then have the choice of how to deal with the hard disk. The default is “Create a virtual hard disk now,” but for this exercise, choose “Use an existing virtual hard disk file,” and then click the small folder icon to the right of the pulldown menu lebeled Empty, as shown in Figure 32-4.

Figure 32-4. The hard drive dialog box
In the dialog box that opens, in the upper-left corner of the center pane, click the Add icon, as depicted in Figure 32-5. Another dialog box opens in which you can choose a virtual hard disk file—this is the vEOS-lab-4.21.1.1F.vmdk file that I downloaded earlier. Because I didn’t do anything with the file, it’s in my Downloads folder, so I point there, select the file, and click Open. See Figure 32-5 because a picture is worth at least 137 words.
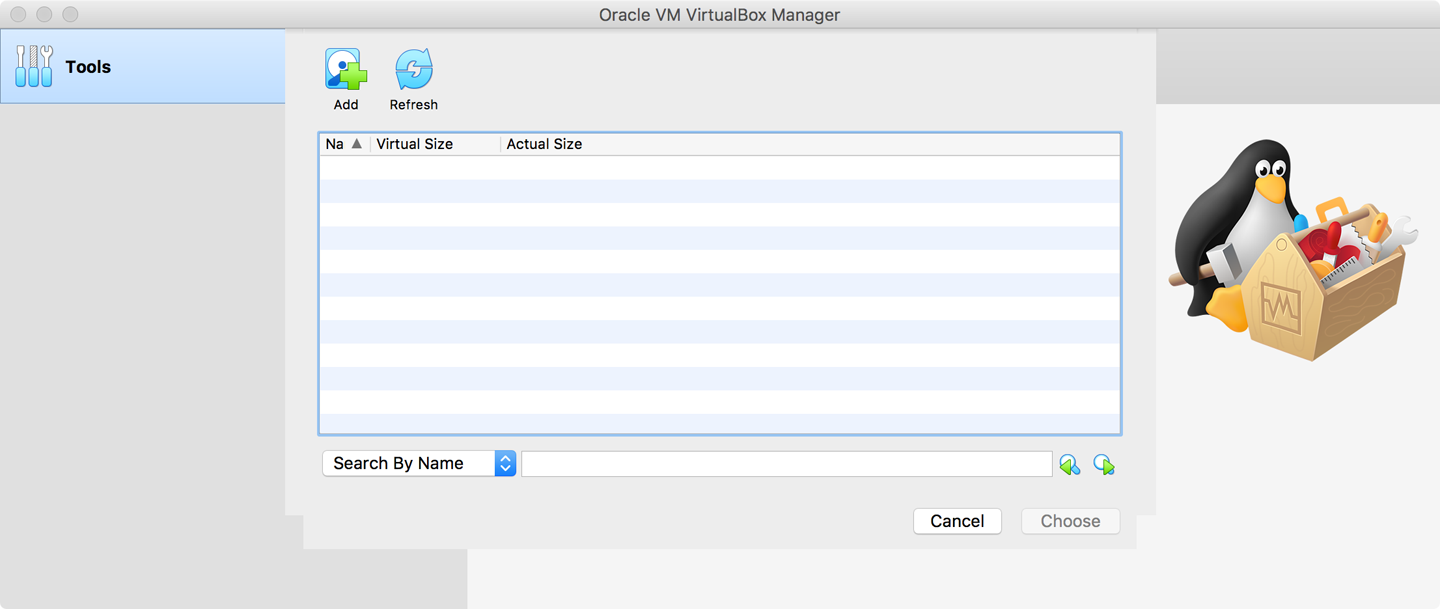
Figure 32-5. Selecting a VMDK files
With the vEOS file selected and opened, it should now appear in the list of disk images. Make sure it’s selected and then click Choose. You should return to the Hard Disk dialog, which should now show the chosen VMDK file, as shown in Figure 32-6.
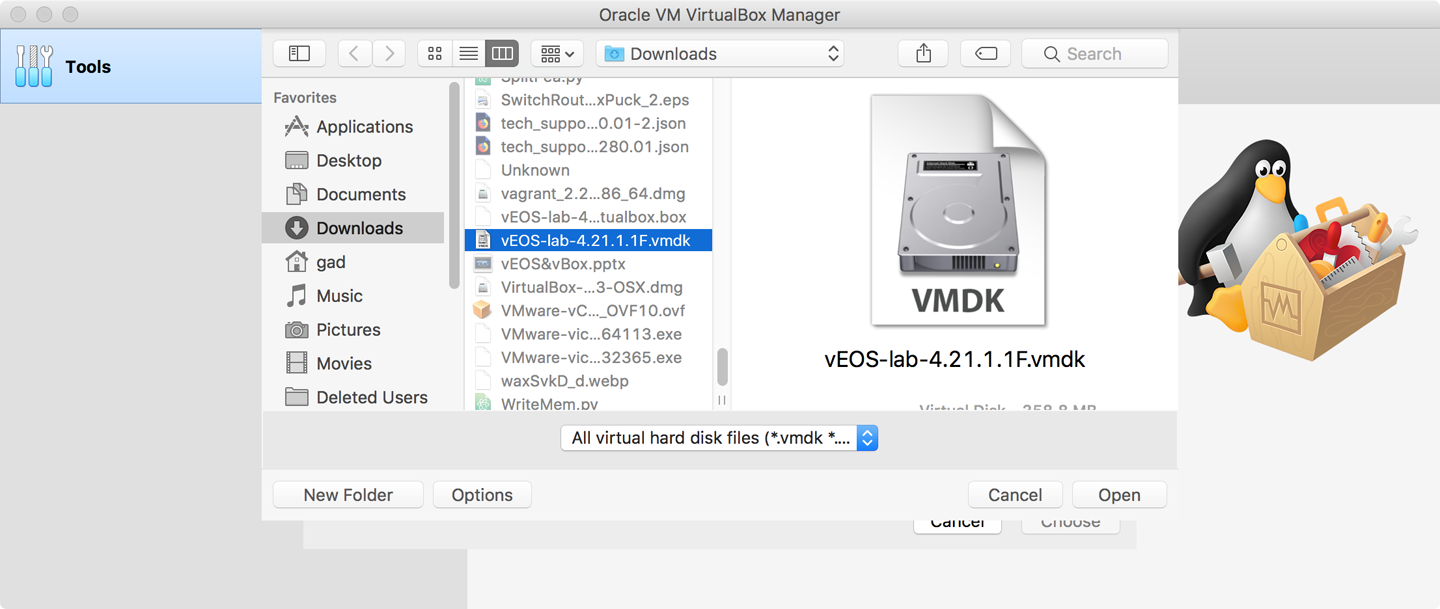
Figure 32-6. Back to the hard disk dialog box
Click the Create button. Your VM should now have been created, and you should see a screen similar to Figure 32-7. Congrats! Only 934 screenshots to go!
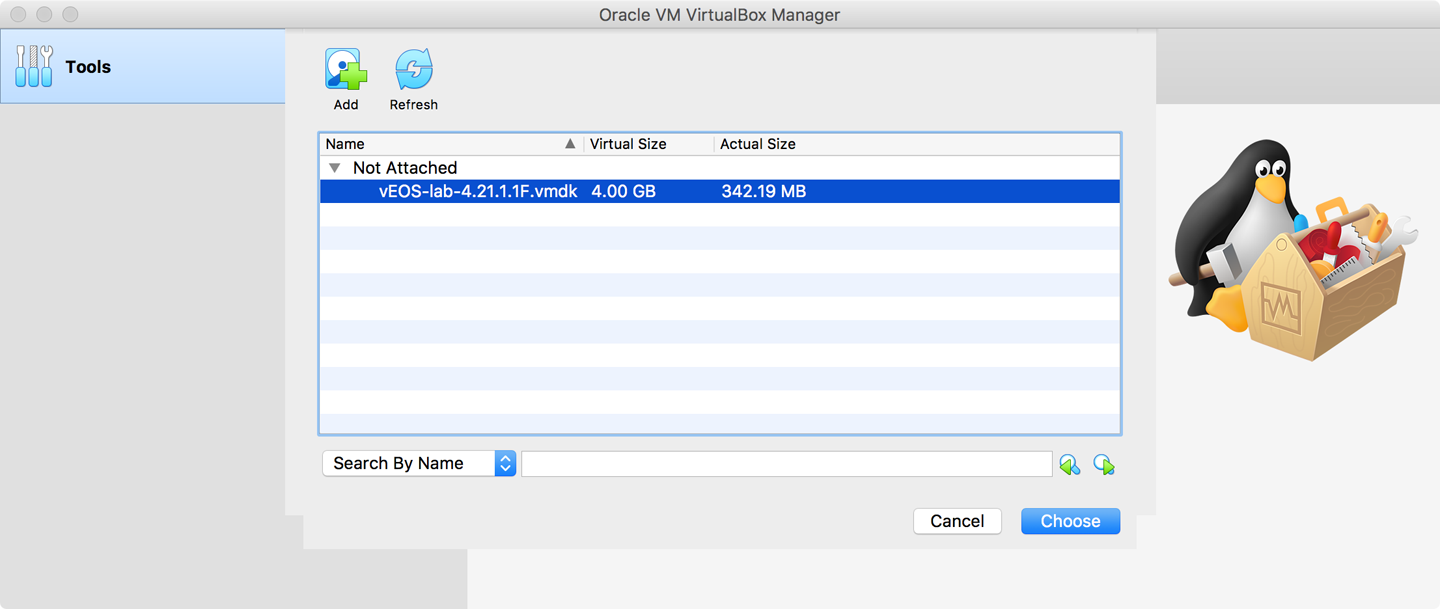
Figure 32-7. Base vEOS image created
Before we continue, we must create a host network using the Host Network Manager. From the main pull-down menu, click File, and then choose Host Network Manager. If you’ve never done this before, you’ll have an empty page. Click the Create button, which gives you a default network named “vboxnet0.” I’ve changed the IP address on mine from the default 192.168.x.x range to 10.0.0.0, but anything will work so long as you’re consistent. To change the IP address, right-click the “vboxnet0” line and choose “properties,” which opens a dialog box similar to that shown in Figure 32-8.
This is the network that will allow the VMs to communicate with the host, which, in my case, is my Macbook Pro.
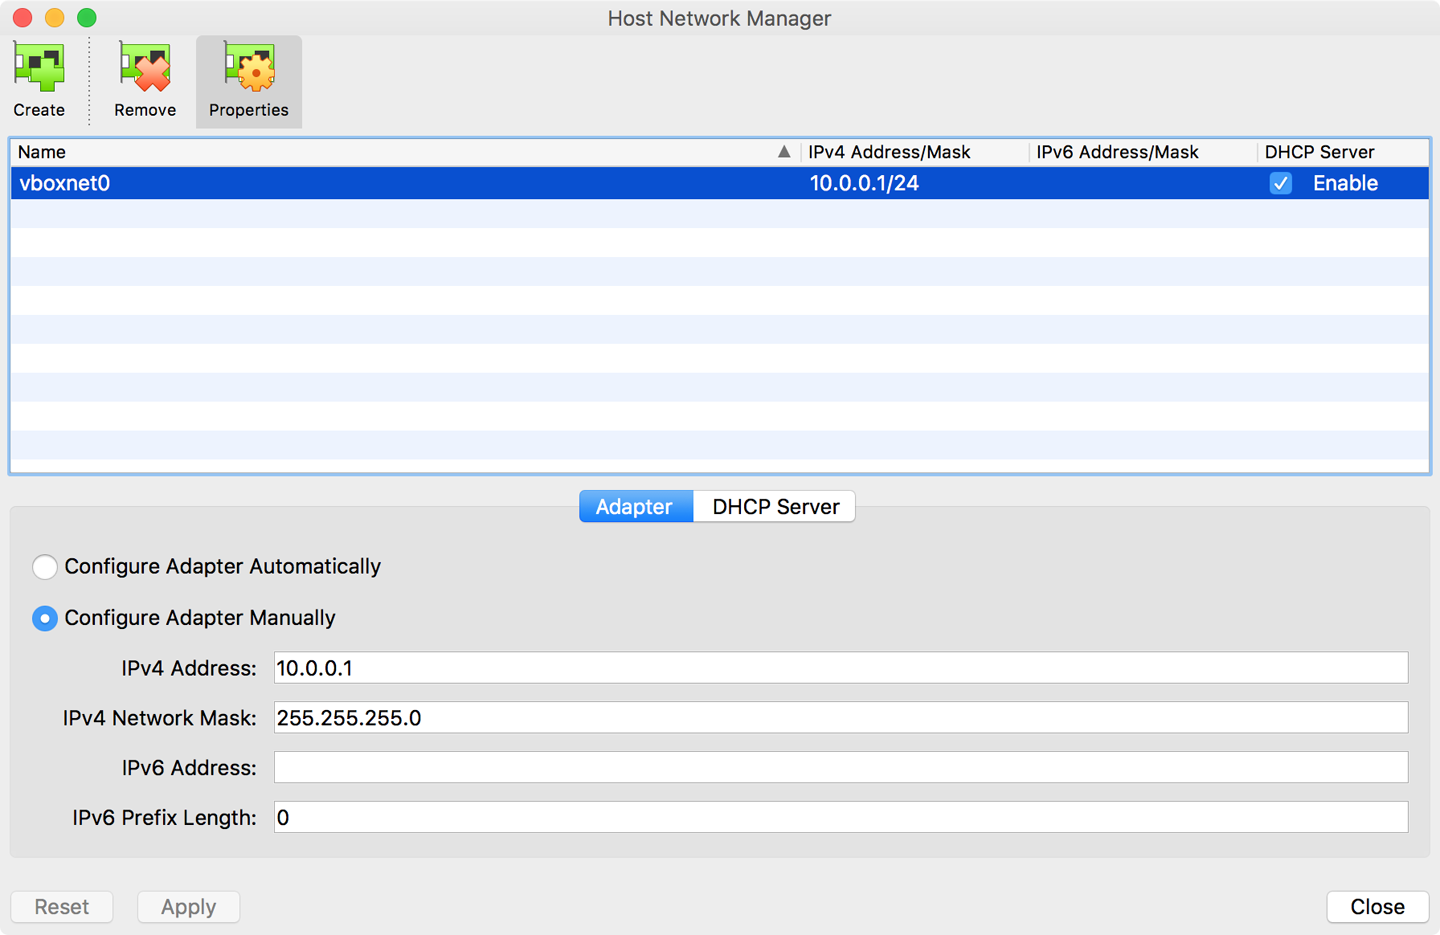
Figure 32-8. Creating a host network
When you’re done, click Close. With the host network created, we can move on to the management interface on our VM. VirtualBox supports up to eight interfaces, even though it shows only four; I show you how to add additional network interfaces later on. The remaining interfaces are configured based on how they’re connected, so we’re going to hold off on those for now and just create the management interface. Back on the main VirtualBox screen, click the Settings icon (the yellow gear), and then choose Network. You then see four interfaces, which is the default number supported.
The interfaces are assigned in order in vEOS with Management-1 being the first. Thus, Adapter 2 resolves to Ethernet-1, Adapter 3 to Ethernet-2, and so on. Choose Adapter 1 and set the “Attached to” pull-down menu to “Host-only Adapter.” The name should default to “vboxnet0” now that we’ve created it. Click the “advanced” switch and then change the Adapter Type to “PCnet-FAST III” and Promiscuous Mode to “Allow VMs.” The options should look similar to the one depicted in Figure 32-9.
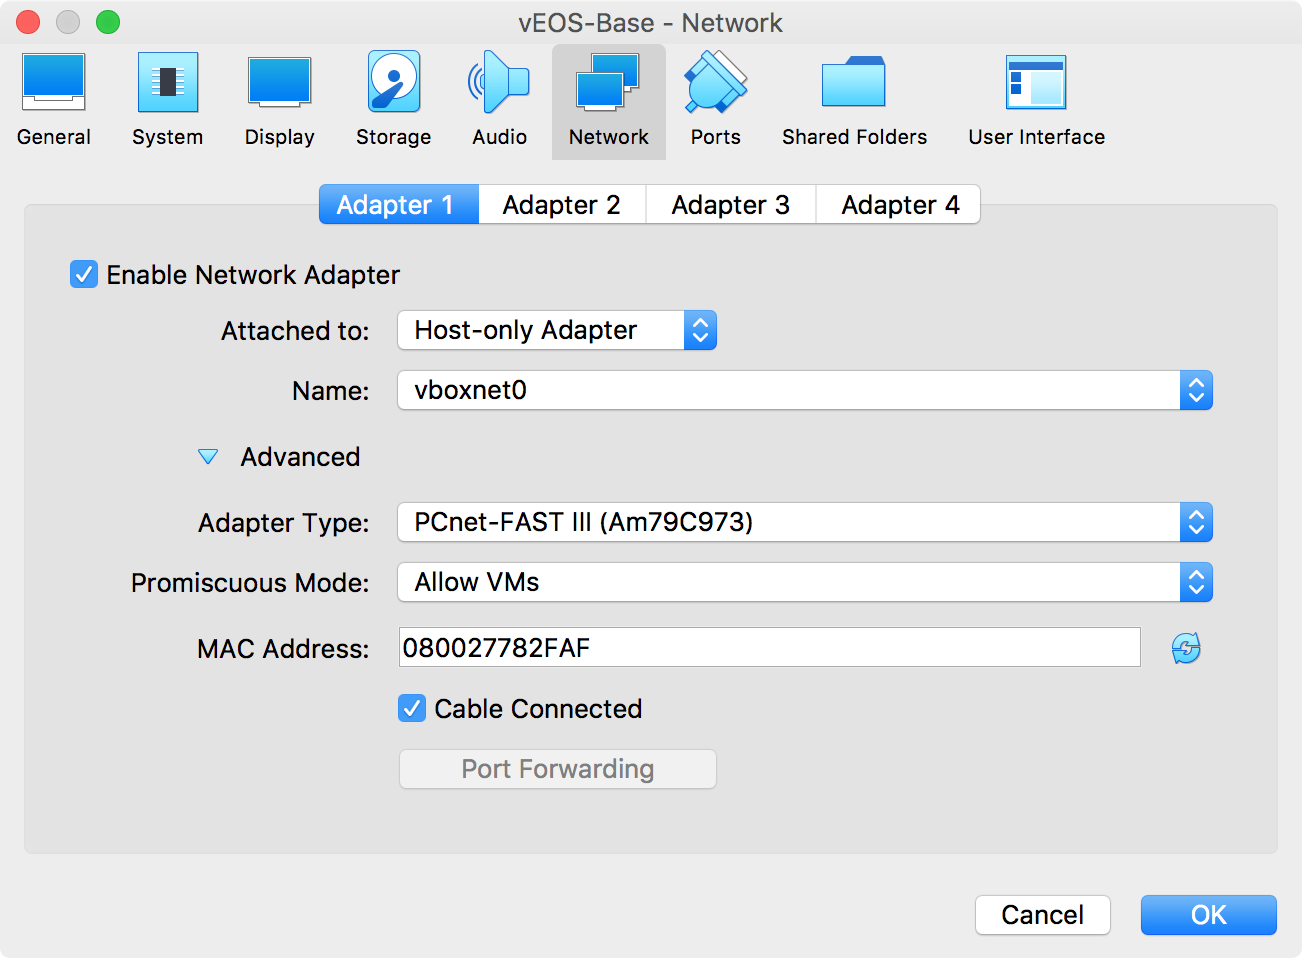
Figure 32-9. Configuring the management interface
With the management interface created, let’s go and set the other three to useful defaults so that we need make only minimal changes to the other VMs when we clone this one. You can configure all four interfaces before you click OK.
Go to each of the other three adapters and set them the same way, making sure that you click Enable Network Adapter for each, but for these interfaces the “Attached to” field will be “Internal Network.” This setting needs a Name, which will default to “intnet”—leave that as the default for now on all three interfaces. Again, click Advanced and set the Adapter Type to “PCnet-FAST III” and the Promiscuous Mode to Allow VMs. Each of the interface configurations should look like the example shown in Figure 32-10.
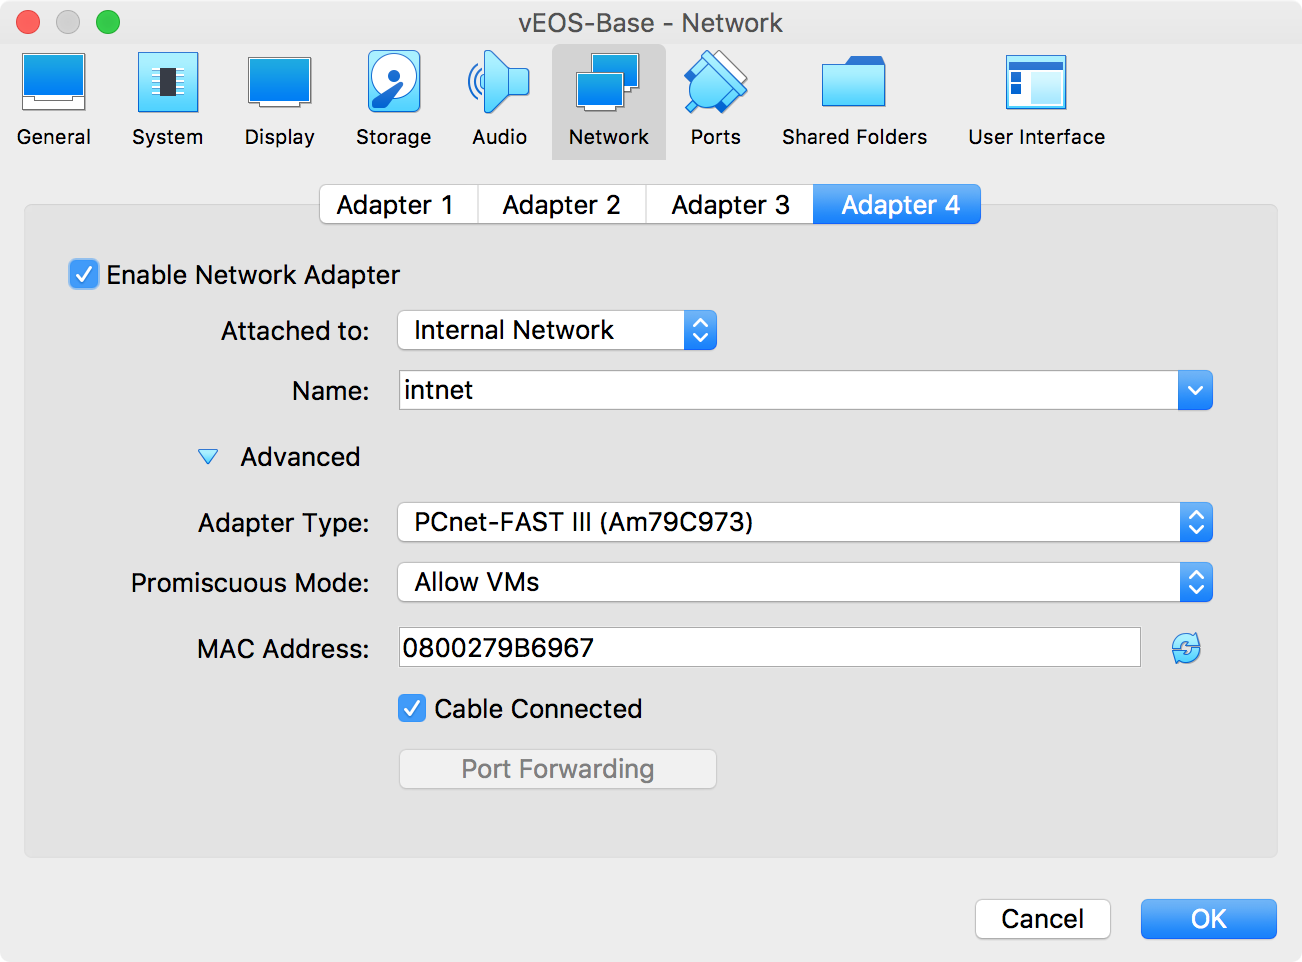
Figure 32-10. Configuring additional interfaces
When you’re done, click OK. At this point, it’s a good idea to start the VM to verify that everything looks good. From the main VirtualBox window, ensure that the vEOS-Base VM is selected and then, at the top of the page, click the big green Start arrow. You might see some VirtualBox messages in the new console that pops up, but you can just close those for now. The resulting page should look like any other switch console. Note that on my Mac, the console window is too tiny to read, probably due to the Retina display and the way I have the screen set. If that’s the case, go to the VirtualBox pull-down menu, click View, Virtual Screen 1, and then scale to your desired size.
The VMs can take a little longer to boot than a normal switch in my experience, and you might see some entries on the screen that you wouldn’t see on a switch, but be patient and the VM should boot and look like what is shown in Figure 32-11.
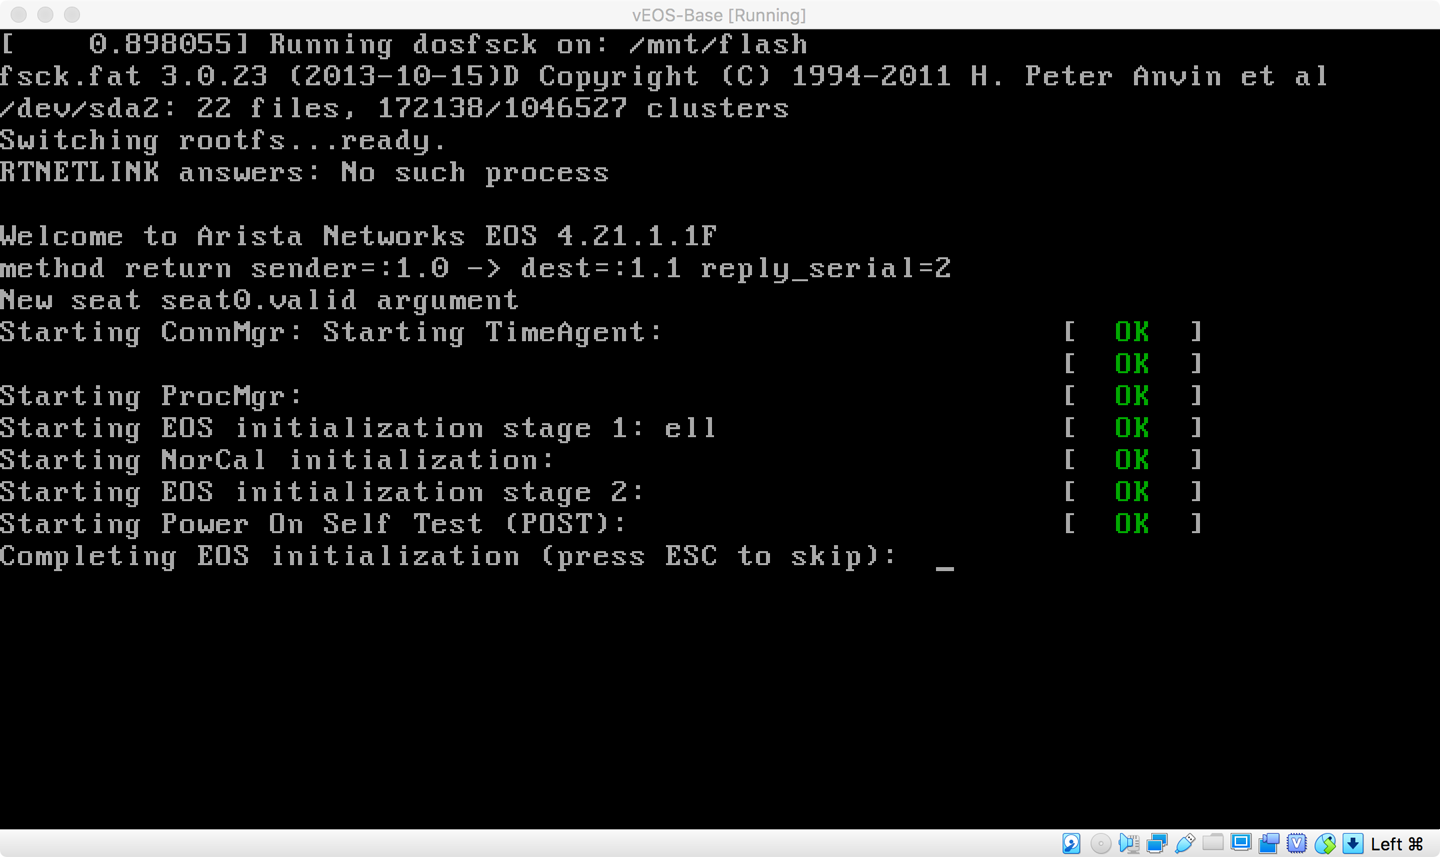
Figure 32-11. vEOS booting
The VM will likely boot into ZTP mode, so follow the steps you learned in Chapter 13 to disable that (unless you’re using the VMs to learn about ZTP, in which case, carry on). After you disable ZTP (remember that the switch will reboot), log in as admin with no password, and then enable and do a show interface status to confirm that your interfaces are all there. If you don’t see what’s shown in Figure 32-12, you’ll need to shut down the VM and check your interface configurations in VirtualBox.
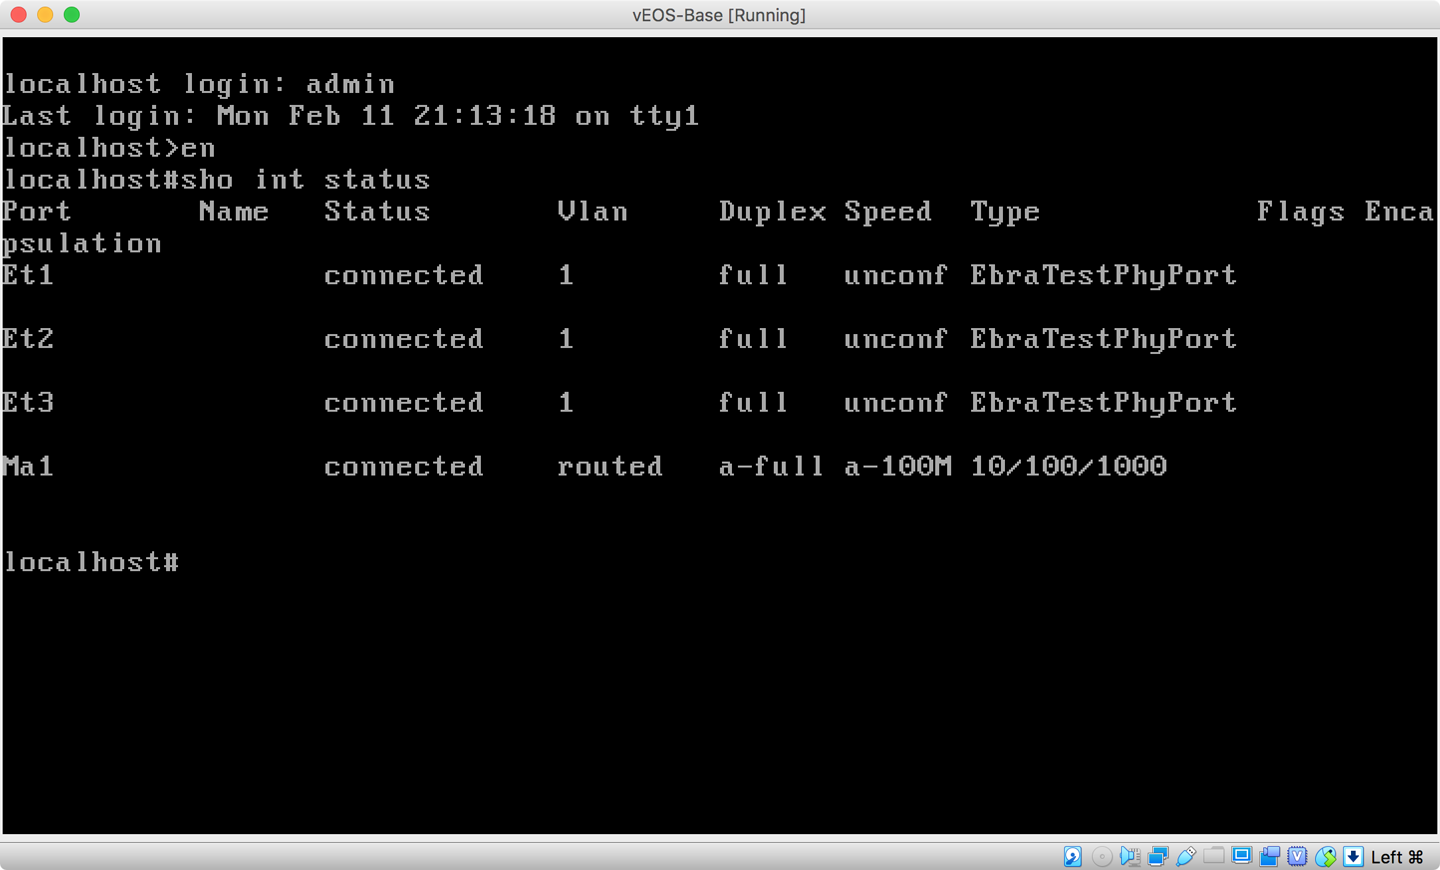
Figure 32-12. Interfaces in the vEOS-Base VM
At this point you can shut down the VM. In the VirtualBox main screen, in the left pane, right-click the VM (it should say vEOS-Base Running), choose Close, and then click “save state.” Now the real fun can begin.
Making a Real Lab Through Cloning
With the base VM created, we can now clone it into four other VMs that we’ll call vEOS-A, vEOS-B, vEOS-C, and vEOS-D. To do so, in the left pane of the main VirtualBox window, right-click the VM, and then, in the context menu that opens, choose “clone.” You are presented with a new dialog box asking about how the clone should be made. These options are very important, and your VMs won’t work properly if you don’t choose wisely. The name of the first clone will be vEOS-A. Leave the path alone, but ensure that the MAC Address Policy is set to “Generate new MAC addresses for all network adapters,” as shown in Figure 32-13.

Figure 32-13. Cloning a VM
Click Continue. Another dialog box opens, in which you must pick Full Clone for the lab to work properly. Click the Clone button. You should now have a new VM in the list called vEOS-A. Follow the steps three more times, cloning the original vEOS-Base image to create VMs named vEOS-B, vEOS-C, and vEOS-D. Take a second to appreciate the fact that a sheep shows up during the cloning process, which is an homage to Dolly the sheep, who was the first living mammal ever cloned. At the end of the cloning process you should have four VMs created and the main VirtualBox, as shown in Figure 32-14.
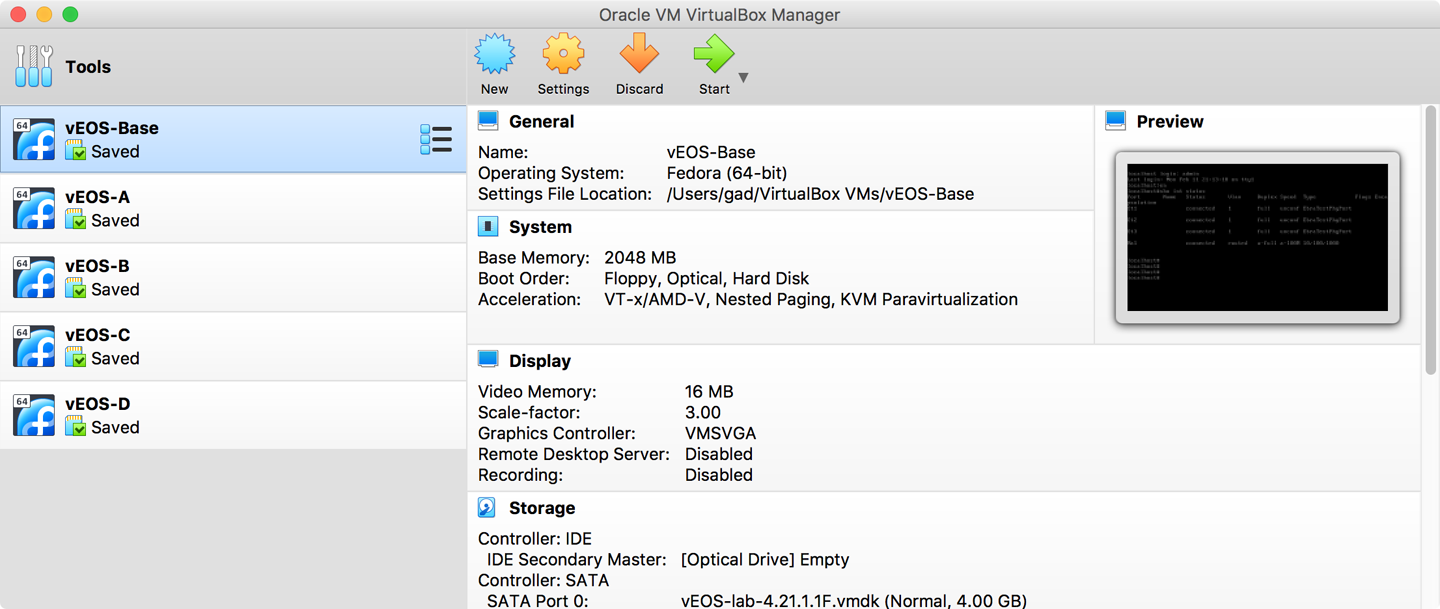
Figure 32-14. Four cloned VMs
Do yourself a favor at this point and start each VM and change the hostname in vEOS so that they don’t all say “localhost.” Also, be thankful that we cloned VMs so that you don’t need to disable ZTP in all three VMs. After you change the hostnames, do a write in each of the VMs and then go back to the VirtualBox screen and right-click Close, Save State on all three of the VMs because now it’s time to build the inter-VM networks.
Building the Interswitch Networks
I find this to be the most complicated part of the process, mostly because of the way that VirtualBox deals with the private inter-VM networks. This is a common issue when using switches in virtual environments because VMs weren’t really designed to run switches—they were designed to run servers. As such, there is no real concept of a virtual cable, so we need to make little networks. To begin, I’ve created a spreadsheet that outlines how the VMs will connect. Remember that lab layout I showed you a few pages back? Well, it has a fair bit of interconnects that we need to define. You can see these in the spreadsheet shown in Figure 32-15.
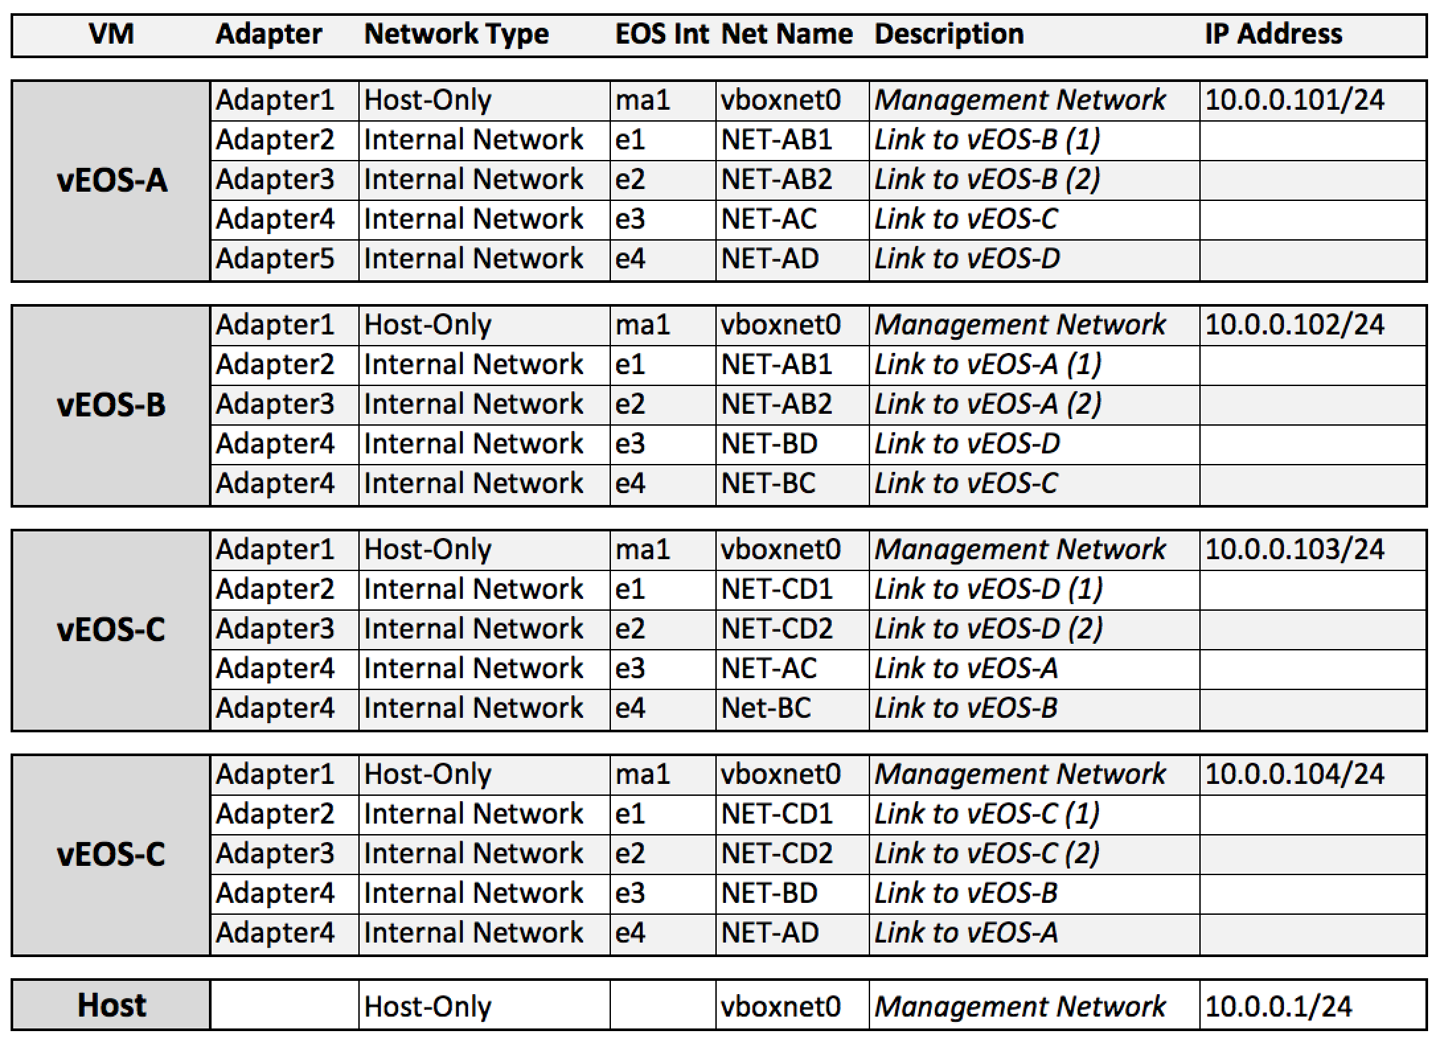
Figure 32-15. vEOS lab network layout
To make all of that work we need to go into the configuration for each VM and add settings for each of the network interfaces from Adapter2 through Adapter4 (not Adapter1 because that’s the management interface). Be careful during this step because each interface must connect to the correct internal network in order to simulate the network that we want. This can be easily fixed if you get it wrong, but troubleshooting it can be a pain. I try to name the networks in relation to what they connect to so, for example, NET-BC is connecting vEOS-B and vEOS-C. Figure 32-16 shows the network-to-interface pairing for vEOS-A Adapter 4.
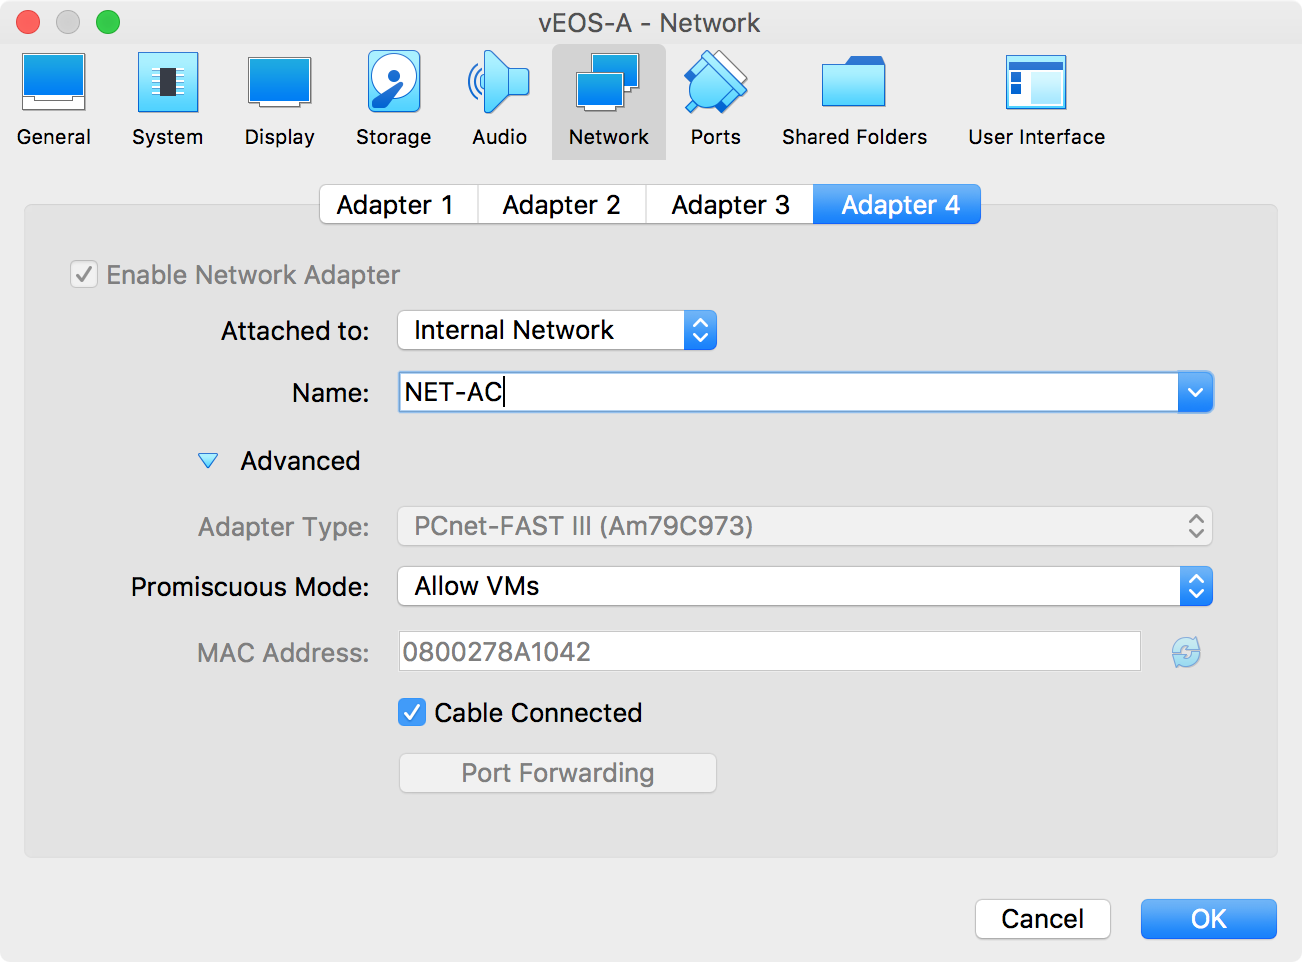
Figure 32-16. Changing Ethernet interfaces on VMs
You might have noticed that I have an Adapter5 in my spreadsheet and there’s no such option in VirtualBox. Unfortunately, they wrote the GUI to support only four interfaces even though VirtualBox can support up to eight. To add another interface, we need to resort to using command-line tools. I love me some command-line tools! This is a good thing because I probably had to redo this step four times after judicious misuse of the up-arrow and enter combination burned me repeatedly.
To do these next few steps, the VMs must all be powered off. If you just suspend them, you’ll get a “VM is not immutable” error, and no one wants that. From my Mac I open up the terminal app and type the following, which adds Adapter5, connects it to an internal network, connects to the proper network according to my spreadsheet, and then sets it to Promiscuous mode allow-vms.
GAD-15-Pro: gad$ vboxmanage modifyvm vEOS-A --nic5 intnet
GAD-15-Pro: gad$ vboxmanage modifyvm vEOS-A --intnet5 "NET-AD"
GAD-15-Pro: gad$ vboxmanage modifyvm vEOS-A –nicpromisc5 allow-vms

GAD-15-Pro: gad$ vboxmanage modifyvm vEOS-B --nic5 intnet
GAD-15-Pro: gad$ vboxmanage modifyvm vEOS-B --intnet5 "NET-BC"
GAD-15-Pro: gad$ vboxmanage modifyvm vEOS-B –nicpromisc5 allow-vms

GAD-15-Pro: gad$ vboxmanage modifyvm vEOS-C --nic5 intnet
GAD-15-Pro: gad$ vboxmanage modifyvm vEOS-C --intnet5 "NET-BC"
GAD-15-Pro: gad$ vboxmanage modifyvm vEOS-C –nicpromisc5 allow-vms

GAD-15-Pro: gad$ vboxmanage modifyvm vEOS-D --nic5 intnet
GAD-15-Pro: gad$ vboxmanage modifyvm vEOS-D --intnet5 "NET-AD"
GAD-15-Pro: gad$ vboxmanage modifyvm vEOS-D –nicpromisc5 allow-vms
That might seem like a lot of technical typing, but the only thing that changes is the VM name and, in the second line of each VM’s configurations, the network name. It’s really just a matter of doing the first VM and then carefully up-arrowing and changing the few characters where needed. The “carefully” part is what caused me grief.
After we have configured the first four interfaces via the VirtualBox GUI and we add the last one via the command line, we should have a working network.
To make your life simpler (which is always a good thing), start up your VMs, log into each on the console, and then do the following:
If you haven’t already, set the hostnames:
localhost#conf
localhost(config)#hostname vEOS-A
Set the IP address on the management interface for each vEOS VM according to the values in the spreadsheet in Figure 32-15:
vEOS-A(config)#int ma1
vEOS-A(config-if-Ma1)#ip address 10.0.0.101/24
Finally, configure the VMs so that you can log in as admin without a password, unless you want to enter a password every time you connect to them.
vEOS-A(config-if-Ma1)#aaa authentication policy local allow-nopass
After you do this on all of your VMs, check your network connectivity by using the show lldp neighbor command in each of them:
vEOS-A(config)#sho lldp nei
Last table change time   : 0:01:33 ago
Number of table inserts  : 10
Number of table deletes  : 3
Number of table drops    : 0
Number of table age-outs : 0

Port       Neighbor Device ID               Neighbor Port ID           TTL
Et1        vEOS-B                           Ethernet1                  120
Et2        vEOS-B                           Ethernet2                  120
Et3        vEOS-C                           Ethernet3                  120
Et4        vEOS-D                           Ethernet4                  120
Ma1        vEOS-C                           Management1                120
Ma1        vEOS-B                           Management1                120
Ma1        vEOS-D                           Management1                120
vEOS-A(config)#
You’ll likely see all of the other VMs showing up on the management interface, which is normal in this environment due to the way that the virtual bridge works.
From this point on, you can start your VMs in headless mode, which means that they will start without consoles popping up all over your screen. The consoles are great when you need to be on the console (for things like ZTP and Aboot), but they’re a pain in the butt if you’re used to using a real Secure Shell (SSH) client. You can now use your favorite SSH client or even just the terminal window (if you have a Mac) to connect to your VMs:
GAD-15-Pro:~ gad$ ssh -l admin 10.0.0.101
Last login: Mon Feb 11 23:20:01 2019 from 10.0.0.1
vEOS-A>en
vEOS-A#
At this point, if you don’t think you’ll need to do any more cloning, you can delete the original vEOS-Base VM that we created. I like to keep it around because it’s a great way to spin up new standalone VMs for testing, but I also dislike clutter, so deleting it is fine, too.
At this point, your lab should be up and you can toy with anything you might want to build. Use it to test out some MLAG knowledge, or even Equal-Cost MultiPathing (ECMP) using Border Gateway Protocol (BGP). The world is your oyster. Or something.
Automating VirtualBox Builds
There’s a very cool tool out there called Vagrant that can automate this entire process. I didn’t just do that because I think there’s a fair bit of knowledge and experience to be gained by building it by hand. There are a bunch of cool Vagrant network builds available on GitHub that you can find by searching for Vagrant vEOS using your favorite internet search engine. Note that this is not a way around getting vEOS because you must have a vEOS image and VirtualBox installed for any of these to work. Note also that if you decide to play around with this capability that you’ll need the vEOS image with the virtualbox.box filename extension and not the normal .vmdk file.
vEOS in an EOS VM
Did you know that you can run VMs on your Arista switch? This doesn’t mean that you should, but you absolutely can by using the EOS virtual-machine commands. There is a fair bit of risk involved in doing this because a VM can consume resources on your switch, and one of the worst things that can happen to an Arista switch is running out of memory, so don’t do this just because it’s cool. Having written that, I’m absolutely going to do this because it’s cool. Hell, I’m going to go crazy and take it a step further by building two VMs. Why? Because I have a kick-ass 7280R switch with 32 GB of RAM just begging to be utilized. And it’s cool:
Arista(config)#sho ver
Arista DCS-7280SR-48C6-M-F
Hardware version:    11.03
Serial number:       SSJ16462978
System MAC address:  2899.3a26.515d

Software image version: 4.21.1F
Architecture:           i386
Internal build version: 4.21.1F-9887494.4211F
Internal build ID:      1497e24b-a79b-48e7-a876-43061e109b92

Uptime:                 0 weeks, 5 days, 2 hours and 47 minutes
Total memory:           32458980 kB
Free memory:            28324816 kB
I wanted to do something that would be fun, weird, and maybe even show off some more Arista…ness. And that’s why I’m going to build this crazy lab, so buckle up and hang on because it’s about to get weird.
First, let’s create a VM. Because I am utterly devoid of imagination after writing for nine hours straight (it’s currently 3 a.m.), I’m going to call it GAD-1.
Arista(config)#virtual-machine GAD-1
Next, we need to specify the image for the VM. I’d previously procured a copy of vEOS version 4.21.1.1F, which you’ll notice is a minor revision different than the version on my switch (4.21.1 versus 4.21.1.1) and which also has a file extension of vmdk instead of swi.
Arista(config-vm-GAD)#disk-image flash:vEOS-lab-4.21.1.1F.vmdk
Because memory is a valuable commodity in EOS, the default memory size that a VM will be allocated is a paltry 128 MB, so we need to up that. The maximum on EOS 4.21 is 2 GB, so that’s what I’m going to use (and yes, the maximum value is 2,047 and not 2,048):
Arista(config-vm-GAD)#memory-size 2047
Remember, 2 GB of RAM from my 32 GB pool is not a big deal, but a large number of Arista switches out there have only 4 GB of RAM, so be very careful with your allocations here.
Next, I need to give the VM a network path so that I can connect to it. I’ll be able to connect via the virtual console, as you’ll see in a bit, but a switch is for networking, so let’s give it a management interface. You can manually set a MAC address here if you’d like, but I’m just going to use the defaults and let EOS do the difficult work.
Arista(config-vm-GAD)#virtual-nic 1 Management1
Adding other interfaces requires VLAN Switch Virtual Interfaces (SVIs) to exist on the switch, which I learned the hard way (which is the same way I learn everything):
Arista(config)#vlan 101
Arista(config-vlan-101)#vlan 102
Arista(config-vlan-102)#virtual-machine GAD
Arista(config-vm-GAD)#virtual-nic 2 vlan 101
% Configuration ignored: Device Vlan101 does not exist.
It just won’t work without an SVI. The SVI needs to exist, but it doesn’t necessarily need to be configured:
Arista(config-vm-GAD)#int vlan 101
Arista(config-if-Vl101)# int vlan 102
Arista(config-if-Vl102)#virtual-machine GAD
Arista(config-vm-GAD)#virtual-nic 2 vlan 101
Arista(config-vm-GAD)#virtual-nic 3 vlan 102
Why do they need to be SVIs? My guess is that like most hypervisor environments, the assumption is that the VM will be a server and not a virtual switch, though it’s completely fair to have a server that has an L2 trunk interface. At this point, I just accept this as a limitation of the wacky thing I’m trying to do and move on.
Before we go any further, I’m going to make a copy of the vmdk file (you’ll see why in a moment):
Arista(config-vm-GAD-1)#copy flash:veOS-lab-4.21.1.1F.vmdk vEOS2.vmdk
Copy completed successfully.
Finally, we should enable the VM:
Arista(config-vm-GAD)#enable
With those steps done, the VM should boot. You can check whether it’s running by using the show virtual-machine command:
Arista#sho virtual-machine
VM Name              Enabled    State
-------              -------    -----
GAD-1                Yes        Running
To connect to the VM, use the virtual-machine VM-Name console command:
Arista#virtual-machine GAD-1 console
Connected to domain GAD-1
Escape character is
[  OK  ]
Starting NorCal initialization: [  OK  ]
Starting EOS initialization stage 2: [  OK  ]
Starting Power On Self Test (POST): [  OK  ]
Completing EOS initialization (press ESC to skip): [  OK  ]
Model and Serial Number: unknown
System RAM: 2015524 kB
Flash Memory size:  4.0G

localhost login:
The VMs take a long time to boot due to resource constraints, but be patient and it will come up. You might need to disable ZTP, which you can do by using the zerotouch disable command (see Chapter 13). When the switch is done booting, you’ll want to go in and change the hostname:
localhost login: admin
localhost>
localhost>en
localhost#conf
localhost(config)#hostname GAD-1
GAD-1(config)#
With the hostname configured, let’s put an IP address on the management interface. Remember, this is a VM within an Arista switch, and the management interface of the VM is bound to the management interface on the host switch. The management IP of the host switch is 10.0.0.1/24, so I’m going to use an IP from the same range that’s not in use:
GAD-1(config)#int ma1
GAD-1(config-if-Ma1)#ip address 10.0.0.21/24
GAD-1(config-if-Ma1)#ping 10.0.0.100
PING 10.0.0.100 (10.0.0.100) 72(100) bytes of data.
80 bytes from 10.0.0.100: icmp_seq=1 ttl=64 time=0.000 ms
80 bytes from 10.0.0.100: icmp_seq=2 ttl=64 time=0.000 ms
80 bytes from 10.0.0.100: icmp_seq=3 ttl=64 time=0.000 ms
80 bytes from 10.0.0.100: icmp_seq=4 ttl=64 time=0.000 ms
80 bytes from 10.0.0.100: icmp_seq=5 ttl=64 time=0.000 ms

--- 10.0.0.100 ping statistics ---
5 packets transmitted, 5 received, 0% packet loss, time 8ms
rtt min/avg/max/mdev = 0.000/0.000/0.000/0.000 ms, ipg/ewma 2.000/0.000 ms
GAD-1(config-if-Ma1)#
Note
This is not actually a Layer 3 binding, so the IP address does not need to match the network on the host’s management interface. I just like it that way to keep things simple.
Woohoo! I now have a VM running on a switch that’s communicating through that switch to get to the network on the management interface. That’s the easy part, though.
The Ethernet interfaces on our VM are bound to the SVIs for VLANs 101 and 102, so let’s see how that works. The host switch has an IP address of 30.0.0.101/24 on VLAN 101, so let’s see if we can do what we just did on the management interface and get Ethernet1 to work with an IP address on the same network. Actually, I’m going to make it more complicated and add a VLAN 30 in the VM, and add an IP of 30.0.0.21/24 to the SVI. Here’s the configuration on the VM named GAD-1:
GAD-1(config)#vlan 30
GAD-1(config-vlan-30)#int vlan 30
GAD-1(config-if-Vl30)#ip address 30.0.0.21/24
GAD-1(config-if-Vl30)#int e1
GAD-1(config-if-Et1)#switchport access vlan 30
GAD-1(config-if-Et1)#
Let’s see if it works:
GAD-1(config-if-Et1)#ping 30.0.0.101
PING 30.0.0.101 (30.0.0.101) 72(100) bytes of data.

--- 30.0.0.101 ping statistics ---
5 packets transmitted, 0 received, 100% packet loss, time 52ms

GAD-1(config-if-Et1)#ping 30.0.0.102
PING 30.0.0.102 (30.0.0.102) 72(100) bytes of data.

--- 30.0.0.102 ping statistics ---
5 packets transmitted, 0 received, 100% packet loss, time 52ms
Well, crap. Let me save you the literal days of frustration I went through that I resolved only after talking to some kick-ass Arista developers who helped me out.
With vEOS running as a VM on an EOS switch, the interfaces within the VM don’t behave the way you might think. To get this to work, you need to attach the IP address to the virtual bridge that is created in Bash within the vEOS instance. The ifconfig command from Bash is your friend here:
GAD-1(config-if-Et1)#bash

Arista Networks EOS shell

 [admin@GAD-1 ~]$ ifconfig -a | grep et1
et1: flags=4163<UP,BROADCAST,RUNNING,MULTICAST>  mtu 9214
vmnicet1: flags=4419<UP,BROADCAST,RUNNING,PROMISC,MULTICAST>  mtu 1500
Remember, this is in the VM. Now, using the ifconfig command again we need to apply the same IP address to the vmnicet1 bridge:
[admin@GAD-1 ~]$ sudo ifconfig vmnicet1 30.0.0.21/24
Now, we exit back to vEOS and test again:
[admin@GAD-1 ~]$ exit
logout
GAD-1(config-if-Et1)#ping 30.0.0.101
PING 30.0.0.101 (30.0.0.101) 72(100) bytes of data.
--- 30.0.0.101 ping statistics ---
5 packets transmitted, 0 received, 100% packet loss, time 52ms
Hmm. That’s disheartening…
GAD-1(config-if-Et1)#ping 30.0.0.102
PING 30.0.0.102 (30.0.0.102) 72(100) bytes of data.
80 bytes from 30.0.0.102: icmp_seq=1 ttl=64 time=4.00 ms
80 bytes from 30.0.0.102: icmp_seq=2 ttl=64 time=0.000 ms
80 bytes from 30.0.0.102: icmp_seq=3 ttl=64 time=0.000 ms
80 bytes from 30.0.0.102: icmp_seq=4 ttl=64 time=0.000 ms
80 bytes from 30.0.0.102: icmp_seq=5 ttl=64 time=0.000 ms

--- 30.0.0.102 ping statistics ---
5 packets transmitted, 5 received, 0% packet loss, time 24ms
rtt min/avg/max/mdev = 0.000/0.800/4.000/1.600 ms, ipg/ewma 6.000/2.344 ms
Wait…what happened? The IP address 30.0.0.101 is on the host switch, and the VM cannot reach it. The IP address 30.0.0.102 is somewhere else on the network, and the VM can reach it. That appears to be a limitation of running vEOS in a VM within EOS (dizzy yet?). In other words, the VM will be able to connect to devices other than the host, but not the host itself. This is also true on the management interface, though I kind of glossed over that earlier. The host’s management IP is 10.0.0.1, and there is another host elsewhere on the network with the IP address of 10.0.0.100:
GAD-1#ping 10.0.0.1
PING 10.0.0.1 (10.0.0.1) 72(100) bytes of data.

--- 10.0.0.1 ping statistics ---
5 packets transmitted, 0 received, 100% packet loss, time 52ms

GAD-1#ping 10.0.0.100
PING 10.0.0.100 (10.0.0.100) 72(100) bytes of data.
80 bytes from 10.0.0.100: icmp_seq=1 ttl=64 time=0.000 ms
80 bytes from 10.0.0.100: icmp_seq=2 ttl=64 time=0.000 ms
80 bytes from 10.0.0.100: icmp_seq=3 ttl=64 time=0.000 ms
80 bytes from 10.0.0.100: icmp_seq=4 ttl=64 time=0.000 ms
80 bytes from 10.0.0.100: icmp_seq=5 ttl=64 time=0.000 ms

--- 10.0.0.100 ping statistics ---
5 packets transmitted, 5 received, 0% packet loss, time 0ms
rtt min/avg/max/mdev = 0.000/0.000/0.000/0.000 ms, ipg/ewma 0.000/0.000 ms
This has to do with the way vEOS works and the fact that the interfaces in the VM are actually attached to virtual interfaces that you can’t see within the VM. In fact, if you show the running configuration for the VM, you’ll see that EOS (on the host) supplied MAC addresses for the interface bindings:
Arista#sho run sec virt
virtual-machine GAD-1
   disk-image flash:/veOS-lab-4.21.1.1F.vmdk
   memory-size 2047
   virtual-nic 1 Management1 52:54:00:02:d9:56
   virtual-nic 2 Vlan101 52:54:00:92:2b:60
   virtual-nic 3 Vlan102 52:54:00:f9:da:40
   enable
But, if we look at the MAC addresses in the VM (we’ll use Bash), we can see that those MAC addresses are not the Ethernet interfaces in the VM but rather the vmnicet# interfaces that we had to configure in Bash:
[admin@GAD-1 ~]$ ifconfig et1 | grep ether
        ether 52:54:00:ad:fc:da  txqueuelen 500  (Ethernet)
[admin@GAD-1 ~]$ ifconfig vmnicet1 | grep ether
        ether 52:54:00:92:2b:60  txqueuelen 1000  (Ethernet)
As you can see, the configuration from the host is binding to the MAC address of the vmnicet1 interface.
So, we have a VM running vEOS on our Arista switch. Pretty cool, and pretty weird, but it’s not weird enough. Let’s add another one! This will go much more quickly because I don’t need to explain every step. I simply add another VM and call it something even more clever: GAD-2. Everything else is the same, but I use the copy of the vEOS vmdk file that we made.
Arista(config)#virtual-machine GAD-2
Arista(config-vm-GAD-2)#disk-image flash:vEOS-2.vmdk
Arista(config-vm-GAD-2)#memory-size 2047
Arista(config-vm-GAD-2)#virtual-nic 1 Management1
Arista(config-vm-GAD-2)#virtual-nic 2 Vlan101
Arista(config-vm-GAD-2)#virtual-nic 3 Vlan102
Arista(config-vm-GAD-2)#enable
Arista(config-vm-GAD-2)#exit
Arista(config)#
We cannot use the same vmdk file that we did on GAD-1 because that will result in two VMs using the same image. Although some operating systems can work that way, you don’t want to do that with vEOS.
We should now have two VMs running:
Arista(config)#sho virtual-machine
VM Name              Enabled    State
-------              -------    -----
GAD-1                Yes        Running
GAD-2                Yes        Running
Warning
By the way, if this isn’t obvious by now, my two VMs are now consuming 4 GB of RAM. That’s how much memory many Arista switches have in total, so you shouldn’t be doing this on your very important production switches in the middle of the day. If you are, though, you’ve probably stopped reading because the network is on fire.
With the new VM running (remember, it will take a while to boot), let’s go in and set the hostname and management IP address:
Arista(config)#virtual-machine GAD-2 console
Connected to domain GAD-2
Escape character is

localhost login: admin
localhost>
localhost>en
localhost#conf
localhost(config)#hostname GAD-2
GAD-2(config)#
Oh, if you’re following along on a real switch, you might have noticed that control-c will bounce you out of the VM, so if you’re used to doing that to get out of configuration mode, you’re going to get quite annoyed. At this point, I am quite annoyed. Bad habits are hard to break.
Time to set the management IP address:
GAD-2(config)#int ma1
GAD-2(config-if-Ma1)#ip address 10.0.0.22/24
GAD-2(config-if-Ma1)#ping 10.0.0.100
PING 10.0.0.100 (10.0.0.100) 72(100) bytes of data.
80 bytes from 10.0.0.100: icmp_seq=1 ttl=64 time=4.00 ms
80 bytes from 10.0.0.100: icmp_seq=2 ttl=64 time=0.000 ms
80 bytes from 10.0.0.100: icmp_seq=3 ttl=64 time=0.000 ms
80 bytes from 10.0.0.100: icmp_seq=4 ttl=64 time=0.000 ms
80 bytes from 10.0.0.100: icmp_seq=5 ttl=64 time=0.000 ms

--- 10.0.0.100 ping statistics ---
5 packets transmitted, 5 received, 0% packet loss, time 20ms
rtt min/avg/max/mdev = 0.000/0.800/4.000/1.600 ms, ipg/ewma 5.000/2.344 ms
Now let’s configure VLAN 30 and Ethernet 1:
GAD-2(config-if-Ma1)#vlan 30
GAD-2(config-vlan-30)#int vlan 30
GAD-2(config-if-Vl30)#ip address 30.0.0.22/24
GAD-2(config-if-Vl30)#int e1
GAD-2(config-if-Et1)#switchport access vlan 30
Remember, that won’t work until we also add the IP to the vmnicet1 interface in Bash. Let’s do that and then exit back to vEOS and test it:
[admin@GAD-2 ~]$ sudo ifconfig vmnicet1 30.0.0.22/24
[admin@GAD-2 ~]$ exit
logout
GAD-2(config-if-Et1)#
GAD-2(config-if-Et1)#ping 30.0.0.102
PING 30.0.0.102 (30.0.0.102) 72(100) bytes of data.
80 bytes from 30.0.0.102: icmp_seq=1 ttl=64 time=0.000 ms
80 bytes from 30.0.0.102: icmp_seq=2 ttl=64 time=0.000 ms
80 bytes from 30.0.0.102: icmp_seq=3 ttl=64 time=0.000 ms
80 bytes from 30.0.0.102: icmp_seq=4 ttl=64 time=0.000 ms
80 bytes from 30.0.0.102: icmp_seq=5 ttl=64 time=0.000 ms

--- 30.0.0.102 ping statistics ---
5 packets transmitted, 5 received, 0% packet loss, time 8ms
rtt min/avg/max/mdev = 0.000/0.000/0.000/0.000 ms, ipg/ewma 2.000/0.000 ms
Success! Remember that we can only ping off the box and not to the interfaces on EOS.
However...
This is my favorite part. With two VMs running on my Arista switch they can communicate with each other but not with the host switch! The VM GAD-1 has an IP address of 30.0.0.21 on VLAN 30, whereas the VM GAD-2 has an IP address of 30.0.0.22 on VLAN 30. Check it out—GAD-2 can ping GAD-1:
GAD-2(config-if-Et1)#ping 30.0.0.21
PING 30.0.0.21 (30.0.0.21) 72(100) bytes of data.
80 bytes from 30.0.0.21: icmp_seq=1 ttl=64 time=4.00 ms
80 bytes from 30.0.0.21: icmp_seq=2 ttl=64 time=0.000 ms
80 bytes from 30.0.0.21: icmp_seq=3 ttl=64 time=0.000 ms
80 bytes from 30.0.0.21: icmp_seq=4 ttl=64 time=4.00 ms
80 bytes from 30.0.0.21: icmp_seq=5 ttl=64 time=0.000 ms

--- 30.0.0.21 ping statistics ---
5 packets transmitted, 5 received, 0% packet loss, time 28ms
rtt min/avg/max/mdev = 0.000/1.600/4.001/1.960 ms, ipg/ewma 7.000/2.783 ms
It cannot ping the host in which it resides:
GAD-2(config-if-Et1)#ping 30.0.0.101
PING 30.0.0.101 (30.0.0.101) 72(100) bytes of data.

--- 30.0.0.101 ping statistics ---
5 packets transmitted, 0 received, 100% packet loss, time 52ms
But it can ping hosts other than the host on which it resides!
GAD-2(config-if-Et1)#ping 30.0.0.102
PING 30.0.0.102 (30.0.0.102) 72(100) bytes of data.
80 bytes from 30.0.0.102: icmp_seq=1 ttl=64 time=0.000 ms
80 bytes from 30.0.0.102: icmp_seq=2 ttl=64 time=0.000 ms
80 bytes from 30.0.0.102: icmp_seq=3 ttl=64 time=0.000 ms
80 bytes from 30.0.0.102: icmp_seq=4 ttl=64 time=0.000 ms
80 bytes from 30.0.0.102: icmp_seq=5 ttl=64 time=0.000 ms

--- 30.0.0.102 ping statistics ---
5 packets transmitted, 5 received, 0% packet loss, time 8ms
rtt min/avg/max/mdev = 0.000/0.000/0.000/0.000 ms, ipg/ewma 2.000/0.000 ms
I think that’s crazy and cool and all sorts of weird. Does it have any practical applications? Perhaps. I’ll leave that to your imagination, but the fact that it’s possible is one of those things that, to me at least, just shows how freaking cool EOS is.
By the way I feel that I should point out that the VLAN is not being tagged and that the VLAN numbers in each of my VMs do not need to match. Interface Et1 in those VMs is not a trunk, and the VLAN is locally significant. If you don’t believe me, try it for yourself with different VLANs in each VM.
Hey, I wonder if we could add a VM to the vEOS VM running in EOS?
GAD-2#virt?
  virtual-machine  not supported on this hardware platform
Heh—I guess that’s enough Inception-level configuration madness for today.
If you’d like to see detail about your VMs, you can use the show virtual-machine detail command:
Arista#sho virtual-machine detail
Virtual Machine: GAD-1
   Enabled:             Yes
   State:               Running
   Disk Image:          /mnt/flash/veOS-lab-4.21.1.1F.vmdk
   Memory Size:         2047MB
   VNC port:            None
   Virtual Nic: vnic1
      Mac Address:    52:54:00:02:d9:56
      Device:         Management1
      Model Type:     e1000
   Virtual Nic: vnic2
      Mac Address:    52:54:00:92:2b:60
      Device:         Vlan101
      Model Type:     e1000
   Virtual Nic: vnic3
      Mac Address:    52:54:00:f9:da:40
      Device:         Vlan102
      Model Type:     e1000

Virtual Machine: GAD-2
   Enabled:             Yes
   State:               Running
   Disk Image:          /mnt/flash/vEOS-2.vmdk
   Memory Size:         2047MB
   VNC port:            None
   Virtual Nic: vnic1
      Mac Address:    52:54:00:b8:b4:a6
      Device:         Management1
      Model Type:     e1000
   Virtual Nic: vnic2
      Mac Address:    52:54:00:7e:4c:e1
      Device:         Vlan101
      Model Type:     e1000
   Virtual Nic: vnic3
      Mac Address:    52:54:00:23:e2:ad
      Device:         Vlan102
      Model Type:     e1000
Let’s shut down those VMs so that we can free up all that memory:
Arista#conf
Arista(config)#virtual-machine GAD-1
Arista(config-vm-GAD-1)#no enable
Arista(config-vm-GAD-1)#virtual-machine GAD-2
Arista(config-vm-GAD-2)#no enable
Arista(config-vm-GAD-2)#^z
Arista#sho virtual-machine
VM Name              Enabled    State
-------              -------    -----
GAD-1                No         Stopped
GAD-2                No         Stopped
If you leave them enabled and write the configuration, they will automatically start when the switch reboots. With them disabled, the only resources they consume are the fairly large amount of flash disk space being consumed:
Arista#dir vEOS*
Directory of flash:/vEOS*

       -rwx   725680128           Feb 14 20:44  vEOS-2.vmdk
       -rwx   725614592           Feb 14 21:03  vEOS-lab-4.21.1.1F.vmdk

3440762880 bytes total (578560000 bytes free)
If I were to do something like this in a real network, I’d probably make sure to use a switch with a solid-state drive, which will probably be available if you have switches with 32 GB of RAM. The flash drive is a precious commodity, so you should use it sparingly.
Conclusion
So, what can you do with vEOS? You can build a Bow Tie MLAG (man, how I hate that term) environment. You can do routing tests. You can play around with ZTP, or EOS Application Programmable Interface (eAPI), or anything else that doesn’t require a hardware ASIC. What requires an ASIC? Things covered in this book include tap aggregation, latency analyzer (LANZ), and FlexRoute, but there are certainly other features that do, too.
My favorite thing to use vEOS for is testing eAPI scripts. With a single VM running and the ability to connect to it using IP from my Mac I can test all sorts of crazy stuff without ever leaving the virtual environment on my laptop. I’ve also written entire class modules sitting on a plane with vEOS running. The only downside of that is the CPU utilization, which consumes battery and makes my lap hot, but that’s kind of a me problem that doesn’t affect people who are smart enough to put their laptops on the little tray that’s there pretty much for that very purpose.