
Upgrading EOS is a simple process. In a nutshell, get the software
image onto the switch, configure the switch to see the new image, and then
reboot the switch. Let’s start by taking a look at the current version of EOS on our
7124S switch by using the show version
command:
Arista#sho ver
Arista DCS-7124S-F
Hardware version:    06.02
Serial number:       JSH10170315
System MAC address:  001c.7308.80ae

Software image version: 4.7.8
Architecture:           i386
Internal build version: 4.7.8-535760.EOS478
Internal build ID:      530a4112-b24f-40ef-bbe2-8c4b139a797d

Uptime:                 4 days, 20 hours and 4 minutes
Total memory:           2042400 kB
Free memory:            891220 kB
We can see from this output that our switch is running EOS version 4.7.8.
Note
Check out the model number in the first line of output, which reads DCS-7124S-F. The -F indicates that this switch shipped with front-to-rear airflow fans. If the model number had a -R appended to it, the fans would be rear-to-front. Cool, huh? Well I think it is, but then, little things like this excite me.
If we felt like poking around further where we don’t belong (and who
doesn’t?), then we could use the show version
detail command, which will regale us with page upon page of
process names and their requisite versions:
Arista#sho version detail
Arista DCS-7124S-F
Hardware version:    06.02
Deviations:          D0000213, D0000203
Serial number:       JSH10170315
System MAC address:  001c.7308.80ae

Software image version: 4.7.8
Architecture:           i386
Internal build version: 4.7.8-535760.EOS478
Internal build ID:      530a4112-b24f-40ef-bbe2-8c4b139a797d

Uptime:                 4 days, 20 hours and 6 minutes
Total memory:           2042400 kB
Free memory:            890972 kB

Installed software packages:

Package              Version         Release
--------------------------------------------
Aaa                  1.0.0           535760.EOS478
Aboot-utils          2.0.5           535760.EOS478
Acl                  1.0.0           535760.EOS478
Adt7462              1.0.1           535760.EOS478
Altera               1.0.1           535760.EOS478

[-- pages of output removed to keep my editor from hurting me --]

xz                   4.999.9         0.2.beta.20091007git.fc12
xz-libs              4.999.9         0.2.beta.20091007git.fc12
xz-lzma-compat       4.999.9         0.2.beta.20091007git.fc12
yum                  3.2.27          2.fc12
yum-metadata-parser  1.1.2           14.fc12
zile                 2.3.9           2.fc12
zip                  2.31            8.fc12
zlib                 1.2.3           23.fc12

Component  Version
---------- ---------------------------------------
Aboot      Aboot-norcal1-1.9.2-140514.2006.eswierk
scd        0x13
Note
See the line in bold (as well as many others) in the previous output that ends with .fc12? That indicates that the package on that line was built on Fedora Core 12.
Interesting information if you’re Arista TAC (Technical Assistance Center), but probably overkill for us. Our goal in this chapter is to upgrade this switch from EOS version 4.7.8 to version 4.8.1. So let’s get started.
The first thing we’ll do is take a look at what devices there are
available to us on the Arista 7124S using the dir
? command:
Arista#dir ?
all-filesystems List files on all filesystems
extension: Directory or file name
file: Directory or file name
flash: Directory or file name
system: Directory or file name
/all List all files, including hidden files
/recursive List files recursively
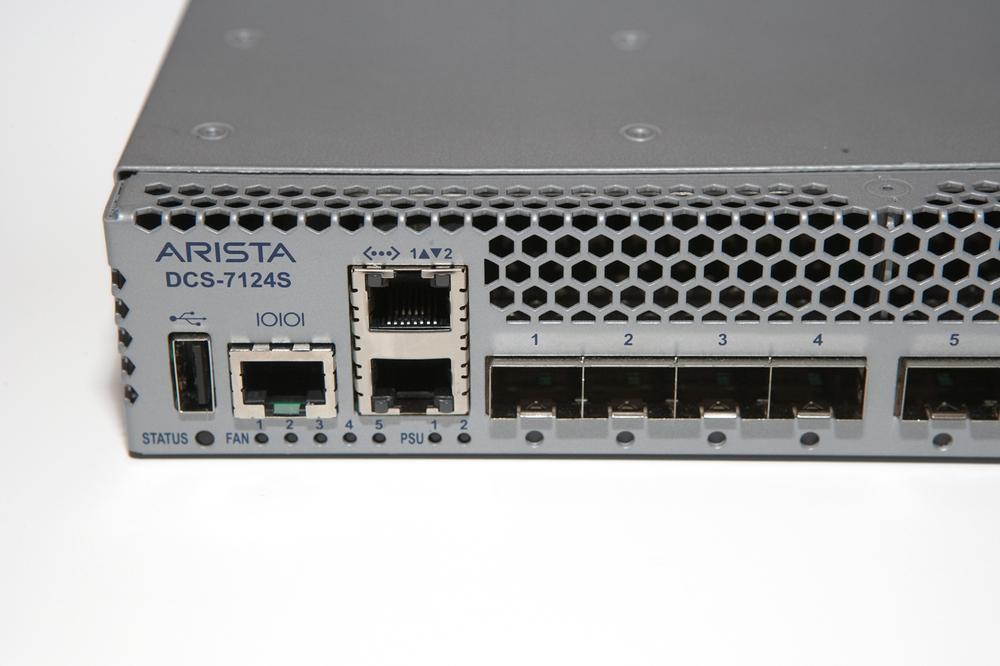
<cr>Arista switches all contain useful USB ports. Figure 7-1 shows the USB port on a 7124S switch, located to the far left of the device. After years of using switches from other vendors that contained USB ports that were unavailable, being able to slap a thumb drive in and actually make use of it came as a pleasant surprise.
Upon insertion of a USB drive, the dir
? command yields different results:
Arista#dir ?
  all-filesystems  List files on all filesystems
  extension:       Directory or file name
  file:            Directory or file name
  flash:           Directory or file name
  system:          Directory or file name
  usb1:            Directory or file name
  /all             List all files, including hidden files
  /recursive       List files recursively
  <cr>
Now we see the usb1: device, which was not there previously.
Executing the dir command by itself
will default to the current directory, which is in
flash/:
Arista#dir
Directory of flash:/

       -rwx   222153243           Dec 22  2011  EOS-4.7.8.swi
       -rwx          24           Dec 22  2011  boot-config
       drwx        4096           Apr 10 23:20  debug
       -rwx           0            May 7  2008  fullrecover
       drwx        4096           Apr 10 23:20  persist
       -rwx        2674           Apr 10 23:13  startup-config
       -rwx           0           Apr 10 23:20  zerotouch-config

1862512640 bytes total (1418162176 bytes free)
As we can see, there is an existing EOS image in this directory,
entitled EOS-4.7.8.swi. This image
corresponds to the version shown earlier with the show version command. References to the image file
may also be found in the running configuration. We will use the command
found here to upgrade the system in this chapter:
Arista#sho run | inc boot
! boot system flash:EOS-4.7.8.swi
The sharp-eyed among you may have noticed that the command is
commented out. This is due to there not actually being a boot system command configured. This command, as
shown, is generated by the switch for reasons that will become apparent
later in this chapter.
Let’s take a look at what’s on the new USB drive that’s been inserted. We can do this by specifying the usb1: device discovered previously:
Arista#dir usb1:
Directory of usb1:/

       -rwx   221921815           Sep 21  2011  EOS-4.7.7.swi
       -rwx   225217184           Oct 26  2011  EOS-4.8.1.swi

4001914880 bytes total (3553292288 bytes free)
It looks like we’ve got two EOS images to choose from. Since
4.8.1 is what we’re currently after, let’s move it to the system flash. To
do this, we’ll use the copy
source destination command. Arista allows a
variety of source and destinations when copying. To see them all, issue the
copy ? command:
Arista#copy ?
  boot-extensions       Copy boot extensions configuration
  extension:            Source file path
  file:                 Source file path
  flash:                Source file path
  ftp:                  Source file path
  http:                 Source file path
  https:                Source file path
  installed-extensions  Copy installed extensions status
  running-config        Copy from current system configuration
  scp:                  Source file path
  startup-config        Copy from startup configuration
  system:               Source file path
  tftp:                 Source file path
  usb1:                 Source file path
In this case, since we’re using a USB drive, the source will be
usb:filename,
and the destination will be flash:. If we
were to source the file from a TFTP server, then the source would be
tftp:.
Arista#copy usb1:EOS-4.8.1.swi flash:
Arista#
On this rev of code, there is no pretty progress indicator. Luckily, the system copies pretty quickly, and this image is only about 225 MB, so there isn’t much time to panic. Still, if pressing enter and not getting a response makes you panic, then be prepared to grit your teeth for a few seconds while the copy ensues. Once the copy is done, we can verify that it resides in its new home in the flash:/ directory.
Arista#dir
Directory of flash:/

       -rwx   222153243           Dec 22  2011  EOS-4.7.8.swi
       -rwx   225217184           Apr 15 19:48  EOS-4.8.1.swi
       -rwx          24           Dec 22  2011  boot-config
       drwx        4096           Apr 10 23:20  debug
       -rwx           0            May 7  2008  fullrecover
       drwx        4096           Apr 10 23:20  persist
       -rwx        2674           Apr 10 23:13  startup-config
       -rwx           0           Apr 10 23:20  zerotouch-config

1862512640 bytes total (1192943616 bytes free)
Now that we have our EOS image safely on board, we can configure the system to use it. But what happens if we don’t? With two images on flash, and the system not configured to use either, which one will it choose? For fun, I rebooted the system, during which I saw the following messages:
Arista#reload
Proceed with reload? [confirm]

Broadcast message from root@ArisStopping sshd: [  OK  ]
SysRq : Remount R/O
Restarting system


Aboot 1.9.2-140514.2006.eswierk


Press Control-C now to enter Aboot shell
Booting flash:EOS-4.7.8.swi
Starting new kernel
[-- output removed --]
EOS will not simply boot the first image it finds on flash. The reason
for this will become apparent in another paragraph or two, so hang in there.
For now, let’s go ahead and configure the system to boot from the new image.
As with other vendors, the command to do this is the boot system command:
Arista(config)#boot system ?
  file:   Software image URL
  flash:  Software image URL
  usb1:   Software image URL
Did you notice that the usb1: file system is included in the output? We could configure the switch to boot from an image on the USB drive if we so desired. Almost anything we can do with normal flash, we can also do with USB, provided that there is a drive in the USB slot. For now, though, let’s go ahead and configure the switch to boot from its new image in flash:
Arista(config)#boot system flash:EOS-4.8.1.swiEOS supports tab completion, so instead of copying and pasting the entire filename, try using the Tab key. Luckily, Arista keeps all the image names short and tidy, which is another pleasant surprise after decades of other vendors’ lengthy filenames.
Now that we’ve got the new image primed and ready to go, let’s reboot the switch:
Arista(config)#reload
Proceed with reload? [confirm]
Hold on a minute! We didn’t save the configuration, so why didn’t the
system prompt us to save it before rebooting? The boot system command doesn’t really make changes to
the running config. Instead, it writes to a file on system:/ called
boot-config.
Arista(config)#dir
Directory of flash:/

       -rwx   222153243           Dec 22  2011  EOS-4.7.8.swi
       -rwx   225217184           Apr 15 12:48  EOS-4.8.1.swi
       -rwx          25           Apr 15 20:03  boot-config
       drwx        4096           Apr 15 20:11  debug
       -rwx           0            May 7  2008  fullrecover
       drwx        4096           Apr 15 20:10  persist
       -rwx        2676           Apr 15 19:55  startup-config
       -rwx           0           Apr 10 23:20  zerotouch-config

1862512640 bytes total (1189879808 bytes free)
As you see, boot-config is the filename used for a process called Aboot. Aboot is the boot-loader for the switch (which is really a Linux system, remember). Aboot will be covered in more detail later in the book. For now, understand that without the boot-loader’s configuration file, our switch will not boot. I took the liberty of deleting this file to prove my point. With both image files present, and no boot-config file found, the switch flounders shortly after initialization:
Arista(config)#reload
System configuration has been modified. Save? [yes/no/cancel/diff]:
Invalid response
System configuration has been modified. Save? [yes/no/cancel/diff]:y
Proceed with reload? [confirm]

Broadcast meStopping sshd: [  OK  ]
[  575.544430] SysRq : Remount R/O
Restarting system


Aboot 1.9.2-140514.2006.eswierk


Press Control-C now to enter Aboot shell
No SWI specified in /mnt/flash/boot-config
Welcome to Aboot.
Aboot#
That’s it; the switch is dead in the water. What’s worse, if you’ve ever been near a modern switch from most any vendor when it boots, you’ll know that all the fans go to full power upon power up, and then slow down to an acceptable level after boot up. With no EOS image to load, the switch spins its fans at full speed. It’s annoying, and no one likes it, especially my wife who came down to yell at me about all the noise while I was writing this chapter. But I digress...
Aboot will be covered in another chapter, but for now, let’s get our noisy switch back online before my wife kills me:
Aboot# boot mnt/flash/EOS-4.8.1.swiThis will boot the switch from the proper image, but after deleting
the boot-config file, we will need to put it
back. To further reinforce that the boot-config file is
where the magic happens, take a look at the output from the show
boot command after the switch boots:
Arista#sho boot
Software image: (not set)
Console speed: (not set)
Aboot password (encrypted): (not set)
But what about the running-config? Didn’t
the switch figure out where we booted from? Not really. Remember, we told
Aboot what image to boot from, but that only applied for this instance. The
boot mnt/flash/EOS-4.8.1.swi Aboot
command did not update the boot-config file, it just
booted the system. As a result, the running-config
contains no reference to a boot image, because the
running-config gets that information from the
boot-config file. The proper way to fix this is with the boot
system command:
Arista#boot system flash:/EOS-4.8.1.swiThe output from show boot looks much better
now, and the system will boot normally, just as long as we keep our paws off
of the boot-config file:
Arista(config)#sho boot
Software image: flash:/EOS-4.8.1.swi
Console speed: (not set)
Aboot password (encrypted): (not set)
From this point on, the switch will load the specified image on
reload. Without the diversion for showing you how the switch reacts to not
having a boot-config file, the process was very simple:
get the code on the system, update the boot-config file
with the boot system command, and
reload.
If you’re running MLAG, check out Chapter 12 for details about upgrading using MLAG ISSU, which allows for a switch pair to be upgraded with minimal packet loss and no STP reconvergence!