
When a fixed configuration Arista switch boots, and no startup-config is found, the switch will default to Zero-Touch Provisioning (ZTP) mode (on EOS v3.7 and higher). Your first reaction to ZTP may be that it’s a pain in the ass, but I assure you it’s not, and I hope that by the end of this chapter, you’ll agree. In fact, it’s a seriously cool feature that can be used to great effect.
Have you ever installed a new switch out of the box? Chances are you mounted it and sat in the data center with a console cable, or you sat with it on your desk while your workmates plotted against you because of all the fan noise. Or consider the idea of remote installations. I’ve had many clients who have bought remote “smart” hands service, only to discover that those remote hands weren’t so smart after all. ZTP is designed to provide the ability to eliminate both situations, all through the use of standards-based Dynamic Host Configuration Protocol (DHCP).
Note
Late in the production of this book, I received word that ZTP would be coming to chassis-based switches sometime soon after EOS v4.10, due to popular demand.
The reason I say that it can be a pain, is because when a new switch is powered up, and steps to use ZTP have not been taken, configuring the switch is next to impossible. Here’s the first indication that you’re in for a long day if you’ve no idea how Arista switches behave. When you hit Enter at the login prompt of a new switch, you’re greeted with the following warning:
localhost login:

No startup-config was found.

The device is in Zero Touch Provisioning mode and is attempting to
download the startup-config from a remote system. The device will not
be fully functional until either a valid startup-config is downloaded
from a remote system or Zero Touch Provisioning is cancelled.

To cancel Zero Touch Provisioning, login as admin and type
'zerotouch cancel' at the CLI. Alternatively, to disable Zero Touch
Provisioning permanently, type 'zerotouch disable' at the CLI.
Note: The device will reload when these commands are issued.
Now, if you’re a high-level know-it-all network guy like me, you glossed over that because there were too many words. Allow me to point out the important bits in bold:
The device will not be fully functional until either a valid
startup-config is downloaded from a remote system or Zero Touch
Provisioning is cancelled.
Yeah, that looks important…especially the part about the device not being fully functional. Still didn’t read? Allow me to demonstrate. Ignoring all dire warnings of impotent switches, I’ve logged in and started configuring. First, the hostname; it will need to be something special:
localhost#conf tlocalhost(config)#hostname AristaArista(config)#
Cool! Now that my switch has a clever hostname, I’ll save the configuration, because 30 years of bad habits are hard to undo:
Arista(config)#wriLife is good, so I take a well-deserved break for my hourly dose of caffeine and sugar, after which I come back and hit Return. Again, 30 years of bad habits force me to perform actions beyond my control, so without thinking I mash the Return key a couple of times:
Arista(config)#
localhost(config)#
localhost(config)#
What the hell? I configured the switch, even saved the config, and the switch reverted to a generic hostname on its own! Stupid new switches that…wait a minute. What was that error message I saw earlier? Wasn’t there something about canceling something? Here’s the part:
To cancel Zero Touch Provisioning, login as admin and type
'zerotouch cancel' at the CLI. Alternatively, to disable Zero Touch
Provisioning permanently, type 'zerotouch disable' at the CLI.
Note: The device will reload when these commands are issued.
This little comedy of errors I just walked you through is almost a word-for-word account of my first interaction with an Arista switch. Because I’m a man, and a high-level networking know-it-all, I found no reason to read the documentation, let alone the warning message. Let’s cut to the chase, and I’ll show you what’s really going on.
When an Arista switch boots for the first time, ZTP is enabled.
The switch sees that there is no
startup-config, so it configures all interfaces with
the no switchport command, then sends out
DHCP queries on any Ethernet and Management interfaces. If you’re patient
(I’m not), and take the time to read the messages (I didn’t), you’ll see
exactly what’s going on. Here’s a sample from a switch in such a
state:
Apr 10 23:17:19 localhost ZeroTouch: %ZTP-5-DHCP_QUERY: Sending DHCP
request on  [ Ethernet10, Ethernet11, Ethernet24 ]
Apr 10 23:18:19 localhost ZeroTouch: %ZTP-5-DHCP_QUERY_FAIL: Failed
to get a valid DHCP response
Apr 10 23:18:19 localhost ZeroTouch: %ZTP-5-RETRY: Retrying Zero Touch
Provisioning from the begining (attempt 2)
The switch found three connected interfaces (E10, E11, and E24), and sent DHCP queries out to all of them. Sadly, there were no responses, so it kept trying. If you leave it in this state, it will try forever. If you configure the switch, the configuration will be trashed, as ZTP tries again and again to find a config, or at least an IP address.
At this point, there are four things you can do:
Cancel ZTP
Disable ZTP
Actually boot using ZTP to our advantage
Give up, quit your job, move to Texas, and grow sugar beets
I suppose we could also turn off the switch and hit the bar for some cocktails, but let’s keep this discussion focused on ZTP and examine each choice.
Cancelling ZTP is pretty simple. Just log in, enter configuration
mode, and issue the zerotouch cancel
command:
localhost#conf tlocalhost(config)#zerotouch cancelApr 10 23:19:26 localhost ZeroTouch: %ZTP-5-CANCEL: Cancelling Zero Touch Provisioning localhost(config)#Apr 10 23:19:26 localhost ZeroTouch: %ZTP-5-RELOAD: Rebooting the system Broadcast messagStopping sshd: [ OK ] watchdog is not running SysRq : Remount R/O Restarting system
Notice that there is no “Are you sure?” prompt. If you issue this command, the switch will reload. That’s not such a bad thing, since anything we tried to configure got wiped out anyway. Besides, those ZTP messages get old quickly.
When the switch reboots, you’ll be able to configure it as you would expect. Here’s the rub: if you cancel ZTP, it’s still there, it’s just not bothering you this time. In fact, the configuration will still have the login banner programmed with the ZTP warning message.
If, with ZTP cancelled, you erase the startup-config and reboot, you will again be treated to ZTP’s never ending messages and attempts at finding a DHCP server:
May 14 05:44:59 localhost ZeroTouch: %ZTP-5-INIT: No startup-config
found, starting Zero Touch Provisioning
May 14 05:45:34 localhost ZeroTouch: %ZTP-5-DHCP_QUERY: Sending DHCP
request on  [ Ethernet10, Ethernet11, Ethernet24 ]
Let’s say that for some reason, no matter what, you don’t want to see ZTP’s ugly face again. In order for that to happen, ZTP must be completely disabled.
To completely disable ZTP, log in as admin and issue the
zerotouch disable command. The switch
will immediately reboot (again, without warning or confirmation), only
this time, ZTP is terminated with extreme prejudice as evidenced by the
following messages;
localhost#zerotouch disable
May 14 05:47:42 localhost ZeroTouch: %ZTP-5-CANCEL: Cancelling Zero Touch Provisioning
May 14 05:47:42 localhost ZeroTouch: %ZTP-5-RELOAD: Rebooting the system
May 14 05:47:43 localhost ProcMgr-worker: %PROCMGR-6-WORKER_WARMSTART:
ProcMgr worker warm start. (PID=1446)
May 14 05:47:43 localhost ProcMgr-worker:
%PROCMGR-6-TERMINATE_RUNNING_PROCESS: Terminating
deconfigured/reconfigured process 'ZeroTouch' (PID=1506)
May 14 05:47:44 localhost ProcMgr-worker:
%PROCMGR-6-PROCESS_TERMINATED: 'ZeroTouch' (PID=1506) has terminated.
May 14 05:47:44 localhost ProcMgr-worker:
%PROCMGR-6-PROCESS_NOTRESTARTING: Letting 'ZeroTouch' (PID=1506)
exit - NOT restarting it.
Now, the system boots once more, and there isn’t even a trace of ZTP:
The system is going down for reboot NOW!
Stopping sshd: [  OK  ]
watchdog is not running
[  253.549272] SysRq : Remount R/O
Restarting system


Aboot 1.9.2-140514.2006.eswierk


Press Control-C now to enter Aboot shell
Booting flash:/EOS-4.9.3.swi
Starting new kernel
Switching rootfs
Welcome to Arista Networks EOS 4.9.3
Mounting filesystems:  [  OK  ]
Starting udev: [  OK  ]
Setting hostname localhost:  [  OK  ]
Entering non-interactive startup
Starting EOS initialization stage 1: [  OK  ]
ip6tables: Applying firewall rules: [  OK  ]
iptables: Applying firewall rules: [  OK  ]
iptables: Loading additional modules: nf_conntrack_tftp [  OK  ]
Starting system logger: [  OK  ]
Starting NorCal initialization: [  OK  ]
Retrigger failed udev events[  OK  ]
Starting EOS initialization stage 2: [  OK  ]
Starting ProcMgr: [  OK  ]
Completing EOS initialization: [  OK  ]
Starting Power On Self Test (POST): [  OK  ]
Starting sshd: [  OK  ]
Starting xinetd: [  OK  ]
Starting crond: [  OK  ]
Model: DCS-7124S
Serial Number: JSH10170315
System RAM: 2043416 kB
Flash Memory size:  1.8G

localhost login:
At this point you can reboot the switch to your heart’s content, and
ZTP will not come back. If you’d like to bring ZTP back, you can’t even do
it from exec mode:
localhost#zerotouch ?
  cancel               Cancel ZeroTouch and reload the switch
  disable              Disable ZeroTouch and reload the switch
  script-exec-timeout  Change timeout for the downloaded script to
                       finish execution
In fact, you can’t even do it in config mode, though there’s an option for
enable, which gives us a clue as to
what we need to do:
localhost#conf tlocalhost(config)#zerotouch enable% Configuration ignored: ZeroTouch can not be enabled interactively. To enable ZeroTouch, delete startup-config and reload the switch.
Sadly, that doesn’t work either, at least in EOS version 4.9.3. ZTP is dead. Unless you accept the fact that nothing is impossible with an Arista switch! Check out what’s on the flash: drive:
localhost#dir
Directory of flash:/

       -rwx   188621783           Apr 16 02:32  EOS-4.4.0.swi
       -rwx   221921815           Apr 16 02:38  EOS-4.7.7.swi
       -rwx   222153243           Apr 16 02:39  EOS-4.7.8.swi
       -rwx   225217184           Apr 16 02:38  EOS-4.8.1.swi
       -rwx   245827739           Apr 16 08:19  EOS-4.9.1.swi
       -rwx   248665992           May 12 12:36  EOS-4.9.3.swi
       -rwx         137           May 12 13:44  boot-config
       drwx        4096           May 14 06:00  debug
       drwx        4096           May 14 06:00  persist
       drwx        4096           Apr 15 19:47  schedule
       -rwx           0           May 14 19:31  startup-config
       -rwx          13           May 14 06:10  zerotouch-config
Hmm. Let’s dig into that file and see what we find, shall we?
localhost#bashArista Networks EOS shell [admin@localhost ~]$cd /mnt/flash[admin@localhost flash]$more zerotouch-configDISABLE=True
Ha! I bet if we change that to false, that we’ll get ZTP back. Let’s
try it and see. I’ve gone in and flexed my nerdy vi
skills, and changed the file to show DISABLE=False:
[admin@localhost flash]$ more zerotouch-config
DISABLE=False
Now I’ll clear the startup-config with write erase and reboot to see what
happens:
[admin@localhost flash]$exitlogout localhost# localhost#write eraselocalhost#reloadSystem configuration has been modified. Save? [yes/no/cancel/diff]:noProceed with reload? [confirm] Broadcast message from root@localhost (unknown) at 19:40 ... The system is going down for reboot NOW! [--- lots of output truncated ---] May 14 19:42:54 localhost ZeroTouch: %ZTP-5-INIT: No startup-config found, starting Zero Touch Provisioning
This was actually pretty cool for me when I first figured it out. Though I could find no mention of how to do this in the documentation, with my experience using Arista switches, I reasoned that there had to be a configuration file somewhere, and that Arista would never permanently disable a feature. Following that logic, I found the configuration file, changed it, and was rewarded with the expected results.
Note
You can also reset ZTP by issuing the fullrecover command in Aboot. Be careful
though, as this will wipe out everything on your
switch. See Chapter 18 for more information on
Aboot.
Hopefully you’ve considered the possibility of booting with ZTP, because as we’re about to see, it’s pretty darn cool. As with all things Arista, it’s well thought out and powerful.
The first thing we need to know is that while ZTP can load a configuration from the network, it can also run scripts. Before we get to that, let’s take a look at what needs to happen in order for an Arista switch to boot using ZTP.
When a switch boots in ZTP mode, it configures all the Ethernet and
Management interfaces with the no
switchport command in order to allow DHCP to be run on those
interfaces. DHCP is capable of much more than just providing an IP
address, and ZTP takes advantage of this fact. In order to see how, let’s
first take a look at how to configure a DHCP server in order to use
ZTP.
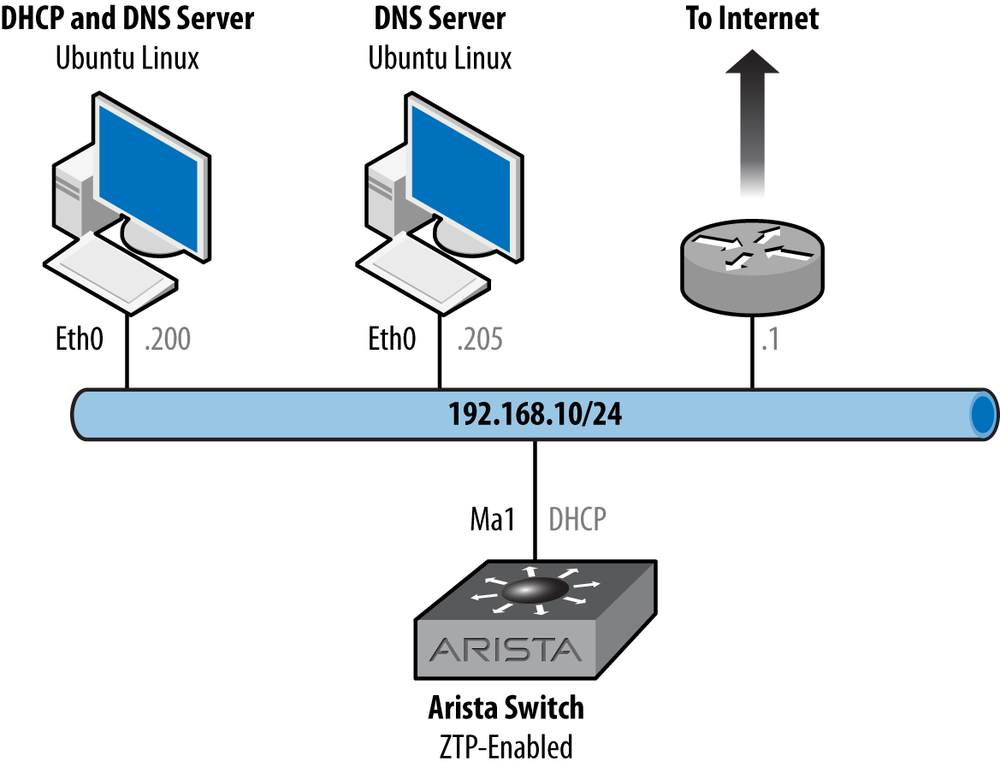
I’ve set up a lab where I have an Ubuntu Linux server, an existing network, and a new Arista switch. I’m using dhcpd on the Linux server to serve DHCP. The examples used in this section will reflect the configuration required for dhcpd, though the concepts should be universal for any DHCP server that supports them. The lab network is shown in Figure 25-1.
To start with, I’ve configured the regular DHCP parameters as follows to fit with my network:
option subnet-mask 255.255.255.0;
option broadcast-address 192.168.1.255;

option routers 192.168.1.1;
option domain-name-servers 192.168.1.200, 192.168.1.205;
option domain-name "gad.net";

subnet 192.168.1.0 netmask 255.255.255.0 {
range 192.168.1.160 192.168.1.167;
Given this configuration, dynamically allocated IP addresses will be
served from the pool 192.168.1.160–167. Now I’ll configure a specific IP
address outside of that range for my Arista switch. First, I’ll need to
know the MAC address for the management
1 interface on my switch. To get that, I’ll use the show interface ma1 command:
localhost#sho int management 1
Management1 is up, line protocol is up (connected)
  Hardware is Ethernet, address is 001c.7308.80ac (bia 001c.7308.80ac)
  Description: [ Management Link ]
  MTU 1500 bytes, BW 1000000 Kbit
  Full-duplex, 1Gb/s, auto negotiation: on
  Up 17 minutes, 58 seconds
  Last clearing of "show interface" counters never
  5 minutes input rate 748 bps (0.0% with framing), 1 packets/sec
  5 minutes output rate 52 bps (0.0% with framing), 0 packets/sec
     814 packets input, 103190 bytes
     Received 201 broadcasts, 608 multicast
     0 runts, 0 giants
     0 input errors, 0 CRC, 0 alignment, 0 symbol
     0 PAUSE input
     47 packets output, 8296 bytes
     Sent 0 broadcasts, 0 multicast
     0 output errors, 0 collisions
     0 late collision, 0 deferred
     0 PAUSE output
With the MAC address in hand, I can now configure my DHCP server for this switch:
host Arista1 {
  option dhcp-client-identifier 00:1c:73:08:80:ae;
  fixed-address 192.168.1.170;
  option bootfile-name "http://www2.gad.net/Arista/Arista1-ZTP";
  }
This configuration will deliver the IP address 192.168.1.170 to the
device that requests an IP address from the MAC address shown. Note that I
had to change the format of the MAC address since it is shown differently
on the switch than the way the DHCP configuration file requires it.
Lastly, the option bootfile-name line
shows an HTTP URL. The switch, upon receiving and activating the IP
address, will go to this URL and download the bootfile. Here’s where this
gets fun.
This file can be either a startup-config, in
which case the switch will apply the configuration and reboot, or it can
be a script. ZTP will decide based on the first line of the file found at
the bootfile-name address. If the first
line includes the path to a shell, the shell will be loaded and the file
will be considered a shell script. If not, the file will be considered a
startup-config file, and treated accordingly.
Let’s look at an example that might apply for the real world. Here’s how I’ve configured my Arista1-ZTP file on the webserver:
[root@cozy Arista]$ more Arista1-ZTP
#!/usr/bin/Cli -p2
enable
copy http://www2.gad.net/Arista/Arista1-startup flash:startup-config
copy http://www2.gad.net/Arista/EOS-4.9.3.swi flash:
config
boot system flash:EOS-4.9.3.swi
This file will perform the following actions on the switch, in order, after ZTP loads it:
Load the CLI process
Enter EOS CLI enable mode
Copy the startup-config from the webserver to flash:
Copy the desired revision of EOS from the web server to flash:
Enter EOS CLI configuration mode
Set the boot-config to boot from the new EOS version just downloaded
Once the script has completed, the switch will reload. Let’s take a look at the switch as it boots with the ZTP configuration loaded on the DHCP server.
Here, my switch is running EOS version 4.8.1:
Arista#sho ver
Arista DCS-7124S-F
Hardware version:    06.02
Serial number:       JSH10170315
System MAC address:  001c.7308.80ae

Software image version: 4.8.1
Architecture:           i386
Internal build version: 4.8.1-495947.2011eric481Showstopper
Internal build ID:      b15379fb-13e9-4255-819f-e55dde3c3471

Uptime:                 1 day, 19 hours and 38 minutes
Total memory:           2043424 kB
Free memory:            785968 kB
And the existing boot configuration is pointing to 4.8.1 as well:
Arista#sho boot
Software image: flash:/EOS-4.8.1.swi
Console speed: (not set)
Aboot password (encrypted): (not set)
Now I’ll erase the startup-config with the
write erase command:
Arista#write eraseI’ll prove there’s nothing there:
Arista#sho start
Arista#
And reload:
Arista#reloadSystem configuration has been modified. Save? [yes/no/cancel/diff]:noProceed with reload? [confirm]
Now let’s watch the ZTP messages as the switch boots. I’ve only included the relevant message here to save space:
May 12 20:28:45 localhost ZeroTouch:
%ZTP-5-DHCP_QUERY: Sending DHCP request on  [ Ethernet10, Ethernet11,
 Management1 ]
May 12 20:28:48 localhost ZeroTouch: %ZTP-5-DHCP_SUCCESS: DHCP
response received on Management1  [ Ip Address: 192.168.1.170/24;
Nameserver: 192.168.1.200; Nameserver: 192.168.1.205; Domain: gad.net;
 Gateway: 192.168.1.1; Boot File:
 http://www2.gad.net/Arista/Arista1-ZTP ]
May 12 20:28:53 localhost ZeroTouch: %ZTP-5-CONFIG_DOWNLOAD:
Attempting to download the startup-config from
http://www2.gad.net/Arista/Arista1-ZTP
May 12 20:28:54 localhost ZeroTouch: %ZTP-5-CONFIG_DOWNLOAD_SUCCESS:
Successfully downloaded config script from
http://www2.gad.net/Arista/Arista1-ZTP
May 12 20:28:54 localhost ZeroTouch: %ZTP-5-EXEC_SCRIPT:
Executing the downloaded config script
At this point the switch has downloaded the Arista ZTP file, applied what it found there, and reloaded. Note that this message may seem to hang for a bit if you’re watching it and the switch is downloading new code:
May 12 20:29:18 localhost ZeroTouch: %ZTP-5-EXEC_SCRIPT_SUCCESS:
Successfully executed the downloaded config script
May 12 20:29:18 localhost ZeroTouch: %ZTP-5-RELOAD: Rebooting the system
Stopping sshd: [  OK  ]
watchdog is not running
[  148.565460] SysRq : Remount R/O
Restarting system


Aboot 1.9.2-140514.2006.eswierk


Press Control-C now to enter Aboot shell
Booting flash:/EOS-4.9.3.swi
Starting new kernel
Data in /mnt/flash/EOS-4.9.3.swi differs from previous boot image
 on /mnt/flash.
Saving new boot image to /mnt/flash...
Switching rootfs
Welcome to Arista Networks EOS 4.9.3
Mounting filesystems:  [  OK  ]
Starting udev: [  OK  ]
Setting hostname localhost:  [  OK  ]
Entering non-interactive startup
Starting EOS initialization stage 1: [  OK  ]
ip6tables: Applying firewall rules: [  OK  ]
iptables: Applying firewall rules: [  OK  ]
iptables: Loading additional modules: nf_conntrack_tftp [  OK  ]
Starting system logger: [  OK  ]
Starting NorCal initialization: [  OK  ]
Retrigger failed udev events[  OK  ]
Starting EOS initialization stage 2: [  OK  ]
Starting ProcMgr: [  OK  ]
Completing EOS initialization:
Starting Power On Self Test (POST): [  OK  ]
Starting sshd: [  OK  ]
Starting xinetd: [  OK  ]
Starting crond: [  OK  ]
Model: DCS-7124S
Serial Number: JSH10170315
System RAM: 2043416 kB
Flash Memory size:  1.8G

Arista login:
So without direct interaction, the switch booted, ran our script, loaded the new configuration, downloaded new code, rebooted, and applied the new code. Did you notice that the switch suddenly has a hostname (Arista)? That’s due to the configuration being loaded from the URL listed in the Arista1-ZTP file.
Imagine a scenario where you’re installing 50 new Arista switches. This procedure could put a base configuration on them all while also loading the right version of code. That’s my kind of time-saving feature!
Not only that, but some customers have developed scripts that auto-archive the configs on all their switches every day (which is always a good idea), and then update the ZTP files accordingly. When a switch fails, ZTP on the replacement switch references the proper files that have been scripted to contain the config of the switch being replaced. Think about the time saved during an outage when the switch configures itself after a replacement.