
p.39
Mixing Consoles. So Many Knobs, So Little Time
In This Chapter:
THE MIXING CONSOLE
A mixing console may commonly be referred to as a mixer, a desk, a board, a soundboard, an audio production console, or by a list of other names. No matter what a console is called they all perform the same basic functions. All consoles have faders that allow for volume control, pan knobs to position a sound from left to right, an auxiliary section to control effects, headphones, or monitors, and a whole host of other functions that will be discussed in this chapter. Mastering the console will be necessary to succeed in audio production. Think of the console as command central, controlling audio and its various components. Much like the dashboard of your car that has controls for the A/C, radio, and lights, a console has audio-related controls. Consoles are used in recording, live sound, or in conjunction with digital audio workstations (DAWs). In the all-digital world, there are virtual mixers, but there are also control surfaces that allow you to work on hardware instead of clicking a mouse when using a DAW.
The Channel Strip
Whether you are working on a physical or a virtual console, many of the controls are the same. If there are thirty-two channels on the board, understanding the controls on one channel is a huge step because understanding one channel means you will understand all the thirty-two channels. Once you learn one channel strip, you will know quite a bit about the console or virtual mixer.
p.40

FIGURE 4.1 Neve Discrete in control room “A” of the Firefly Sound Studio at The Studios at Fischer, Texas
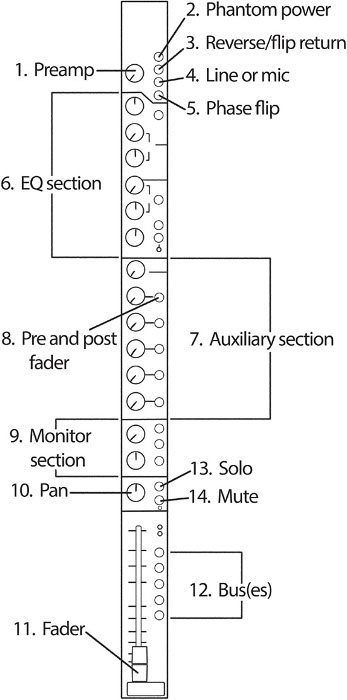
FIGURE 4.2
p.41
Most console channel strips, real or virtual, will include the following functions:
1. Preamp – Used to amplify a microphone’s signal.
2. +48 V – Provides phantom power required by most condenser microphones.
3. Reverse/flip return – Usually a function with in-line consoles. This button gives you another option besides the fader to send or return a signal. This return option is often a choice between a pot and a fader.
4. Line/mic – Determines if the channel will be used with a mic (send) or as a line (return/monitor).
5. Phase flip – Flips the polarity 180 degrees on the channel selected. This is a great feature to use when checking phase between stereo mics.
6. EQ section – Varies from console to console and with the type of software being used. It can change the tone of the signal that is being routed through the channel.
7. Auxes/auxiliary – Used for monitoring and effects (FX). With live sound, they control the mix sent to the stage monitors. In the recording studio, auxes are used to build a headphone mix. When the aux is used for monitoring you will typically select “pre.” Both in the studio and with live sound, auxes are used to apply FX to a particular channel. When the auxes are used for FX you will typically select “post.” This ensures that the FX isn’t heard unless the fader is up.
8. Pre and Post – Allows the user to select whether aux sends are before or after the fader. In “pre,” the aux path would be before the fader, meaning the fader would not affect what is being processed. As previously mentioned, “pre” position is typical when the aux is being used for headphones or monitors. When you turn a fader up or down it will not affect the headphone mix. In “post,” the auxiliary knob would be after the fader, meaning the fader position would affect the aux send. The “post” position is used when the aux is being used for FX, unless you still want to hear a ghostly FX sound when the fader is all the way down. I have only used this method once in about 25 years, so that should tell you something. . .
9. Monitor section – Another option to return the signal from the recorder to monitor the sound. This section is typically used during tracking and can also be referred to as the tape return section or as Mix B.
10. Pan – Allows you to place a sound anywhere between the left and right speakers.
11. Fader – Controls the level being sent to a bus or a recorder.
12. Bus(es) – A common path that allows the engineer to combine signals from as many channels as you select. A bus on a console is typically configured for 4-, 8-, or 24-channel mono or stereo L/R. Often the Bus section is shared with the Group or Subgroup section.
13. Solo – Allows you to isolate the channel selected from the others. However, multiple channels can be soloed at the same time.
15. Mute – Turns off sound on the selected channel; opposite of solo.
p.42
![]() TIP
TIP
Don’t rely on using the solo function too much while mixing. It is more important for music to sound good as a whole, rather than as individual sounds. It is not uncommon that an individual sound may not be what you really had in mind but it sounds perfect in the mix. If you rely on the solo function you may not discover how a sound works with all the other sounds.
Preamp
The preamp controls the gain and is used to boost a microphone signal. The preamp section usually has a +48 V button to apply phantom power to the required mics. The line button is often found in the preamp section. When the line button is pressed down, it receives signal and acts as a tape return. Although many consoles don’t say it, when the line button is up, mic is selected. So really the line button is either line or mic depending on your selection. If the console is an in-line type, there will be a reverse or flip button possibly near the preamp to allow the channel to send and receive signal simultaneously. The phase flip option gives the user the ability to flip the polarity 180 degrees on the channel selected. This can be helpful when checking phase between two or more mics.

FIGURE 4.3
EQ Section
The EQ section gives control over the tone or color of the instrument being run through the selected channel. Both amplitude and frequency adjustments are made in this section. This allows the user to boost or cut a frequency or range of frequencies. The most common parameters associated with an equalizer are frequency, amplitude, and slope (Q).
p.43

FIGURE 4.4
EQ sections are divided into specific frequency bands. Many consoles will be broken up into three bands with a low-frequency knob, a mid-frequency knob, and a high-frequency knob. Some consoles will have a fixed set of frequencies to choose from, while other consoles give control to select virtually any frequency between 20 Hz and 20 kHz.
Next to each frequency knob will be another knob, or pot, to adjust the amplitude of the frequency you have chosen. There will be a center point on the amplitude knob, where nothing will be boosted or cut. Adjusting the knob to the right of this point will increase the amplitude of the frequency selected. Adjusting the knob to the left of this point will decrease the amplitude.
The slope is the area around the frequency selected. If you have the ability to adjust the slope you are working with a parametric equalizer where slope settings range from extremely narrow, or notching, to extremely wide and gentle. A narrow slope is helpful when notching out noise. Choosing a narrower slope will affect a smaller range of frequencies. A wider slope will affect a larger range of frequencies. Choosing a wider slope may allow you to eliminate unwanted noises, but in doing so you may likely alter or affect your desired sounds as well.
p.44
Most EQ sections include a low-cut and/or high-cut filter. The frequency associated with this filter varies from console to console and is often indicated next to the button you are selecting.
More affordable consoles tend to have at least one fixed frequency knob to save on cost. This is usually some type of shelving EQ. With a shelving EQ, the preset or frequency selected is the starting point and not the center point as with many other EQs. These fixed points are either high or low frequencies, and when selected all frequencies are boosted or cut the same amount above or below the point, creating a shelf. Some common presets would be a low shelf (LF) at 60 or 120 Hz and a high shelf (HF) at 12 or 16 kHz. With these controls, only amplitude can be adjusted and not frequency.
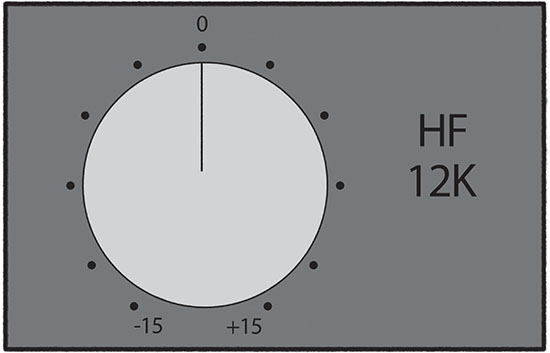
FIGURE 4.5
Auxiliary Section
Auxes are used to control FX sends. They are also used to control headphone and monitor mixes. I have worked on consoles that have anywhere from two to eighteen auxes per channel. In the studio, auxes are used to create a headphone mix or are used as FX sends. For live sound, auxes are used to create a stage or monitor mix and to control FX. The “pre” button located near the aux send, when selected, puts the aux path before the fader. The pre is selected when the aux is being used as a headphone or monitor send. In this way, the engineer can have their own fader mix and the adjustments won’t affect the headphone mix. The pre will not be selected when you want to use the aux as an FX send.
p.45
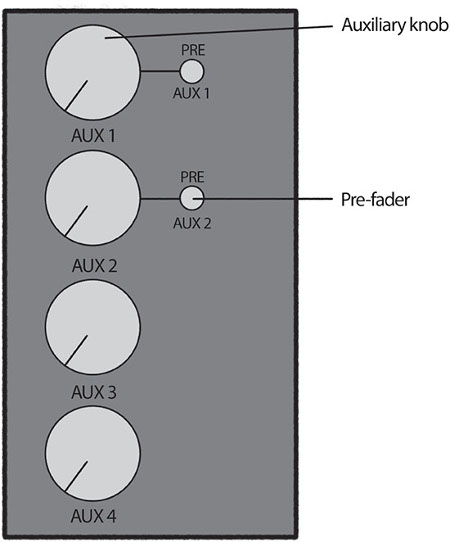
FIGURE 4.6
Monitors, Faders, and Buses
Some consoles, especially those known as in-line, will allow the user to both send and receive signal on a single channel when recording. If you are using the channel’s preamp, it is necessary to have both a tape send and a tape return. The fader would typically be your monitor level, but when recording it controls the amount of signal going to your recorder. If the fader is being used to send level to the recorder, you obviously won’t be able to monitor the return on that same fader. In-line consoles allow you to send level on a channel and also monitor level on the same channel because of an additional pot or fader. On some consoles, the monitor return is called “Mix B” with “Mix A” represented by the fader. When recording with a split console, half the console’s faders are used for sending level to the recorder and the other half of the faders are used to monitor the sound. With a thirty-two-input console, channels 1 to 16 could be used for sending level to tape and channels 17 to 32 used to monitor the sound (return). Channel 1 would send level to track 1 and channel 17 would be used to monitor the track. Channel 2 would send level to track 2, channel 18 would monitor track 2, and so on.
p.46

FIGURE 4.7
A fader controls the volume for that channel. It is almost always found at the bottom of the console, and on some it appears as a “slider.” As previously mentioned, if a mic is plugged into a channel, the fader may control the output level sent to the recorder. Faders can act as returns to monitor signal or as sends to control output to a recorder. There will be more discussion about signal flow in the next chapter.
The bus section can be found near the fader at the bottom of the console or at the top of the console near the preamp. When the signal returns to the channel, it must be assigned to a bus to be heard. The most common selection would be to press L/R or stereo bus on the channel. This would send the signal to the stereo fader, which in turn feeds the speakers and two-track recorder. Besides the L/R or stereo bus, consoles have additional buses. Most consoles have eight buses, but some have up to twenty-four buses. The bus allows you to assign the channel to a variety of signal paths. If level is returning to a channel and can’t be heard it might be because a bus (path) for the signal has not been selected.
p.47
Master Section
In addition to the channel strip, recording consoles have a master section. The master section will have the master controls for the faders, auxiliaries, speakers, and other inputs and outputs, like an external two-track or CD player.
The master fader is where all individual sounds are summed to two channels: left and right. The output of this commonly feeds the speakers and any external two-track such as a CD/DVD recorder, the stereo input into your DAW or a half-inch tape machine.
The master auxiliary section controls the overall volume of the auxiliary selected. Most consoles have both an Aux Send master section and an Aux Return master section.
The master solo controls the overall solo volume when you solo a track. I set this to match my overall listening volume. When you solo an instrument, it will sound like your listening volume and you will be less likely to make unnecessary adjustments based on the volume. Often we think louder is better. . .
Main – sometimes called monitor – volume controls overall listening volume for speakers. This typically controls the volume for the stereo bus, two-track returns, or any other signal played through speakers.
Some additional controls common on an audio production console are as follows: Alt(ernate) Monitor switch, Mono button, and Talkback mic and button. These controls are often grouped together on the board.
The alternate monitor button will allow the user to switch between multiple sets of speakers. Studios typically have at least two sets of speakers that the engineer will use to A/B (compare) sounds. Consider having at least two sets of speakers that specialize in different areas. Make sure mixes sound good on lower quality speakers as well as the best pair. Always remember that if a mix sounds good on a lower quality pair of speakers, it’ll more than likely sound good on just about anything.
When the mono button is pressed, the stereo image is summed to mono. I constantly check my mixes in mono to make sure that they are in phase and that they would hold up if played on a mono system.
The talkback mic is useful when the musicians are wearing headphones, using stage monitors, or if there are playback speakers in the studio. Talkback mics are often mounted flush with the surface of the console. Other talkback mics can be attached to the console. The talkback button is pushed to activate the mic. In the studio, the talkback mic signal is usually routed through the aux sends feeding the headphone mix. This makes it easier for the engineer or producer to communicate with the musicians in the studio.
p.48
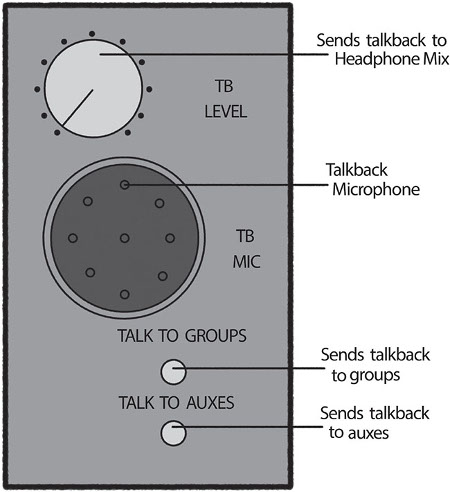
FIGURE 4.8
Meters
Meters on a console indicate the amount of signal input or output from the channel, stereo bus, groups, or auxiliary section. Meters come in many forms, with the most common being a variety of peak and VU meters. Modern audio equipment uses peak meters because they respond instantaneously to an audio signal. This is necessary with digital audio equipment.
The abbreviation VU stands for volume units and this type of meter responds much more slowly than a typical peak meter used with digital audio. Most VU meters will have a needle that measures the average amount of signal. This is similar to how our ears react to sound. This type of meter is common with analog gear.
Peak meters typically have green, yellow, and red LED light indicators. With digital audio, a meter is needed to quickly respond to transients to ensure that no levels exceed zero and square off the sound wave. A peak meter responds quickly and is essential with digital audio because recording levels in the digital world cannot exceed 0 dBFS (dBFS stands for decibels relative to full scale. With digital audio, 0 dBFS is the maximum peak level.) Unlike a VU meter that measures the average amount of voltage, a peak meter measures the peaks.
p.49
No matter what kind of meter is being used you should always trust your ears first. Believe it or not, meters are not always accurate. If it sounds good, it is good. Meters are there as a guide and should give you confidence that you are operating your equipment at acceptable levels. Meters are not just found on consoles, they are also found in audio software programs and on most pieces of analog and digital outboard gear.

FIGURE 4.9
The Control Surface
A control surface goes along with a DAW and gives the user tactile control and touch control over software functions. Like a mixer, you can control EQ, FX, panning, mutes, volume with a fader, and other general mixing console/DAW functions. A control surface can also help minimize mousing duties. Some control surfaces are designed to work with specific software, like the Steinberg CC121 Control Surface for Cubase. Pictured here are the affordable Behringer X-Touch, Slate’s Raven touch screen control surface, and the high-end Avid C/24. Other notable brands include Mackie, Presonus, Korg, and Yamaha.
p.50

FIGURE 4.10 Behringer X-Touch
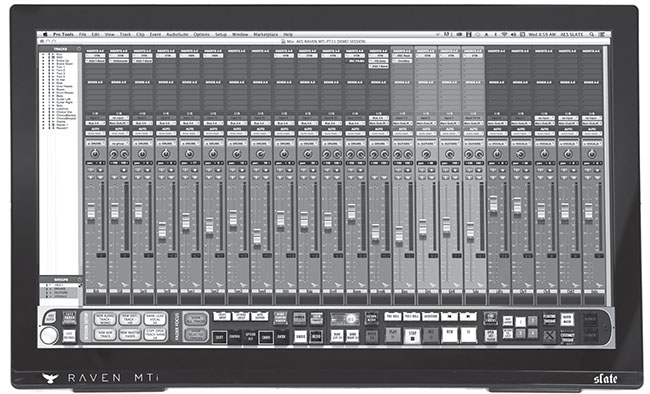
FIGURE 4.11 Slate Raven MTi
p.51
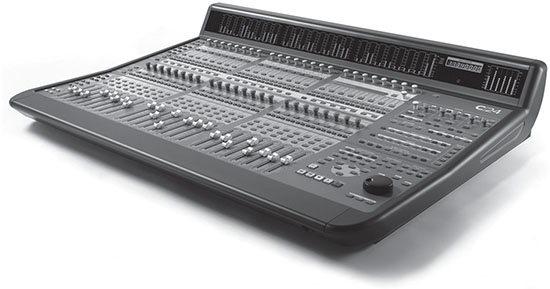
FIGURE 4.12 Avid C/24
OTHER CONSOLE FUNCTIONS
Monitoring Sound
Monitors, or speakers, are an important part of any studio. After all, monitors are how you evaluate and listen to a sound. You need to be familiar with both the speakers and the room in which you are working. Although some larger commercial studios still have “big” speakers, most studios stick to midfield and nearfield monitors. In fact, most home and smaller studios have only nearfield monitors. Nearfield monitors are placed on the console bridge or on speaker stands very near the console. They typically have a woofer in the five-to-eight-inch range and a small tweeter. I prefer two pairs of nearfield monitors: One pair that emphasizes the midrange and another pair that scoops out the mids, emphasizing the lows and highs that make it easier on the ears for long listening sessions.
You don’t need the most expensive pair of monitors to mix successfully. You just need to be extremely familiar with your speaker’s frequency response. The same can be said for the room. You don’t have to have a perfect acoustic space to mix in but you do have to be familiar with its sound. If you know that your control room cancels out bass frequencies, you won’t add more bass because you are familiar with the amount of bass you should hear in a typical mix when mixing in that particular space. Listen to a lot of music in the room you will be mixing in. It will help you get to know how things sound in the room.
It’s a good idea to listen to mixes on different speaker systems. In addition to listening on your main speakers, you may want to reference mixes on an old-school jam box, headphones, surround sound system with subwoofer, or in your car. The car is a common place to listen to mixes because a great deal of people listen to music in their cars. Many musicians prefer to hear the mixes in their own vehicles since they are familiar with the sound quality and EQ settings. This often gives them confidence that the mix meets their expectations. Monitoring on different systems can help you determine if your mixes will translate on multiple speaker setups and not just your studio monitors. You will also want to reference your mixes on laptop speakers, iPad, cell phone, or ear buds since many people now listen to music this way. You would hate for your dance mix not to have kick drum in it when people are checking out a mix online.
p.52
For the best stereo image, monitors need to be properly placed. A traditional way to set up speakers is to make a triangle with equal distance between each point and sit at the point of the triangle. This is known as the “sweet spot.” Make sure you point the speakers inward at approximately 60-degree angles. Otherwise, the stereo image won’t be properly represented. If you set your monitors too close to each other, the stereo field will be blurred. If you set your monitors too far apart, the stereo image will have a hole in the center. In terms of height, try to make sure that your tweeters are at ear height.

FIGURE 4.13
Patchbay
A patchbay contains all the inputs and outputs of most, if not all, of the equipment in the recording studio. The patchbay allows you to access and redirect signal flow. A patchbay typically contains the console direct outs, the multi-track inputs and outputs, the console line-ins and line-outs, and all the outboard gear (compressors, FX processors, gates, and equalizers). The patchbay usually has tie lines to the studio so you can redirect the mic inputs.
If you are using more than eight tracks, especially if you are using all analog gear, a patchbay will be your best friend. You will quickly realize this if you try operating without a patchbay. Without a patchbay you will have to go behind your console and outboard gear to patch and unpatch any cables. Say you want to patch in a compressor to a particular track, you would have to run a cable from your tape output into your compressor and then run another cable from the output of that compressor into the console line-in. Believe me, this will get confusing and old quickly! With a patchbay you will take a patch cable and make the same thing happen in seconds.
p.53
Even if you are working entirely in the box (doing everything with a computer) you may want to consider a patchbay. If your computer is doing all the processing (FX, dynamics controls, and automation), it will take a lot of CPU power to keep up. Your computer will run more efficiently if you use outboard gear to do some of the processing. Plug-ins are great, but the real deal is often better. If you use outboard gear, you will need a patchbay to access this gear or you will be running a bunch of unnecessary cables every time you want to use your prized possessions.

FIGURE 4.14
Many studio owners have expressed the opinion to me that young engineers have no idea how to make a simple patch. Literally, learning the ins and outs of a patchbay can separate you from other upcoming engineers lacking this skill. Professional studios have patchbays and you will eventually need to learn how to use one.
INTRODUCTION TO MIXING
All Mixed Up
The term “mix” comes up quite a lot when talking about recording. This section will clarify different ways to use this term and introduce you to a few basic mixing techniques.
Mixing (verb) – The art of blending, editing, EQ’ing, and processing the recorded tracks to a stereo, L/R mix. As in, “I have been mixing this track for three days.”
Mix (noun) – The result of mixing. A stereo, two-track, L/R mix. As in, “I did a vocal up mix.”
p.54
Mixed (verb) – Past tense of a mix. Usually means a mix that has been completed. As in, “I mixed ten tracks last week.”
Mixer (noun) – The person doing the mixing or the audio production console. Both can be referred to as “mixers.”
The three steps of the mixing process are as follows:
1. Visualization. Picture how you want the mix and the individual instruments to sound. Instead of aimlessly turning the EQ knob trying to find a frequency range that sounds good, visualize how you want the sound to end up. Fatter? Brighter? Edgier? You can then turn the knobs with a purpose.
2. Application. This involves fader adjustments, panning, signal processing, equalization, and applying FX to the mix.
3. Evaluation. Evaluate the changes you just made. Were you able to achieve your vision with the action taken? Evaluate what is working and what isn’t and continue this three-step process until everything is tweaked the way you like.
A major difference between the professional engineer and the novice is that the professional can visualize how they want something to sound and quickly apply the necessary tools to achieve that vision. A novice, on the other hand, is more apt to search for sounds with less direction. The more you mix the easier it will become to achieve a particular sound in less time. Practice mixing as much as possible. This is really the best way to improve your mixing skills.
A good mix should
■ allow the listener to focus on what you want the listener to focus on.
■ sound good on all speakers, not just a high-end pair.
■ highlight the best elements and mask the weaker elements. Just as a photographer uses lighting to accentuate positive details, a recording engineer can apply this same principle. For example, maybe the backing vocals aren’t as awesome as they could have been for one reason or another. Find a way to mask the backing vocals so they don’t stick out and/or use FX to make them sound interesting without too much focus or detail in the overall mix.
■ have a good balance between the instruments, vocals, and other sounds. If the mix consists of a folk band with an acoustic guitar, vocals, fiddle, acoustic bass, and a small drum kit and all you hear is kick drum, it’s probably safe to say this is not a good mix.
■ be appropriate for the song and the genre. This isn’t to say you shouldn’t break the rules, but you should know that musical genres often have their own style and sound. Make sure you understand the sound the band is seeking. Mixing outside the accepted norm of these genres can make you a hero or it can be a disaster, should you stretch too far or get it wrong. You need to know the rules before you can break them successfully. I encourage bands to give me a few CDs of music they like to listen to weeks beforehand so we can have some reference points later. The band will also respect you for knowing more about their genre of music. It is always a good idea to have the reference material close to hand when mixing. Although you’re not trying to copy it exactly, it will give you a rough idea how it should sound in relation to the genre.
p.55
■ have some dynamics. Keeping everything at a loud volume will get old. Not to mention, dynamics are an excellent way to create emotion. When you see a scary movie, the music slowly goes from quiet and soft to loud and shrill, to indicate a rise in the action and keeps you at the edge of your seat. Watching the shower scene in Psycho with the volume turned off is a very different experience. This dynamic effect creates the tension and emotion. Along the same line, dropping out multiple tracks can be a very effective way to make the listener aware and emotionally invested in the song. Don’t be afraid to drop out the drums or guitar. Just because it was recorded or always played that way doesn’t mean that it has to be in the final mix.
■ make the listener react as the songwriter intended. A dance track should make you want to get up and dance, just like an aggressive metal song should make you want to rock out and bang your head.
■ leave the listener humming the melody or vocal line.
■ move you and the listener emotionally. Music is about vibrations and creating a feeling. If you can bring that out as an engineer you have done a great service!
![]() TIP
TIP
Instead of searching for what you want in a mix by trying different EQs, reverbs, and other signal processing, visualize what you would like to hear and then apply those tools and tweaks necessary to achieve your vision.
How to Improve Your Mixing Skills
Analyze mixes of different genres and listen closely to how the songs are mixed.
Practice! It takes years and years of terrible mixes to become halfway decent.
Compare other people’s mixes to your own. What is different? What is similar? Make notes. “My mixes don’t seem to have as much bass” or “My mixes lack dynamics.”
Learn how to recognize the different frequency ranges and how they make you feel.
More practice – this cannot be overstated! Becoming a good mixer will take years and years of practice.
Don’t let the pressure get to you. There will be situations in the studio that you will have to learn to deal with, like everyone wanting their instrument turned up the loudest, or someone’s friend or relative who has no obvious musical talent suggesting to you how to mix the song. Other pressures may include getting a decent recording, or mixing within a short time frame and within the artist’s budget, and keeping the artist happy. Making the artist happy is tricky and can bring out insecurities as an engineer. Presenting a band mix is similar to them presenting their songs to you. You really want people to like it but you question whether or not it is worthy. The chances are you won’t make everyone happy. Maybe the bass player doesn’t like his tone or the guitar player wanted his solo even louder in the final mix. Whatever the reason someone doesn’t like the final mix, you will need to get used to dealing with the fact that you can’t please everyone. Be confident in your decision-making but don’t be cocky, defensive, or unreasonable.
p.56
Put your heart into it. To most music lovers, music is an emotional experience and often quite personal, so imagine how it feels to have people judging you on whether or not you have made a good mix or written a good song. I have been mixing for over twenty-five years and every time I present a mix for the first time I have butterflies. I try not to show it, but I care what the band thinks. I put my heart and soul into that mix and I hope the band gives me the thumbs up, the metal horns, or whatever moves them to express their emotion.
Don’t worry about things beyond your control. There are some things you won’t have control over as an engineer, like the song selection. Unless you are also producing the band, the chances are you have zero control as to whether or not the song presented to you is a “hit.” A good song is a key component to any good mix. I didn’t realize this early on in my career and I would often ask myself why my mixes didn’t sound as good as my mentor’s mixes. One reason is that the level of talent I was working with was much lower. My mentor was recording experienced songwriters with great-sounding instruments. Their arrangements also made it easier to achieve a good mix. Eventually, I figured out that a weak song, with weak players, and weak-sounding instruments is almost impossible to make sound good. As you improve your skills, access to record better songwriters and musicians will make your recordings sound even better. As a young engineer you should expect your results to be proportional to the band’s talent. However, your ultimate goal should be to make the artist sound even better than their talent level. As an engineer, it is rewarding when someone compliments how great a band sounds and how much he or she enjoys the recordings of a particular artist. Only the engineer knows the truth. It took a lot of hard work to make an average band sound better than average. Regardless of anything else, the reward is in knowing you did a good job and your audio skills serviced your client well.
Mixing is both a technical and an artistic adventure. It will require more than just turning knobs. It isn’t something you will learn overnight and it will require both patience and perseverance. Not only will you have to learn the technical side, you will have to learn how to deal with people, make hard decisions, and be at your creative peak. In the end, you will need to understand the tools of the trade and also understand how to bring out the emotional components of the mix to be an exceptional mixer.
For more information on mixing check out these two books: Mixing Audio: Concepts, Practices, and Tools (by Roey Izhaki, Focal Press, third edition, 2017; www.MixingAudio.com) and Zen and the Art of Mixing: Rev 2 (by Mixerman, Hal Leonard Books, 2014).