p.103
Signal Processors. Toys You Could Play With for Days!
In This Chapter:
WHAT ARE SIGNAL PROCESSORS?
Signal processors take an original signal and manipulate it to produce a new sound. The original sound can be blended with the processor or can be run directly into the processor. They can be purchased as plug-ins, pedals, and rack-mounted or stand-alone units. Signal processors can do everything from making a sound more consistent to making a sound appear to be from out of this world. Basically, they are used to treat a sound for a desired effect or control. Compressors, limiters, gates, equalizers, reverbs, and delays are a few signal processors you may run across.
When beginner audio students are turned loose in the control room, they naturally gravitate toward the effects processors. Students tend to be attracted to the time-based effects like reverb and delay, probably because, unlike compressors, effects are easily heard. Scrolling through endless effects units can be mesmerizing. Searching through every possible effect on every effect unit can take countless hours, a sure way to get lost in an audio vortex! Eventually, you find the ones you love and store those to your memory to recall next time you want that special guitar tone or spacey vocal someone requests. You will probably do the same thing with compressors and other signal processors: that is, experimenting with all the effects patches at your disposal. It will just take longer to learn how to control and hear the results of non-time-based processors like compressors.
p.104

FIGURE 7.1
CONTROLLING DYNAMIC RANGE
Compression
Compression helps control the dynamic range of an instrument, voice, or recording. Compression is harder to master and much more difficult to initially hear and understand than the other signal processors discussed in this chapter. The dynamic range is the difference between the softest and loudest sound with an instrument, recording, or mix. A compressor is great for that emo, punk, or hard-core singer who whispers and then screams as loudly as possible. A compressor can help even out a performance or make two instruments react together. This is a useful signal-processing tool when you want a vocal to sit more consistently in a mix or make any instrument sound consistent in volume. Because a compressor turns down the loudest sound, it essentially brings up the quietest sound. Be aware of what that quietest sound is . . . A/C noise? Hum? Hiss? It could be a noise rather than an instrument. If the noise is too loud and is destructive to the desired sound, don’t compress the signal too hard (aka squash). Squashing the sound will introduce more of the unwanted noise into the desired sound.
p.105
Compression can also be used to bring up that quiet sound in the mix. Let’s say you recorded a band with one mic in the room and the guitar was really quiet and the drums were really loud. Using compression could make the guitar sound louder and the drums quieter, in essence making the two instruments more even in volume.
Compression is used to:
■ even out the dynamic range of a sound, instrument, or recording.
■ glue two instruments together so they “move” together, such as with a bass and kick drum track.
■ bring up a quiet sound.
■ control a loud sound.
■ “color” the track a particular way. For example, a Tube Compressor could be used to darken and fatten up a bright and thin track.
■ make a creative or different type of sound, like setting a very fast attack and a super slow release to a recorded cymbal sound. This creates a cymbal hit with very little attack that gradually gets louder while emphasizing the “wash,” a great effect for some types of music.
![]() TIP
TIP
Try miking a drum set with one mic in the room. Compress the sound and listen to how the compression can bring up the quiet drums or cymbals in the mix and how it turns down the loudest sounds. Compression can work great on room mics!
Although compression can be applied to any instrument, the most commonly compressed signals are vocals, bass, and kick drum. Many engineers also apply a stereo compressor to the stereo bus to control peaks, color the sound, or glue the entire mix together.
The main parameters on a compressor are the following:
■ Threshold or input
■ Gain reduction (GR)
■ Output or makeup gain
■ Attack
■ Release
■ Ratio
■ Link
■ Side chain
■ Bypass
p.106
Threshold controls when the compressor kicks in and reduces the dynamic range.
Gain reduction (GR) indicates how much the dynamic range is being reduced. Usually, there is some kind of meter that will identify the amount of gain reduction.
Output/makeup gain “makes up” the reduction from the compression of the loudest sound with the output, sometimes referred to as the makeup gain. If you reduced the gain −3 dB, setting the output at +3 dB would make up the gain you lost and now the processed sound would have the same apparent volume as the unprocessed sound.
Attack tells the compressor how fast to kick in when the signal reaches the threshold. A fast attack will kill the transient and deaden the sound (drum tom will sound like a box). A fast attack setting will range from approximately 0.01 to 10 ms. A slow attack will let the transient pass, resulting in a much punchier, livelier sound (kick drum beater will be in your face). A slow attack setting will be approximately 50 ms and up.
Release indicates how long the original signal will be held after it is compressed. Although there are no hard and fast rules here, the release is commonly set based on the tempo of the song so that the sustaining of the original signal does not interfere with any new signals. Many engineers use faster release times for faster songs and slower release times for slower songs. In pop music, faster release times are used so the effect of the compressor is not heard. Again, there are many ways to set both attack and release times. You will need to experiment until you become familiar with what different attack and release compression settings produce.
Ratio (2:1, 4:1, 10:1, etc.) determines the amount of output based on the level of input. A 2:1 ratio indicates that for every 2 dB over where the threshold is set will result in a volume increase of 1 dB. A 4:1 ratio indicates that every 4 dB over the threshold will result in a 1 dB increase. Ratios of 10:1 or greater are referred to as limiting instead of compression. Limiting provides a kind of “brick wall” effect. You may also see “soft knee” or “hard knee” when dealing with a compressor.
A hard-knee setting will abruptly reduce the signal’s gain as soon as it reaches the threshold setting. This is a much more noticeable setting. A soft knee will gradually compress the signal as it reaches the threshold setting and is a much more subtle setting. Most “auto” settings apply a soft knee.
![]() TIP
TIP
Until you are familiar with compression, I recommend using “auto” settings and not compressing the sound too much (maybe a decibel or two of gain reduction at a 3:1 ratio). Of course, don’t be afraid to experiment with different levels of compression and settings, so you will be familiar with the compressor controls when it counts.
p.107
Link allows you to join a two-channel compressor or a single-channel compressor to another single-channel compressor for stereo use. You may choose to use this feature when using stereo bus compression or stereo mic setups. In this operation mode, it is typical for one channel to act as the master control for both the channels, subsequently overriding the second channel or second compressor settings.
Side chain allows you to use a signal other than the main input to control the amount of compression. Often an EQ is used, resulting in compression being applied to what is being equalized. The side chain is also used for de-essing, multiband compression, and selective gating. Side chain is common in EDM and hip-hop styles of music.
Bypass is used to compare a signal with and without compression. It’s a good idea to switch back and forth between the compressed and uncompressed signal. You may find that you don’t need any compression after all or that the output will need to be increased (makeup gain) to match the original volume.
![]() TIP
TIP
Some styles of music require and expect more of a compressed sound than others.
Pop, EDM, hip-hop, metal, new country, and modern rock typically are more compressed than other styles. Loud and bass-heavy music requires more compression to control these more extreme amplitudes and frequencies. A compressed sound is also common with commercial-ready music.
Folk, jazz, bluegrass, classical, old country, and most indie rock tend to have a less compressed sound. This helps to retain the natural dynamics and authenticity of these particular styles.
Whether compression is used to control the dynamic range or for special effect, it is a common signal-processing tool that will require much interaction and experience to master its results. Unlike EQ, compression and limiting are much harder to initially hear and control.
Gates
A noise gate, or gate, allows the user to turn on and off a sound. If the gate is open, it allows a sound to be heard. If the gate is closed, no sound will be heard. Gates are typically amplitude based. For instance, a drum mic may be gated so that the mic is only “open” or “on” when you strike the drum. The gate would remain closed until a certain volume or threshold has been met. Like a compressor, the threshold parameter will control when the gate is activated. Gates are most commonly used with drums and in live sound. Some gates have the ability to adjust to frequency as well as amplitude, like the classic Drawmer gates. The opposite function of a gate is known as a “duck.” Many gates have this function as well. A duck allows you to bring down a sound when triggered. Ducking is common in broadcast radio to bring down music when a voice-over is present.
p.108
CREATING SOUND FX
Although some signal processors are used to control the dynamic range, others are used to simulate or recreate an environment or imaginary space. The following effects (FX) fall into the latter category. These signal processors can add delay, reverb, chorus, flanger, harmonization, distortion, and do just about anything to a sound. FXs are time based, using delay times to create the different sounds. Like compressors, limiters, and gates, they are available as plug-ins, pedals, or rack-mounted units. Let’s start with reverb.
Reverb
The remainder of sound that exists in a room after the source of the sound has stopped is called reverberation or reverb. The sound is often characterized as an undefined wash of sound created by different delays. Reverb is probably the most common FX used when recording and mixing music. It can be applied to any instrument, vocal, or sound. Traditional reverbs are halls, plates, rooms, or spring reverbs. Modern technology has provided us with a variety of reverbs that simulate all types of real and imaginary spaces. Reverb can help unify sounds together, as well as help separate sounds. For instance, applying a “small hall” reverb FX to all tracks in a recording would glue them together. The effect applied to all instruments may inadvertently make the instruments sound less distinct and muddy the mix. Applying the “small hall” effect on a select few instruments will help separate the affected instruments from the unaffected, or dry, instruments, creating more depth and less clutter in the mix.
![]() AUDIO CLIP 7.1
AUDIO CLIP 7.1

The main parameters with reverb are the following:
■ Choice of FX
■ Input
■ Mix
■ Decay time
■ Predelay
■ EQ, usually a high-frequency (HF) roll-off
■ Bypass
Choice of FX: The first thing to do is choose the FX that you want to hear. Most outboard gear will have a knob or selector button that will allow you to scroll through the FX options. If you are using software, you will also scroll through a list of possible FX and select the one you would like to hear. This could take hours when you are getting to know the various FX at your disposal. As you become more familiar with your FX choices, you will be able to pick and choose much faster. Make notes of the ones you like for future reference. Until you have your list of favorites, prepare to be lost in the land of endless sounds. It will be well worth your adventure!
p.109
Input controls the amount of dry signal (unprocessed sound) to be processed. The input signal can usually be adjusted to make sure there is plenty of gain. Be careful not to use too much gain or the signal will be distorted. Generally, there will be an input meter that will help you determine the amount of input coming into the FX.
Mix control usually determines the amount of dry signal (unprocessed sound) versus the wet signal (processed sound) you would like to hear in the mix. It is a balance control between the wet affected signal and the dry unaffected signal.
Decay time allows you to adjust how long it takes the reverb to disappear. Most reverb units have decay adjustments from about 1 ms up to several seconds. Longer decay times make a sound bigger and appear in a larger space. Shorter decay times make things sound more upfront. Make sure the decay time matches the tempo of the music. A long, slow, reverb decay could make the tracks sound muddy or disjointed if the song is fast. Try a longer decay time on a slower-tempo song and a shorter decay time on a more upbeat-tempo song.
Predelay adjusts the amount of time before the dry signal is affected by the wet (delayed) sound. Think of predelay as the time it takes the dry signal to bounce off a wall or surface before it is affected by the reverb. A longer predelay can help the dry vocal sit more upfront in the mix along with generating a clearer sound that isn’t muddied by the reverb.
Bypass allows you to hear the signal with or without the FX in the signal chain. This is basically an on/off function.
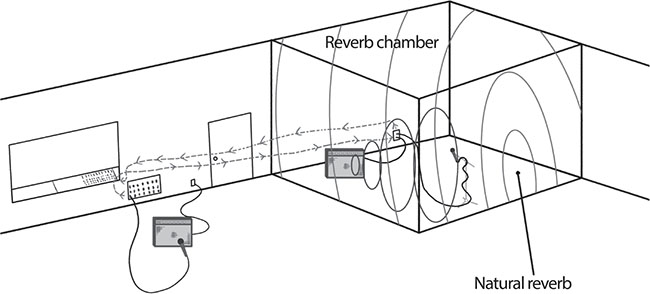
FIGURE 7.2
p.110
![]() TIP
TIP
A majority of reverb units allow you to adjust the tone of the reverb or at least offer a high-frequency (HF) roll-off. One way to make a reverb sound less digital and more natural is to roll off the high frequencies. This is the area where most digital reverb units (especially cheaper ones) tend to sound fake and thin. Try rolling off some high frequencies and note the result.
Delay
A delay is a time-based effect. A delay can take a signal and process it to be played back at a later, predetermined time. A delay can repeat a signal once or an infinite number of times. It can be used to separate a vocal from the rest of the mix or for a special effect. It appears natural when used subtly. Apply a large amount of delay and it can make a sound appear spacey and from another world.
The main parameters with delay are the following:
■ FX
■ Input
■ Output
■ Time/tap
■ Repeat/feedback
■ Mix
■ EQ
![]() AUDIO CLIP 7.2
AUDIO CLIP 7.2

FX: There are a variety of types of delays available. Some delays are straight delays, whereas others offer a variety of delay selections. On a few units, you may only be able to select short, medium, or long delay times. Other delay units will offer delay types such as analog or digital echo, ping pong, delay with modulation, sweep echo, slapback, dynamic delay, tape delay, and many others.
Input indicates the amount of signal entering the processor. Be careful not to overload.
Output indicates the amount of signal exiting the processor. This is typically the blend of the dry and processed signal.
Time/tap allows you to adjust the amount of time between the dry, unprocessed signal and the wet, processed signal. Some newer delay units, especially pedals and rack-mounted FX, provide a “tap,” a button, to determine the delay time. This is extremely handy when setting a delay time in a live situation or when seeking a particular delay rhythm.
p.111
Repeat/feedback controls how many repeats of a delayed sound you desire. It can be adjusted to repeat anywhere from one to an infinite number of times. Increasing the repeat/feedback to the maximum amount creates a unique-sounding feedback loop.
Mix controls the blend of the dry and wet signals.
EQ: Different processors give you different EQ options. The most common is a high-frequency cutoff.
![]() TIP
TIP
How to make an echo or delay sound in time:
Divide 60,000 (number of milliseconds in a minute) by the BPM (beats per minute) to create a synchronized quarter-note delay.
For example:
60,000 divided by 100 BPM = 600 ms.
Therefore, a 600-ms delay would result in a quarter-note delay.
For a half-note delay, double the result = 1200 ms
For an eighth-note delay, divide the result by 2 = 300 ms
For a sixteenth-note delay, divide the result by 4 = 150 ms, a kind of slapback effect useful for dance music.
Another delay type is an echo, which should not be confused with a delay. Echo is a classic FX that creates a repeating signal that becomes progressively quieter over time. There is usually little or no repeat of the original signal. A slapback echo is used to recreate the sound of a nearby echo source such as a gym wall or canyon. It is created with an unmodulated delay time between about 50 and 150 ms. Slapback echo emerged in the 1950s and can be heard on many early Elvis Presley records. This is one of my favorite effects to use on vocals.
More Time-Based FX
The parameters of the following FX will be similar to those of a delay or reverb. Any exceptions will be pointed out.
Most of the following effects differ because of delay times or because the signal is either modulated or unmodulated. If a signal is modulated, its signal is constantly swept at a predetermined or adjusted speed. A modulated sound sweeps through a specific frequency range. If a signal is unmodulated, there is no sweeping effect or whooshing sound.
p.112
Chorus generates a detuned double of the original signal that modulates in pitch slightly over time. Essentially, it is an FX where the original signal is mixed with a modulated delay of itself, creating a “chorus” effect. The delay times are generally between 10 and 60 ms. This can happen naturally with groups of strings and vocals. Chorus is often applied to vocals, guitar, bass, keyboards, or strings to make them sound more in tune, thicker, and dreamier than a single sound, while still sounding more or less like a single sound. A chorus FX can come in a pedal form, rack mount, plug-in, or be made naturally by recording multiple takes of a single instrument and mixing them together.
Chorus FX may provide additional control over the following. Depth: The amount and intensity of chorus and/or modulation. Sweep: The speed and/or range at which the chorus modulates. Speed: Adjusts the rate of the low-frequency oscillator (LFO) and pitch modulation.
![]() TIP
TIP
The next time a vocal or group of vocals sound out of tune, try a little chorus and note the result. I find this a great FX, especially for out-of-tune strings or vocals. Even if the source isn’t out of tune or you don’t have a chorus FX, you can have a singer, guitarist, horn player, or string player double or triple their part. This often creates a natural chorus FX for a lusher and thicker sound.
Doubler is used to approximate the sound of two instruments or vocals performing in unison. Most commonly heard on vocals, this doubling effect is created with unmodulated delay times between 40 and 90 ms.
Flanger creates a “whooshing” or “jet-like” sound. It is created with a delay setting of 1 to 25 ms. The delay is then modulated by a low-frequency oscillator (LFO). The LFO setting determines the rate and depth of the effect. There are several claims on when it was first used, but word is that John Lennon apparently coined the term “flanging” when referring to this effect with producer George Martin, actually calling it “Ken’s Flanger” after one of Abbey Road Studios’ Engineers.
![]() AUDIO CLIP 7.3
AUDIO CLIP 7.3

Phaser causes various frequencies in the original signal to be delayed by different amounts, causing peaks and valleys in the output signal. These peaks and valleys are not necessarily harmonically related. This effect sounds very similar to a flanger. Flanging, on the other hand, uses a delay applied equally to the entire signal. This is similar in principle to phasing except that the delay (and hence phase shift) is uniform across the entire sound. The result is a comb filter with peaks and valleys that are in a linear harmonic series.
p.113
Harmonizer creates a harmony with the original signal.
Overdrive or distortion can make a “clean” sound “dirty.” Overdrive or distortion can make a sound fuzzy, crunchy, edgy, and even retro sounding. Most common with guitar effects pedals, distortion or overdrive can, however, be applied to any sound.
![]() AUDIO CLIP 7.4
AUDIO CLIP 7.4

![]() TIP
TIP
I like to blend distortion into a recorded snare drum track. Try applying this effect next time you need a snare drum to cut through a big rock mix or you just want to give it a unique sound.
500 SERIES
The home studio has become increasingly popular for audio production. This has spawned a new series of compact, mobile signal processors. These units are referred to as the 500 series modules, and are available as preamps, compressors, FX, and EQs. Many classic and boutique brands are offered such as API, dbx, Rupert Neve Designs, Purple Audio, Warm Audio, Great River, and Solid State Logic. A 500 series-type chassis is required with the 500 series modules. These modules fit securely into the chassis. The chassis is an external power supply that provides phantom power, XLR ins/outs, and houses the 500 series modules.
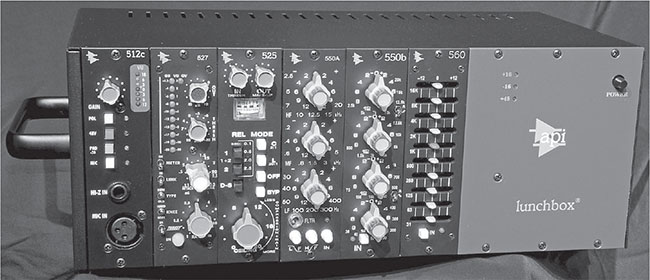
FIGURE 7.3
p.114

FIGURE 7.4
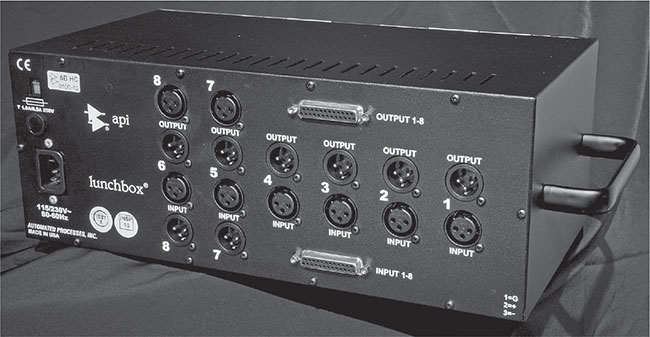
FIGURE 7.5
You can purchase an empty chassis that contains from two to ten slots for your modules. The 500 series modules range in price from around $149 to $1500 per channel, while the chassis runs from $299 to $1300. Also, some larger manufacturers offer a 500-series console. I personally love the mobility of my 500-series gear. Now I can take my favorite preamps and compressors with me anywhere I work.
PLUG-INS VERSUS THE REAL DEAL
Plug-ins are a set of software components that add specific abilities to a larger software application such as Pro Tools or Nuendo. It is likely that you have already used plug-ins with other computing activities. Adobe Acrobat Reader, QuickTime, Real Player, and anti-virus software are just a few types of plug-ins that you may already be using. Many people are curious as to whether plug-ins are comparable to the real deal; the real deal being the hardware or original rack-mounted version of the compressor, limiter, or FX unit. Although plug-ins mimic the controls and look similar to these classic pieces of gear, they typically do not sound the same. This is not to say plug-ins aren’t valuable and effective, but they rarely sound like the original versions, which have real transformers, tubes, and other electronics that warm up and color the sound. These classic pieces of gear can still be found used, as reissues and new.
p.115
There are a few advantages to owning audio plug-ins, instead of hardware. You basically own an unlimited amount of copies of a particular effect. They are compact. With plug-ins, you don’t need a bunch of extra space in the control room for racks of gear. They are more affordable. While you could maybe only afford one real LA-2A limiter (a classic piece of outboard gear that isn’t cheap), you can own the LA-2A plug-in, along with a load of various other plug-ins. Owning an LA-2A plug-in is like owning an unlimited number of LA-2As. Well, kind of . . . like I mentioned, they don’t necessarily sound the same, but they are getting closer every day. Some prefer plug-ins because they are cleaner and generally provide less noise. The settings are easy to recall and automate. Another cool advantage of using plug-ins is that when you get a chance to operate the real deal, you will already be familiar with its knobs and controls.
Plug-ins are not just designed to mimic classic pieces of gear. Plug-ins can do all kinds of things unique to the virtual world. Plug-ins can be used to help with restoration of old records by removing pops and other anomalies, or for specializing in mixing and mastering. One such specialty plug-in is Auto-Tune. It is a common plug-in used in pop, hip-hop/rap, and EDM. Auto-Tune was first introduced to the masses by Cher on her late 90s hit “Believe.” This plug-in is used to correct the pitch of a vocal or instrument and can also be utilized to make a voice sound like a synthesizer. Some of my favorite plug-ins change the sound in interesting and unique ways and don’t necessarily copy classic gear. The future with audio plug-ins is limitless and exciting.
It doesn’t matter if the signal processors you use are real or virtual. These are just tools that can make your job easier – or more difficult if you don’t know what you’re doing. At some point, you will need to learn how to operate and manipulate sound with these tools. Like much of audio production, it can take you years to figure out what the heck you are doing. Be patient, learn the tools of the trade, and forge ahead.