
p.131
Basic Acoustics. How to Make Your Recording Space Sound Better
In This Chapter:
Soundproofing Versus Acoustical Treatment
How to Make Your Room Sound Better
How to Build a Random Diffuser
How to Build a Broadband Absorber
How to Build a Quiet Space for Your Computer or Tape Machine
If you get into music production and decide to have your own home or project studio, you will need to learn some basics about acoustics. Acoustics is the science of sound and can help determine the quality of sound transmitted in a room or space. Understanding the sonic characteristics of a room will result in better decisions when recording and mixing.
Different surfaces and materials can affect the acoustics in a room. Too much of one material applied to a wall or surface is generally destructive to a sound. For instance, if a room is carpeted from floor to ceiling, the room will sound dead and dark. Carpet does an exceptional job of absorbing higher frequencies and minimizing hard reflections. On the other hand, it does little to deter the long low-end waves. Whether it is carpet, concrete, tile, or any other material, too much of one type of material is rarely a good thing. Professional recording environments are typically constructed with many types of surfaces and materials. They may have wood floors with throw carpets, a brick or stone wall, diffusers, a few concave or convex walls, and a variety of other acoustic treatments. Unlike most bedrooms or home offices, where many project studios are located, professional recording spaces are rarely perfect squares with low ceilings. This is because parallel walls and surfaces create standing waves, or room modes, and can affect the frequency response of your room. Many professional recording studios are acoustically designed, especially the control room.
p.132
![]() TIP
TIP
Don’t worry if you are unable to hire an acoustician to set up your studio. As with speakers, you are not required to have the perfect pair, or in this case the perfect space; knowing your space will allow you to consistently predict the way a mix will translate through other listeners’ audio systems.
We just discussed that carpet absorbs only a limited amount of the lower frequency range. If you completely carpet a room with the intention of soundproofing, the carpet will do very little to stop the long, destructive bass waves from traveling outside. If the neighbors are offended by loud music, carpet will not solve the problem. Later in this chapter, the distinction will be made between soundproofing and acoustic treatment.
This chapter will include only basic acoustic terms and concepts, as the science of acoustics is too complex to be covered in a beginner’s guide to audio. This chapter also provides a do-it-yourself (DIY) section to help you learn how to make your room sound better by building acoustic treatments such as gobos, diffusers, broadband absorbers, and bass traps.
As illustrated in Chapter 2, sound is divided into three successively occurring categories. Sound is made up of the direct path, its early reflections, and the reverberant field. With a basic understanding of acoustics, it will be much easier to manage these three elements of sound.
BASIC ACOUSTIC TERMS
Reflection
When sound strikes a wall, ceiling, or any object, the sound is reflected at an angle equal to, and opposite of, its initial angle of incidence. The surface material determines the amount of energy reflected. Sound and light have similar reflective paths. In regards to mid and high-frequency ranges, harder surfaces (tile) reflect more sound than softer surfaces (carpet). Figure 9.1 shows how sound reflects off a 90-degree angle concave surface, convex surface, and straight wall.
![]() TIP
TIP
You may want to step outside for this one. Try throwing a tennis ball or other bouncy ball at the floor or ground near a wall. Notice how the ball rebounds, or reflects, off multiple surfaces. This is similar to how midrange and high frequencies would reflect off the same wall.
Absorption
Absorption is the process by which acoustic energy is reduced when a sound wave passes through a medium or strikes a surface. Absorption is the inverse of reflection. The amount of energy absorbed compared to the amount reflected is expressed as a ratio known as the absorption coefficient. Different materials affect different frequencies (see chart below). If a material’s absorption coefficient is 0.25, it absorbs 25% and reflects 75% of the sound. An absorption coefficient of 1 means that 100% of the energy striking the surface will be absorbed and none reflected. An absorption coefficient of 0 means none of the sound is being absorbed by the surface and 100% is being reflected.
p.133

FIGURE 9.1
Table 9.1 How sound is affected by different materials

p.134
Notice that plywood and unpainted concrete absorb lower frequencies the best, whereas carpet and heavy drapes are most suitable for absorbing higher frequencies. Ultimately, the goal is to combine materials so your room has a flatter frequency response.
Diffraction
The ability of sound to bend around an object and reform itself is known as diffraction. Bass frequencies are great at this! Have you ever heard bass from a car trunk thumping through the neighborhood? The reason why only the bass range is heard is that low frequencies can easily escape the confines of the car or trunk. The lack of higher frequencies is due to the fact that objects such as buildings, trunks, trees, etc., easily impede more directional, higher frequencies.
Diffusion
Besides absorption, diffusion is another way to control reflections and standing waves. A diffuser can be used to break up standing waves, minimize flutter echo, and scatter sound by reflecting sound at a wider angle than its initial angle of incidence. Check out the DIY projects on how to build a diffuser.
DEALING WITH ACOUSTICS
Room Modes or Standing Waves
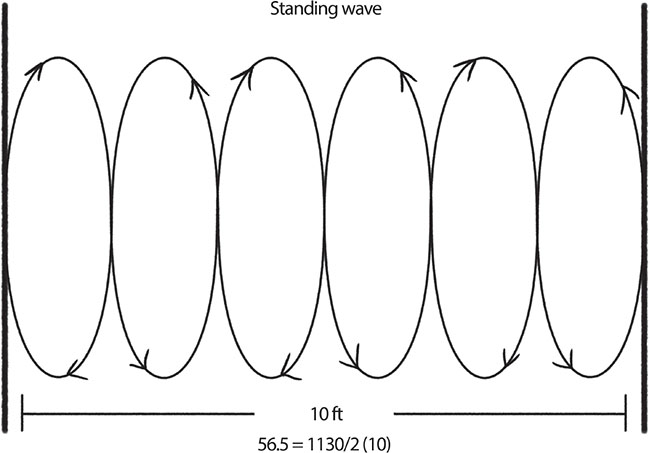
FIGURE 9.2
p.135
Room modes, or standing waves, are created by parallel surfaces. Acoustical problems may arise from standing waves such as a level boost or cut-off frequencies, or a creation of resonant frequencies in a room.
Have you ever sung in a bathroom or other reflective space and noticed how a particular frequency resonates in the room? Standing waves create this resonance. Here is how to calculate a room’s standing waves.
Frequency = 1130 (speed of sound or velocity) divided by the length × 2
For instance, with a ten-foot space between two walls, the equation will be:
1130/2 (10’) = 56.5 Hz
This would be the first resonating frequency in the center of the room. There will be many room modes between two walls as the phenomenon will repeat itself at multiples of the first frequency: 2 f, 3 f, etc. Therefore, the second room mode would be 56.5 × 2 = 113 Hz, the third would be 56.5 × 3 = 169.5 Hz, and so forth.
![]() TIP
TIP
How to deal with standing waves:
As you will learn later in this chapter, bass traps, broadband absorbers, and diffusers are some helpful ways to lessen standing waves in a room.
Soundproofing Versus Acoustical Treatment
It is important to make a distinction between soundproofing a room and treating the room to sound better. Soundproofing a room is much more difficult than acoustically treating a room.
Soundproofing involves completely isolating sound so it does not escape the room. It is much more difficult and expensive to soundproof after a room has been built versus preplanning and building the room from the ground up. Air space is a great way to soundproof. Building a room within a room and leaving a small space between the new walls and the original wall will be very effective in isolating sound. Believe it or not, a little air space between layers is good for isolation because it helps slow the sound’s momentum.
Acoustical treatment involves making a room sound better. Generally, this can be achieved much more cheaply than completely isolating a room. Acoustical treatments include bass traps, diffusers, broadband absorbers, Auralex, or other wall foams. These treatments may involve minor construction, but generally not to the degree of soundproofing a studio. There are many do-it-yourself (DIY) methods and resources. Here are some DIY projects to try.
p.136
DIY PROJECTS
How to Make Your Room Sound Better
First off, choose the room best suited for your needs. A rectangular room (11’ × 17’) will typically work better than a square room (10’ × 10’). Also, consider the room farthest away from neighbors, street noise, and the kids’ room.
Once you pick the room, identify your room’s acoustical qualities. Along with trusting your ears, you can use the standing-wave/room-mode calculation previously discussed to identify potential sound quality issues.
There are also many software programs that offer tools to help identify acoustical qualities. A measurement microphone can be used with a variety of software programs or spectrum analyzers to help identify your room’s anomalies.
Here are a few RTA (real time analyzer) software programs that are available:
Faber acoustical, www.faberacoustical.com – for Mac and iPhone
True Audio, True RTA, www.trueaudio.com – for PC
ARTA, Audio Measurement and Analysis, www.artalabs.hr – software/shareware
How to make your room sound better:
1. Use smaller speakers.
2. Set up symmetrically.
3. Use a bed or a couch to help with bass control and to tighten up the room sound.
4. Don’t set up your mix station and speakers in the corner or with your back too close to the wall.
5. If your room is tiled or concrete, place a carpet or two on the floor to dampen the reflections and echo.
6. Don’t cover all your walls with the same material or treatment. This may end up causing another set of problems . . . too much of one material is detrimental to good sound quality.
7. Cover your windows with heavy curtains to keep sound from escaping.
8. If needed, build bass traps to control the bass. See the DIY project below.
9. Try stacking empty boxes in the corner of the room. Place the open side against the wall and fill them with sheets, laundry, blankets, pillows, or similar material to help trap and control bass.
10. If needed, build a diffuser to help break up and disperse sound for a more accurate-sounding space. Again, see the DIY project below. If you aren’t handy with a saw consider putting a bookshelf full of books or random items in the studio or the back wall of the control room. A bookshelf full of books or other random items can be an effective alternative to building or buying a diffuser.
11. If needed, treat walls and ceilings with the necessary acoustical materials.
p.137
12. If possible, remove appliances or noisy electronics from the room. Many people choose to build out a machine room for their computer or tape machine (see DIY project below).
There are many acoustical treatments you can build on your own. These treatments will help you control bass, midrange, and treble within a recording space, allowing you to effectively manage a room’s imperfections. Four common, easy-to-build acoustic solutions are gobos, diffusers, broadband absorbers, and bass traps. I suggest treating your space over time and tweaking it as you go. The following projects should help you affordably address at least a few acoustical issues.
How to Build a Gobo
A go-between, also known as a gobo, is a great mobile way to control sound. It can be used to help isolate an instrument or lessen the reflections and reverberation of a space. I often place a gobo in front of an amplifier or kick drum to isolate and absorb the sound. Gobos are also effective if placed around a drum kit, especially if they are being played in a “live” space such as a kitchen or on a tiled floor. This will tighten up the sound and minimize reflections.
In order to build a gobo, you will need the following items:
1. R11/R13 wall insulation, Ultratouch, or Owens Corning 703.
2. Jute or polyester material.
3. 1-inch to 2.5-inch wood screws.
4. Stapler or staple gun.
5. Utility knife.
6. Scissors.
7. Phillips screwdriver, but preferably a drill.
8. Saw.
9. 1 × 2, 2 × 2, 1 × 4 wood.
10. Two small washers.
How to build a gobo:
1. Build the frame to the desired size.
2. Cover one side with the jute, burlap, or other material by stapling it to the frame.
3. Put the insulation inside.
4. Enclose insulation with material and staple to frame.
5. Finish off with additional framing/trim if desired.
6. Attach feet with a single screw and washer. Don’t tighten the feet too much, allowing the feet to swivel.
You can put plywood or masonite on one side for a more versatile gobo. One side will be hard and reflective and the other soft and absorptive. The plywood or masonite will absorb some of the lower frequencies.
p.138
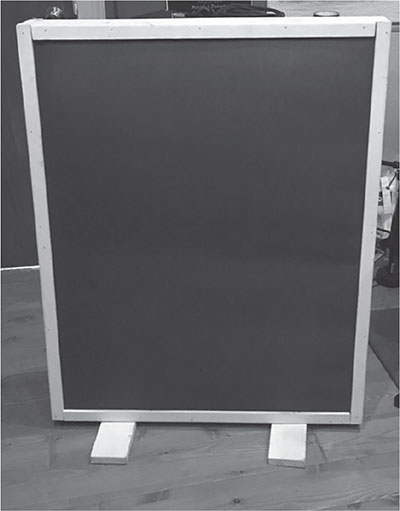
FIGURE 9.3
![]() TIP
TIP
You can also use a mic stand with a boom arm and acoustic blanket for a quick, mobile gobo. This is a great way to quiet down a drum kit or tighten up an amp or vocal recording. Fold the mic stand into a “T” and drape the blanket over it. It is easy and fast to set up and to tear down. Many hardware stores and moving companies sell quilted packing or acoustic blankets; some of these places are listed below in the links. They are also available at companies that carry acoustical treatments.
How to Build a Diffuser
A diffuser is a great way to control reflections in a room and make your room sound flatter. If your room is on the “dead” side, diffusers may be more suitable than adding absorptive sound control such as Auralex. Diffusers are often placed on the back wall behind the engineer’s head. They can also be placed in the studio on walls or ceilings to help tighten up a room, reduce flutter echo, and control reflections. Here’s a good way to make a diffuser using a proven formula. This diffuser is designed to be effective above about 1.7 kHz. If you double the length of the individual pieces, from one to four inches up to two to eight inches, the diffuser will be effective above about 850Hz.
In order to build a classic quadratic diffuser based on the BBC RD report from 1995 (Figures 9.4 and 9.5), you will need the following items:
1. 1 × 1, 1 × 2, 2 × 2 wood of your choice, eight-feet length; quantity dependent on size of diffuser.
2. Heavy-duty wood glue.
p.139
3. 12” × 12” or 24” × 24” quarter-inch masonite or other wood.
4. Heavy picture hangers or screws for mounting.
How to build a diffuser:
1. Cut the following pieces to the appropriate length listed below. You will have a total of 131 pieces with 13 blank spots.
1” − 38
2” − 38
3” − 40
4” − 15
2. Arrange the precut pieces of 1 × 1 or 2 × 2 wood and glue them on the quarter-inch 12” × 12” or 24” × 24” masonite or other wood base in the following manner:

3. Hang and enjoy.
How to Build a Random Diffuser
In order to build a random diffuser, you will need the following items:
1. Scrap wood.
2. Heavy-duty wood glue.
3. Any size piece of plywood for use as a base.
4. A handful of wood screws.
p.140

FIGURE 9.4
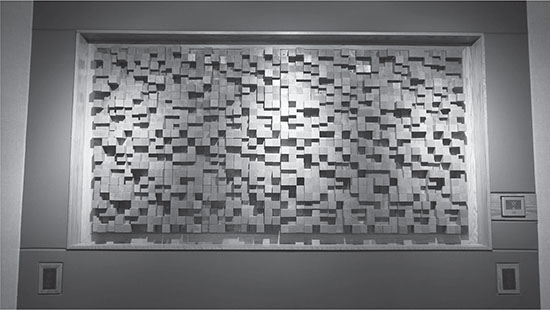
FIGURE 9.5 Built by former students by combining eight of the above design, Windy Hill Studio, Austin, Texas
p.141
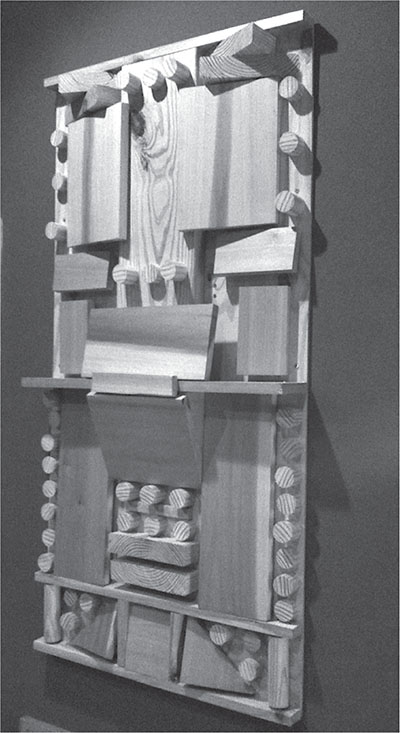
FIGURE 9.6
How to build a random diffuser:
1. Use your imagination and arrange the scrap wood as you wish on the plywood. Although a random diffuser may not be to a specific formula, it will help break up and disperse sound effectively.
2. Glue scrap wood to base wood.
3. Hang and enjoy.
p.142
How to Build a Broadband Absorber
The most common form of treatment that I see in homes and project studios is broadband absorbers placed in the corners and other problems spots of the control room and studio (see Figures 9.7 and 9.8). The great thing about a broadband absorber is that it can solve multiple frequency issues with one panel.
The thicker you make it, the lower the frequency that will be absorbed. The build out is similar to constructing a gobo but without the feet. Here’s what you will need:
1. (3) 1” × 4” or 1” × 6” wood (depends on how thick the insulation is that you decide to use).
2. Enough burlap or other porous, non-flammable material to cover both sides of the panel.
3. Insulation: Owens Corning 703, 705, Roxul, or (my favorite) Ultratouch recycled denim. Remember, the thicker the material the lower the frequency absorbed.
4. Scissors to cut materials.
5. Staple gun to staple material on frame.
6. About twelve wood/deck screws per frame.
7. Screwdriver/drill to screw frame together.
8. Saw to cut wood.
How to build a broadband absorber panel:
1. Make a 2’ × 8’ frame out of 1” × 4”s or 1” × 6”s, cut wood to desired length and use screws to hold the frame together.
2. Cut material and wrap one side with burlap or other porous, non-flammable material. Staple to frame.
3. Flip frame over and fill with insulation.
4. Enclose insulation with material by stapling to frame.
5. Stand in corners or other problem areas. The panel does not need to be screwed in or mounted.
6. For a more finished appearance, cover the frame in another layer of wood to hide the staples and joints.
How to Build a Bass Trap
Bass traps are effective in capturing and controlling low end, especially sub frequencies, and are often placed in room corners because this is one place where bass lingers. One of the easiest bass traps to build is known as the “super chunk.” The materials are fairly inexpensive and it does the trick.
In order to build a bass trap, you will need the following items:
1. Twelve panels of 24” × 48” × 2” mineral wool or rigid fiberglass board for an eight-foot ceiling.
2. 1 × 4 or 2 × 4 wood for framing.
3. Jute or polyester.
4. Stapler or staple gun.
5. Drill.
6. Razor blade, kitchen knife, or other cutting edge.
7. Gloves for cutting insulation.
8. Glue for insulation.
p.143
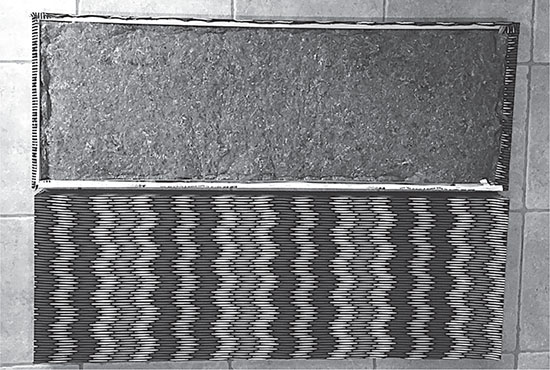
FIGURE 9.7

FIGURE 9.8
How to build a bass trap:
1. Cut the panels in half; this should give you plenty of 24” × 24” × 2” squares.
2. Next, cut these squares into triangles.
3. Glue and stack triangles from floor to ceiling in the corner of the control room or studio space.
p.144
4. Make sure the stacked triangles are pushed up against the wall.
5. Build a rectangular frame out of the 1 × 4s to cover the stacked triangles.
6. Wrap the frame with material, preferably jute or polyester, and staple it to the inside of the frame.
7. Screw the frame into the corner hiding the stacked triangles.
How to Build a Quiet Space for Your Computer or Tape Machine
The main goal with this DIY project is to eliminate the fan noise from your computer or tape machine so it doesn’t interfere with your critical listening environment. You are not going to be recording in this particular space so it doesn’t have to sound good. First, locate a spare closet near the control room or an empty space under a staircase. Carefully consider airflow and venting so the equipment doesn’t overheat. Leave space under the door or install vents. There is no need for bass trapping since the frequencies emitted will likely be mid to mid-high frequencies.
You will need enough insulation or Auralex to completely cover all surfaces of a small closet or space under a staircase, and some proper adhesive, if you are using Auralex or a similar product.
1. Cover the area in Auralex foam or absortive panels (like the broadband absorber described above).
2. Proceed to make the area as dead as possible!
![]() TIP
TIP
This is a great bonus project if you are recording vocals. The objective with this project is to create a tight, dry, non-reflective space to record vocals. The quickest way to do this is to use your existing closet space and convert it into a makeshift vocal booth. First, push your clothes to both sides of the closet, clearing an opening to stand. Next, on the wall you are facing, place a broadband absorber panel or strip of 2’ × 4’ Auralex. If the floor is bare, place a throw carpet down to stand on. Behind the singer use an acoustic blanket draped over a mic stand as described in the previous tip. This should significantly get rid of any noticeable room sound and may make a vocal take more usable, especially with hip-hop, EDM, pop, and metal.
p.145
Learn before you build. Listen to your mixes and get to know how your room sounds before you get excited and staple egg crates all over your walls. Take your time and get it right. Read more about acoustics, get to know your recording environment, and tweak your room as needed.
If you are not the DIY type or just don’t have the time, you can purchase prefabricated gobos, diffusers, bass traps, broadband absorbers, and other acoustic treatments at a variety of reputable companies. Some of these companies are listed below:
Additional Links and Resources
Some good reads:
Acoustic Design for the Home Studio by Mitch Gallagher (Artistpro, 2006)
The Studio Builder’s Handbook: How to Improve the Sound of Your Studio on Any Budget by Bobby Owsinski (Alfred Publishing, 2011)
Handbook of Sound Studio Construction: Rooms for Recording and Listening by F. Alton Everest and Ken C. Pohlmann (McGraw-Hill Education, 2013)