Events are everywhere! Any activity or task that changes the state of a work item generates an event. Due to a lack of infrastructure and the non-availability of cheap devices, there previously was not much traction for the Internet of Things (IoT). Historically, organizations used hosted environments from internet service providers (ISPs) that just had monitoring systems on top of them. These monitoring systems raised events that were few and far between.
However, with the advent of the cloud, things are changing rapidly. With increased deployments on the cloud, especially of Platform as a Service (PaaS) services, organizations no longer need much control over the hardware and the platform, and now every time there is a change in an environment, an event is raised. With the emergence of cloud events, IoT has gained a lot of prominence and events have started to take center stage.
Another recent phenomenon has been the rapid burst of growth in the availability of data. The velocity, variety, and volume of data has spiked, and so has the need for solutions for storing and processing data. Multiple solutions and platforms have emerged, such as Hadoop, data lakes for storage, data lakes for analytics, and machine learning services.
Apart from storage and analytics, there is also a need for services that are capable of ingesting millions upon millions of events and messages from various sources. There is also a need for services that can work on temporal data, rather than working on an entire snapshot of data. For example, event data/IoT data is used in applications that make decisions based on real-time or near real-time data, such as traffic management systems or systems that monitor temperature.
Azure provides a plethora of services that help in capturing and analyzing real-time data from sensors. In this chapter, we will go through a couple of eventing services in Azure, as listed here:
- Azure Event Hubs
- Azure Stream Analytics
There are other eventing services, such as Azure Event Grid, that are not covered in this chapter; however, they are extensively covered in Chapter 10, Azure Integration Services with Azure functions (Durable Functions and Proxy functions).
Introducing events
Events are important constructs in both Azure and Azure application architecture. Events are everywhere within the software ecosystem. Generally, any action that is taken results in an event that can be trapped, and then further action can be taken. To take this discussion forward, it is important to first understand the basics of events.
Events help in capturing the new state of a target resource. A message is a lightweight notification of a condition or a state change. Events are different than messages. Messages are related to business functionality, such as sending order details to another system. They contain raw data and can be large in size. In comparison, events are different; for instance, a virtual machine being stopped is an event. Figure 12.1 demonstrates this transition from the current state to the target state:
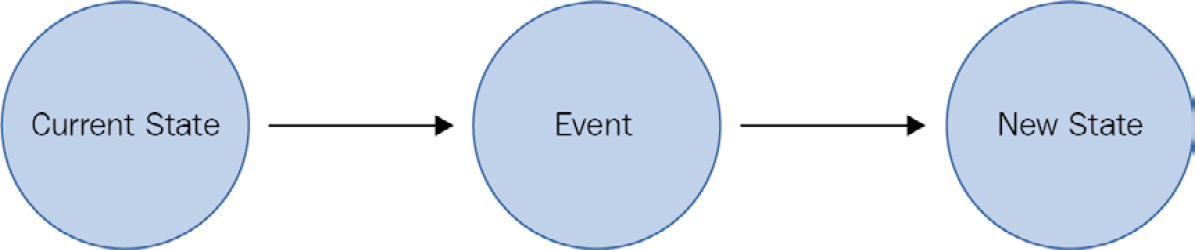
Figure 12.1: Transition of a state due to an event
Events can be stored in durable storage as historical data and events can also be used to find patterns that are emerging on an ongoing basis. Events can be thought of as data being streamed constantly. To capture, ingest, and perform analysis on a stream of data, special infrastructure components that can read a small window of data and provide insights are needed, and that is where the Stream Analytics service comes into the picture.
Event streaming
Processing events as they are ingested and streamed over a time window provides real-time insights about data. The time window could 15 minutes or an hour—the window is defined by the user and depends on the insights that are to be extracted from data. Take credit card swipes, for instance—millions of credit card swipes happen every minute, and fraud detection can be done over streamed events for a time window of one or two minutes.
Event streaming refers to services that can accept data as and when it arises, rather than accepting it periodically. For example, event streams should be capable of accepting temperature information from devices as and when they send it, rather than making the data wait in a queue or a staging environment.
Event streaming also has the capability of querying data while in transit. This is temporal data that is stored for a while, and the queries occur on the moving data; therefore, the data is not stationary. This capability is not available on other data platforms, which can only query stored data and not temporal data that has just been ingested.
Event streaming services should be able to scale easily to accept millions or even billions of events. They should be highly available such that sources can send events and data to them at any time. Real-time data ingestion and being able to work on that data, rather than data that's stored in a different location, is the key to event streaming.
But when we already have so many data platforms with advanced query execution capabilities, why do we need event steaming? One of the main advantages of event streaming is that it provides real-time insights and information whose usefulness is time-dependent. The same information found after a few minutes or hours might not be that useful. Let's consider some scenarios in which working on incoming data is quite important. These scenarios can't be effectively and efficiently solved by existing data platforms:
- Credit card fraud detection: This should happen as and when a fraudulent transaction happens.
- Telemetry information from sensors: In the case of IoT devices sending vital information about their environments, the user should be notified as and when an anomaly is detected.
- Live dashboards: Event streaming is needed to create dashboards that show live information.
- Datacenter environment telemetry: This will let the user know about any intrusions, security breaches, failures of components, and more.
There are many possibilities for applying event streaming within an enterprise, and its importance cannot be stressed enough.
Event Hubs
Azure Event Hubs is a streaming platform that provides functionality related to the ingestion and storage of streaming-related events.
It can ingest data from a variety of sources; these sources could be IoT sensors or any applications using the Event Hubs Software Development Kit (SDK). It supports multiple protocols for ingesting and storing data. These protocols are industry standard, and they include the following:
- HTTP: This is a stateless option and does not require an active session.
- Advanced Messaging Queuing Protocol (AMQP): This requires an active session (that is, an established connection using sockets) and works with Transport Layer Security (TLS) and Secure Socket Layer (SSL).
- Apache Kafka: This is a distributed streaming platform similar to Stream Analytics. However, Stream Analytics is designed to run real-time analytics on multiple streams of data from various sources, such as IoT sensors and websites.
Event Hubs is an event ingestion service. It can't query a request and output query results to another location. That is the responsibility of Stream Analytics, which is covered in the next section.
To create an Event Hubs instance from the portal, search for Event Hubs in Marketplace and click on Create. Select a subscription and an existing resource group (or create a new one). Provide a name for the Event Hubs namespace, the preferred Azure region to host it in, the pricing tier (Basic or Standard, explained later), and the number of throughput units (explained later):
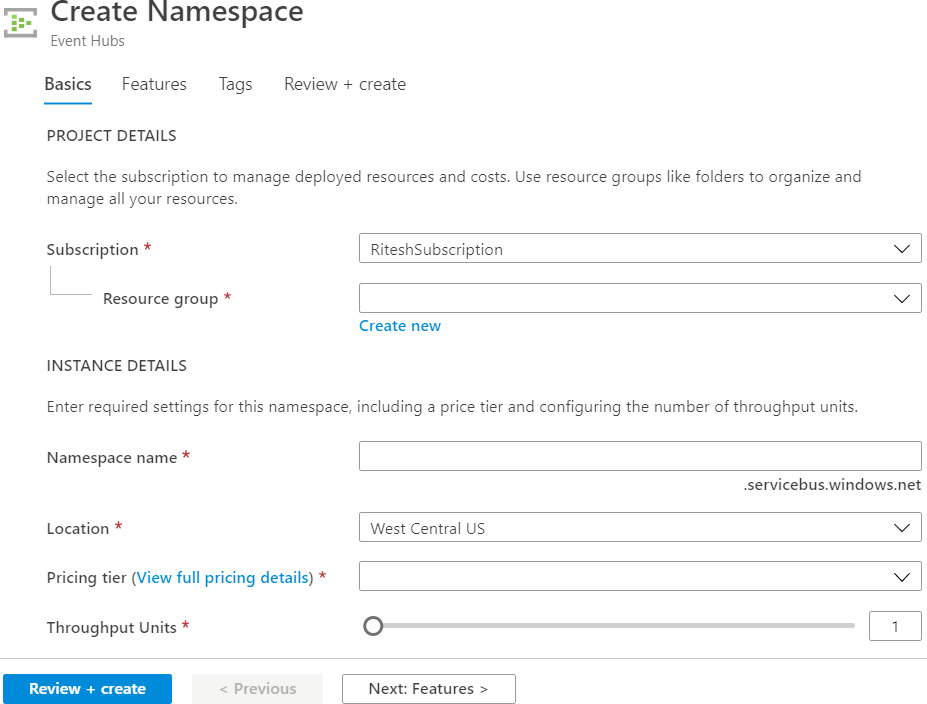
Figure 12.2: Creating an Event Hubs namespace
Event Hubs, being a PaaS service, is highly distributed, highly available, and highly scalable.
Event Hubs comes with the following two SKUs or pricing tiers:
- Basic: This comes with one consumer group and can retain messages for 1 day. It can have a maximum of 100 brokered connections.
- Standard: This comes with a maximum of 20 consumer groups and can retain messages for 1 day with additional storage for 7 days. It can have a maximum of 1,000 brokered connections. It is also possible to define policies in this SKU.
Figure 12.3 shows the different SKUs available while creating a new Event Hubs namespace. It provides an option to choose an appropriate pricing tier, along with other important details:
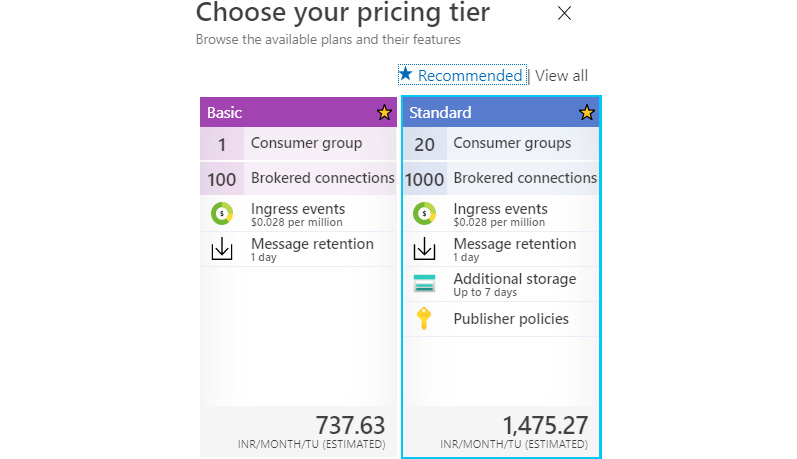
Figure 12.3: Event Hubs SKUs
Throughput can also be configured at the namespace level. Namespaces are containers that consist of multiple event hubs in the same subscription and region. The throughput is calculated as throughput units (TUs). Each TU provides:
- Up to 1 MB per second of ingress or a maximum of 1,000 ingress events and management operations per second.
- Up to 2 MB per second of egress or a maximum of 4,096 events and management operations per second.
- Up to 84 GB of storage.
The TUs can range from 1 to 20 and they are billed on an hourly basis.
It is important to note that the SKU cannot be changed after provisioning an Event Hubs namespace. Due consideration and planning should be undertaken before selecting an SKU. The planning process should include planning the number of consumer groups required and the number of applications interested in reading events from the event hub.
Also, the Standard SKU is not available in every region. It should be checked for availability at the time of the design and implementation of the event hub. The URL for checking region availability is https://azure.microsoft.com/global-infrastructure/services/?products=event-hubs.
Event Hubs architecture
There are three main components of the Event Hubs architecture: The Event Producers, the Event Hub, and the Event Consumer, as shown in the following diagram:

Figure 12.4: Event Hubs architecture
Event Producers generate events and send them to the Event Hub. The Event Hub stores the ingested events and provides that data to the Event Consumer. The Event Consumer is whatever is interested in those events, and it connects to the Event Hub to fetch the data.
Event hubs cannot be created without an Event Hubs namespace. The Event Hubs namespace acts as a container and can host multiple event hubs. Each Event Hubs namespace provides a unique REST-based endpoint that is consumed by clients to send data to Event Hubs. This namespace is the same namespace that is needed for Service Bus artifacts, such as topics and queues.
The connection string of an Event Hubs namespace is composed of its URL, policy name, and key. A sample connection string is shown in the following code block:
Endpoint=sb://demoeventhubnsbook.servicebus.windows.net/;SharedAccessKeyName=RootManageSharedAccessKey;SharedAccessKey=M/E4eeBsr7DAlXcvw6ziFqlSDNbFX6E49Jfti8CRkbA=
This connection string can be found in the Shared Access Signature (SAS) menu item of the namespace. There can be multiple policies defined for a namespace, each having different levels of access to the namespace. The three levels of access are as follows:
- Manage: This can manage the event hub from an administrative perspective. It also has rights for sending and listening to events.
- Send: This can write events to Event Hubs.
- Listen: This can read events from Event Hubs.
By default, the RootManageSharedAccessKey policy is created when creating an event hub, as shown in Figure 12.5. Policies help in creating granular access control on Event Hubs. The key associated with each policy is used by consumers to determine their identity; additional policies can also be created with any combination of the three previously mentioned access levels:
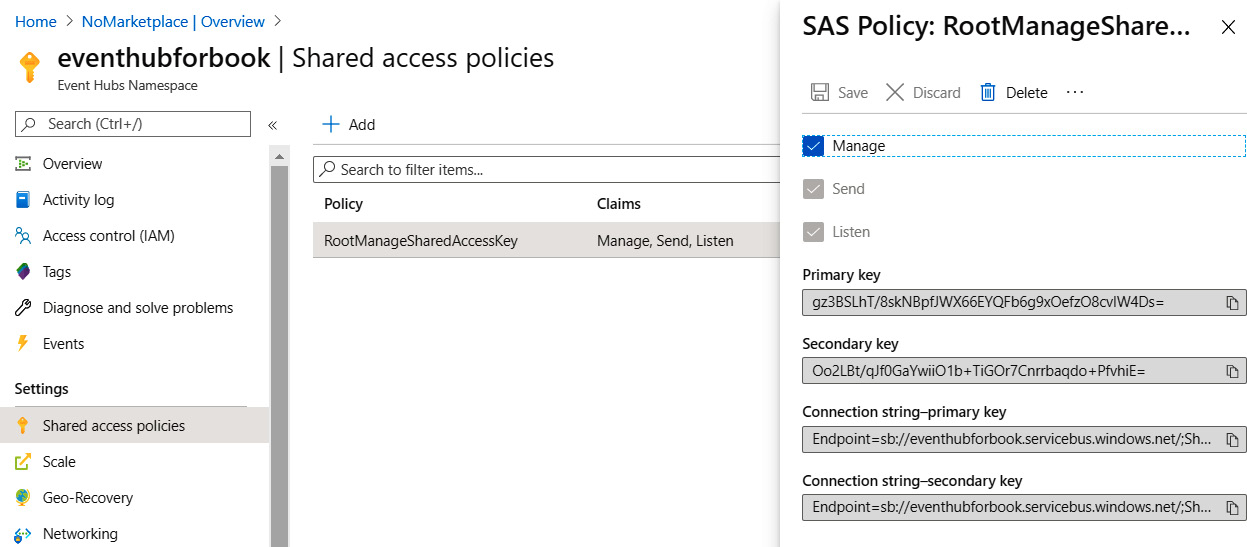
Figure 12.5: Shared access policies in Event Hubs
Event hubs can be created from the Event Hubs namespace service by performing the following actions:
- Click on Event Hubs in the left-hand menu and click on + Event Hub in the resultant screen:
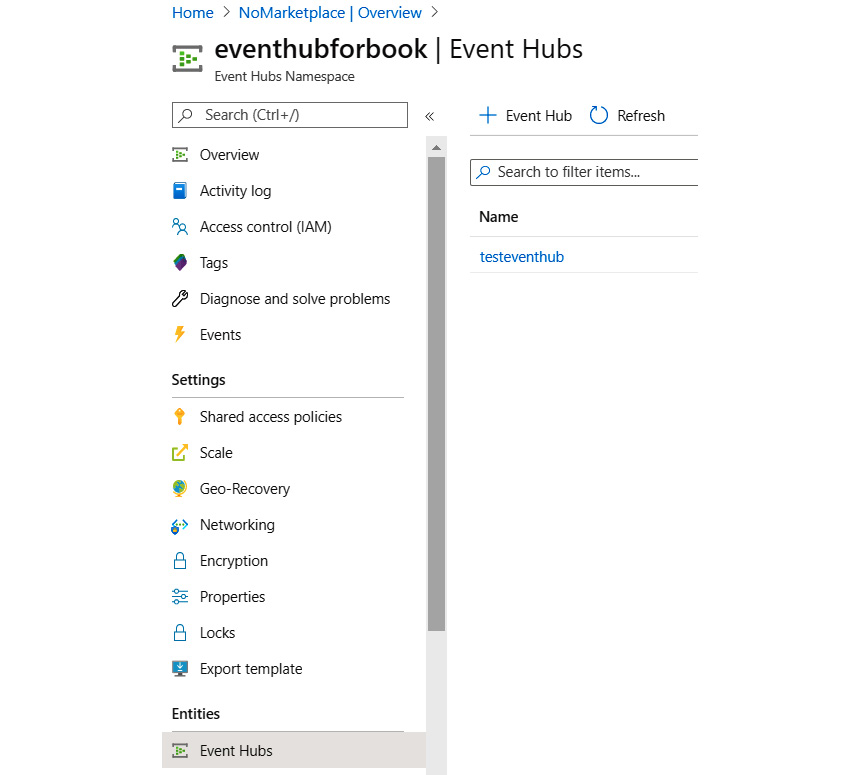
Figure 12.6: Creating an event hub from the Azure portal
- Next, provide values for the Partition Count and Message Retention fields, along with the name of your choice. Then, select Off for Capture, as demonstrated in Figure 12.7:

Figure 12.7: Creating a new event hub
After the event hub is created, you will see it in the list of event hubs, as shown in Figure 12.8:
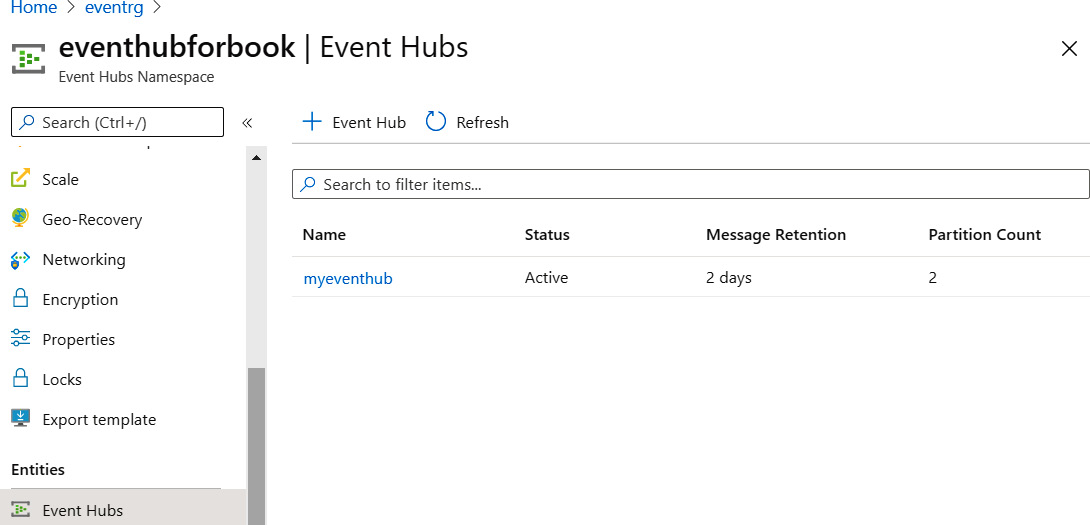
Figure 12.8: List of created event hubs
Event Hubs also allows the storage of events to a storage account or data lake directly using a feature known as Capture.
Capture helps in the automatic storage of ingested data to either an Azure storage account or an Azure data lake. This feature ensures that the ingestion and storage of events happens in a single step, rather than transferring data into storage being a separate activity:
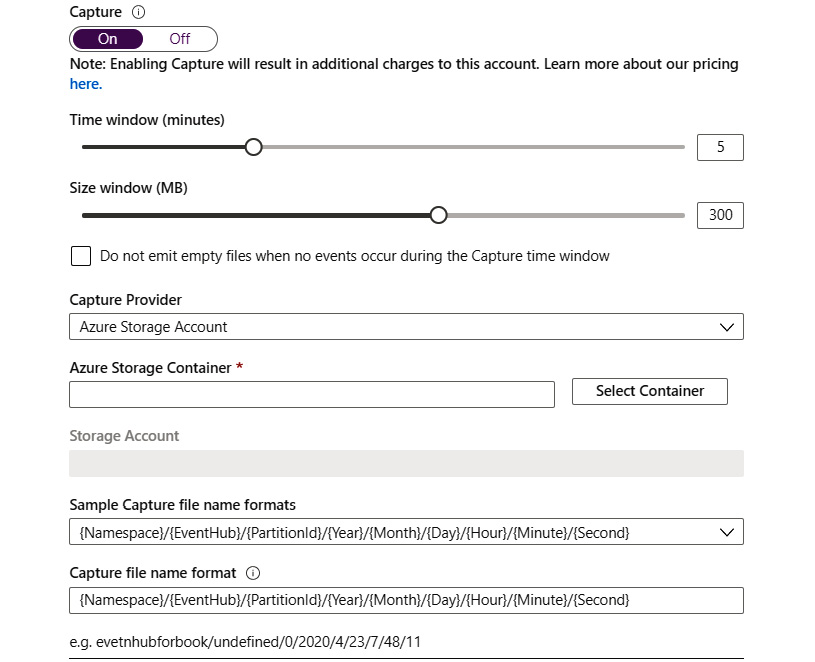
Figure 12.9: Capture feature options
Separate policies can be assigned to each event hub by adding a new policy at the event hub level.
After creating the policy, the connection string is available from the Secure Access Signature left-menu item in the Azure portal.
Since a namespace can consist of multiple event hubs, the connection string for an individual event hub will be similar to the following code block. The difference here is in the key value and the addition of EntityPath with the name of the event hub:
Endpoint=sb://azuretwittereventdata.servicebus.windows
=rxEu5K4Y2qsi5wEeOKuOvRnhtgW8xW35UBex4VlIKqg=;EntityPath=myeventhub
We had to keep the Capture option set to Off while creating the event hub, and it can be switched back on after creating the event hub. It helps to save events to Azure Blob storage or an Azure Data Lake storage account automatically. The configuration for the size and time interval is shown in Figure 12.10:
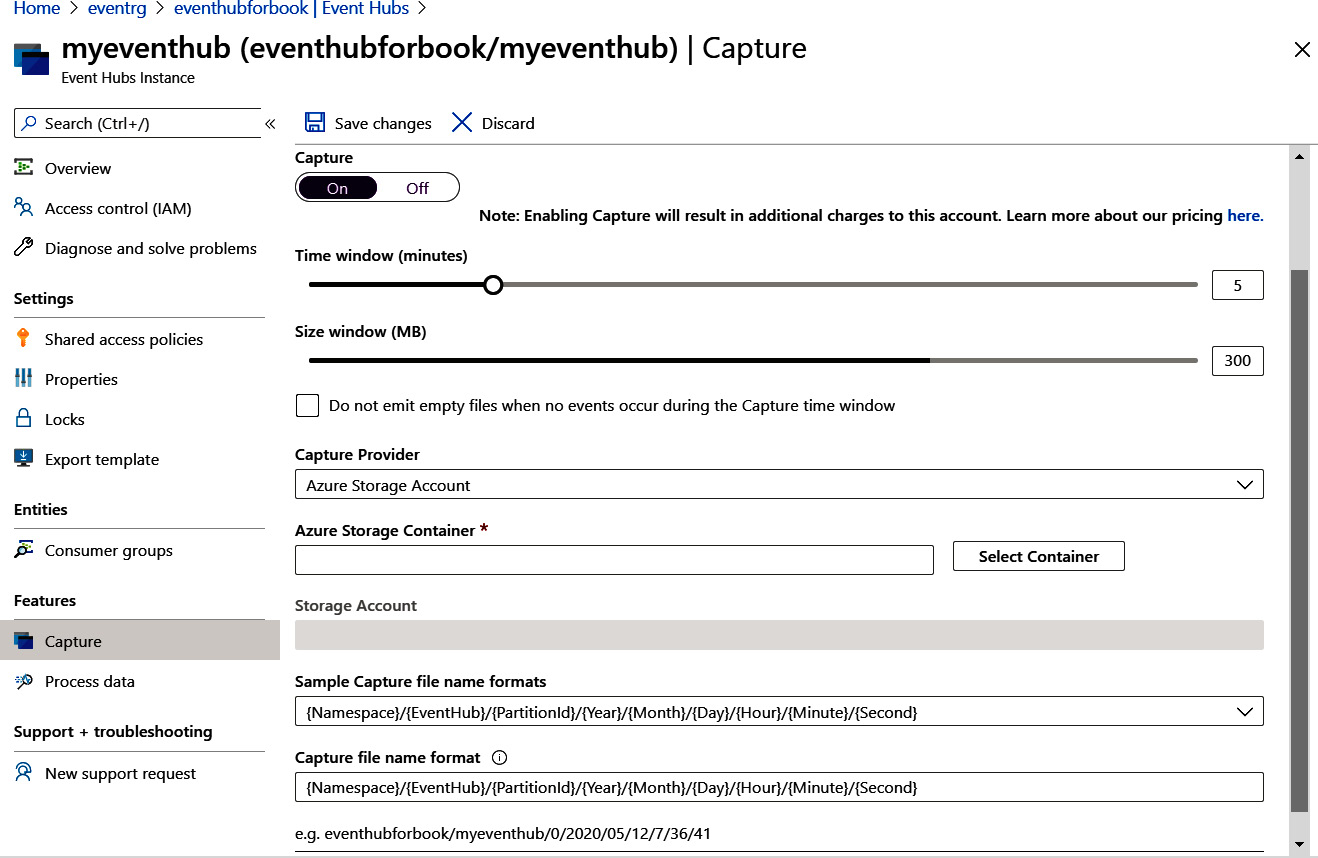
Figure 12.10: Selecting the size and time interval for capturing events
We did not cover the concepts of partitions and message retention options while creating event hubs.
Partitioning is an important concept related to the scalability of any data store. Events are retained within event hubs for a specific period of time. If all events are stored within the same data store, then it becomes extremely difficult to scale that data store. Every event producer will connect to the same data store and send their events to it. Compare this with a data store that can partition the same data into multiple smaller data stores, each being uniquely identified with a value.
The smaller data store is called a partition, and the value that defines the partition is known as the partition key. This partition key is part of the event data.
Now the event producers can connect to the event hub, and based on the value of the partition key, the event hub will store the data in an appropriate partition. This will allow the event hub to ingest multiple events at the same time in parallel.
Deciding on the number of partitions is a crucial aspect of the scalability of an event hub. Figure 12.11 shows that ingested data is stored in the appropriate partition internally by Event Hubs using the partition key:
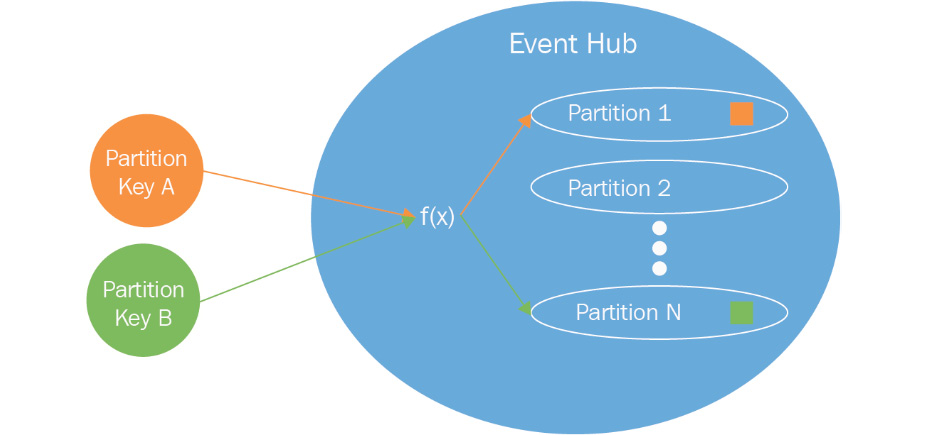
Figure 12.11: Partitioning in an event hub
It is important to understand that one partition might have multiple keys. The user decides how many partitions are required, and the event hub internally decides the best way to allocate the partition keys between them. Each partition stores data in an orderly way using a timestamp, and newer events are appended toward the end of the partition.
It is important to note that it is not possible to change the number of partitions once the event hub is created.
It is also important to remember that partitions also help in bringing parallelism and concurrency for applications reading the events. For example, if there are 10 partitions, 10 parallel readers can read the events without any degradation in performance.
Message retention refers to the time period for which events should be stored. After the expiry of the retention period, the events are discarded.
Consumer groups
Consumers are applications that read events from an event hub. Consumer groups are created for consumers to connect to in order to read the events. There can be multiple consumer groups for an event hub, and each consumer group has access to all the partitions within an event hub. Each consumer group forms a query on the events in events hubs. Applications can use consumer groups and each application will get a different view of the event hub events. A default $default consumer group is created when creating an event hub. It is good practice for one consumer to be associated with one consumer group for optimal performance. However, it is possible to have five readers on each partition in a consumer group:
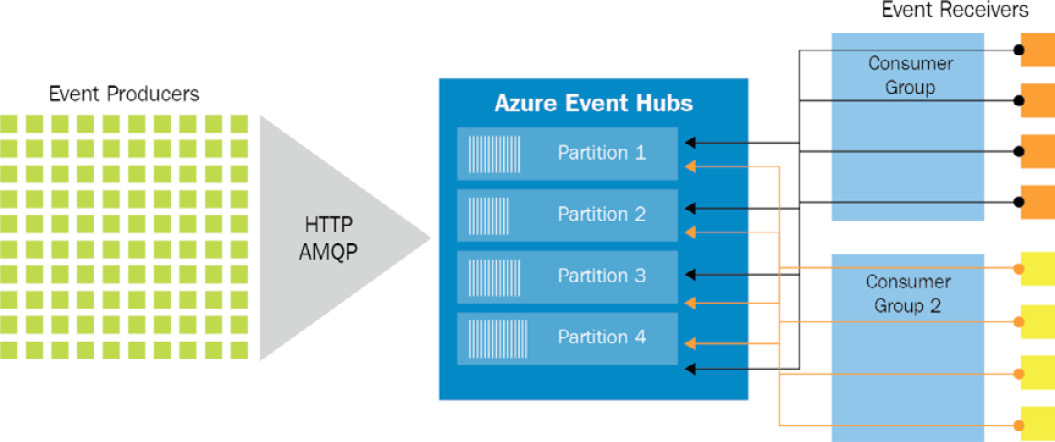
Figure 12.12: Event receivers in a consumer group
Now that you understand consumer groups, it is time to go deeper into the concept of Event Hubs throughput.
Throughput
Partitions help with scalability, while throughput helps with capacity per second. So, what is capacity in terms of Event Hubs? It is the amount of data that can be handled per second.
In Event Hubs, a single TU allows the following:
- 1 MB of ingestion data per second or 1,000 events per second (whichever happens first)
- 2 MB of egress data per second or 4,096 events per second (whichever happens first)
The auto-inflate option helps in increasing the throughput automatically if the number of incoming/outgoing events or the incoming/outgoing total size crosses a threshold. Instead of throttling, the throughput will scale up and down. The configuration of throughput at the time of the creation of the namespace is shown in Figure 12.13. Again, careful thought should go into deciding the TUs:
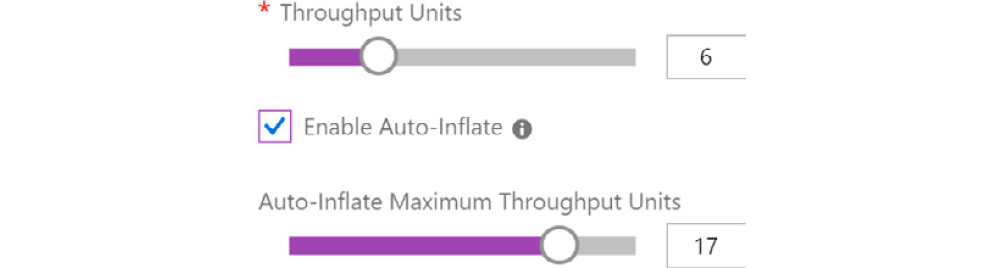
Figure 12.13: Selecting the TUs along with auto-inflate
A primer on Stream Analytics
Event Hubs is a highly scalable data streaming platform, so we need another service that can process these events as a stream rather than just as stored data. Stream Analytics helps in processing and examining a stream of big data, and Stream Analytics jobs help to execute the processing of events.
Stream Analytics can process millions of events per second and it is quite easy to get started with it. Azure Stream Analytics is a PaaS that is completely managed by Azure. Customers of Stream Analytics do not have to manage the underlying hardware and platform.
Each job comprises multiple inputs, outputs, and a query, which transforms the incoming data into new output. The whole architecture of Stream Analytics is shown in Figure 12.14:
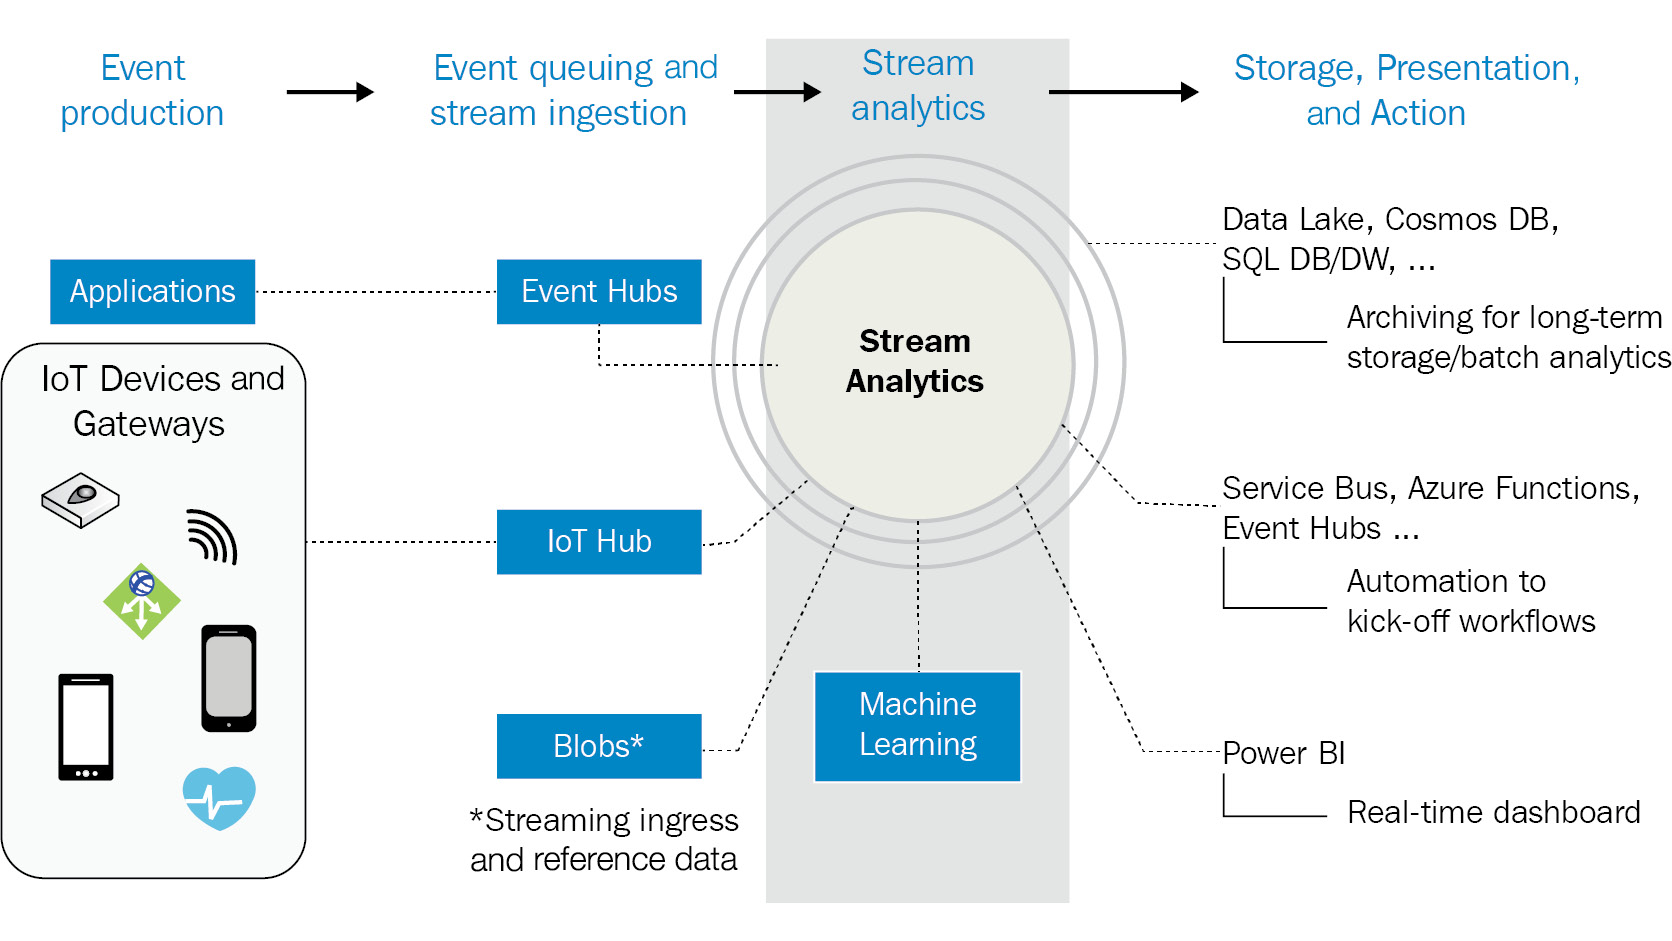
Figure 12.14: Azure Stream Analytics architecture
In Figure 12.14, the event sources are displayed on the extreme left. These are the sources that produce the events. They could be IoT devices, custom applications written in any programming language, or events coming from other Azure platforms, such as Log Analytics or Application Insights.
These events must first be ingested into the system, and there are numerous Azure services that can help to ingest this data. We've already looked at Event Hubs and how they help in ingesting data. There are other services, such as IoT Hub, that also help in ingesting device-specific and sensor-specific data. IoT Hub and ingestion are covered in detail in Chapter 11, Designing IoT Solutions. This ingested data undergoes processing as it arrives in a stream, and this processing is done using Stream Analytics. The output from Stream Analytics could be fed to a presentation platform, such as Power BI, to show real-time data to stakeholders, or a storage platform such as Cosmos DB, Data Lake Storage, or Azure Storage, from which the data can be read and actioned later by Azure Functions and Service Bus queues.
Stream Analytics helps in gathering insights from real-time ingested data within a time window frame and helps in identifying patterns.
It does so through three different tasks:
- Input: The data should be ingested within the analytics process. The data can originate from Event Hubs, IoT Hub, or Azure Blob storage. Multiple separate reference inputs using a storage account and SQL Database can be used for lookup data within queries.
- Query: This is where Stream Analytics does the core job of analyzing the ingested data and extracting meaningful insights and patterns. It does so with the help of JavaScript user-defined functions, JavaScript user-defined aggregates, Azure Machine Learning, and Azure Machine Learning studio.
- Output: The result of the queries can be sent to multiple different types of destinations, and prominent among them are Cosmos DB, Power BI, Synapse Analytics, Data Lake Storage, and Functions:
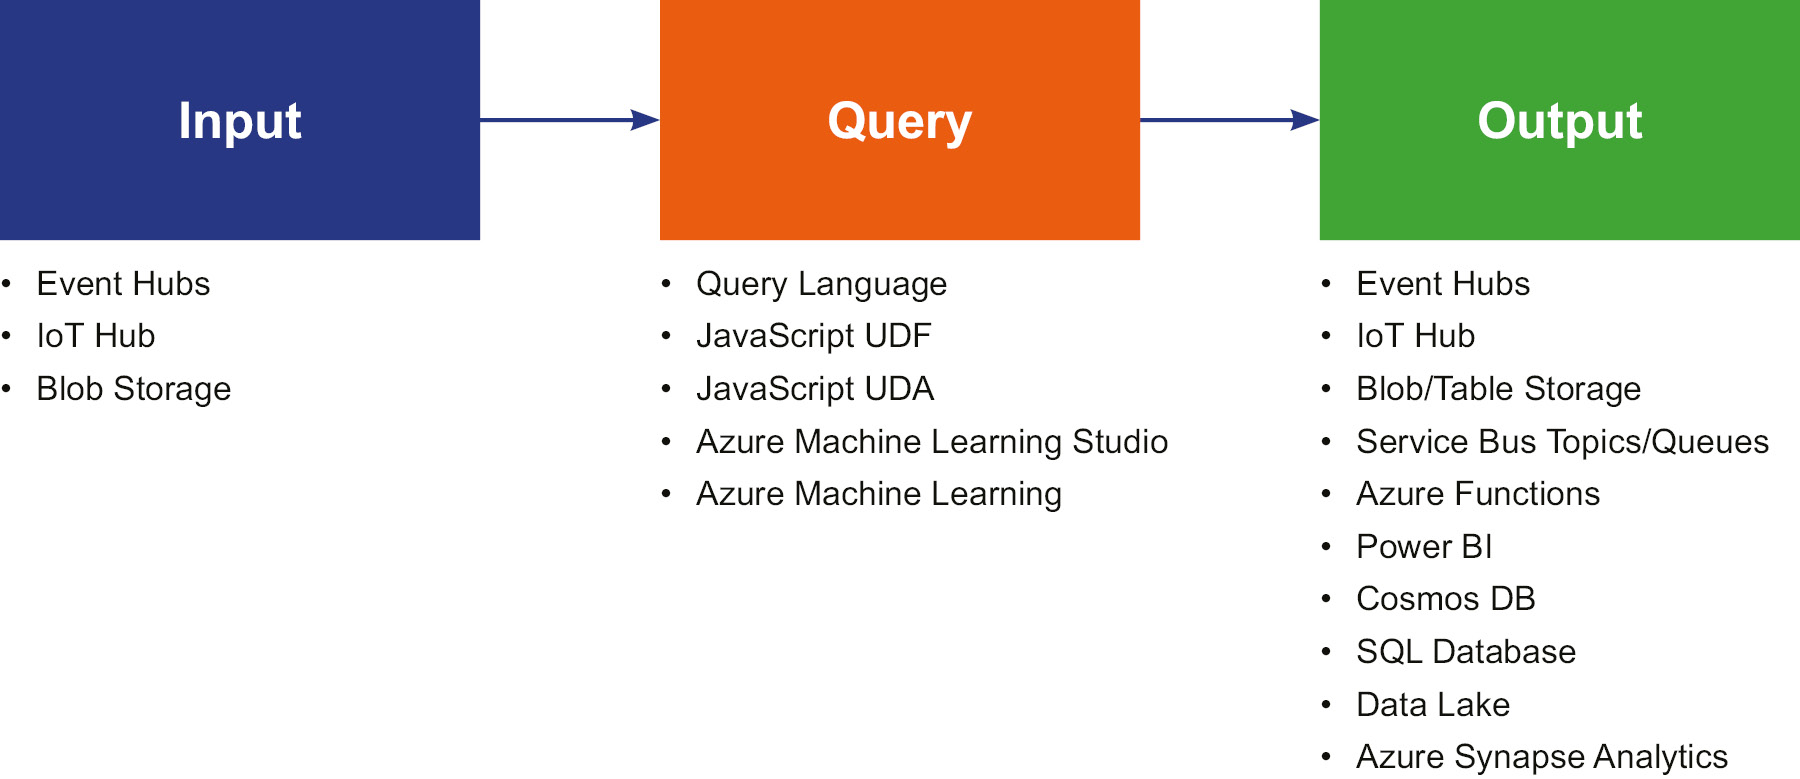
Figure 12.15: Stream Analytics process
Stream Analytics is capable of ingesting millions of events per second and can execute queries on top of them.
Input data is supported in any of the three following formats:
- JavaScript Object Notation (JSON): This is a lightweight, plaintext-based format that is human readable. It consists of name-value pairs; an example of a JSON event follows:
{ "SensorId" : 2, "humidity" : 60, "temperature" : 26C }
- Comma-Separated Values (CSV): These are also plaintext values, which are separated by commas. An example of CSV is shown in Figure 12.16. The first row is the header, containing three fields, followed by two rows of data:
Figure 12.16: Plaintext values
- Avro: This format is similar to JSON; however, it is stored in a binary format rather than a text format:
{
"firstname": "Ritesh",
"lastname": "Modi",
"email": "[email protected]"
}
However, this does not mean that Stream Analytics can only ingest data using these three formats. It can also create custom .NET-based deserializers, using which any format of data can be ingested, depending upon the deserializers' implementation. The steps you can follow to write a custom deserializer are available at https://docs.microsoft.com/azure/stream-analytics/custom-deserializer-examples.
Not only can Stream Analytics receive events, but it also provides advanced query capability for the data that it receives. The queries can extract important insights from the temporal data streams and output them.
As shown in Figure 12.17, there is an input dataset and an output dataset; the query moves the events from the input to the output. The INTO clause refers to the output location, and the FROM clause refers to the input location. The queries are very similar to SQL queries, so the learning curve is not too steep for SQL programmers:
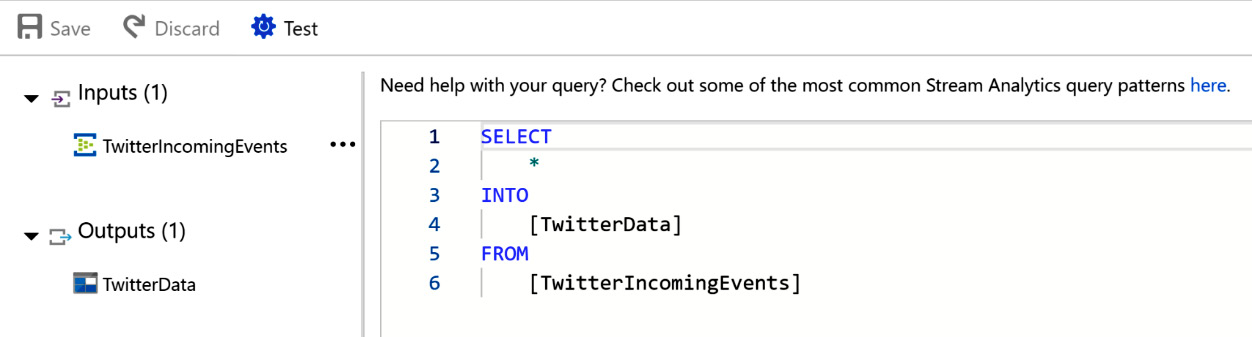
Figure 12.17: Stream Analytics query for receiving Twitter data
Event Hubs provides mechanisms for sending outputs from queries to target destinations. At the time of writing, Stream Analytics supports multiple destinations for events and query outputs, as shown before.
It is also possible to define custom functions that can be reused within queries. There are four options provided to define custom functions.
- Azure Machine Learning
- JavaScript user-defined functions
- JavaScript user-defined aggregates
- Azure Machine Learning studio
The hosting environment
Stream Analytics jobs can run on hosts that are running on the cloud, or they can run on IoT edge devices. IoT edge devices are devices that are near to IoT sensors, rather than on the cloud. Figure 12.18 shows the New Stream Analytics job pane:
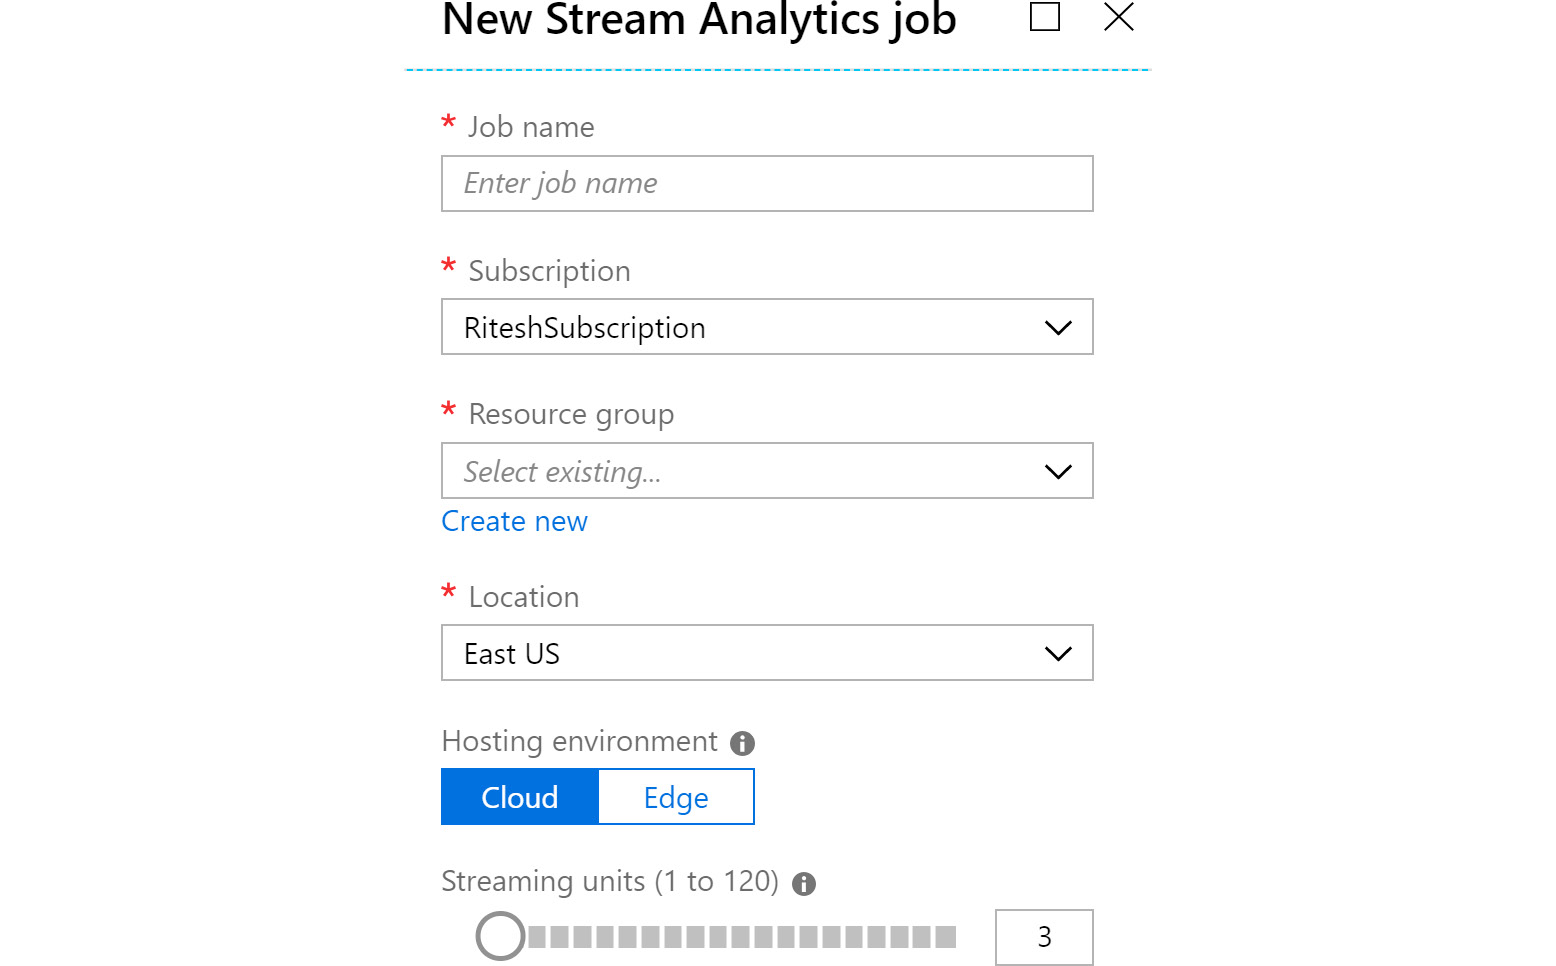
Figure 12.18: Creating a new Stream Analytics job
Let's check out streaming units in detail.
Streaming units
From Figure 12.18, you can see that the only configuration that is unique to Stream Analytics is streaming units. Streaming units refers to the resources (that is, CPU and memory) that are assigned for running a Stream Analytics job. The minimum and maximum streaming units are 1 and 120, respectively.
Streaming units must be pre-allocated according to the amount of data and the number of queries executed on that data; otherwise, the job will fail.
It is possible to scale streaming units up and down from the Azure portal.
A sample application using Event Hubs and Stream Analytics
In this section, we will be creating a sample application comprising multiple Azure services, including Azure Logic Apps, Azure Event Hubs, Azure Storage, and Azure Stream Analytics.
In this sample application, we will be reading all tweets containing the word "Azure" and storing them in an Azure storage account.
To create this solution, we first need to provision all the necessary resources.
Provisioning a new resource group
Navigate to the Azure portal, log in using valid credentials, click on + Create a resource, and search for Resource group. Select Resource group from the search results and create a new resource group. Then, provide a name and choose an appropriate location. Note that all resources should be hosted in the same resource group and location so that it is easy to delete them:
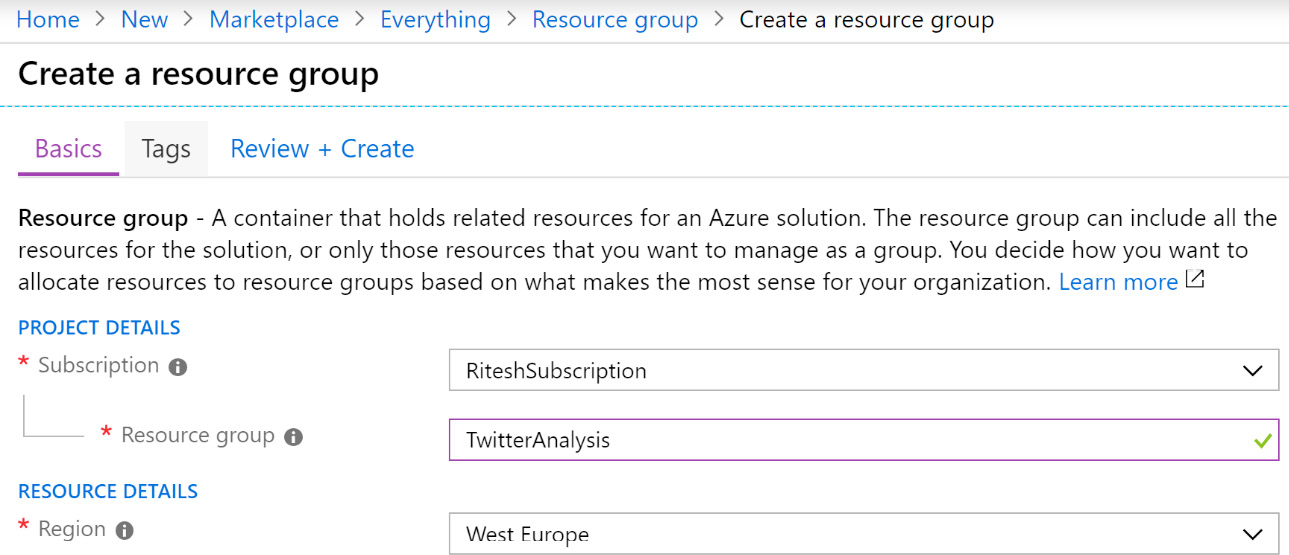
Figure 12.19: Provisioning a new resource group in the Azure portal
Next, we will create an Event Hubs namespace.
Creating an Event Hubs namespace
Click on + Create a resource and search for Event Hubs. Select Event Hubs from the search results and create a new event hub. Then, provide a name and location, and select a subscription based on the resource group that was created earlier. Select Standard as the pricing tier and also select Enable Auto-inflate, as shown in Figure 12.20:
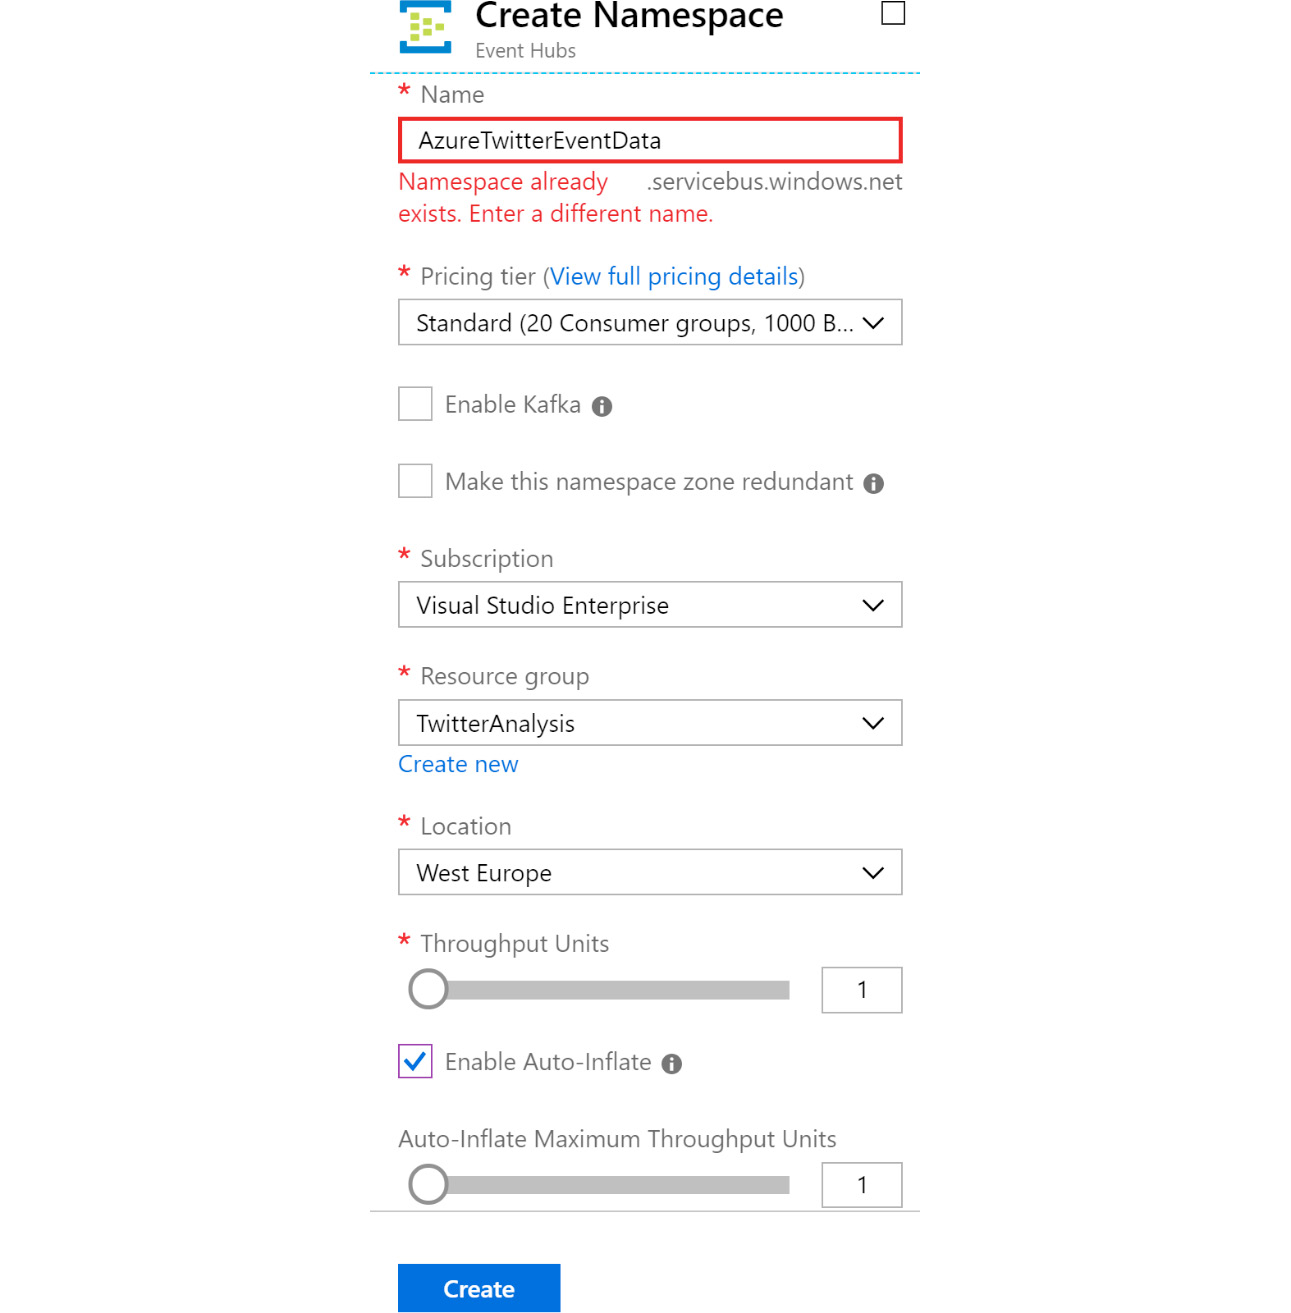
Figure 12.20: Creating an Event Hubs namespace
By now, an Event Hubs namespace should have been created. It is a pre-requisite to have a namespace before an event hub can be created. The next step is to provision an event hub.
Creating an event hub
From the Event Hubs namespace service, click on Events Hubs in the left-hand menu, and then click on + Event hubs to create a new event hub. Name it azuretwitterdata and provide an optimal number of partitions and a Message Retention value:
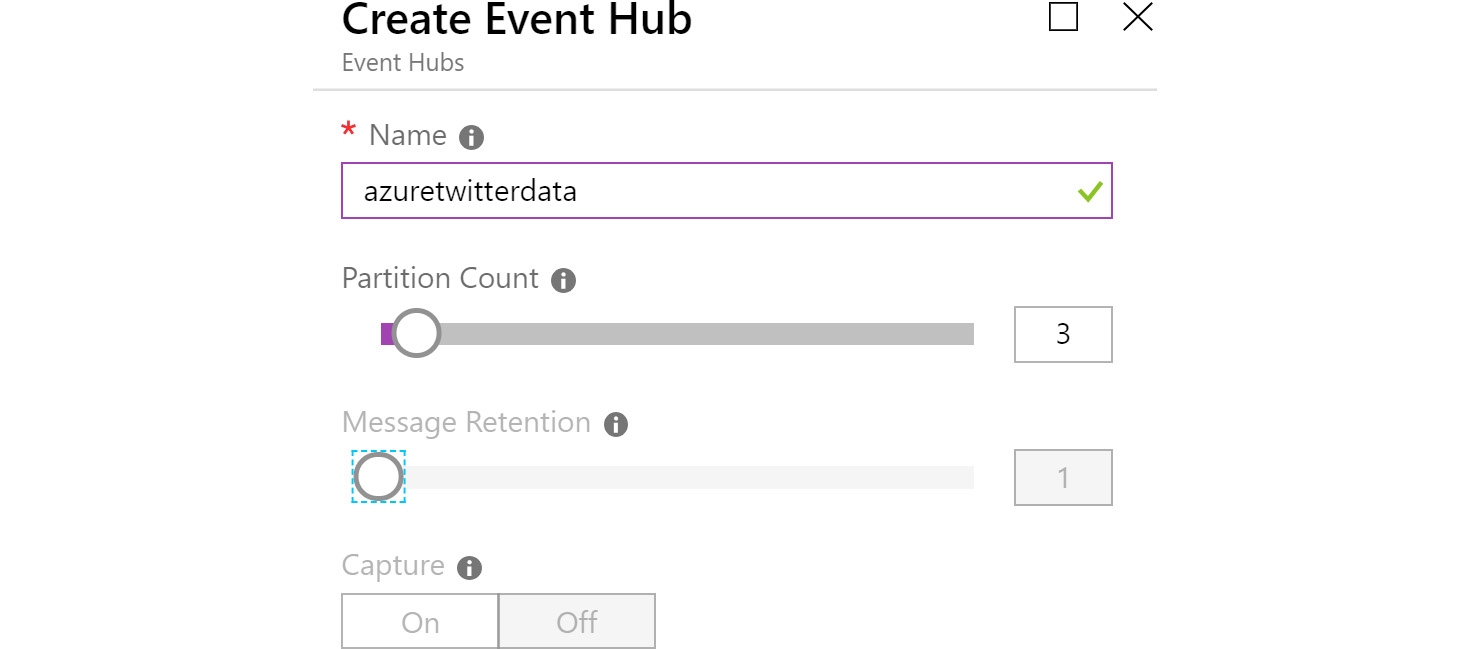
Figure 12.21: Creating the azuretwitterdata event hub
After this step, you will have an event hub that can be used to send event data, which is stored in durable storage such as a data lake or an Azure Storage account, to be used by downstream services.
Provisioning a logic app
After the resource group is provisioned, click on + Create a resource and search for Logic Apps. Select Logic Apps from the search results and create a new logic app. Then, provide a name and location, and select a subscription based on the resource group created earlier. It is good practice to enable Log Analytics. Logic Apps is covered in more detail in Chapter 11, Azure Solutions using Azure Logic Apps, Event Grid, and Functions. The logic app is responsible for connecting to Twitter using an account and fetching all the tweets with Azure in them:
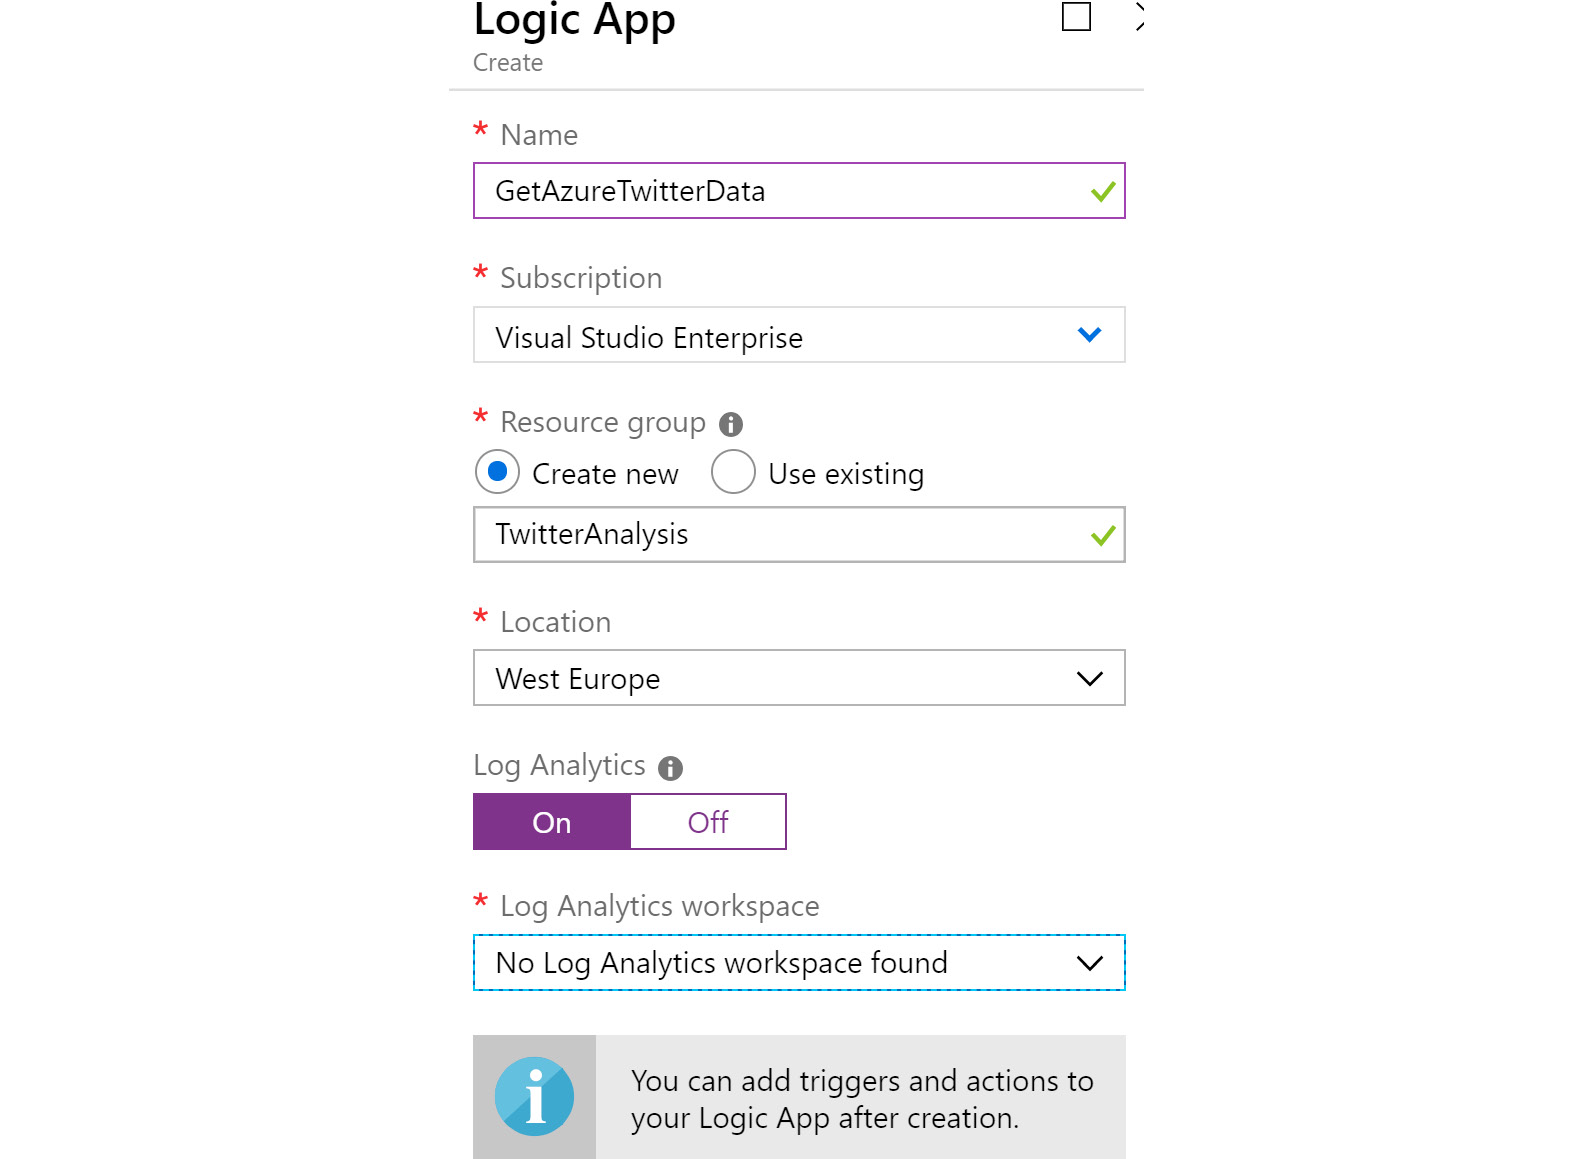
Figure 12.22: Creating a logic app
After the logic app is created, select the When a new tweet is posted trigger on the design surface, sign in, and then configure it as shown in Figure 12.23. You will need a valid Twitter account before configuring this trigger:
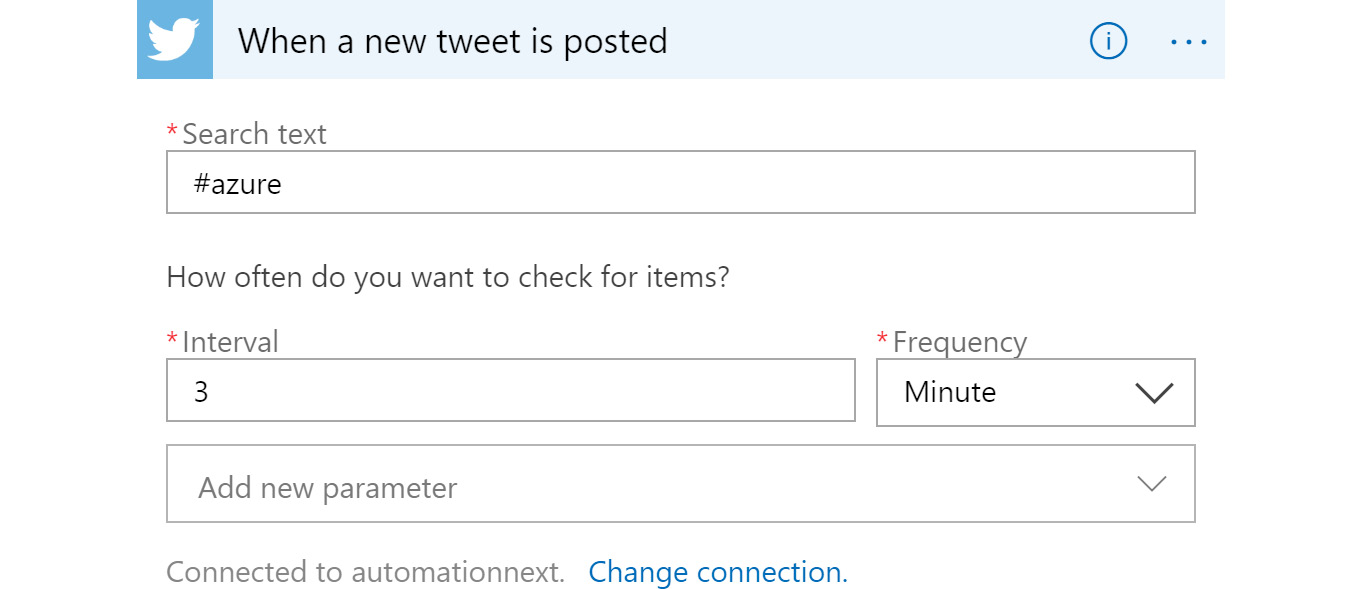
Figure 12.23: Configuring the frequency of incoming tweets
Next, drop a Send event action on the designer surface; this action is responsible for sending tweets to the event hub:
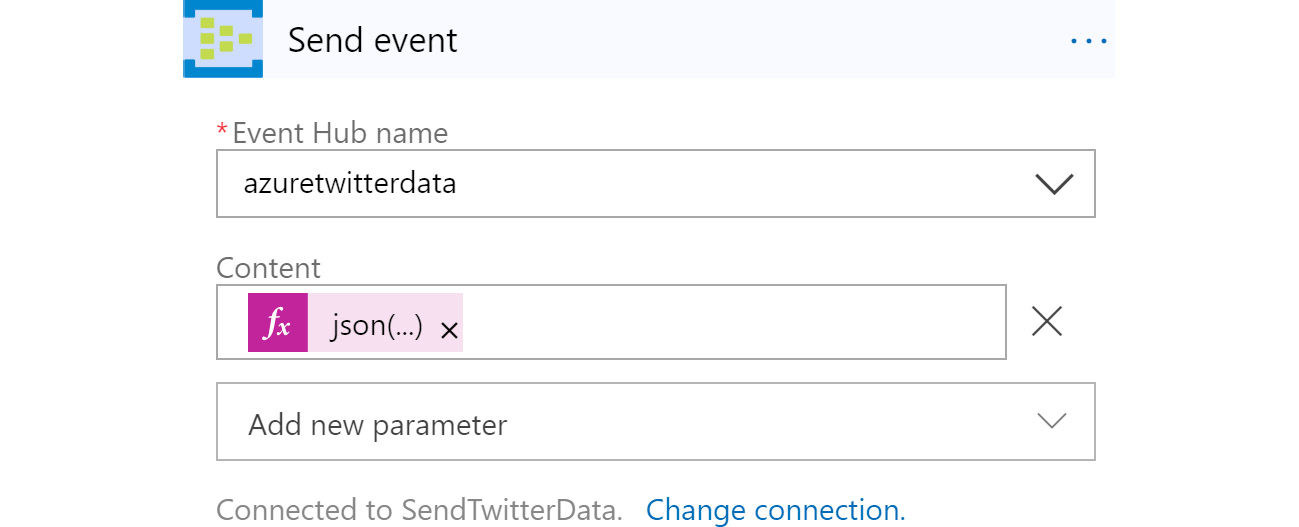
Figure 12.24: Adding an action to send tweets to the event hub
Select the name of the event hub that was created in an earlier step.
The value specified in the content textbox is an expression that has been dynamically composed using Logic Apps–provided functions and Twitter data. Clicking on Add dynamic content provides a dialog through which the expression can be composed:
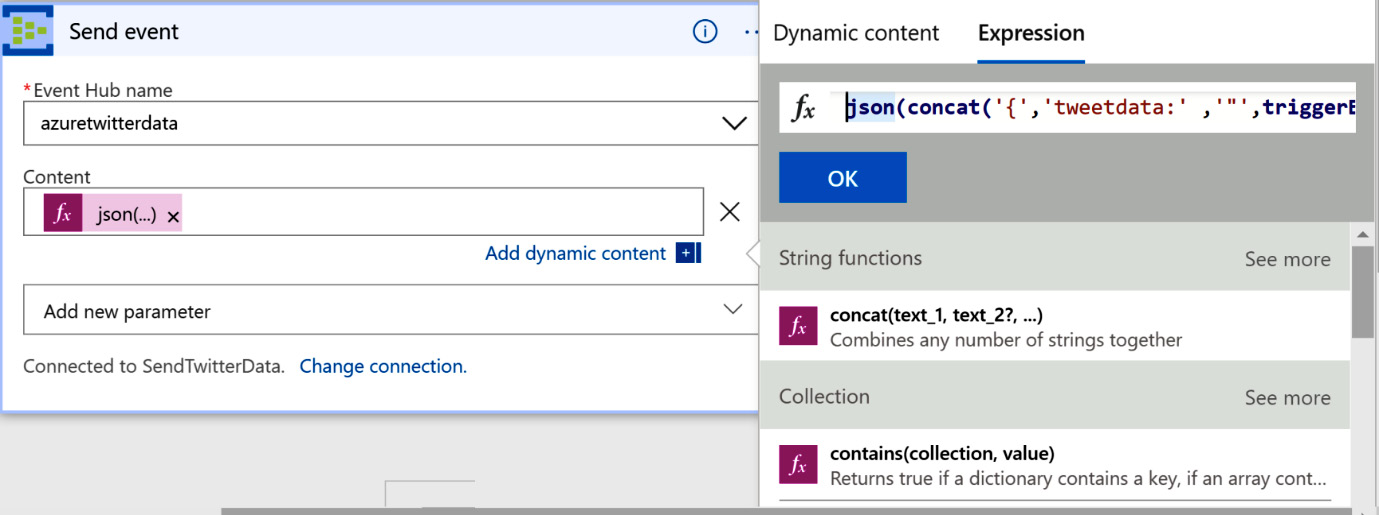
Figure 12.25: Configuring Logic Apps activity using dynamic expressions
The value of the expression is as follows:
json(concat('{','tweetdata:' ,'"',triggerBody()?['TweetText'],'"', '}'))
In the next section, we will provision the storage account.
Provisioning the storage account
Click on + Create a resource and search for Storage Account. Select Storage Account from the search results and create a new storage account. Then, provide a name and location, and select a subscription based on the resource group that was created earlier. Finally, select StorageV2 for Account Kind, Standard for Performance, and Locally-redundant storage (LRS) for the Replication field.
Next, we will create a Blob storage container to store the data coming out of Stream Analytics.
Creating a storage container
Stream Analytics will output the data as files, which will be stored within a Blob storage container. A container named twitter will be created within Blob storage, as shown in Figure 12.26:
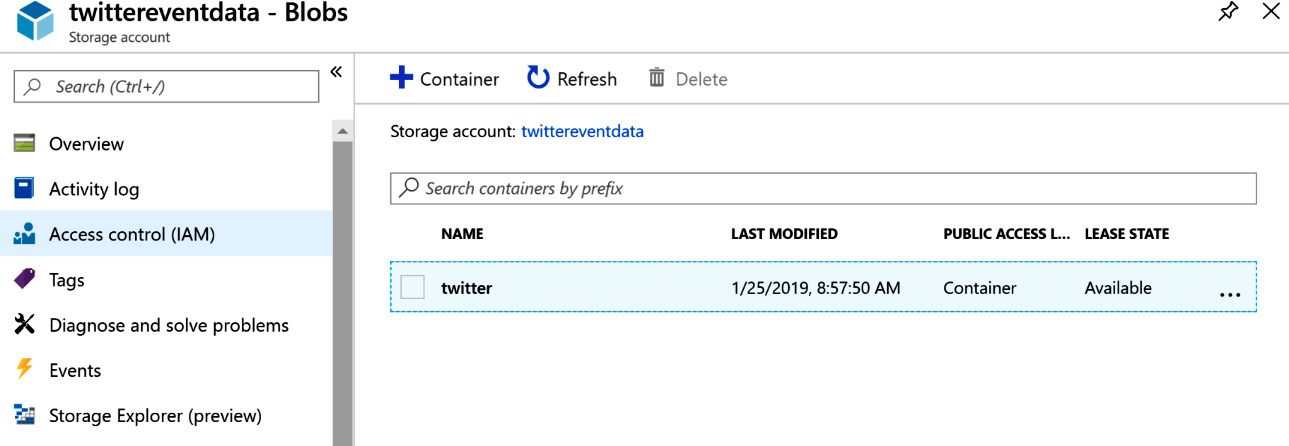
Figure 12.26: Creating a storage container
Let's create a new Stream Analytics job with a hosting environment on the cloud and set the streaming units to the default settings.
Creating Stream Analytics jobs
The input for this Stream Analytics job comes from the event hub, and so we need to configure this from the Inputs menu:
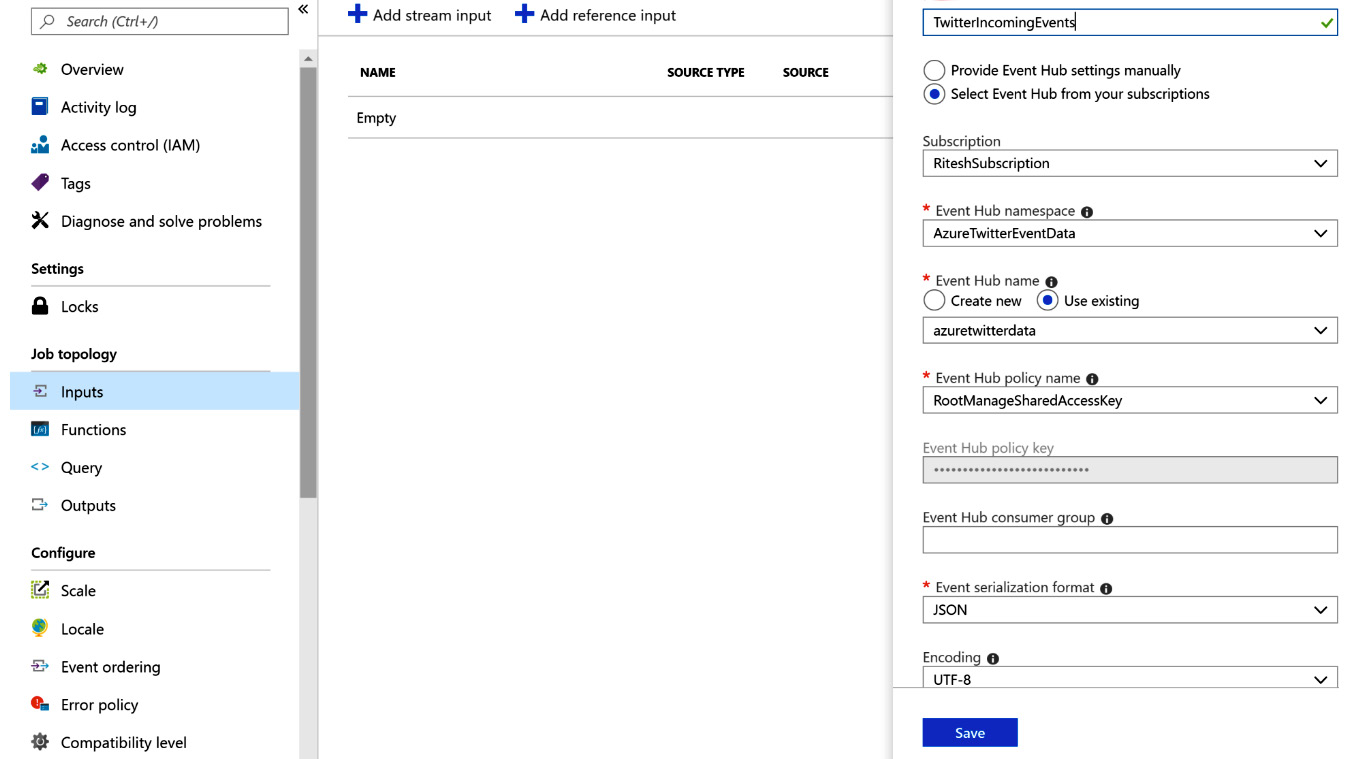
Figure 12.27: Creating an input Stream Analytics job
The output for the Stream Analytics job is a Blob storage account, so you need to configure the output accordingly. Provide a path pattern that is suitable for this exercise; for example, {datetime:ss} is the path pattern that we are using for this exercise:

Figure 12.28: Creating a Blob storage account as output
The query is quite simple; you are just copying the data from the input to the output:
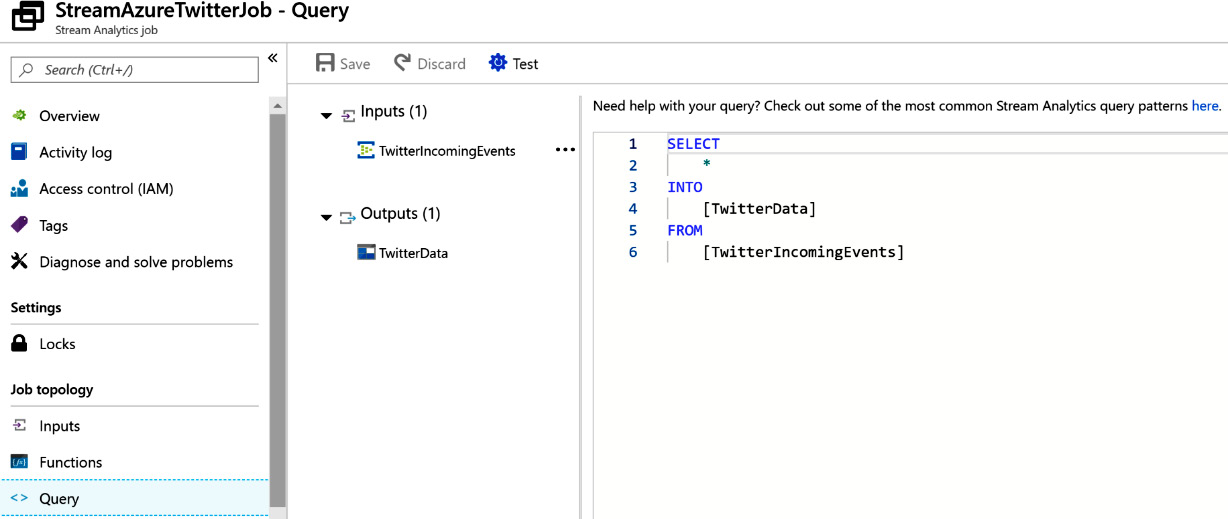
Figure 12.29: Query for copying Twitter feeds
While this example just involves copying data, there can be more complex queries for performing transformation before loading data into a destination.
This concludes all the steps for the application; now you should be able to run it.
Running the application
The logic app should be enabled and Stream Analytics should be running. Now, run the logic app; it will create a job to run all the activities within it, as shown in Figure 12.30:
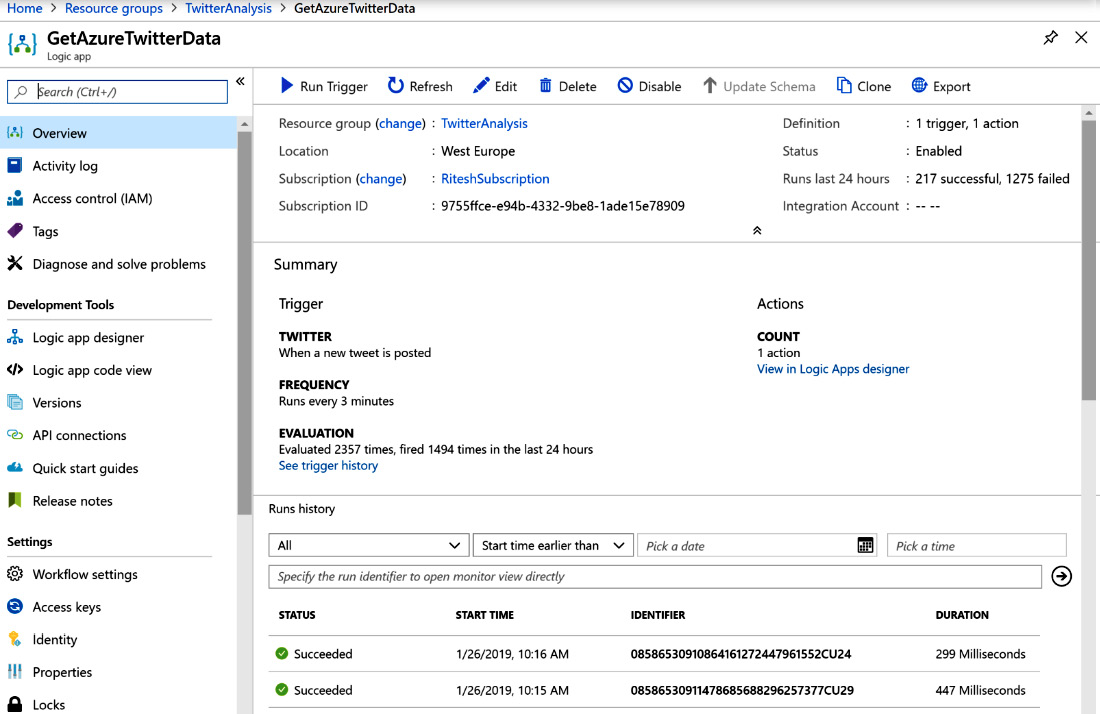
Figure 12.30: Overview of the GetAzureTwitterData application
The Storage Account container should get data, as shown in Figure 12.31:
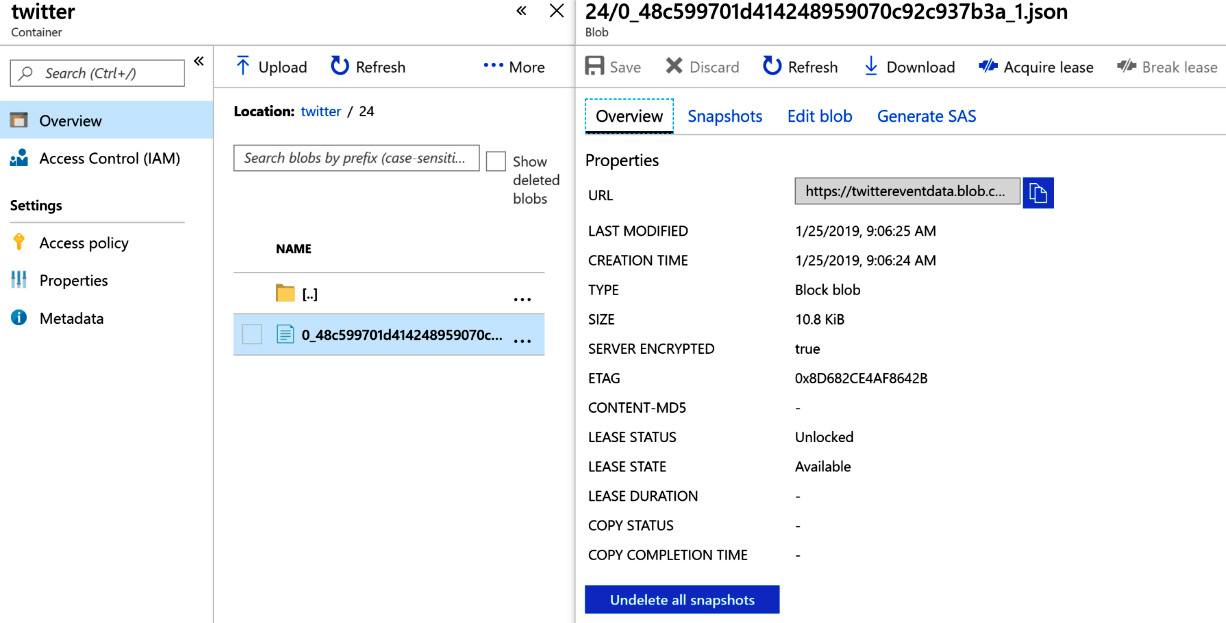
Figure 12.31: Checking the Storage Account container data
As an exercise, you can extend this sample solution and evaluate the sentiment of the tweets every three minutes. The Logic Apps workflow for such an exercise would be as follows:
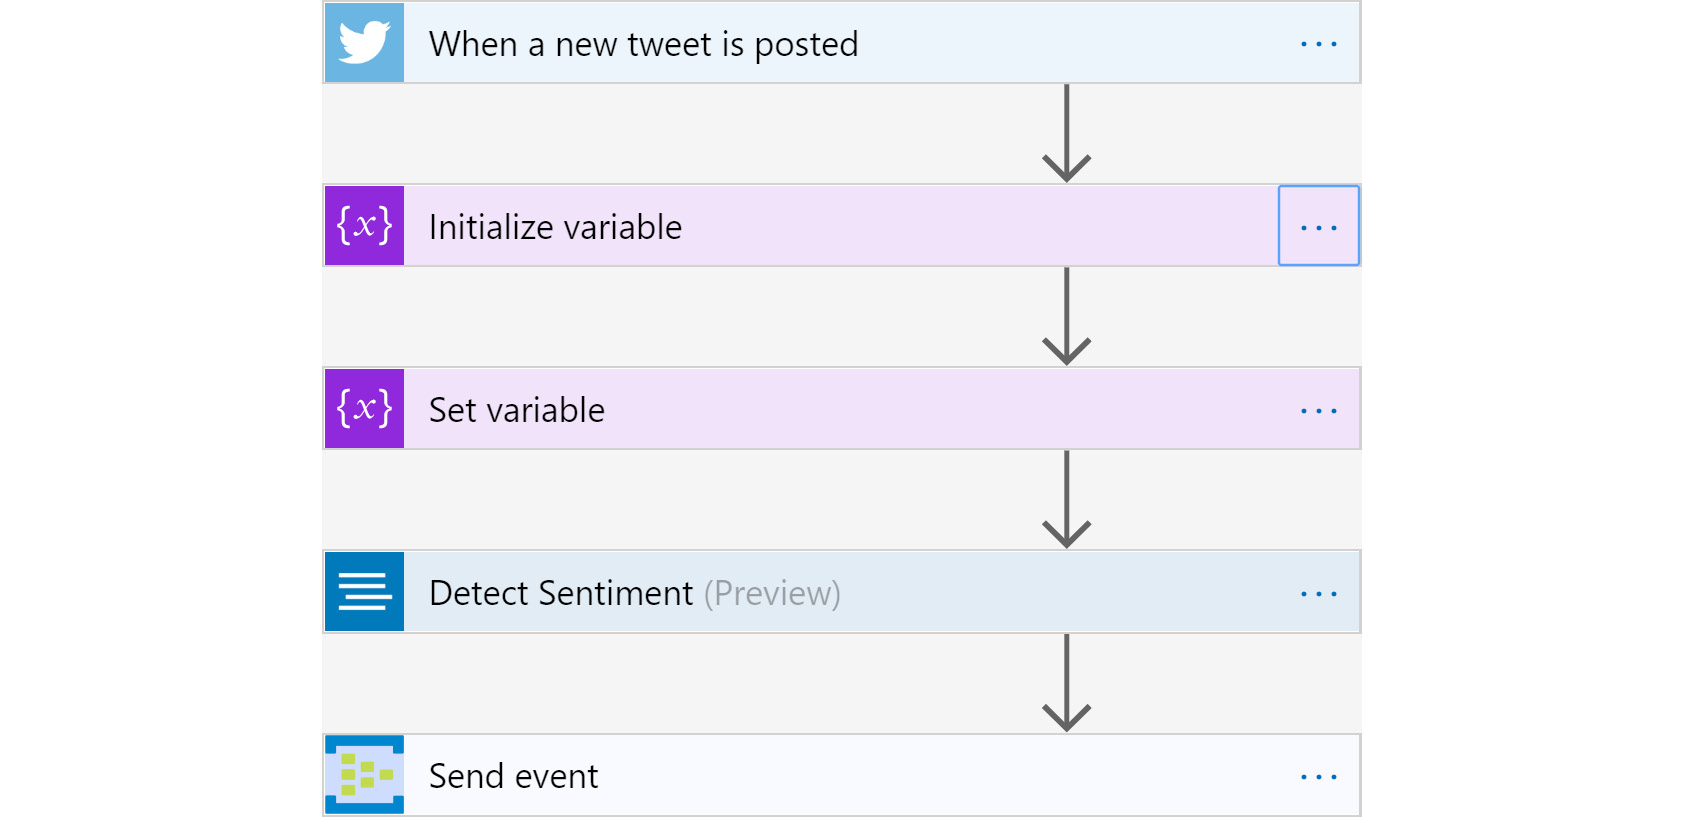
Figure 12.32: Flowchart for analyzing tweet sentiment
To detect sentiment, you'll need to use the Text Analytics API, which should be configured before being used in Logic Apps.
Summary
This chapter focused on topics related to the streaming and storage of events. Events have become an important consideration in overall solution architecture. We covered important resources, such as Event Hubs and Stream Analytics, and foundational concepts, such as consumer groups and throughputs, as well as creating an end-to-end solution using them along with Logic Apps. You learned that events are raised from multiple sources, and in order to get insights in real time about activities and their related events, services such as Event Hubs and Stream Analytics play a significant role. In the next chapter, we will learn about integrating Azure DevOps and Jenkins and implementing some of the industry's best practices while developing solutions.