Every organization wants to reduce manual effort and error in their pursuits, and automation plays an important role in bringing about predictability, standardization, and consistency in both building a product and in operations. Automation has been the focus of almost every Chief information officer (CIO) and digital officer to ensure that their systems are highly available, scalable, reliable, and able to cater to the needs of their customers.
Automation became more prominent with the advent of the cloud because new resources can be provisioned on the fly without the procurement of hardware resources. Hence, cloud companies want automation in almost all of their activities to reduce misuse, errors, governance, maintenance, and administration.
In this chapter, we will evaluate Azure Automation as a major service that provides automation capabilities, along with its differentiating capabilities compared to other apparently similar-looking services. This chapter will cover the following:
- The Azure Automation landscape
- The Azure Automation service
- Resources for Azure Automation services
- Writing Azure Automation runbooks
- Webhooks
- Hybrid Workers
Let's get started with Azure Automation, a cloud service for process automation.
Automation
Automation is needed for the provisioning, operations, management, and deprovisioning of IT resources within an organization. Figure 4.1 gives you a closer look at what each of these use cases represents:
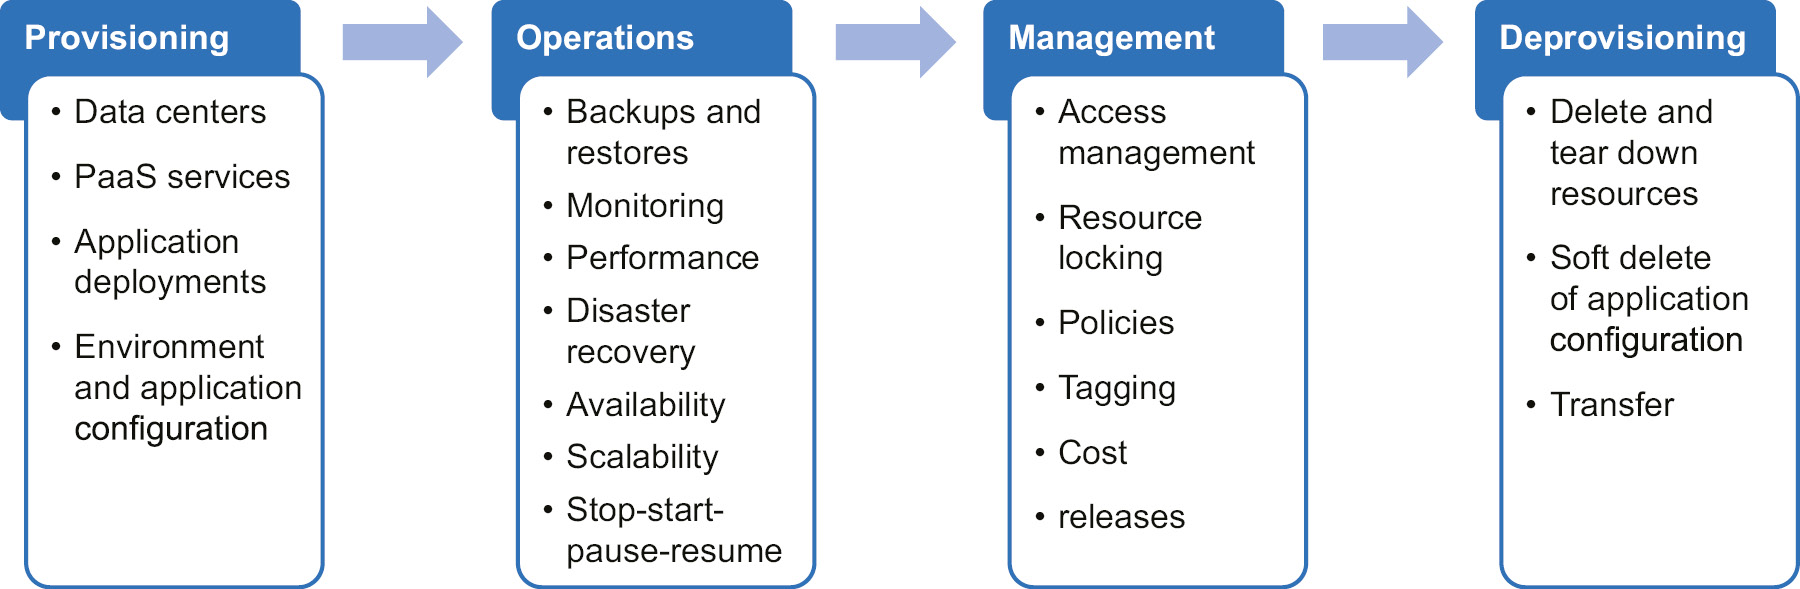
Figure 4.1: Use cases of automation
Before the advent of the cloud, IT resources were primarily on-premises, and manual processes were often used for these activities. However, since cloud adoption has increased, automation has found increased focus and attention. The primary reason is that cloud technology's agility and flexibility provide an opportunity to provision, deprovision, and manage these resources on the fly in a tiny fraction of the time it used to take. Along with this flexibility and agility come the requirements to be more predictable and consistent with the cloud because it has become easy for organizations to create resources.
Microsoft has a great tool for IT automation known as System Center Orchestrator. It is a great tool for automation for on-premises and cloud environments, but it is a product and not a service. It should be licensed and deployed on servers, and then runbooks can be executed to effect changes on cloud and on-premises environments.
Microsoft realized that an automation solution was required that could be provided to customers as a service rather than bought and deployed as a product. Enter Azure Automation.
Azure Automation
Azure provides a service called Azure Automation, which is an essential service for the automation of processes, activities, and tasks not only on Azure but also on-premises as well. Using Azure Automation, organizations can automate their processes and tasks related to processing, tear-down, operations, and the management of their resources across the cloud, IT environments, platforms, and languages. In Figure 4.2, we can see some features of Azure Automation:
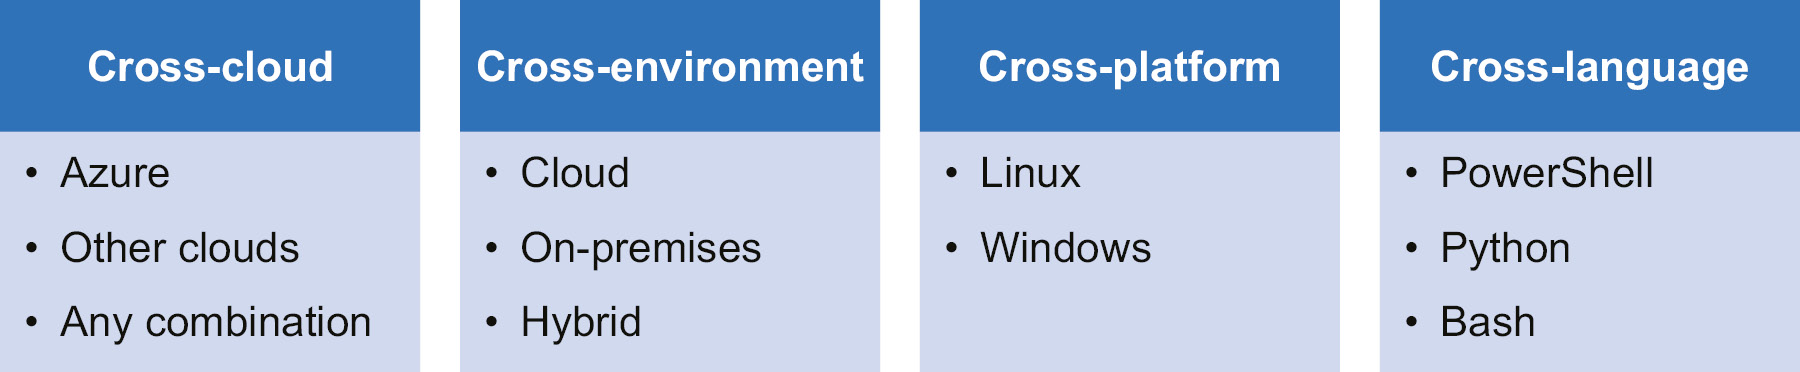
Figure 4.2: Features of Azure Automation
Azure Automation architecture
Azure Automation comprises multiple components, and each of these components is completely decoupled from the others. Most of the integration happens at the data store level, and no components talk to each other directly.
When an Automation account is created on Azure, it is managed by a management service. The management service is a single point of contact for all activities within Azure Automation. All requests from the portal, including saving, publishing, and creating runbooks, to execution, stopping, suspending, starting, and testing are sent to the automation management service and the service writes the request data to its data store. It also creates a job record in the data store and, based on the status of the runbook workers, assigns it to a worker.
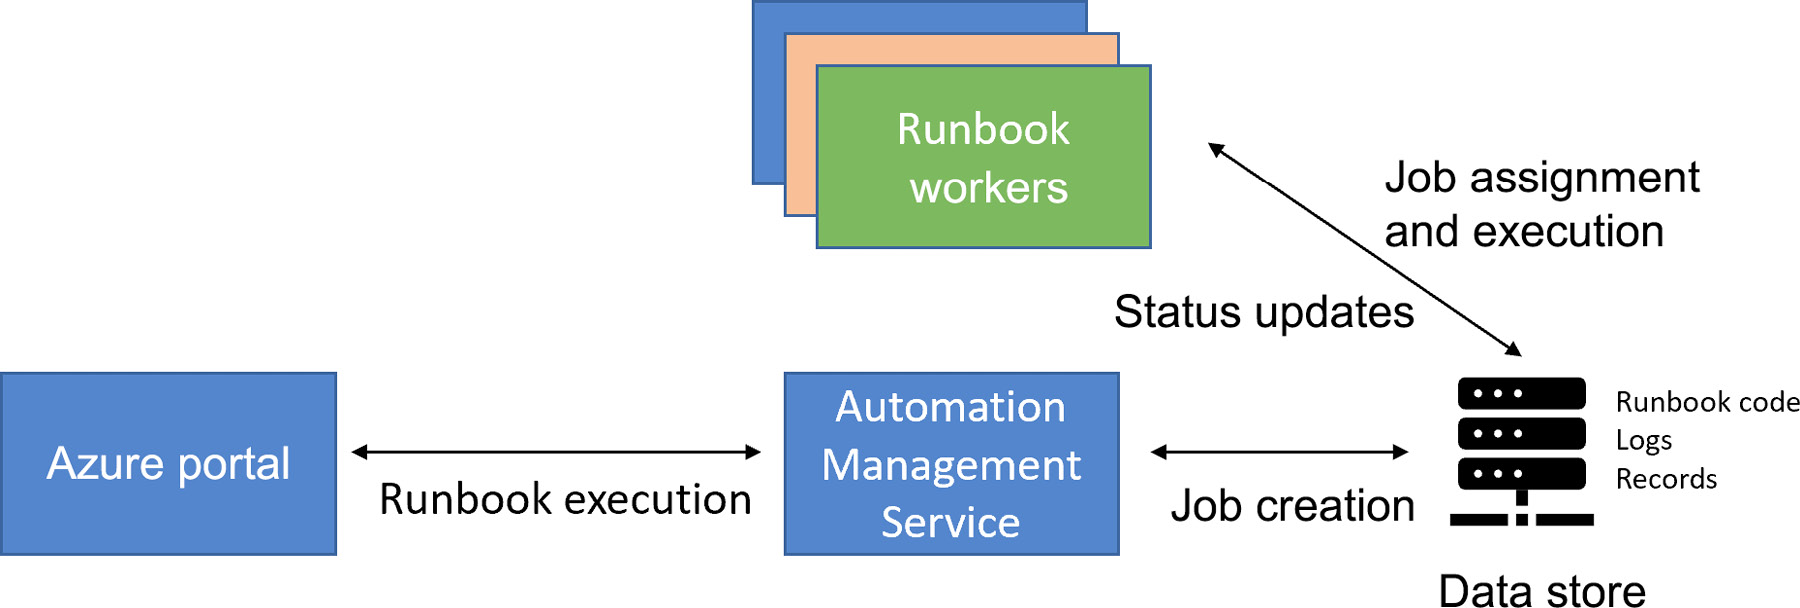
Figure 4.3: Azure Automation architecture
The worker keeps polling the database for any new jobs assigned to it. Once it finds a job assignment, it fetches the job information and starts executing the job using its execution engine. The results are written back to the database, read by the management service, and displayed back on the Azure portal.
The Hybrid Workers that we will read about later in this chapter are also runbook workers, although they're not shown in Figure 4.3.
The first step in getting started with Azure Automation is to create a new account. Once the account is created, all other artifacts are created within the account.
The account acts as the main top-level resource that can be managed using Azure resource groups and its own control plane.
The account should be created within a region, and all automation within this account gets executed on servers in that region.
It is important to choose the region wisely, preferably close to other Azure resources that the Automation account integrates or manages, to reduce the network traffic and latency between the regions.
The Automation account also supports a couple of Run As accounts, which can be created from the Automation account. As these Run As accounts are analogous to a service account, we mostly create them to execute actions. Even though we generally say Run As account, there are two types of Run As account: one is called the Azure Classic Run As account, and the other one is simply the Run As account, and both of them are used to connect to Azure subscriptions. The Azure Classic Run As account is for connecting to Azure using the Azure Service Management API, and the Run As account is for connecting to Azure using the Azure Resource Management (ARM) API.
Both of these accounts use certificates to authenticate with Azure. These accounts can be created while creating the Automation account, or you can opt to create them at a later stage from the Azure portal.
It is recommended to create these Run As accounts later instead of creating them while creating the Automation account because if they are created while setting up the Automation account, Automation will generate the certificates and service principals behind the scenes with the default configuration. If more control and custom configuration is needed for these Run As accounts, such as using an existing certificate or service principal, then the Run As accounts should be created after the Automation account.
Once the Automation account is created, it provides a dashboard through which multiple automation scenarios can be enabled.
Some of the important scenarios that can be enabled using an Automation account are related to:
- Process automation
- Configuration management
- Update management
Automation is about writing scripts that are reusable and generic so that they can be reused in multiple scenarios. For example, an automation script should be generic enough to start and stop any VM in any resource group in any subscription and management group. Hardcoding VM server information, along with resource group, subscription, and management group names, will result in the creation of multiple similar scripts, and any change in one will undoubtedly result in changing all the scripts. It is better to create a single script for this purpose by using scripting parameters and variables, and you should ensure that the values are supplied by the executor for these artifacts.
Let's take a closer look at each of the aforementioned scenarios.
Process automation
Process automation refers to the development of scripts that reflect real-world processes. Process automation comprises multiple activities, where each activity performs a discrete task. Together, these activities form a complete process. The activities might be executed on the basis of whether the previous activity executed successfully or not.
There are some requirements that any process automation requires from the infrastructure it is executed on. Some of them are as follows:
- The ability to create workflows
- The ability to execute for a long duration
- The ability to save the execution state when the workflow is not complete, which is also known as checkpointing and hydration
- The ability to resume from the last saved state instead of starting from the beginning
The next scenario we are going to explore is configuration management.
Configuration management
Configuration management refers to the process of managing the system configuration throughout its life cycle. Azure Automation State Configuration is the Azure configuration management service that allows users to write, manage, and compile PowerShell DSC configuration for cloud nodes and on-premises datacenters.
Azure Automation State Configuration lets us manage Azure VMs, Azure Classic VMs, and physical machines or VMs (Windows/Linux) on-premises, and it also provides support for VMs in other cloud providers.
One of the biggest advantages of Azure Automation State Configuration is it provides scalability. We can manage thousands of machines from a single central management interface. We can assign configurations to machines with ease and verify whether they are compliant with the desired configuration.
Another advantage is that Azure Automation can be used as a repository to store your Desired State Configuration (DSC) configurations, and at the time of need they can be used.
In the next section, we will be talking about update management.
Update management
As you already know, update management is the responsibility of the customer to manage updates and patches when it comes to IaaS. The Update Management feature of Azure Automation can be used to automate or manage updates and patches for your Azure VMs. There are multiple methods by which you can enable Update Management on your Azure VM:
- From your Automation account
- By browsing the Azure portal
- From a runbook
- From an Azure VM
Enabling it from an Azure VM is the easiest method. However, if you have a large number of VMs and need to enable Update Management, then you have to consider a scalable solution such as a runbook or from an Automation account.
Now that you are clear about the scenarios, let's explore the concepts related to Azure Automation.
Concepts related to Azure Automation
You now know that Azure Automation requires an account, which is called an Azure Automation account. Before we dive deeper, let's examine the concepts related to Azure Automation. Understanding the meaning of each of these terms is very important, as we are going to use these terms throughout this chapter. Let's start with runbook.
Runbook
An Azure Automation runbook is a collection of scripting statements representing a single step in process automation or a complete process automation. It is possible to invoke other runbooks from a parent runbook, and these runbooks can be authored in multiple scripting languages. The languages that support authoring runbooks are as follows:
- PowerShell
- Python 2 (at the time of writing)
- PowerShell workflows
- Graphical PowerShell
- Graphical PowerShell workflows
Creating an Automation account is very easy and can be done from the Azure portal. In the All Services blade, you can find Automation Account, or you can search for it in the Azure portal. As mentioned before, during creation you will get an option to create a Run As account. Figure 4.4 shows the inputs required to create an Automation account:
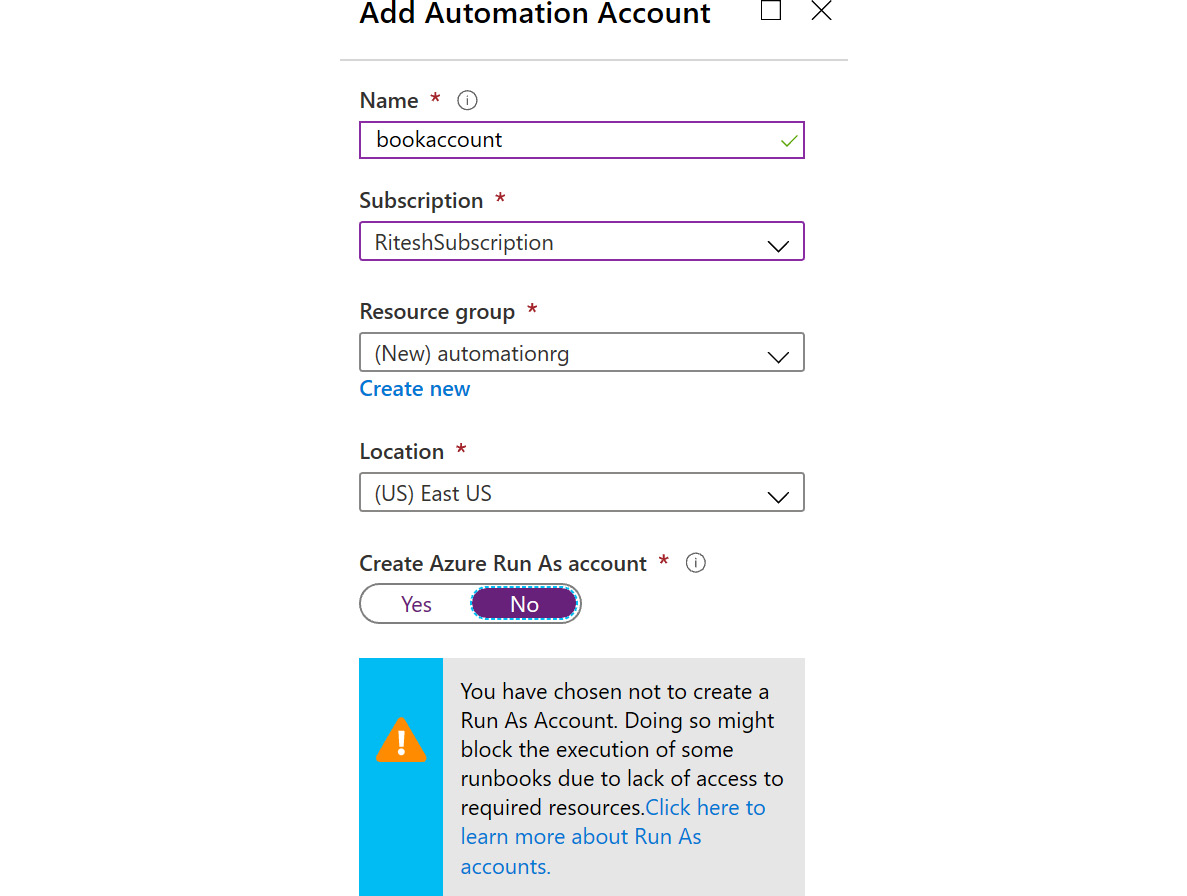
Figure 4.4: Creating an Automation account
Run As accounts
Azure Automation accounts, by default, do not have access to any resources included in any Azure subscription, including the subscription in which they are hosted. An account needs access to an Azure subscription and its resources in order to manage them. A Run As account is one way to provide access to subscriptions and the resources within them.
This is an optional exercise. There can be at most one Run As account for each classic and resource manager-based subscription; however, an Automation account might need to connect to numerous subscriptions. In such cases, it is advisable to create shared resources for each of the subscriptions and use them in runbooks.
After creating the Automation account, navigate to the Run as accounts view on the portal and you will see that two types of accounts can be created. In Figure 4.5, you can see that the option to create an Azure Run As Account and an Azure Classic Run As Account is available in the Run as accounts blade:
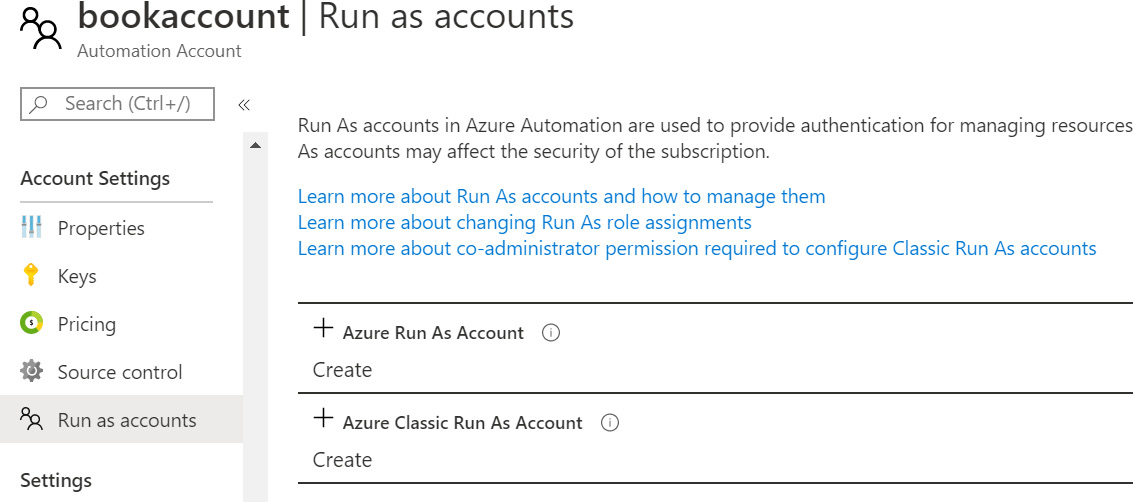
Figure 4.5: Azure Run As Account options
These Run As accounts can be created using the Azure portal, PowerShell, and the CLI. For information about creating these accounts using PowerShell, visit https://docs.microsoft.com/azure/automation/manage-runas-account.
In the case of the ARM Run As account, this script creates a new Azure AD service principal and a new certificate and provides contributor RBAC permissions to the newly created service principal on the subscription.
Jobs
The submission of a job request is not linked directly to the execution of the job request because of Azure Automation's decoupled architecture. The linkage between them is indirect using a data store. When a request to execute a runbook is received by Automation, it creates a new record in its database with all the relevant information. There is another service running on multiple servers, known as Hybrid Runbook Worker, within Azure, which looks for any new entries added to the database for the execution of a runbook. Once it sees a new record, it locks the record so that no other service can read it and then executes the runbook.
Assets
Azure Automation assets refer to shared artifacts that can be used across runbooks. They are shown in Figure 4.6:
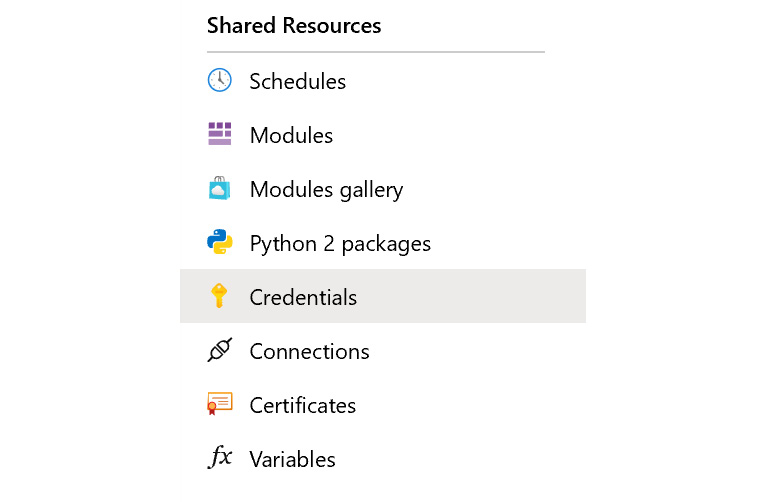
Figure 4.6: Shared artifacts in Azure Automation
Credentials
Credentials refers to the secrets, such as the username/password combination, that can be used to connect to other integration services that need authentication. These credentials can be used within runbooks using the Get-AutomationPSCredential PowerShell cmdlet along with its associated name:
$myCredential = Get-AutomationPSCredential -Name 'MyCredential'
The Python syntax requires that we import the automationassets module and use the get_automation_credential function along with the associated credential name:
import automationassets
cred = automationassets.get_automation_credential("credtest")
Certificates
Certificates refers to the X.509 certificate that can be purchased from certificate authorities or can be self-signed. Certificates are used for identification purposes in Azure Automation. Every certificate has a pair of keys known as private/public keys. The private key is used for creating a certificate asset in Azure Automation, and the public key should be available in the target service. Using the private key, the Automation account can create a digital signature and append it to the request before sending it to the target service. The target service can fetch the details (the hash) from the digital signature using the already available public key and ascertain the identity of the sender of the request.
Certificate assets store certificate information and keys in Azure Automation. These certificates can be used directly within runbooks, and they are also used by the connection's assets. The next section shows the way to consume certificates in a connection asset. The Azure service principal connection asset uses a certificate thumbprint to identify the certificate it wants to use, while other types of connection use the name of the certificate asset to access the certificate.
A certificate asset can be created by providing a name and uploading a certificate. It is possible to upload public certificates (.cer files) as well as private certificates (.pfx files). The private part of the certificate also has a password that should be used before accessing the certificate.
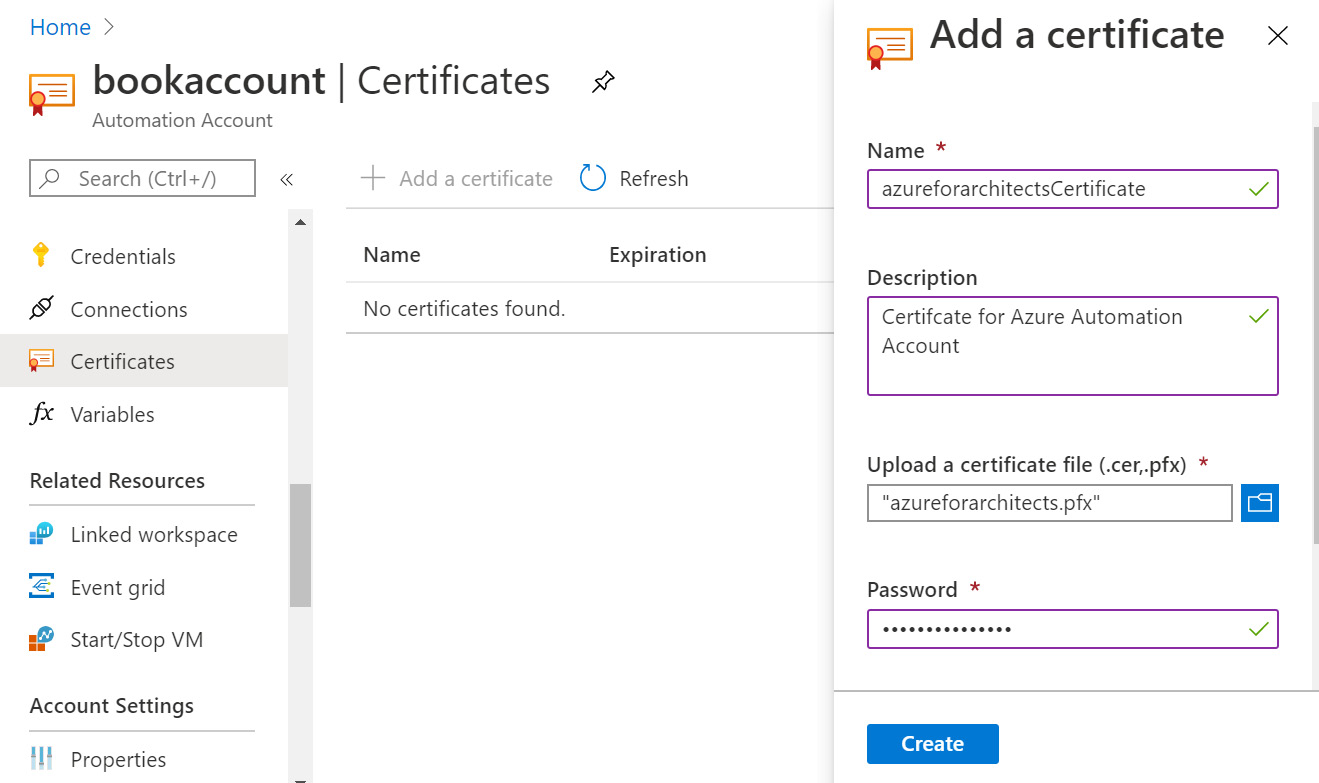
Figure 4.7: Adding a certificate to Azure Automation
Creating a certificate involves providing a name and a description, uploading the certificate, providing a password (in the case of .pfx files), and informing the user whether the certificate is exportable or not.
There should be a certificate available before this certificate asset can be created. Certificates can be purchased from certificate authorities or can be generated. Generated certificates are known as self-signed certificates. It is always a good practice to use certificates from certificate authorities for important environments such as production environments. It is fine to use self-signing certificates for development purposes.
To generate a self-signed certificate using PowerShell, use this command:
$cert = New-SelfSignedCertificate -CertStoreLocation "Cert:CurrentUsermy" -KeySpec KeyExchange -Subject "cn=azureforarchitects"
This will create a new certificate in the current user certificate store in your personal folder. Since this certificate also needs to be uploaded to the Azure Automation certificate asset, it should be exported to the local file system, as shown in Figure 4.8:
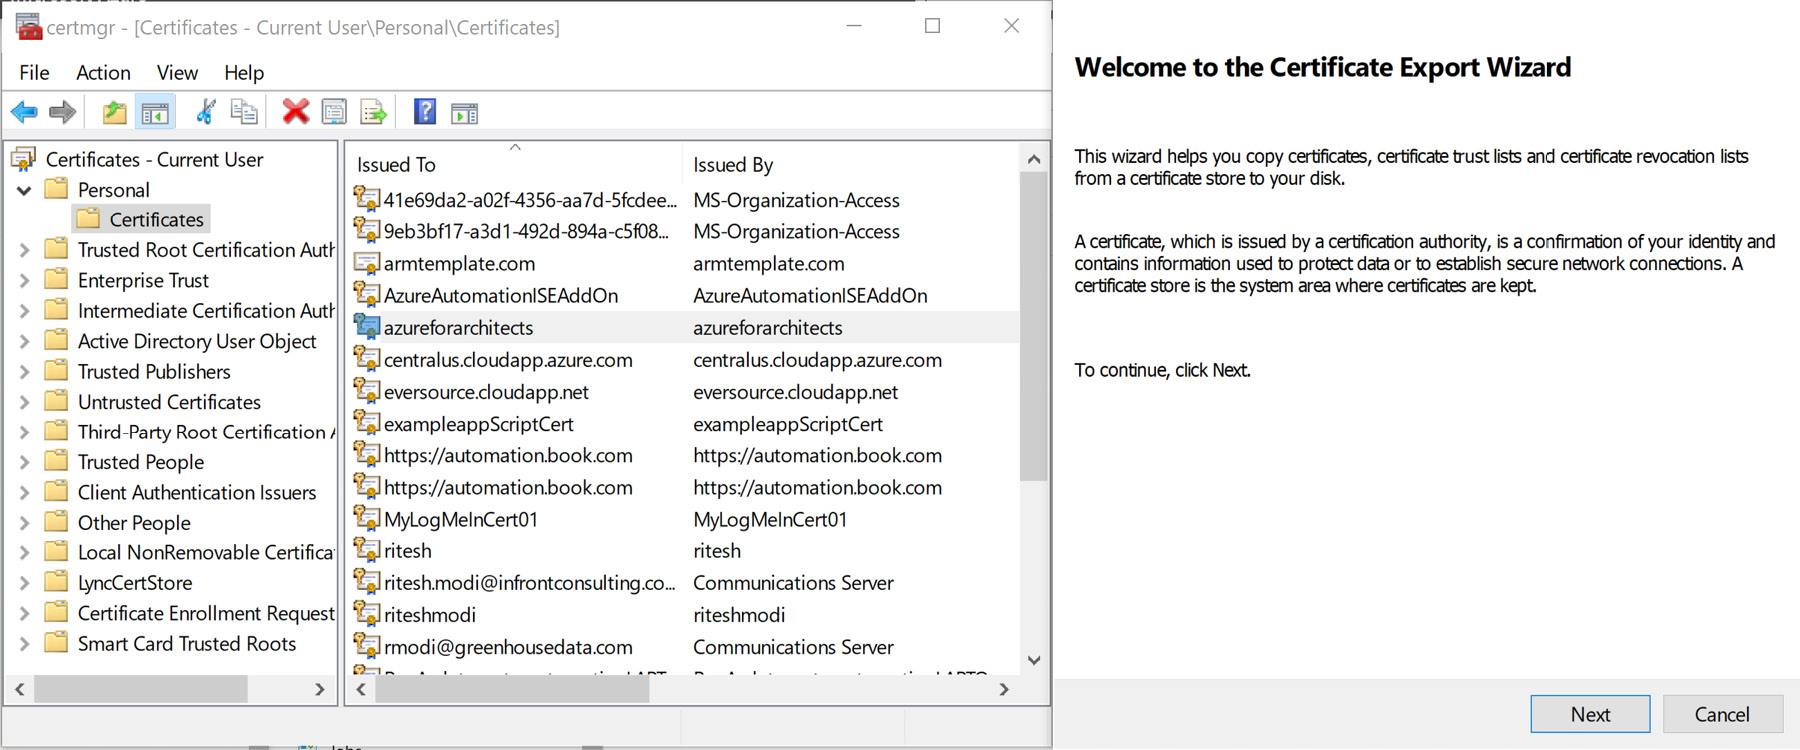
Figure 4.8: Exporting the certificate
When exporting the certificate, the private key should also be exported, so Yes, export the private key should be selected.
Select the Personal Information Exchange option, and the rest of the values should remain as the defaults.
Provide a password and the filename C:azureforarchitects.pfx, and the export should be successful.
Connecting to Azure can be done in multiple ways. However, the most secure is by way of a certificate. A service principal is created on Azure using the certificate. The service principal can be authenticated against using the certificate. The private key of the certificate is with the user and the public part is with Azure. In the next section, a service principal will be created using the certificate created in this section.
Creating a service principal using certificate credentials
A service principal can be created using the Azure portal, Azure CLI, or Azure PowerShell. The script for creating a service principal using Azure PowerShell is available in this section.
After logging into Azure, the certificate created in the previous section is converted into base64 encoding. A new service principal, azureforarchitects, is created, and the certificate credential is associated with the newly created service principal. Finally, the new service principal is provided contributor role-based access control permissions on the subscription:
Login-AzAccount
$certKey = [system.Convert]::ToBase64String($cert.GetRawCertData())
$sp = New-AzADServicePrincipal -DisplayName "azureforarchitects"
New-AzADSpCredential -ObjectId $sp.Id -CertValue $certKey -StartDate $cert.NotBefore -EndDate $cert.NotAfter
New-AzRoleAssignment -RoleDefinitionName contributor -ServicePrincipalName $sp.ApplicationId
Get-AzADServicePrincipal -ObjectId $sp.Id
$cert.Thumbprint
Get-AzSubscription
To create a connection asset, the application ID can be obtained using the Get-AzADServicePrincipal cmdlet, and the result is shown in Figure 4.9:

Figure 4.9: Checking the service principal
The certificate thumbprint can be obtained using the certificate reference along with SubscriptionId, which can be obtained using the Get-AzSubscription cmdlet.
Connections
Connection assets are used for creating connection information to external services. In this regard, even Azure is considered as an external service. Connection assets hold all the necessary information needed for successfully connecting to a service. There are three connection types provided out of the box by Azure Automation:
- Azure
- Azure classic certificate
- Azure service principal
It is a good practice to use Azure service principal to connect to Azure Resource Manager resources and to use the Azure classic certificate for Azure classic resources. It is important to note that Azure Automation does not provide any connection type to connect to Azure using credentials such as a username and password.
Azure and Azure classic certificates are similar in nature. They both help us connect to Azure Service management API-based resources. In fact, Azure Automation creates an Azure classic certificate connection while creating a Classic Run As account.
Azure service principal is used internally by Run As accounts to connect to Azure Resource Manager-based resources.
A new connection asset of type AzureServicePrincipal is shown in Figure 4.10. It needs:
- The name of the connection. It is mandatory to provide a name.
- A description of the connection. This value is optional.
- Select an appropriate Type. It is mandatory to select an option; AzureServicePrincipal is selected for creating a connection asset for all purposes in this chapter.
- ApplicationId, also known as clientid, is the application ID generated during the creation of a service principal. The next section shows the process of creating a service principal using Azure PowerShell. It is mandatory to provide an application ID.
- TenantId is the unique identifier of the tenant. This information is available from the Azure portal or by using the Get-AzSubscription cmdlet. It is mandatory to provide a tenant identifier.
- CertificateThumbprint is the certificate identifier. This certificate should already be uploaded to Azure Automation using the certificate asset. It is mandatory to provide a certificate thumbprint.
- SubscriptionId is the identifier of the subscription. It is mandatory to provide a subscription ID.
You can add a new connection using the Connections blade in the Automation account, as shown in Figure 4.10:
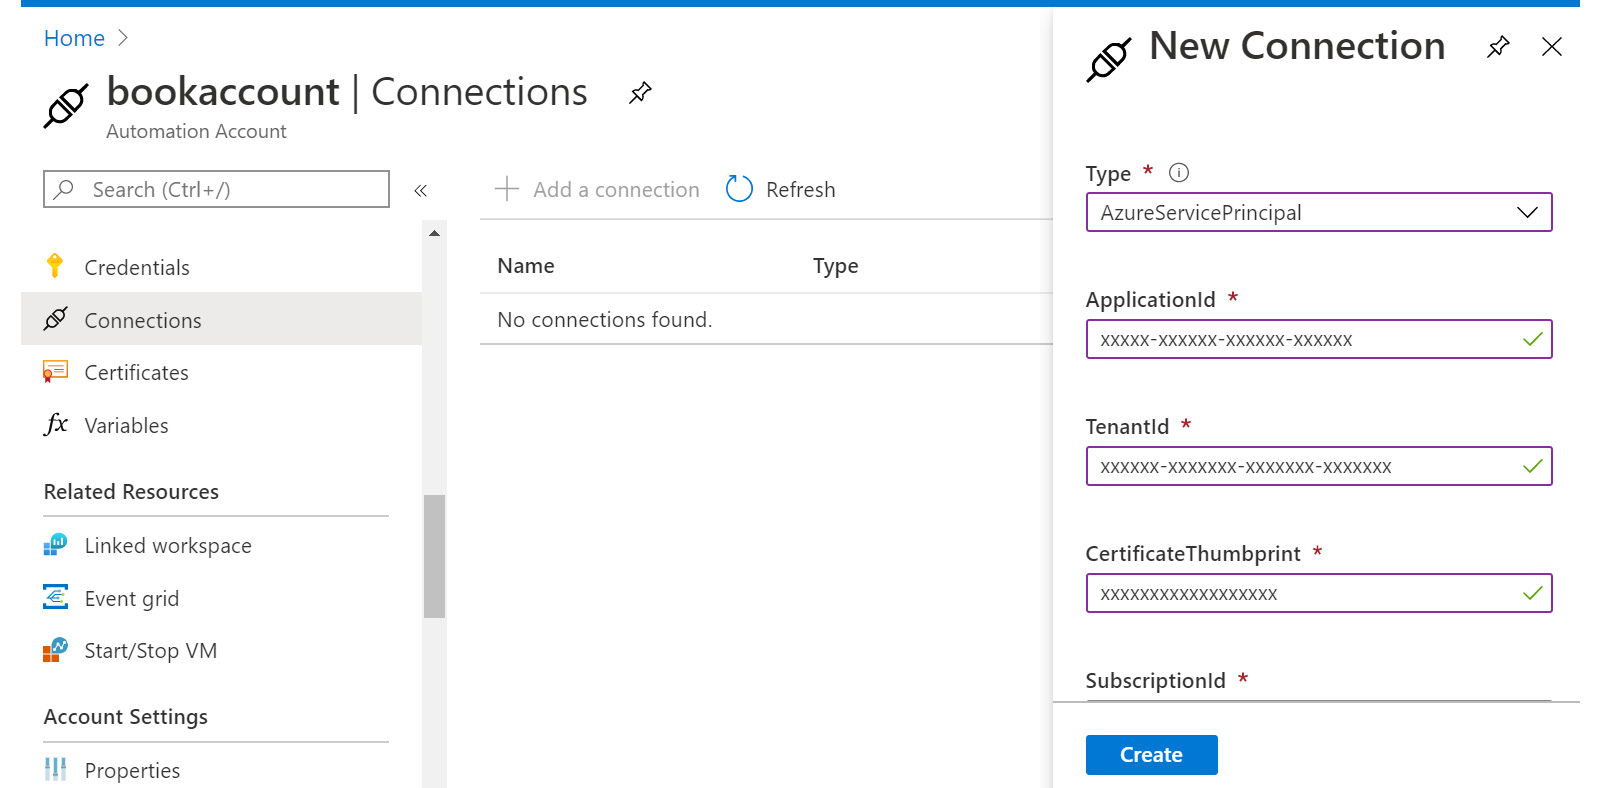
Figure 4.10: Adding a new connection to the Automation Account
Runbook authoring and execution
Azure Automation allows the creation of automation scripts known as runbooks. Multiple runbooks can be created using the Azure portal or PowerShell ISE. They can also be imported from Runbook Gallery. The gallery can be searched for specific functionality, and the entire code is displayed within the runbook.
A runbook can accept parameter values just like a normal PowerShell script. The next example takes a single parameter named connectionName of type string. It is mandatory to supply a value for this parameter when executing this runbook:
param(
[parameter(mandatory=$true)]
[string] $connectionName
)
$connection = Get-AutomationConnection -name $connectionName
$subscriptionid = $connection.subscriptionid
$tenantid = $connection.tenantid
$applicationid = $connection.applicationid
$cretThumbprint = $connection.CertificateThumbprint
Login-AzureRMAccount -CertificateThumbprint $cretThumbprint -ApplicationId $applicationid -ServicePrincipal -Tenant $tenantid
Get-AzureRMVM
The runbook uses the Get-AutomationConnection cmdlet to reference the shared connection asset. The name of the asset is contained within the parameter value. Once the reference to the connection asset has been made, the values from the connection reference are populated into the $connection variable, and subsequently, they are assigned to multiple other variables.
The Login-AzureRMAccount cmdlet authenticates with Azure, and it supplies the values obtained from the connection object. It uses the service principal created earlier in this chapter for authentication.
Finally, the runbook invokes the Get-AzureRMVm cmdlet to list all the VMs in the subscription.
By default, Azure Automation still provides AzureRM modules for working with Azure. It does not install Az modules by default. Later we will install an Az module manually in the Azure Automation account and use cmdlets in runbooks.
Parent and child runbooks
Runbooks have a life cycle, from being authored to being executed. These life cycles can be divided into authoring status and execution status.
The authoring life cycle is shown in Figure 4.11.
When a new runbook is created, it has the New status and as it is edited and saved multiple times, it takes the In edit status, and finally, when it is published, the status changes to Published. It is also possible to edit a published runbook, and in that case, it goes back to the In edit status.

Figure 4.11: Authoring life cycle
The execution life cycle is described next.
The life cycle starts with the beginning of a runbook execution request. A runbook can be executed in multiple ways:
- Manually from the Azure portal
- By using a parent runbook as a child runbook
- By means of a webhook
It does not matter how a runbook is initiated; the life cycle remains the same. A request to execute the runbook is received by the Automation engine. The Automation engine creates a job and assigns it to a runbook worker. Currently, the runbook has a status of Queued.
There are multiple runbook workers, and the chosen one picks up the job request and changes the status to Starting. At this stage, if there are any scripting and parsing issues in the script, the status changes to Failed and the execution is halted.
Once the runbook execution is started by the worker, the status is changed to Running. The runbook can have multiple different statuses once it is running.
The runbook will change its status to Completed if the execution happens without any unhandled and terminating exceptions.
The running runbook can be manually stopped by the user, and it will have the Stopped status.
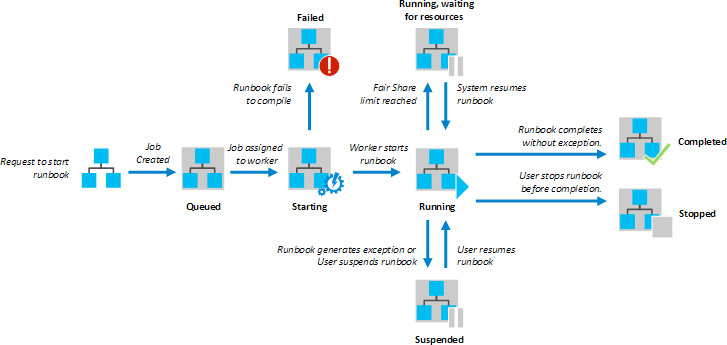
Figure 4.12: The execution life cycle for runbooks
The user can also suspend and resume the execution of the runbook.
Creating a runbook
A runbook can be created from the Azure portal by going to the Runbook menu item in the left navigation pane. A runbook has a name and type. The type determines the scripting language used for creating the runbook. We have already discussed the possible languages, and in this chapter, PowerShell will be used primarily for all examples.
Creating a PowerShell runbook is exactly the same as creating a PowerShell script. It can declare and accept multiple parameters—the parameters can have attributes such as data types, which are mandatory (just like any PowerShell parameter attributes). It can invoke PowerShell cmdlets whose modules are available and already loaded and declared, and it can invoke functions and return output.
A runbook can also invoke another runbook. It can invoke a child runbook inline within the original process and context or in a separate process and context.
Invoking a runbook inline is similar to invoking a PowerShell script. The next example invokes a child runbook using the inline approach:
.ConnectAzure.ps1 -connectionName "azureforarchitectsconnection"
Get-AzSqlServer
In the preceding code, we saw how the ConnectAzure runbook accepts a parameter named connectionName and an appropriate value is supplied to it. This runbook creates a connection to Azure after authenticating with it using a service principal. Check out the syntax for invoking the child runbook. It is very similar to invoking a general PowerShell script along with parameters.
The next line of code, Get-AzVm, fetches the relevant information from Azure and lists the VM details. You will notice that although the authentication happens within a child runbook, the Get-AzVm cmdlet succeeds and lists all the VMs in the subscription because the child runbook executes in the same job as that of the parent runbook, and they share the context.
Alternatively, a child runbook can be invoked using the Start-AzurermAutomationRunbook cmdlet provided by Azure Automation. This cmdlet accepts the name of the Automation account, the resource group name, and the name of the runbook along with parameters, as mentioned here:
$params = @{"connectionName"="azureforarchitectsconnection"}
$job = Start-AzurermAutomationRunbook '
–AutomationAccountName 'bookaccount' '
–Name 'ConnectAzure' '
-ResourceGroupName 'automationrg' -parameters $params
if($job -ne $null) {
Start-Sleep -s 100
$job = Get-AzureAutomationJob -Id $job.Id -AutomationAccountName 'bookaccount'
if ($job.Status -match "Completed") {
$jobout = Get-AzureAutomationJobOutput '
-Id $job.Id '
-AutomationAccountName 'bookaccount' '
-Stream Output
if ($jobout) {Write-Output $jobout.Text}
}
}
Using this approach creates a new job that's different from the parent job, and they run in different contexts.
Using Az modules
So far, all examples have used AzureRM modules. The previously shown runbooks will be re-written to use cmdlets from the Az module.
As mentioned before, Az modules are not installed by default. They can be installed using the Modules gallery menu item in Azure Automation.
Search for Az in the gallery and the results will show multiple modules related to it. If the Az module is selected to be imported and installed, it will throw an error saying that its dependent modules are not installed and that they should be installed before installing the current module. The module can be found on the Modules gallery blade by searching for Az, as shown in Figure 4.13:
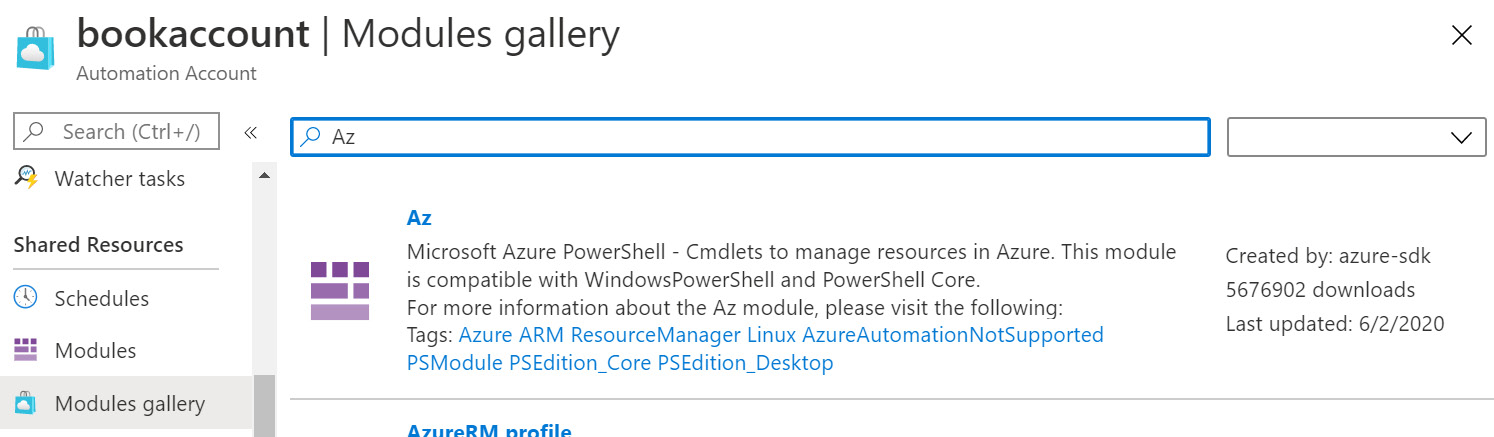
Figure 4.13: Finding the Az module on the Modules gallery blade
Instead of selecting the Az module, select Az.Accounts and import the module by following the wizard, as shown in Figure 4.14:
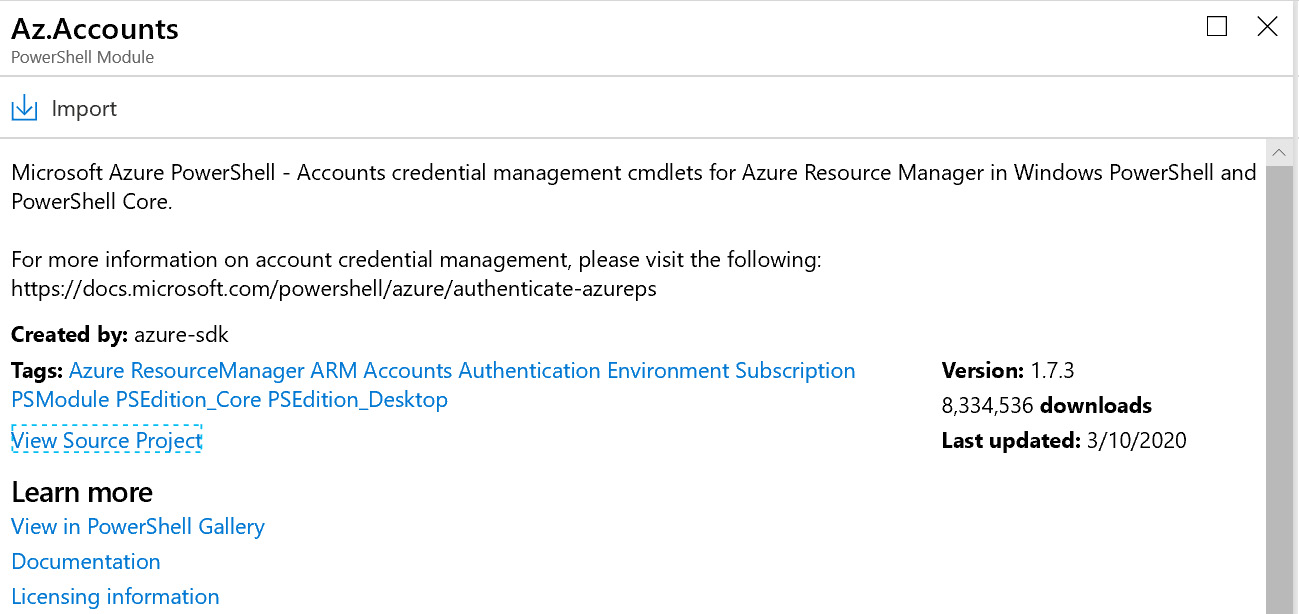
Figure 4.14: Importing the Az.Accounts module
After installing Az.Accounts, the Az.Resources module can be imported. Azure virtual machine-related cmdlets are available in the Az.Compute module, and it can also be imported using the same method as we used to import Az.Accounts.
Once these modules are imported, the runbooks can use the cmdlets provided by these modules. The previously shown ConnectAzure runbook has been modified to use the Az module:
param(
[parameter(mandatory=$true)]
[string] $connectionName
)
$connection = Get-AutomationConnection -name $connectionName
$subscriptionid = $connection.subscriptionid
$tenantid = $connection.tenantid
$applicationid = $connection.applicationid
$cretThumbprint = $connection.CertificateThumbprint
Login-AzAccount -CertificateThumbprint $cretThumbprint -ApplicationId $applicationid -ServicePrincipal -Tenant $tenantid -SubscriptionId $subscriptionid
Get-AzVm
The last two lines of the code are important. They are using Az cmdlets instead of AzureRM cmdlets.
Executing this runbook will give results similar to this:
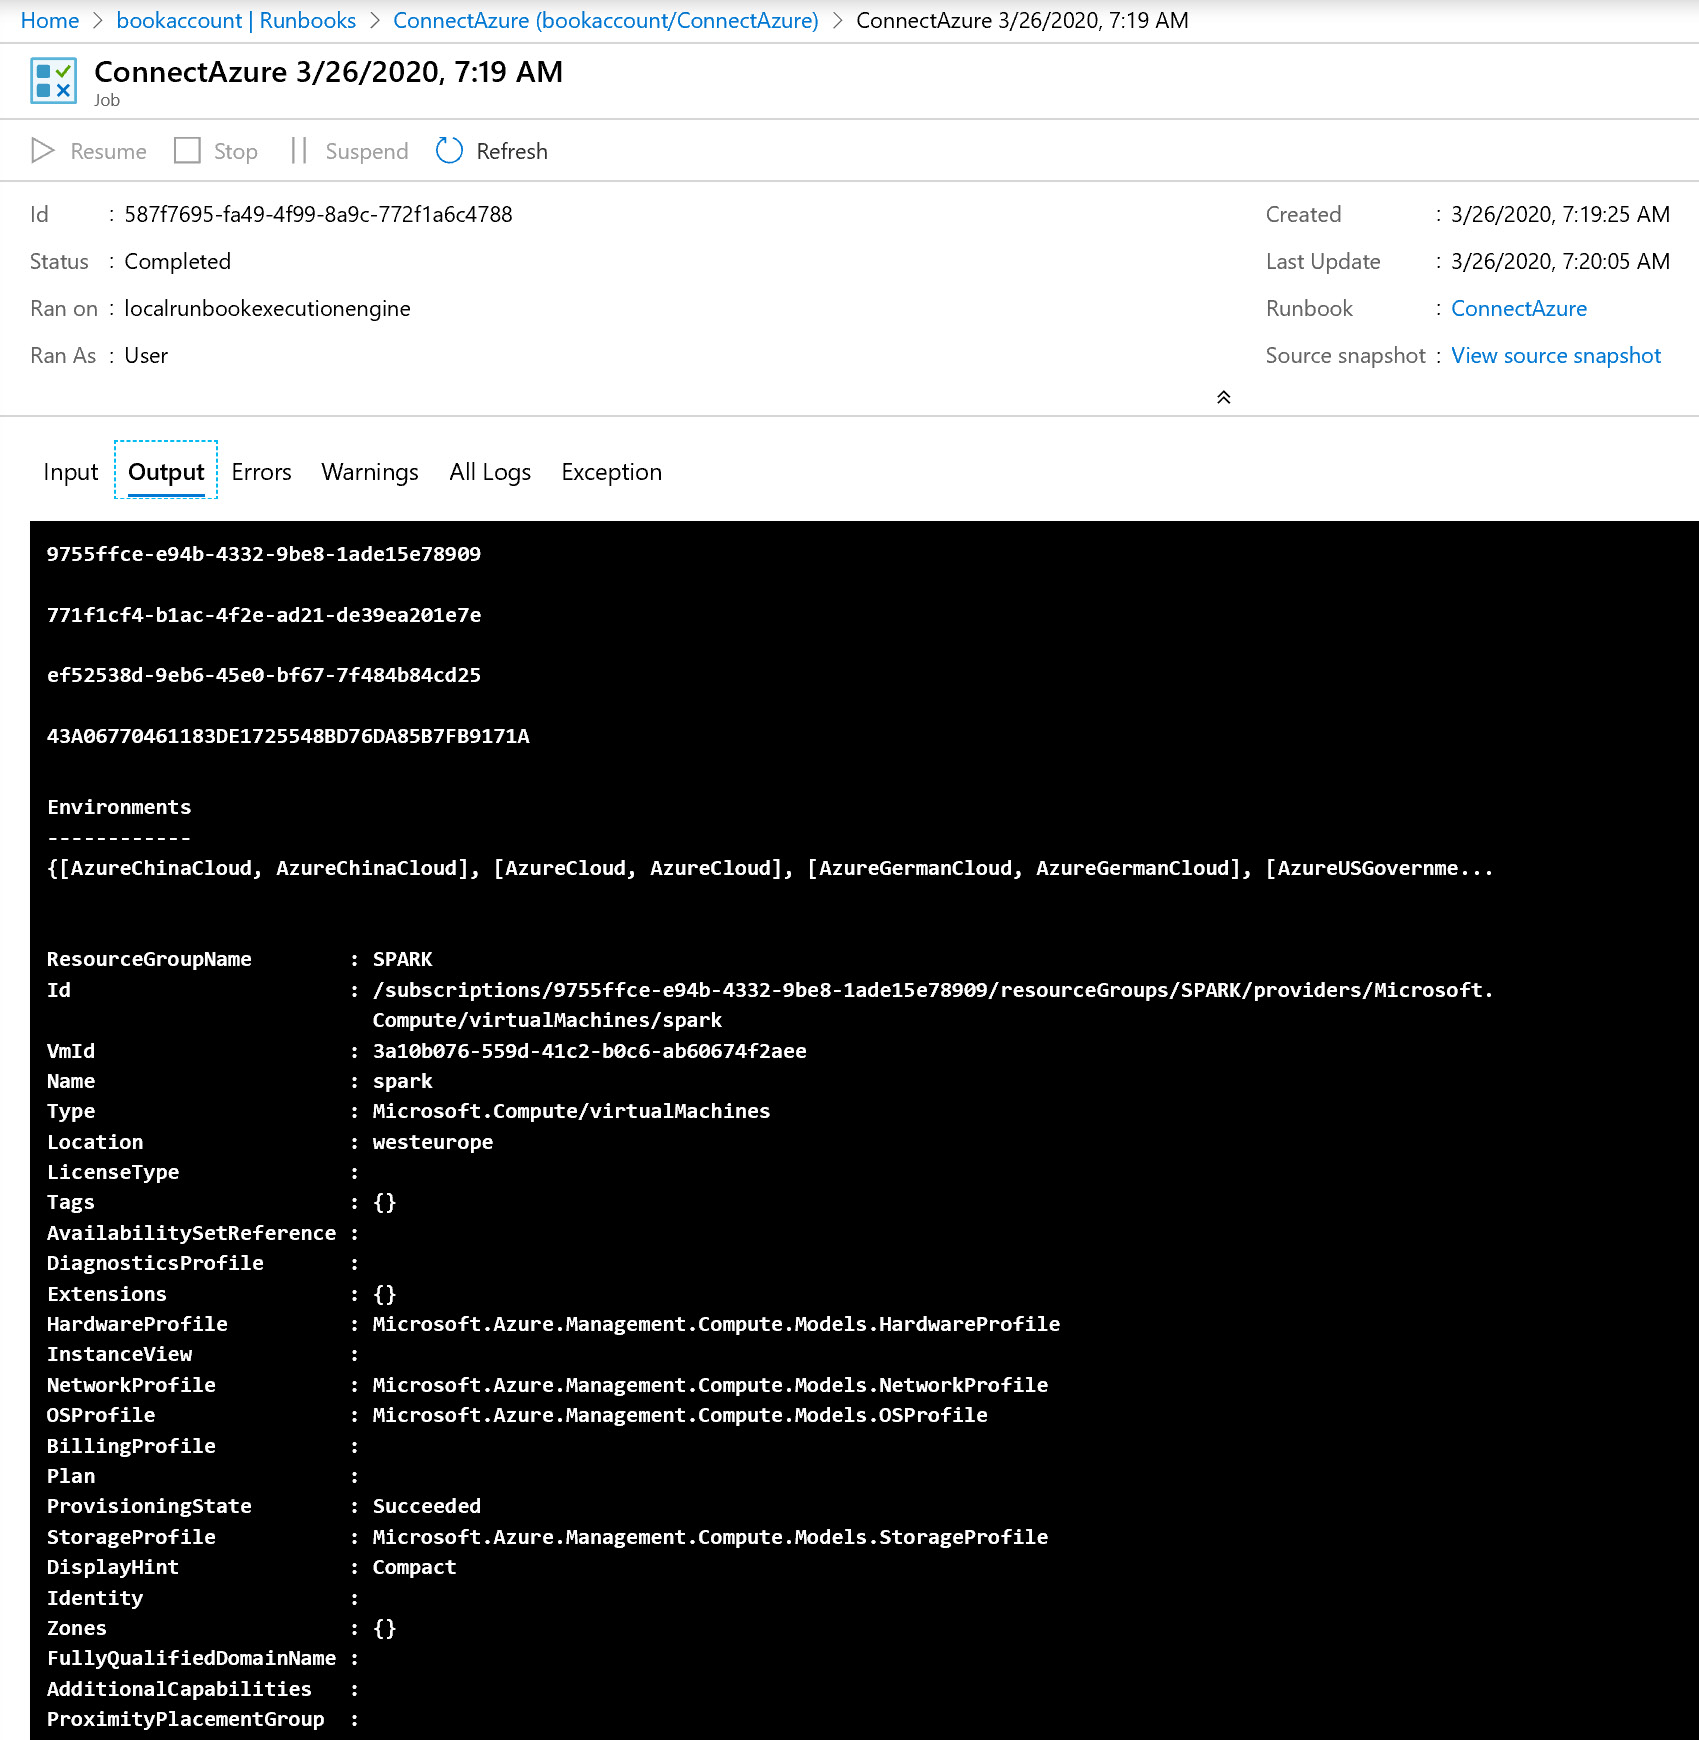
Figure 4.15: The Az.Accounts module successfully imported
In the next section, we will work with webhooks.
Webhooks
Webhooks became famous after the advent of REST endpoints and JSON data payloads. Webhooks are an important concept and architectural decision in the extensibility of any application. Webhooks are placeholders that are left within special areas of an application so that the user of the application can fill those placeholders with endpoint URLs containing custom logic. The application will invoke the endpoint URL, automatically passing in the necessary parameters, and then execute the login available therein.
Azure Automation runbooks can be invoked manually from the Azure portal. They can also be invoked using PowerShell cmdlets and the Azure CLI. There are SDKs available in multiple languages that are capable of invoking runbooks.
Webhooks are one of the most powerful ways to invoke a runbook. It is important to note that runbooks containing the main logic should never be exposed directly as a webhook. They should be called using a parent runbook, and the parent runbook should be exposed as a webhook. The parent runbook should ensure that appropriate checks are made before invoking the main child runbook.
The first step in creating a webhook is to author a runbook normally, as done previously. After a runbook has been authored, it will be exposed as a webhook.
A new PowerShell-based runbook named exposedrunbook is created. This runbook takes a single parameter, $WebhookData, of the object type. It should be named verbatim. This object is created by the Azure Automation runtime and is supplied to the runbook. The Azure Automation runtime constructs this object after obtaining the HTTP request header values and body content and fills in the RequestHeader and RequestBody properties of this object:
param(
[parameter(mandatory=$true)]
[object] $WebhookData
)
$webhookname = $WebhookData.WebhookName
$headers = $WebhookData.RequestHeader
$body = $WebhookData.RequestBody
Write-output "webhook header data"
Write-Output $webhookname
Write-output $headers.message
Write-output $headers.subject
$connectionname = (ConvertFrom-Json -InputObject $body)
./connectAzure.ps1 -connectionName $connectionname[0].name
The three important properties of this object are WebhookName, RequestHeader, and RequestBody. The values are retrieved from these properties and sent to the output stream by the runbook.
The header and body content can be anything that the user supplies when invoking the webhook. These values get filled up into the respective properties and become available within the runbook. In the previous example, there are two headers set by the caller, namely message and status header. The caller will also supply the name of the shared connection to be used as part of the body content.
After the runbook is created, it should be published before a webhook can be created. After publishing the runbook, clicking on the Webhook menu at the top starts the process of creating a new webhook for the runbook, as shown in Figure 4.16:

Figure 4.16: Creating a webhook
A name for the webhook should be provided. This value is available within the runbook using the WebhookData parameter with the WebhookName property name.
The webhook can be in the enabled or disabled state, and it can expire at a given date and time. It also generates a URL that is unique for this webhook and runbook. This URL should be provided to anyone who wishes to invoke the webhook.
Invoking a webhook
Webhooks are invoked as HTTP requests using the POST method. When a webhook is invoked, the HTTP request lands up with Azure Automation to start a runbook. It creates the WebHookData object, filling it with the incoming HTTP header and body data, and creates a job to be picked up by a runbook worker. This call uses the webhook URL generated in the previous step.
The webhook can be invoked using Postman, by any code having the capability of calling a REST endpoint using the POST method. In the next example, PowerShell will be used to invoke the webhook:
$uri = "https://s16events.azure-automation.net/webhooks?token=rp0w93L60fAPYZQ4vryxl%2baN%2bS1Hz4F3qVdUaKUDzgM%3d"
$connection = @(
@{ name="azureforarchitectsconnection"}
)
$body = ConvertTo-Json -InputObject $ connection
$header = @{ subject="VMS specific to Ritesh";message="Get all virtual machine details"}
$response = Invoke-WebRequest -Method Post -Uri $uri -Body $body -Headers $header
$jobid = (ConvertFrom-Json ($response.Content)).jobids[0]
The PowerShell code declares the URL for the webhook and constructs the body in JSON format, with name set to azureforarchitectsconnection and a header with two header name-value pairs – subject and message. Both the header and body data can be retrieved in the runbook using the WebhookData parameter.
The invoke-webrequest cmdlet raises the request on the previously mentioned endpoint using the POST method, supplying both the header and the body.
The request is asynchronous in nature, and instead of the actual runbook output, the job identifier is returned as an HTTP response. It is also available within the response content. The job is shown in Figure 4.17:
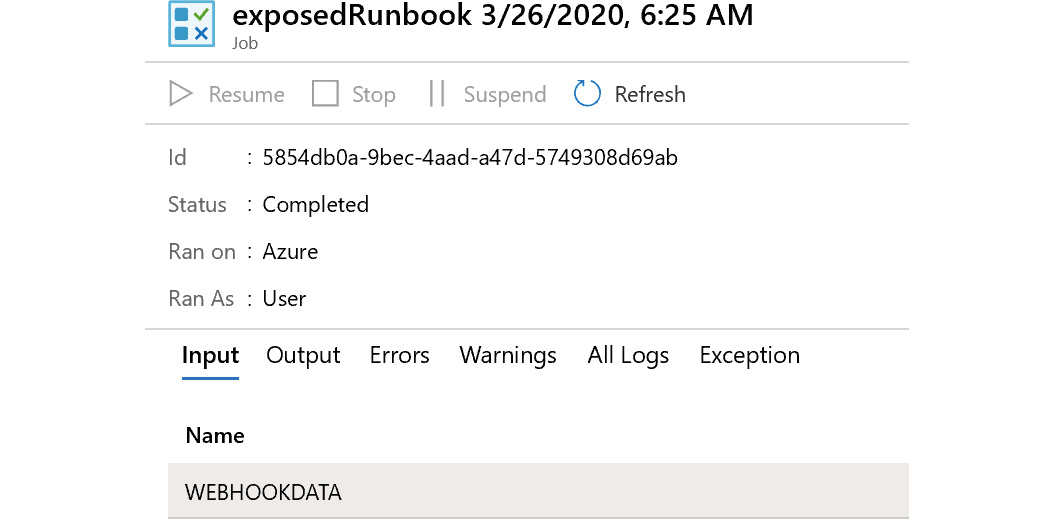
Figure 4.17: Checking the job
Clicking on WEBHOOKDATA shows the values that arrived in the runbook automation service in the HTTP request:
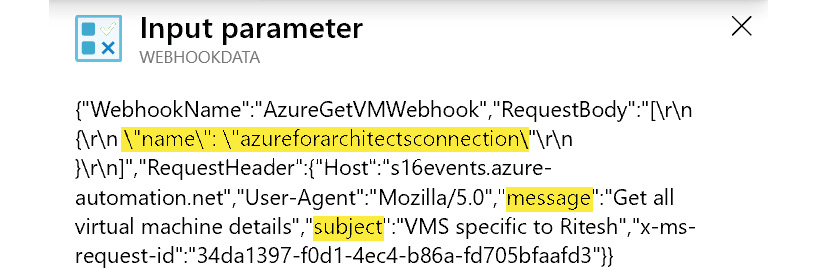
Figure 4.18: Verifying the output
Clicking on the output menu shows the list of VMs and SQL Server in the subscription.
The next important concepts in Azure Automation are Azure Monitor and Hybrid Workers, and the next sections will explain them in detail.
Invoking a runbook from Azure Monitor
Azure Automation runbooks can be invoked as responses to alerts generated within Azure. Azure Monitor is the central service that manages logs and metrics across resources and resource groups in a subscription. You can use Azure Monitor to create new alert rules and definitions that, when triggered, can execute Azure Automation runbooks. They can invoke an Azure Automation runbook in its default form or a webhook that in turn can execute its associated runbook. This integration between Azure Monitor and the ability to invoke runbooks opens numerous automation opportunities to autocorrect the environment, scale up and down compute resources, or take corrective actions without any manual intervention.
Azure alerts can be created and configured in individual resources and resource levels, but it is always a good practice to centralize alert definitions for easy and better maintenance and administration.
Let's go through the process of associating a runbook with an alert and invoking the runbook as part of the alert being raised.
The first step is to create a new alert, as shown in Figure 4.19:
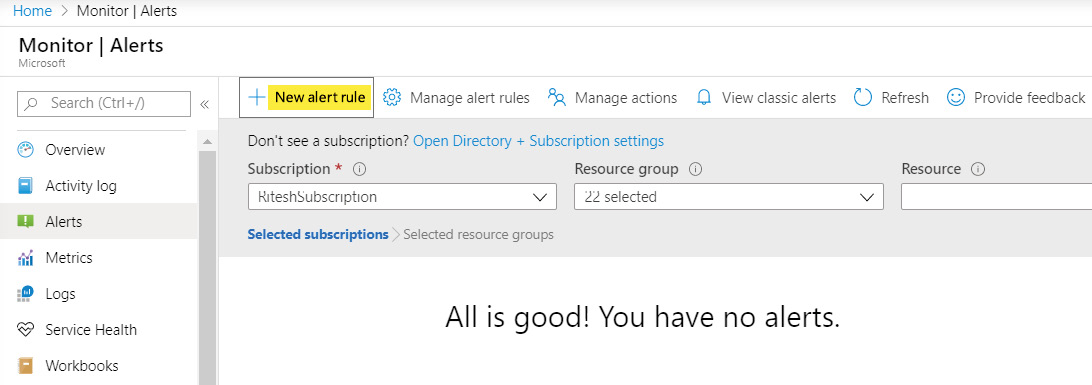
Figure 4.19: Creating an alert rule
Select a resource that should be monitored and evaluated for alert generation. A resource group has been selected from the list, and it automatically enables all resources within the resource group. It is possible to remove the resource selections from the resource group:
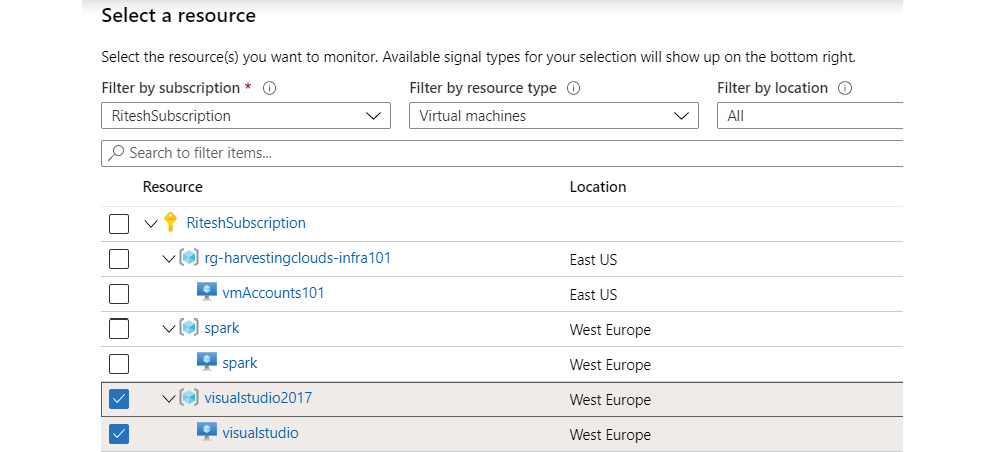
Figure 4.20: Selecting the scope of the alert
Configure the condition and rules that should get evaluated. Select the Power Off Virtual Machine signal name after selecting Activity Log as the Signal type:
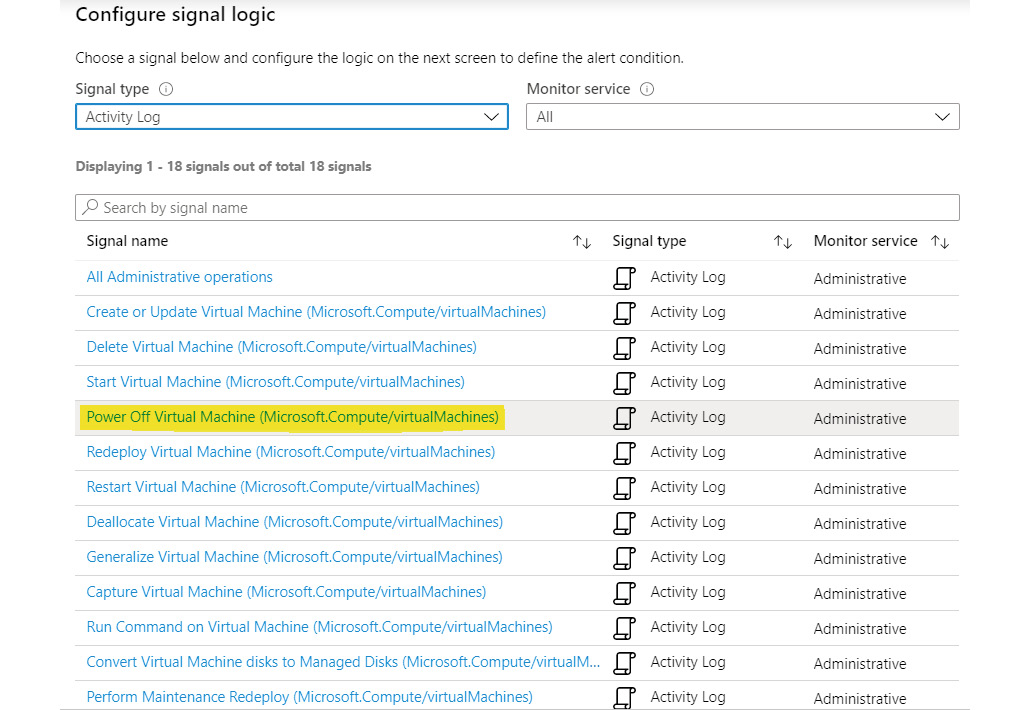
Figure 4.21: Selecting the signal type
The resultant window will allow you to configure the Alert logic/condition. Select critical for Event Level, and set Status to Succeeded:
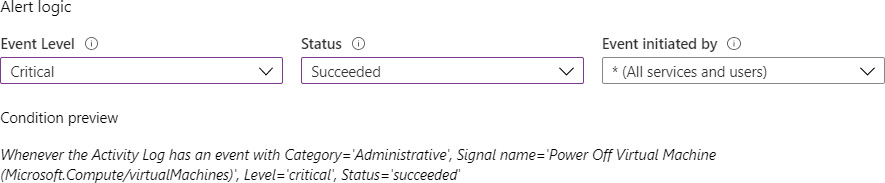
Figure 4.22: Setting up the alert logic
After determining the alert condition comes the most important configuration, which configures the response to the alert by invoking a runbook. We can use Action groups to configure the response to an alert. It provides numerous options to invoke an Azure function, webhook, or Azure Automation runbook, as well as to send emails and SMS.
Create an action group by providing a name, a short name, its hosting subscription, a resource group, and an Action name. Corresponding to Action name select the Automation Runbook option as Action Type:
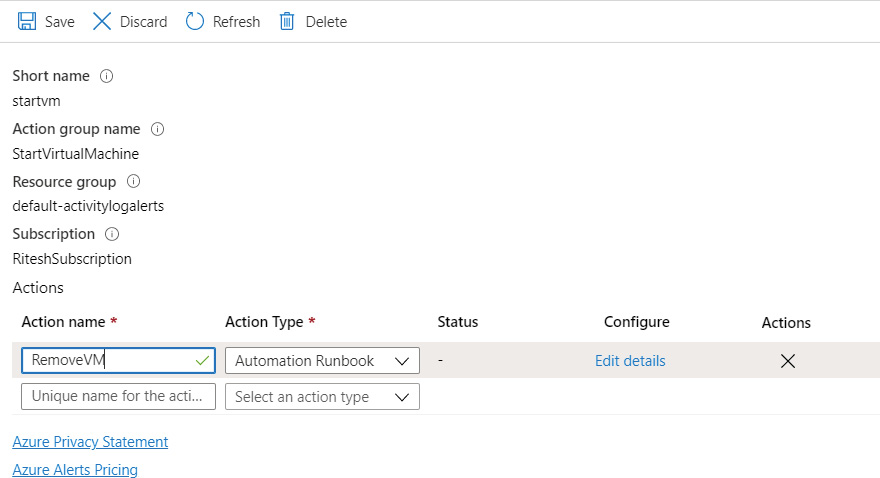
Figure 4.23 Configuring the action group
Selecting an automation runbook will open another blade for selecting an appropriate Azure Automation account and runbook. Several runbooks are available out of the box, and one of them has been used here:
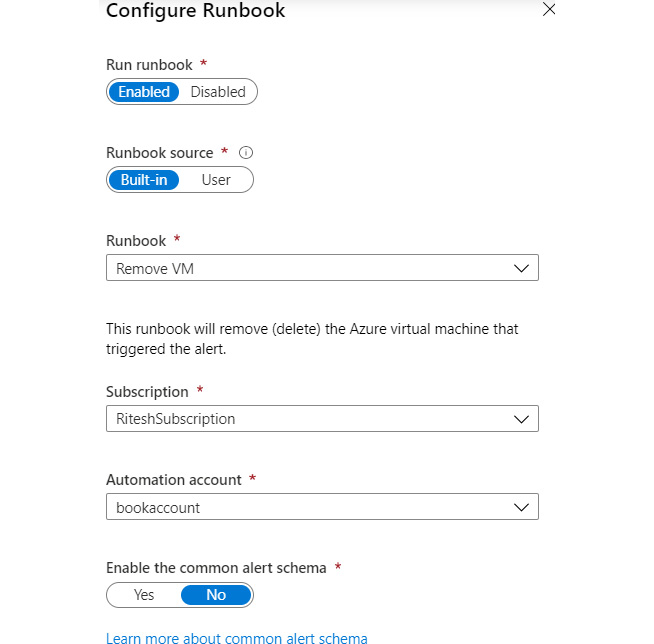
Figure 4.24 Creating the runbook
Finally, provide a name and hosting resource group to create a new alert.
If the VM is deallocated manually, the alert condition gets satisfied and it will raise an alert:
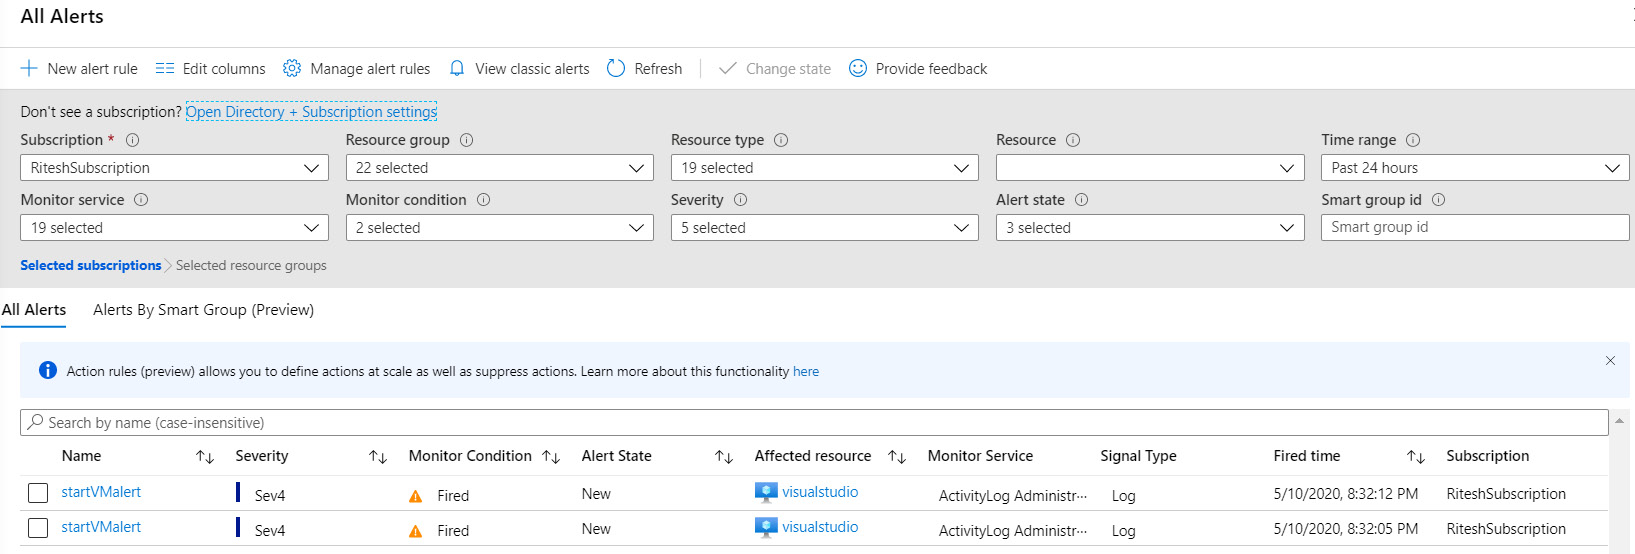
Figure 4.25 Testing alerts
If you check the details of the VM after a few seconds, you should see that the VM is being deleted:
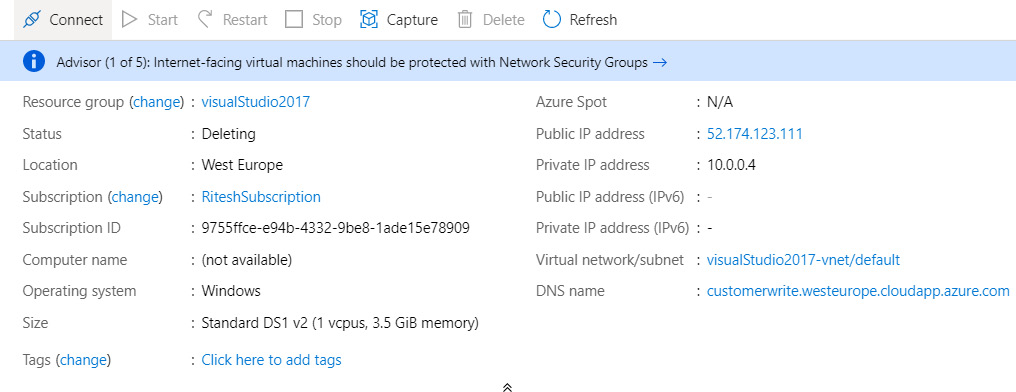
Figure 4.26 Verifying the results
Hybrid Workers
So far, all the execution of runbooks has primarily been on infrastructure provided by Azure. The runbook workers are Azure compute resources that are provisioned by Azure with appropriate modules and assets deployed in them. Any execution of runbooks happens on this compute. However, it is possible for users to bring their own compute and execute the runbook on this user-provided compute rather than on default Azure compute.
This has multiple advantages. The first and foremost is that the entire execution and its logs are owned by the user with Azure having no visibility of it. Second, the user-provided compute could be on any cloud, as well as on-premises.
Adding a Hybrid Worker involves multiple steps
- First and foremost, an agent needs to be installed on the user-provided compute. Microsoft provides a script that can download and configure the agent automatically. This script is available from https://www.powershellgallery.com/packages/New-OnPremiseHybridWorker/1.6.
The script can also be executed from PowerShell ISE as an administrator from within the server that should be part of the Hybrid Worker using the following command:
Install-Script -Name New-OnPremiseHybridWorker -verbose
- After the script is installed, it can be executed along with parameters related to the Azure Automation account details. A name is also provided for the Hybrid Worker. If the name does not exist already, it will be created; if it exists, the server will be added to the existing Hybrid Worker. It is possible to have multiple servers within a single Hybrid Worker, and it is possible to have multiple Hybrid Workers as well:
New-OnPremiseHybridWorker.ps1 -AutomationAccountName bookaccount -AAResourceGroupName automationrg '
-HybridGroupName "localrunbookexecutionengine" '
-SubscriptionID xxxxxxxx-xxxx-xxxx-xxxx-xxxxxxxxxxxx
- Once the execution finishes, navigating back to the portal will show an entry for a Hybrid Worker, as shown in Figure 4.27:
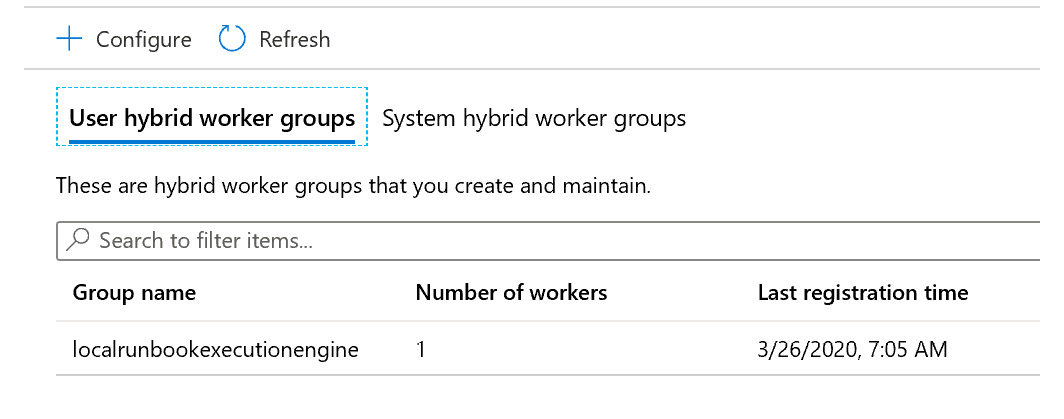
Figure 4.27: Checking user Hybrid Worker groups
- If, at this time, an Azure runbook is executed that has a dependency on the Az module and a custom certificate uploaded to the certificate asset, it will fail with errors related to the Az module and the certificate not being found:
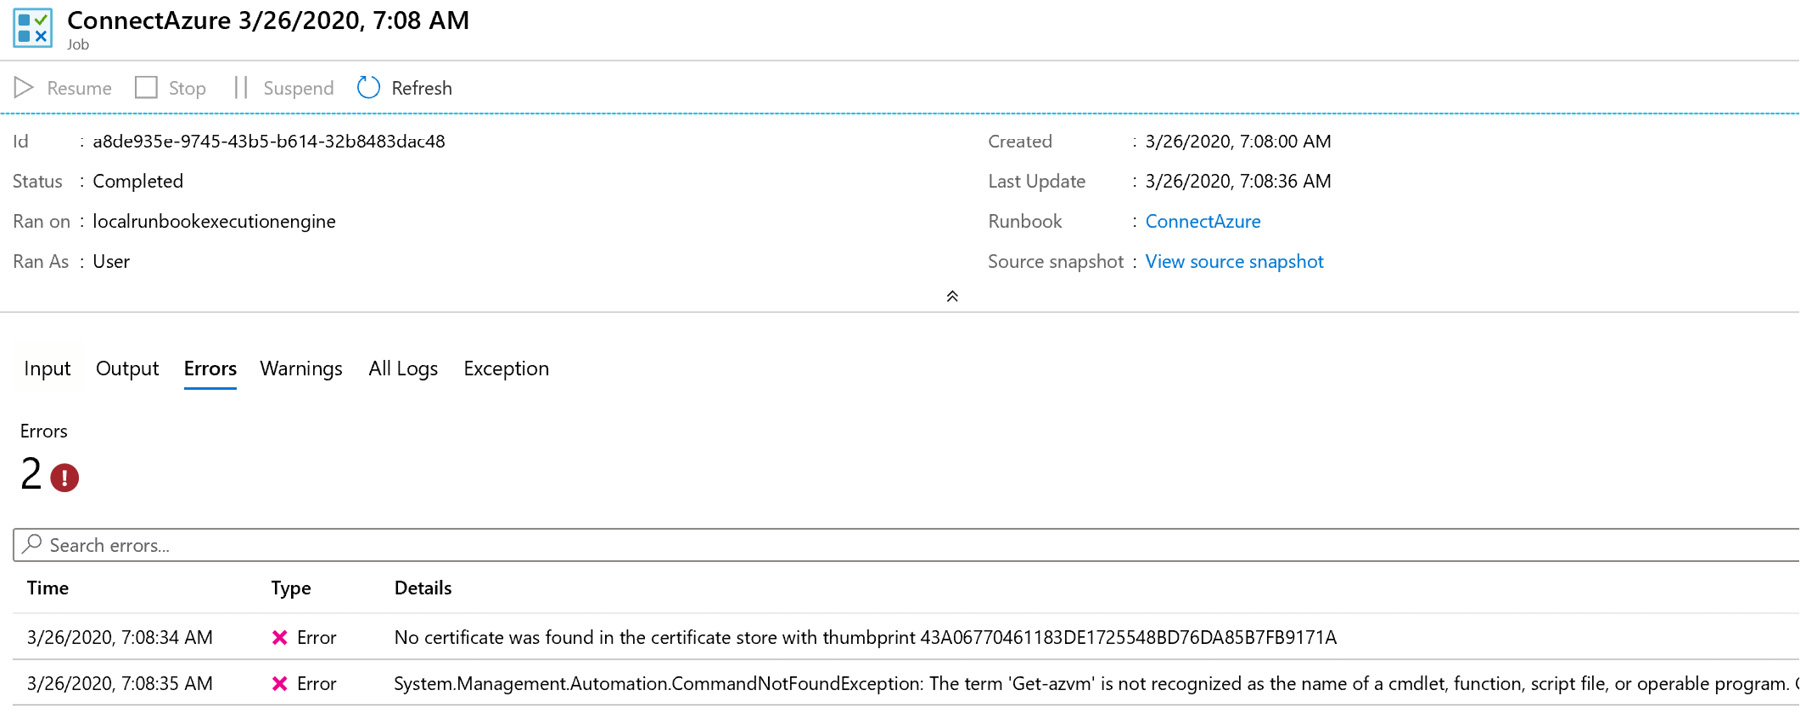
Figure 4.28: Checking errors
- Install the Az module using the following command on the server:
Install-module -name Az -AllowClobber -verbose
It is also important to have the .pfx certificate available on this server. The previously exported certificate should be copied to the server and installed manually.
- After installation of the Az module and certificate, re-executing the runbook on the Hybrid Worker is shown in Figure 4.29, and it should show the list of VMs in the subscription:

Figure 4.29: Setting up a runbook to run on a Hybrid Worker
When we discussed different scenarios, we talked about configuration management. In the next section, we will be discussing configuration management with Azure Automation in more detail.
Azure Automation State Configuration
Azure Automation provides a Desired State Configuration (DSC) pull server along with every Azure Automation account. The pull server can hold configuration scripts that can be pulled by servers across clouds and on-premises. This means that Azure Automation can be used to configure any server hosted anywhere in the world.
The DSC needs a local agent on these servers, also known as a local configuration manager (LCM). It should be configured with the Azure Automation DSC pull server so it can download the required configuration and autoconfigure the server.
The autoconfiguration can be scheduled to be periodic (by default it is half an hour), and if the agent finds any deviation in the server configuration compared to the one available in the DSC script, it will autocorrect and bring back the server to the desired and expected state.
In this section, we will configure one server hosted on Azure, and the process will remain the same irrespective of whether the server is on a cloud or on-premises.
The first step is to create a DSC configuration. A sample configuration is shown here, and complex configurations can be authored similarly:
configuration ensureiis {
import-dscresource -modulename psdesiredstateconfiguration
node localhost {
WindowsFeature iis {
Name = "web-server"
Ensure = "Present"
}
}
}
The configuration is quite simple. It imports the PSDesiredStateConfiguration base DSC module and declares a single-node configuration. This configuration is not associated with any specific node and can be used to configure any server. The configuration is supposed to configure an IIS web server and ensure that it is present on any server to which it is applied.
This configuration is not yet available on the Azure Automation DSC pull server, and so the first step is to import the configuration into the pull server. This can be done using the Automation account Import-AzAutomationDscConfiguration cmdlet, as shown next:
Import-AzAutomationDscConfiguration -SourcePath "C:Riteshensureiis.ps1" -AutomationAccountName bookaccount -ResourceGroupName automationrg -Force -Published
There are a few important things to note here. The name of the configuration should match the filename, and it must only contain alphanumeric characters and underscores. A good naming convention is to use verb/noun combinations. The cmdlets need the path of the configuration file and the Azure Automation account details to import the configuration script.
At this stage, the configuration is visible on the portal:
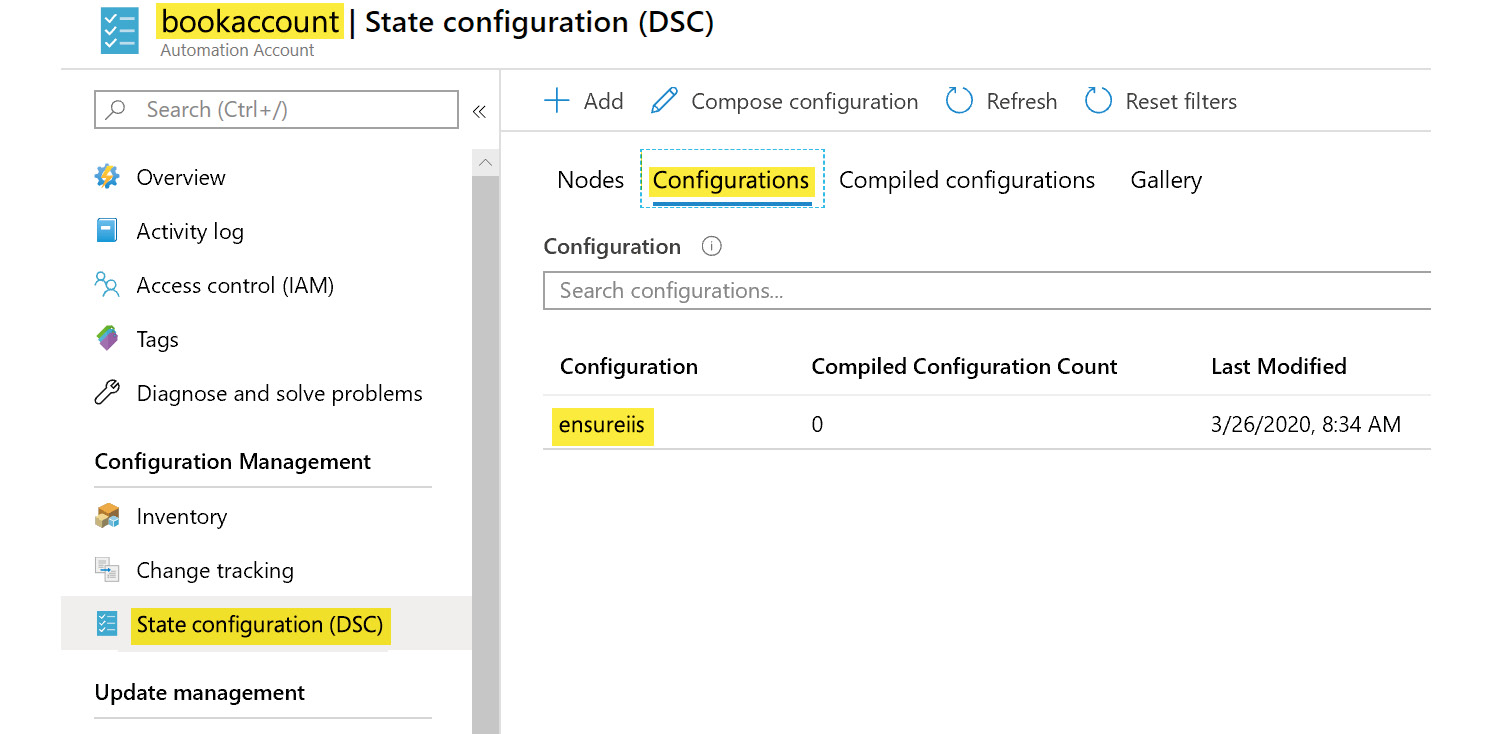
Figure 4.30: Adding configuration
Once the configuration script is imported, it is compiled and stored within the DSC pull server using the Start-AzAutomationDscCompilationJob cmdlet, as shown next:
Start-AzAutomationDscCompilationJob -ConfigurationName 'ensureiis' -ResourceGroupName 'automationrg' -AutomationAccountName 'bookaccount'
The name of the configuration should match the one that was recently uploaded, and the compiled configuration should be available now on the Compiled configurations tab, as shown in Figure 4.31:

Figure 4.31: Listing compiled configurations
It is important to note that the Node Count in Figure 4.31 is 0. It means that a node configuration called ensureiss.localhost exists but it is not assigned to any node. The next step is to assign the configuration to the node.
By now, we have a compiled DSC configuration available on the DSC pull server, but there are no nodes to manage. The next step is to onboard the VMs and associate them with the DSC pull server. This is done using the Register-AzAutomationDscNode cmdlet:
Register-AzAutomationDscNode -ResourceGroupName 'automationrg' -AutomationAccountName 'bookaccount' -AzureVMLocation "west Europe" -AzureVMResourceGroup 'spark' -AzureVMName 'spark' -ConfigurationModeFrequencyMins 30 -ConfigurationMode 'ApplyAndAutoCorrect'
This cmdlet takes the name of the resource group for both the VM and the Azure Automation account. It also configures the configuration mode and the configurationModeFrequencyMins property of the local configuration manager of the VM. This configuration will check and autocorrect any deviation from the configuration applied to it every 30 minutes.
If VMresourcegroup is not specified, the cmdlet tries to find the VM in the same resource group as the Azure Automation account, and if the VM location value is not provided, it tries to find the VM in the Azure Automation region. It is always better to provide values for them. Notice that this command can only be used for Azure VMs as it asks for AzureVMname explicitly. For servers on other clouds and on-premises, use the Get-AzAutomationDscOnboardingMetaconfig cmdlet.
Now, a new node configuration entry can also be found in the portal, as shown in Figure 4.32:
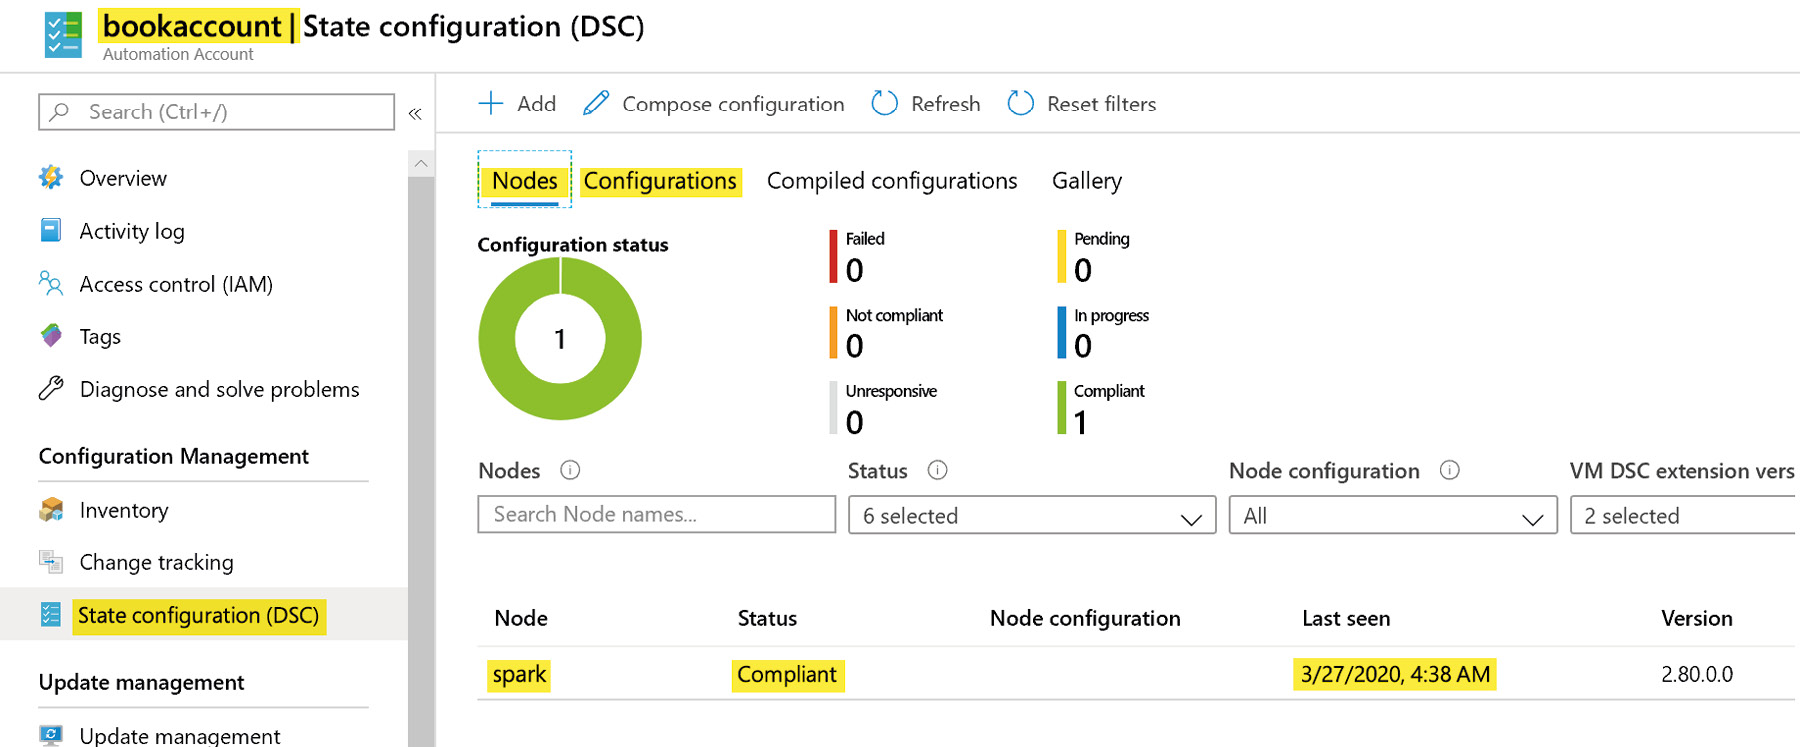
Figure 4.32: Verifying node status
The node information can be obtained as follows:
$node = Get-AzAutomationDscNode -ResourceGroupName 'automationrg' -AutomationAccountName 'bookaccount' -Name 'spark'
And a configuration can be assigned to the node:
Set-AzAutomationDscNode -ResourceGroupName 'automationrg' -AutomationAccountName 'bookaccount' -NodeConfigurationName 'ensureiis.localhost' -NodeId $node.Id
Once the compilation is complete, it can be assigned to the nodes. The initial status is Pending, as shown in Figure 4.33:
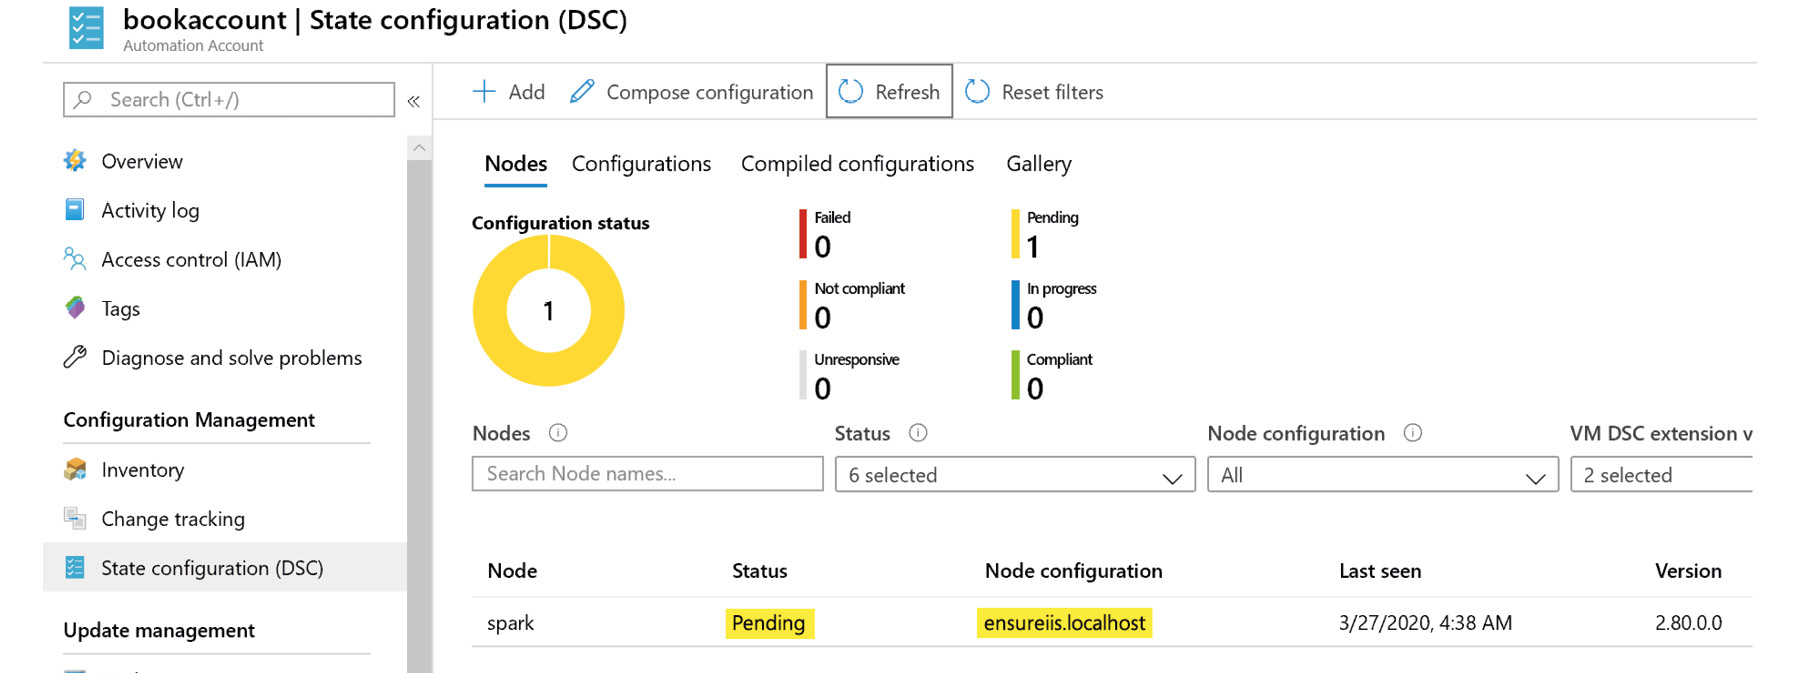
Figure 4.33: Verifying node status
After a few minutes, the configuration is applied to the node, the node becomes Compliant, and the status becomes Completed:
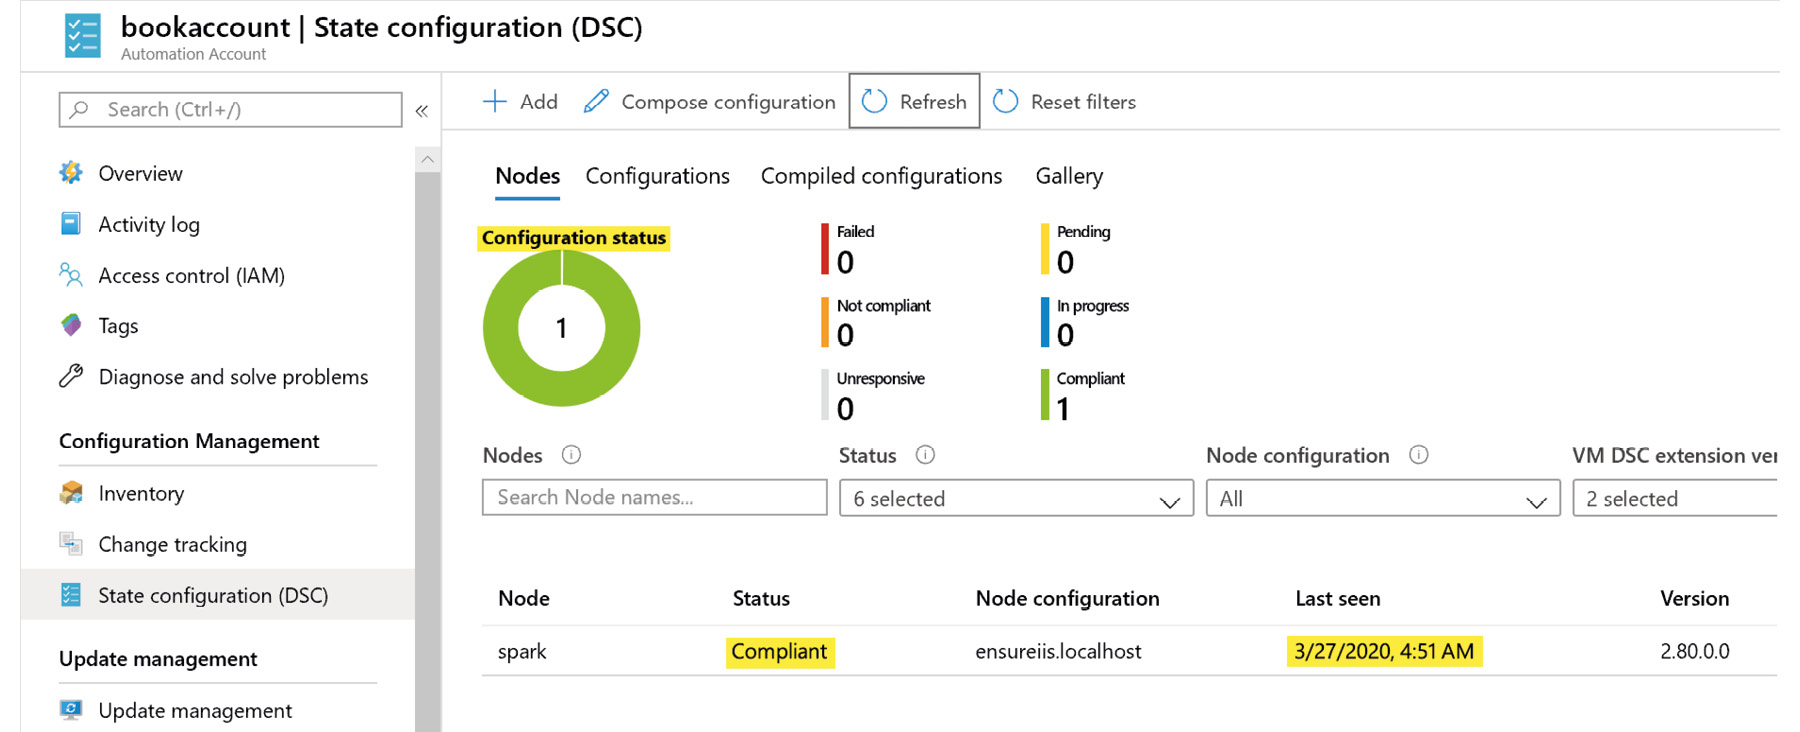
Figure 4.34: Verifying if the node is compliant
Later, logging into the server and checking if the web server (IIS) is installed confirms that it is installed, as you can see in Figure 4.35:

Figure 4.35: Checking whether the desired state has been achieved
In the next section, Azure Automation pricing will be discussed.
Azure Automation pricing
There is no cost for Azure Automation if no runbooks are executed on it. The cost of Azure Automation is charged per minute for execution of runbook jobs. This means that if the total number of runbook execution minutes is 10,000, the cost of Azure Automation would be $0.002 per minute multiplied by 9,500, as the first 500 minutes are free.
There are other costs involved in Azure Automation depending on features consumed. For example, a DSC pull server does not cost anything within Azure Automation; neither does onboarding Azure VMs on to the pull server. However, if non-Azure servers are onboarded, typically from other clouds or on-premises, then the first five servers are free and anything on top of that costs $6 per server per month in the West US region.
Pricing may vary from region to region, and it's always a good practice to verify the pricing on the official pricing page: https://azure.microsoft.com/pricing/details/automation.
You might ask, why do we need an Automation account when we can deploy serverless applications via Azure Functions? In the next section, we will explore the key differences between Azure Automation and serverless automation.
Comparison with serverless automation
Azure Automation and Azure serverless technologies, especially Azure Functions, are quite similar and overlap in terms of functionality. However, these are separate services with different capabilities and pricing.
It is important to understand that Azure Automation is a complete suite for process automation and configuration management, while Azure Functions is meant for implementing business functionality.
Azure Automation is used for automating the processes of provisioning, deprovisioning, management, and operations of infrastructure and configuration management thereafter. On the other hand, Azure Functions is meant for the creation of services, implementing functionality that can be part of microservices and other APIs.
Azure Automation is not meant for unlimited scale, and the load is expected to be moderate, while Azure Functions can handle unlimited traffic and scale automatically.
There are a host of shared assets, such as connections, variables, and modules, that can be reused across runbooks in Azure Automation; however, there is no out-of-the-box shared concept in Azure Functions.
Azure Automation can manage intermediate state by way of checkpointing and continue from the last saved state, while Azure functions are generally stateless and do not maintain any state.
Summary
Azure Automation is an important service within Azure and the only service for process automation and configuration management. This chapter covered a lot of important concepts related to Azure Automation and process automation, including shared assets such as connection, certificates, and modules.
It covered the creation of runbooks, including invoking runbooks in different ways, such as parent-child relationships, webhooks, and using the portal. The chapter also discussed the architecture and life cycle of runbooks.
We also looked at the usage of Hybrid Workers and, toward the end of the chapter, explored configuration management using a DSC pull server and a local configuration manager. Finally, we made comparisons with other technologies, such as Azure Functions.
In the next chapter, we will explore designing policies, locks, and tags for Azure deployments.