Azure is a versatile cloud platform. Customers can not only create and deploy their applications; they can also actively manage and govern their environments. Clouds generally follow a pay-as-you-go paradigm, where a customer subscribes and can then deploy virtually anything to the cloud. It could be as small as a basic virtual machine, or it could be thousands of virtual machines with higher stock-keeping units (SKUs). Azure will not stop any customer from provisioning the resources they want to provision. Within an organization, there could be a large number of people with access to the organization's Azure subscription. There needs to be a governance model in place so that only necessary resources are provisioned by people who have the right to create them. Azure provides resource management features, such as Azure Role-Based Access Control (RBAC), Azure Policy, management groups, blueprints, and resource locks, for managing and providing governance for resources.
Other major aspects of governance include cost, usage, and information management. An organization's management team always wants to be kept up to date about cloud consumption and costs. They would like to identify what team, department, or unit is using what percentage of their total cost. In short, they want to have reports based on various dimensions of consumption and cost. Azure provides a tagging feature that can help provide this kind of information on the fly.
In this chapter, we will cover the following topics:
- Azure management groups
- Azure tags
- Azure Policy
- Azure locks
- Azure RBAC
- Azure Blueprints
- Implementing Azure governance features
Azure management groups
We are starting with Azure management groups because, in most of the upcoming sections, we will be referencing or mentioning management groups. Management groups act as a level of scope for you to effectively assign or manage roles and policies. Management groups are very useful if you have multiple subscriptions.
Management groups act as a placeholder for organizing subscriptions. You can also have nested management groups. If you apply a policy or access at the management group level, it will be inherited by the underlying management groups and subscriptions. From the subscription level, that policy or access will be inherited by resource groups and then finally by the resources.
The hierarchy of management groups is shown here:
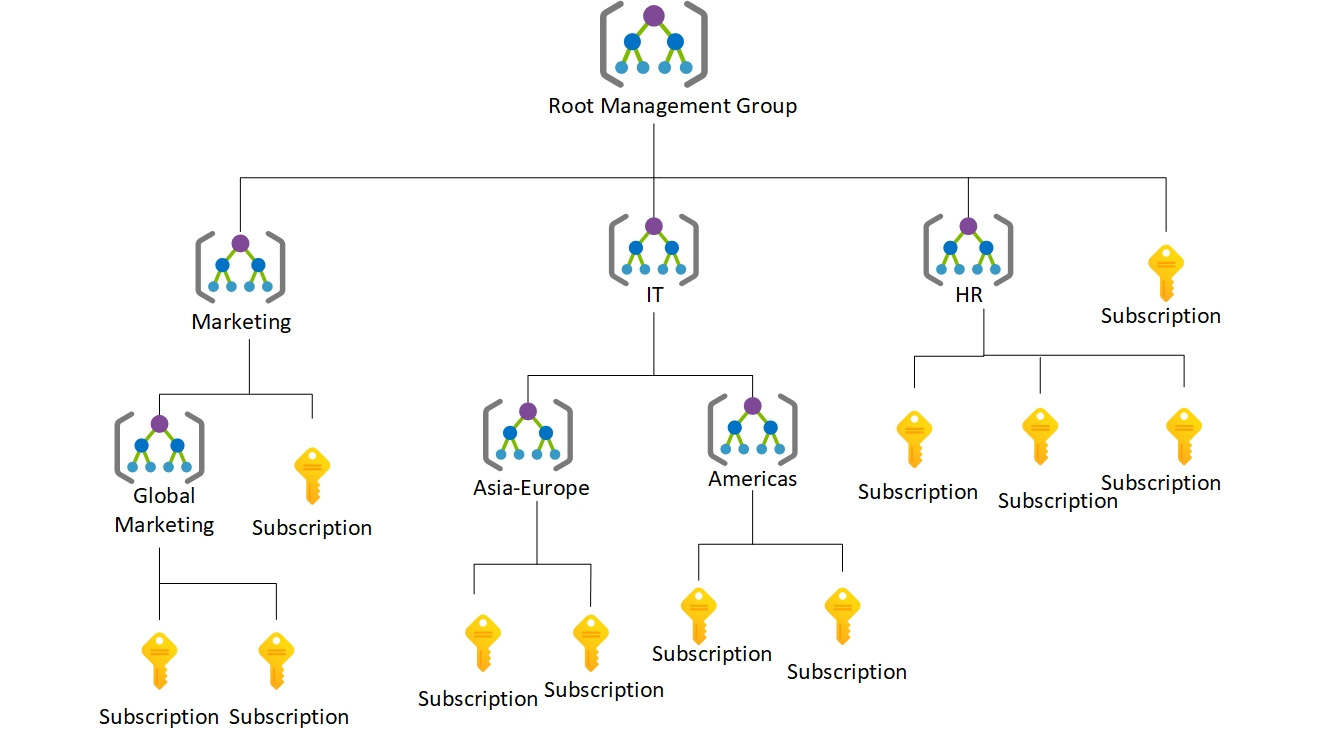
Figure 5.1: Hierarchy of Azure management groups
In Figure 5.1, we are using management groups to separate the operations of different departments, such as marketing, IT, and HR. Inside each of these departments, there are nested management groups and subscriptions, which helps to organize resources into a hierarchy for policy and access management. Later, you will see how management groups are used as a scope for governance, policy management, and access management.
In the next section, we will be discussing Azure tags, which play another vital role in the logical grouping of resources.
Azure tags
Azure allows the tagging of resource groups and resources with name-value pairs. Tagging helps in the logical organization and categorization of resources. Azure also allows the tagging of 50 name-value pairs for a resource group and its resources. Although a resource group acts as a container or a placeholder for resources, tagging a resource group does not mean the tagging of its constituent resources. Resource groups and resources should be tagged based on their usage, which will be explained later in this section. Tags are bound to a subscription, resource group, or resource. Azure accepts any name-value pair, and so it is important for an organization to define both the names and their possible values.
But why is tagging important? In other words, what problems can be solved using tagging? Tagging has the following benefits:
- Categorization of resources: An Azure subscription can be used by multiple departments within an organization. It is important for the management team to identify the owners of any resources. Tagging helps in assigning identifiers to resources that can be used to represent departments or roles.
- Information management for Azure resources: Again, Azure resources can be provisioned by anyone with access to the subscription. Organizations like to have a proper categorization of resources in place to comply with information management policies. Such policies can be based on application life cycle management, such as the management of development, testing, and production environments. They could also be based on usage or any other priorities. Each organization has its own way of defining information categories, and Azure caters for this with tags.
- Cost management: Tagging in Azure can help in identifying resources based on their categorization. Queries can be executed against Azure to identify cost per category, for instance. For example, the cost of resources in Azure for the development of an environment for the finance department and the marketing department can be easily ascertained. Moreover, Azure also provides billing information based on tags. This helps in identifying the consumption rates of teams, departments, or groups.
Tags in Azure do have certain limitations, however:
- Azure allows a maximum of 50 tag name-value pairs to be associated with resource groups.
- Tags are non-inheritable. Tags applied to a resource group do not apply to the individual resources within it. However, it is quite easy to forget to tag resources when provisioning them. Azure Policy provides the mechanism to use to ensure that tags are tagged with the appropriate value during provision time. We will consider the details of such policies later in this chapter.
Tags can be assigned to resources and resource groups using PowerShell, the Azure CLI 2.0, Azure Resource Manager templates, the Azure portal, and the Azure Resource Manager REST APIs.
An example of information management categorization using Azure tags is shown here:
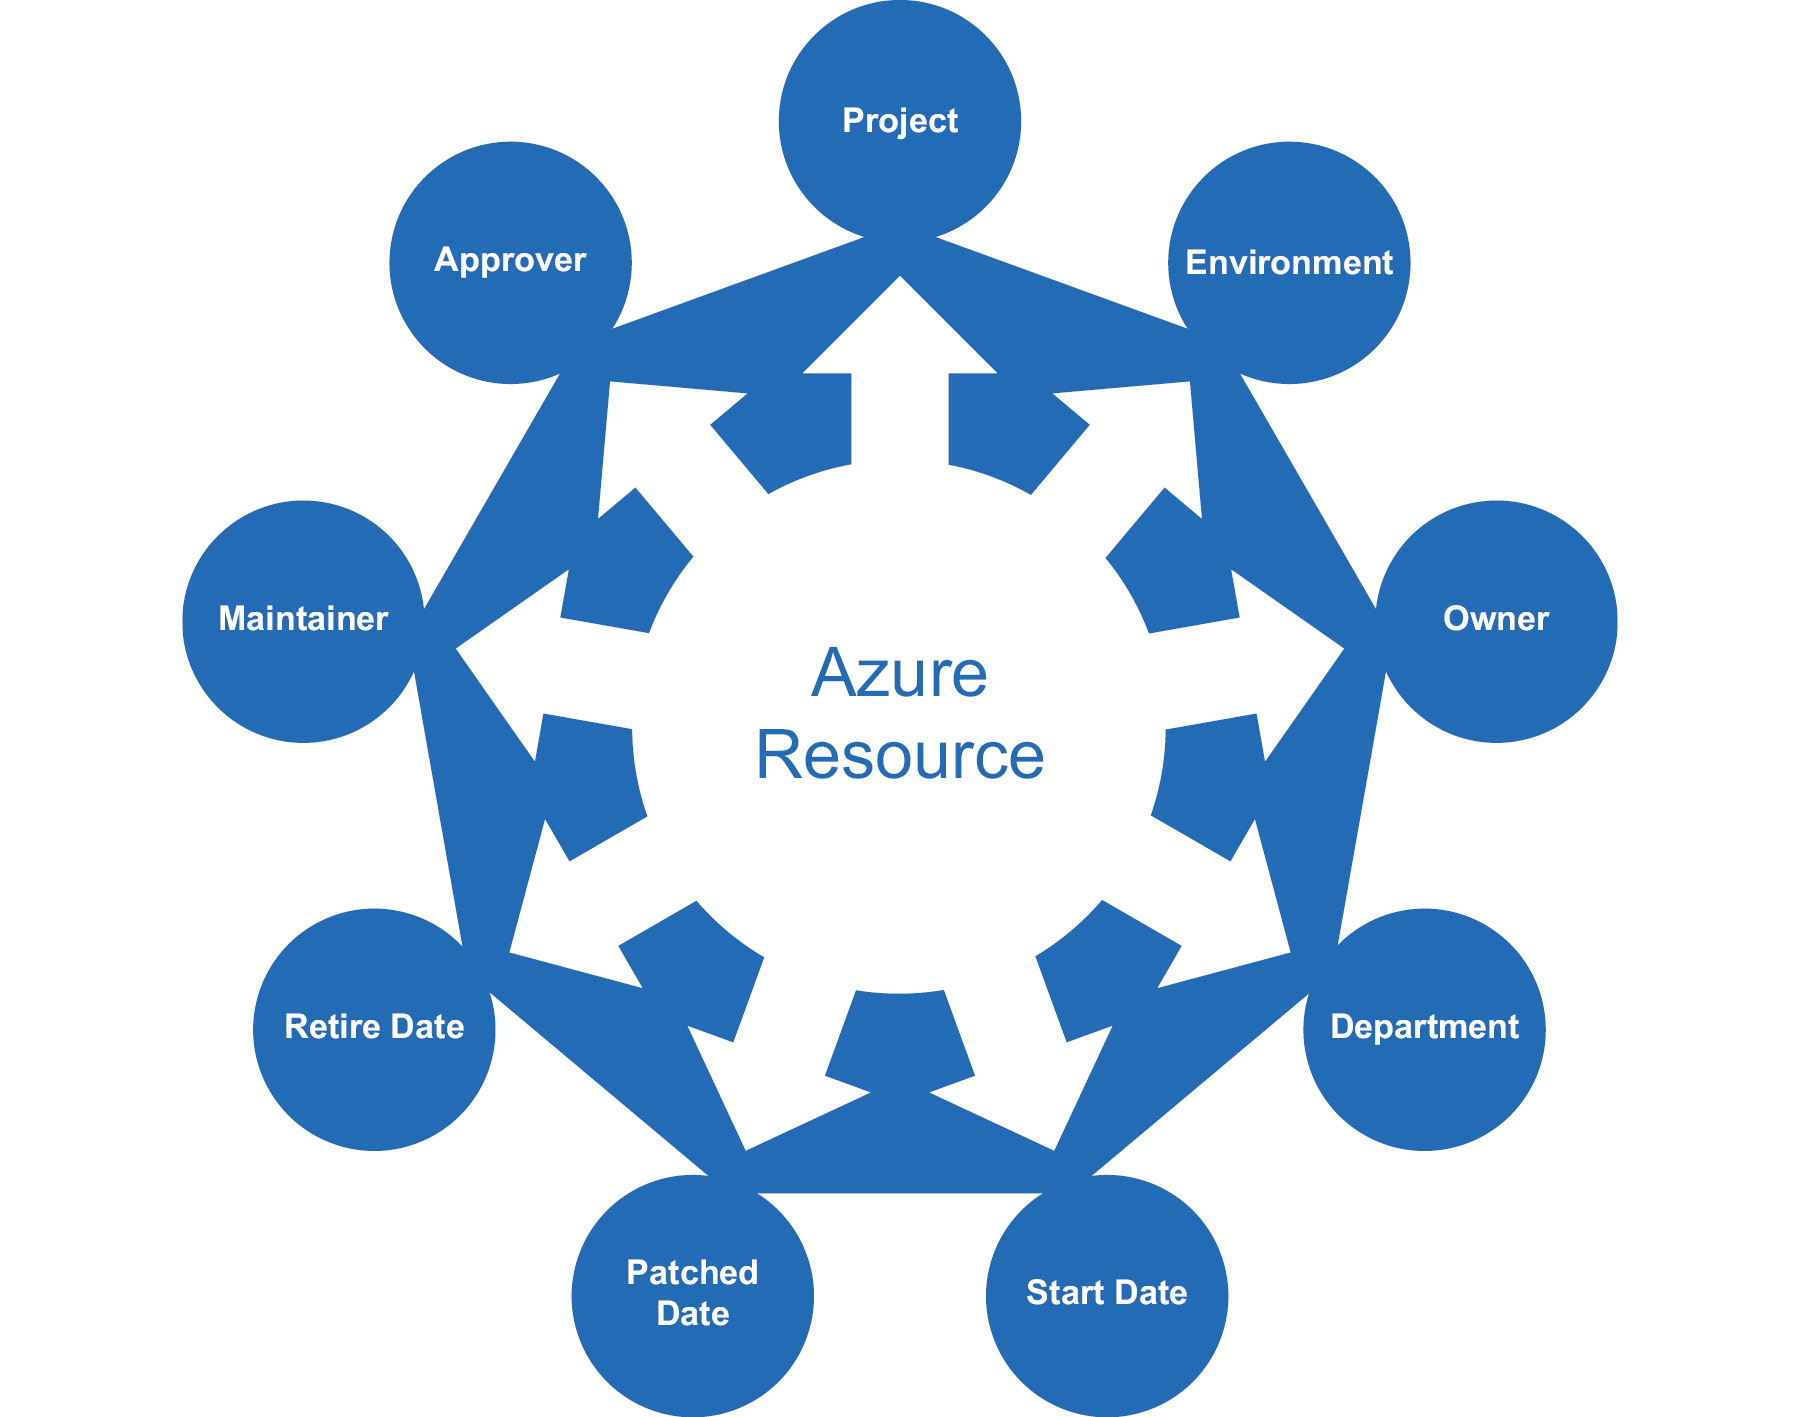
Figure 5.2: Information management categorization using Azure tags
In this example, the Department, Project, Environment, Owner, Approver, Maintainer, Start Date, Retire Date, and Patched Date name-value pairs are used to tag resources. It is extremely easy to find all the resources for a particular tag or a combination of tags using PowerShell, the Azure CLI, or REST APIs. The next section will discuss ways to use PowerShell to assign tags to resources.
Tags with PowerShell
Tags can be managed using PowerShell, Azure Resource Manager templates, the Azure portal, and REST APIs. In this section, PowerShell will be used to create and apply tags. PowerShell provides a cmdlet for retrieving and attaching tags to resource groups and resources:
- To retrieve tags associated with a resource using PowerShell, the Get-AzResource cmdlet can be used:
(Get-AzResource -Tag @{ "Environment"="Production"}).Name
- To retrieve tags associated with a resource group using PowerShell, the following command can be used:
Get-AzResourceGroup -Tag @{"Environment"="Production"}
- To set tags to a resource group, the Update-AzTag cmdlet can be used:
$tags = @{"Dept"="IT"; "Environment"="Production"}
$resourceGroup = Get-AzResourceGroup -Name demoGroup
New-AzTag -ResourceId $resourceGroup.ResourceId -Tag $tags
- To set tags to a resource, the same Update-AzTag cmdlet can be used:
$tags = @{"Dept"="Finance"; "Status"="Normal"}
$resource = Get-AzResource -Name demoStorage -ResourceGroup demoGroup
New-AzTag -ResourceId $resource.id -Tag $tags
- You can update existing tags using the Update-AzTag command; however, you need to specify the operation as Merge or Replace. Merge will append the new tags you are passing into the existing tags; however, the Replace operation will replace all the old tags with the new ones. Here is one example of updating the tags in a resource group without replacing the existing ones:
$tags = @{"Dept"="IT"; "Environment"="Production"}
$resourceGroup = Get-AzResourceGroup -Name demoGroup
Update-AzTag -ResourceId $resourceGroup.ResourceId -Tag $tags -Operation Merge
Let's now look at tags with Azure Resource Manager templates.
Tags with Azure Resource Manager templates
Azure Resource Manager templates also help in defining tags for each resource. They can be used to assign multiple tags to each resource, as follows:
{
"$schema": "https://schema.management.azure.com/schemas/2019-04-01/deploymentTemplate.json#",
"contentVersion": "1.0.0.0",
"resources": [
{
"apiVersion": "2019-06-01",
"type": "Microsoft.Storage/storageAccounts",
"name": "[concat('storage', uniqueString(resourceGroup().id))]",
"location": "[resourceGroup().location]",
"tags": {
"Dept": "Finance",
"Environment": "Production"
},
"sku": {
"name": "Standard_LRS"
},
"kind": "Storage",
"properties": { }
}
]
}
In the previous example, a couple of tags, Dept and Environment, were added to a storage account resource using Azure Resource Manager templates.
Tagging resource groups versus resources
It is a must for architects to decide the taxonomy and information architecture for Azure resources and resource groups. They should identify the categories by which resources will be classified based on the query requirements. However, they must also identify whether tags should be attached to individual resources or to resource groups.
If all resources within a resource group need the same tag, then it is better to tag the resource group, even though tags don't inherit the resources in the resource group. If your organization requires tags to be passed to all the underlying resources, then you can consider writing a PowerShell script to get the tags from the resource group and update the tags for the resources in the resource group. It is important to take queries on tags into consideration before deciding whether tags should be applied at the resource level or the resource group level. If the queries relate to individual resource types across a subscription and across resource groups, then assigning tags to individual resources makes more sense. However, if identifying resource groups is enough for your queries to be effective, then tags should be applied only to resource groups. If you are moving resources across resource groups, the tags applied at the resource group level will be lost. If you are moving resources, consider adding the tags again.
Azure Policy
In the previous section, we talked about applying tags for Azure deployments. Tags are great for organizing resources; however, there is one more thing that was not discussed: how do organizations ensure that tags are applied for every deployment? There should be automated enforcement of Azure tags to resources and resource groups. There is no check from Azure to ensure that appropriate tags are applied to resources and resource groups. This is not just specific to tags—this applies to the configuration of any resource on Azure. For example, you may wish to restrict where your resources can be provisioned geographically (to only the US-East region, for instance).
You might have guessed by now that this section is all about formulating a governance model on Azure. Governance is an important element in Azure because it ensures that everyone accessing the Azure environment is aware of organizational priorities and processes. It also helps to bring costs under control. It helps in defining organizational conventions for managing resources.
Each policy can be built using multiple rules, and multiple policies can be applied to a subscription or resource group. Based on whether the rules are satisfied, policies can execute various actions. An action could be to deny an ongoing transaction, to audit a transaction (which means writing to logs and allowing it to finish), or to append metadata to a transaction if it's found to be missing.
Policies could be related to the naming convention of resources, the tagging of resources, the types of resources that can be provisioned, the location of resources, or any combination of those.
Azure provides numerous built-in policies and it is possible to create custom policies. There is a policy language based on JSON that can be used to define custom policies.
Now that you know the purpose and use case of Azure Policy, let's go ahead and discuss built-in policies, policy language, and custom policies.
Built-in policies
Azure provides a service for the creation of custom policies; however, it also provides some out-of-the-box policies that can be used for governance. These policies relate to allowed locations, allowed resource types, and tags. More information for these built-in policies can be found at https://docs.microsoft.com/azure/azure-resource-manager/resource-manager-policy.
Policy language
Policies in Azure use JSON to define and describe policies. There are two steps in policy adoption. The policy should be defined and then it should be applied and assigned. Policies have scope and can be applied at the management group, subscription, or resource group level.
Policies are defined using if...then blocks, similar to any popular programming language. The if block is executed to evaluate the conditions, and based on the result of those conditions, the then block is executed:
{
"if": {
<condition> | <logical operator>
},
"then": {
"effect": "deny | audit | append"
}
}
The policies not only allow simple if conditions but also allow multiple if conditions to be joined together logically to create complex rules. These conditions can be joined using AND, OR, and NOT operators:
- The AND syntax requires all conditions to be true.
- The OR syntax requires one of the conditions to be true.
- The NOT syntax inverts the result of the condition.
The AND syntax is shown next. It is represented by the allOf keyword:
"if": {
"allOf": [
{
"field": "tags",
"containsKey": "application"
},
{
"field": "type",
"equals": "Microsoft.Storage/storageAccounts"
}
]
},
The OR syntax is shown next. It is represented by the anyOf keyword:
"if": {
"anyOf": [
{
"field": "tags",
"containsKey": "application"
},
{
"field": "type",
"equals": "Microsoft.Storage/storageAccounts"
}
]
},
The NOT syntax is shown next. It is represented by the not keyword:
"if": {
"not": [
{
"field": "tags",
"containsKey": "application"
},
{
"field": "type",
"equals": "Microsoft.Storage/storageAccounts"
}
]
},
In fact, these logical operators can be combined together, as follows:
"if": {
"allOf": [
{
"not": {
"field": "tags",
"containsKey": "application"
}
},
{
"field": "type",
"equals": "Microsoft.Storage/storageAccounts"
}
]
},
This is very similar to the use of if conditions in popular programming languages such as C# and Node.js:
If ("type" == "Microsoft.Storage/storageAccounts") {
Deny
}
It is important to note that there is no allow action, although there is a Deny action. This means that policy rules should be written with the possibility of denial in mind. Rules should evaluate conditions and Deny the action if the conditions are met.
Allowed fields
The fields that are allowed in conditions while defining policies are as follows:
- Name: The name of the resource for applying the policy to. This is very specific and applicable to a resource by its usage.
- Type: The type of resource, such as Microsoft.Compute/VirtualMachines. That would apply the policy to all instances of virtual machines, for example.
- Location: The location (that is, the Azure region) of a resource.
- Tags: The tags associated with a resource.
- Property aliases: Resource-specific properties. These properties are different for different resources.
In the next section, you will learn more about safekeeping resources in production environments.
Azure locks
Locks are mechanisms for stopping certain activities on resources. RBAC provides rights to users, groups, and applications within a certain scope. There are out-of-the-box RBAC roles, such as owner, contributor, and reader. With the contributor role, it is possible to delete or modify a resource. How can such activities be prevented despite the user having a contributor role? Enter Azure locks.
Azure locks can help in two ways:
- They can lock resources such that they cannot be deleted, even if you have owner access.
- They can lock resources in such a way that they can neither be deleted nor have their configuration modified.
Locks are typically very helpful for resources in production environments that should not be modified or deleted accidentally.
Locks can be applied at the levels of subscription, resource group, management group, and individual resource. Locks can be inherited between subscriptions, resource groups, and resources. Applying a lock at the parent level will ensure that those resources at the child level will also inherit it. Resources that are added later in the sub-scope also inherit the lock configuration by default. Applying a lock at the resource level will also prevent the deletion of the resource group containing the resource.
Locks are applied only to operations that help in managing a resource, rather than operations that are within a resource. Users need either Microsoft.Authorization/* or Microsoft.Authorization/locks/* RBAC permissions to create and modify locks.
Locks can be created and applied through the Azure portal, Azure PowerShell, the Azure CLI, Azure Resource Manager templates, and REST APIs.
Creating a lock using an Azure Resource Manager template is done as follows:
{
"$schema": "https://schema.management.azure.com/schemas/2015-01-01/deploymentTemplate.json#",
"contentVersion": "1.0.0.0",
"parameters": {
"lockedResource": {
"type": "string"
}
},
"resources": [
{
"name": "[concat(parameters('lockedResource'), '/Microsoft.Authorization/myLock')]",
"type": "Microsoft.Storage/storageAccounts/providers/locks",
"apiVersion": "2019-06-01",
"properties": {
"level": "CannotDelete"
}
}
]
}
The resources section of the Azure Resource Manager template code consists of a list of all the resources to be provisioned or updated within Azure. There is a storage account resource, and the storage account has a lock resource. A name for the lock is provided using dynamic string concatenation, and the lock that's applied is of the CannotDelete type, which means that the storage account is locked for deletion. The storage account can only be deleted after the removal of the lock.
Creating and applying a lock to a resource using PowerShell is done as follows:
New-AzResourceLock -LockLevel CanNotDelete -LockName LockSite '
-ResourceName examplesite -ResourceType Microsoft.Web/sites '
-ResourceGroupName exampleresourcegroup
Creating and applying a lock to a resource group using PowerShell is done as follows:
New-AzResourceLock -LockName LockGroup -LockLevel CanNotDelete '
-ResourceGroupName exampleresourcegroup
Creating and applying a lock to a resource using the Azure CLI is done as follows:
az lock create --name LockSite --lock-type CanNotDelete
--resource-group exampleresourcegroup --resource-name examplesite
--resource-type Microsoft.Web/sites
Creating and applying a lock to a resource group using the Azure CLI is done as follows:
az lock create --name LockGroup --lock-type CanNotDelete --resource-group exampleresourcegroup
To create or delete resource locks, the user should have access to the Microsoft.Authorization/* or Microsoft.Authorization/locks/* actions. You can further give granular permissions as well. Owners and user access administrators will have access to creating or deleting locks by default.
If you are wondering what the Microsoft.Authorization/* and Microsoft.Authorization/locks/* keywords are, you will get to know more about them in the next section.
Let's now look at Azure RBAC.
Azure RBAC
Azure provides authentication using Azure Active Directory for its resources. Once an identity has been authenticated, the resources the identity will be allowed to access should be decided. This is known as authorization. Authorization evaluates the permissions that have been afforded to an identity. Anybody with access to an Azure subscription should be given just enough permissions so that their specific job can be performed, and nothing more.
Authorization is popularly also known as RBAC. RBAC in Azure refers to the assigning of permissions to identities within a scope. The scope could be a management group, a subscription, a resource group, or individual resources.
RBAC helps in the creation and assignment of different permissions to different identities. This helps in segregating duties within teams, rather than everyone having all permissions. RBAC helps in making people responsible for their job only, because others might not even have the necessary access to perform it. It should be noted that providing permissions at a greater scope automatically ensures that child resources inherit those permissions. For example, providing an identity with read access to a resource group means that the identity will have read access to all the resources within that group, too.
Azure provides three general-purpose, built-in roles. They are as follows:
- The owner role, which has full access to all resources
- The contributor role, which has access to read/write resources
- The reader role, which has read-only permissions to resources
There are more roles provided by Azure, but they are resource-specific, such as the network contributor and security manager roles.
To get all roles provided by Azure for all resources, execute the Get-AzRoleDefinition command in the PowerShell console.
Each role definition has certain allowed and disallowed actions. For example, the owner role has all actions permitted; no action is prohibited:
PS C:Users iskaria> Get-AzRoleDefinition -Name "Owner"
Name : Owner
Id : 8e3af657-a8ff-443c-a75c-2fe8c4bcb635
IsCustom : False
Description : Lets you manage everything, including access to resources.
Actions : {*}
NotActions : {}
DataActions : {}
NotDataActions : {}
AssignableScopes : {/}
Each role comprises multiple permissions. Each resource provides a list of operations. The operations supported by a resource can be obtained using the Get-AzProviderOperation cmdlet. This cmdlet takes the name of the provider and resource to retrieve the operations:
PS C:Users iskaria> Get-AzProviderOperation -OperationSearchString "Microsoft.Insights/*" | select Operation
This will result in the following output:
PS C:Users iskaria> Get-AzProviderOperation -OperationSearchString "Microsoft.Insights/*" | select Operation
Operation
---------
Microsoft.Insights/Metrics/Action
Microsoft.Insights/Register/Action
Microsoft.Insights/Unregister/Action
Microsoft.Insights/ListMigrationDate/Action
Microsoft.Insights/MigrateToNewpricingModel/Action
Microsoft.Insights/RollbackToLegacyPricingModel/Action
.
.
.
.
.
.
.
.
Microsoft.Insights/PrivateLinkScopes/PrivateEndpointConnectionProxies/Read
Microsoft.Insights/PrivateLinkScopes/PrivateEndpointConnectionProxies/Write
Microsoft.Insights/PrivateLinkScopes/PrivateEndpointConnectionProxies/Delete
Microsoft.Insights/PrivateLinkScopeOperationStatuses/Read
Microsoft.Insights/DiagnosticSettingsCategories/Read
The output shown here provides all the actions available within the Microsoft.Insights resource provider across its associated resources. The resources include Metrics, Register, and others, while the actions include Read, Write, and others.
Let's now look at custom roles.
Custom roles
Azure provides numerous out-of-the-box generic roles, such as owner, contributor, and reader, as well as specialized resource-specific roles, such as virtual machine contributor. Having a reader role assigned to a user/group or service principal will mean reader permissions being assigned to the scope. The scope could be a resource, resource group, or a subscription. Similarly, a contributor would be able to read as well as modify the assigned scope. A virtual machine contributor would be able to modify virtual machine settings and not any other resource settings. There are, however, times when existing roles might not suit our requirements. In such cases, Azure allows the creation of custom roles. They can be assigned to users, groups, and service principals and are applicable to resources, resource groups, and subscriptions.
Custom roles are created by combining multiple permissions. For example, a custom role can consist of operations from multiple resources. In the next code block, a new role definition is being created, but instead of setting all properties manually, one of the existing "Virtual Machine Contributor" roles is retrieved because it almost matches with the configuration of the new custom role. Avoid using the same name as built-in roles, as that would create conflict. Then, the ID property is nullified and a new name and description is provided. The code also clears all the actions, adds some actions, adds a new scope after clearing the existing scope, and finally creates a new custom role:
$role = Get-AzRoleDefinition "Virtual Machine Contributor"
$role.Id = $null
$role.Name = "Virtual Machine Operator"
$role.Description = "Can monitor and restart virtual machines."
$role.Actions.Clear()
$role.Actions.Add("Microsoft.Storage/*/read")
$role.Actions.Add("Microsoft.Network/*/read")
$role.Actions.Add("Microsoft.Compute/*/read")
$role.Actions.Add("Microsoft.Compute/virtualMachines/start/action")
$role.Actions.Add("Microsoft.Compute/virtualMachines/restart/action")
$role.Actions.Add("Microsoft.Authorization/*/read")
$role.Actions.Add("Microsoft.Resources/subscriptions/resourceGroups/read")
$role.Actions.Add("Microsoft.Insights/alertRules/*")
$role.Actions.Add("Microsoft.Support/*")
$role.AssignableScopes.Clear()
$role.AssignableScopes.Add("/subscriptions/548f7d26-b5b1-468e-ad45-6ee12accf7e7")
New-AzRoleDefinition -Role $role
There is a preview feature available in the Azure portal that you can use to create custom RBAC roles from the Azure portal itself. You have the option to create roles from scratch, clone an existing role, or start writing the JSON manifest. Figure 5.3 shows the Create a custom role blade, which is available at IAM > +Add section:
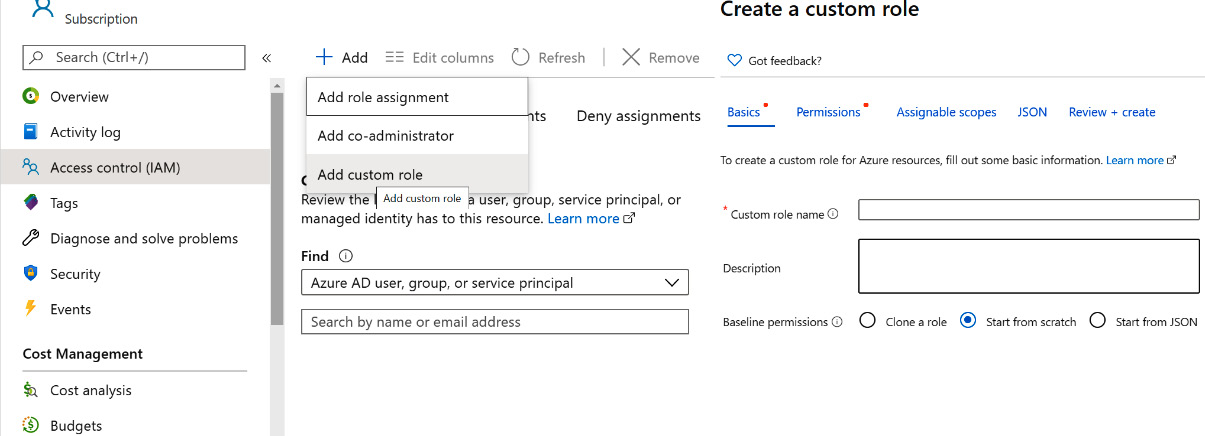
Figure 5.3: Creating custom roles from the Azure portal
This makes the process of custom role creation hassle-free.
How are locks different from RBAC?
Locks are not the same as RBAC. RBAC helps in allowing or denying permissions for resources. These permissions relate to performing operations, such as read, write, and update operations on resources. Locks, on the other hand, relate to disallowing permissions to configure or delete resources.
In the next section, we will be discussing Azure Blueprints, which helps us with the orchestration of artifacts, such as role assignments, policy assignments, and more, that we have discussed so far.
Azure Blueprints
You will be familiar with the word blueprint, which refers to the plan or drawing that is used by an architect to architect a solution. Similarly, in Azure, cloud architects can leverage Azure Blueprints to define a set of repeatable Azure resources that adheres to an organization's standards, processes, and patterns.
Blueprints allows us to orchestrate the deployment of various resources and other artifacts, such as:
- Role assignments
- Policy assignments
- Azure Resource Manager templates
- Resource groups
Azure blueprint objects are replicated to multiple regions and are backed by Azure Cosmos DB. The replication helps in providing consistent access to resources and maintaining the organization's standards irrespective of which region you are deploying to.
Azure Blueprints comprises various artifacts, and you can find the list of supported artifacts here: https://docs.microsoft.com/azure/governance/blueprints/overview#blueprint-definition.
Blueprints can be created from the Azure portal, Azure PowerShell, the Azure CLI, REST APIs, or ARM templates.
In the next section, we will look at an example of implementing Azure governance features. Services and features such as RBAC, Azure Policy, and Azure resource locks will be used in the example.
An example of implementing Azure governance features
In this section, we will go through a sample architecture implementation for a fictitious organization that wants to implement Azure governance and cost management features.
Background
Company Inc is a worldwide company that is implementing a social media solution on an Azure IaaS platform. They use web servers and application servers deployed on Azure virtual machines and networks. Azure SQL Server acts as the backend database.
RBAC for Company Inc
The first task is to ensure that the appropriate teams and application owners can access their resources. It is recognized that each team has different requirements. For the sake of clarity, Azure SQL is deployed in a separate resource group to the Azure IaaS artifacts.
The administrator assigns the following roles for the subscription:
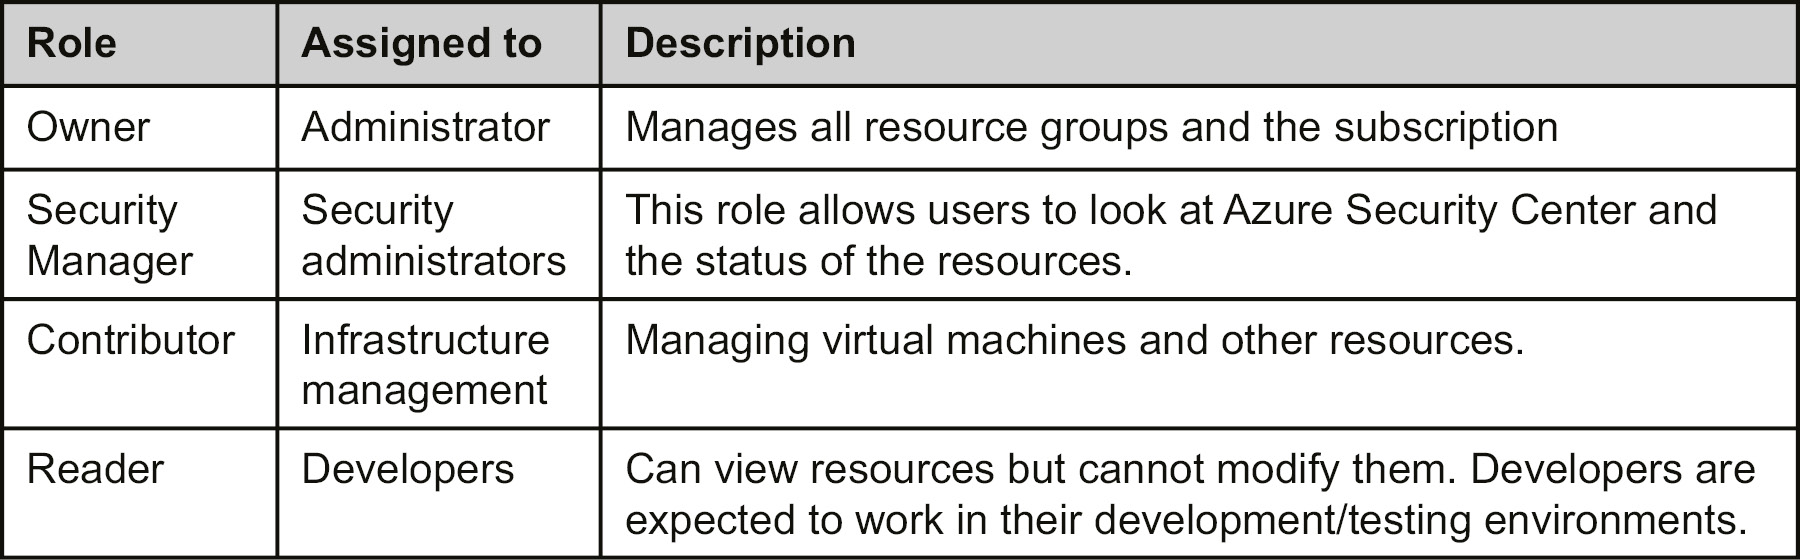
Table 5.1: Different roles with access details
Azure Policy
The company should implement Azure Policy to ensure that its users always provision resources according to the company guidelines.
The policies in Azure govern various aspects related to the deployment of resources. The policies will also govern updates after the initial deployment. Some of the policies that should be implemented are given in the following section.
Deployments to certain locations
Azure resources and deployments can only be executed for certain chosen locations. It would not be possible to deploy resources in regions outside of the policy. For example, the regions that are allowed are West Europe and East US. It should not be possible to deploy resources in any other region.
Tags of resources and resource groups
Every resource in Azure, including the resource groups, will mandatorily have tags assigned to it. The tags will include, as a minimum, details about the department, environment, creation data, and project name.
Diagnostic logs and Application Insights for all resources
Every resource deployed on Azure should have diagnostic logs and application logs enabled wherever possible.
Azure locks
A company should implement Azure locks to ensure that crucial resources are not deleted accidentally. Every resource that is crucial for the functioning of a solution needs to be locked down. This means that even the administrators of the services running on Azure do not have the capability to delete these resources; the only way to delete a resource is to remove the lock first.
You should also note that:
All production and pre-production environments, apart from the development and testing environments, would be locked for deletion.
All development and testing environments that have single instances would also be locked for deletion.
All resources related to the web application would be locked for deletion for all production environments.
All shared resources would be locked for deletion irrespective of the environment.
Summary
In this chapter, you learned that governance and cost management are among the top priorities for companies moving to the cloud. Having an Azure subscription with a pay-as-you-go scheme can harm the company budget, because anyone with access to the subscription can provision as many resources as they like. Some resources are free, but others are expensive.
You also learned that it is important for organizations to remain in control of their cloud costs. Tags help in generating billing reports. These reports could be based on departments, projects, owners, or any other criteria. While cost is important, governance is equally important. Azure provides locks, policies, and RBAC to implement proper governance. Policies ensure that resource operations can be denied or audited, locks ensure that resources cannot be modified or deleted, and RBAC ensures that employees have the right permissions to perform their jobs. With these features, companies can have sound governance and cost control for their Azure deployments.
In the next chapter, we will be discussing cost management in Azure. We will go through different optimization methods, cost management, and billing APIs.