
Lenses: controlling the image
The next step in understanding lenses is to see how the controls on your camera’s lens allow you to alter the image. This introduces focusing scales and lens aperture (including f-numbers). The aperture adjusts image brightness and the range of subject distances you can focus sharply at one setting. It is very important in image-making to know when and how to create total sharpness, or to localize image detail. Some differences between cameras of different format (picture size) start to appear here too.
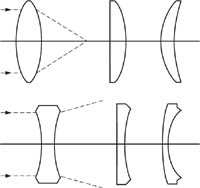
Figure 3.1 Single lens elements can be made in a great range of shapes and glass types. The top row here converge light. The bottom row, which are all thinnest in the centre, cause light to diverge. Diverging lens elements are combined with (stronger) converging elements in photographic lenses to help counteract optical defects
A simple glass lens gives you a much better image than a pinhole. However, its quality is still a long way short of the standard needed for photography. When you look closely at Figure 2.13, image sharpness is poor and not maintained equally over the whole picture, even when the subject is all at one distance. Simple single lenses often distort shapes, create odd colour fringes or give a general ‘misty’ appearance. Occasionally such results work well as interpretative romantic images, but it is better to have a lens capable of producing utmost image clarity and detail. Then you can add a diffuser to the camera or later manipulate results digitally (Chapter 14) when you want pictures of the other kind.

Figure 3.2 One type of 50 mm lens made as the normal focal length lens for a 35 mm camera. It combines seven lens elements, five converging and two diverging light
The main object of photographic lens design and manufacture is to produce lenses which minimize optical defects (known as ‘aberrations’) while increasing resolution of detail and image brightness. To achieve this a range of special optical glasses is used, each type having different refraction and dispersion properties. So a photographic lens has a ‘compound’ construction, containing a series of elements of different shapes and made from different glass types to help neutralize aberrations. In fact, a camera lens of normal focal length typically has 5–8 elements (Figure 3.2). Their centring and spacing within the metal lens barrel is critical, and can be upset if the lens is dropped or roughly knocked. But even the number of elements causes problems, as the tiny percentage of light reflected off every glass surface at the point of refraction multiplies as scattered light. If uncorrected, the result would be images that lack contrast and sparkle – like looking through a window with multiple double-glazing. Modern lenses therefore have their elements surface-coated with one or more extremely thin layers of a transparent material which practically eliminates internal reflections under most conditions. However, light may still flare if you shoot towards a bright light source just outside the picture area and fail to use a lenshood, see page 92.
Your camera or enlarging lens is therefore a relatively thick barrel of lens elements, all of them refracting light but together having an overall converging effect. Every photographic lens has its focal length (usually in millimetres) clearly engraved around the lens barrel or front-element retaining ring.

Figure 3.3 Engraving around lenses here shows (top) name of lens; maximum aperture f/5.6 and focal length 180 mm and (bottom) name, f/1.7 maximum aperture, 50 mm focal length
Focal length and angle of view
The focal length photographers and manufacturers regard as ‘normal’ for a camera is approximately equal to the diagonal of the camera’s picture format. In other words:
For a 6 × 7in rollfilm camera, a lens of about 80–105 mm would be considered normal.
For a 35 mm (24 × 36 mm) camera, between 35 mm and 50 mm focal length is normal.
For APS (17 × 30) picture size cameras, the normal lens is 25 mm.
And for a digital camera with a tiny 4.8 × 6.4 mm sensor, the lens would only be 6–10 mm focal length.
As Figure 2.18 showed, the shorter the focal length the smaller the image the lens produces. But a lens of short focal length used with a small-format camera gives the same angle of view as a lens of longer focal length used in a bigger camera. You are just scaling everything up or down. All your combinations above therefore give an angle of view of about 45°, and so each camera set up to photograph the same (distant) subject will include about the same amount of the scene, see Figure 3.4. The use of lenses giving a wider or narrower angle of view is discussed on page 79.

Figure 3.4 Angle of view. All four lenses here give a similar angle of view. They each differ in focal length but are used on different format cameras, maintaining a close ratio of focal length to picture format diagonal. Each combination will therefore include about the same amount of your subject in the picture. See also Figure 2.18

Figure 3.5 Lens focusing movement. Top left: Typical focusing ring on a manually focusing 35 mm single-lens reflex camera. Bottom left: Focusing ring on an autofocus SLR, rotated by hand when switched to Manual. Right: Two kinds of larger format sheet film cameras. Having longer focal length lenses which need greater physical focusing movement a focusing knob on the camera body shifts the whole lens-carrying front panel
Focusing movement
Cheap simple cameras have lenses which are so-called ‘focus-free’. In practice this means the lens is fixed in position to sharply image subjects about 2.5 m from the camera. The assumption is that this is a typical situation for snapshots, and items slightly nearer or further away will appear reasonably sharp due to depth of field, page 44.
Most lens units include some means of adjusting its position forwards or backwards for focusing subjects closer or more distant respectively. Typically the whole lens shifts smoothly by a centimetre or so within a sleeve (or internal elements alter position). Focus is manually adjusted by rotating the lens barrel, or via a motor under the control of a sensor which detects when the image is sharp. See autofocusing, page 67. Often point-and-shoot autofocus compact cameras show no distance settings on the lens. Lenses on cameras offering greater control (all single-lens reflexes for example) show a scale of subject distance which moves against a setting mark, see Figure 3.5.
All lenses can be set to focus for infinity (∞ symbol). The closest subject distance offered depends on a number of factors. For example, the lens may not maintain the same high image optical resolution at close distances (see macro lenses, page 90) and mechanically it may be difficult to shift the lens further forward. The longer the focal length the greater the physical movement needed for adjusting focus settings. Again, close-up focusing may be purposely prevented because the lens is part of a camera with separate direct viewfinder, page 54. This grows increasingly inaccurate in framing up your picture the closer you work.
Normal lenses for large-format sheet film cameras need more focusing movement to cover a similar range of subject distances, owing to their longer focal length. The whole front unit of the camera moves independently of the back, the two being joined together by bellows. There is seldom any scale of distances on lens or camera body; you focus by checking the actual image on a ground glass screen at the back of the camera, see page 63.

Figure 3.6 Typical f-number sequence (some lenses may open up beyond f/2, and stop down beyond f/16)
Inside most photographic lenses you will see a circular hole or aperture located about midway between front and back elements. Usually a series of overlapping black metal blades called an iris diaphragm allows the size of this aperture to be narrowed continuously from full lens diameter to just the centre part of the lens. It is adjusted with a setting ring or lever outside the lens barrel. Most smaller-format cameras control the aperture size automatically, at the moment of exposure. (On single-lens reflex cameras you may not see the aperture actually alter when you turn the ring, unless you first detach the lens from the camera; see page 58.)
A series of relative aperture settings can be felt by ‘click’ and are shown on a scale of figures known as f-numbers. Notice that the smaller the relative aperture the higher the f-number. They typically run:
f/2; 2.8; 4; 5.6; 8; 11; 16; etc.
The f-numbers follow what is an internationally agreed sequence relating to the brightness of the image. It is like operating a ‘light tap’; each change to the next highest number halves the amount of light passing through your lens. And because the aperture is positioned in the lens centre it dims or brightens the entire image evenly.
The f-number system means that every lens set to the same number and focused on the same (distant) subject gives matching image brightness, irrespective of its focal length or the camera size. You can change lenses or cameras, but as long as you set the same f-number the image brightness remains constant.
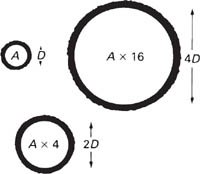
Figure 3.7 The basis of f-numbers. Each time the diameter (D) of a circle is doubled its area (A) increases four times
How f-numbers work
The actual f-numbers themselves denote the number of times the effective diameter of the aperture divides into the lens focal length. So f/2 means setting an aperture diameter one-half the focal length; f/4 is one-quarter, and so on. The system works because each f-number takes into account two main factors which control how bright an image is formed:
1 |
Distance between lens and image. As you saw in Figure 2.11, doubling the distance of a surface from a light-source quarters the light it receives. And since distant subjects are focused one focal length from the lens, a lens of (say) 100 mm focal length basically forms an image only one-quarter as bright as a lens of 50 mm. |
2 |
Diameter of the light beam. Doubling the diameter of a circle increases its area four times, Figure 3.7. So if the diaphragm of the first lens passes a beam of light 12 mm wide and the second only 6 mm wide, the first image is four times as bright as the second. |

Figure 3.8 Image brightness. These lenses differ in focal length and therefore give different-size images of the same distant subject. But by having diaphragm diameter effectively one-eighth of focal length in each case, the images match in brightness. Both are working at f/8
Now if you express (2) as a fraction of (1), you find that both lenses are working at near-enough relative apertures of f/8 (100 ÷ 12, and 50 ÷ 6), which is correct since their images match in brightness. So:
f-number = lens focal length ÷ effective aperture diameter

Figure 3.9 This collection of lenses – for large, medium and small format cameras – shows the variety of ways in which information on aperture, focal length, maker, and reference number appear
In practice the f-number relationship to brightness breaks down when working very close up, because the lens-to-image distance will then differ greatly from one focal length, see page 89.
The f-number settings are also occasionally referred to as ‘stops’. In early photography, long before iris diaphragms, each stop was a thin piece of metal punched with a hole the required size which you slipped into a slot in the lens barrel. Hence photographers speak of ‘stopping down’ (changing to a smaller opening, higher f-number). The opposite action is ‘opening up’.
You will find in practice that upper and lower limits of the f-number scale vary with different lenses. Most small-format camera lenses stop down to f/16 or f/22. Larger, sheet-film camera lenses are designed to continue down to f/32 or f/45. Smaller apertures are useful for extra depth of field, see below, but if taken to extremes diffraction (page 326) starts to destroy image detail. This is why no lens will stop down literally to pinhole size.
At the other end of the f-number scale, limits are set by price and the current state of technology. The wider the maximum relative aperture setting the more difficult it is for the manufacturer to suppress aberrations. The lens must also be bigger, and costs more. But then a wide-aperture lens passes more light (it is ‘fast’) and this is handy in dim conditions – for photo-journalism for example. Apertures of f/1.4 are quite common on standard non-zoom lenses for small-format cameras. Often a lens design may produce acceptable image quality up to a relative aperture wider than, say, f/2 but not as wide as the next f-number, f/1.4. A maximum setting of f/1.8 or some other irregular f-number will then appear as the limiting factor on its scale. Most large-format camera lenses only open to about f/4 at the most. In fact, the ‘best’ aperture with most lenses is around f/8, being a compromise between the opposite influences of lens aberrations and diffraction.
The f-number of your lens’ maximum aperture, together with its focal length, name and individual reference number, are engraved on the lens rim. You may find that, of two lenses identical in make and focal length, one is almost twice the cost of the other because it has a maximum aperture one stop wider. This can be a high price to pay for the ability to shoot in poorer light or use faster shutter speeds, particularly when you can buy excellent ultra-fast film.

Figure 3.10 Why aperture diameter alters depth of field. Right: When you focus a lens for a close subject it images each detail of a more distant item as an unsharp disc of light. Left: Stopping down to a smaller lens aperture narrows all cones of light. Although still not in critical focus other items begin to look sharp too
Your lens aperture is an important control for dimming or brightening images – helping to compensate for bright or dim subject conditions (see Exposure measurement, Chapter 10). But it has an even more important effect on visual results whenever you photograph scenes containing a number of items at various distances from the lens. Imagine for example that the shot consists of a head-and-shoulders portrait with a street background behind and some railings in front. If you focus the lens to give a sharp image of the face and take a photograph at widest aperture, both the street and railings will appear unsharp. But if you stop down to, say, f/16 (giving more exposure time to compensate for the dimmer image) you are likely to find that everything appears in focus from foreground through to background. This changing ‘zone’ of sharp focus, nearer and further than the object distance on which you actually focused, is known as depth of field.
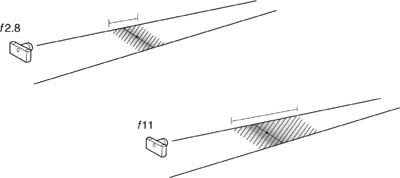
Figure 3.11 The practical effect of changing depth of field. The focus setting of the lens remained the same for both shots. (A slower shutter speed was needed for the right hand version to maintain correct exposure)
Depth of field is the distance between the nearest and furthest parts of a subject that can be imaged with acceptably sharp detail at one focus setting of the lens.
Widest aperture (smallest f-number) gives least depth of field, while smallest aperture (highest f-number) gives most. There are two other significant effects: (1) depth of field becomes less when you are shooting close-ups and greater when all your subject matter is further away; (2) the longer the focal length of your lens the less depth of field it gives, even with the same aperture and subject distance (Figures 3.13 and 5.2).
Practical significance
It is very important to be able to control depth of field and make it work for your pictures, not against them. By choosing shallow depth of field you can isolate one item from others at different distances. You can create emphasis, and ‘suggest’ surroundings without also showing them in such detail that they clutter and confuse. Such pictures are said to be ‘differentially focused’, Figure 3.12. But remember that minimizing depth of field with a wide aperture also means you must be really accurate with your focusing – there is much less latitude for error. You may also have exposure problems if you choose to shoot at wide aperture in bright lighting, or with fast film, or want to create blur effects by means of a slow shutter speed.
On the other hand, by choosing greatest possible depth of field your picture will contain maximum information. It can be argued that this is more like seeing the actual subject, because the viewer can decide what to concentrate on, rather than being dictated to by you. For most commercial and record photography, people expect photographs to show detail throughout. Just be careful that you notice (and avoid) any unwanted clutter in the foreground or background. Where possible, check the actual focused picture with the diaphragm aperture at the same diameter to be used for photography.
Sometimes you cannot produce sufficient depth of field by stopping down (perhaps lighting conditions are so dim or film so slow that an unacceptably long exposure is needed). In such cases take any step which makes the image smaller. Either move back, or use a shorter focal length lens or smaller-format camera. Later you will have to enlarge the image in printing, but you still gain on depth of field. See top left picture, Figure 5.2.

Figure 3.12 Shallow depth of field. Using a wide aperture (f/2) limits detail, concentrates interest on an element at one chosen distance – the pollen-covered flower tip
To understand why depth of field changes you need to remember how a lens critically focuses an image point at one distance only, depending on how far the lens is from the subject. In this position light from other parts of the subject nearer or farther from the lens comes to focus farther away or nearer, forming discs instead of points of light. They are known as circles of confusion. Large circles of confusion, overlapping (Figure 2.15) give the image an extremely unsharp appearance.

Figure 3.13 Depth of field at different apertures when a 50mm lens is focused for 7 metres (left) and for 1.5 metres (right). The symbol ∞ denotes infinity. Depth of field is greatly reduced with close subjects
Since your eyes have limited resolving power, when viewing a final print or slide you rate an image acceptably sharp even when tiny discs are present instead of dots. The upper limit to what most people accept as sharp is taken to be 0.25 mm diameter on the final print. (The same applies to the dot pitch on a computer screen.) Lens manufacturers for 35 mm format cameras assume that if 25 × 20 cm (10 × 8 in) enlargements are made (film image magnified × 8)to this standard then the largest acceptable circle of confusion on film is 0.25 ÷ 8 = 0.03 mm.
By accepting discs up to this size as sharp, subjects slightly nearer and farther away than the subject actually in focus start to look in focus too. And if the lens aperture is made smaller all the cones of light become narrower, so that images of subjects even nearer and farther are brought into the zone of acceptable sharp focus. Depth of field has increased.
Again if you move farther back from the subject or change to a shorter focal length lens, the positions of sharp focus for images of nearest and farthest subject parts bunch closer together. Their circles of confusion become smaller, again improving depth of field.
So remember that you produce greatest depth of field when:

Figure 3.14 Maximum depth of field. This scene has important elements at several different distances and was shot at f/16 to produce sharp detail throughout
• |
f-number is high (the lens is stopped down); |
• |
subject is distant; |
• |
focal length is short; |
• |
you can accept relatively large circles of confusion (big enlargements won’t be needed). |
With subjects beyond about ten focal lengths from the lens, depth of field extends farther behind the subject than towards the lens. Hence the photographer’s maxim ‘focus one-third in’, meaning focus on part of the scene one-third inside the depth of field required. With close-up work, however, depth of field extends more equally before and behind the focused subject distance.

Figure 3.15 Depth of field when standard focal length lenses for different formats are used at an identical aperture (f/4 here). All were focused for 7 metres. Larger format cameras produce less depth of field because they use longer focal length lenses
Using depth of field scales on lenses
You may find that your camera lens carries a depth of field scale, next to its scale of subject distances (Figure 3.16). The scale gives you a rough guide to the limits of depth of field and is useful if you are ‘zone focusing’ – presetting distance when there is no time to judge focus and depth of field visually. Scales also show how you can gain bonus depth of field in shooting distant scenes. For example, if it is focused on infinity (losing half your depth of field ‘over the horizon’), read off the nearest subject distance sharp. This is called the ‘hyperfocal distance’ for the f-number you are using. Change your focus to this setting and depth of field will extend from half the distance through to the horizon; see Figure 3.17.
Depth of field is also exploited in some cheap cameras with simple symbols for setting lens focus. Typically a silhouette of mountains sets the lens to its hyperfocal distance; a ‘group of people’ symbol means 3.5 metres; while a ‘single head’ is 2 metres. Provided the lens has a small working aperture, these zones overlap in depth of field. So users stand a good chance of getting in-focus pictures as long as they make the correct choice of symbol.

Figure 3.16 Using zone focusing. The lens above has a depth of field scale located between focusing and f-number scales. To zone focus, first visually focus the nearest object you want sharp (left) noting the marked distance. Then do the same for the most distant part (centre). Using the depth of field scale, set the lens for a distance which places both near and far parts within the zone of sharp focus at a small aperture. Here is needed (far right). Remember to set a slower shutter speed to maintain the same exposure
Remember that depth of field limits don’t occur as abruptly as the figures suggest – sharpness deteriorates gradually. Much depends too on what you regard as a permissible ‘circle of confusion’. If you intend to make big enlargements, your standard of sharpness on film must be higher, and this automatically means less depth of field. Even if your camera allows you to observe depth of field effects on a focusing screen (page 54) you should work well within the limits of what looks sharp, or you may be disappointed with the final print.

Figure 3.17 Using hyperfocal distance. For maximum depth of field with distant scenes, first set the lens to infinity. Note the nearest distance still within depth of field for the f-number you are using, here 10 metres (left). Then refocus the lens for this ‘hyperfocal’ distance (right). Depth of field will extend from half this distance to infinity

Figure 3.18 Depth of focus. Unlike depth of field this is concerned with focus accuracy between lens and image, e.g. in the camera or enlarger. The smaller the lens aperture and larger the maximun permissible circle of confusion (C), the greater the depth of focus. (Think of this focusing latitude as the distance you could freely move a ring along two cones positioned apex to apex)
When using a camera giving a large-format image you can anticipate less enlargement than, say, with a 35 mm camera. But although this makes a larger circle of confusion permissible, the long focal length lens needed by the large camera to include the same angle of view has a much stronger and opposite influence. In practice the smaller your camera the greater your depth of field. However you also have to bear in mind the effect of the grain pattern of the chemically recorded image when a smaller film is enlarged. The same applies to the number of pixels used by a digital camera. Since final sharpness in your photograph is influenced by these factors as well as depth of field, the small camera is deprived of some of its advantages. You will find more on camera comparisons in Chapter 4.
Depth of focus often gets confused with depth of field. But whereas depth of field is concerned with making light from different subject distances all come to focus at one lens setting, depth of focus refers to how much you can change the lens-to-image distance without the focused image of any one subject growing noticeably unsharp. It is therefore concerned with tolerance in the lens-to-sensitive material distance in your camera or enlarger, and accuracy in focusing.
As Figure 3.18 shows, the two ‘depths’ have certain features in common. Depth of focus increases with small aperture and large permissible circle of confusion. However, depth of focus becomes greater the closer your subject and the longer the focal length of the lens. (Both changes cause light to come to focus further from the lens, making the cones of light narrow.)
These reversed features mean that in practice:
Your lens is the most important part of the camera or enlarger. It is important to prevent damage to its glass surfaces. On a camera you can help to do this with some form of lens cap, or a clear glass UV filter (page 172). Avoid carrying a camera over your shoulder or in a bag containing other loose items without some lens protection. A small speck on the glass is relatively unimportant – it just minutely reduces illumination, but a greasy finger mark, scratches, or a layer of dust will scatter and diffuse light, so your images have less contrast and detail.
Loose dust and debris is best puffed away with a blower brush or gently guided to the rim of the lens. Grease or marks left by spots of rain may have to be removed with a soft tissue moistened in lens cleaning fluid. A scratched lens will probably have to be sent for repolishing.
Don’t become too obsessive about polishing lenses. You will do far more harm than good if you start to mark permanently the surface of the glass or top coating. Prevention is much better than cure.
Summary. Lenses: controlling the image
• |
Photographic lenses are assembled from multi-elements to help correct optical aberrations produced by single-elements. Glass surfaces are coated throughout to minimize reflections. Smallest and largest aperture settings are also restricted to help reduce aberration effects. |
• |
A typical ‘normal’ focal length lens for a camera has its focal length approximately the same as the diagonal of the picture format. It must also be designed to give an image of satisfactory quality over the whole of this area. The smaller the camera the shorter the focal length lens it uses. |
• |
The longer the lens focal length the greater the physical focusing movement needed to cover a range of subject distances. |
• |
An out-of-focus image of a point on the subject broadens into a ‘circle of confusion’. Provided this is relatively small (typically 0.25 mm or smaller on the final result) it will still look acceptably sharp. |
• |
Focusing (manual or by autofocusing mechanism) ranges from infinity setting down to a closest subject distance determined by whether the lens still maintains satisfactory image quality; and the accuracy of the camera’s viewfinder. |
• |
Relative apertures are given f-numbers. Each number is focal length divided by diameter of effective aperture, so the lowest f-number denotes widest aperture setting. Each f-number change either doubles or halves image brightness. Typically the scale runs f/2, 2.8, 4, 5.6, 8, 11, 16. |
• |
Depth of field is the zone between nearest and furthest subjects which are all acceptably in focus at one distance setting. |
• |
Depth of field is increased by ‘stopping down’. It is also greater when you focus distance subjects, use a lens of shorter focal length, or accept lower standards of what passes as sharpness. |
• |
When shooting three-dimensional scenes, control over depth of field allows you to either isolate and emphasize, or to give maximum information by resolving detail throughout. Preview the effect visually by checking the image itself, or use a depth of field scale if you are zone focusing. |
• |
As a guide, focus on an item one-third inside the total depth of field you need. For distant shots, focusing for the hyperfocal distance will give you depth of field from half this distance to infinity. |
• |
Small-format cameras give greater depth of field than large-format cameras, assuming normal lenses are used under the same conditions of distance and f-number. |
• |
Depth of focus is the amount that lens–image distance can vary before an originally sharply imaged part of the subject appears unsharp. It is greatest with close subjects and long focal length lenses. |
• |
Take care of your lenses by protecting them from scratches, finger marks and dust. Clean only when necessary. Learn to remove dust and slight marks safely, and leave the rest to experts. |
1 |
Visually check depth of field. Use a single-lens reflex camera fitted with a preview button (or work with a large format camera). Arrange a scene containing well-lit objects at, say, 1 m, 2 m and beyond 3 m. Focus for 2 m and view the result at widest aperture. Next set the lens to f/8, press the preview button if using an SLR, and ignoring the dimmer image see how nearest and farthest objects have improved in sharpness. Test again at f/16. Also compare the effects of focusing on closer or more distant groups of objects. |
2 |
Bright out-of-focus highlights spread into approximately circular discs of light because lens and diaphragm are nearly circular. Cut out a star or cross shape from black paper and hold it against the front of your SLR camera lens, set to widest aperture. View a subject full of sparkling highlights (such as crumpled foil) rendered out of focus, and see the change of appearance your shape gives. |
3 |
Using your camera on a tripod, compose a picture containing detailed objects over a wide range of distances, from about 0.5 m to the far horizon. Take a series of shots at (1) widest aperture and (2) smallest aperture, with the lens set for (a) infinity, (b) the hyperfocal distance for your aperture (read this off the depth of field scale), (c) a foreground object, (d) the same object as (c) but with the camera twice as far away and refocused. Compare results for depth of field changes. Remember to adjust exposure time for each change of aperture. |