Digital image manipulation
Computers have affected all our lives. For photographers they have opened up exciting new ways of ‘digitally processing’ images – retouching, manipulating and generally improving results, without need of chemicals or darkroom facilities. Linked to a desktop scanner and an ink-jet printer, a home computer now allows you to make excellent colour or black and white prints from any of your camera-shot material. Images can also be sent out in disk form or within pages on the Internet.
This chapter gives you a flavour of digital post-shooting techniques from a practical point of view. It is based on the use of a PC, for although many colleges and design studios use Apple Mac computers the same software and procedures increasingly apply. The huge numbers of home PCs also means that you are more likely to be able to do digital work at home. Time spent on regular practice is of great importance in the early stages of learning.
When digital manipulation programs first became available to photographers in the 1990s, endless arguments began over whether this is electronic ‘cheating’ rather than ‘true’ photography. Such ethical issues are discussed later, on page 290. Leaving these aside for the moment you should get first hand experience of the new techniques yourself, not shy away from them. Undoubtedly, creativity and imagination are what count most in photography but it would be foolish not to explore the potential of the latest tools now available to you.
Digital manipulation allows you to do conventional photographic tasks like shading, spotting, printing-in or adjusting contrast and colour in a quicker and more direct way than in the darkroom. Results can be seen at once on your computer monitor screen and any mistakes corrected without having to go as far as having to make a print. Additionally you can alter depth of field; add movement blur; realistically merge several images into one another; and cover over a defect or unwanted element by cloning from detail nearby. Changes like these are impossible, or at least very laborious, to achieve by darkroom techniques. The computer allows you to alter an image in several directions at once yet never lose the original, which remains intact in case of accidents or changes of requirements. And finally you can transmit thumbnail versions of your picture to anywhere in the world for instant approval.
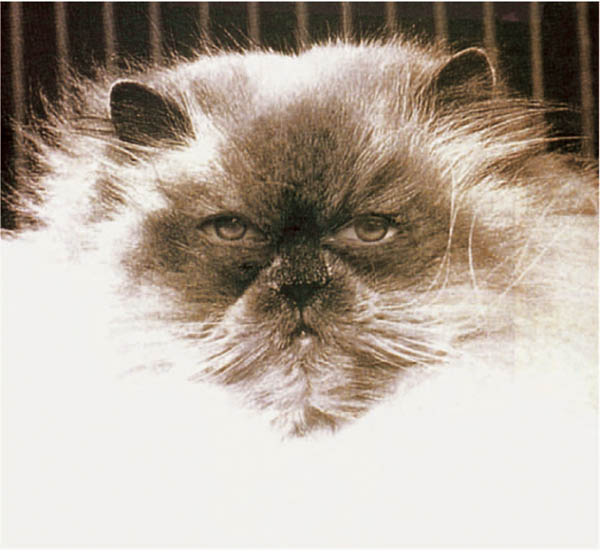
Figure 14.1 ‘Cat’s Eyes’ by Nicky Coutts. A strong example of digital manipulation to relate human/creature attributes. This is one of a series in which the photographer subtly transferred human eyes to animals and birds. All have a sense of the uncanny, making the point that we don’t allow creatures to self-reflect, rather we reflect upon them
On the other hand probably more over-blown photographs have been produced digitally than by any other means. Ability to just select from menus containing dozens of digital ‘effects’ in a mindless way encourages shallow, gimmicky pictures. Unimaginative photographers press buttons and are delighted with their garish results. Such work discourages creative people (many of whom have been put off anyway by having to learn computer skills).

Figure 14.2 Layout of a digital workroom for the manipulation and production of monochrome and colour prints up to A4 size. C: computer tower with entry for CD, floppy-disk and hard disk drives. F: film scanner for 35 mm negatives and slides. S: flat-bed scanner accepting paper prints, also used for photogram making. P: ink-jet colour printer. R: CD-ROMs relating to various image manipulation software programs. The computer is controlled mainly via the mouse or the graphics palette shown next to the 19 inch high-resolution monitor. Compare with Figure 12.1
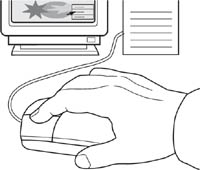
Figure 14.3 Mouse. Shifting the whole mouse moves the cursor (arrow here) anywhere on screen. Single or double clicking a button calls up whatever tool, command bar icon, etc., the cursor has been positioned over. See Figure 14.11
Two important features of digitalized image manipulation need to be recognized:
1 |
It takes time, patience and a good memory to master computer controls and (particularly) to use the right chain of commands demanded by the software program you have installed. Computers are basically idiot machines; software programs adopt a curious logic of their own; and most of the jargon is in language very different to terms long used in photography. |
2 |
Severely limit your use of the special effects command. Like fisheye lenses or effects filters, results may look good at first but quickly become repetitive and boring. Digital manipulation is arguably at its best when used imperceptibly – to remove a road sign or parked car in an architectural shot for example, or lighten or darken areas of a print too complex to shade or burn-in successfully in the darkroom. Remember too that used skillfully it can help to communicate a strong visual idea (Figures 14.1 and 14.41) for even though manipulation is apparent, it greatly strengthens meaning. |
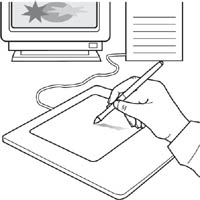
Figure 14.4 Graphics palette. Together with its cordless pen this serves the same functions as the mouse. It makes it easier to trace around a complicated shape, draw freehand or sign your name. A small switch on the pen provides the equivalents of mouse click
The computer itself
As shown in Figure 14.2, the computer itself is the centre of the digital system. Some are tower shape, others flatter desktop units which fit under the monitor. A good size mini-tower has the most room and easiest access for expansion if you plan future upgrading – extra drives or memory for example. Key components housed within the tower include the following:
• |
Hard disk. This acts like an electronic filing cabinet, storing the computer operating programs such as Windows and Photoshop you initially load in, plus all the files of pictures you choose to save. The capacity of the hard disk is measured in gigabytes (GB); 4 GB is just adequate but something over 17 GB will allow you to store hundreds of pictures. |
• |
Processor. Next the computer’s brain, known as the central processing unit or CPU (containing ‘Intel Pentium’ technology, for example) which determines how fast digital information is transferred. Aim for 350 megahertz (MHz) here. Too slow a processor means you frequently wait minutes for tools to transform large images. |
• |
Memory. Another important internal component, random access memory (RAM) determines the working area of the computer. The more RAM the more information can be transferred. RAM is measured in megabytes (MB). 64 MB is adequate but aim for 128 MB or more to work with image files. |
• |
Graphics card. This circuit board ensures a high quality monitor screen image. As a minimum go for an 8 MB card. |
• |
Drives. Unlike all the above, these units provide entry slots for discs on the front face of the computer. Typically one accepts CD-ROMs (Compact Disc Read-Only Memory). Manipulation and many other programs are supplied in CD-ROM form. Other compact discs include Photo-CDs carrying film images which may be scanned in cheaply by your processing lab. A Zip drive for high capacity removable hard disks is usefully built-in. This will allow you to send digital files to a custom lab to have large prints made, provided they are of sufficient resolution (Figure 6.6). Some computers offer a drive for older floppy disks, only suitable for small files. |
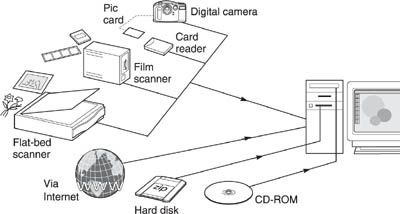
Figure 14.5 The main ways an mage in digital form can be downloaded into the computer. It is then displayed on the monitor and can be saved as a named file on the computer’s internal hard disk
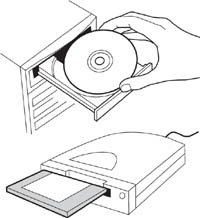
Figure 14.6 Top: Inserting a Photo- CD, e.g. made from your film by the processing lab. Below: images on a Zip hard disk load into a separate drive unit which is wired to the computer, or often built into the tower.
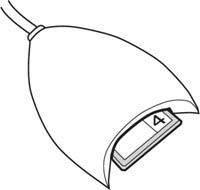
Figure 14.7 An adapter to read CompactFlash camera cards into the computer
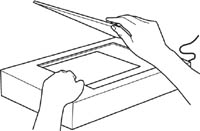
Figure 14.8 Positioning a monochrome or colour print face down on the glass of a flat-bed scanner
Most of the above components can be individually upgraded later (or added if not originally fitted) provided the tower has enough room. Monitor, scanners, printer and any other peripherals plug into panels at the back.
Peripherals
Monitor. Since you will spend hours looking at this screen it should be a high resolution type, at least 15 inches diagonal (which gives an A4 viewing area). A 17 or 19 inch monitor is ideal. Whatever its size the display needs a resolution of 1024 × 768 pixels and 24 bit colour depth.
Mouse, keyboard and palette. These allow you to physically communicate with your computer. Unlike word processing, the keyboard is little used in digital image work. Its main function is to title your saved pictures. One or two keys are also used in conjunction with tools such as cloning (page 275) or to provide short cut alternatives to much-used controls. Mostly you will be working with a mouse and/or a graphics palette and pen, page 268. Both steer movement of the cursor anywhere on screen. Pen and mouse carry buttons you click to select tools or cue a command pointed to by the cursor. Keeping a button held down while on the move enables these devices to drag sliders, and reposition fly-outs or the picture itself on the monitor’s screen.
Flat-bed scanner. A glass-top box containing a tracking light source and scan bar, this is able to convert monochrome and colour prints up to A4 (some up to A3) into digital images which feed into the computer. Resolution needs to be at least 1200 × 600 pixels. The scanner will also allow you to make photograms, page 284. Some flat-beds also scan film images but don’t really have sufficient resolution for such small originals, which need a film scanner instead.
Film scanner. Produces a relatively high resolution scan (typically 2700 dpi, giving over 8 million pixels from a 35mm slide and negative). Film scanners made for rollfilm or sheet film originals are much more expensive. Unless you regularly shoot using these medium or large formats it is cheaper to use a lab to scan them onto a Zip disk or CD.
Card reader. A digital camera when attached by cable to the computer (Figure 14.5) will download the pictures it has taken. However, removing its memory card and inserting this into a card reader instead gives a much speedier transfer, and frees the camera for use elsewhere.
Modem. Millions of low resolution Internet images can be accessed on screen by surfing around on the World Wide Web; see page 301. You can also transmit your own work. For this a modem unit is necessary to convert analogue images (which telephone lines need) into a digital form acceptable to the computer.
Printer. To print out your final image as ‘hard copy’ on paper calls for a printer using ink-jet, dye-sublimation or laser technology. Of these an ink-jet unit (using five or six ink colours, plus black) is the cheapest way to make high quality prints. But make sure it will print out at least 300 dots per inch in preferably 30 bit depth colour. The size of the image file you feed it with from the computer must also be sufficient for your intended print size; see Figures 14.10 and 6.6. Start by printing onto a ‘photo-quality’ paper the same brand as the printer and inks. Later it is worth exploring the huge range of different surfaced papers now produced for ink-jet printers by manufacturers of photographic bromide paper.
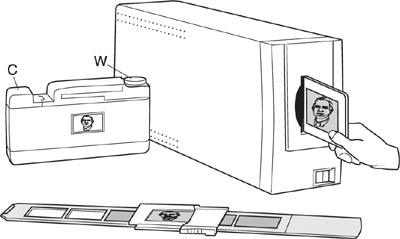
Figure 14.9 Film scanner. This accepts 35 mm slides or negatives in glassless mounts or uncut strips (foreground unit). APS films must first be inserted into an adapter (left) where C houses and opens the cartridge and W allows you to wind film through until the chosen frame appears in the Window
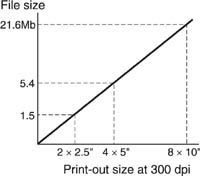
Figure 14.10 The minimum image file needed to give 24 bit ‘photo quality’ ink-jet prints of various Sizes
When you buy any software program it normally comes as a CD which you insert into the computer and download onto your hard disk. Once installed the CD can be removed and you call up your program internally as and when required, plus the picture you want to work on. The hard disk has ample capacity to hold several different programs and you can transfer your picture from one to another if you want to work on it for a while with a particular tool.
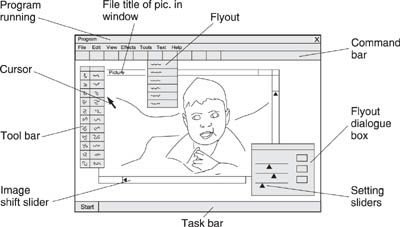
Figure 14.11 The geography of a typical monitor display when using image manipulation software. A single or double click when the cursor is on a tool symbol (see page 274) or command bar text often produces a fly-out where you must use the cursor to click on further choices or move sliders to alter contrast, colour, magnification, etc. Any dialogue box or tool bar which blocks part of your image can be repositioned by clicking onto its top strip, keeping the mouse button depressed and dragging to some other part of the screen
A wide range of photo-manipulation (also known as image-editing) software is available. Some are all-embracing, other smaller programs act as ‘plug-ins’ to their bigger brothers and contain for example special effects or wide ranging ways of incorporating photographs with graphics into show-cards, posters, etc.
The industry standard software for professional manipulation of photographs is ‘Photoshop’. This program is expensive but extremely comprehensive. It offers an enormous menu of image changes, with many adjustment options for each one. Consequently there are longer chains of commands than any other program. This makes Photoshop less accessible and user-friendly for beginners than more limited software, such as PhotoDeluxe or PhotoSuite. If you have no experience of digital image manipulation it is much easier to start with one of these entry-level programs. They are also relatively cheap. The image changes they offer are those most frequently needed, each one being tagged with on-screen advice covering what to do next; see Figure 14.16. Later, when you are practised and confident in using a basic program you can upgrade to Photoshop or other advanced software, working with their extra features and chains of command without confusion and frustration.
The bulky manuals supplied with manipulation software are often too comprehensive. Time is wasted trying to find simple, direct routes from what you presently have on screen to what you want to produce. The best solution (particularly if you don’t often work digitally) is to compile your own notes covering the most useful changes and just listing the precise sequence of commands needed to achieve them. See page 280, for example. The picture manipulations shown later here have all been made using PhotoSuite II or Photoshop 5. Updated editions of these programs are brought out regularly and so details shown may differ slightly from what is now current, but still give you a flavour of what is possible.
What you see on screen
Each software program differs somewhat in the layout it presents to you on screen, see page 271. Figure 14.11 shows the most common features you see once you have brought up your program, then opened or scanned-in the picture to be manipulated. In the very top left corner for example there appears the name of the software program you are running. In the far top right is an × in a box – you position the cursor and click onto this when you want to close the program again.
The command bar carries options including File; Edit; Filter; and Help. Cursor placing and clicking on any of these produces a ‘fly-out’, listing further options under that heading. In the case of File the fly-out lists Open; Save As; etc. Then clicking on Open presents the listed titles of all the pictures saved onto your hard disk. A further click on the image you want makes it appear on screen, within the window area. Its title appears top left, and another × box top right allows you to return the picture back to file when you have finished with it.
Manipulating tools can be clicked on from the vertical toolbar on the left (many of these release a further sub-range of symbols, discussed on page 275). The tool shown with a magnifying glass symbol allows you to enlarge the image, continuously or in steps. By cursor clicking onto and moving horizontal or vertical sliders along two sides of the enlarged picture you scroll it up-and-down or sideways to centre the bit you want to work on. Some commands or tools make a ‘dialogue box’ fly-out. Here you have to set choices – such as moving a Brightness slider with the cursor (Figure 14.14) to lighten or darken the image. This has an effect equivalent to giving more or less exposure in the darkroom.
How programs differ
The monitor screens opposite show a picture file opened in three different software programs. In the top one (Photoshop 5) the word ‘Window’ has been clicked in the top command bar. It produced the flyout allowing you to bring various dialogue boxes on screen. In this instance Navigator was chosen and appears top right. The box features a slider you drag with the cursor as a further way to enlarge the picture in the image window of the monitor. Its effect is like raising an (autofocusing) enlarger in the darkroom.
A thumbnail version of the whole picture also appears in the dialogue box, framed in a red rectangle. As the main picture is made bigger the rectangle gets smaller. Dragging the rectangle to cover a different part of the thumbnail causes the enlarged contents of the image window to shift in tandem. So this is the equivalent of moving the easel around under the enlarger.
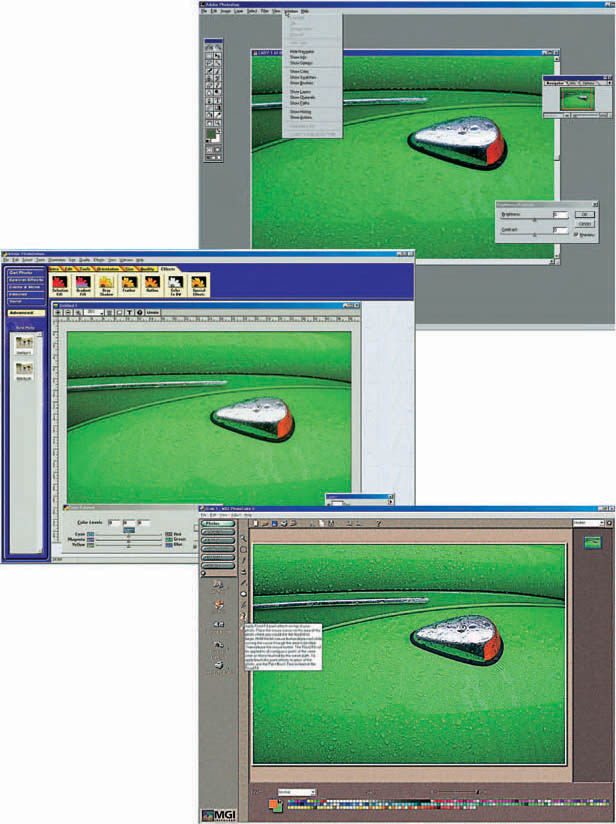
Figure 14.12 The monitor screen appearance when running different software programs. Top: Photoshop, the industry standard, offering hundreds of image adjustments but because of its vast array of choices is not very friendly for the beginner. Centre: PhotoDeLuxe and (bottom) PhotoSuite II. This type of lower cost program offers most of the key controls, page 275, although with fewer fine-tuning options. Written fly-outs guide you in what a selected tool will do. (From time to time software programs bring out new editions with changed layouts. These three were current in 1999)
At bottom right a previously selected fly-out (accessed by clicking in turn on Image>Adjust>Brightness>Contrast) contains two sliders. One produces the effect of giving less or more exposure, the other changes image contrast as if you were dialling in different VC bromide paper filtration. Unlike darkroom work though, the computer monitor instantly shows you the image’s changed appearance. When you judge that results are about right clicking an ‘OK’ or ‘Apply’ tab sets the image in its new form.
The centre and bottom screens in Figure 14.12 show how two entrylevel programs present the image. The centre one, PhotoDeluxe, has tabs with drawings illustrating the kind of changes on offer in Special Effects. Clicking on any of these produces a fly-out dialogue box ready for you to set the finer details of your chosen effect. PhotoSuite II, the third example in Figure 14.12, displays an explanatory panel of text when you position the cursor over any of the tools and before you click to select them.
All programs offer ‘undo’, typically accessed Edit>Undo, to take changes back a step if you are dissatisfied with what you have just done. They all offer a ‘Help’ command too, see Figure 14.33. It delivers you a fly-out index leading to a panel of words and drawings explaining how to get to whatever you are trying to achieve.
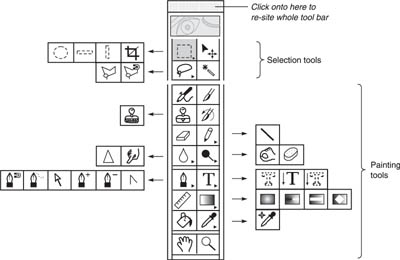
Figure 14.13 Part of the tool bar used in Photoshop 5. ‘Selection’ tools allow you to pre-select the picture area you intend to manipulate or crop. These and several of the ‘painting’ tools produce fly-outs from which you must make sub-choices
At first sight a tool bar like Figure 14.13 is a bit intimidating, particularly when tool symbols shoot out a row of fly-out options when you first click onto them. But given time and practice you will grow familiar with what each of them means. Some you will never use, others are key controls needed for almost every picture. Many of the symbols are easy for a photographer to recognize – the dodger for example and the hand symbol, shaped to burn in, see Figure 13.7. The eraser, and the set-squares for cropping your picture are self-explanatory too.
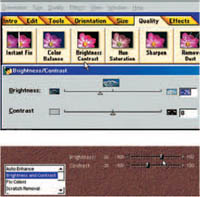
Figure 14.14 Image brightness and contrast controls, as presented on dialogue boxes in (top) PhotoDeLuxe and (bottom) PhotoSuite II
A good way to start learning digital image manipulation on your own is to pick a few key controls and then experiment with them one at a time. If you have a bad memory make notes stringing together the precise sequence of commands, tools and dialogue box settings you must click onto to achieve a particular image change. (The trouble with computer work is that omitting just one command will stop progress and usually there is nothing to tell you why.)
The next section of this chapter discusses the practical uses of a selection of key controls, particularly those which give results similar to or better than what is achievable using darkroom techniques on silver halide materials.
Key controls
Brightness/contrast. This is the most basic image adjustment device and the one you are likely to use more than others. Bear in mind though that, just like printing in the darkroom, limits to improvements lie in the quality of your original camera image. Neither control will conjure up shadow detail lost because of gross underexposure, for example. But almost every picture will benefit from some overall density and contrast adjustment owing to subject lighting conditions, minor exposure errors, or the need to help along the mood of your shot. Again, if the image as it appears on your computer monitor is not quite matched to the printer it may be necessary to have the picture darker or lighter on screen in anticipation of changes when it comes out on paper.
Instead of darkening or lightening overall you can click on a burn or dodge tool, spray can or brush, which then becomes the cursor, and apply changes locally. A fly-out or similar dialogue box shows you various ‘brush sizes’ which apply to all these tools. They range from a tiny spot (good for small well-defined parts of the picture) to large softedged brushes better for working in patches. If, however, you have a large area to change, such as sky, these tools will have an uneven effect. It is better to first encircle the sky area using a selection tool like Photoshop’s ‘Lasso’. Set the tool to a feathered edge – the equivalent of keeping your hand on the move when shading under the enlarger. Then when you use the brightness/contrast sliders only the sky will change; see Figure 14.17.
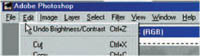
Figure 14.15 Clicking on Undo, accessed by first clicking Edit, removes the last change you made to your image. Undo is vital if you make a mistake
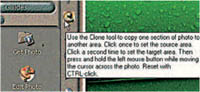
Figure 14.16 The fly-out guidance i formation which appears whenthe Clone symbol is selected from the tool bar in PhotoSuite II
Undo. You will use this almost as much as brightness/contrast, especially when you begin. Some programs only allow you to undo the last action you have undertaken – for example encircling sky would be one step, darkening it another. The best programs allow you to step back many stages, important if you have to ‘unravel’ a string of badly judged manipulations and start again (but not from the beginning).
Clone. This impressive tool is unmatched by darkroom techniques. The cloning (or in Photoshop the ‘Rubber Stamp’) tool works by copying pixels from one part of your image to another. So if, say, you want to remove an aircraft vapour trail across blue sky in a landscape you can work as follows: (1) Enlarge up the image until only the white trail fills the screen. (2) Select clone tool and set a suitable ‘brush size’, i.e. just wider than the trail blemish. (3) With the help of the keyboard, see below, select and click onto somewhere in the sky nearby. This becomes your source or ‘pick up’ area. (4) Next reposition the cursor in the white vapour trail. Then, keeping the mouse button held down, you brush the cursor over the trail and watch the white become blue sky.
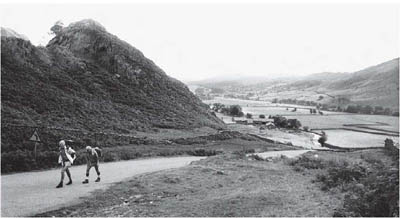
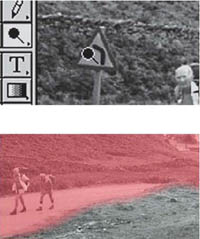
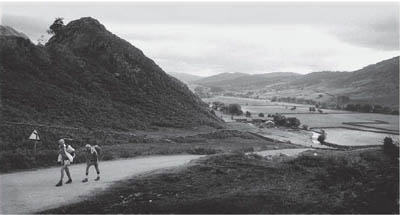
Figure 14.17 Top right: Straight print from a monochrome film negative. Below, top: dodger tool in use to lighten the road sign. Below, lower: detail of featheredged mask applied before darkening the whole of the foreground. Bottom right: final ink-jet print after digital correction of selected areas is completed
Cloning is an instance where you have to use your keyboard as well. To change and pick up pixels from some other part of the image you must hold down the Ctrl key (Alt in Photoshop) while you click on a new source area. This tool is remarkable for making parked cars vanish by cloning from another bit of road and pavement. Similarly road signs, litter, and even people (Figure 14.20) can be replaced by cloned surroundings. Most often however cloning is used as a fast, simple way to eliminate spots and similar defects whatever their tone or colour. See also page 298.
Rotate, crop. Image rotation (Rotate and crop>Rotate symbol in PhotoSuite; Image>Rotate Canvas in Photoshop) allows you to correct a slightly tilted shot such as a landscape with the horizon running down hill. Most often though it is just needed when an upright negative or print scanned in horizontally has to be turned 90° in the monitor window. Selecting the Cropping tool frames your picture with a broken line. ‘Handles’ on each of the corners and sides of the frame can be clicked on with the cursor and dragged inwards or outwards to re-frame your shot. Pressing a Crop button (Image>Crop in Photoshop) the computer then only displays your cropped result. If possible crop your picture before starting any retouching, otherwise you may waste time working on areas which are later removed.
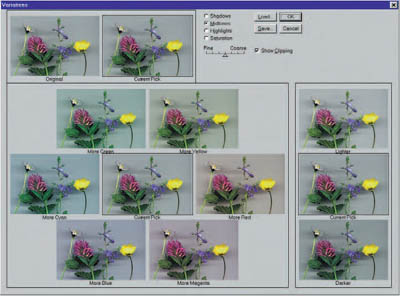
Figure 14.18 The Photoshop command Variations (accessed via Image>Adjust) presents your picture in a range of different colour balances. This is like making a whole series of tests before colour printing in the darkroom
Colour balance. This is important to help to correct shots taken in lighting of the wrong colour temperature, page 164. Some programs offer you a ring-around like Figure 14.18 (accessed in Photoshop via Image>Adjust>Variations). A display of thumbnails then previews how your shot will look if given different colour adjustments and you click onto the one giving the most accurate looking result. For further finetuning it is possible to change mostly highlights, or mid-tones, or shadows. All programs also offer fly-outs with sliders allowing you to adjust colour balance by separately increasing/decreasing the amounts of red, green and blue present, see Figure 14.12 centre. Incidentally a colour shot can be converted to monochrome (‘grey-scale’ in computer language) by using a sequence such as Effects>Colour to B/W in PhotoDeluxe, or Image>Adjust>Mode>Greyscale in Photoshop. The Digital Notebook entries on page 321 list paths to achieve other useful image changes.
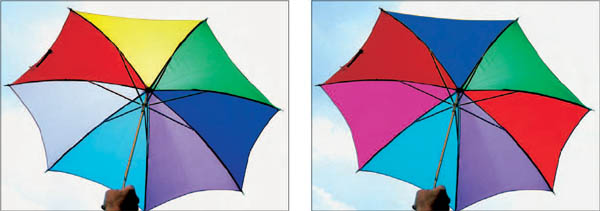
Figure 14.19 Below, left: straight ink-jet print from an original colour slide. Below, right: print from a PhotoSuite manipulated version. Segments selected to be changed in colour were traced over by hand, then ‘flood filled’ with a colour chosen from the program’s palette
Modifying chosen areas
The sequence, Figure 14.17, shows how the computer lets you dodge and burn-in one part of a picture after another. (Photoshop can display a temporary pink tint to show you the areas you have protected from change in the next brighten or darken step.)
In Figure 14.19 PhotoSuite’s ‘flood fill’ tool was used to realistically change the colours of selected segments of an umbrella. In each instance the new colour was picked out from a palette displayed under the picture (Figure 14.12 bottom) when the commands Edit Photos> Flood fill>Colorize were given.
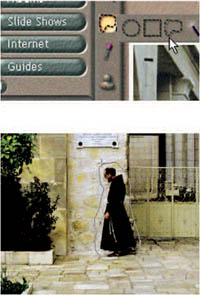
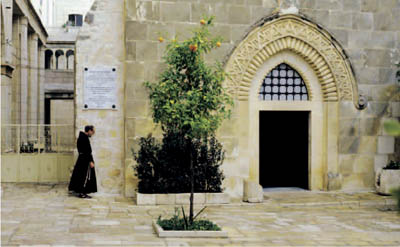
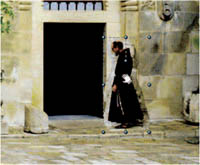
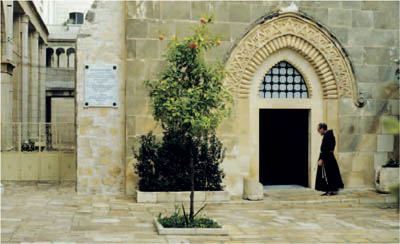
Figure 14.20 Moving the monk. Right: the original shot as scanned in. In PhotoSuite the image was reversed left to right, then the freehand selection tool used to roughly outline the figure on screen. This area was copied to the program’s ‘clipboard’, the remaining file closed, then reopened again from the original scan (right way round). The monk image retrieved from the clipboard was superimposed at the doorway. The eraser tool used close around the figure in its new location next restored bits of doorframe and stonework covered by the rough-cut. Finally, right, the original monk still present under the wall plaque, was covered over completely by cloning from adjacent stonework and paving
Resiting elements
Digitally moving elements in a picture to new positions allows you to re-compose shots after they were taken. First you must select and ‘copy’ (effectively cut out) the item to be moved, and ‘paste’ it over the picture in the new place you have chosen. Finally where the moved item was originally positioned must be filled over convincingly using bits cloned from background nearby.
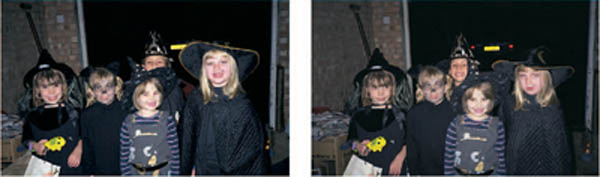
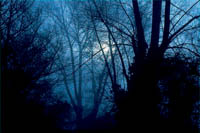
Figure 14.21 Halloween group. Above: three component images for montaging. In the two pictures shot in a garage faces have mixed expressions or are partly obscured. A slide of a woodland scene was chosen as background component
There are various routines for doing this resiting. In Figure 14.20 the figure of the monk was roughly shaped out and temporarily saved in PhotoSuite’s ‘clipboard’ memory by clicking a symbol on the command bar. A clipboard stored image can be brought back, altered in size, moved to anywhere and finally pasted permanently in position by mouse click. (In fact half a dozen monks in different sizes could have been brought back this way and scattered throughout the scene.) Figure 14.20 only required the use of clone, erase, and selection tools.

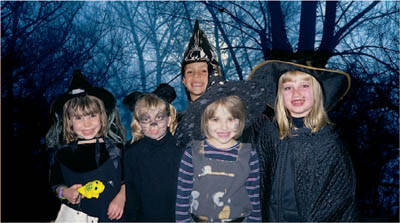
Figure 14.22 Above: two children from the centre section of one group were copied, this bit of image being slid over their faces in the other group, cleaned up all round by eraser and the whole file closed. The tree shot was next scanned in, and the manipulated group file re-opened and superimposed. Finally the garage background was erased completely from around the children to give the result right
Montaging several shots
Montaging different pictures together takes repositioning a stage further. Take care though that the various component images relate realistically in the quality, contrast and the direction of their lighting, as well as perspective. Montaging is particularly useful when you have photographed a group only to discover that different people have eyes shut, look glum, etc., in every shot. Figure 14.21 for example shows two groups shot flash-on-camera and containing a mixture of expressions plus an obscured face. Using PhotoSuite, two central children were rough cut from the right hand version and stored on clipboard. Closing the file of this group and opening the file of the group on the left instead, the two children were next retrieved from the clipboard, pasted over the centre of the group and cleaned up around their outline with the eraser.
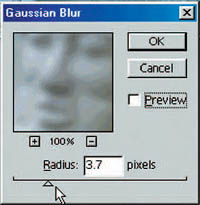
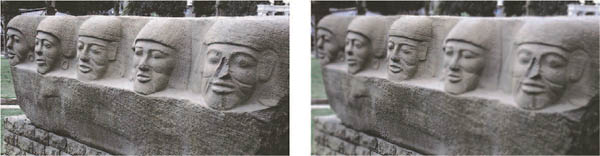
Figure 14.23 Photoshop’s ‘Gaussian Blur’ (via Filter>Blur) used to reduce depth of field in an image originally sharp throughout
The composite group image file was then closed, a background tree image opened and the composite group re-opened on top. Erasing carefully around the circumference of the grouped children removed the garage and revealed the spooky trees image lying underneath. There are several other digital routines for assembling montages – using ‘layers’ in Photoshop for instance. All of them call for the time and patience to carefully trace subject outlines, although being able to greatly enlarge your picture on screen makes this task easier.
Reducing depth of field, adding blur
Starting off with a picture which is sharp throughout, it is possible to reduce depth of field by digital means. First you draw around the areas you pick for de-focusing (in Figure 14.23 each end of the row of stone faces). Clicking Filter>Blur>Gaussian blur produces a dialogue box for setting and previewing the strength of the effect. To simulate depth of field it should be applied progressively, giving several treatments to the areas of the subject which were nearest and furthest from the camera.
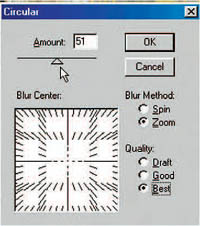
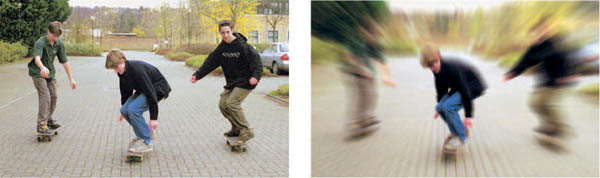
Figure 14.24 ‘Blur’ (zoom) control turns this original static image into an action shot
In Figure 14.24 Photoshop (Filter>Blur>Motion>Circular) allows you a post-shooting effect like zooming the camera lens during exposure. Compare this with Figure 5.15. Unlike camera work you can set any centre point for your zoom by dragging the graphic pattern in the dialogue box. A variation, ‘spin’ is easy to apply selectively to the wheels of cars that were in fact stationary. Alternatively spin or zoom a background scene alone, and paste a sharply defined product into the foreground.
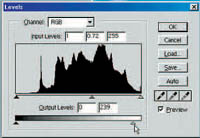
Figure 14.25 Above: Photoshop ‘levels’ dialogue box (Image>Adjust>Levels) gives a histogram of the picture right. Expanding or contracting this alters contrast
Controlling with ‘levels’ and ‘curves’
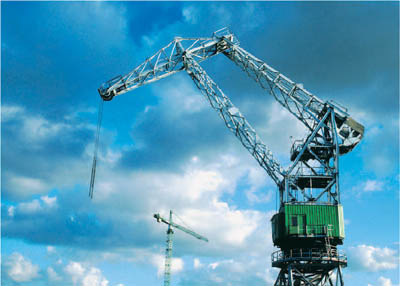
Both these are more technical options for controlling image appearance, provided by Photoshop. Choosing Image>Adjust>Levels makes a dialogue box appear containing a histogram – a graph plotting the number of pixels present in your image for every brightness level, from darkest shadow to brightest highlight. In the histogram of the crane (Figure 14.25) for example, there are least dark pixels because it contains few shadows; lighter mid-tones dominate.
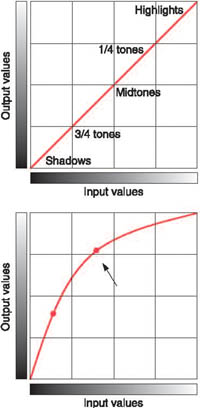
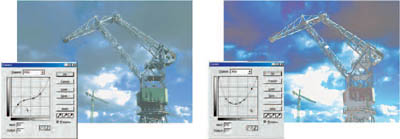
Figure 14.26 Photoshop ‘curves’. Top graph: 45° line means the image remains unaltered. But the cursor can nudge the line into various distorted shapes, giving image changes as shown right
An experienced look at a picture’s histogram tells you whether it was correctly scanned-in or downloaded. Moving sliders in the histogram’s dialogue box reduce or expand overall image contrast, and by moving the middle arrow of the top slider you can change the mid-tones without affecting either shadow or highlight areas.
Curves on the other hand present what amounts to an image control panel in the form of a graph, see Figure 14.26 (top). Input tone values are shown along the horizontal axis and output values along a vertical axis. As it is first displayed the graph carries a straight 45° line, meaning that no manipulation is taking place. But you can use the computer cursor to click onto any part of the line and drag it into almost any shape, the image alongside altering its appearance as you do so. For example, by dragging it in two places into an upward curve, see left, the picture is given steeper contrast in shadows, flattened out tones between mid-tones and highlights. When pulled into the curve shape below left, the mid-tones appear flattened, highlight and shadow areas remain contrasty.
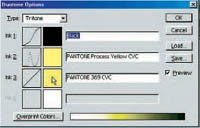
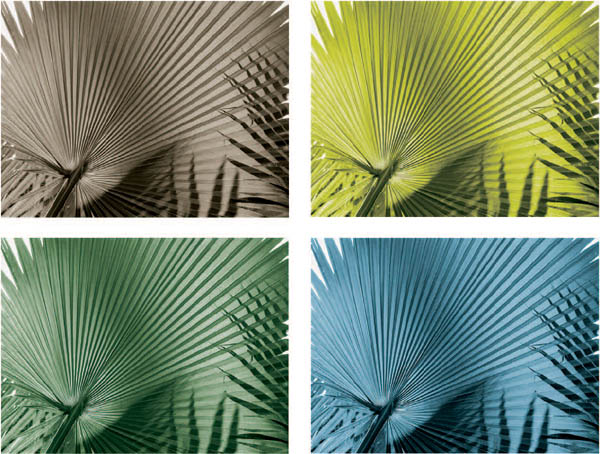
Figure 14.27 Below: Duotone and tritone versions of the monochrome picture on page 131. Your choice of hue and weight of colour in addition to black is set via the Photoshop dialogue box above
A more extreme distortion, bottom right, turns everything between mid-tones and deep shadow into negative form. And by keeping the line straight but re-angling it 45° from top left to bottom right gives you a full tone range colour negative. If you are a photographer familiar with reading a characteristic curve, page 315, making smooth changes this way is not difficult to pick up.
Working in monochrome and duotone
Although computer hardware and programs are predominantly geared to colour images they are also well suited to black and white work. You can utilize most digital manipulations and produce monochrome pictures with a rich tone range from any good quality ink-jet printer. (Set this to print out using all its five or more inks, not just black alone.)
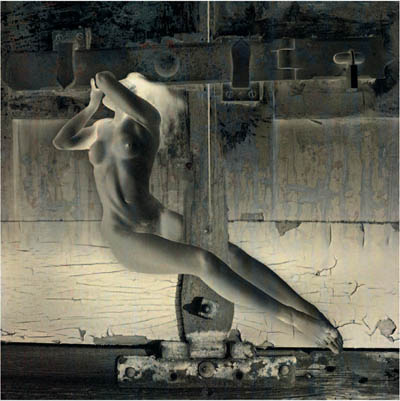
Figure 14.28 ‘Trapped’ by Catherine McIntyre. An imaginative computer-constructed collage, of positive and negative elements, plus gentle use of duotone colour
Your original shot does not have to be on black and white film – a colour negative or slide image is also suitable. Working from colour film, first remove all its original colour information by selecting the entire image and then clicking on Touch up>Fix colours (PhotoSuite II) or Advanced>Effects>Colour to B/W (PhotoDeLuxe) or Image> Adjust>Mode>Grey scale (in Photoshop). Monochrome images can of course be montaged in with other, full colour elements; see page 285.
Some programs allow you to mix a colour into your black and white image – either to achieve results resembling a chemically toned bromide print, page 259, or achieve a ‘duotone’ effect. The Photoshop ‘Duotone Options’ dialogue box allows you to program up to four different inks, including black. Each ink has a curve box to adjust what tones its colour will affect. For example, in the top box black is best left least changed from 45° to ensure that your image has a basic structure and shadows have sufficient ‘body’. Clicking on Ink 2 makes a palette of ink colours appear, from which to make your pick. Pull this ink’s curve around until it differs in shape or position to the black ink and is generally less strong. Most results are best left here in duotone, but you can add shades of further colours with increasingly outlandish results. Of the four examples at the foot of page 282, both top left and bottom right versions are duotones; the other two tritones. Muted colours work best, and it is important not to let any colour overweigh your picture’s black content.
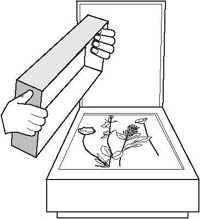
Figure 14.29 Making a digital photogram with a flat-bed scanner. Above: for 3D objects such as these flowers a white lined cardboard box is substituted for the regular lid. Because of light fall-off and a depth of field of only about 2 cm this results in a mid-grey, unsharp background (right)

Digital photograms
Digital equipment offers an interesting range of opportunities for making pictures without the use of a camera. A 35 mm film scanner will accept tiny flat objects sandwiched between glass in a transparency mount. Flower petals, translucent woven fabric, grass seeds can all be scanned directly to digital files this way; similarly slides or negatives sandwiched together in the same mount to form composite images. Better still use a flatbed scanner with the lid removed. This is much more versatile owing to its large A4 pattern and the freedom with which you can lay out items on top.
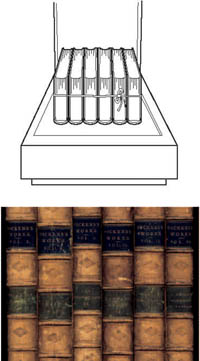
Figure 14.30 Photogramming the spines of old books for the pictures opposite. Scanning took place with the lid open in a darkened room to create a black background. Avoid putting too much weight on the glass
Photogramming allows you to generate and file a range of images for further use as backgrounds. Textured paper, sacking, books, knitting, ferns, timber, etc., can provide you with a small library of image files. Use them montaged in behind camera-shot subjects totally different in scale – human figures, commercial products, landscapes. Figures 14.32 and 14.40 are both examples where out-of-scale combinations have been brought together.
Inevitably you have to work within the limitations of flatbed technology. Lighting for example is flat and frontal, although this can be modified somewhat using mirrors at the side or allowing your subjects to cast shadows upwards onto a surface held a few inches above (Figure 14.29). Depth of field is quite shallow too and cannot be altered. It extends for little more than half an inch above the glass top surface. ‘Deep’ three-dimensional subjects fade away into soft focus and darkness, but this feature can sometimes be used for dramatic effect. Similarly, lightweight items stiffened with wire will vary in sharpness when set up horizontally at different distances above the glass. Always avoid shiny objects such as polished metal in photograms – contrast will be beyond the range of the system.
Remember of course that your picture is scanned in from beneath the glass so everything must be laid out upside down. Only a test scan will show you on the monitor how things will look and what adjustments of positioning are necessary. Another factor is that a flatbed slowly scans what lies on it, taking many seconds to travel from one end of the glass to the other. This means that everything should lie still, but on the other hand dragging, shaking or lifting an object off the glass during the scanning period is also worth exploring. Results vary according to how drag direction relates to the direction of the scan.
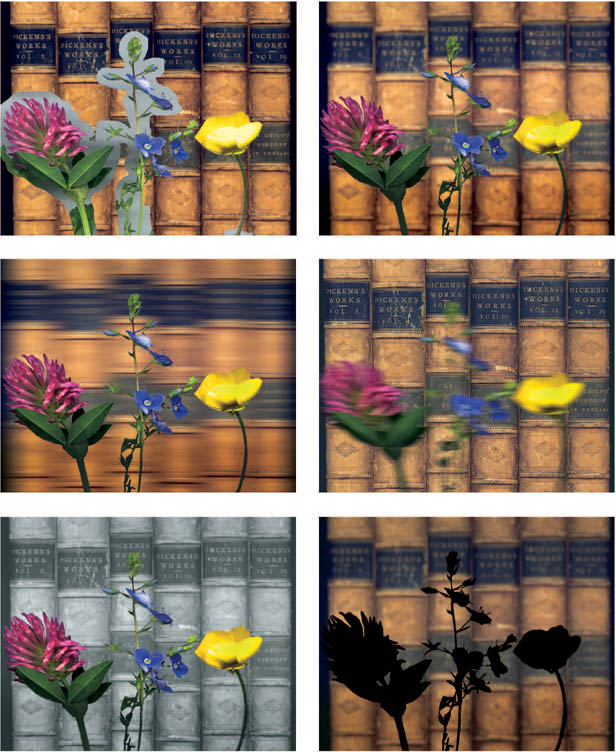
Figure 14.31 Top left: Flowers photogram cropped, roughly cut out and superimposed over scanned-in books. Using the erase tool the right half of this picture has had its grey background removed up to the actual flower outlines. Top right: Gaussian blur effect applied to the books photogram file only. Centre left: horizontal blur effect on books only. Centre right: same blur applied to flowers only. Bottom left: books converted to ‘greyscale’ (monochrome). Bottom right: flowers set to zero brightness, books given Gaussian blur

Figure 14.32 Urban Leaf. Combination of a photogram and an old aerial photograph. The skeleton leaf was first sandwiched between glass in the enlarger and enlarged onto bromide paper. This print, and the aerial print, were next flatbed scanned to form digital files. In PhotoSuite the aerial file was opened first, then the leaf file opened on top. Brushing over different patches with the erase brush reveals parts of the fields and river within the leaf. It was finally printed out with duotone green applied to mid-tones
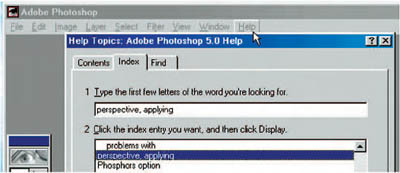
Figure 14.33 The ‘Help’ option on the command bar of most software programs produces a flyout like this. From an index of a hundred or more entries you can make advice appear right alongside the picture you are working on
Adjusting perspective
Several manipulation programs offer different ways of distorting image shape. One side of your subject can be made to look smaller and the other side larger. This changes a flat-on shot of, say, a line of washing into a perspective view tapering away into the distance. The chief value of shape control though is its ability to correct converging verticals. You don’t have to use camera movements or a shift lens to get the top of a tall building in and keep its sides looking parallel.

Figure 14.34 Correction of converging verticals. Below left: the original image. Lack of space meant it had to be shot with the camera tilted upwards. Centre: selecting the whole picture and then clicking on Edit>Transform>Perspective frames the picture within a broken line which can be narrowed at the bottom. Right: the appearance of the corrected image (note some loss of the picture at top left and right)
Figure 14.34 shows how Photoshop brings up lines framing your original picture. Dragging their corners or sides, you can then compress the bottom and expand the top. When applied this distortion redraws the vertical lines of the building parallel. However, to maintain a final rectangular picture, the program has to crop off some of the left- and right-hand picture content towards the top. (The same applies if you tilt the enlarger easel for correction purposes in the darkroom, Figure 12.7.) The height of the building also appears slightly elongated but is corrected by slightly expanding the overall width of your picture relative to its height. In Photoshop this is done via Edit>Transform>Scale, and then finally pressing Enter on your keyboard.
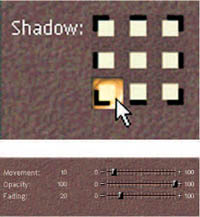
Figure 14.35 Drop shadow applied to this image ‘lifts’ the picture off the page. It gives the viewer a sense of looking at a separated flat surface, as if mounted on board. Below: the PhotoSuite drop shadow dialogue box allows you to pick shadow direction. Sliders adjust the shadow’s width, darkness and softness of edge. A drop shadow can also be tinted
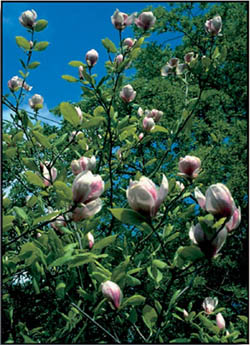
Figure 14.36 Here the actual subject shape has been given a drop shadow. First the vehicle’s background was carefully erased out to white, then a mid-grey drop shadow of generous width applied
Edge lines and drop shadow
Practically every program allows you to add a precision edge line around your picture, to help prevent some images ‘running out’ (page 251). In PhotoDeLuxe, for example, you select Advanced>Effects>Outline. In the dialogue box which appears, you set the width (in pixels) the colour (from a palette) and the opacity or darkness of the line.
As well as, or instead of, a line it is possible to set a ‘drop shadow’ as shown above. This gives your picture an apparent ‘lift’ separating it from the surface of the page. It becomes like an artwork hung on the wall, losing the ‘window on the world’ directness of most photographs. Pale drop shadows are now very often applied to photographic illustrations in brochures and books. A further variation is to make a drop shadow follow the detailed outline of the subject of your picture so that it comes forward as a cutout, like Figure 14.36. This is more time-consuming. The entire circumference must first be shaped out using a marquee or lasso tool. It is next pasted on a white background before applying drop shadow. Bear in mind when you are setting your shadow’s direction that it should relate to the direction of lighting shown in the picture itself.

Figure 14.37 You can output finished work as ink-jet prints in colour or monochrome, or transmit to other computer terminals via the Internet, page 301. Files can be output on hard disk for custom labs to convert into film negatives or slides. CDROMs are a low-cost way to send out digital portfolios of your work for potential clients to keep
‘Saving’ your digital file
When you scan-in or download a picture file into the computer you will need to give it a name (short of this it comes up ‘untitled’). The dialogue box ‘Save As’ appears or can be accessed via File on the command bar. Three actions are required of you: (1) using the keyboard type in a short, one or two word image name, such as ‘Flowers’; (2) click onto one of a list of folders (‘photos’ for example) where you want the picture to be stored on the computer hard disk; (3) click on which file format you want it stored in.
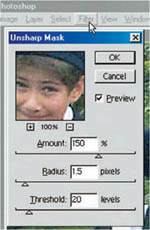
Figure 14.38 Photoshop’s unsharp mask (Filter>Sharpen>Unsharp mask) is the most effective way to improve visual resolution in an image before printing. Typical settings are shown on this fly-out, but explore the effect of each slider while you watch appearances on the sample panel, switching the preview off and on.
Current software makes available about ten different file formats, but the most important and universally used two are TIFF and JPEG. In essence pictures saved as TIFF files retain maximum resolution and are accepted everywhere – by labs, publishing houses and printers. The only trouble is that TIFF files take up many megabytes of space on your hard disk for each picture and are also slow to download through the Internet, etc.
JPEG on the other hand utilizes what is aptly known as a ‘lossy’ compression technique, to slim down the digital information held for each picture. The result is a certain loss of resolution and colour fidelity. Far more JPEG files can be held on your hard disk, which is helpful if the computer is underpowered. They also download quickly to Web sites, etc., where lower resolution pictures still look good read off monitor screens.
Wherever practical it is best to file your work as TIFFs, knowing that a JPEG version can always be generated from it, but not the reverse since information is missing. Photoshop supports its own (PSD) file system similar in characteristics and universal acceptance as TIFF but not interchangeable with it.
When you have finished on an image and click the Close File command or icon, a fly-out queries whether you wish to save the changes you have made. Clicking ‘Yes’ updates the file, which still keeps its same name. Alternatively you can store your manipulated image in a second, new file by clicking File>Save As and then, say, typing in Flowers 2. This way you retain access to both the original picture (File>Open>Flowers 1) and the manipulated version (File>Open>Flowers 2).
To avoid filling up your computer’s limited hard disk space you can transfer or duplicate files onto removable compact discs. This way you can send out finished images to publishers, custom labs, etc. Storage on disk is also a way to back up your work stock – disks can be stored away from the computer itself which could get stolen or damaged. Since each full 35 mm film frame scanned at 2700 dpi creates a TIFF file of around 30 MB, disks themselves must have plenty of storage capacity – at least 100 MB, preferably 250 MB or more. They should also be a widely used system, such as Zip or some form of CD acceptable to almost everyone working with a computer.
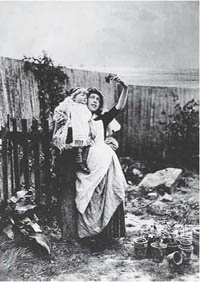
Figure 14.39 ‘The Gilly-flower’ by Victorian photographer H.P. Robinson. A combination print from two negatives – the figures in the garden, and the seascape behind the fence. This manipulated image was made in 1880
Now that we have programs and equipment to convincingly manipulate photographs, where do we stand on how they should be used? The appearance of digital tools in the mid-1990s at first sparked off great rows. Some photographers believed that work produced digitally should be banned from exhibitions, and carry a special disclaimer when reproduced in print. They argued that photography’s key characteristics depend on recording what is seen and captured in the real world, by someone with visual sensitivity. Manipulate and combine images in a computer and you reveal the weakness of photography as an honest medium.
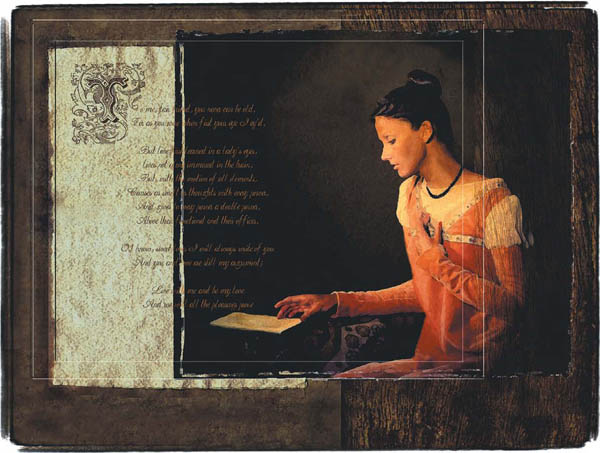
Figure 14.40 ‘Loves Sonnet’. Ian Coates made extensive use of digital manipulation to weave appropriate elements into his romantic contemporary illustration.
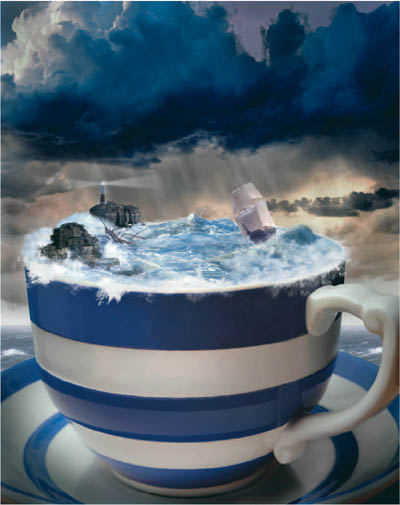
Figure 14.41 ‘Storm in a teacup’ by Paul Wenham-Clarke. A strong example of how a phrase can be translated into a visual image with the help of digital techniques. Imagination and good planning results in the kind of picture much used in poster and press advertising
Others heartily disagreed, pointing out that manipulation is almost as old as photography itself. After all, pictorialists were combination printing from different negatives (Figure 14.39) or making paste-up montages well over 100 years ago. Think too of all those touched-up glamorous Hollywood portraits of the past – and high street studios employing armies of retouchers to ‘stipple over’ every square inch of their clients’ faces in portraits. In any case all photographs on the printed page today have been scanned-in and often modified in some way to improve reproduction. Photographers should explore every conceivable new technology to see what it offers as an image-making tool.
In advertising work digital manipulation is extensively used for eyecatching sales images (within legal limits of product deception). People accept most of this obvious trickery in the spirit of entertainment. Computers allow new, often romanticized, approaches to portraiture. Also commercial mail-order catalogue illustration work is now almost entirely digital. Products shot in the studio are easily montaged into outdoor location backgrounds, fabrics shown in a whole range of colours working from one garment, etc. Fine art photographers too see computers as tools to help them express visual ideas and develop new kinds of imagery.
The main difficulties concern press and documentary photography, and photo-journalism. Here undetectable picture alterations undermine what has traditionally been regarded as the camera’s ‘photographic truth’. Admittedly, photographers working in war zones have been known to physically rearrange the possessions of battlefield casualties for stronger effect … or simply change lens and viewpoint to exaggerate perspective. Editors too regularly crop off ‘unnecessary’ parts of photographs. (The right hand edge of the Vietnam picture, Figure 1.7, originally included a soldier, apparently indifferent, reloading his Nikon.)
Computers now make it a simple step to excesses such as intensifying bruises on the face of a victim of a mugging, showing a teetotal politician holding a glass of champagne in place of a tumbler of water, and so on. Working today that great surrealist documentary photographer Henri Cartier-Bresson could in theory have put the figure in his street scene (page 8) into just the right position by digital means, long after his picture was taken.
The reality of the decisive moment in great photo-journalistic shots is what has always given them substance in the past. Now that digital manipulation can hoodwink readers, they have to rely on the integrity of photographers and editors. It has been mooted that any doctored picture in a newspaper should have the fact admitted in its caption. The idea has not been taken up, although since the late 1990s several newspapers have quietly adjusted the attribution alongside the photographs they publish from ‘Photo: A N Other’ to ‘Picture: A N Other’.
Summary. Digital image manipulation
• |
Working with a computer you can change image depth of field, create movement blur, clone other bits of a picture to change its contents or cover defects; plus most of the regular darkroom techniques including colour print |
• |
You need patience and ample time at first to master the chains of command, understand new technical terms. It all becomes easier as you grow more experienced. |
• |
In specifying your computer hardware make sure that its hard disk, processor and RAM memory all offer sufficient capacity and speed to handle the large digital files photographs create. Have drives for CD and removable hard disks built-in. You can always start with a minimum specification computer and upgrade its various components later. |
• |
Essential peripherals include a high resolution monitor of sufficient size, mouse, keyboard and printer. For a full kit include flat-bed and film scanners, digital camera card reader, graphics palette and modem. |
• |
Photo-manipulation software ranges from entry-level programs up to highly comprehensive packages such as Photoshop. If you are a beginner work your way up gradually. Make notes. |
Typically programs display your picture surrounded by a command bar, tool bar, scrolling controls. Clicking symbols on the bar in turn releases fly-outs such as dialogue boxes for you to make settings. |
|
• |
Image changes made by computer which parallel what you are used to achieving in the darkroom are often the easiest to learn first. The ‘Help’ command brings up explanations and advice on screen, more accessible than an elaborate manual. |
• |
Key manipulation controls – Brightness/Contrast; Colour balance; Rotate/Crop; Clone; Undo. |
• |
Using tools you can change colours; shade and print-in; move elements in your picture to new positions; montage parts of different pictures together; and many more. It’s also possible to reduce depth of field and introduce movement blur, either overall or just over selected areas. Ease off the ‘special effects’. |
• |
Before montaging several images together make sure they match in lighting, perspective and (preferably) colour balance. If you are scanning-in from film remember that negatives are inherently less contrasty than slides and so often give better quality digital images. |
• |
Levels (Histograms) and Curves offer a sophisticated way of altering the distribution of image tone values and colours. |
• |
Experiment working in monochrome, and check out the use of duotone and tri-tone. With a flatbed scanner explore photograms; consider combining them with camera-shot images. |
• |
By applying distortion a ‘flat-on’ shot can be reshaped into an image with pseudo-perspective. Converging verticals can also be corrected this way. Edge-lining and a drop shadow suit some pictures as a finishing touch. |
• |
Be sure to save all your finished work onto the computer’s hard disk, and if possible, duplicate files on a removable disk as back-up. Saving as a TIFF or PSD file will retain maximum resolution, but is demanding on disk space. JPEG compresses information, saves disk space and suits electronic transmission where work will only be viewed small size on a computer screen. |
• |
Although image manipulation has long played a role in photography, modern digital techniques allow speedy, far more convincing results. This casts grave doubt on the integrity of some forms of photography (e.g. documentary) which people still trust as factual evidence. |
1 |
Find examples of manipulated silver halide photography. Check out: H.P. Robinson, Le Gray, Oscar Rejlander, Hannah Hoch, E.L. Lissitzky, John Heartfield, Angus McBean, Peter Kennard. What do you think was the purpose behind the work of each of your chosen photographers? |
2 |
Using an entry-level photo-manipulation program it is possible to practise digital work with a basic computer having as little as 40MB RAM, 8 GB hard disk, and a 15 inch monitor. Your high street lab can inexpensively put a selection of your negatives and slides onto a Photo-CD. The equipment will be slow in opening files, making changes, but you can get started and learn a lot. |
3 |
Pick just one or two tools at first and thoroughly learn what each can do. Try Brightness/Contrast, Clone, and Colour Balance. Make notes. (You don’t necessarily have to print anything out.) |