Films, filters
Having composed and formed the picture at the back of the camera the next step is to create a permanent record of this image. Capturing pictures and turning them into electronic signals by means of a CCD panel (Chapter 6) is fast improving. For the time being, however, exposing onto chemically coated film remains our main camera image recording medium because of its fine quality of results and lower equipment costs. Once film is exposed and processed it can be scanned and digitalized, page 270, allowing more adjustments to be made to pictures than ever before.
Light-sensitive compounds of silver have been used from the earliest days of photography 160 years ago, becoming enormously improved in sophistication and performance over such a long period. This chapter describes the various types of modern films, outlines how they work, their practical performance and their suitability for various types of work. The biggest distinction occurs between colour and black and white materials. Colour records more information, allows you to use extra variables in composition, often gives greater viewer-impact, and the results relate more closely to what you saw through the camera. Black and white is more restrained, more of an interpretation of reality; it allows you stronger use of shapes and tonal range to show form, is cheaper to reproduce, avoids technical problems of wrong-colour lighting, and has more tolerance in exposure and processing.
Nevertheless, both kinds of film share important basic features. These include speed rating, the relationship of graininess and sharpness, response to colour values, contrast, and the various physical forms camera materials take. It is also relevant to look at lens filters here, because their use links up closely with the colour response of films.
Photographic materials carry one or several coatings of silver halide emulsion – gelatin containing crystals of a silver halide chemical, such as silver bromide. Changes begin to happen when these crystals are struck by light-energy particles (‘photons’, see page 25). A few tiny deposits of silver accumulate at crystal imperfections (called ‘sensitivity specks’). But given correct camera exposure they are far too small to see as any visible change, even if you were able to examine them through a microscope at this stage. Given vastly more light, such as leaving film in sunlight for several minutes, crystals do begin to darken slightly. In the camera, however, you need only give brief exposure to the relatively dim image – accumulating just sufficient photons to give tiny build-ups of silver atoms.

Figure 9.1 Silver halide crystals. An electron photomicrograph showing them here magnified approximately ×3000
Since most photons are received from bright parts of the scene, and least from where it is darkest, you have all the components of a photographic image but in an invisible or ‘latent’ form. Later, at the processing stage, chemicals go to work on the tiny silver deposits forming the latent image. They will be grown and amplified enormously to give a visible chemical image; see processing, Chapter 11.
How film is made
Approximately half the world’s production of silver is used by the photographic industry. Bars of the metal are dissolved in nitric acid to form silver nitrate, and this is combined with a halogen element (typically iodine, bromine or chlorine in the form of alkali salts or halides, potassium iodide, potassium bromide or potassium chloride). After by-products have been removed the resulting compound consists of silver halide crystals, which are light-sensitive. In order that these finely divided silver halides can be coated evenly on to film base they are mixed with gelatin to form a creamy silver halide emulsion.
Gelatin is used because it is highly transparent and grainless. It becomes a liquid when heated – ideal for coating – but also sets (‘gels’) when chilled or dried. It holds the silver halides in a firm, even coating across the film surface, yet swells just sufficiently in processing solutions to allow chemicals to enter and affect the halide crystals, without disturbing their positions.
In detail, modern film manufacture is very complex and demanding. Mixed emulsions are given additives and held for fixed periods at controlled temperature to ‘ripen’. This makes some crystals (‘grains’) grow larger, giving increased light sensitivity (greater ‘speed’) and producing less extreme contrast. Film contrast changes because, when first formed, crystals are all very small and not particularly sensitive. They are affected by light equally; see Figure 9.3. When an emulsion has mixed sizes (mixed sensitivity), however, low-intensity light affects large crystals only, more light affects large and medium sizes, and brightest light affects all crystals, even the smallest. When the film is developed, these variations in light intensity therefore record as various grey tones rather than simply extremes of black or white.

Figure 9.2 Cross-section of black and white film. A: scratch-resistant gelatin top coat. B: one or more emulsion layers, containing silver halide crystals. C: foundation which improves adhesion to the plastic film base. D: gelatin anti-curl backing (may also contain anti-halation dye). Compare with Figure 6.2

Figure 9.3 Grain size and contrast. Emulsion with slow. equal-size grains tend to be slow and contrasty. All grains become developable (far right) at one triggering light level. Mixed large and small grains (near right) can yield a range of tones related to light received. They are also faster
Further additions to the emulsion alter its sensitivity to coloured light. In its raw state emulsion responds to blue and UV only, like (graded) black and white printing paper, but this can be extended to further bands or the whole visible spectrum. Meanwhile the film’s base (most often polyester or tri-acetate) receives several preparatory coatings, including an anti-curl gelatin layer applied to the back to prevent the film shrinking or curling when the emulsion is coated on the front. Another layer of dark ‘anti-halation’ dye prevents light reflecting back from the base and forming ‘halos’ around the images of bright highlights. This layer may be between emulsion and base, or coated on the back of the film. In addition, 35 mm film has grey dye in the base to prevent light passing into the cassette, piped along the thickness of the film. Like anti-halation material it disappears during processing.
Emulsion coating itself is extremely critical, and carried out in ultra-clean conditions. Black and white films may need between one and four layers, while most colour films have more than ten layers of several different colour sensitivities. The final layer is clear protective gelatin. (For details of the structure of instant-picture materials, see Advanced Photography.) Film is coated in large rolls, typically 1.5 m wide by 900 m long. After drying, this is cut down to the various standard film sizes, either perforated (double for 35 mm, single for APS) or notched (sheet film), and edge printed.
The flowchart in Figure 9.4 shows the main forms of colour and black and white camera material for general photography. Many types are also made for X-ray, infrared, lithographic and other special purposes. You can often shoot on one film and end up with a form of result normally produced from another – black and white prints from colour negatives, for example. But the most regular route, with fewest stages, always gives best quality. This is why it is important to know in advance what is finally needed from a job, in order to shoot on the right materials in the first place.
Sizes and packings
Figures 9.5 and 9.7 show the main types and sizes of film. For APS cameras films are 24 mm wide and come in cartridges which open and self-load when dropped into the camera body. The picture format is 17 × 30 mm, but croppable at the shooting stage, see page 68. There are 15, 25 or 40 exposures per cartridge, and film is returned from the lab with its processed negatives secured inside this container.
The widest range of colour and black and white emulsions is made in 35 mm size. It is marketed in cassettes giving 36, 24, or (in some types) 12 exposures of standard 24 × 36 mm format. A few monochrome 35 mm films are available as 50 ft and 100 ft (or 15 m and 30 m) lengths in tins. This bulk film is for cameras with special film backs (page 91), or you can cut it into short lengths to refill regular-size reloadable cassettes. Doing reloads (Figure 9.6) reduces film costs but risks scratches and dust. It is a false economy for professional work.
Rollfilm, rolled in backing paper on a spool, and coded 120, is 6.2 cm wide. The number of pictures per film depends on your camera’s picture format; see Figures 4.12 and 9.7. 220 film is on thinner base, allowing twice the length and number of pictures on the same spool size as 120. Some double-perforated 70 mm films are available in 100 ft cans for bulk rollfilm-back cameras.
Sheet films packed 10, 25 or 50 per box come in several standard sizes. The edge-notching (Figure 9.8) helps you locate the emulsion surface when loading film holders in the dark, and has a shape code by which you can ‘feel’ film type, as well as identify it after processing. All films except bulk lengths have further type and batch identification data printed along their edges. Check the manufacturer’s data sheet for the product to decode information.

Figure 9.4 Types of camera film. Main routes (red) plus crossovers leading to different forms of final result
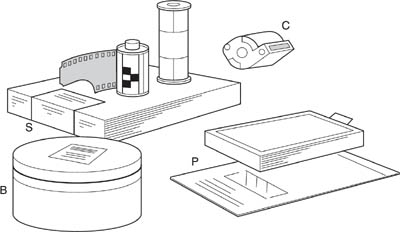
Figure 9.5 Packaged film materials. (S) sheet film, 35mm cassette and rollfilm, (C) APS cartridge, (P) instant-picture peelapart pack and an enveloped sheet, (B) tin of bulk 35mm
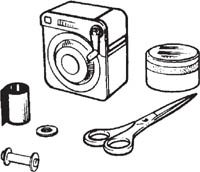
Figure 9.6 35 mm bulk-film loader. Once it has been loaded with up to 30 m of film in the dark, you can insert and fill 36-exposure reusable cassettes in normal room light
Instant print sheet materials are mostly used as 8- or 10-exposure packs 3¼ × 4¼ in and 4 × 5 in, or individual sheets 4 × 5 in and 8 × 10 in in special envelopes. They are of two main types (Figure 9.9), ‘peelapart’ and ‘integral’. Each exposure on peel-apart material is removed from the camera as a sandwich of two sheets you leave together for a timed period, then peel to reveal a right-reading print on one sheet. It is most often used in a pack holder which attaches to rollfilm cameras with magazine backs, or 35 mm cameras with removable backs. Sheet instant film slots into a sheet film holder inserted into a view camera. These peel-apart materials are still extensively used by professional photographers in the studio to produce a quick print confirming lighting, exposure, composition, etc. You have to remember though that colours may not exactly match your final results on conventional colour film. Digital backs (page 103) offer an alternative as their capital cost comes down. ‘Integral’ instant picture prints eject from the camera after exposure as a plain card which forms a picture as you watch. Its main use is in Polaroid point-and-shoot cameras which are designed with an internal mirror – otherwise pictures on integral material are reversed left-to-right.

Figure 9.7 Film sizes – main camera materials
APS films form part of a simplified handling system designed principally for amateurs not wishing to do their own processing, and so closely linked to automatic photo-finishing machinery in commercial laboratories. Unlike the slightly larger 35 mm cassettes, APS cartridges have an external visual display showing whether their contents are exposed, unexposed, etc. (see Figure 4.13). The silver halide film itself carries an additional transparent coating able to magnetically record data from the camera – for example the user’s choice of three viewfinder settings for different picture format ratios, and so programmes an automatic printer at the lab to enlarge the appropriate area of the particular negative (see page 68). For ‘panoramic’ prints, strips top and bottom of the picture are masked off (Figure 4.23) and the rest enlarged up.

Figure 9.8 Typical sheet film notch codes. A: typical transparency film (daylight). B: transparency film balanced for tungsten lighting. C: most graphic-arts specialist films. In the dark you can ‘feel’ the notch pattern to discover the film type. The emulsion is facing you when held as shown
Film speed rating
Your film’s sensitivity to light is denoted by the emulsion speed figure printed on the packaging. It follows strict test procedure laid down by standardizing authorities. Most manufacturers quote an ISO (International Standards Organisation) figure; see Figure 9.10. This combines previous American-based ASA ratings and European DIN ratings. The first part of the ISO figure doubles with each doubling of light sensitivity; the second number (marked with a degree sign) increases only by 3 with each doubling of sensitivity. Often the first ISO figure forms part of the film’s brand name, for example Fujicolor 160. Specialist infra-red film has an Exposure Index (EI) rating.
Your film’s speed rating figure is based on standard conditions of lighting, typical exposure times and the amount of development given during processing. If you intend to increase or decrease development from normal you can (as it’s known) ‘uprate’ or ‘downrate’ film speed when exposing; this may be helpful when you want to alter contrast, or simply get maximum possible speed out of a film in dim conditions. In general fast films of ISO 800 and upwards are designed to best respond to up-rating and consequent extra development, see page 212. Exceptionally long or short exposures also influence film speed, see Appendix C.
35 mm films have checkerboard codes printed on their cassettes. These allow contacts in the camera’s cassette compartment to sense film speed electronically and so set the internal exposure meter automatically. If you want to uprate or downrate the film’s normal speed, you must do this with the camera’s exposure compensation dial (Figures 4.32 and 10.20).

Figure 9.9 Instant-picture materials: Top: integral type. Bottom: peel-apart type, showing pack attached to a rollfilm camera in place of its film magazine
Speed, grain and sharpness
Graininess refers to the pattern of grain clumps in the processed image. If this is coarse it will show up as a mealy pattern and break up delicate tone values when enlarged. Emulsion sharpness or ‘acutance’ is concerned with the degree of fine image detail the film can record. This brings in local contrast or edge sharpness, as well as grain, for an image can be fine-grained yet lack ‘bite’ because detail is flat and grey.

Figure 9.10 ISO film speed ratings. The ASA scale is linear – if the rating is doubled the film sensitivity is doubled. DIN ratings follow a logarithmic progression – an increase of 3 means double the speed. ISO combines both
Film speed, graininess and sharpness are traditionally linked. As Figure 9.12 shows, the challenge to the manufacturer is to improve speed without increasing the size of silver halides and so also coarsen grain. And if the emulsion is simply made thicker to obtain speed by containing more halides there may be minute scatter of light (‘irradiation’) within this sensitive layer which worsens sharpness. Modern flat-shaped ‘tabular’ grains offer more speed with less sharpness loss, but your choice of film is still a trade-off between speed and image quality. Fast films are inherently grainier than slow films, and the more enlargement your film is to receive later the more important this fact becomes.
Sometimes you may choose fast film intentionally to get a granular effect, Figures 8.26 or 9.13, for example. More often this choice is made because the subject is dimly lit, and perhaps you need to stop down for depth of field and freeze movement with a short exposure. One way to reduce your grain problem and improve sharpness is by changing to a larger-format camera, because the film image will need less enlarging, but you will then have to stop down farther for the same depth of field.
In general graininess is increased and image sharpness reduced if you overexpose and/or overdevelop. In black and white photography there are numerous fine-grain and high-resolution developers to choose from, but they may reduce film speed too; see Chapter 11.

Figure 9.11 Typical examples of the image grain given by (left) ISO 25/15°, (centre) ISO 125/22°, and (right) ISO 1000/31° films. Each film was processed normally in its recommended developer and is reproduced here enlarged approx ×32, equivalent to a print 45 × 30 inches from the whole of a 35 mm format image
Monochrome films. Film emulsions are sensitized during manufacture to some or all the colours of the spectrum. The vast majority of black and white films are given panchromatic colour sensitivity (‘pan’). This means that they respond – in monochrome – to virtually the whole of the visual spectrum as well as to shorter UV wavelengths (page 313). In fact this response does not quite match the human eye’s concept of light and dark colours. Pan film ‘sees’ (reproduces on the print) violet, blue and orange-red as somewhat lighter in tone and greens darker in tone than we would judge them to be. The difference is generally accepted, and is of some value in allowing slow pan materials to be handled under very deep green darkroom safelighting. For a more exact match you can shoot using a yellow camera filter.

Figure 9.12 Relationship between film speed, sharpness and graininess. The faster the speed (emulsion C) the lower the resolution and the coarser the grain tends to be, relative to slower emulsions A or B. It is comparatively easy for manufacturers to make trade-offs between the three factors but difficult to increase the triangle area

Figure 9.13 Using a grainy film. A moody, low-key shot taken on ISO 1000/31° film, then given extended processing and enlarged onto contrasty paper to help emphasize the negative’s grain pattern.
A few black and white films are made insensitive to the red end of the spectrum beyond about 590 nm, and are known as orthochromatic (‘ortho’). These films reproduce red as black on the final print, and orange as very dark. Ortho materials – mostly sheet film – are useful for photographing black and white photographs or drawings not involving colours. You can conveniently handle them in the darkroom under red safelight illumination. They are also used for some forms of medical, forensic and scientific photography. Ortho film speed rating is lower when the subject is lit by tungsten light rather than daylight or flash, because the former contains a higher proportion of red wavelengths.
One or two films, very slow and intended for the printing darkroom rather than camera purposes, are made with blue (and UV) sensitivity only. You can also buy special films for camera use that are insensitive to almost the whole visual spectrum but respond to infra-red and UV; see Advanced Photography.
Colour films, both negative and slide types, often have a stack of six or more emulsion layers. They use three different kinds of colour sensitization. The top emulsion is sensitive to blue only; others respond to blue and green; and the remainder primarily to red. A yellow filter may be incorporated below the blue-sensitive layer so that blue light cannot proceed farther into the film. Therefore you effectively have a multi-layered emulsion responding to blue only, green only, and red only – the three thirds of the spectrum. (Later each of these three emulsion types will form its image in a different coloured dye, to reproduce the final image in full colour; see page 313.)
The relative sensitivity of the different layers (colour balance of the film) is carefully controlled during manufacture. Most colour films are balanced to give accurate colour reproduction when the subject is illuminated by daylight or flash (5000–6000K). You can also buy a limited range of tungsten-balanced films which have slightly slower red-sensitive layers to give correct reproduction of subjects lit by redrich 3200K tungsten lamps. Apart from ‘daylight’ and ‘tungsten’ colour balance films, one or two exceptional materials are sensitized to infrared or laboratory light sources.

Figure 9.14 The reproduction of the coloured pencils shown below when photographed on (centre) ortho, and (far right) panchromatic monochrome films
Choosing films for black and white
Negative types for general use
The majority of black and white films are designed to give you a negative image in black silver. In other words, the latent image recorded in the camera is strengthened into visible black silver during developing, then the remaining creamy halides are removed leaving the film with a negative image (subject highlights darkest, shadows lightest) in clear gelatin.
General-purpose pan films range from about ISO 25/15° to ISO 3200/36°. The slower the film, the finer the grain and the better its ability to resolve detail. Contrast – the range of grey tones formed between darkest black and complete transparency – is slightly greater with slow films than fast films. This tendency is taken into account in the recommended developing times, which tend to be shorter for slow films.
Films between ISO 100/22° and ISO 400/27° offer a good compromise between speed and graininess. ISO 400/27° film gives prints with a just visible grain pattern (noticeable in areas of even grey tone, such as sky) when 35 mm is enlarged beyond 10 × 8 in, although this depends upon negative development and the type of enlarger light-source used; see pages 211 and 227.
In general it is best to use the slowest film that subject conditions sensibly allow, especially when working on 35 mm. For occasions when you want to give long exposures to create blur in moving objects, this too will be easier on slow film (see also neutral density filters, page 173). However, slow film may prevent you from stopping down enough for depth of field, or necessitate a tripod in situations where it is impractical. Fastest film is necessary for reportage photography under really dim conditions, and action subjects or hand-held telephoto lens shots which demand exceptionally short shutter speeds. Bear in mind that if you are after a moody – grainy but acceptably sharp – image from a well-lit landscape or portrait you could use ISO 3200 film with a deep grey neutral density filter over the camera lens.
Chromogenic types. A few monochrome negative films, such as Ilford XP2 Super and Kodak T400CN, give their final image in a brownish dye instead of silver. Extra components in the emulsion layers form tiny globules of dye wherever silver is developed. The processing you must give these films is known as ‘chromogenic’ and finally bleaches away all silver, leaving your image in dye molecules alone. Since chemicals and processing stages are the same as for colour negatives (page 215) it is easy to hand your exposed film into a high street mini-lab anywhere for rapid black and white results. APS size monochrome film is also chromogenic, for the same machine processing reasons.
Another advantage of chromogenic films is that they are more able to tolerate inaccurate exposure – especially overexposure – than silver-image types. You can choose to rate your film anywhere between ISO 125/22° and 1600/33°, provided you develop accordingly. However, although results are fine grain the grain is less ‘crisp’ and image sharpness slightly poorer than silver image film. They also cost more for self-processing, and you don’t have the choice of developers possible with the other films. Chromogenic films are popular with some news and documentary photographers because they suit a wide range of shooting conditions.
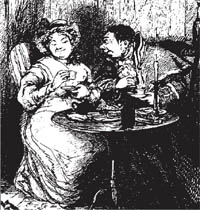
Figure 9.15 High-contrast line film reproduces ink drawings (as here), diagrams, lettering, etc., in pure black and clean white only
Special purpose monochrome film
Line film. Some materials – mostly sheet film, but also 35 mm in 100 ft lengths – are made with high-contrast emulsions. They give negatives with few or no greys at all between dense black and clear white, when processed in the appropriate contrasty developer. Line films (and the more extreme ‘lith’ films) are intended for photographing pen-and-ink drawings, etc., which contain only pure black and pure white and need to reproduce in this form. Emulsions are very slow and fine-grain, and most often have ortho sensitivity for easy darkroom handling.
You can also use line film to simplify regular images of full-tone-range scenes into stark, graphic black and white. Compare Figure 9.16 with 10.19. Since this sort of material only has a speed of about ISO 8, and its high contrast demands absolute exposure accuracy, it is best to shoot your picture first on normal film, then reproduce this onto line film by copying, or through printing in the darkroom. (Bear in mind though that you can make changes much more easily by digital means using an image manipulation software program, page 275.) Line negative film is also excellent for making slides of black-on-white line diagrams, which then project as bold white-on-black images.
Films for monochrome slides. There are three film types that allow you to make monochrome slides direct with a 35 mm camera. These are:
Figure 9.16 Line films can also be used to copy and convert a normal contrast print into a stark graphic image. Original shown on page 192
1 |
Special slow, fine-grain 35 mm films (e.g. Agfa Scala) which must be sent to a nominated laboratory for black and white ‘reversal’ processing. The film is returned containing positive, full-tone-range pictures ready for projection. |
Instant-picture film you process yourself within 2–3 minutes, using a simple unit (Figure 9.17) requiring no darkroom or washing facilities. |
|
3 |
Suitable regular negative-type films, such as Kodak T-max 100, which you then reversal process using a special kit of chemicals (page 217). |
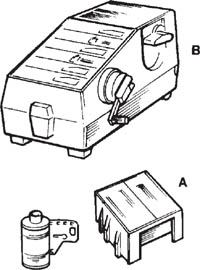
Figure 9.17 35 mm instant-slide film, with pack of processing fluid (A). Both are inserted in handcranked, daylight processing unit (B). See also Figure 11.28
All these materials can give excellent quality monochrome slides, with rich tone range, fine grain and extreme sharpness. But, as with all reversal-processed materials such as colour slides, you must get your exposure correct at the time of shooting because little adjustment is possible later.
Instant black and white print materials. There is a limited range of monochrome instant-print materials, mainly intended for professional use. They work on the ‘peel-apart’ basis (Figure 9.9) and come in pack form or as individual sheets in special envelopes. Speeds range from ISO 50 to ISO 3200. Two of the slower materials by Polaroid give you a high resolution film negative for enlarging, in addition to an instant paper print. Processing times are around 15–30 seconds, according to type.
All these are used mostly as ‘proofing’ materials to make on-the-spot lighting, layout and colour-translation pre-views when shooting a black and white assignment using regular film. It is a reassuring check on all your equipment before (and after) an important job. Instant material is approximately three times the cost of normal film.
Films with extended sensitivity. Occasionally a monochrome film is researched for a narrow, specialist purpose, then marketed for wider use because of its abnormal image qualities. Ilford’s SFX for example, originally designed for speed-trap traffic cameras, has infra-red added to its panchromatic sensitivity. When 35 mm or roll film is exposed with a red SFX filter over the lens, subjects such as portraits record with darkened eyes, pale lips and a slight overall image softness.
Far more extreme, Kodak infra-red 35 mm and sheet film which was developed for aerial survey and medical purposes, has far less panchromatic response. It reproduces blue skies in landscapes black, foliage white and skin tones ghostly pale when exposed through a very deep red filter; see Advanced Photography.
Negative types. By far the greatest volume and range of camera material today is made as colour negative (or ‘colour print’) film. All the high street labs are geared up to process and print it at competitive prices. From colour negatives you can also make black and white prints, either using silver halide material or by scanning into and printing out from a computer (page 270), and professional labs can produce colour or monochrome slides.
Colour negative films carry in effect three types of black and white emulsion, recording blue, green and red respectively. They reproduce the image in negative tones and complementary colours. To understand this term ‘complementary’ colour, remember the colour spectrum of white light (Figure 2.3) shown again overleaf. If you remove all the red wavelengths from the spectrum, what remains appears not white but greeny-blue (called ‘cyan’). Cyan is therefore said to be complementary to red – opposite or negative to it in terms of coloured light. In the same way removing green from white light produces a purply-red (‘magenta’), and if you remove blue from white light you get a dominance of yellow. Cyan, magenta and yellow are said to be complementaries of red, green and blue light. (Note: these differ from the complementary colours in paints and pigments.)

Figure 9.18 Complementary colours. When one-third of the spectrum (one of the primary colours red, green or blue) is removed from white light, the remaining mix of wavelengths appears cyan, magenta or yellow respectively. So each of these colours is a combination of two primaries and can be said to be ‘complementary’ to the missing third. In a sense they are ‘negative versions’ of red, green and blue

Figure 9.19 Colour negative image. Compare the original pencil colours (top) with the complementary colours in which they have recorded on negative colour film
The way that natural image colours formed by your lens in the camera are turned into their complementary colours in the processed film, is shown in Figure 9.20. Each emulsion layer in the film also contains a colour coupler chemical – a yellow dye former in the blue-sensitive layer, a magenta former in the green-sensitive layer, and a cyan former in the red-sensitive layer. Couplers only turn into their designated colour dye when and where the silver halides to which they are attached are affected by light, and so develop to black silver. When towards the end of this chromogenic processing the silver is removed, what was originally the blue-sensitive layer contains an image in which all parts of the picture containing blue record as yellow. Similarly, in other layers, parts of the image containing green record as magenta, and red parts as cyan. Wherever the scene was some other colour the image is recorded in more than one layer, while white or grey records in all three. Viewed as one, the ‘stack’ of layers gives you the familiar colour negative image (plus a characteristic warm tint remaining in clear areas). Follow this through in the reproduction of the coloured pencils, Figure 9.19. During enlarging similar layers in colour paper give ‘a colour negative of a colour negative’, recreating subject colours and tones.

Figure 9.20 How colour negative films reproduce colours. Near right: black silver develops and complementary dye forms where each layer responds to subject colour (compare this G and R response with Figure 9.18). Far right: silver and remaining halides are removed, leaving negative image in dyes alone
Colour negative films for general use
Colour balance. The vast majority of colour negative films are balanced for use with daylight or flash. If you shoot with them in tungsten lighting instead results show a warm orange/yellow cast. It is possible to make colour correction during darkroom printing or digital manipulation, but this may create difficulties and restrictions owing to the amount of change required. It is better to shoot with a bluish conversion filter over the lens (page 165). A very few roll and sheet films are made colour balanced for 3200K tungsten lighting – if used with daylight or flash an orange filter is necessary.
Film speeds, and colour contrast. You have greatest choice of film speeds in 35 mm and to a lesser extent rollfilm formats. Typically they run ISO 100, 160, 200, 400 and 800. Small format films of ISO 1600 or 3200 give coarse grain pattern but thanks to improvements in emulsion chemistry combine this with good image resolution. These fast films are also designed to be up-rated when needed to double their box speed, then push-processed in the standard developing kit for all colour negatives known as C-41; see page 215. Sheet films differ very little in speed, typically around ISO 100. 35 mm colour negative film of ISO 200 or 400 gives good trade-off between speed, graininess and resolution for most situations apart from press photography.
The colour qualities of your final picture can range from natural or subtle to bold and vivid. Fine judgement of what looks best depends on subject and use – a striking shot advertising colourful products is helped by film giving slightly bolder contrast and colours but this would not suit delicate flesh tones in, say, the portrait of a child. Adjustments can again be made in colour printing, but to minimize compensations at this stage (particularly if you use an outside lab for prints) some films for professional photography are made in a choice of colour strengths. So the same film name, whether fast or slow, may be followed by the suffix NC for ‘natural colour’ or VC for ‘vivid colour’. The NC version is usually the best choice for natural flesh tones in studio portraiture; VC would enhance a subject with a rich predominant colour, especially in flat, existing light.
Slide and transparency films
Colour films designed to give positive images direct often include the suffix chrome in their brand name rather than color, which is used for negative types. Fujichrome rather than Fujicolor. Chrome films are also collectively known as colour reversal films, because of the special reversal processing they must be given. Results from rollfilms and sheet films are normally referred to as transparencies, and 35 mm results as slides. These materials are mainly used by the professional; as most colour pictures for reproduction on the printed page are traditionally preferred in this form because of their high image resolution (unlike most prints which have had to pass through a lens twice).
All reversal films have a multi-layer structure, making use of blue-, green- and red-sensitive emulsions, and most have yellow, magenta and cyan dye forming couplers, similar to those in colour negative film. However, results have stronger contrast and saturation of colour, plus a lack of ‘masking’ (see Advanced Photography), which means there is none of the overall pinkish tint characteristic of colour negatives. Viewed on a light box or projected as slides, reversal film images show a wider range of colours than it is possible to achieve on paper prints.

Figure 9.21 How slide films reproduce colours. Above: black silver develops only where layers respond. Centre: remaining emulsion is turned into black silver plus dyes. Right: all silver is removed, leaving positive image in dyes alone
During the first part of processing only black and white developer is used, forming black silver negatives in the various layers. Dyes are then formed where the unused halides remain so that when all silver is removed a positive, correct-colour image remains. For example, referring to Figure 9.21, green (e.g. foliage) in your subject records on the green-sensitive layer and is developed as black silver there. The blue- and red-sensitive layers in this foliage area are not affected by the light and so form yellow and cyan, which together make the final image here look green.
Virtually all reversal colour films need chromogenic processing using developing kit E-6 and this, like C-41 for negatives, can be carried out by photographer or laboratory. Only Kodachrome, which is an older film type, needs a much more elaborate processing procedure (K-14) which is offered by one or two laboratories in various countries.
Colour balance. Colour balance must be more accurately matched to type of lighting than with negative materials, as corrections are not possible later except by digital means. The majority of colour slide films are balanced for daylight and flash but there are also several films designed for 3200K tungsten-light. Daylight film needs a bluish filter if used with tungsten light; tungsten-balanced film needs an orange filter with daylight or flash (Figure 9.22). Image colour is easily ‘burnt out’ by accidentally overexposing or darkened by underexposing, so here again you have to be more accurate – little correction is possible later, apart from some speed-rating compensation of complete films during processing.
Film speeds and colour contrasts. Again, the widest range of reversal films is available in 35 mm format, from ISO 25 to ISO 1600. Most (up to ISO 1000) are also made as rollfilms. Sheet films range in speeds from ISO 64 to 160. Tungsten balanced films are typically ISO 64. Most reversal films of ISO 200 or faster can be up-rated and then push-processed to double their normal speed rating – either to correct overall exposure errors or help when you shoot in dim lighting. Some make a feature of their up-rating potential and allow four times the speed rating shown on the box, although changes in image contrast and increased graininess become your limiting factors. (When you know in advance that light will be poor it is usually wisest to shoot on fastest film, rather than up-rate normal speed material.)
Processed results from reversal films are brighter and richer in hue than colour negatives. They must have the brilliance of appearance expected in a final image, as opposed to an intermediate tailored to match up with the characteristics of neg-pos colour printing paper later. Different reversal films produce subtle differences in image colours owing to different image dyes used by the manufacturer. According to subject and mood you can shoot with a very saturated colour film; or one saturated but ‘warm’; or one specially optimized for skin-tones; or again film giving a slightly warm colour balance for outdoors in cloudy conditions. Take care though not to mix reversal films from various manufacturers when covering any one assignment. Shots showing differences in hue and contrast then stand out like a sore thumb.

Figure 9.22 Colour films, especially slides, exposed to subjects lit by a source of the wrong colour temperature show a cast. You shoot using an appropriate conversion filter. (Note: 3400K tungsten lamps, regularly used for TV and movie lighting, require filtering on both daylight and tungsten type stills-photography film)
Special low-contrast transparency films are designed for duplicating slides, while others with boosted contrast are used for copying coloured line drawings, or low-contrast specimens photographed through the microscope, etc. You can also obtain false-colour infra-red Ektachrome for medical and aerial work, or special colour effects; see Advanced Photography.
Instant-picture materials. Instant-picture 35 mm colour slide materials are made by Polaroid and known as Polachrome. These are processed in the same mechanical unit as black and white instant slides. They work on an ‘additive screen’ basis, internally quite unlike conventional multilayer colour materials. Results are not yet up to the standard of regular colour transparency materials or instant black and white slides.
Storing film – before and after exposure
‘Professional’ and ‘amateur’ films
All the main film manufacturers designate some of their range (negative and slide) as professional and include this word on the pack. The main difference between professional and ‘non-pro’ or amateur film is that the former is designed to give its best, exactly specified performance the moment it leaves the factory. So provided you give it immediate refrigerated storage at 13°C or less, as suggested for the product, it will record with great film-to-film consistency. Professional film must be processed immediately after exposure too.
Amateur films are planned for a slightly different storage scenario – in which they remain at room (or shop) temperature for an average time after delivery, and there is a more variable time delay between exposure and processing. In practice, amateur films are about 25 per cent cheaper than professional films of the same speed. They are in no way inferior for professional work, but it is advisable to make checks for possible batch-to-batch variations. Having done this, colour consistency is better maintained if you keep them in refrigerated storage as for professional films.
Length and type of storage
The main hazards to avoid – before and after exposure, and before processing – are damp humid conditions, chemical fumes, and fogging to light or to radiation such as X-rays. Exposed films are more likely to react than unexposed ones; and fast film rather than slow.

Figure 9.23 Film types: Top to bottom: monochrome rollfilm negative, 35 mm colour negative, reversal colour (slide) film, reversal monochrome film
Speed loss is the most common effect of overlong storage. Colour film is especially vulnerable to change because alterations to the finely adjusted relative speeds of its different emulsion layers upset colour balance. Remember that the expiry date stamped on the packaging is only a guide – so much depends on storage conditions (including before you bought it). Stored in the general compartment of a domestic refrigerator, sealed film should remain usable beyond this date without changes.
However allow time for your film to warm up, unopened, between removing it from the refrigerator and shooting. Unsealing too soon may cause condensation to form on the emulsion. Recommended periods are 1 hour for cassettes and sheet film, or 3 hours for cans of bulk film. Remember too that instant-picture materials only function at their expected speeds when at 18–30°C. Below about 10°C most will not work at all, so take care to warm up the pack under your coat when working outdoors in winter.
If you cannot process exposed film straight away store it in a cool, dry, dark place. If it goes back into the refrigerator keep it in a taped-up foil bag or airtight box, as without this your film is no longer protected from humidity. If possible include a packet of desiccating crystals such as silica gel within its container to absorb any moisture.
Regard radiation from X-ray inspection machines used to check luggage at airports as a potentially serious hazard. Disclaimer notices are often deceptive. Fast film (ISO 400 and over) can end up with serious orange-brown streaks after processing if you leave them in bags loaded into the aircraft’s luggage bay. Carry films with you and ask (argue if necessary) for them to be hand-searched. Radiation fogging effects accumulate, building up even small dosages at every checkpoint. As inspection technology keeps changing the risk factor to film becomes greater or lesser – you can never be sure of the dosage given, particularly from old equipment in foreign airports. Professionals returning with large batches of exposed film from a major shoot may have to discover an air freight carrier who can guarantee that the shipment will not be X-rayed.
Despite the future erosion of silver halide photography by digital capture you are spoilt for choice by today’s vast range of films – especially if you shoot on 35 mm. It makes good sense to narrow your field: use as small a range of films as your work allows, and get to know them thoroughly. Real familiarity with a film’s characteristics is most likely to give technically consistent, reliable results. Just remember the existence of other materials for special tasks.
The main factors to consider when choosing film are:
1 |
What is to be the final result? Print or slide/transparency; colour or black and white; a large print to hang on the wall, a set in an album, or for reproduction on the printed page or transmission via the Internet? If your picture might be used now or in the future in a whole variety of ways shoot colour negative. And if there is any likelihood that a large display or exhibition print will be the end product go for a film format larger than 35 mm. If pictures will illustrate a magazine or book, or be used for a lecture, colour reversal film might be best. If you plan to scan your pictures into a desktop computer, however, colour negatives give better results because of their lower contrast. Remember too that colour negatives can be darkroom printed in monochrome, or scanned-in ‘grey-scale’ (page 270). |
2 |
Relate the film to type of subject and lighting conditions. Will its contrast, colour brilliance and grain (if any) best suit the image quality and/or mood you want to achieve? Will the film’s speed and colour balance link up with the strength and colour of the lighting (remember likely depth of field and movement blur requirements too). Perhaps you will be working in changing lighting, and conditions where exposure may be difficult to measure accurately? In which case pick a film which is most tolerant of over- or underexposure. |
3 |
Will you process and print it yourself, or use a lab? For self-processing use a tried and tested combination of film and developing which gives excellent results on your enlarger (or through your computer’s film scanner). Is there a reliable, caring lab able to handle the work for you and return it promptly – preferably knowing the kind of result you like, via personal contact? |
4 |
Personal preference. Beyond a certain point colour, contrast, and ‘crispness’ or ‘subtlety’ of image quality is subjective. Get to know one or two films which really suit your style, and help give a recognizable look to all your work. |
5 |
How expensive is film and processing? If you are working professionally this comes lower down the list because your time, travel, studio and lighting hire, etc., are all more expensive elements (especially if you have to reshoot because inferior materials and back-up were used). |
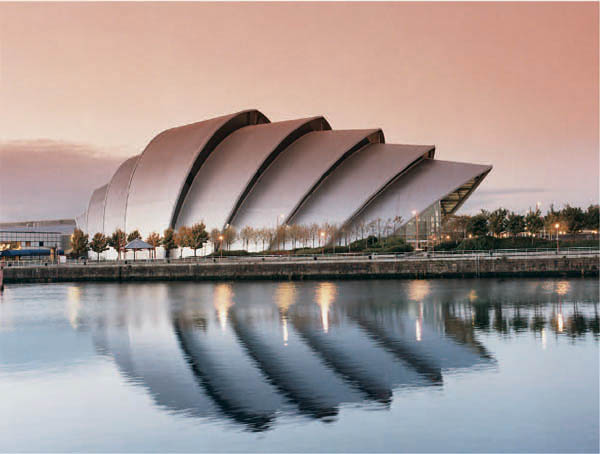
Figure 9.24 ‘Armadillo’. Taken by Jim Mackintosh Photography for SECC Glasgow. An effective example of the use of colour in architectural photography. A split filter tinted only in its upper half was used over the camera lens. See page 174

Figure 9.25 Simplified colour wheel, based on the spectrum of light ‘bent’ into a circle. Oversize segments blue, green and red are the primary colours of light. Yellow, magenta and cyan are complementary colours, and (for filtering purposes) the most opposite to each primary
Always test out a film you have never used before, prior to using it on an assignment. And where practical buy your transparency film in batches all of the same coating number (printed on the box). If most of your photography is ‘constructed’ – using models in the studio or on location, working to layouts, etc. – use instant-picture material in a suitable camera back as well. Here it helps to pick material with the same ISO speed as your regular colour film, so that camera settings (which affect depth of field, etc.) remain the same for test and shot.
Uses of col. filters on B/W film |
Exposure increase factors: D/light Tungs. |
Deep red |
× 8 × 5 |
Darkens blue skies |
|
Turns red stains white |
|
Changes green against red into black against white |
|
Orange |
× 4 × 2 |
Like red but less extreme |
|
Yellow-green |
× 5 × 4 |
Tones down blue skies |
|
Compensates pan film oversensitivity to blues |
|
Green |
× 8 × 8 |
Darkens blue skies |
|
Turns green stains white |
|
Changes green against red into white against black |
|
Helps reveal detail in landscape foliage |
|
Blue |
× 6 × 12 |
Lightens blue skies |
|
Turns red stains black |
|
Changes blue against deep yellow into white against dark |
|
Colour filters help you to alter the contrast between grey tones representing subject colours when shot on monochrome film, see Figure 9.27. Used with colour film they allow you to shoot using light sources for which the film is not balanced (e.g. daylight film in tungsten light) without getting an overall colour cast, Figure 9.22. And by means of pale filters you can gently ‘warm up’ or ‘cool down’ your colour images. The rule is that a filter passes light matching its own colour, and absorbs (darkens) other colours – particularly those farthest from it in the spectrum; see the colour wheel opposite. To check out filter effects, first find yourself a bold, multi-coloured design – a book jacket or cornflake packet perhaps, or a motif like Figure 9.25. View it through a strong red filter (even a sweet wrapping will do). The whole subject appears red, but check how light or dark the original colours now appear. Strong blue and green subject areas are relatively darker in tone, almost indistinguishable from black areas. This is because the light wavelengths they reflect cannot pass the filter.
Red parts of the subject, however, look much paler than before, practically the same as white areas since they reflect as much red light as the white areas do (the other colours that white reflects are absorbed by the red filter). The same tonal changes occur when the light source illuminating your subject is filtered instead of your eye or camera lens.
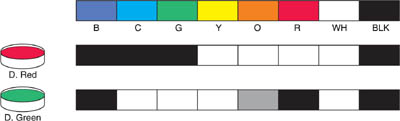
Figure 9.26 Colour filters with black and white film. Colour chart (top row) photographed on panchromatic film through a deep red (centre) and deep green filter (bottom)


Figure 9.27 Filtering to improve sky detail. The top picture was shot on pan film without any filter while the sun was diffused by a patch of thin cloud. A deep red filter was added for the bottom picture, shot a minute later when direct sun side-lit the building. Notice how filtering has darkened the mid-blue sky, the green grass and deep blue flag. The red tiles, however, appear lighter. (The filter was marked ×6, and since exposure was not read through the lens, two and a half stops extra was given, see page 192)
The form that filters take. Colour filters are sold as thin square sheets of dyed gelatin or polyester which you either hold over the lens or cut down to fit a filter holder. These are relatively cheap but soon pick up finger marks and scratches if used often. Some filters are made in glass and sold in circular mounts which screw into the front rim of your lens. The majority of dyed filters are now manufactured in optical (CR 39) resin, square in shape to slip into a holder. Remember that a glass or resin filter slightly alters the position of sharp focus, so always focus with your filter in place, especially if shooting at wide aperture. Gelatins have no such effect. It’s difficult to fit a filter over the front of a wide-angle lens without corners of the picture darkening (‘cut-off’). Some wide-angles therefore have 3 or 4 internal colour filters which a dial on the lens barrel will bring into use.
Using a colour filter reduces the image light, but this is taken into account by a modern exposure meter located close to or behind the lens because it reads through the filter. When you are using a hand meter you will have to increase exposure by a ‘filter factor’, shown in the table in Figure 9.26 (see also page 192).
Using colour filters in black and white photography
Blue sky and white clouds normally record with the sky much paler grey than it seemed at the time, because film is more sensitive than the eye to blue. Clouds may therefore barely show up unless you photograph (on pan film) through an orange-red filter. Light is then absorbed by the filter, making white clouds stand out boldly against what is now dark sky, Figure 9.27.
No change takes place if the whole sky is white with clouds, and there is little effect if the sky is only weak blue (containing a high proportion of white light too). You should also consider any other colours present. If the sky is part of a landscape with green foliage, for example, the green darkens as well. If you use a deep green filter here instead this will darken sky tone almost as much, but lightens the foliage instead. The table in Figure 9.26 lists the typical uses of other filters.
Whereas deep coloured filters are known as ‘contrast’ filters, one or two paler types, normally yellow or pale yellow-green, are known as ‘correction filters’. They make colours record in grey tones closer to their visual brightness instead of that given by unfiltered panchromatic film. This is really only important for critical technical photography – with most work the difference hardly shows. However, for landscapes with blue sky you could work with a yellow filter as standard.
Using colour filters with colour materials
Colour filters are used with colour films either for correction or for special effects.

Figure 9.28 Some gelatin sheet colour compensating filters. The numbers relate to their strength, the final letter to colour
Correction filters. There are two kinds of colour correction filters. Firstly a small number of often quite strong ‘colour conversion’ filters (Figure 9.22) allow you to shoot film balanced for one colour temperature in lighting of another. The second group consists of a wide range of mostly paler ‘colour compensating’ (CC) filters in six colours and various strengths (Figure 9.28). These allow you to ‘fine-tune’ adjustments towards warmer or colder results due to batch variations, working conditions, non-standard light sources, etc. They are especially important with colour transparency materials, which, unlike colour negatives, cannot easily be adjusted at the printing stage.
Conversion filters with odd reference numbers are yellowish or orange, for lowering the colour temperature of the light. Filters with even numbers are bluish and raise the colour temperature. These set filters change a particular light source by the amount required for a particular film type. For example an 85B, which is orange, changes daylight to the colour equivalent of 3200K tungsten lighting to suit tungsten-balanced film. An 81A, much paler pink, changes the slightly too-blue light of 3400K photolamps to 3200K to suit the same film.
Film type: |
|
|
source |
D/L |
Tungs. |
Daylight |
No filter |
85B |
Flash |
CC10Y* |
85B + CC10Y* |
Tungsten 3400K |
80B |
81A |
Tungsten 3200K |
80A |
No filter |
Tungsten 100W lamp |
|
82A |
Fluorescent (basis of test) |
CC40M |
CC50R |
*A few small flash units
Figure 9.29 Colour conversion filters
An 80A and an 80B filter (even numbers, and both blue) change 3200K and 3400K tungsten lighting respectively to match daylight and so suit daylight-balanced film. These are particularly useful filters because manufacturers offer so few films balanced for tungsten light. An 85B filter is always worth having in your camera case for roll and 35 mm materials if daylight scenes and tungsten lit shots are likely to be recorded on the same film. If subject lighting is mixed (a tungsten lamp used to ‘fill in’ and reduce contrast in a daylight-lit interior, for example) you can use the filter in sheet acetate form over one source to match it to the other. (Never use a lighting acetate for the lens; its poor optical qualities will upset image definition.)
Colour compensating filters, on the other hand, are best bought as gelatins of various tints and strengths. The most useful ones are yellow, red and magenta, in CC10 and CC20 strength (used together these form a CC30). Filters are most often needed on the lens:
• |
When using light sources (such as some fluorescent tubes) for which no one colour conversion filter exists. |
• |
To fine-tune your image colours, based on the appearance of processed slide film tests. If, for example, the test film shows a slight bluish shift, view it through yellow CC filters of different strengths until neutral midtone subject areas look neutral again. The rule then is to use a CC filter half this value over the lens when you reshoot. |
• |
To help counter the effect of reflective coloured surroundings – green vegetation, room decorations, etc. – which may otherwise tint your subject. |
• |
To give the scene an intentional slight all-over colour bias which strengthens mood, helps blend and coordinate a colour scheme. |
Colourless filters, used for both monochrome and colour films
Several important filters are equally useful whether you are shooting in black and white or colour.
Ultra-violet
UV-absorbing filters look like plain glass because they only absorb wavelengths our eyes cannot see. The sun’s short-wavelength radiation is most readily scattered by particles in the atmosphere – a reason why sky looks blue here on earth and distant haze in landscapes has a bluish appearance. On films, however, this scattered UV records too, increasing the mistiness of haze and, on colour film, exaggerating its blueness. The effect is especially notable with landscapes at high altitude and near the sea. A UV absorbing filter therefore helps to record the subject appearance you actually see. Modern camera lenses often incorporate a UV absorber within their optics.
Better still, for colour films, use a 1A ‘skylight’ or ‘haze’ filter, which has a barely perceptible pink tint. It’s worth having this filter on for all landscape work shot on reversal film, to prevent excess blue. (All warm-coloured filters act as UV absorbers.)

Figure 9.30 Neutral density filters

Figure 9.31 Polarized light. Top: unpolarized light, shown vibrating in two of many directions at right-angles to its path of travel, becomes restricted to one plane when passed through a polarizing filter. (It would be polarized this same way if reflected off a shiny non-metallic vertical surface.) Bottom: polarized light stopped by a polarizing filter turned 90° to the light’s plane of polarization
Neutral density
Grey, colourless filters affect all wavelengths equally and just cut down the image light by set amounts. They are made in various strengths, see Figure 9.30. A ×2 or ×4 ND filter is useful when you have fast film loaded but want to use a slow shutter speed (to create blur) or a wide aperture (for shallow depth of field), or just need to shoot in intense lighting without overexposing.
Polarizer
A polarizing filter also looks grey, and can be used as an ND filter, but has unusual extra properties which give it several applications. As Figure 9.32 shows, normal, unpolarized light waves vibrate in all planes at right-angles to their directions of travel. Polarized light is restricted to one plane. Unlike some creatures, our eyes cannot tell the difference between polarised and unpolarized light, but polarized light exists around us – in light from parts of blue sky at right-angles to sunlight, for example, or light reflected off any shiny non-metallic surface at a low angle (about 33° to the surface).
A polarizing filter has a special molecular structure. Think of its effect on light waves as like an egg slicer or narrow parallel railings: when its ‘lines’ are parallel to the plane in which polarized light is vibrating, light is transmitted, but when they are at right-angles the polarized light cannot pass. In practice you look through the filter, rotating it until an unwanted reflection disappears, or the sky darkens, and so on.
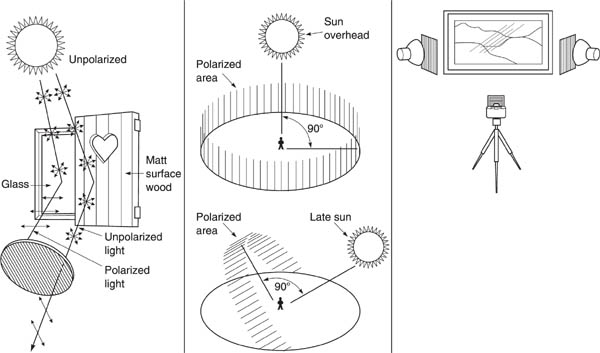
Figure 9.32 Using a polarizing filter. Left: to absorb light reflected from a glass window – most strongly polarized at 33° to the surface. Light scattered from the matt-surfaced wood remains unpolarized, and passes through the camera filter. Centre: rotating the polarizing filter darkens parts of blue sky at right-angles to the sun’s direction. Above: all reflections removed from glass by polarizing the light from the lamps and fitting another filter (turned 90°) over the camera lens

Figure 9.33 Suppressing reflections with a polarizer. Left: pattern of tables on a roof terrace with shiny brick flooring, no filter. Right: the same view, using a polarizing filter rotated to the position giving maximum effect
Whole lake surfaces or every window of an office block can be cleared of reflected skylight if you have the right viewpoint. Blue sky can be darkened in colour as well as in black and white photography, making clouds prominent. The colour of glossy objects such as glazed ceramic or shiny plastic becomes more intense when the sheen they reflect from surroundings is removed. If you are copying subjects like paintings behind glass, a polarizing sheet over each light plus another on the lens allows specular reflections off any surface, and at any angle, to be suppressed. (Note: regular linear polarizing filters, upset the exposure-reading or focus-sensing mechanisms in some SLR cameras. You must use a circularly polarized filter instead – they have a similar effect on the image.)
Special-effects filters and attachments
There are dozens of different colour filters for special effects. Some are so strong and assertive they destroy more pictures than they improve. ‘Graduated’ filters, however, have a tint which fades off into clear glass halfway across the disc. They allow you to tint just the sky (or ground) in landscapes, see Figure 9.24. When used vertically they can change the colour of one half of a street of buildings. Graduates that are almost colourless or grey are the most useful for reducing light from the sky and so allow bright cloud detail to record at the same exposure needed for darker land.
Always check the effect through the lens at your chosen f-number, because the aperture setting affects whether the change of colour will be very graduated or more abrupt. (Such filters cannot be used precisely with direct viewfinder cameras.)
Use fast film with deep coloured effects filters. They cut down light considerably and you will want a choice of apertures for different results. Suitable subjects include relatively colourless scenes – clouded seascapes or open landscapes (particularly under snow), stone buildings, sand dunes, silhouettes and stark shapes against fairly plain backgrounds.

Figure 9.34 Effects attachments. Top: faceted multi-image unit. Bottom: graduated tobacco tinted filter, for skies in landscapes, etc. The holder for the square shaped filter allows adjustment of its positioning up or down, to suit the placing of the horizon. See Figure 9.24
Attachments: Colourless special-effects optical attachments (they do not strictly filter anything out) include multi-image refractors, diffusers, and ‘starbursts’. None of them call for increase in exposure. Multi-image units are simply faceted glass discs which form an overlapping repeat pattern of part of the normal image formed by your camera lens. The number of images depends on the number of facets – typically 3, 4 or 5. The longer your lens focal length the farther apart these images are spaced. Such attachments must be deeply hooded from stray light, or image contrast will suffer.
Diffusers spread light parts of the image into dark parts, diluting shadow tones and colours, lowering contrast and helping to give an atmospheric, often high-key effect, like faint mist. ‘Starbursts’ have a grid of finely etched lines which turn brilliant highlights into radiating spokes of light like a star. The number of ‘rays’ depends upon the number and angle of the lines. Diffraction sometimes adds a slight colour effect too.
Other lens attachments have finely etched lines to create ‘rainbow’ effects around brilliant highlights by diffraction of light, Figure 9.35. It is vital to have one or more really intense point light sources in the picture – the sun, spotlights, or speckled reflections from water – otherwise these attachments just give a slightly diffused low-contrast image.
Effects attachments are helpful for ‘jazzing up’ product photography, enlivening disco shots, etc. But they are easily overused. Like the Effects menus offered in digital manipulation software programs (page 271), results then become familiar and boring.
The most worthwhile filters are also the most versatile – for example a polarizing filter and a UV or haze type, both of which are best in glass form. For colour work you should carry appropriate colour balance conversion filters, plus a few CC types. These could be gelatin. Medium red (or orange), deep yellow, and green filters in either gelatin or glass are the most useful for black and white, although your warmer colour-conversion filters may do double service for some of these. The most versatile ‘effects’ filters might be a graduate in either pale grey or brownish tint, to reduce sky overexposure and warm up grey clouded landscapes.

Figure 9.35 A rainbow or ‘colour-burst’ diffraction attachment adds a graphic effect to the brilliant spill of sunlight topping a simple post. (Take great care not to dazzle your eye looking through an SLR eyepiece unless the lens in fully stopped down.) An intense highlight in relatively dark surroundings is ideal for giving brilliant spectral patterns. This attachment also suits shots of disco spotlights, industrial welding, etc.
• |
Camera films have silver halides, plus gelatin and other additives, forming a light-sensitive emulsion coated on a plastic base. During manufacture, grain size and resolution, speed and contrast (all inter-related) are brought to specification, and the material is sensitized to chosen bands of the spectrum. |
• |
Exposure in the camera forms a latent image. Later this is amplified by chemical processing to give a visible, permanent result. |
• |
Light sensitivity is mostly quoted as an ISO rating – containing one figure which doubles with the doubling of speed, and another (with degree sign) which increases by three. In practice effective speed figures vary with the processing you choose to give. |
• |
Most black and white films have full-spectrum panchromatic sensitivity. Ortho materials are insensitive to red wavelengths. |
• |
Slow films have finer grain, better resolution, slightly more contrast than fast types. Line and lith films give extreme contrast, when appropriately developed. Some monochrome films which produce a final negative image in dye rather than black silver are processed in the same chemicals (C-41) as colour negatives. You can also shoot 35 mm black and white slides – regular or instant picture type – and larger-format instant prints and negatives. Infrared and SFX films give dreamlike landscapes, strange portraits. |
• |
Colour film emulsion layers are effectively sensitive to B, G and R. Colour negative film contains couplers, forming negative images in complementary yellow, magenta and cyan dye during chromogenic developing. Slide and transparency colour films first form black and white negatives, then the remaining emulsion is processed into Y, M, C dye images, finally creating a positive result. |
• |
Colour film emulsions are balanced to suit set light sources. The two main types are for daylight/flash, and for 3200K tungsten lamps. Use each type for other white-light sources with a colour conversion filter over the lens or light source. Negatives allow you further adjustment during printing. |
• |
Many faster colour and monochrome films can be exposed uprated in their ISO speed, then push processed. |
• |
Instant-picture materials include colour or monochrome slides; also colour prints (integral or peel-apart). |
• |
‘Professional’ films are more finely adjusted in performance than amateur types; often marketed in natural and vivid colour image strengths, geared to subject and aesthetic preference. |
Slide and transparency (‘reversal’) colour films are less tolerant of exposure error, give more contrasty images than colour negatives. Daylight type film needs a bluish (80A) filter in tungsten |
|
• |
lighting. |
• |
Colour filters (gelatin, glass or acetate) lighten the tone of subjects their own colour, and darken complementaries in terms of monochrome photography. The richer the colour of the filter and subject the stronger this effect. |
• |
Colour correction filters are used with colour films to convert the colour temperature of your subject lighting to suit the colour balance of your film. |
• |
Colour compensating (CC) filters allow you fine adjustment of colour balance for correction or mood. Graduated, split, colour spot, diffraction and other tinted lens attachments give special colour effects. |
• |
UV, neutral density and polarising filters, and many colourless effects attachments such as multi-image, diffusers, and starbursts, are usable for both black and white and colour work. Polarizers can darken polarized light from a blue sky, or reflections off shiny (non-metallic) surfaces. The effect varies according to the direction of your subject lighting and the angle you rotate the filter to on the lens. |
• |
Get really familiar with the practical performance of a selected range of films. Establish a technique which makes the most of your materials. Remember you can check your equipment, technique and composition as you shoot, via instant prints. |
• |
When you choose your film for a job it should match up to type of subject, lighting, and the size and form of the final image required. |
• |
Protect all film from excess humidity, chemical fumes, X-radiation. Refrigeration reduces how much the stored emulsion changes with time. |
1 |
Check the visual effects of colour filters. Set up a slide projector in a darkened room and either use its light to illuminate a colourful poster, or simply project a slide containing many strong colours. Use a series of deep colour filters (see Project 2) in turn in front of the lens and notice which parts of the poster or slide image darken/lighten in tone. |
2 |
Check colour casts. Using a daylight slide film, shoot subjects (1) in daylight, (2) in tungsten light with and without an 80A filter, (3) in fluorescent light with and without a correction filter for the film, see Figure 9.29. Also (4) in daylight with an 85B filter. Using the same subjects, try shooting the same sequence again on a tungsten light film. Compare processed results – examine the distorted colours given by mismatching, and consider them for creative effects. |