You’ve already seen how you can draw common geometric shapes in augmented reality such as cylinders, boxes, pyramids, and spheres. You’ve also seen how you can draw custom geometric shapes by defining starting and end points. Creating and displaying virtual objects on the screen typically occurs in code.
However, what if you want to give the user the choice of drawing items on the screen? That’s what you’ll learn in this chapter: how to let the user draw lines directly on an augmented reality view.
First, let’s explain another debugging feature that you’ve been using all this time:
sceneView.showsStatistics = true
This line of code shows the number of frames per second that the camera displays, as shown in Figure 8-1.
Figure 8-1
Viewing frames per second in an augmented reality app
Frames per second defines how often the camera updates or renders its view. Each time the camera updates or renders its view (usually 60 frames per second), it runs a willRenderScene function like this:
So to draw something in an augmented reality view, we need to use this willRenderScene function to update or render an image on the screen.
To draw an item in an augmented reality, we need to create a new Xcode project by following these steps:
1.
Start Xcode. (Make sure you’re using Xcode 10 or greater.)
2.
Choose File ➤ New ➤ Project. Xcode asks you to choose a template.
3.
Click the iOS category.
4.
Click the Single View App icon and click the Next button. Xcode asks for a product name, organization name, organization identifiers, and content technology.
5.
Click in the Product Name text field and type a descriptive name for your project, such as Drawing. (The exact name does not matter.)
6.
Click the Next button. Xcode asks where you want to store your project.
7.
Choose a folder and click the Create button. Xcode creates an iOS project.
Now modify the Info.plist file to allow access to the camera and to use ARKit by following these steps:
1.
Click the Info.plist file in the Navigator pane. Xcode displays a list of keys, types, and values.
2.
Click the disclosure triangle to expand the Required Device Capabilities category to display Item 0.
3.
Move the mouse pointer over Item 0 to display a plus (+) icon.
4.
Click this plus (+) icon to display a blank Item 1.
5.
Type arkit under the Value category in the Item 1 row.
6.
Move the mouse pointer over the last row to display a plus (+) icon.
7.
Click on the plus (+) icon to create a new row. A popup menu appears.
8.
Choose Privacy – Camera Usage Description.
9.
Type AR needs to use the camera under the Value category in the Privacy – Camera Usage Description row.
Now it’s time to modify the ViewController.swift file to use ARKit and SceneKit by following these steps:
1.
Click on the ViewController.swift file in the Navigator pane.
2.
Edit the ViewController.swift file so it looks like this:
import UIKit
import SceneKit
import ARKit
class ViewController: UIViewController, ARSCNViewDelegate {
let configuration = ARWorldTrackingConfiguration()
override func viewDidLoad() {
super.viewDidLoad()
// Do any additional setup after loading the view, typically from a nib.
}
}
To view augmented reality in our app, add a single ARKit SceneKit View (ARSCNView) and a UISwitch so the user interface looks similar to Figure 8-2.
Figure 8-2
The user interface includes a single UISwitch on an ARSCNView
After you’ve designed your user interface, you need to add constraints. To add constraints, choose Editor ➤ Resolve Auto Layout Issues ➤ Reset to Suggested Constraints at the bottom half of the menu under the All Views in Container category.
After designing the user interface, the next step is to connect the user interface items to the Swift code in the ViewController.swift file. To do this, follow these steps:
1.
Click the Main.storyboard file in the Navigator pane.
2.
Click the Assistant Editor icon or choose View ➤ Assistant Editor ➤ Show Assistant Editor to display the Main.storyboard and the ViewController.swift file side by side.
3.
Move the mouse pointer over the ARSCNView, hold down the Control key, and Ctrl-drag under the class ViewController line.
4.
Release the Control key and the left mouse button. A popup menu appears.
5.
Click in the Name text field and type sceneView, then click the Connect button. Xcode creates an IBOutlet as shown here:
@IBOutlet var sceneView: ARSCNView!
6.
Move the mouse pointer over the UISwitch, hold down the Control key, and Ctrl-drag under the IBOutlet sceneView line.
7.
Release the Control key and the left mouse button. A popup menu appears.
8.
Click in the Name text field and type switchDraw, then click the Connect button. Xcode creates an IBOutlet as shown here:
@IBOutlet var switchDraw: UISwitch!
9.
Edit the viewDidLoad function so it looks like this:
override func viewDidLoad() {
super.viewDidLoad()
// Do any additional setup after loading the view, typically from a nib.
The renderer willRenderScene function runs every time the app updates the augmented reality view, which is usually 60 frames per second.
To draw on the augmented reality view, we must first retrieve the iOS device camera’s location within the willRenderScene function. To do this, we can use the following, which retrieves the camera’s position and direction:
guard let pov = sceneView.pointOfView else {return}
The guard statement just makes sure we get camera information from the iOS device. If for some reason we do not, then the guard statement immediately exits the willRenderScene function.
Assuming we get camera information from the iOS device, the next step is to transform this information into a 4 by 4 matrix that contains various information about the camera:
let transform = pov.transform
The third row of this 4 by 4 matrix contains the x, y, and z rotation of the camera. To retrieve this information, we need to use this code:
let rotation = SCNVector3(-transform.m31, -transform.m32, -transform.m33)
Notice that there’s a negative sign in front of each item retrieved from the third row of the matrix. This negative sign reverses the rotation information because without it, moving right on the x-axis would be negative (instead of positive), moving up on the y-axis would be negative (instead of positive), and moving back on the z-axis would be negative (instead of positive).
The rotation defines the camera’s direction that it’s facing. Next we need to retrieve the location of the camera from the fourth row of the 4 by 4 matrix like this:
let location = SCNVector3(transform.m41, transform.m42, transform.m43)
Once we have the rotation and location of the camera, we need to add their x, y, and z coordinates to get the position of the camera like this:
The purpose of this app is to display a red pointer in the center of the screen. When the user turns the UISwitch to the On position, then the app will draw a green line wherever the user points the camera. To keep the app from drawing right away, let’s turn the UISwitch to the Off position by following these steps:
1.
Click the Main.storyboard file in the Navigator pane. The user interface appears.
2.
Click on the UISwitch to select it.
3.
Click on the Show the Attributes Inspector icon or choose View ➤ Inspectors ➤ Show Attributes Inspector.
4.
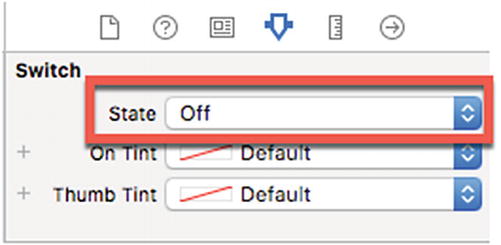
Click on the State popup menu and choose Off (see Figure 8-3).
Figure 8-3
Changing the UISwitch State value to Off
Now we need to write additional code inside the renderer function, which should currently look like this:
We need additional code inside this renderer function to determine whether to show the pointer or draw a line. Since this additional code will need to run at the same time that the app displays the augmented reality view from the camera, we need to use the DispatchQueue. This allows the app to show the camera and draw a line at the same time. A DispatchQueue simply defines code to run separately from the main code and looks like this:
DispatchQueue.main.async {
}
Inside this DispatchQueue, we need an if-else statement. If the UISwitch is turned on, then draw a line. Otherwise, display a pointer to show where the line will start to appear when the switch is turned on. This makes the DispatchQueue code look like this:
DispatchQueue.main.async {
if self.switchDraw.isOn {
// Draw a line
} else {
// Display a pointer
}
}
First, let’s add code to draw a green line in the augmented reality view. The first step is to create a node and define it as a sphere like this:
let drawNode = SCNNode()
drawNode.geometry = SCNSphere(radius: 0.01)
Next, we’ll color the sphere green and place it at the current position that of the camera’s location and rotation so it appears in the center of the augmented reality view:
This code draws successive green spheres on the screen, creating the illusion of a line. Of course, the app only draws this green line if the UISwitch is set to On. If the user sets the UISwitch to Off, then the else portion of the if-else statement must run, which displays a pointer.
Let’s create the pointer as a red sphere like this:
Just like creating a green sphere to draw a line, this code will display a red sphere and draw a line, which is not what we want. The problem is as the user moves the camera around, the app keeps drawing red spheres that creates the illusion of a line.
What we need is to draw a red sphere and then delete the previous red sphere so it does not create a line on the screen. To do that, we need the following code:
self.sceneView.scene.rootNode.enumerateChildNodes({ (node, _) in
if node.name == "aiming point" {
node.removeFromParentNode()
}
})
The enumerateChildNodes creates a loop that examines every node connected to the rootnode. Then inside this loop we use the removeFromParentNode command to remove the node. This will delete all nodes connected to the rootnode, including our green line, so we need an if statement that checks if the node is called “aiming point”. If so, then delete just that node.
That means we need to name the pointer node as “aiming point” like this:
point.name = "aiming point"
So the full DispatchQueue code should look like this:
self.sceneView.scene.rootNode.enumerateChildNodes({ (node, _) in
if node.name == "aiming point" {
node.removeFromParentNode()
}
})
self.sceneView.scene.rootNode.addChildNode(point)
}
}
}
}
Modify the code in your ViewController.swift file to match the code. Then, to see the app run, do the following:
1.
Connect an iOS device to your Macintosh through its USB cable.
2.
Click the Run button or choose Product ➤ Run.
3.
When the app runs, move the iOS device around to see the red pointer in the middle of the screen.
4.
Tap the UISwitch to turn it On.
5.
Move the iOS device around and notice that it now draws a green line.
6.
Tap the UISwitch to turn it Off.
7.
Move the iOS device to a new location.
8.
Tap the UISwitch to turn it On.
9.
Move the iOS device to draw a separate green line (see Figure 8-4).
10.
Click the Stop button or choose Product ➤ Stop.
Figure 8-4
Drawing a line in augmented reality
To polish this app, we need one more feature. You may notice that you can turn the UISwitch on to draw a green line, then turn the UISwitch off again to move the camera to a new location. Now if you turn the UISwitch back on again, you can draw a green line somewhere else in the augmented reality view.
However, if we keep adding green lines, eventually the screen gets filled with green lines. So let’s add a simple feature to let us clear the entire screen by following these steps:
1.
Click the Main.storyboard file in the Navigator pane.
2.
Add a UIButton to the user interface.
3.
Change the title of the UIButton to Clear. You may also want to resize the button to make it wider.
4.
Click the Show the Attributes Inspector icon or choose View ➤ Inspectors ➤ Show Attributes Inspector.
5.
Change the background color of the UIButton to white (see Figure 8-5).
Click the Show Assistant Editor icon or choose View ➤ Assistant Editor ➤ Show Assistant Editor. Xcode displays your Main.storyboard file and ViewController.swift file side by side.
8.
Move the mouse pointer over the UIButton, hold down the Control key, and Ctrl-drag underneath the IBOutlet. A popup window appears.
9.
Click in the Name text field and type clearButton.
10.
Click the Connect button. Xcode creates an IBOutlet as follows:
@IBOutlet var clearButton: UIButton!
11.
Click the Show Standard Editor icon or choose View ➤ Standard Editor ➤ Show Standard Editor.
12.
Click on the ViewController.swift file.
13.
Add the following code to the bottom of the DispatchQueue code:
if self.clearButton.isHighlighted {
self.sceneView.scene.rootNode.enumerateChildNodes({ (node, _) in
node.removeFromParentNode()
})
}
The entire ViewController.swift file should look like this:
import UIKit
import SceneKit
import ARKit
class ViewController: UIViewController, ARSCNViewDelegate {
@IBOutlet var sceneView: ARSCNView!
@IBOutlet var switchDraw: UISwitch!
@IBOutlet var clearButton: UIButton!
let configuration = ARWorldTrackingConfiguration()
override func viewDidLoad() {
super.viewDidLoad()
// Do any additional setup after loading the view, typically from a nib.
self.sceneView.scene.rootNode.enumerateChildNodes({ (node, _) in
if node.name == "aiming point" {
node.removeFromParentNode()
}
})
self.sceneView.scene.rootNode.addChildNode(point)
}
if self.clearButton.isHighlighted {
self.sceneView.scene.rootNode.enumerateChildNodes({ (node, _) in
node.removeFromParentNode()
})
}
}
}
}
To see the app run, do the following:
1.
Connect an iOS device to your Macintosh through its USB cable.
2.
Click the Run button or choose Product ➤ Run.
3.
When the app runs, move the iOS device around to see the red pointer in the middle of the screen.
4.
Tap the UISwitch to turn it On.
5.
Move the iOS device around and notice that it now draws a green line.
6.
Tap the UISwitch to turn it Off.
7.
Move the iOS device to a new location.
8.
Tap the UISwitch to turn it On.
9.
Move the iOS device to draw a separate green line.
10.
Tap the Clear button. Notice that the app now clears all the green lines you’ve drawn.
11.
Click the Stop button or choose Product ➤ Stop.
Summary
An augmented reality app relies on the camera in an iOS device. This camera typically refreshes images at the rate of 60 frames per second (fps). You can view the number of frames per second that your app displays by adding this line of code:
sceneView.showsStatistics = true)
The renderer function runs each time the app updates the image displayed, which is 60 frames per second. By drawing objects inside the renderer function, your app can constantly draw an image. In our example app, we drew a sphere but since the renderer function constantly drew a sphere, it drew multiple spheres. When the user moves the camera, this draws multiple green spheres that create the illusion of drawing a line.
To clear virtual objects, we can use the enumerateChildNodes loop that examines each node:
self.sceneView.scene.rootNode.enumerateChildNodes({ (node, _) in
})
To avoid removing all nodes, we can name a node and then use an if statement to remove only certain named nodes. Drawing in an augmented reality view requires getting the camera’s current rotation and location so that the app can draw virtual objects wherever the user points the camera.