
Up until now, every augmented reality view project we’ve created has had one problem. While you might be able to add virtual objects to an augmented reality view, the moment you close the app and start it again, any virtual objects you added would now be gone.
In many cases, this is exactly what you want, so starting the app again creates a blank augmented reality view for the user. However, sometimes you may want to retain any virtual objects placed in the view. To save an augmented reality view so it appears in another person’s app or in your own app if you start it up again at a later time, you need to use persistence.
Persistence simply saves any virtual objects placed in an augmented reality view in a world map. By saving this world map, you can retain the placement of virtual objects. By loading this world map later, you can restore an augmented reality view to a previous state.
- 1.
Start Xcode. (Make sure you’re using Xcode 10 or greater.)
- 2.
Choose File ➤ New ➤ Project. Xcode asks you to choose a template.
- 3.
Click the iOS category.
- 4.
Click the Single View App icon and click the Next button. Xcode asks for a product name, organization name, organization identifiers, and content technology.
- 5.
Click in the Product Name text field and type a descriptive name for your project, such as Persistence. (The exact name does not matter.)
- 6.
Click the Next button. Xcode asks where you want to store your project.
- 7.
Choose a folder and click the Create button. Xcode creates an iOS project.
- 1.
Click the Info.plist file in the Navigator pane. Xcode displays a list of keys, types, and values.
- 2.
Click the disclosure triangle to expand the Required Device Capabilities category to display Item 0.
- 3.
Move the mouse pointer over Item 0 to display a plus (+) icon.
- 4.
Click this plus (+) icon to display a blank Item 1.
- 5.
Type arkit under the Value category in the Item 1 row.
- 6.
Move the mouse pointer over the last row to display a plus (+) icon.
- 7.
Click on the plus (+) icon to create a new row. A popup menu appears.
- 8.
Choose Privacy – Camera Usage Description.
- 9.
Type AR needs to use the camera under the Value category in the Privacy – Camera Usage Description row.
- 1.
Click on the ViewController.swift file in the Navigator pane.
- 2.
Edit the ViewController.swift file so it looks like this:
The most important line to notice is the one that adds the ARSCNViewDelegate because this contains the functions we need to save and restore a world map.
A single ARKit SceneKit view (ARSCNView)
Three UIButtons
A single UILabel

Three buttons, a label, and an ARKit SceneKit view on the user interface
After you’ve designed your user interface, you need to add constraints. To add constraints, choose Editor ➤ Resolve Auto Layout Issues ➤ Reset to Suggested Constraints at the bottom half of the menu under the All Views in Container category.
- 1.
Click the Main.storyboard file in the Navigator pane.
- 2.
Click the Assistant Editor icon or choose View ➤ Assistant Editor ➤ Show Assistant Editor to display the Main.storyboard and the ViewController.swift file side by side.
- 3.
Move the mouse pointer over the ARSCNView, hold down the Control key, and Ctrl-drag under the class ViewController line.
- 4.
Release the Control key and the left mouse button. A popup menu appears.
- 5.Click in the Name text field and type sceneView, then click the Connect button. Xcode creates an IBOutlet as shown here:@IBOutlet var sceneView: ARSCNView!
- 6.
Move the mouse over the label, hold down the Control key, and Ctrl-drag under the IBOutlet you just created.
- 7.
Release the Control key and the left mouse button. A popup menu appears.
- 8.Click in the Name text field and type lblMessage, then click the Connect button. Xcode creates an IBOutlet as shown here:@IBOutlet var lblMessage: UILabel!
- 9.Underneath the two IBOutlets, type the following:let configuration = ARWorldTrackingConfiguration()
- 10.Edit the viewDidLoad function so it looks like this:override func viewDidLoad() {super.viewDidLoad()// Do any additional setup after loading the view, typically from a nib.sceneView.debugOptions = [ARSCNDebugOptions.showWorldOrigin, ARSCNDebugOptions.showFeaturePoints]sceneView.delegate = selfsceneView.session.delegate = selfconfiguration.planeDetection = .horizontallet tapGesture = UITapGestureRecognizer(target: self, action: #selector(handleTap))sceneView.addGestureRecognizer(tapGesture)self.lblMessage.text = "Tap to place a virtual object"sceneView.session.run(configuration)}
Saving a World Map
At this point, the app will simply allow the user to tap the screen and place blue boxes in the augmented reality view. However, you cannot save the augmented reality view yet. To save an augmented reality view, we need to store the current augmented reality view as a world map.
- 1.
Click the Main.storyboard file in the Navigator pane.
- 2.
Click the Assistant Editor icon or choose View ➤ Assistant Editor ➤ Show Assistant Editor to display the Main.storyboard and the ViewController.swift file side by side.
- 3.
Move the mouse pointer over the button displaying Save on the user interface, hold down the Control key, and Ctrl-drag under the class ViewController line.
- 4.
Release the Control key and the left mouse button. A popup menu appears.
- 5.
Make sure the Connection popup menu displays Action, then click in the Name text field and type saveButton.
- 6.Click in the Type popup menu and choose UIButton, then click the Connect button. Xcode creates an IBAction method as shown here:@IBAction func saveButton(_ sender: UIButton) {}
- 7.Edit this saveButton IBAction method as follows:@IBAction func saveButton(_ sender: UIButton) {saveMap()}
Loading a World Map
After we’ve saved a world map, the next step is to load that world map back into the augmented reality view. This requires using the user defaults key (defined as worldmap). To retrieve the stored world map, we need to connect the Load button on the user interface to an IBAction method and then write code to retrieve any data stored in the user defaults database.
- 1.
Click the Main.storyboard file in the Navigator pane.
- 2.
Click the Assistant Editor icon or choose View ➤ Assistant Editor ➤ Show Assistant Editor to display the Main.storyboard and the ViewController.swift file side by side.
- 3.
Move the mouse pointer over the button displaying Load on the user interface, hold down the Control key, and Ctrl-drag under the class ViewController line.
- 4.
Release the Control key and the left mouse button. A popup menu appears.
- 5.
Make sure the Connection popup menu displays Action, then click in the Name text field and type saveButton.
- 6.Click in the Type popup menu and choose UIButton, then click the Connect button. Xcode creates an IBAction method as shown here:@IBAction func loadButton(_ sender: UIButton) {}
- 7.Edit this saveButton IBAction method as follows:@IBAction func loadButton(_ sender: UIButton) {loadMap()}
Each time the user taps the Load button, the Load button runs the loadMap() function , which will need to either retrieve a previously saved world map or simply start an ordinary augmented reality session in case no previous world map has been stored.
Clearing an Augmented Reality View
At this point, our app can save a world map and load it again, but let’s make one final adjustment and create a Clear button. When the user taps the Clear button, we need to remove any virtual objects so we can create and save a new augmented reality view.
- 1.
Click the Main.storyboard file in the Navigator pane.
- 2.
Click the Assistant Editor icon or choose View ➤ Assistant Editor ➤ Show Assistant Editor to display the Main.storyboard and the ViewController.swift file side by side.
- 3.
Move the mouse pointer over the button displaying Clear on the user interface, hold down the Control key, and Ctrl-drag under the class ViewController line.
- 4.
Release the Control key and the left mouse button. A popup menu appears.
- 5.
Make sure the Connection popup menu displays Action, then click in the Name text field and type saveButton.
- 6.Click in the Type popup menu and choose UIButton, then click the Connect button. Xcode creates an IBAction method as shown here:@IBAction func clearButton(_ sender: UIButton) {}
- 7.Edit this saveButton IBAction method as follows:@IBAction func clearButton(_ sender: UIButton) {clearMap()}
- 1.
Connect an iOS device to your Macintosh through its USB cable.
- 2.
Click the Run button or choose Product ➤ Run.
- 3.
Aim your iOS device’s camera at a flat surface with plenty of distinctive features and tap the screen to place blue boxes in the augmented reality view, as shown in Figure 17-2.
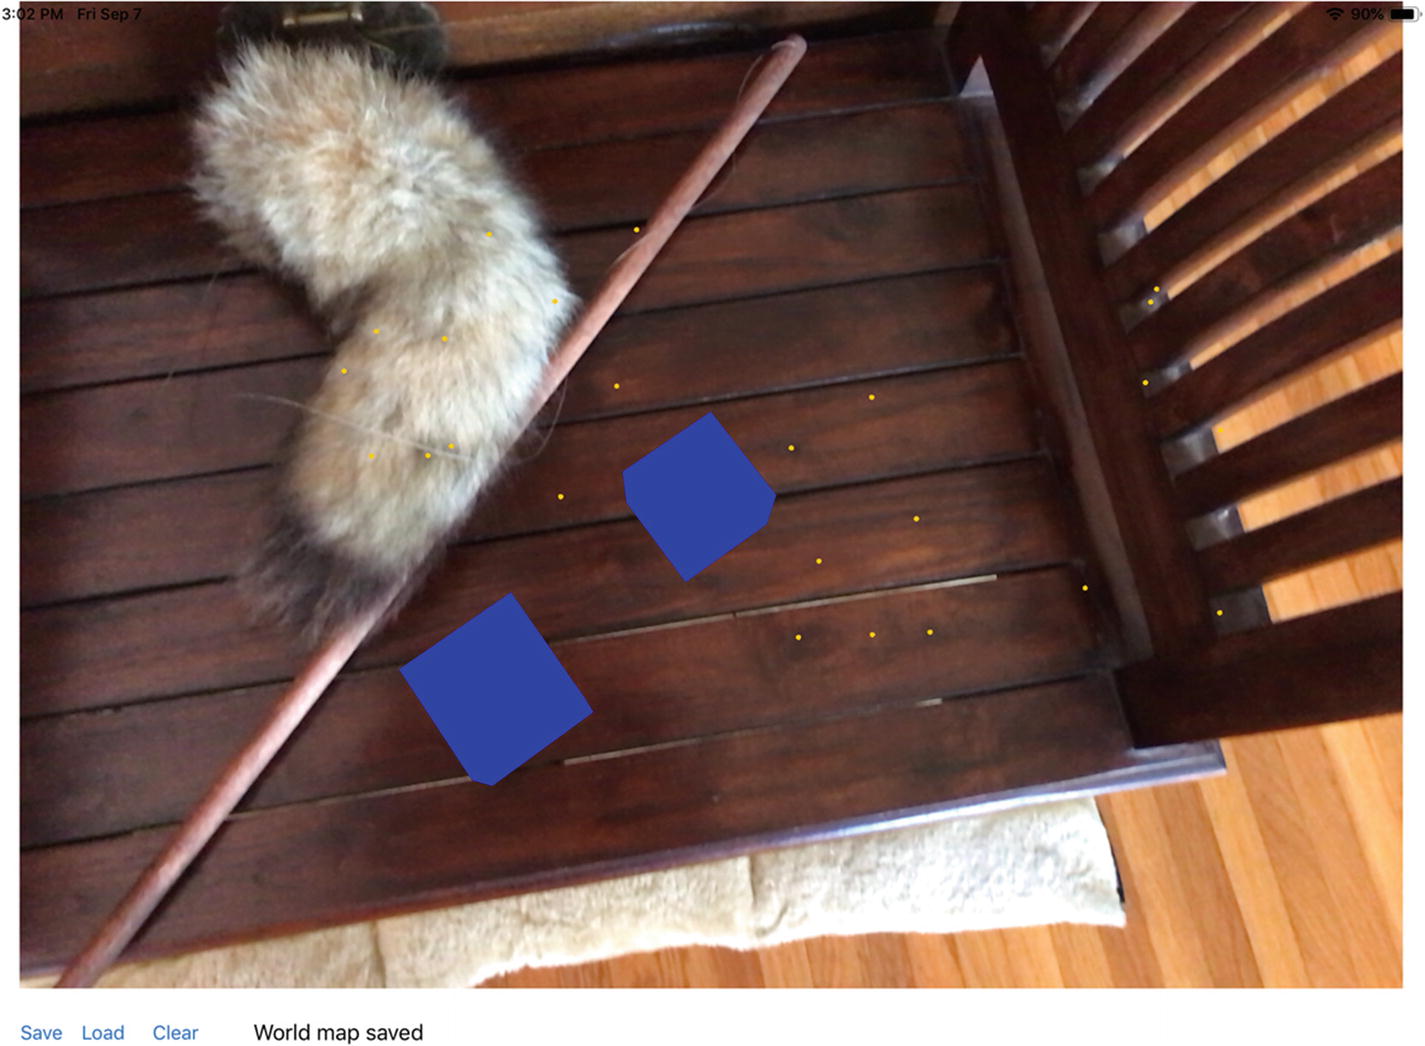
Placing virtual objects on a distinctive flat surface
- 4.
Press the Home button twice on your iOS device to display a list of currently running apps (or swipe up on the Home screen and pause on an iOS device without a Home button). All currently running apps appear as thumbnail images, as shown in Figure 17-3.
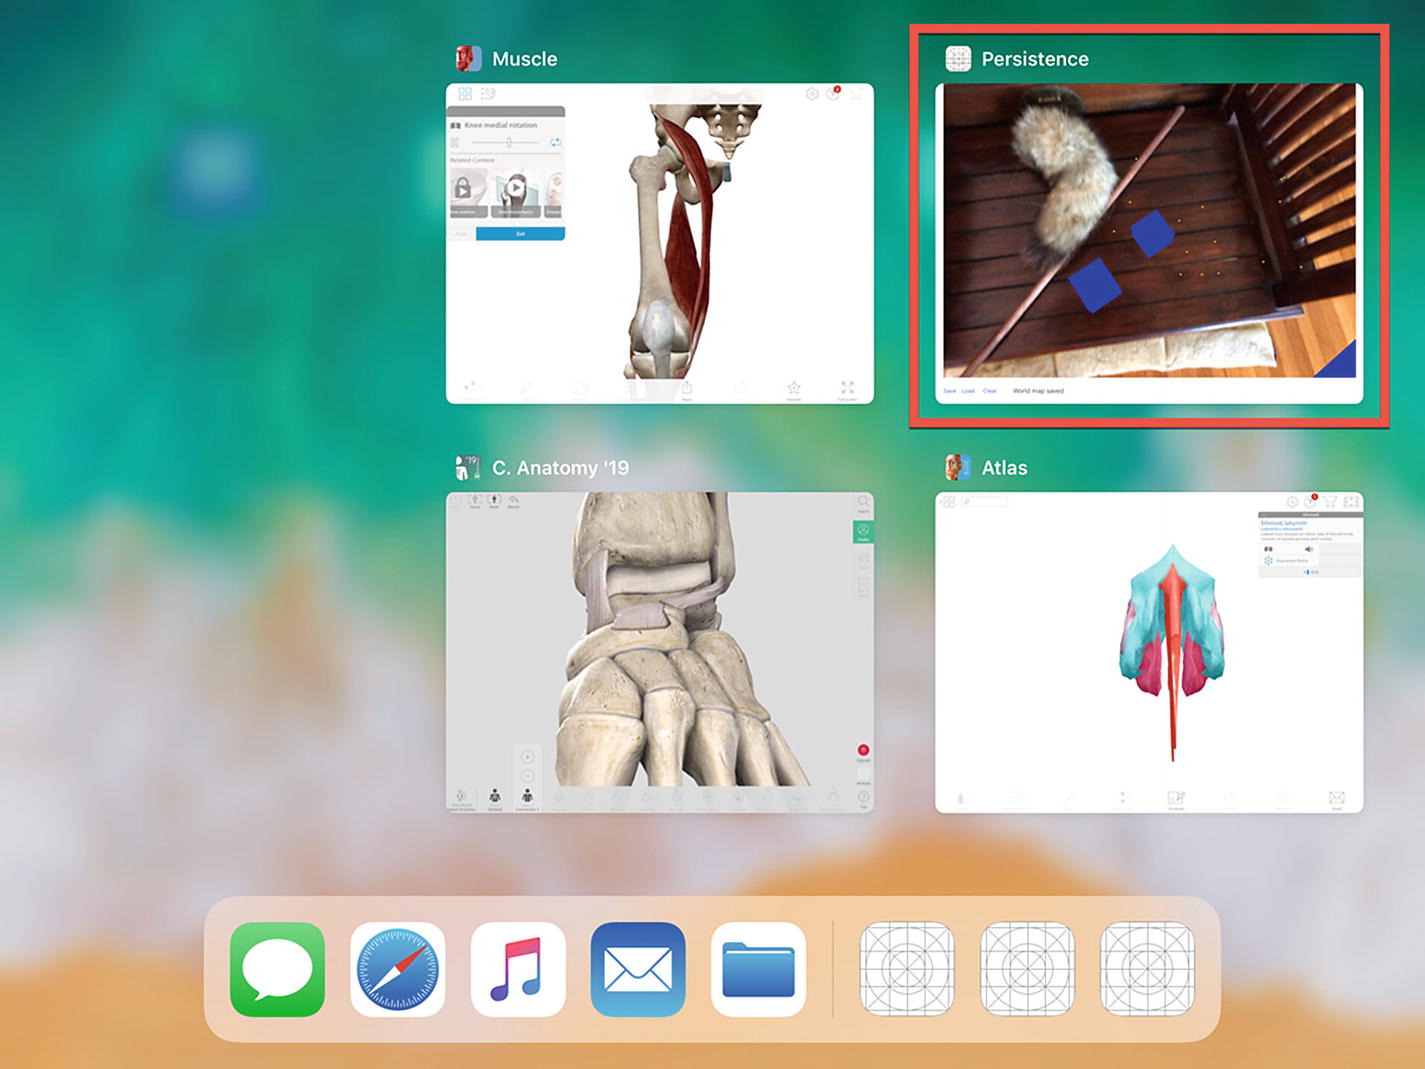
Displaying currently running apps as thumbnail images
- 5.
Swipe up on the Persistence app thumbnail (or firmly press on the Persistence app thumbnail and tap the minus sign inside a red circle on an iOS device without a Home button).
- 6.
Return to the Home screen and tap on the Persistence icon to load the app again, as shown in Figure 17-4.

Finding the Persistence icon on the iOS device screen again
- 7.
Tap the Load button on the Persistence app. The message Previous world map loaded appears.
- 8.
Aim your iOS device’s camera at the flat surface where you had previously placed one or more blue boxes in the augmented reality view. As soon as the app recognizes the same area, it displays the virtual objects you placed earlier. (You must place your virtual objects on a flat surface with lots of distinctive features to make it easy for ARKit to recognize the same area and display the saved virtual objects in the same location again. If ARKit cannot recognize the area, it won’t be able to display the saved world map.)
- 9.
Tap the Clear button to remove all virtual objects from the augmented reality view. At this point, you can repeat Steps 3–8 again.
- 10.
Click the Stop button or choose Product ➤ Stop.
Summary
Persistence gives your app a way to save the current augmented reality view so the user can load it and view it again. This can be handy if an augmented reality session can take place over an extended period of time, such as an augmented reality game where users can save the game and return to it at another time.
Saving a world map in the user defaults is the simplest way to store an augmented reality view. The key is simply giving the user the ability to save a world map, load it at a later time, and clear the augmented reality view.