
Augmented reality works by tracking the real world through a camera. By identifying solid objects in the real world such as floors, tables, and walls, augmented reality can then accurately place virtual objects on the scene that create the illusion of actually being there. Even if the virtual object is nothing more than a cartoon Pokémon character, augmented reality must overlay that virtual object so the virtual object feels like it’s part of the real world seen through a camera.

Defining the x-, y-, and z-axes for the ARKit coordinate system
To place virtual objects in the real world, ARKit uses a technique called visual-inertial odometry , which is just a fancy way of recognizing solid objects in the real world (such as walls and tabletops) and the current position of the camera (the iOS device) in relation to objects in the real world. With this information, ARKit can place objects on real-world items such as floors or desks, or at a fixed distance from the camera’s current location, such as two meters in front of you and a half meter to your left.
Identifying real-life objects seen through a camera is known as world tracking. World tracking accuracy works best in good lighting with multiple, contrasting objects that can be easily spotted such as a chair and a table in a room. World tracking accuracy can suffer in dim or poor lighting or when viewing objects that are not easy to identify such as a solid wall or road with no other contrasting objects.
Think of how you identify objects in the real world. It’s easy to identify a lamp on a table because you can see both the lamp’s entire outline and the table surface and edges. If someone just showed you a close up of a lamp or table surface, you might not know whether you’re looking at a wall or a floor. As a general rule, if it’s easy for a person to identify objects in an image, it’s easy for ARKit to identify the shape of those objects too.
Besides identifying object boundaries, another key to accuracy depends on the user holding the camera steady. This gives ARKit time to accurately map out its surroundings. If the user moves the camera around too quickly or in erratic movements, ARKit will have a harder time accurately identifying real-world objects in the same way you might have trouble identifying objects if shown a video of someone moving a camera rapidly in all directions.
Displaying the World Origin
- 1.
Start Xcode. (Make sure you’re using Xcode 10 or greater.)
- 2.
Choose File ➤ New ➤ Project. Xcode asks you to choose a template.
- 3.
Click the iOS category.
- 4.
Click the Single View App icon and click the Next button. Xcode asks for a product name, organization name, organization identifiers, and content technology.
- 5.
Click in the Product Name text field and type a descriptive name for your project, such as World Tracking. (The exact name does not matter.)
- 6.
Make sure the Content Technology popup menu displays SceneKit.
- 7.
Click the Next button. Xcode asks where you want to store your project.
- 8.
Choose a folder and click the Create button. Xcode creates an iOS project.
- 1.
Click the Info.plist file in the Navigator pane. Xcode displays a list of keys, types, and values.
- 2.
Click the disclosure triangle to expand the Required Device Capabilities category to display Item 0.
- 3.
Move the mouse pointer over Item 0 to display a plus (+) icon.
- 4.
Click this plus (+) icon to display a blank Item 1.
- 5.
Type arkit under the Value category in the Item 1 row.
- 6.
Move the mouse pointer over the last row to display a plus (+) icon.
- 7.
Click on the plus (+) icon to create a new row. A popup menu appears.
- 8.
Choose Privacy – Camera Usage Description.
- 9.
Type AR needs to use the camera under the Value category in the Privacy – Camera Usage Description row.
- 1.
Click on the Main.storyboard file in the Navigator pane of Xcode. Xcode displays an iOS device on the storyboard screen that you can change by clicking View As at the bottom of the storyboard screen.
- 2.
Click the Object Library icon to display the Object Library window.
- 3.
Click in the search field at the top of the Object Library window and type ARKit . The Object Library window displays all ARKit objects available.
- 4.
Drag the ARKit SceneKit View from the Object Library on to the storyboard.
- 5.
Resize the ARKit SceneKit View on the storyboard. The exact size and position of the ARKit SceneKit View isn’t important, but make it large enough because the size of the ARKit SceneKit View defines how large the image will appear when viewed through the iOS device’s camera.
- 6.
Click on the ARKit SceneKit View to select it and then choose Editor ➤ Resolve AutoLayout Issues ➤ Reset to Suggested Constraints. Xcode adds constraints to keep your ARKit SceneKit View properly aligned no matter which size or orientation the user holds the iOS device.
- 7.
Click the Show Assistant Editor icon, or choose View ➤ Assistant Editor ➤ Use Assistant Editor. Xcode displays the ViewController.swift file side by side with the storyboard.
- 8.
Move the mouse over the ARKit SceneKit View, hold down the Control key, and drag the mouse underneath the class ViewController line.
- 9.
Release the Control key and the mouse. Xcode displays a popup menu to define a name for the IBOutlet.
- 10.Click in the Name field and type sceneView and press Return. Xcode creates an IBOutlet in the ViewController.swift file as follows:@IBOutlet var sceneView: ARSCNView!
- 11.
Click the Use Standard Editor icon or choose View ➤ Standard Editor ➤ Use Standard Editor.
- 12.
Click the ViewController.swift file in the Navigator pane. Xcode displays the Swift code stored in the ViewController.swift file.
- 13.Edit the ViewController.swift file as follows:import UIKitimport SceneKitimport ARKitclass ViewController: UIViewController, ARSCNViewDelegate {@IBOutlet var sceneView: ARSCNView!override func viewDidLoad() {super.viewDidLoad()sceneView.delegate = selfsceneView.showsStatistics = truesceneView.debugOptions = [ARSCNDebugOptions.showWorldOrigin]}override func viewWillAppear(_ animated: Bool) {super.viewWillAppear(animated)let configuration = ARWorldTrackingConfiguration()sceneView.session.run(configuration)}}
- 1.
Connect your iOS device to your Macintosh through its USB cable.
- 2.
Click on the Set the Active Scheme popup menu and choose the iOS device you’ve connected to your Macintosh, as shown in Figure 3-2.

The Set the Active Scheme popup menu
- 3.
Click on the Run button or choose Product ➤ Run. (The first time you run this app, you’ll need to grant it access to the camera.)
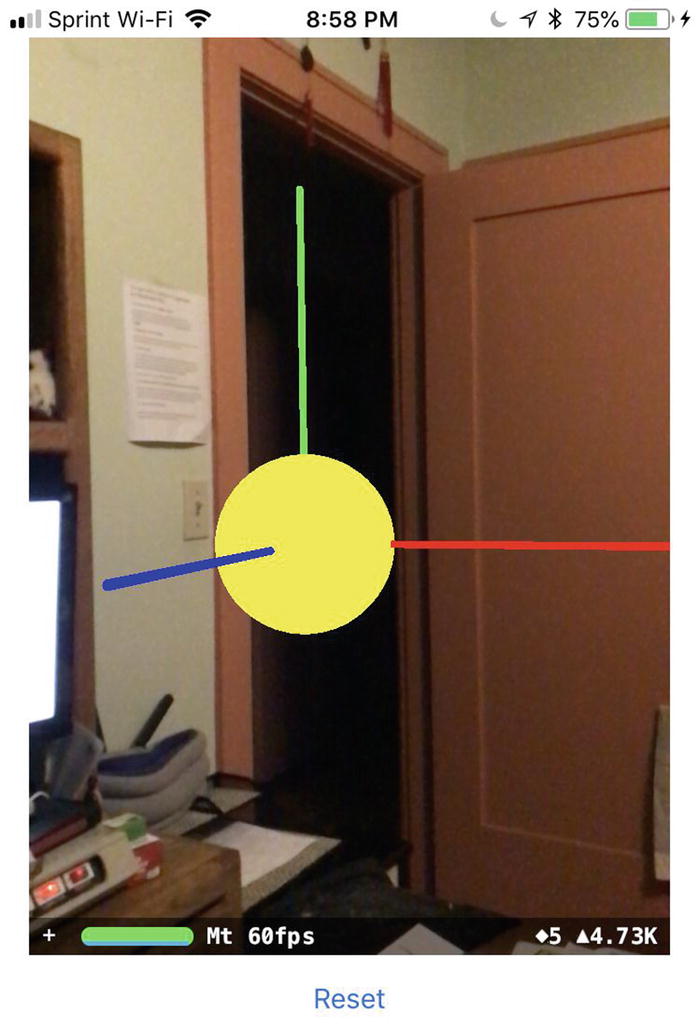
- 4.
Turn and aim your iOS camera until you spot the colored world coordinates floating in midair, as shown in Figure 3-3.

Viewing the world coordinate system through an iOS device camera
- 5.
Click the Stop button or choose Product ➤ Stop.
ARKit displays the world origin coordinate system where your iOS device appears as soon as the app runs. That’s why you may need to step back to see the world coordinate system floating before your eyes the moment your app starts running.
Resetting the World Origin
Each time you run an augmented reality app, it defines the world coordinates at the current location of the iOS device. Of course, you may not want the world coordinate system to appear only where you’re currently holding your iOS device when the app runs. That’s why ARKit gives you the option to reset the world coordinate system so you can move your iOS device to a new location and reset the world location to the new position of your iOS device.
- 1.
Click on the Main.storyboard file in the Navigator pane.
- 2.
Resize the ARSCNView so there’s a blank space between the bottom of the ARSCNView and the bottom of the iOS device screen.
- 3.
Click the Object Library icon to open the Object Library window.
- 4.
Type UIButton. The Object Library window displays the UIButton, as shown in Figure 3-4.
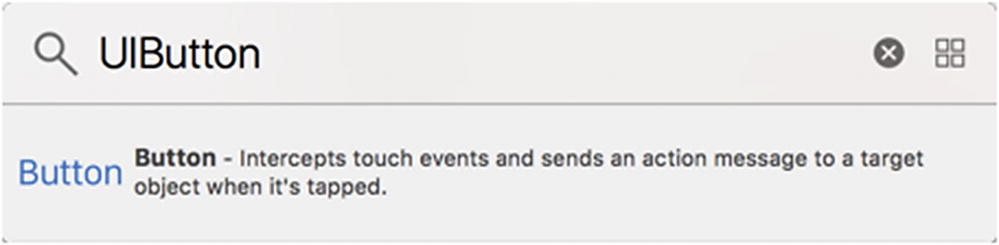
Finding the UIButton in the Object Library
- 5.
Drag the UIButton underneath the ARSCNView.
- 6.
Resize the width of the UIButton.
- 7.
Double-click on the UIButton to highlight its caption and type a new caption, such as Reset. Your user interface should look similar to Figure 3-5.

Adding a UIButton to the user interface
- 8.
Hold down the Shift key and click on the ARSCNView object. Handles should now appear around both the ARSCNView and the UIButton.
- 9.
Choose Editor ➤ Resolve AutoLayout Issues ➤ Reset to Suggested Constraints under the All Views in View Controller category. Xcode adds constraints for both the ARSCNView and the UIButton.
- 10.
Click the Assistant Editor icon or choose View ➤ Assistant Editor ➤ Show Assistant Editor. Xcode displays the ViewController.swift file and the storyboard side by side.
- 11.
Move the mouse over the UIButton on the storyboard, hold down the Control key, and drag the mouse underneath the IBOutlet in the ViewController.swift file, as shown in Figure 3-6.
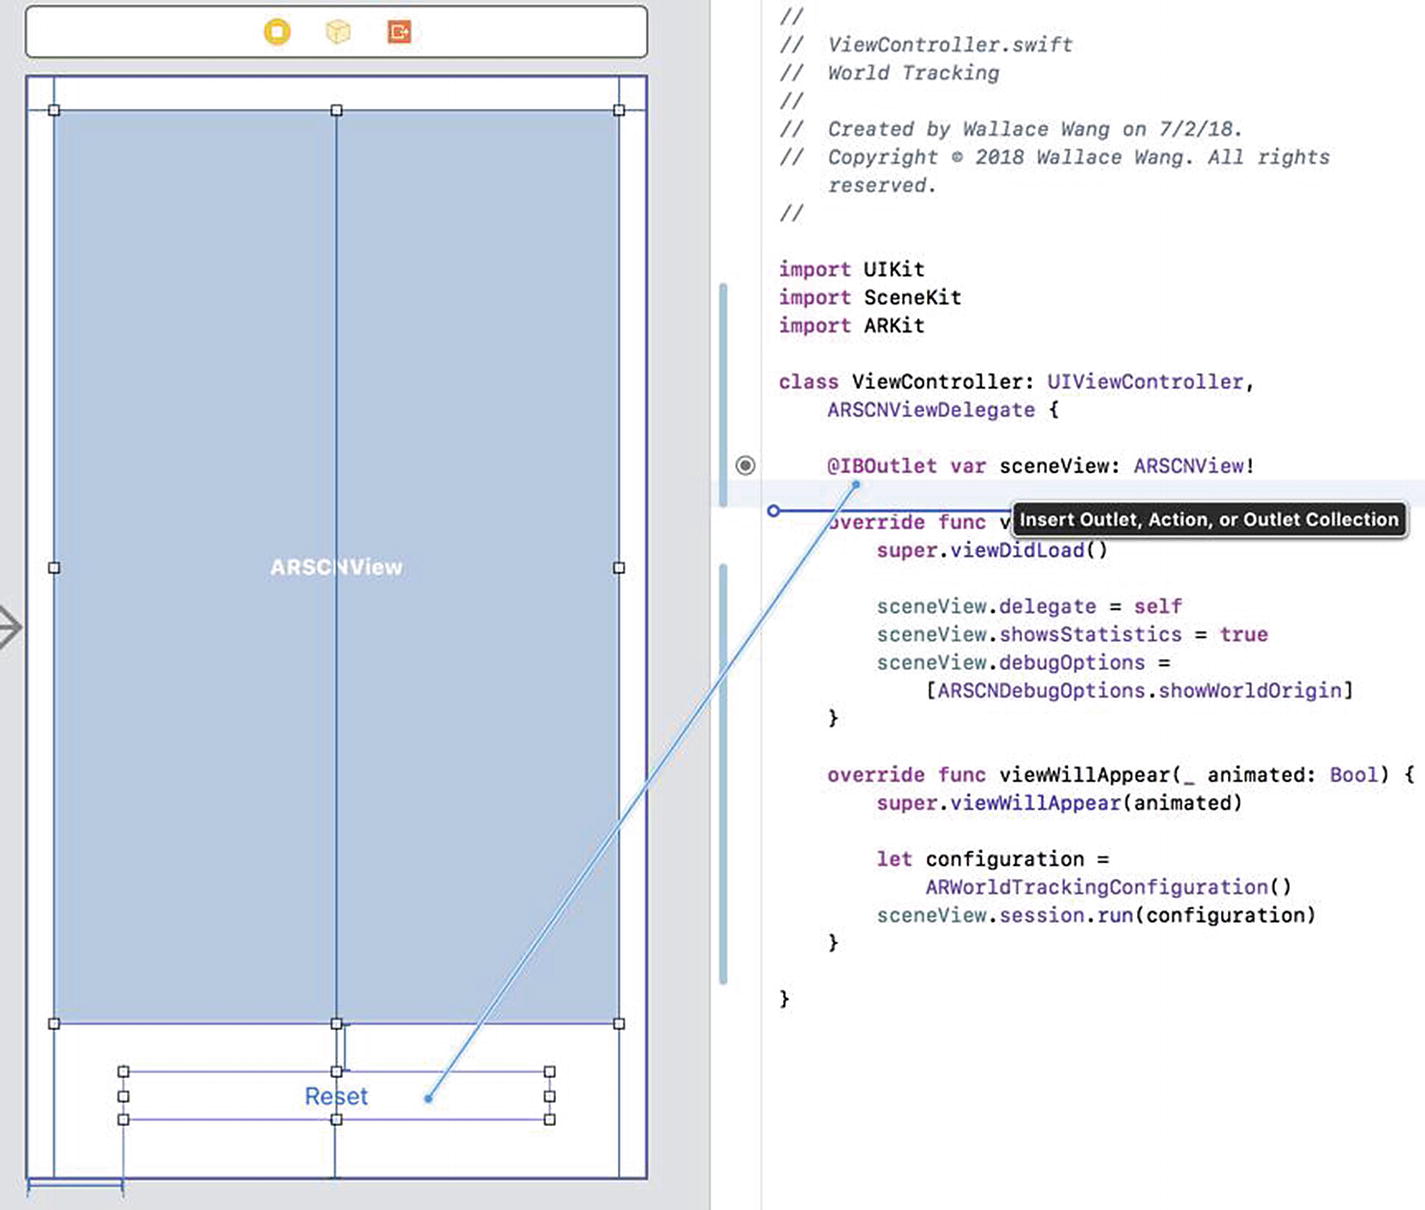
Control-dragging from the UIButton to the ViewController.swift file
- 12.
Release the Control key and the mouse. Xcode displays a popup menu.
- 13.
Click on the Connection popup menu and choose Action, as shown in Figure 3-7.
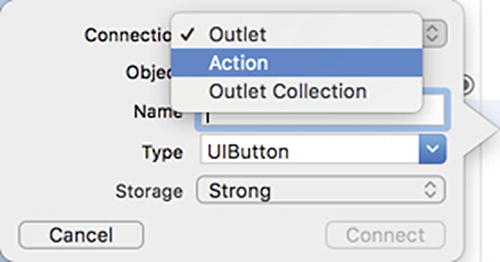
Creating an IBAction method
- 14.
Click in the Name field, type resetButton, and press Return.
- 15.
Click in the Type popup menu and choose UIButton.
- 16.
Click the Connect button. Xcode displays a blank IBAction method.
- 17.
Click the Standard Editor icon or choose View ➤ Standard Editor ➤ Show Standard Editor. If Xcode does not display the ViewController.swift file, click on the ViewController.swift file in the Navigator pane.
- 18.Edit the IBAction resetButton function as follows:@IBAction func resetButton(_ sender: UIButton) {sceneView.session.pause()sceneView.session.run(configuration, options: [.resetTracking])}
- 19.Move the let configuration = ARWorldTrackingConfiguration line underneath the IBOutlet line , as follows:@IBOutlet var sceneView: ARSCNView!let configuration = ARWorldTrackingConfiguration()The entire ViewController.swift file should look like this:import UIKitimport SceneKitimport ARKitclass ViewController: UIViewController, ARSCNViewDelegate {@IBOutlet var sceneView: ARSCNView!let configuration = ARWorldTrackingConfiguration()@IBAction func resetButton(_ sender: UIButton) {sceneView.session.pause()sceneView.session.run(configuration, options: [.resetTracking])}override func viewDidLoad() {super.viewDidLoad()sceneView.delegate = selfsceneView.showsStatistics = truesceneView.debugOptions = [ARSCNDebugOptions.showWorldOrigin]}override func viewWillAppear(_ animated: Bool) {super.viewWillAppear(animated)sceneView.session.run(configuration)}}
- 20.
Connect an iOS device to your Macintosh with its USB cable.
- 21.
Click the Run button or choose Product ➤ Run. When the app runs, step back to see the x-, y-, and x-axes world coordinates floating in the air.
- 22.
Move to a new location and tap the Reset button on the iOS screen.
- 23.
Step back and you’ll see the x-, y-, and z-axes world coordinates in the location of your iOS device when you tapped the Reset button.
- 24.
Click the Stop button or choose Product ➤ Stop.
Displaying Shapes at Coordinates
Displaying the world origin lets you see where you can define virtual objects to appear in your augmented reality view. By specifying x, y, and z coordinates, you can display virtual objects appear in relation to the current position of the user’s iOS device. Besides displaying virtual objects like spaceships or dinosaurs, the simplest virtual objects ARKit can display at specific coordinates are shapes like spheres, boxes, and planes.
Since the node needs an x, y, and z coordinate, the position of the node must be defined by three specific values as well. Defining the x, y, and z positions as 0 means that the node will appear at the world origin where the x-, y-, and z-axes intersect.
- 1.
Modify the World Tracking project or create a new project identical to the World Tracking project except give it a name of Node Placement.
- 2.Modify the ViewController.swift file so the code looks like this:import UIKitimport SceneKitimport ARKitclass ViewController: UIViewController, ARSCNViewDelegate {@IBOutlet var sceneView: ARSCNView!let configuration = ARWorldTrackingConfiguration()override func viewDidLoad() {super.viewDidLoad()// Do any additional setup after loading the view, typically from a nib.sceneView.delegate = selfsceneView.showsStatistics = truesceneView.debugOptions = [ARSCNDebugOptions.showWorldOrigin]showShape()}override func viewWillAppear(_ animated: Bool) {super.viewWillAppear(animated)sceneView.session.run(configuration)}@IBAction func resetButton(_ sender: UIButton) {sceneView.session.pause()sceneView.session.run(configuration, options: [.resetTracking])showShape()}func showShape() {let node = SCNNode()node.geometry = SCNSphere(radius: 0.05)node.geometry?.firstMaterial?.diffuse.contents = UIColor.yellownode.position = SCNVector3(0,0,0)sceneView.scene.rootNode.addChildNode(node)}}
- 3.
Connect an iOS device to your Macintosh through its USB cable.
- 4.
Click the Run button or choose Product ➤ Run. A yellow sphere appears at the world origin, as shown in Figure 3-8.
Displaying a yellow sphere at the world origin
- 5.
Move your iOS device to a new location and tap the Reset button. Notice that the world coordinates now appear in a different location with a yellow sphere at the origin.
- 6.
Click the Stop button or choose Product ➤ Stop.
Remember, these values define meters so if you choose too large a value, such as 10 meters, the yellow sphere will appear too far away to see within the augmented reality view, so experiment with low values such as -0.4 or 0.2.
Adding and Removing Multiple Objects
In the previous app example, we displayed the world origin, which appears at the current iOS device’s location. Then we displayed a yellow sphere at a specific location. Unfortunately, defining x, y, and z coordinates for the yellow sphere remains fixed in code. If we want the yellow sphere to appear in another location, or if we want to display additional yellow spheres, we can’t do that.
For more versatility, let’s put an Add button on the user interface. Each time the user taps the Add button, it will add a new yellow sphere. Of course, adding multiple yellow spheres won’t look any different if all the spheres share the same x, y, and z coordinates, so let’s also add three sliders that let us define new x, y, and z coordinates for a sphere before adding it to the augmented reality view.
- 1.
Click the Main.storyboard file in the Navigator pane.
- 2.
Resize the height of the ARKit SceneKit View to make more room near the bottom.
- 3.
Add a new UIButton next to the existing Reset button and give this new UIButton a caption name of Add.
- 4.
Add three UISliders.
- 5.
Add three labels and modify the captions to display X, Y, and Z. Your user interface should look similar to Figure 3-9.
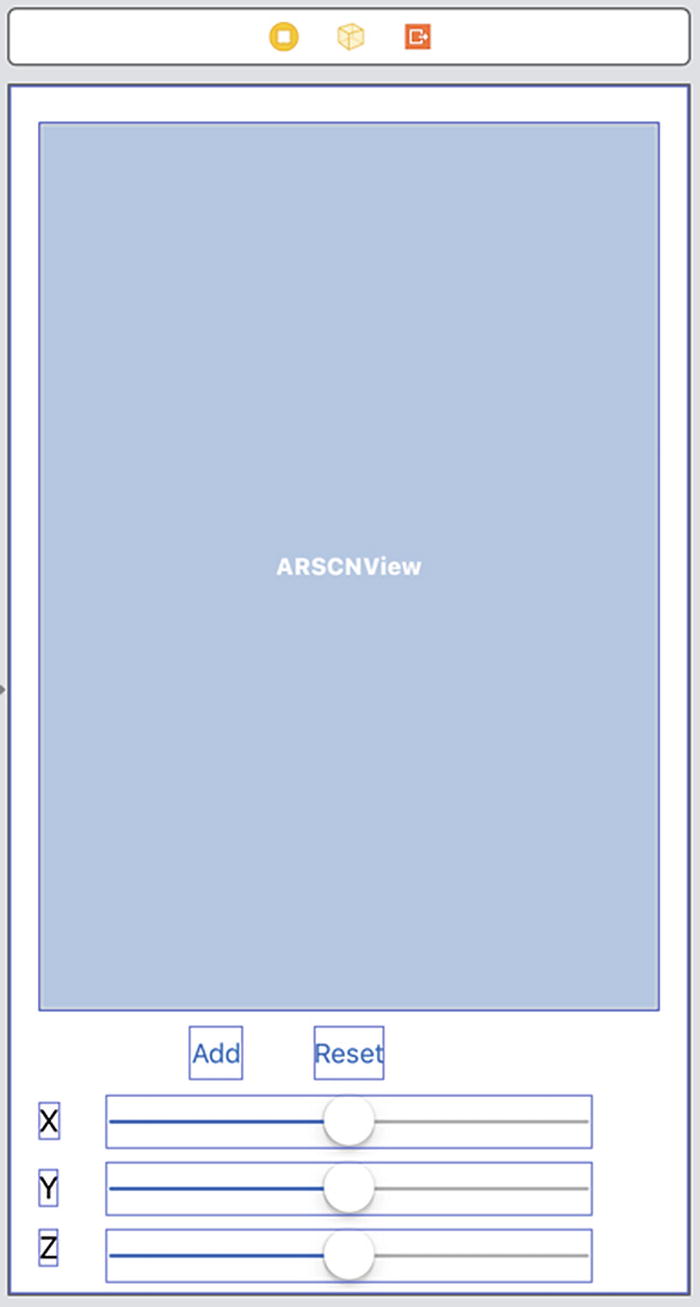
Redesigning the user interface with three sliders
This completes the user interface changes. Let’s add constraints by choosing Edit ➤ Select All (or pressing Command+A). Then choose Editor ➤ Resolve Auto Layout Issues ➤ Reset to Suggested Constraints. Xcode adds constraints to your labels, buttons, and sliders.
Now we need to modify this user interface in two ways. First, we need to define the minimum and maximum values for the slider along with a default value. Second, we need to connect the three sliders to our ViewController.swift file as IBOutlets. In addition, we also need to connect the Add button as an IBAction method.
- 1.
Click on each slider.
- 2.
Click the Show Attributes Inspector icon or choose View ➤ Inspectors ➤ Show Attributes inspector. Xcode displays the Attributes Inspector pane.
- 3.
Change the Value property to 0.
- 4.
Change the Minimum property to -1.
- 5.
Change the Maximum property to 1, as shown in Figure 3-10. This lets you choose a value of -1 meter to 1 meter for defining a coordinate for placing a sphere in the augmented reality view.
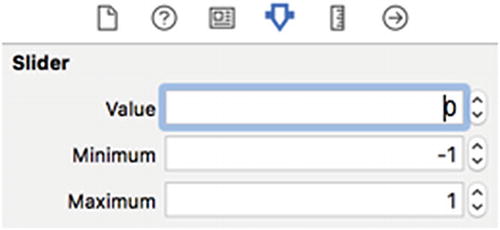
Modifying the properties of a slider
- 6.
Make sure you change the Value, Minimum, and Maximum properties identically for all three sliders.
- 1.
Click on the Assistant Editor icon or choose View ➤ Assistant Editor ➤ Show Assistant Editor. Xcode displays the ViewController.swift file side by side with the Main.storyboard file.
- 2.
Click on each slider, hold down the Control key, and drag the mouse to the ViewController.swift file under the existing IBOutlet, as shown in Figure 3-11.
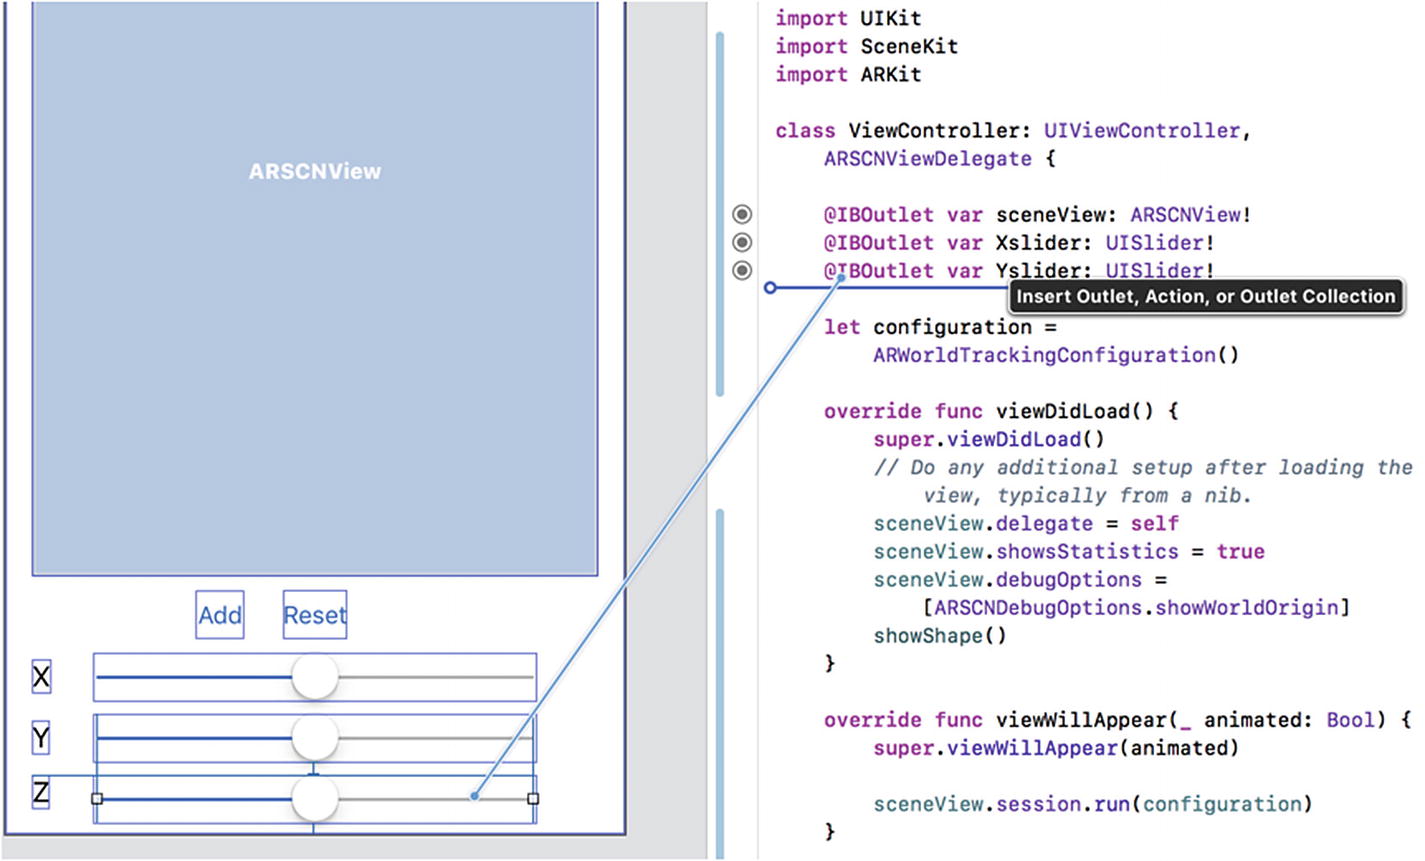
Creating an IBOutlet for a slider
- 3.
Release the Control key and the mouse. A popup menu appears.
- 4.Click in the Name text field and type a descriptive name such as Xslider, Yslider, or Zslider. You should create three IBOutlets that represent the x, y, and z coordinates as follows:@IBOutlet var Xslider: UISlider!@IBOutlet var Yslider: UISlider!@IBOutlet var Zslider: UISlider!
- 5.
Click on the Add button, hold down the Control key, and drag the mouse near the bottom of the ViewController.swift file to create an IBAction method.
- 6.
Release the Control key and the mouse. A popup menu appears.
- 7.
Click in the Connection popup menu and choose Action.
- 8.
Click in the Name text field and type addButton.
- 9.
Click in the Type popup menu and choose UIButton.
- 10.
Click the Connect button. Xcode creates an IBAction method.
- 11.Edit this addButton IBAction method like this:@IBAction func addButton(_ sender: UIButton) {showShape()}
- 12.Modify the showShape() function like this:func showShape() {let node = SCNNode()node.geometry = SCNSphere(radius: 0.05)node.geometry?.firstMaterial?.diffuse.contents = UIColor.yellownode.position = SCNVector3(Xslider.value,Yslider.value,Zslider.value)node.name = "sphere"sceneView.scene.rootNode.addChildNode(node)}
The showShape() function creates yellow spheres that are placed in the augmented reality view based on the x, y, and z coordinates defined by the three sliders (Xslider, Yslider, and Zslider) on the user interface. The first step to creating a virtual object is to define a node:
let node = SCNNode()SCNNode defines a SceneKit node where a node simply represents a virtual object. Once we’ve defined a node, we need to define an actual object to appear. SceneKit offers several different geometric shapes to choose, but for this example, we’ll use a sphere and define its radius as 0.05 meters:node.geometry = SCNSphere(radius: 0.05)The geometry property defines the node’s shape, which is a sphere. To make that object visible, we need to define its material. For this example, we’ll choose the color yellow and diffuse it across the entire surface of the sphere:node.geometry?.firstMaterial?.diffuse.contents = UIColor.yellowNext, we need to define the node’s position, which requires an x, y, and z floating point value. Rather than define fixed values, we’ll retrieve the values from the three sliders on the user interface:node.position = SCNVector3(Xslider.value,Yslider.value,Zslider.value)Each time we add a new node (sphere), let’s give it a name. This name will be important later when we need to remove all spheres from the augmented reality view. The name can be anything so just call it sphere:node.name = "sphere"Finally, we need to add this node to the root node. ARKit organizes everything displayed as a hierarchy where every augmented reality view comes with a single root node. Each time you create a new object to display in an augmented reality view, that new object is a node that becomes a child node to the root node. Every augmented reality view contains one root node and zero or more child nodes:sceneView.scene.rootNode.addChildNode(node) - 13.Modify the resetButton function like this:@IBAction func resetButton(_ sender: UIButton) {sceneView.session.pause()sceneView.scene.rootNode.enumerateChildNodes { (node, _) inif node.name == "sphere" {node.removeFromParentNode()}}sceneView.session.run(configuration, options: [.resetTracking])}
This resetButton function first pauses the current augmented reality session, then it checks each child node. If the name of that child node happens to be sphere, then it removes that node from the root node.
This code would remove all nodes from the root node, including the world origin. By only removing nodes named sphere, we can keep the world origin displayed while removing all yellow spheres displayed in the augmented reality view.

Displaying multiple yellow spheres
You can repeat this process of changing the slider values and tapping the Add button to keep adding more yellow spheres. Move your iOS device to a new location and tap the Reset button. Your app will remove all yellow spheres and display the world origin at the current location of your iOS device.
Summary
In this chapter, you learned how to display a world origin for debugging purposes in helping you verify that your app is placing objects correctly in an augmented reality view. Once your app is finished, you’ll need to remove the code that makes the world origin appear each time your app displays its augmented reality view.
The world origin helps you position objects by defining its x, y, and z coordinates. To display items in an augmented reality view, you need to create a node and define a shape for that node, such as a sphere, box, or torus. Next, you need to define an object’s appearance, such as yellow or red, along with its size.
To make augmented reality more versatile, you can reset the world origin based on a new location the user may hold an iOS device. This ability to reset the world origin lets your app display virtual objects wherever the user decides to move and point an iOS device.
In the next chapter, we go into more details about creating geometric shapes and applying different textures to a shape beyond solid colors.