
When you place a virtual object in an augmented reality view, it always appears in its default orientation such as a cylinder or pyramid appearing vertically. However, sometimes you may want a virtual object to appear in a different orientation. To achieve this, you may need to rotate the virtual object around its x-, y-, and z-axes.
Rotating a virtual object involves changing a virtual object’s Euler angle around its x-, y-, and z-axes. In addition to learning how to rotate virtual objects around the x-, y-, and z-axes, you’ll also learn how Xcode rotates additional virtual objects positioned relative to an existing virtual object. For example, if you create a box and place a pyramid relative to box, rotating the box will also change the position of the pyramid.
Rotating Objects Using Euler Angles
By specifying different values for x, y, and z, eulerAngles can define a virtual object’s rotation around the x-, y-, and z-axes. When specifying SCNVector3 values for the x-, y-, and z-axes, make sure you use Float values and that you specify the amount of rotation in radians.
This code converts degrees to radians. Once the degrees have been converted into radians, you can use those radians to define the rotation around the x-, y-, and z-axes.
- 1.
Start Xcode. (Make sure you’re using Xcode 10 or greater.)
- 2.
Choose File ➤ New ➤ Project. Xcode asks you to choose a template.
- 3.
Click the iOS category.
- 4.
Click the Single View App icon and click the Next button. Xcode asks for a product name, organization name, organization identifiers, and content technology.
- 5.
Click in the Product Name text field and type a descriptive name for your project, such as Rotation. (The exact name does not matter.)
- 6.
Click the Next button. Xcode asks where you want to store your project.
- 7.
Choose a folder and click the Create button. Xcode creates an iOS project.
- 1.
Click the Info.plist file in the Navigator pane. Xcode displays a list of keys, types, and values.
- 2.
Click the disclosure triangle to expand the Required device capabilities category to display Item 0.
- 3.
Move the mouse pointer over Item 0 to display a plus (+) icon.
- 4.
Click this plus (+) icon to display a blank Item 1.
- 5.
Type arkit under the Value category in the Item 1 row.
- 6.
Move the mouse pointer over the last row to display a plus (+) icon.
- 7.
Click on the plus (+) icon to create a new row. A popup menu appears.
- 8.
Choose Privacy – Camera Usage Description.
- 9.
Type AR Needs to Use the Camera under the Value category in the Privacy – Camera Usage Description row.
- 1.
Click on the ViewController.swift file in the Navigator pane.
- 2.Edit the ViewController.swift file so it looks like this:import UIKitimport SceneKitimport ARKitimport GLKitclass ViewController: UIViewController, ARSCNViewDelegate {let configuration = ARWorldTrackingConfiguration()let node = SCNNode()var currentX : Float = 0var currentY : Float = 0var currentZ : Float = 0override func viewDidLoad() {super.viewDidLoad()// Do any additional setup after loading the view, typically from a nib.}}
A single ARKit SceneKit View (ARSCNView)
Three UILabels
Three UISliders

The user interface includes an ARSCNView, three labels, and three sliders
After you’ve designed your user interface, you need to put constraints on those user interface items. To add constraints, choose Editor ➤ Resolve Auto Layout Issues ➤ Reset to Suggested Constraints at the bottom half of the menu under the All Views in Container category.
- 1.
Click the Main.storyboard file in the Navigator pane.
- 2.
Click the Assistant Editor icon or choose View ➤ Assistant Editor ➤ Show Assistant Editor to display the Main.storyboard and the ViewController.swift file side by side.
- 3.
Move the mouse pointer over the ARSCNView, hold down the Control key, and Ctrl-drag under the class ViewController line.
- 4.
Release the Control key and the left mouse button. A popup menu appears.
- 5.Click in the Name text field and type sceneView, then click the Connect button. Xcode creates an IBOutlet, as shown here:@IBOutlet var sceneView: ARSCNView!
- 6.Edit the viewDidLoad function so it looks like this:override func viewDidLoad() {super.viewDidLoad()// Do any additional setup after loading the view, typically from a nib.sceneView.delegate = selfsceneView.showsStatistics = truesceneView.debugOptions = [ARSCNDebugOptions.showWorldOrigin, ARSCNDebugOptions.showFeaturePoints]showShape()}
- 7.Edit the viewWillAppear function so it looks like this:override func viewWillAppear(_ animated: Bool) {super.viewWillAppear(animated)sceneView.session.run(configuration)}
This viewDidLoad function calls on a showShape function. The showShape function displays a green pyramid.
- 8.Type the following underneath the viewWillAppear function:func showShape() {let pyramid = SCNPyramid(width: 0.05, height: 0.1, length: 0.05)pyramid.firstMaterial?.diffuse.contents = UIColor.greennode.geometry = pyramidnode.position = SCNVector3(0.05, 0.05, -0.05)sceneView.scene.rootNode.addChildNode(node)}
- 9.
Click on the top slider (x-axis), hold down the Control key, and Ctrl-drag above the last curly bracket at the bottom of the ViewController.swift file.
- 10.
Release the Control key and the left mouse button. A popup menu appears.
- 11.
Click in the Connection popup menu and choose Action.
- 12.
Click in the Name text field and type XChanged.
- 13.
Click in the Type popup menu and choose UISlider.
- 14.Click the Connect button. Xcode creates an IBAction method like this:@IBAction func XChanged(_ sender: UISlider) {currentX = GLKMathDegreesToRadians(sender.value)node.eulerAngles = SCNVector3(currentX, currentY, currentZ)}
- 15.
Click on the middle slider (y-axis), hold down the Control key, and Ctrl-drag above the last curly bracket at the bottom of the ViewController.swift file.
- 16.
Release the Control key and the left mouse button. A popup menu appears.
- 17.
Click in the Connection popup menu and choose Action.
- 18.
Click in the Name text field and type YChanged.
- 19.
Click in the Type popup menu and choose UISlider.
- 20.Click the Connect button. Xcode creates an IBAction method like this:@IBAction func YChanged(_ sender: UISlider) {currentY = GLKMathDegreesToRadians(sender.value)node.eulerAngles = SCNVector3(currentX, currentY, currentZ)}
- 21.
Click on the bottom slider (z-axis), hold down the Control key, and Ctrl-drag above the last curly bracket at the bottom of the ViewController.swift file.
- 22.
Release the Control key and the left mouse button. A popup menu appears.
- 23.
Click in the Connection popup menu and choose Action.
- 24.
Click in the Name text field and type ZChanged.
- 25.
Click in the Type popup menu and choose UISlider.
- 26.Click the Connect button. Xcode creates an IBAction method like this:@IBAction func ZChanged(_ sender: UISlider) {currentZ = GLKMathDegreesToRadians(sender.value)node.eulerAngles = SCNVector3(currentX, currentY, currentZ)}
- 1.
Connect an iOS device to your Macintosh through its USB cable.
- 2.
Click the Run button or choose Product ➤ Run.
- 3.
When the app runs, a green pyramid appears.
- 4.
Slide the x-, y-, and z-axes sliders left and right. Notice that the green pyramid rotates around the x-, y-, or z-axis, depending on which slider you’re moving at the time, as shown in Figure 7-2.
- 5.
Click the Stop button or choose Product ➤ Stop.
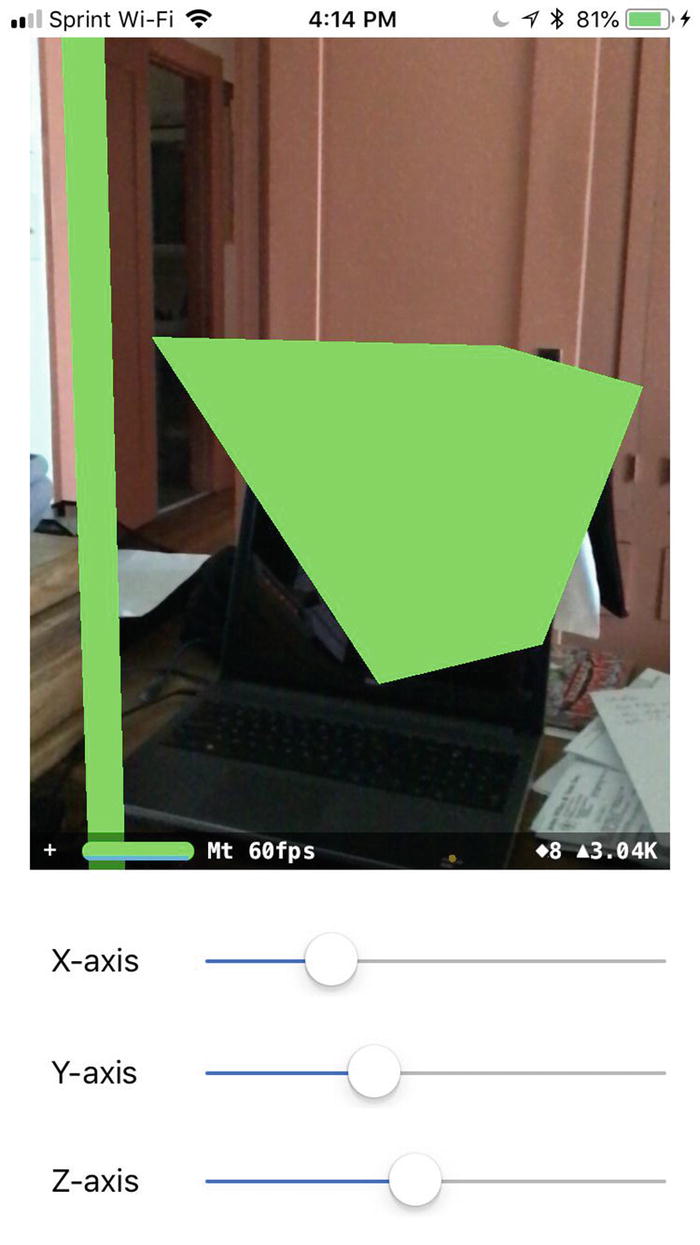
The three sliders let you rotate the green pyramid around the x-, y-, and z-axes
Relational Object Rotation
By using Euler angles, it’s easy to rotate a virtual object around its x-, y-, or z-axis. If you rotate an object, you may wonder what happens to any neighboring objects that are positioned relative to the rotating object. If you use relative positioning to place one virtual object next to another one, then rotating an object also causes any nearby objects to change their position too.
So if you have a green pyramid and use relative positioning to place an orange box next to the green pyramid, then rotating the green pyramid also moves the orange box. That’s because the orange box uses relative positioning to place it a specific distance from the green pyramid. When the green pyramid rotates, the orange box changes its position as well.
Let’s add a second virtual object, such as an orange box, and use relative positioning to place it 0.15 meters to the left (the x-axis), 0 meters on the y-axis, and 0 meters on the z-axis.

Relative positioning automatically moves an object to maintain its fixed distance from another object
Run this revised app and slide the x-axis, y-axis, and z-axis sliders left and right. Notice that the green pyramid rotates and forces the orange box to change its location based on the green pyramid’s rotation.
Because the orange box is positioned relative to the green pyramid, rotating the green pyramid forces the orange box to move as well. What happens if we create a third virtual object that uses relative positioning with the orange box? Then rotating the pyramid will move the orange box, which in turn will move our third virtual object. Let’s see how that works.
Rewrite the showShape function so it adds a red cylinder that uses relative positioning to orient itself according to the orange box’s position. Now rotating the green pyramid moves the orange box, which maintains its position to the green pyramid, and also moves the red cylinder, which maintains its position to the orange box.

Relative positioning moves all related virtual objects
At this point we have three virtual objects—a green pyramid, an orange box, and a red cylinder. However, we’re only rotating the green pyramid. The orange box moves to maintain its relative position to the green pyramid and the red cylinder moves to maintain its relative position to the orange box.
What happens if we add a fourth virtual object that’s only positioned according to the rootnode? In that case, rotating the green pyramid will have no effect on this fourth virtual object because this fourth virtual object only depends on the rootnode (world origin). Let’s see this work.
Because the torus is positioned to the rootnode and not relative to any of the other virtual objects, rotating the green pyramid does not affect the position of the torus. This shows the difference between relative positioning and positioning to the rootnode when moving virtual objects in an augmented reality view.
Summary
There are two ways to define a location of a virtual object in an augmented reality view. One, you can define the object’s position in relation to the rootnode, which appears at the world origin (0, 0, 0). Two, you can define the object’s position relative to another object’s position.
To rotate an object, you need to define its Euler angles around the x-, y-, and z-axes. Euler angles use radians so you’ll need to convert degrees to radians using a function stored in the GLKit framework. By using the GLKMathDegreesToRadians function, you can easily convert degrees to radians.
Rotating an object also changes the position of any nearby objects that are defined relative to the rotated object. Only objects positioned relative to the rootnode won’t change when other objects are rotated.