
The simplest way to alter the appearance of a virtual object is to change its color or texture. However, a more subtle way to alter the appearance of virtual objects is to change the lighting source. Think of a typical studio that lets a photographer place one or more lights in different positions around a subject. These lights can be bright or dim, and shine at different intensities and colors to highlight an object in different ways.

Different light types available
By adding light and customizing the appearance of light through color, intensity, and temperature, you can illuminate virtual objects in unique ways within an augmented reality view.
Using Color, Intensity, and Temperature
Color light can illuminate virtual objects in different ways, especially if the virtual objects display their own colors. While color is an obvious way to change a light, two other ways to change the appearance of light involve temperature and intensity.
Temperature works by multiplying the color value by a color corresponding to the light’s temperature. The default value of 6500 represents a pure white light, while lower values (down to a minimum of zero) add a “warmer” yellow or orange effect to the light source. On the other hand, higher values (up to a maximum of 40000) add a “cooler” blue effect.
Intensity modifies light by brightening or dimming the light where a value of 1000 leaves the light unaffected. Lower values dim the light while higher values brighten the light.
- 1.
Start Xcode. (Make sure you’re using Xcode 10 or greater.)
- 2.
Choose File ➤ New ➤ Project. Xcode asks you to choose a template.
- 3.
Click the iOS category.
- 4.
Click the Single View App icon and click the Next button. Xcode asks for a product name, organization name, organization identifiers, and content technology.
- 5.
Click in the Product Name text field and type a descriptive name for your project, such as Light Sources. (The exact name does not matter.)
- 6.
Click the Next button. Xcode asks where you want to store your project.
- 7.
Choose a folder and click the Create button. Xcode creates an iOS project.
- 1.
Click the Info.plist file in the Navigator pane. Xcode displays a list of keys, types, and values.
- 2.
Click the disclosure triangle to expand the Required Device Capabilities category to display Item 0.
- 3.
Move the mouse pointer over Item 0 to display a plus (+) icon.
- 4.
Click this plus (+) icon to display a blank Item 1.
- 5.
Type arkit under the Value category in the Item 1 row.
- 6.
Move the mouse pointer over the last row to display a plus (+) icon.
- 7.
Click on the plus (+) icon to create a new row. A popup menu appears.
- 8.
Choose Privacy – Camera Usage Description.
- 9.
Type AR needs to use the camera under the Value category in the Privacy – Camera Usage Description row.
- 1.
Click on the ViewController.swift file in the Navigator pane.
- 2.Edit the ViewController.swift file so it looks like this:import UIKitimport SceneKitimport ARKitclass ViewController: UIViewController, ARSCNViewDelegate {let configuration = ARWorldTrackingConfiguration()override func viewDidLoad() {super.viewDidLoad()// Do any additional setup after loading the view, typically from a nib.}}
One ARKit SceneKit View (ARSCNView)—For displaying augmented reality with the camera view
Two UISliders—For controlling the temperature and intensity of the light
Two UILabels—For identifying the purpose of each slider
Five UIButtons—For choosing different colors for the light
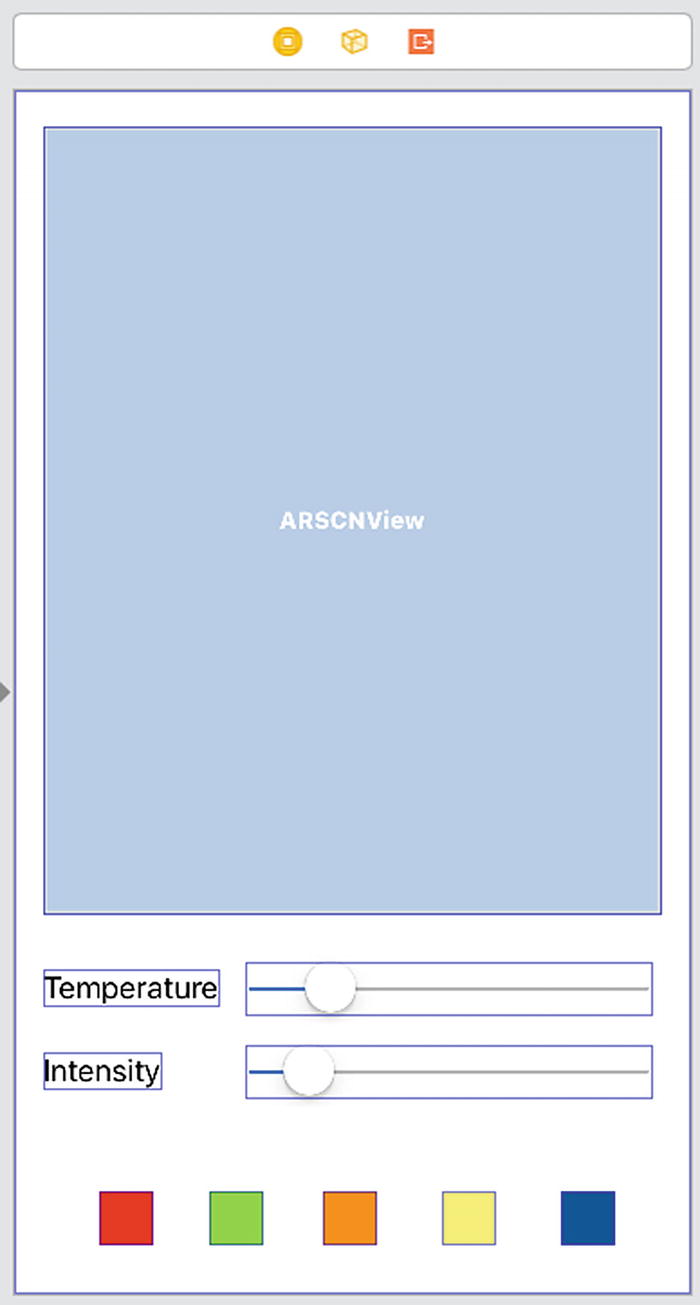
Designing the user interface
After you’ve designed the user interface, you need to put constraints on those user interface items. To add constraints, choose Editor ➤ Resolve Auto Layout Issues ➤ Reset to Suggested Constraints at the bottom half of the menu under the All Views in Container category.
After adding constraints, the next step is to modify the user interface objects. Double-click on the two UILabels and change their titles to Temperature and Intensity (see Figure 5-2).
- 1.
Click on the Temperature UISlider.
- 2.
Click the Attributes Inspector icon or choose View ➤ Inspectors ➤ Show Attributes Inspector.
- 3.
Type in the Value text field the number 6500.
- 4.
Type in the Minimum text field 0.
- 5.
Type in the Maximum text field 40000, as shown in Figure 5-3.

Defining values for the Temperature slider
- 6.
Click on the Intensity UISlider.
- 7.
Type in the Value text field the number 1000.
- 8.
Type in the Minimum text field 0.
- 9.
Type in the Maximum text field 10000, as shown in Figure 5-4.
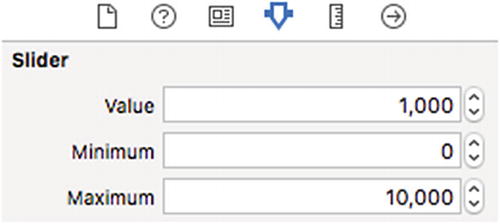
Defining values for the Intensity slider
- 1.
Click on UIButton.
- 2.
Click on the Size Inspector icon or choose View ➤ Navigators ➤ Show Size Inspector.
- 3.
Type 30 in the Width and Height text fields in the View category, as shown in Figure 5-5.

Defining a width and height for the UIButton
- 4.
Click on the Attributes Inspector icon or choose View ➤ Navigators ➤ Show Attributes Inspector.
- 5.
Delete the title from the UIButton.
- 6.
Click on the Background popup menu under the View category and choose a color, as shown in Figure 5-6.

Defining a background color for a UIButton
- 7.
Repeat Steps 2-6 for each UIButton except choose a different color for each UIButton in Step 5. (The specific colors you choose won’t matter but make sure you don’t choose the same color for two or more UIButtons.)
- 1.
Click the Main.storyboard file in the Navigator pane.
- 2.
Click the Assistant Editor icon or choose View ➤ Assistant Editor ➤ Show Assistant Editor to display the Main.storyboard and the ViewController.swift file side by side.
- 3.
Move the mouse pointer over the ARSCNView, hold down the Control key, and Ctrl-drag under the class ViewController line.
- 4.
Release the Control key and the left mouse button. A popup menu appears.
- 5.Click in the Name text field and type sceneView, then click the Connect button. Xcode creates an IBOutlet as shown here:@IBOutlet var sceneView: ARSCNView!
- 6.Underneath this IBOutlet, type the following:let showLight = SCNNode()
- 7.Edit the viewDidLoad function so it looks like this:override func viewDidLoad() {super.viewDidLoad()// Do any additional setup after loading the view, typically from a nib.sceneView.delegate = selfsceneView.showsStatistics = truesceneView.debugOptions = [ARSCNDebugOptions.showWorldOrigin, ARSCNDebugOptions.showFeaturePoints]}
- 8.Edit the viewWillAppear function so it looks like this:override func viewWillAppear(_ animated: Bool) {super.viewWillAppear(animated)showShape()lightOn()sceneView.session.run(configuration)}
This viewWillAppear function calls on a showShape and a lightOn function. The showShape function displays a sphere and the lightOn function defines a light source.
- 9.Type the following underneath the viewWillAppear function :func showShape() {let sphere = SCNSphere(radius: 0.03)sphere.firstMaterial?.diffuse.contents = UIColor.whitelet node = SCNNode()node.geometry = spherenode.position = SCNVector3(0.1, 0, 0)sceneView.scene.rootNode.addChildNode(node)}func lightOn() {showLight.light = SCNLight()showLight.light?.type = .omnishowLight.light?.color = UIColor(white: 0.6, alpha: 1.0)showLight.position = SCNVector3(0,0,0)sceneView.scene.rootNode.addChildNode(showLight)}
- 10.
Move the mouse pointer over the Temperature UISlider, hold down the Control key, and Ctrl-drag underneath the lightOn function.
- 11.
Release the control key and left mouse button. A popup menu appears.
- 12.
Click on the Connection popup menu and choose Action.
- 13.
Click in the Name text field and type temperatureChange.
- 14.
Click in the Type popup menu and choose UISlider, then click the Connect button. This creates an IBAction method.
- 15.Edit this temperatureChange IBAction method as follows:@IBAction func temperatureChange(_ sender: UISlider) {showLight.light?.temperature = CGFloat(sender.value)}
- 16.
Move the mouse pointer over the Intensity UISlider, hold down the Control key, and Ctrl-drag underneath the lightOn function .
- 17.
Release the control key and left mouse button. A popup menu appears.
- 18.
Click on the Connection popup menu and choose Action.
- 19.
Click in the Name text field and type intensityChange .
- 20.
Click in the Type popup menu and choose UISlider, then click the Connect button. This creates an IBAction method.
- 21.Edit this intensityChange IBAction method as follows:@IBAction func intensityChange(_ sender: UISlider) {showLight.light?.intensity = CGFloat(sender.value)}
- 22.
Move the mouse pointer over any UIButton, hold down the Control key, and Ctrl-drag at the bottom of the ViewController.swift file right above the last } bracket.
- 23.
Release the Control key and the left mouse button. A popup menu appears.
- 24.
Click on the Connection popup menu and choose Action.
- 25.
Click in the Name text field and type colorButton.
- 26.
Click in the Type popup menu and choose UIButton, then click the Connect button. This creates an IBAction method.
- 27.Edit this colorButton IBAction method as follows:@IBAction func colorButton(_ sender: UIButton) {//colorMe.backgroundColor = sender.backgroundColorshowLight.light?.color = sender.backgroundColor!}
- 28.
Move the mouse pointer over another UIButton (not the one you originally used to Ctrl-drag into the ViewController.swift file to create the colorButton IBAction method), hold down the Control key, and Ctrl-drag the mouse over the colorButton IBAction method that you just created until it’s highlighted, as shown in Figure 5-7.

Connecting additional UIButtons to an existing IBAction method
- 29.
When the entire colorButton IBAction method appears highlighted, release the Control key and the left mouse button.
- 30.
Repeat Steps 28-29 for each additional UIButton until all UIButtons are connected to the same colorButton IBAction method.
- 1.
Connect an iOS device to your Macintosh through its USB cable.
- 2.
Click the Run button or choose Product ➤ Run.
- 3.
When the app runs, a sphere appears on the x-axis. Click on any of the color buttons at the bottom of the screen to change the light source color.
- 4.
Slide the Temperature and Intensity sliders left and right to see how it alters the appearance of the light, as shown in Figure 5-8.
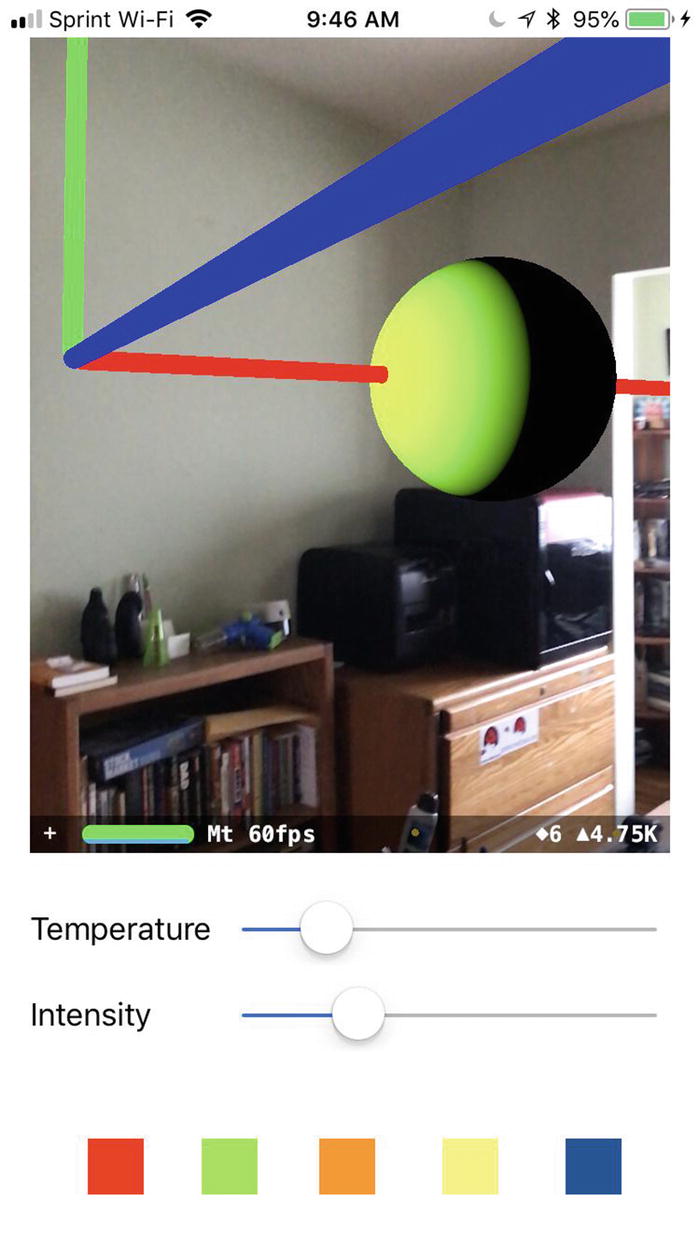
Changing the temperature, intensity, and color of a light source
- 5.
Click the Stop button or choose Product ➤ Stop.

Using directional light instead of omni light
Using a Spotlight
In a theater, people can position one or more spotlights in different locations and aim them at different angles to create interesting visual effects. When you create a spotlight, you need to define its location and angle.
By default, the spotlight aims down the negative z-axis so if you place a spotlight at the world origin (0, 0, 0), then the spotlight will shine down the z-axis away from the user. If a virtual object off the z-axis, the spotlight will miss it completely.
If you run this code, the spotlight will appear at the world origin (0, 0, 0) and shine down the z-axis, missing the sphere completely, leaving the sphere completely unlit.
Change the spotlight’s position relative to any virtual objects you want to illuminate
Change the angle that the spotlight points
Pitch (the x component) is the rotation about the node’s x-axis.
Yaw (the y component) is the rotation about the node’s y-axis.
Roll (the z component) is the rotation about the node’s z-axis.
- 1.
Start Xcode. (Make sure you’re using Xcode 10 or greater.)
- 2.
Choose File ➤ New ➤ Project. Xcode asks you to choose a template.
- 3.
Click the iOS category.
- 4.
Click the Single View App icon and click the Next button. Xcode asks for a product name, organization name, organization identifiers, and content technology.
- 5.
Click in the Product Name text field and type a descriptive name for your project such as Spotlight. (The exact name does not matter.)
- 6.
Click the Next button. Xcode asks where you want to store your project.
- 7.
Choose a folder and click the Create button. Xcode creates an iOS project.
- 1.
Click the Info.plist file in the Navigator pane. Xcode displays a list of keys, types, and values.
- 2.
Click the disclosure triangle to expand the Required device capabilities category to display Item 0.
- 3.
Move the mouse pointer over Item 0 to display a plus (+) icon.
- 4.
Click this plus (+) icon to display a blank Item 1.
- 5.
Type arkit under the Value category in the Item 1 row.
- 6.
Move the mouse pointer over the last row to display a plus (+) icon.
- 7.
Click on the plus (+) icon to create a new row. A popup menu appears.
- 8.
Choose Privacy – Camera Usage Description.
- 9.
Type AR needs to use the camera under the Value category in the Privacy – Camera Usage Description row.
- 1.
Click on the ViewController.swift file in the Navigator pane.
- 2.Edit the ViewController.swift file so it looks like this:import UIKitimport SceneKitimport ARKitclass ViewController: UIViewController, ARSCNViewDelegate {let configuration = ARWorldTrackingConfiguration()override func viewDidLoad() {super.viewDidLoad()// Do any additional setup after loading the view, typically from a nib.}}
One ARKit SceneKit View (ARSCNView)—For displaying augmented reality with the camera view
Three UISliders—For controlling the pitch, yaw, and roll of the spotlight
Three UILabels—For identifying the pitch, yaw, and roll sliders
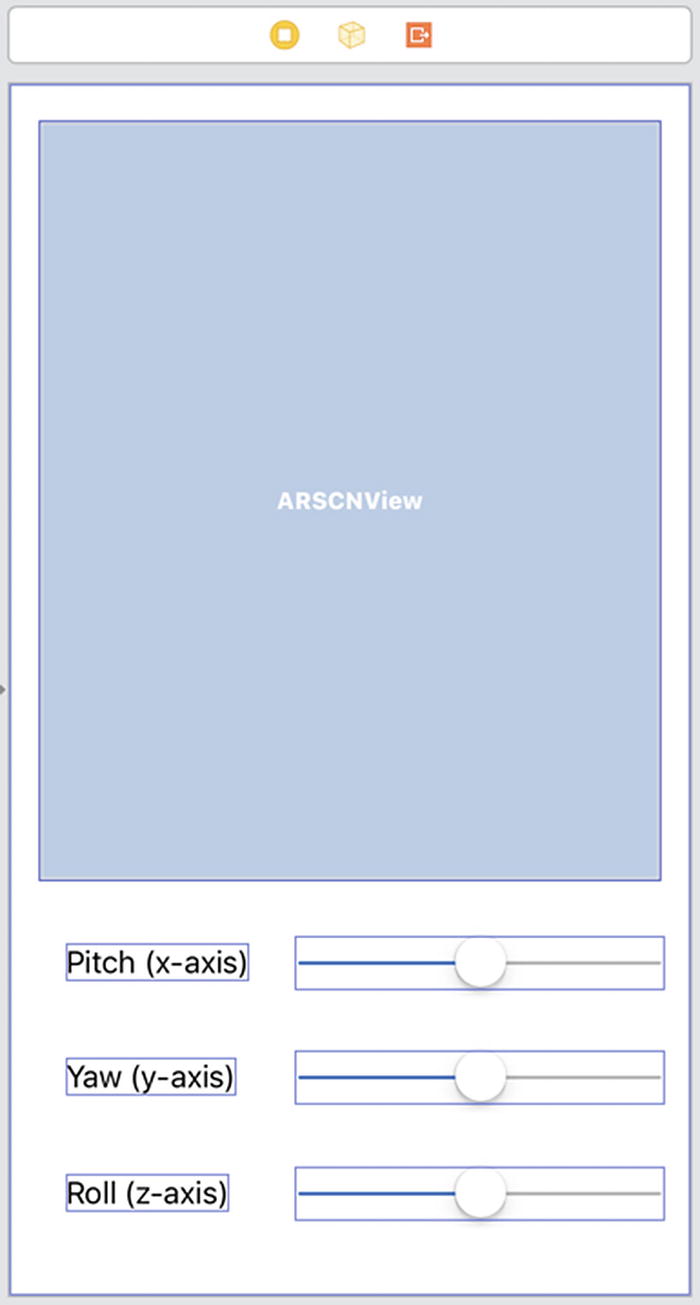
Designing the user interface
After you’ve designed the user interface, you need to put constraints on those user interface items. To add constraints, choose Editor ➤ Resolve Auto Layout Issues ➤ Reset to Suggested Constraints at the bottom half of the menu under the All Views in Container category.
After adding constraints, the next step is to modify the user interface objects. Double-click on the three UILabels and change their titles to Pitch (x-axis), Yaw (y-axis), and Roll (z-axis) (see Figure 5-10).
- 1.
Click on the Pitch (x-axis) UISlider.
- 2.
Click the Attributes Inspector icon or choose View ➤ Inspectors ➤ Show Attributes Inspector.
- 3.
Type in the Value text field the number 0.
- 4.
Type in the Minimum text field -360.
- 5.
Type in the Maximum text field 360, as shown in Figure 5-11.
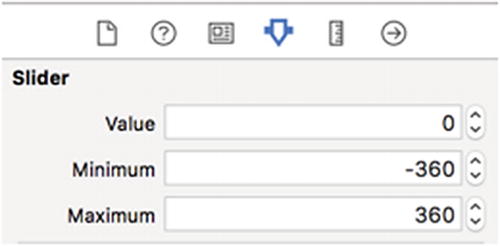
Customizing the UISlider
- 6.
Repeat Steps 1-5 for the Yaw (y-axis) and Roll (z-axis) UISliders.
- 1.
Click the Main.storyboard file in the Navigator pane.
- 2.
Click the Assistant Editor icon or choose View ➤ Assistant Editor ➤ Show Assistant Editor to display the Main.storyboard and the ViewController.swift file side by side.
- 3.
Move the mouse pointer over the ARSCNView, hold down the Control key, and Ctrl-drag under the class ViewController line.
- 4.
Release the Control key and the left mouse button. A popup menu appears.
- 5.Click in the Name text field and type sceneView, then click the Connect button. Xcode creates an IBOutlet as shown here:@IBOutlet var sceneView: ARSCNView!
- 6.Underneath this IBOutlet, type the following:let configuration = ARWorldTrackingConfiguration()let showLight = SCNNode()var currentX : Float = 0var currentY : Float = 0var currentZ : Float = 0
- 7.Edit the viewDidLoad function so it looks like this:override func viewDidLoad() {super.viewDidLoad()// Do any additional setup after loading the view, typically from a nib.sceneView.delegate = selfsceneView.showsStatistics = truesceneView.debugOptions = [ARSCNDebugOptions.showWorldOrigin, ARSCNDebugOptions.showFeaturePoints]}override func viewWillAppear(_ animated: Bool) {super.viewWillAppear(animated)showShape()lightOn()sceneView.session.run(configuration)}
This viewWillAppear function calls on a showShape and a lightOn function. The showShape function displays a sphere and the lightOn function defines a light source.
- 8.Type the following underneath the viewWillAppear function:func showShape() {let plane = SCNPlane(width: 0.75, height: 0.75)plane.firstMaterial?.diffuse.contents = UIColor.yellowlet node = SCNNode()node.geometry = planenode.position = SCNVector3(0, 0, -0.3)sceneView.scene.rootNode.addChildNode(node)}func lightOn() {showLight.light = SCNLight()showLight.light?.type = .spotshowLight.light?.color = UIColor(white: 0.6, alpha: 1.0)showLight.position = SCNVector3(0, 0, 0)showLight.eulerAngles = SCNVector3(0, 0, 0)sceneView.scene.rootNode.addChildNode(showLight)}
This code creates a yellow plane that appears at -0.03 behind the world origin (0, 0, 0). Then the code creates a spotlight at the world origin aimed at the plane. Even though the spotlight is white, it will shine on the black plane and display yellow because the plane is yellow.
- 9.
Move the mouse pointer over the Pitch (x-axis) UISlider, hold down the Control key, and Ctrl-drag underneath the lightOn function .
- 10.
Release the control key and left mouse button. A popup menu appears.
- 11.
Click on the Connection popup menu and choose Action.
- 12.
Click in the Name text field and type pitchChange.
- 13.
Click in the Type popup menu and choose UISlider, then click the Connect button. This creates an IBAction method.
- 14.Edit this pitchChange IBAction method as follows:@IBAction func pitchChanged(_ sender: UISlider) {currentX = GLKMathDegreesToRadians(sender.value)showLight.eulerAngles = SCNVector3(currentX, currentY, currentZ)}
- 15.
Move the mouse pointer over the Yaw (y-axis) UISlider, hold down the Control key, and Ctrl-drag underneath the lightOn function .
- 16.
Release the control key and the left mouse button. A popup menu appears.
- 17.
Click on the Connection popup menu and choose Action.
- 18.
Click in the Name text field and type yawChange.
- 19.
Click in the Type popup menu and choose UISlider, then click the Connect button. This creates an IBAction method.
- 20.Edit this yawChange IBAction method as follows:@IBAction func yawChanged(_ sender: UISlider) {currentY = GLKMathDegreesToRadians(sender.value)showLight.eulerAngles = SCNVector3(currentX, GLKMathDegreesToRadians(sender.value), currentZ)}
- 21.
Move the mouse pointer over the Roll (z-axis) UISlider, hold down the Control key, and Ctrl-drag underneath the lightOn function .
- 22.
Release the control key and left mouse button. A popup menu appears.
- 23.
Click on the Connection popup menu and choose Action.
- 24.
Click in the Name text field and type rollChange.
- 25.
Click in the Type popup menu and choose UISlider, then click the Connect button. This creates an IBAction method.
- 26.Edit this rollChange IBAction method as follows:@IBAction func rollChanged(_ sender: UISlider) {currentZ = GLKMathDegreesToRadians(sender.value)showLight.eulerAngles = SCNVector3(currentX, currentY, currentZ)}
- 1.
Connect an iOS device to your Macintosh through a USB cable.
- 2.
Click the Run button or choose Product ➤ Run.
- 3.
Slide the Pitch (x-axis), Yaw (y-axis), and Roll (z-axis) sliders left and right to see how the spotlight shines on the plane on different areas. Although the spotlight is white, the plane is yellow so the spotlight appears to be a yellow light, as shown in Figure 5-12.

Shining a white spotlight on a yellow plane
- 4.
Click the Stop button or choose Product ➤ Stop.
Summary
In many cases, you can simply display virtual objects through an augmented reality view but if you want to create interesting visual effects, you can define different types of light sources. Think of a theater where you can place multiple lights in different locations and colors to shine on different objects.
By altering the color, intensity, and temperature, you can make a light appear brighter or dimmer. By using a spotlight, you can shine a light in different directions after placing a light anywhere within your augmented reality view.
Experiment with lights and the placement of virtual objects. Lights can give you multiple ways to change the appearance of what users see in your augmented reality app.