
Chapter 3
Your First Android Project
Now that you have the Android SDK, it is time to make your first Android project. The good news is that this requires zero lines of code—Android's tools create a “Hello, world!” application for you as part of creating a new project. All you need to do is build it, install it, and watch it open on your emulator or device.
Step 1: Create the New Project
Android's tools can create a complete skeleton project for you, with everything you need for a complete (albeit very trivial) Android application. The process differs depending on whether you are using an IDE like Eclipse or the command line.
Eclipse
From the Eclipse main menu, choose File ![]()
New ![]()
![]()
Project to open the New Project dialog box, which gives you a list of project type wizards to choose from. Expand the Android option and click Android Project, as shown in Figure 3–1.
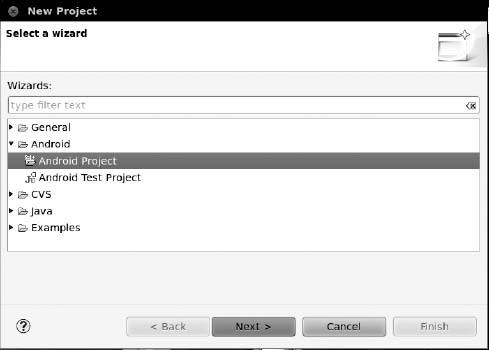
Figure 3–1. Selecting a wizard in the Eclipse New Project dialog box
Click Next to advance to the first page of the New Android Project wizard, shown in Figure 3–2.
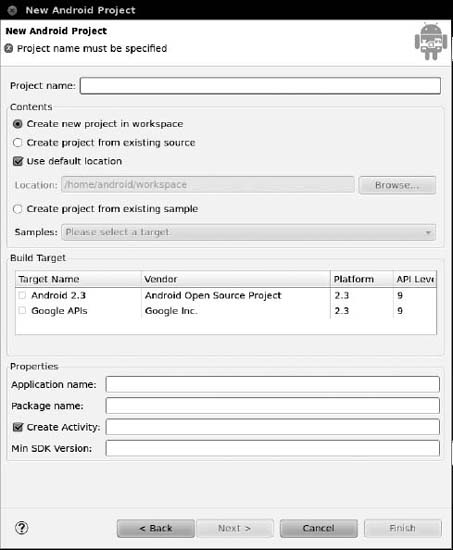
Figure 3–2. Eclipse New Android Project wizard, ready to fill in
Fill in the following and leave the default settings otherwise (the completed example for this project is shown in Figure 3–3):
- Project name: The name of the project (e.g., Now)
- Build Target: The Android SDK you wish to compile against (e.g., Google APIs for Android 2.3.3)
- Application name: The display name of your application, which will be used for the caption under your icon in the launcher (e.g., Now)
- Package name: The name of the Java package in which this project belongs (e.g., com.commonsware.android.skeleton)
- Create Activity: The name of the initial activity to create (e.g., Now)

Figure 3–3. Eclipse New Android Project wizard, completed
At this point, click Finish to create your Eclipse project.
Command Line
Here is a sample command that creates an Android project from the command line:
android create project --target "Google Inc.:Google APIs:7" --path Skeleton/Now

 --activity Now --package com.commonsware.android.skeleton
This creates an application skeleton for you, complete with everything you need to build your first Android application: Java source code, build instructions, and so forth. However, you'll probably need to customize this somewhat. Here are what those command-line switches mean:
--target: Indicates which version of Android you are targeting in terms of your build process. You need to supply the ID of a target that is installed on your development machine, one you downloaded via the Android SDK and AVD Manager. You can find out which targets are available via theandroid list targetscommand. Typically, your build process will target the newest version of Android that you have available.--path: Indicates where you want the project files to be generated. Android will create a directory if the one you name does not exist. For example, in the preceding command, aSkeleton/Now/directory will be created (or used if it exists) under the current working directory, and the project files will be stored there.--activity: Indicates the Java class name of your first activity for this project. Do not include a package name, and make sure the name meets Java class-naming conventions.--package: Indicates the Java package in which your first activity will be located. This package name also uniquely identifies your project on any device on which you install it, and it must be unique on the Android Market if you plan on distributing your application there. Hence, typically, you should construct your package based on a domain name you own (e.g.,com.commonsware.android.skeleton), to reduce the odds of an accidental package name collision with somebody else.
For your development machine, you need to pick a suitable target, and you may wish to change the path. You can ignore the activity and package for now.
Step 2: Build, Install, and Run the Application in Your Emulator or Device
Having a project is nice and all, but it would be even better if you could build and run it, whether on the Android emulator or on your Android device. Once again, the process differs somewhat depending on whether you are using Eclipse or the command line.
Eclipse
With your project selected on the Package Explorer panel of Eclipse, click the green play button in the Eclipse toolbar to run your project. The first time you do this, you have to go through a few steps to set up a run configuration, so Eclipse knows what you want to do.
First, in the Run As dialog box, choose Android Application, as shown in Figure 3–4.

Figure 3–4. Choosing to run as an Android application in the Eclipse Run As dialog box
Click OK. If you have more than one emulator AVD or device available, you will then get an option to choose which you wish to run the application on. Otherwise, if you do not have a device plugged in, the emulator will start up with the AVD you created earlier. Then, Eclipse will install the application on your device or emulator and start it.
Command Line
For developers who are not using Eclipse, in your terminal, change into the Skeleton/Now directory, then run the following command:
ant clean install
The Ant-based build should emit a list of steps involved in the installation process, which looks like this:
Buildfile: /home/some-balding-guy/projects/Skeleton/Now/build.xml

    [setup] Android SDK Tools Revision 10

    [setup] Project Target: Android 1.6

    [setup] API level: 4

    [setup]

    [setup] ------------------

    [setup] Resolving library dependencies:

    [setup] No library dependencies.

    [setup]

    [setup] ------------------

    [setup]

    [setup] WARNING: No minSdkVersion value set. Application will install on all Android

versions.

    [setup]

    [setup] Importing rules file: tools/ant/main_rules.xml


clean:
   [delete] Deleting directory /home/some-balding-guy/projects/Skeleton/Now/bin

   [delete] Deleting directory /home/some-balding-guy/projects/Skeleton/Now/gen


-debug-obfuscation-check:


-set-debug-mode:


-compile-tested-if-test:


-pre-build:


-dirs:

     [echo] Creating output directories if needed...

    [mkdir] Created dir: /home/some-balding-guy/projects/Skeleton/Now/bin

    [mkdir] Created dir: /home/some-balding-guy/projects/Skeleton/Now/gen

    [mkdir] Created dir: /home/some-balding-guy/projects/Skeleton/Now/bin/classes


-aidl:

     [echo] Compiling aidl files into Java classes...


-renderscript:

     [echo] Compiling RenderScript files into Java classes and RenderScriptbytecode...


-resource-src:

     [echo] Generating R.java / Manifest.java from the resources...


-pre-compile:


compile:

    [javac] /opt/android-sdk-linux/tools/ant/main_rules.xml:384: warning:

'includeantruntime' was not set, defaulting to build.sysclasspath=last; set to false for

repeatable builds

    [javac] Compiling 2 source files to /home/some-balding-

guy/projects/Skeleton/Now/bin/classes


-post-compile:


-obfuscate:


-dex:

     [echo] Converting compiled files and external libraries into /home/some-balding-

guy/projects/Skeleton/Now/bin/classes.dex...


-package-resources:

     [echo] Packaging resources

     [aapt] Creating full resource package...


-package-debug-sign:

[apkbuilder] Creating Now-debug-unaligned.apk and signing it with a debug key...


debug:

     [echo] Running zip align on final apk...

     [echo] Debug Package: /home/some-balding-guy/projects/Skeleton/Now/bin/Now-debug.apk


install:
     [echo] Installing /home/some-balding-guy/projects/Skeleton/Now/bin/Now-debug.apk

onto default emulator or device...

     [exec] 98 KB/s (4626 bytes in 0.045s)

     [exec] pkg: /data/local/tmp/Now-debug.apk

     [exec] Success


BUILD SUCCESSFUL

Total time: 10 seconds
Note the BUILD SUCCESSFUL message at the bottom—that is how you know the application compiled successfully.
When you have a clean build, in your emulator or device, open the application launcher, shown in Figure 3–5, which typically is found at the bottom of the home screen.

Figure 3–5. Android emulator application launcher
Notice there is an icon for your Now application. Click it to open it and see your first activity in action. To leave the application and return to the launcher, press the Back button, which is located to the right of the Menu button and looks like an arrow pointing to the left.