
Chapter 26
Focusing on Tablets and Larger UIs
February 2011 saw the introduction of Android 3.0 and a UI paradigm that embraced screens of radically larger size than the traditional phones for which earlier versions of Android had been designed. Fast-forward to October 2011, and Android 4.0 Ice Cream Sandwich (ICS) has been released, unifying the tablet-specific Honeycomb UI system from Android 3.0 with the mainstream Android code base. The move to embrace tablets, and indeed larger devices such as televisions, cinema displays, and so forth, presents the biggest single change in Android since Android 0.9, before the first phones were available.
Whether to consider tablet devices when designing and building Android applications is a matter of your own preference, but knowing the ways in which the platform has adapted to large formats will allow you to design your code to easily accommodate tablets in the future and, most importantly, deal with the core tenets of the APIs that must be addressed regardless of your feelings toward tablets. This chapter is focused more on the big picture of the current state of the APIs for tablet-sized devices and their place within Android.
Why the Drive to Tablets?
In principle, Android's original phone-centric UI can run on tablets. After all, a few tablets have shipped with Android 2.2 support, such as the Samsung Galaxy Tab and ZTE V9. Clearly, those manufacturers thought the Android of the time was strong enough for their tablet devices.
That being said, as you get into larger tablets (e.g., the Motorola XOOM with its 10-inch diagonal screen), the older Android phone UI starts to become clunkier. Although applications can scale up to use the larger screen, the default way to scale up is just to make everything bigger, frequently resulting in a lot of wasted space. Whereas an e-mail client on a phone might dedicate an activity to showing the list of e-mails in the inbox, an e-mail client on a tablet really ought to show the list of e-mails plus something else, such as the content of a selected e-mail. We have the room, so we may as well use it.
Similarly, the dependence on menus, while reasonable on a phone, makes less sense on a tablet. We have the space to show more of those functions right on the screen. Hiding them in menus makes them less discoverable to users and requires extra taps to access.
So, “modern” Android is designed to retain the essence of the Android user experience, while allowing applications to (relatively) gracefully take advantage of the space that is available.
What the User Sees
A tablet screen looks a bit different from an Android 2.x screen on a traditional phone, as shown in Figure 26–1.
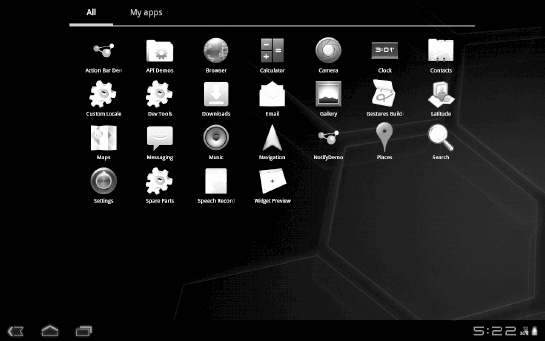
Figure 26–1. The Android app launcher, as seen on the emulator configured as a tablet
With all that additional real estate, various stock components can be placed in more varied locations. In this example, we see the system bar located on the bottom of the screen. On the left end of the system bar are onscreen buttons for Back, Home, and recent tasks (obviating the need to remember the long-press of the Home button to achieve the same effect). Notification icons appear on the right of the system bar, along with the clock and the signal and battery strength indicators (the concept of notifications will be covered in Chapter 37).
The UI of an application that has not been optimized for Android 3.x/4.0 appears much the same, as shown in Figure 26–2.
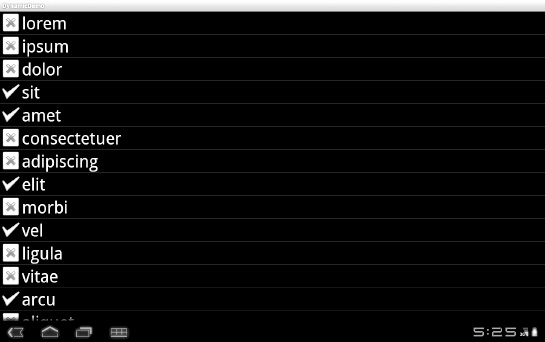
Figure 26–2. The FancyLists/Dynamic sample project, on Android 3.0
The only substantive difference is the new icon forth from the left in the system bar, which will open an Android 2.x options menu, if the application has one.
Tablet-optimized applications will look a bit different, as shown in Figure 26–3.

Figure 26–3. Adding a contact on Android 4.0
At the top of the screen is the action bar, taking over the space where pre-Android 3.0 apps would use menus. In Figure 26–3, the Done option appears as a menu choice. Other menu behaviors to note are things such as the < icon on the left end of the action bar, as shown in Figure 26–4.

Figure 26–4. The < icon for moving up in the hierarchy of actions, displayed in Android 4.0
In this case, tapping the < icon takes the user up in the hierarchy of actions in this application, going “up” from viewing a new contact to viewing the list of existing contacts, as shown in Figure 26–5.

Figure 26–5. The roster of available contacts as displayed in Android 4.0
Our UI has come almost full-circle over the life of several Android versions. In Android 2.x, the contacts UI would have one activity with the list of contacts, and a separate activity to view the details of that contact. In Android 3.0, these are combined into a single activity. With Android 4.0, we've reverted to the one-activity-per-operation mode. The right side of the action bar includes a “Find contacts” search icon (magnifying glass) and an icon for adding a new contact. Adjacent to these would be icons representing any other available options menu items and context menu items.
Dealing with the Rest of the Devices
Of course, all the Android phones in the world haven't up and vanished just because Android 4.0 has been released. The goal is for you to create an application that supports both phones and tablets from a single code base.
Your phone-centric app will run just fine on a tablet, though you may wish to do some things to take advantage of larger screen sizes, as was discussed in the previous chapter. If you want to adopt the general look and feel of the Ice Cream Sandwich UI, you will need to include android:targetSdkVersion="14" in your <uses-sdk> element in the manifest. If you previously developed for Honeycomb and became accustomed to explicitly turning on hardware accelerations using the android:hardwareAccelerated="true" attribute, the good news is that you no longer need to explicitly set such acceleration in Android 4.0. Hardware acceleration is now the default. This excerpt from the ScreenSizes/EU4You_5 sample project's AndroidManifest.xml file shows the SDK change:
<?xml version="1.0" encoding="utf-8"?>

<manifest xmlns:android="http://schemas.android.com/apk/res/android"

  package="com.commonsware.android.eu4you"

  android:versionCode="1"

  android:versionName="1.0">

  <uses-permission android:name="android.permission.INTERNET" />

  <supports-screens

    android:largeScreens="true"

    android:normalScreens="true"

    android:smallScreens="true"

    android:anyDensity="true"

  />

  <uses-sdk android:minSdkVersion="4" android:targetSdkVersion="14" />

  <application android:label="@string/app_name"

    android:icon="@drawable/cw"

    <activity android:name=".EU4You"

              android:label="@string/app_name">

      <intent-filter>

        <action android:name="android.intent.action.MAIN" />

        <category android:name="android.intent.category.LAUNCHER" />

      </intent-filter>

    </activity>

  </application>

</manifest>
The resulting application works fine on older devices, but with no other changes, we get the result shown in Figure 26–6 on a Motorola XOOM.
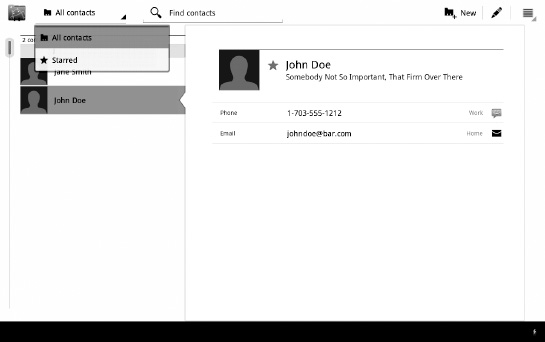
Figure 26–6. The EU4You sample application, on a Motorola XOOM
If you want to take advantage of some of the newer features of Ice Cream Sandwich, you will also need to think about backward compatibility, to make sure that what you implement in your application will work successfully on both newer and older versions of Android. This topic is covered later in this book.
If you have resources, such as styles, that need to be version-specific, you can use the -vNN resource set suffix syntax, where NN denotes the version you are targeting. For example, you could have a res/values/styles.xml and a res/values-v14/styles.xml—the latter would be used on Ice Cream Sandwich, and the former would be used on older versions of Android. But first, you need to explore all the tablet UI features that you can take advantage of, which is the point of the next few chapters.