
Chapter 31
Using Preferences
Android has many different ways for you to store data for long-term use by your activity. The simplest to use is the preferences system, which is the focus of this chapter.
Android allows activities and applications to keep preferences, in the form of key/value pairs (akin to a Map), that will hang around between invocations of an activity. As the name suggests, the primary purpose of preferences is to enable you to store user-specified configuration details, such as the last feed the user looked at in your feed reader, the sort order to use by default on a list, or whatever. Of course, you can store in the preferences whatever you like, as long as it is keyed by a String and has a primitive value (boolean, String, etc.)
Preferences can be either for a single activity or shared among all activities in an application. Other components, such as services, also can work with shared preferences.
Getting What You Want
To get access to the preferences, you have three APIs to choose from:
getPreferences()from within yourActivity, to access activity-specific preferencesgetSharedPreferences()from within yourActivity(or other applicationContext), to access application-level preferencesgetDefaultSharedPreferences(), onPreferenceManager, to get the shared preferences that work in concert with Android's overall preference framework
The first two methods take a security mode parameter—the right choice is MODE_PRIVATE, so that no other applications can access the file. The getSharedPreferences() method also takes a name of a set of preferences. getPreferences() effectively calls getSharedPreferences() with the activity's class name as the preference set name. The getDefaultSharedPreferences() method takes the Context for the preferences (e.g., your Activity).
All of these methods return an instance of SharedPreferences, which offers a series of getters to access named preferences, returning a suitably typed result (e.g., getBoolean() to return a Boolean preference). The getters also take a default value, which is returned if there is no preference set under the specified key.
Unless you have a good reason to do otherwise, you are best served using the third option—getDefaultSharedPreferences()—as that will give you the SharedPreferences object that works with a PreferenceActivity by default, as will be described later in this chapter.
Stating Your Preference
Given the appropriate SharedPreferences object, you can use edit() to get an editor for the preferences. This object has a set of setters that mirror the getters on the parent SharedPreferences object. It also has the following methods:
remove(): Deletes a single named preferenceclear(): Deletes all preferencescommit(): Persists your changes made via the editor
The commit() method is important, because if you modify preferences via the editor and fail to commit() the changes, those changes will evaporate once the editor goes out of scope. Note that Android 2.3 has an apply() method, which works like commit() but runs faster.
Conversely, since the preferences object supports live changes, if one part of your application (say, an activity) modifies shared preferences, another part of your application (say, a service) will have access to the changed value immediately.
Introducing PreferenceFragment and PreferenceActivity
You could roll your own activity to collect preferences from the user. On the whole, this is a bad idea. Instead, use preference XML resources and a PreferenceFragment or a PreferenceActivity, depending on your targeted version of Android. Why? One of the common complaints about Android developers is that they lack discipline, not following any standards or conventions inherent in the platform. For other operating systems, the device manufacturer might prevent you from distributing apps that violate their human interface guidelines. With Android, that is not the case—but this is not a blanket permission to do whatever you want. Where there is a standard or convention, please follow it, so that users will feel more comfortable with your app and their device. Using a PreferenceFragment in Android 3.0 or later, or a PreferenceActivity in earlier versions, for collecting preferences is one such convention. The behavior of PreferenceActivity was revamped with Android 3.0 and 4.0, so we'll introduce the new way of working with preferences first, and then illustrate the original model—useful for the many existing Android 1.x and 2.x devices with which your code may need to be compatible.
Preferences via Fragments
Android 3.0 and beyond introduce a new and improved PreferenceScreen and PreferenceActivity. This allows preference selection on larger screens to look great, providing rapid access to a large number of settings, as shown in Figure 31–1.
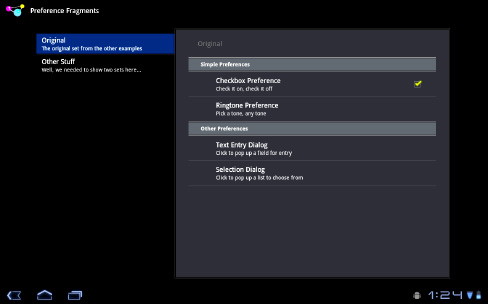
Figure 31–1. PreferenceActivity using fragments
On the minus side, the new system is not part of the Android Compatibility Library, and as such cannot be used directly on pre-3.0 versions of Android. That being said, it is possible to work out a backward-compatible solution, though it may require some effort if you have a lot of preferences.
Preferences the New and Improved Way
In pre-Honeycomb versions of Android, a PreferenceActivity subclass loads preferences from resource files, to indicate what should go on the screen. In Honeycomb and Ice Cream Sandwich, a PreferenceActivity subclass loads preference headers from resource files, to indicate what should go on the screen.
Preference Headers
Visually, preference headers are not preference categories (placing a header over a set of preferences). Rather, preference headers are the major clusters of preferences. The headers are listed on the left, with the preferences for the selected header shown on the right, as depicted in Figure 31–1. Ice Cream Sandwich or Honeycomb PreferenceActivity calls loadHeadersFromResource(), pointing to another XML resource that describes the preference headers. For example, here is res/xml/preference_headers.xml from the Prefs/Fragments sample project:
<preference-headers xmlns:android="http://schemas.android.com/apk/res/android">

    <header android:fragment="com.commonsware.android.preffrags.StockPreferenceFragment"

            android:title="Original"

            android:summary="The original set from the other examples">

      <extra android:name="resource" android:value="preferences" />

    </header>

    <header android:fragment="com.commonsware.android.preffrags.StockPreferenceFragment"

            android:title="Other Stuff"

            android:summary="Well, we needed to show two sets here…">

      <extra android:name="resource" android:value="preferences2" />

    </header>

</preference-headers>
Each <header> element indicates the PreferenceFragment subclass that will describe the preferences that belong to the header. In addition, the <header> element describes the title and summary for the header, along with an optional icon (android:icon attribute). A <header> element may also have one or more <extra> child elements, providing a key/value pair of extra data that a PreferenceFragment can use for configuration. In the preceding example, each <header> element has one <extra> element defining the name of an XML resource that will hold the preferences for that header.
Hence, the PreferenceActivity is a very short structure:
package com.commonsware.android.preffrags;


import android.os.Bundle;

import android.preference.PreferenceActivity;

import java.util.List;


public class EditPreferences extends PreferenceActivity {

  @Override

  public void onBuildHeaders(List<Header> target) {

    loadHeadersFromResource(R.xml.preference_headers, target);

  }

}
You override an onLoadHeaders() method and call loadHeadersFromResource() there.
PreferenceFragment and StockPreferenceFragment
As previously mentioned, the preference headers point to subclasses of PreferenceFragment. The job of PreferenceFragment is to do what PreferenceActivity does in older versions of Android (which we'll cover shortly)—call addPreferencesFromResource() to define the preferences to be displayed on the right when the associated header is tapped on the left.
What is odd about PreferenceFragment is that it requires subclasses. Considering that the vast majority of such fragments would simply call addPreferencesFromResource()once on a single resource, it would seem logical to have that built into Android, allowing subclasses of PreferenceFragment for more complicated cases. Yet, that is not presently supported. Official Android samples would have you create one PreferenceFragment subclass for each preference header, which seems wasteful.
Another approach is to use StockPreferenceFragment, a PreferenceFragment subclass that is implemented in the Prefs/Fragments project but can be used wherever. It assumes that you have added an <extra> to the <header> identifying the name of the preference XML resource to load, and it loads it. No extra subclasses are required. That is how both headers shown in the previous section can point to the single StockPreferenceFragment implementation.
StockPreferenceFragment is not especially long, but it does employ one trick:
package com.commonsware.android.preffrags;


import android.os.Bundle;

import android.preference.PreferenceFragment;


public class StockPreferenceFragment extends PreferenceFragment {

  @Override

  public void onCreate(Bundle savedInstanceState) {

    super.onCreate(savedInstanceState);


    int res=getActivity()

              .getResources()

              .getIdentifier(getArguments().getString("resource"),

                             "xml",

                             getActivity().getPackageName());


    addPreferencesFromResource(res);

  }

}
To get at the extras, a PreferenceFragment can call getArguments(), which returns a Bundle. In our case, we can get the resources extra value via getArguments().getString("resource"). The problem is, this is a String, not a resource ID. In order to call addPreferencesFromResource(), we need the resource ID of the preference that we know only by name.
The trick is to use getIdentifier(). The getIdentifier() method on the Resources object—itself obtained by calling getResources() on an Activity—will use reflection to find the resource ID when given three pieces of information:
- The name of the resource (in this case, the value from the arguments)
- The type of the resource (in this case,
xml) - The package where this ID should reside (typically, your own package, obtained by calling
getPackageName()on anActivity)
So, StockPreferenceFragment uses getIdentifier() to convert the resource extra into a resource ID, which it then uses with addPreferencesFromResource().
Note that getIdentifier() is not particularly fast, since it uses reflection. Do not use this in a tight loop, in getView() of an Adapter, or any place where it may be called thousands of times.
Avoiding Nested PreferenceScreen Elements
In pre-Honeycomb Android, if you have a lot of preferences, you might consider turning them into nested PreferenceScreen elements. It is better to break them out into separate preference headers. Partly, this is to provide a better user experience—users can directly see and access the various headers, versus having to wade through your preferences to find ones that lead to nested PreferenceScreens. It is also partly because the nested PreferenceScreen UI does not adopt the contemporary Android look and feel (e.g., there are no nested preference headers), so there will be a visual clash.
Intents for Headers or Preferences
If you need to collect some preferences that are beyond what the standard preferences can handle, you have some choices.
One choice is to create a custom Preference. Extending DialogPreference to create your own Preference implementation is not especially hard. However, it does constrain you to something that can fit in a dialog box.
Another option is to specify an <intent> element as a child of a <header> element. When the user taps this header, your specified Intent is used with startActivity(), giving you a gateway to your own activity for collecting things that are beyond what the preference UI can handle. For example, you could have the following <header>:
<header android:icon="@drawable/something"

        android:title="Fancy Stuff"

        android:summary="Click here to transcend your plane of existence">

  <intent android:action="com.commonsware.android.MY_CUSTOM_ACTION" />

</header>
Then, as long as you have an activity with an <intent-filter> specifying your desired action (com.commonsware.android.MY_CUSTOM_ACTION), that activity will get control when the user taps the associated header.
Adding Backward Compatibility
Of course, everything described in this section works only on Android 3.0 through 4.0 and higher. What about the millions of other Android devices? Are they chopped liver? No. For one thing, chopped liver has notoriously bad cellular reception. However, they will have to retreat to the original PreferenceActivity approach. Since older versions of Android cannot load classes that refer to other classes or methods that are from newer versions of Android, the simplest approach is to have two PreferenceActivity classes, one new and one old.
For example, the Prefs/FragmentsBC sample project has all the code from Prefs/Fragments, with a few alterations. First, the specific version of the EditPreferences class that targets Ice Cream Sandwich and Honeycomb is renamed EditPreferencesNew. Another EditPreferences class, based on our original prefragment implementation, is added:
package com.commonsware.android.preffrags;


import android.os.Bundle;

import android.preference.PreferenceActivity;


public class EditPreferences extends PreferenceActivity {

  @Override

  public void onCreate(Bundle savedInstanceState) {

    super.onCreate(savedInstanceState);


    addPreferencesFromResource(R.xml.preferences);

    addPreferencesFromResource(R.xml.preferences2);

  }

}
Here, we take advantage of the fact that addPreferencesFromResource() can be called multiple times to simply chain together our two preference headers' worth of preferences. And, the options menu choice for opening our PreferenceActivity changes to choose the right one, based on our Build.VERSION.SDK_INT value:
  @Override

  public boolean onOptionsItemSelected(MenuItem item) {

    switch (item.getItemId()) {

      case EDIT_ID:

        if (Build.VERSION.SDK_INT<Build.VERSION_CODES.HONEYCOMB) {

                                                                       startActivity(new

Intent(this, EditPreferences.class));

        }

        else {

                                                                       startActivity(new

Intent(this, EditPreferencesNew.class));

        }


        return(true);

      }


    return(super.onOptionsItemSelected(item));

  }
Hence, we use the EditPreferencesNew class only when that is known to be safe. Otherwise, we use the older one.
The Older Model of Preference Handling
In older versions of Android, pre 3.x, the linchpin to the preferences framework and PreferenceActivity is yet another XML data structure. You can describe your application's preferences in an XML file stored in your project's res/xml/ directory. Given that, Android can present a pleasant UI for manipulating those preferences, which are then stored in the SharedPreferences you get back from getDefaultSharedPreferences(). Even if you plan to target Android 3.0 and later, the examples that follow are useful to you because they show how the basic preference elements such as check boxes and entry fields behave—basic elements that are common to both old and new approaches.
The following is the preference XML for the Prefs/Simple preferences sample project:
<PreferenceScreen

  xmlns:android="http://schemas.android.com/apk/res/android">

  <CheckBoxPreference

    android:key="checkbox"

    android:title="Checkbox Preference"

    android:summary="Check it on, check it off" />

  <RingtonePreference

    android:key="ringtone"

    android:title="Ringtone Preference"

    android:showDefault="true"

    android:showSilent="true"

    android:summary="Pick a tone, any tone" />

</PreferenceScreen>
The root of the preference XML is a PreferenceScreen element. Some of the things you can have inside a PreferenceScreen element, not surprisingly, are preference definitions. These are subclasses of Preference, such as CheckBoxPreference or RingtonePreference, as shown in the preceding XML. As you might expect, these allow you to check a check box or choose a ringtone, respectively. In the case of RingtonePreference, you have the option of allowing users to choose the system default ringtone or choose Silent as a ringtone.
Letting Users Have Their Say
Given that you have set up the preference XML, you can use a nearly built-in activity for allowing your users to set their preferences. The activity is “nearly built-in” because you merely need to subclass it and point it to your preference XML, plus hook the activity into the rest of your application.
For example, here is the EditPreferences activity of the Prefs/Simple project:
package com.commonsware.android.simple;


import android.app.Activity;

import android.os.Bundle;

import android.preference.PreferenceActivity;


public class EditPreferences extends PreferenceActivity {

  @Override

  public void onCreate(Bundle savedInstanceState) {

    super.onCreate(savedInstanceState);


    addPreferencesFromResource(R.xml.preferences);

  }
}
As you can see, there is not much to see. All you need to do is call addPreferencesFromResource() and specify the XML resource containing your preferences.
You will also need to add this as an activity to your AndroidManifest.xml file:
<?xml version="1.0" encoding="utf-8"?>

<manifest xmlns:android="http://schemas.android.com/apk/res/android" package="com.commonsware.android.simple">

    <application android:label="@string/app_name" android:icon="@drawable/cw">

        <activity android:name=".SimplePrefsDemo" android:label="@string/app_name">

            <intent-filter>

                <action android:name="android.intent.action.MAIN"/>

                <category android:name="android.intent.category.LAUNCHER"/>

            </intent-filter>

            </activity>

            <activity android:name=".EditPreferences" android:label="@string/app_name">

            </activity>

    </application>

  <supports-screens android:largeScreens="true" android:normalScreens="true" android:smallScreens="true" android:anyDensity="true"/>

</manifest>
And you will need to arrange to invoke the activity, such as from a menu option. The following is pulled from SimplePrefsDemo:
 public boolean onCreateOptionsMenu(Menu menu) {

    menu.add(Menu.NONE, EDIT_ID, Menu.NONE, "Edit Prefs")

        .setIcon(R.drawable.misc)

        .setAlphabeticShortcut('e'),


    return(super.onCreateOptionsMenu(menu));

  }


  @Override

  public boolean onOptionsItemSelected(MenuItem item) {

    switch (item.getItemId()) {

      case EDIT_ID:

        startActivity(new Intent(this, EditPreferences.class));

        return(true);

    }


    return(super.onOptionsItemSelected(item));

  }
That is all that is required, and it really is not that much code outside of the preferences XML. What you get for your effort is an Android-supplied preference UI, as shown in Figure 31–2.
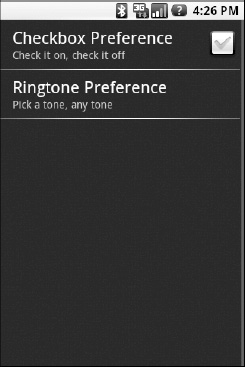
Figure 31–2. The Simple project's preferences UI
The check box can be directly checked or unchecked. To change the ringtone preference, just select the entry in the preference list to bring up a selection dialog box, as shown in Figure 31–3.
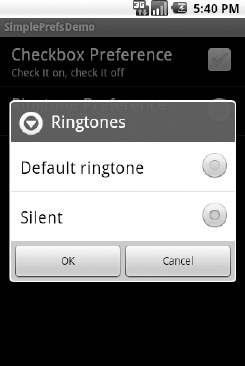
Figure 31–3. Choosing a ringtone preference
Note that there is no explicit save or commit button or menu on the PreferenceActivity—changes are persisted automatically.
The SimplePrefsDemo activity, beyond having the aforementioned menu, also displays the current preferences via a TableLayout:
<?xml version="1.0" encoding="utf-8"?>

<TableLayout

  xmlns:android="http://schemas.android.com/apk/res/android"

  android:layout_width="fill_parent"

  android:layout_height="fill_parent"

>

  <TableRow>

    <TextView

        android:text="Checkbox:"

        android:paddingRight="5dip"

    />

    <TextView android:id="@+id/checkbox"

    />

  </TableRow>

  <TableRow>

    <TextView

        android:text="Ringtone:"

        android:paddingRight="5dip"

    />

    <TextView android:id="@+id/ringtone"

    />

  </TableRow>

</TableLayout>
The fields for the table are found in onCreate():
public void onCreate(Bundle savedInstanceState) {

  super.onCreate(savedInstanceState);

  setContentView(R.layout.main);


  checkbox=(TextView)findViewById(R.id.checkbox);

  ringtone=(TextView)findViewById(R.id.ringtone);

}
The fields are updated on each onResume():
public void onResume() {

  super.onResume();


  SharedPreferences prefs=PreferenceManager

                           .getDefaultSharedPreferences(this);


  checkbox.setText(new Boolean(prefs

                               .getBoolean("checkbox", false))

                     .toString());

  ringtone.setText(prefs.getString("ringtone", "<unset>"));

}
This means the fields will be updated when the activity is opened and after the preferences activity is left (e.g., via the Back button), as shown in Figure 31–4.
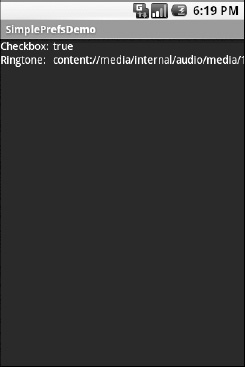
Figure 31–4. The Simple project's list of saved preferences
Adding a Wee Bit o' Structure
If you have a lot of preferences for users to set, having them all in one big list may become troublesome. Android's preference UI gives you a few ways to impose a bit of structure on your bag of preferences, including categories and screens.
Categories are added via a PreferenceCategory element in your preference XML and are used to group together related preferences. Rather than have your preferences all as children of the root PreferenceScreen, you can put a few PreferenceCategory elements in the PreferenceScreen, and then put your preferences in their appropriate categories. Visually, this adds a divider with the category title between groups of preferences.
If you have lots and lots of preferences—more than are convenient for users to scroll through—you can also put them on separate “screens” by introducing the PreferenceScreen element. Yes, that PreferenceScreen element.
Any children of PreferenceScreen go on their own screen. If you nest PreferenceScreen elements, the parent screen displays the screen as a placeholder entry, and tapping that entry brings up the child screen.
For example, from the Prefs/Structured sample project, here is a preference XML file that contains both PreferenceCategory and nested PreferenceScreen elements:
<PreferenceScreen

  xmlns:android="http://schemas.android.com/apk/res/android">

  <PreferenceCategory android:title="Simple Preferences">

    <CheckBoxPreference
      android:key="checkbox"

      android:title="Checkbox Preference"

      android:summary="Check it on, check it off"

    />

    <RingtonePreference

      android:key="ringtone"

      android:title="Ringtone Preference"

      android:showDefault="true"

      android:showSilent="true"

      android:summary="Pick a tone, any tone"

    />

  </PreferenceCategory>

  <PreferenceCategory android:title="Detail Screens">

    <PreferenceScreen

      android:key="detail"

      android:title="Detail Screen"

      android:summary="Additional preferences held in another page">

      <CheckBoxPreference

        android:key="checkbox2"

        android:title="Another Checkbox"

        android:summary="On. Off. It really doesn't matter."

      />

    </PreferenceScreen>

  </PreferenceCategory>

</PreferenceScreen>
The result, when you use this preference XML with your PreferenceActivity implementation, is a categorized list of elements, as shown in Figure 31–5.
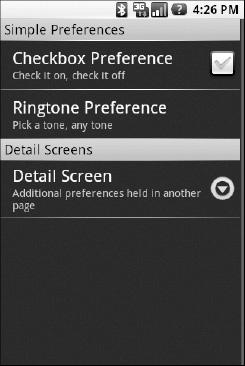
Figure 31–5. The Structured project's preference UI, showing categories and a screen placeholder
If you tap the Detail Screen entry, you are taken to the child preference screen, as shown in Figure 31–6.
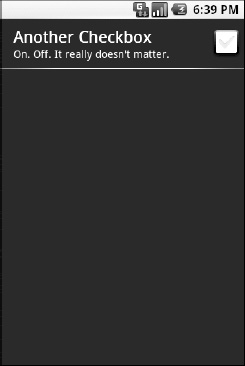
Figure 31–6. The child preference screen of the Structured project's preference UI
The Kind of Pop-Ups You Like
Of course, not all preferences are check boxes and ringtones. For others, like entry fields and lists, Android uses pop-up dialog boxes. Users do not enter their preference directly in the preference UI activity, but rather tap a preference, fill in a value, and tap OK to commit the change.
Structurally, in the preference XML, fields and lists are not significantly different from other preference types, as seen in this preference XML from the Prefs/Dialogs sample project:
<PreferenceScreen

  xmlns:android="http://schemas.android.com/apk/res/android">

  <PreferenceCategory android:title="Simple Preferences">

    <CheckBoxPreference

      android:key="checkbox"

      android:title="Checkbox Preference"

      android:summary="Check it on, check it off"

    />

    <RingtonePreference

      android:key="ringtone"

      android:title="Ringtone Preference"

      android:showDefault="true"

      android:showSilent="true"

      android:summary="Pick a tone, any tone"
    />

  </PreferenceCategory>

  <PreferenceCategory android:title="Detail Screens">

    <PreferenceScreen

      android:key="detail"

      android:title="Detail Screen"

      android:summary="Additional preferences held in another page">

      <CheckBoxPreference

        android:key="checkbox2"

        android:title="Another Checkbox"

        android:summary="On. Off. It really doesn't matter."

      />

    </PreferenceScreen>

  </PreferenceCategory>

  <PreferenceCategory android:title="Other Preferences">

    <EditTextPreference

      android:key="text"

      android:title="Text Entry Dialog"

      android:summary="Click to pop up a field for entry"

      android:dialogTitle="Enter something useful"

    />

    <ListPreference

      android:key="list"

      android:title="Selection Dialog"

      android:summary="Click to pop up a list to choose from"

      android:entries="@array/cities"

      android:entryValues="@array/airport_codes"

      android:dialogTitle="Choose a Pennsylvania city" />

  </PreferenceCategory>

</PreferenceScreen>
With the field (EditTextPreference), in addition to the title and summary you put on the preference itself, you can also supply the title to use for the dialog box.
With the list (ListPreference), you supply both a dialog box title and two string-array resources: one for the display names and one for the values. These need to be in the same order and have the same number of elements, because the index of the chosen display name determines which value is stored as the preference in the SharedPreferences. For example, here are the arrays for use by the ListPreference shown in the preceding example:
<?xml version="1.0" encoding="utf-8"?>

<resources>

  <string-array name="cities">

    <item>Philadelphia</item>

    <item>Pittsburgh</item>

    <item>Allentown/Bethlehem</item>

    <item>Erie</item>

    <item>Reading</item>

    <item>Scranton</item>

    <item>Lancaster</item>

    <item>Altoona</item>

    <item>Harrisburg</item>

  </string-array>

  <string-array name="airport_codes">

    <item>PHL</item>

    <item>PIT</item>
    <item>ABE</item>

    <item>ERI</item>

    <item>RDG</item>

    <item>AVP</item>

    <item>LNS</item>

    <item>AOO</item>

    <item>MDT</item>

  </string-array>

</resources>
When you bring up the preference UI, you start with another category with another pair of preference entries, as shown in Figure 31–7.

Figure 31–7. The preference screen of the Dialogs project's preference UI
Tapping Text Entry Dialog brings up a text entry dialog box—in this case, with the prior preference entry filled in, as shown in Figure 31–8.
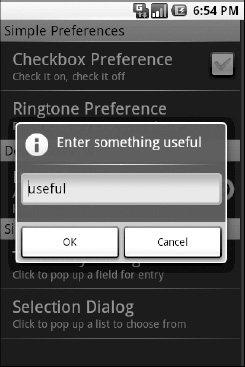
Figure 31–8. Editing a text preference
Tapping Selection Dialog brings up a selection dialog box showing the display names from the one array, as shown in Figure 31–9.
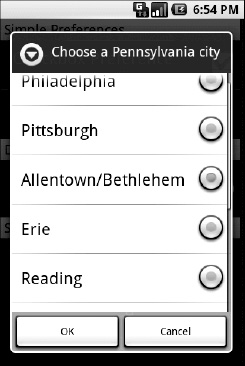
Figure 31–9. Editing a list preference