
CHAPTER 3
Creating a To-Do List
Application
Now that you've set up Cake on your own computer, it's time to begin building applications. In this chapter, you'll create a to-do list application in Cake using the built-in scaffold feature. This is the simplest approach to application building in Cake. It will only require creating a couple of plain-text files as well as a database with a couple of tables. You won't deal too much with the design but rather let Cake generate all of your HTML output.
Exploring the MVC Structure
Cake is designed using the common MVC structure. What this means is that the framework splits apart different processes into separate areas (see "Model-View-Controller" in Chapter 1). In the app folder, you will notice a folder for the program's models, a folder for controllers, and a folder for views. Right now the application is bare, so you won't find any files inside these folders. As you build the application, you'll create the necessary models, views, and controllers that correspond to the functions of the application.
In a way, these pieces of the framework talk to each other. Say, for example, that the application needs to run a user login process. It takes the user to a screen that displays two fields: a username field and a password field. This display, the actual HTML, would be contained inside a view file stored somewhere in the app/views folder. When the user fills out the login information and clicks Submit, the form gets processed in one of the controllers. At this point, the controller needs to find out whether the given username and password match in the database. So, the controller will talk to its corresponding model asking whether the supplied values match a record in the database. The model replies with a true or false response, and from there the controller decides either to return to the login screen and display an error message or to allow the user access to another area of the site.
The following is the login process in the MVC structure (see Figure 3-1):
- The client enters a username and password and then submits the form.
- The view that contains the form passes the form data to the controller for processing.
- The controller sends a find request to the model asking whether the submitted information matches anything in the database.
- The model generates the query and runs it through the database.
- Based on the response in step 4, the model returns either a true result or a false result to the controller.
- The controller processes the result and fetches the appropriate view to be sent to the client (either a success screen or an error message).
- The final output view is displayed to the client.
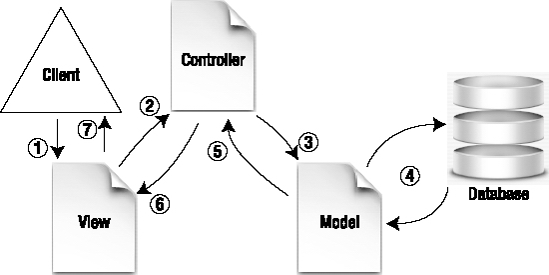
Figure 3-1. A flowchart of a login process in the MVC structure
MVC structures are useful because they allow you to separate the different processes of the web site. When needing to change or add new form fields, for instance, you need only to locate the appropriate view file and make the change. Instead of sifting through PHP output functions or scripts, you know that all the views are contained in the views folder. The same is true of controllers and models. Certain functions are available across the whole application without requiring any includes. Managing all the paths for include files or libraries in a non-MVC application can become difficult as the program grows; in this regard, the MVC architecture helps keep the application more agile. Table 3-1 explains what the models, views, and controllers handle; where these files are stored in Cake; and how the files are named.
Table 3-1. MVC Structure Areas
| Area | Type of Process | File Name and Location in Application |
| Model | Handles all database functions | app/models/{Model name}.php |
| View | Handles the presentation layer and displays, including Ajax output | app/views/{Controller |
| Controller | Handles all logic and requests | app/controllers/{Controller |
The To-Do List's MVC Layout
The first order of business is to understand how the MVC structure will work with the specific needs of the application. For the general to-do list application that you'll build, you will need to arrange certain processes throughout the MVC structure.
The to-do list application will have items that the client will want to complete. For each item there will be a description or title, a due date, a priority level, and a true/false field for whether the item is completed. So, in the MVC structure, you will split the processes into their respective elements. First, you'll create a controller for the items the client will want to save. Second, you'll create a model that will fetch items from the database and manage any other data-handling processes. Next, you will have Cake generate the views that will allow the client to list, edit, delete, and create new items. That's all there is to it.
Before you can begin saving items in the database, you must first create the database tables and fields. In general, when designing an application, the order of creation goes something like this:
- Design and create the database.
- Create models.
- Create controllers.
- Create and adjust views.
You already have a folder in your localhost root named first_app that has Cake 1.2 running. Let's rename this folder to todo and build the database. You should be able to launch the to-do list application by typing http://localhost/todo.
Designing and Creating the Database
In thinking about how the database should be designed, first you need to know something about the application you're building. Most programmers like to sketch use cases or flowcharts that explain step-by-step how the user will interact with the program and how the application will react to their inputs. I have already discussed how the application will work under an MVC structure; translating this into the schema so that the database works correctly with Cake is the next step.
Note If you haven't already done so, make sure you have created a database to be used with this application and put the configuration parameters into the app/config/database.php file.
Create a table in the database and name it items (be sure to use lowercase). Then give the table the fields shown in Table 3-2.
Table 3-2. The To-Do List Application Table Structure
| Field Name | Field Type | Length | Other Parameters |
id |
int | 11 | Set to unsigned; give it the primary key, and set it to auto_increment. |
name |
varchar | 255 | |
date |
datetime | ||
priority |
int | 2 | |
completed |
tinyint | 1 |
Giving each record a unique id value is essential for Cake to function without trouble. This application is simple, so you may be able to get by without creating an id field set to auto_increment. However, it's good practice to make sure that all your records in the database can be identified by a unique value and that it's named id, because then Cake can generate scaffolding around your table without any code on your part. Once you begin creating associated tables, then it will be mandatory to include an id field.
Note When specifying how to design the database schema, I will provide you with MySQL dump table creation code rather than walk through each field and its types and values (for example, `id` int(11) unsigned NOT_NULL auto_increment).
Creating Models
Now that you have a table in the database, Cake will need a model file to talk to that table and fetch results for the application. In the app/models directory, create a new file named item.php. This file name conforms with Cake's naming conventions, and you will need to make sure when creating models that you name the files correctly. Should you give this file a different name, you would then have to specify the nonstandard file name in the controller and (depending on what accesses the model) elsewhere too. Remember the inversion of control structure of the framework—Cake will automatically look for a file named item.php in the app/models folder, which saves you from writing unnecessary code.
In the item.php file, paste the code shown in Listing 3-1.
Listing 3-1. Contents of the app/models/item.php File
1    <?

2    class Item extends AppModel {

3        var $name = 'Item';

4    }

5    ?>
Caution Depending on your localhost or remote hosting setup, you may need to change line 1. In all the examples in this book, I'm using a type of PHP shorthand. In some setups, though, PHP shorthand is not available. If this is the case, just use <?php on line 1 instead. Semantically, shorthand makes your code cleaner and easier to read, so to improve the readability of this book, I'm going to stick with it. You will want to double-check the examples if you have set up your localhost differently or if you're sure that PHP shorthand is not available on your setup.
What's Happening in This Model
All models will always contain some of the same header code. First you will notice on line 2 that you have created a PHP class named Item and that this class extends another class named AppModel. Cake has already created the necessary PHP objects to connect to the database, so in a way all you're doing is adding to that preconfigured object. For good measure, line 3 gives an object variable named name the value of Item, which allows for backward compatibility with PHP 4. Lines 4 and 5 close out the file.
Model Possibilities
Inside this class you can place model functions or specify table associations that directly interact with the items table in the database and return results. Possible functions include field validation, complex find queries and operations, and elaborate table design cleanup.
For now, the Item model is ready to go. Let's make the controller.
Creating Controllers
In the app/controllers folder, create a new file for the items table in the database. Controllers, by default, link up to the table after which they are named. In this case, you have created an items table, so the convention in Cake is to name the controller file after this table, using an underscore and the extension controller.php. So, name this new file items_controller.php, and place it in the app/controllers folder. Paste the code shown in Listing 3-2 into this file.
Listing 3-2. Contents of app/controllers/items_controller.php
1    <?

2    class ItemsController extends AppController {

3        var $name = 'Items';

4        var $scaffold;

5    }

6    ?>
What's Happening in This Controller
Let me explain what's happening in Listing 3-2.
Line 2 is necessary for Cake to run the controller. Just as it does with the model, Cake is already starting some of its own PHP code in what it calls the controller. Next, it moves to any objects that extend this parent class. These will include the application's own controller, or AppController, and any other controller files it finds in the app/controllers folder. All the way down, you need to tell Cake whether you've inserted your own AppController or individual controller file, and you do this by starting a class and extending the previous level of controller. In this case, you created the ItemsController class, and it extends from the AppController.
Line 3 names the controller Items for the same reasons the model also set the object variable to $name earlier.
In line 4, you've called out one of Cake's built-in features: the scaffold. You can include this line in any controller, and Cake will build its own set of HTML forms and tables around what it finds in the database table. In a second, you'll see how helpful this one little string of code can be.
Controller Possibilities
Because the controller controls what happens in the application, it will likely be the most variable of the other resources I've discussed to this point. In a sense, it behaves like the "brain" of the application and coordinates the processes in the models and views. A good MVC application's controller will generally act in this role with most of the custom logic placed here. In Cake, the controller contains a series of functions that are entered like normal PHP functions:
function foo() {

...

}
Cake's helpers and components can be pulled into a controller and used in the application, as well as third-party components, plugins, and helpers. Later you'll build more advanced controllers that make use of all these possibilities.
Launching the Application
Launching Cake applications is always done by entering the appropriate URL in a web browser. All URLs are sent to the dispatcher or Cake's central routing engine that handles all HTTP requests. The dispatcher parses the URL and resolves it. You can manipulate how the dispatcher does this by changing routes, which is explained in Chapter 10.
How Cake Resolves URLs
By default, the URL structure is delimited by slashes, not the typical messy characters such as the question mark or ampersand that you have undoubtedly seen with many web sites using PHP. There is a growing trend for web sites to be optimized so that they show up as high as possible on the result lists returned by search engines. This has led many developers to forego the traditional way of passing URL routes to a PHP script, instead using slashes to separate URL elements. Usually called friendly URLs, these paths are more easily understood by users and search engines, which are themselves beneficial to your application. Friendly URLs also allow Cake to better maintain a consistent reference system within the application, which ultimately makes the programming aspect easier and cleaner for you, the developer.
Cake's default routes follow this pattern:
http://localhost/{Application}/{Controller}/{Action}/{Parameter 1}/

{Parameter 2, etc.}
So, following the Cake defaults, to launch the application, you enter the following in your web browser:
http://localhost/todo
You should see the same Cake welcome screen that you got after installing Cake. You haven't set up a default or base route for Cake, so it will continue to show the welcome screen by default.
Since you have created the Items controller, to access that area of the application you plug in items in the controller spot in the URL:
http://localhost/todo/items
Creating the Scaffolding
Here is where Cake's scaffolding comes in. Recall that in Listing 3-2, line 4, you called the object variable $scaffold. When the dispatcher receives the URL and finds that you are requesting the Items controller, it looks for a default function named index(). First, however, it notices that you have told it to render the scaffolding (line 4), and since you haven't specified a function in the controller called index() yet, the dispatcher will fetch the built-in views and render a standard list view for the items table in the database. After launching the Items controller in the browser, you should get a screen like Figure 3-2.
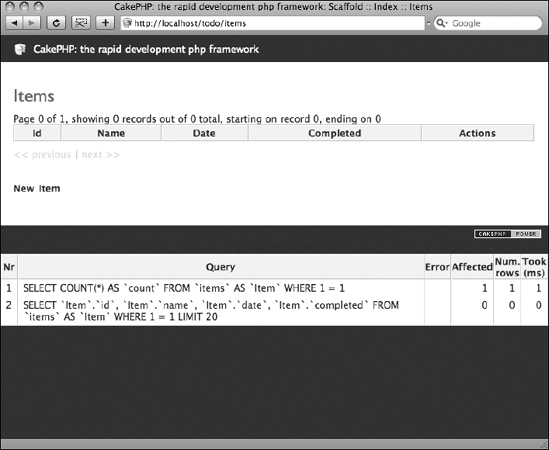
Figure 3-2. Cake's scaffolding feature rendering a list view of the items table
Notice that no items appear in this list view; you haven't created any yet. Normally, you would have to go into the Items controller, create a new function named add(), and then specify each operation for adding a new record in the items table. But Cake's scaffolding will handle all the CRUD operations for you. You can see the link on the screen named New Item. Click it, and you will have a complete add view generated by the scaffold (see Figure 3-3).
Scaffolding is useful because in one line of code you can translate typical database-handling methods into a web interface. In a short amount of time, you can interact with the database through your Cake application and, consequently, the browser as well. Later, you'll build more dynamic schemes that will use multiple tables simultaneously, and the scaffolding will tell you quickly whether you've effectively linked the associations in the models.
Valuable as it is, Cake's scaffolding does have some limitations. For example, you cannot easily change the look or order of the fields in the forms. To do that, you need to generate a different view file separate from the scaffolding views, which would also require you to write the whole add() and edit() functions in the Items controller. For this and other reasons, the scaffold feature is not intended for production-level output. You will discover more about its utility, however, as you create more elaborate skeletons from which to build more powerful applications.
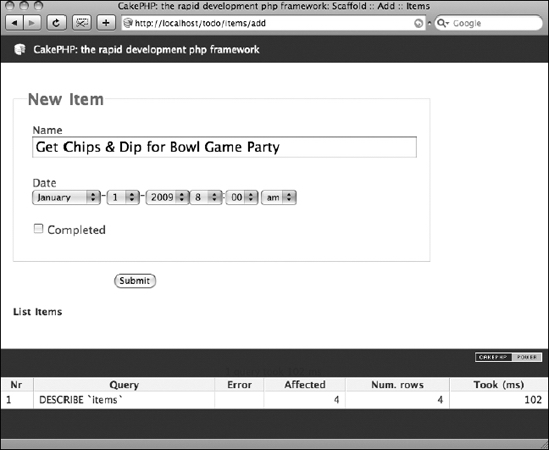
Figure 3-3. Adding a new item to the database using the scaffolding views and functions
Summary
In this chapter, you used the scaffolding feature to create a basic to-do list application in Cake. The MVC architecture in Cake made it possible to use a minimal amount of code to get the program running, and thanks to the scaffolding feature, you can even interact with the database without writing any HTML or form processes. Next, you will expand on this application and improve it using other tools, but for now it will be worth it to practice this routine of setting up a quick Cake application with models, controllers, a database table, and a scaffold until you can do this in about five minutes or less.