
CHAPTER 5
Creating Simple Views and
Baking in the Console
So far, you've really only used the scaffolding feature. Although scaffolding can help test associations and get your database working well with Cake, it does not give you much control over design, and the scaffolding does not go beyond simple CRUD operations either. To get into the individual form elements or to change how you want the list view to display the results, you must manually create and edit the views themselves.
Fortunately, Cake comes with some handy console scripts that can help you generate those views, as well as perform other important development tasks. In this chapter, I'll introduce the Bake script, which will essentially run like the scaffold and analyze the database but then provide code to edit. From there you can include your custom logic and add improved actions that go beyond simple CRUD operations. First, let's change the views a little bit for your blog application.
Note All the view files I'll use in this book will run PHP shorthand for the echo() function. Your server setup may or may not support this method. If not, be sure to use the longer string <?php echo();?> instead of my shorthand <?= ;?>. Because the echo command is so common for view files, Cake does come with an echo convenience function that cuts down on characters. Use e() to echo and pr() for the print_r() function if you prefer the Cake convenience functions. Or, you can talk with your hosting provider to make PHP shorthand tags available and stick with the examples as written.
Introducing Layouts
Remember, Cake's framework follows the MVC method: models, views, and controllers. So far, you've become familiar with the model and the controller. Views are separated from the mix to provide for easier handling of output. Cake organizes all the views in the app/views folder.
The views folder contains the following directories:
The layouts folder contains any overall layout files that are wrapped around your application. You can intercept Cake's default layout for scaffolds, error pages, and any other views by creating your own default layout. Placing a file named default.ctp into the layouts folder tells Cake to apply this layout instead of its own default scaffolding layout. Because it is a layout file, all the surrounding HTML will be applied to all the output.
Writing the default.ctp File
Create app/views/layouts/default.ctp, and place inside it your own HTML/CSS code. Listing 5-1 shows a basic (and boring) HTML layout to demonstrate how layouts work.
Listing 5-1. A Simple Default Layout
1    <html>

2    <head>

3        <title>My Cake Blog Application</title>

4        <?=$html->css('styles'),?>

5    </head>

6    <body>

7        <div id="container">

8        <div id="content">

9            <?=$content_for_layout;?>

10        </div>

11        </div>

12    </body>

13    </html>
Most of this is basic HTML code that displays a title called "My Cake Blog Application" in the browser window but does little else. Line 4 of Listing 5-1 is a bit of Cake helper code that will automatically pull in the CSS file named styles.css (you'll create this file in a second).
Line 9 of Listing 5-1 is the key to any layout file in Cake. It's the string that tells Cake where to put all the views. When you launch any controller that hasn't specified another layout file, by default Cake will now swap out $content_for_layout with whatever output you've generated through your controllers, models, and views.
Creating a Style Sheet for the Layout
Public files, or files such as images, JavaScript files, and style sheets that you make available to the general web user are stored in the app/webroot folder. By default, this folder contains placeholders for CSS files, scripts, images, and other public resources. In a production setup, app/webroot will typically serve as the document root. In any case, Cake will internally reference this directory when linking to style sheets, images, JavaScript files, or other public resource files.
Line 4 of Listing 5-1 is Cake helper code that assembles some HTML for you, in this case, a link to a CSS file. This line is pulling the css() function from the HTML helper, which is part of Cake's core libraries and is passing the parameter styles to the function. The HTML helper's css() function knows to look for a styles.css file in the app/webroot/css folder and generate the <link rel="stylesheet" type="text/css" href="/css/styles.css" /> tag for the layout.
By using the HTML helper to build this link, not only is the amount of code entered by hand reduced, but you also ensure that wherever you may run the Cake application, the link will not be broken from inconsistent server setups. Cake comes with many more helpers. Using them can dramatically reduce the amount of code in the application, especially in views and layouts.
As of yet, there is no styles.css file in the app/webroot/css directory. Create that file, but leave it blank. You should get a rather simple view for the blog application (see Figure 5-1).
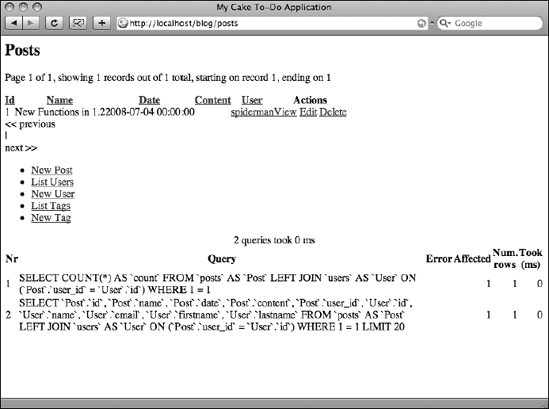
Figure 5-1. A blank style sheet and simple default layout replaces the scaffolding layout and styles.
Pretty boring, eh? You can spice this up by simply editing the app/webroot/css/styles.css file. In this file, paste the code shown in Listing 5-2 or do something similar.
Listing 5-2. Sample CSS Code for the Default Layout
* { font-family: "Lucida Grande",Lucida,sans-serif; }


th {

    font-size: 14px;

    font-weight: bold;

    background-color: #e1e1e1;

    border-bottom: 1px solid #ccc;

    padding: 10px;

}


div.actions ul {

    list-style-type: none;

}
Refresh the Posts controller, and you should get some new styles in the display (see Figure 5-2).
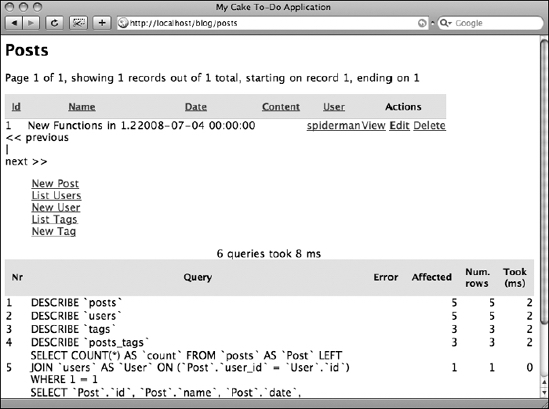
Figure 5-2. The new styles are reflected in all views.
You can see that by placing your own styles into the default layout, you can fully edit the design surrounding your application's output. Any views that are rendered, if they follow the default layout, will also be rendered using the same style sheet, so there's no need to duplicate styles or designs.
Return to the app/views/layouts/default.ctp file, and change line 4 to the following:
<?=$html->css('cake.generic'),?>
When you refresh the Posts controller screen, you'll notice that Cake's styles have been implemented without the scaffolding's default titles and such. With these style changes, the scaffolding is still generating the individual CRUD operation views but now without Cake's built-in layouts.
Creating Individual Views
What do you do if you want to manipulate the views directly? For example, say you wanted to get rid of the title at the top that reads "Posts" and replace it with "Blog Posts." This is where individual views come in.
Yes, the scaffolding is a nice feature that makes testing code quick and painless, especially if all you want to do is play around with the database to make sure it's working right. But it can't possibly read your mind, and it can create only some generic views. Adding or subtracting from the application output will require you to manually build such output. No worries—this, too, is made much easier through the use of the framework.
Adding Actions to the Controller
To break out of the scaffold, you can delete the $scaffold attribute in the controller, or you can intercept the scaffold by adding your own actions instead. Scaffolded actions are specifically named index(), add(), edit(), view(), and delete(). Inserting an action into the controller bearing any of these names will replace the scaffold for that one action. So, leave the $scaffold attribute for all CRUD operations you don't want to code, and generate actions for those you do.
The first, and simplest, action to add is the Index action. All this operation will need to do is fetch all the posts in the database and make them available in the view. The view will then display all the posts as a list. Insert Listing 5-3 into the Posts controller after the $scaffold attribute.
Listing 5-3. The Index Action in the Posts Controller
6    function index() {

7        $this->set('posts',$this->Post->find('all'));

8    }
Entering the action into the controller is only half the process. Should you launch the Posts controller, it would display an error message because the controller would send for the view file and there is no Index action view available yet. The next step is to create the corresponding action view by following Cake's conventions. The file will need to be placed in the app/views/posts directory and be named after the action. Create the necessary posts folder, and place the index.ctp file in it. Then paste the view code from Listing 5-4 into this file.
Listing 5-4. The Index View in the app/views/posts Folder
1    <h2>Blog Posts</h2>

2    <table cellpadding="0" cellspacing="0">

3    <tr>

4        <th>ID</th>

5        <th>Name</th>

6        <th>Date</th>

7        <th>Content</th>

8        <th>User</th>

9        <th>Actions</th>

10    </tr>

11    <? foreach($posts as $post): ?>

12    <tr>

13        <td><?=$post['Post']['id'];?></td>

14        <td><?=$post['Post']['name'];?></td>

15        <td><?=$post['Post']['date'];?></td>

16        <td><?=$post['Post']['content'];?></td>

17        <td><?=$post['User']['name'];?></td>

18        <td class="actions">

19            <?=$html->link('View','/posts/view/'.$post['Post']['id']);?>

20            <?=$html->link('Edit','/posts/edit/'.$post['Post']['id']);?>

21            <?=$html->link('Delete','/posts/delete/'.$post['Post']['id'],null,

'Are you sure you want to delete #'.$post['Post']['id']);?>

22        </td>

23    </tr>

24    <? endforeach;?>

25    </table>

26    <div class="actions">

27        <ul><li><?=$html->link('New Post','/posts/add'),?></li></ul>

28    </div>
Essentially, what you have done here is re-create the scaffolding view (assuming you're still using the cake.generic.css file instead of your own). But now that the code is right in front of you, you can toy with any aspect of it and customize it to meet your own needs. Notice on line 1 of Listing 5-4 that I've changed the <h2> tag to read "Blog Posts." In Listing 5-3, the Index action runs a model function that pulls all post records and assigns them to a variable to be used in the view. In line 7 of Listing 5-3, the set() function is a Cake function that assigns a value to a view variable. In this case, the variable will be named posts and will contain the results from the find() function in the Post model.
In line 11 of Listing 5-4, the view file uses the set() function in the controller. Here in the view, posts is now a typical PHP variable named $posts. Line 11 starts a loop through that array variable, which is the equivalent of looping through each record from the database that was fetched in the query. The view simply takes each record's content and displays it in table cells. Each iteration generates a new table row until it reaches the last record in the $posts variable.
Launch the Index action in the Posts controller, and you should see nearly the same screen as the scaffolding view (see Figure 5-3).
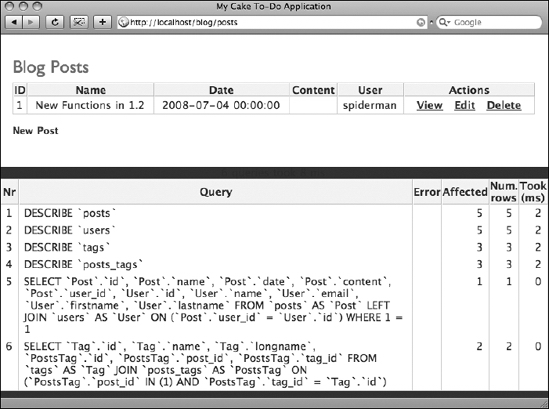
Figure 5-3. The Index action view rendered by manual, not scaffolded, code.
The main difference in this example is that you have access to the display code and the action's logic because you have manually supplied the code in the controller and the view file. Creating this code is not challenging, mainly because the Index action required only one line to run the database query and make the results available to the view. More elaborate operations are necessary for the other CRUD operations and will require many more lines of code, both in the controller and in the view. Fortunately, Cake can help generate this code in the console.
Using Bake to Create Views
I've walked you through how to manually create the index view. Actually, though, you should be able to avoid having to type these basic CRUD functions by hand. Included with Cake is a handy console script called the Bake script (the bake.php script, found in the cake/console/libs folder). Not only will it save you tons of time generating the needed code to build these views, but it will also show you some basic Cake code that will help you understand how Cake uses models, views, and controllers.
Configuring the Console's Profile to Run Bake
However your localhost is set up, you will need a way of running the console to execute Bake. Most Linux setups have a console built into the operating system, and Mac OS X comes bundled with the Terminal application, so if you are running in one of these environments, you shouldn't have to install anything to run shell scripts. For PC users, you may have to install extra software that supports running PHP in the console, such as Cygwin (www.cygwin.com) or MinGW (www.mingw.org). The main requirements for getting Bake to work in your console is that the shell can run PHP and the same database engine you're using for your Cake application.
Many users use helpful programs such as XAMPP, LAMP, or MAMP—personal web server applications that reduce web server setup to a minimum. Although these programs make it possible to essentially click a button to turn on a localhost, they do make things a little bit trickier to get Bake running correctly. Often, the operating system and the web server environments both have shell applications that can conflict with one another when running the console. Whatever your setup looks like, you will likely need to adjust the shell's profile to get Bake working right.
In Mac OS X and some versions of Linux, the command-line console will use a file named .profile, usually invisible in your operating system, when it executes commands. Fortunately, you can add some of your own customized environment settings to tell the console where to go when executing Bake commands.
You can open the .profile file in a number of ways. You can use the following command to edit .profile in the console:
vi .profile
However, if you're like me, you'd probably rather edit this file in a simple plain-text editor. You will need to locate the profile to open it in your editor, but when saved, Bake should run properly regardless of your localhost settings.
The profile will need the line in Listing 5-5 added to get Bake working properly.
Listing 5-5. By Entering an Alias into the Profile, You Can Access Bake in the Command Line
alias cake="php ˜/Sites/blog/cake/console/cake.php"
If you are unfamiliar with console profile aliases, Listing 5-4 may need some explaining. First, a new alias is listed, which in this case is named cake. Now, whenever you type "cake" in the command line of your console, it will execute what is contained within the quotes. The order here is important: the first string is the path to the shell application to be executed when the alias is typed, and the second string is the path to the file to be launched by the shell application. In this case, when "cake" is typed in the console, the shell will run its native PHP shell application. It will also tell PHP to launch the cake/console/cake.php file.
What you enter as the alias here will likely need to be adapted to your own settings, especially if you are running a web server application such as XAMPP. Make sure that the path to PHP points to the PHxsP application that runs your Cake application. For personal web server users, this will likely be a path to the xampp/php/php5/phpcli.exe file, or something like xampp/xamppfiles/bin/php. Whatever the case, it must be the same command-line PHP application that is used by your localhost root.
Also, the path to Cake's console scripts will change depending on where your application is stored on your localhost. A good rule of thumb here is to make these two paths absolute so that regardless of what environment you're using your console with, it will access the correct applications and scripts.
Launching Bake
With the profile configured correctly, launching Bake is done simply by entering the following in a command line:
$ cake bake
Two things can happen when Bake is properly launched: it will ask you what you want to bake, or it will ask you where you want a new Cake application copied. If the latter is the case, you will need to specify the path to the blog application to get Bake to work properly with your existing project. To do so, when launching Bake, use the -app parameter to specify the application's path to its app directory. Be sure to include the trailing slash (see Listing 5-6).
Note If you're running your console in Windows, you may need to reference the Cake command using the file name cake.bat instead of the terminal command cake. This will depend on how you've set up your console and how, if any, third-party console applications are configured.
Listing 5-6. Using the -app Parameter to Point Bake to the Application
$ cake bake -app ˜/Sites/blog/app/
You can tell whether Bake is working properly with your application when you see the Bake welcome screen (see Figure 5-4).
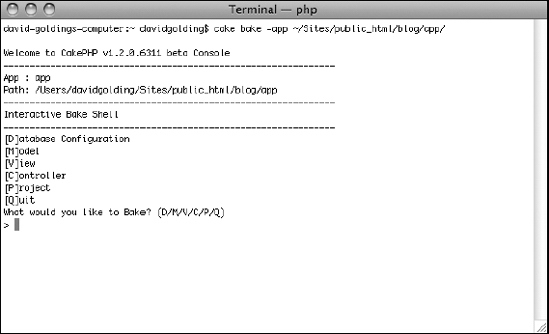
Figure 5-4. The Bake welcome screen
Using Bake to Generate CRUD Views
The welcome screen starts by asking what should be baked. Bake can handle creating a handful of application resources:
- Database configur ation
- Model
- View
- Controller
- Project
Choosing a database configuration or project will bake either a new app/config/database.php file or a new Cake application project. Most of the time, you will use Bake to help create models, views, and controllers. You have already created the Index action in the Posts controller to walk through the steps for manually creating actions and views. With Bake, you will overwrite the Posts controller with a baked controller and then generate the CRUD views.
Bake the Controller First
Select a controller in Bake by typing C in the console. Bake will prompt you to specify from which model to bake, or dynamically write with the Bake script, the new controller (see Figure 5-5). Start with the Posts controller by typing the corresponding number (2).
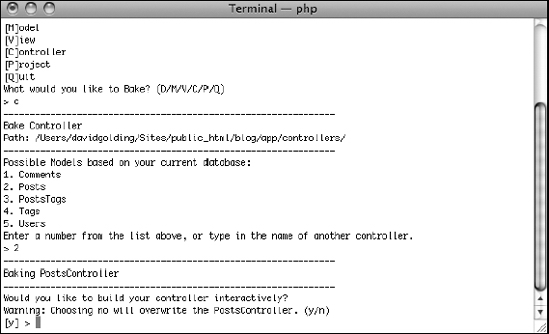
Figure 5-5. To bake a controller, you must specify from which model to build.
Bake gives you the option of baking the controller interactively. In interactive mode, Bake will walk you through each step of building the controller. With each step you will have the option of modifying the setting to fit your needs. Bypassing interactive mode will produce a default controller and will overwrite any controllers that match the file name of the one Bake builds. Enter interactive mode to bake the controller, and specify these settings:
- Would you like to use scaffolding? [No]
- Would you like to include some basic class methods (index(), add(), view(), edit())? [Yes]
- Would you like to create the methods for admin routing? [No]
- Would you like this controller to use other helpers besides HtmlHelper and FormHelper? [No]
- Would you like this controller to use any components? [No]
- Would you like to use Sessions? [Yes]
Bake will ask you whether creating the Posts controller looks OK; this is an opportunity to start over if somehow during the process you entered the wrong parameter. When you continue, because you have already created a Posts controller, Bake will ask you whether you'd like to overwrite the existing Posts controller. Specify Yes. Finally, Bake will ask whether you want to bake unit test files; specify No.
That's it. The Posts controller will now have the business logic included for the basic class methods (see Listing 5-7).
Listing 5-7. The Baked Posts Controller
<?php

class PostsController extends AppController {

    var $name = 'Posts';

    var $helpers = array('Html', 'Form'),


    function index() {

        $this->Post->recursive = 0;

        $this->set('posts', $this->paginate());

    }


    function view($id = null) {

        if (!$id) {

            $this->Session->setFlash(__('Invalid Post.', true));

            $this->redirect(array('action'=>'index'));

        }

        $this->set('post', $this->Post->read(null, $id));

    }


    function add() {

        if (!empty($this->data)) {

            $this->Post->create();

            if ($this->Post->save($this->data)) {

                $this->Session->setFlash(__('The Post has been saved', true));

                $this->redirect(array('action'=>'index'));

            } else {

                 $this->Session->setFlash(__('The Post could not be saved.

 Please try again.', true));

            }

        }

        $tags = $this->Post->Tag->find('list'),

        $users = $this->Post->User->find('list'),

        $this->set(compact('tags', 'users'));

    }


    function edit($id = null) {

        if (!$id && empty($this->data)) {

            $this->Session->setFlash(__('Invalid Post', true));

            $this->redirect(array('action'=>'index'));

        }

        if (!empty($this->data)) {

            if ($this->Post->save($this->data)) {

                $this->Session->setFlash(__('The Post has been saved', true));

                $this->redirect(array('action'=>'index'));

            } else {

                 $this->Session->setFlash(__('The Post could not be saved.

Please try again.', true));

            }

        }

        if (empty($this->data)) {

            $this->data = $this->Post->read(null, $id);

        }

        $tags = $this->Post->Tag->find('list'),

        $users = $this->Post->User->find('list'),

        $this->set(compact('tags','users'));

    }


    function delete($id = null) {

        if (!$id) {

            $this->Session->setFlash(__('Invalid id for Post', true));

            $this->redirect(array('action'=>'index'));

        }


        if ($this->Post->del($id)) {

            $this->Session->setFlash(__('Post deleted', true));

            $this->redirect(array('action'=>'index'));

        }

    }


}

?>
Bake the Views Second
After the controller is baked, Bake will return to the welcome screen. You can immediately begin baking other resources, and with the controller actions now available for the CRUD operations, you can bake the views.
Select View to bake the views, and choose the Posts controller from which to build them. As before with baking the controller, enter interactive mode and then specify the following settings:
- Would you like to create some scaffolded views (index, add, view, edit) for this controller? [Yes]
- Would you like to create the views for admin routing? [No]
Again, you will be asked whether you want to overwrite the app/views/posts/index.ctp file. Select Yes, and Bake should tell you that the view scaffolding is complete (see Figure 5-6).
Launch the Posts controller, and everything should appear exactly like the scaffolding when the $scaffold attribute is called. Bake provides the same views and functions, but now they are available to you to edit in the controller and the views.
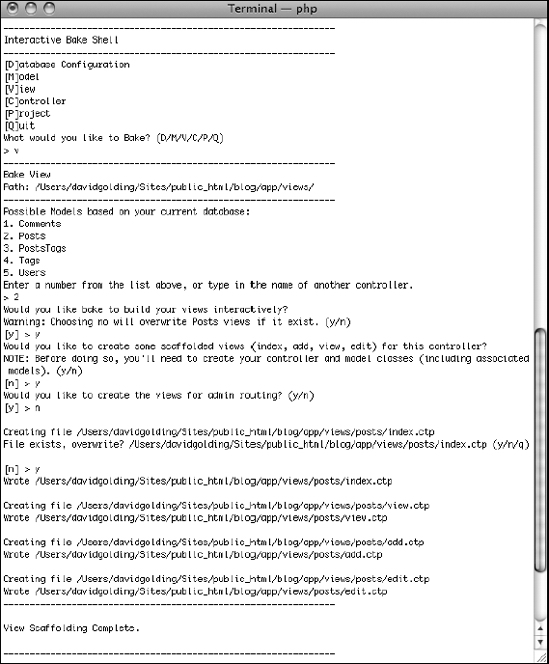
Figure 5-6. The whole process for baking views off the Posts controller
Editing Baked Views
Editing the views is a simple task. Open the app/views/posts folder, and you should find the following baked views:
add.ctpedit.ctpindex.ctpview.ctp
Open the index.ctp file, and you will find all the HTML unique to this view. Change line 2 in this file to the following, and the title on the Index action page will change to "Blog Posts":
<h2><? __('Blog Posts'),?></h2>
You can add to and delete anything from this file to change the Index action view without affecting any of the other actions. For example, the date field is not displayed nicely for the user. You can format this date string to appear more readable by editing it in the view file.
Around line 34 in the app/views/posts/index.ctp file is the date string:
<?php echo $post['Post']['date']; ?>
Using PHP's date() and strtotime() functions will make this variable display better. Change line 34 to something like the following:
<?=date('M jS Y, g:i a',strtotime($post['Post']['date']));?>
The date will then read differently for the Index action view (see Figure 5-7).
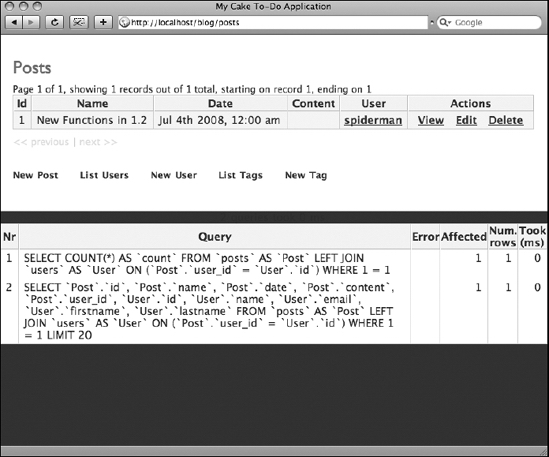
Figure 5-7. Each listing of a post in the Index action view has a more presentable date field.
Considering Internationalization
You may have noticed that some text strings in the baked views are encased in a PHP function __(). Simply stated, this function is Cake's method for making views easy to alter dynamically for international web sites. Cake can localize the content encased in this function to the language of the user, but other settings must be entered in the application's controllers and configuration files. If your application has no need of internationalization or localization, then you can avoid using the __() function.
Using Commands for Faster Baking
Some basic commands can make baking Cake resources easier. Simply enter the resource you need to bake after typing the cake bake command in the console. Examples include the following:
$ cake bake controller

$ cake bake model

$ cake bake view

$ cake bake project
You can even enter the name of the resource if you want to bypass interactive mode and just generate the file:
$ cake bake controller tags

$ cake bake model comment
Don't forget to include the -app parameter if your Cake console installation requires you to do so for Bake to access your working application folder:
$ cake bake controller tags -app /serverroot/blog/app/
Customizing Views
The Bake script cuts down on startup time to get scaffolded views available quickly. By tinkering with the baked view files, you can add onto them your customized elements and forms. In this chapter, you affected only the Index action view and learned to operate the Bake script. Chapter 6 will discuss each line in the baked controllers and views and how to create more advanced web pages. You'll analyze the other CRUD operations and how Cake interacts with user form submissions. Form and HTML helpers that come with Cake will allow you to more effectively administer form fields and submissions with less code than the typical PHP application requires.
Before moving on, practice using Bake with other tables by following this chapter's "Bake More Resources" exercise.
In this chapter, you baked the Posts controller and some scaffolded views. Master Bake by generating the controllers for the tags and comments tables, as well as their models and views. Be sure to try the other Bake commands to improve your development speed and explore the database configuration and project features.
Summary
Layouts in Cake are files that are wrapped around your application. When you create a default layout file, you intercept Cake's default layout for scaffolds, error pages, and any other views. Individual view files are rendered where the $content_for_layout variable is echoed in the layout, thus allowing you to create a common interface for multiple views. One of the fastest ways for getting your application off the ground is to use Cake's scaffold and Bake features. By setting up the console to work with Bake, you can generate customized actions and views with simple shell commands, sometimes with only one string of text. Using Bake correctly can speed up development by providing you with basic code that allows you to create, edit, list, and view database records through a web interface. Chapter 6 will examine more closely what is happening in baked elements and will explain how to customize views in Cake.