
CHAPTER 13
Plugins
In some situations, developers may want to use a Cake application in several other applications. Sometimes another Cake application may be useful in your project but may be difficult to fit in because of its independent structure; controllers, models, and such may conflict with the current project's namespaces. Plugins are elements that function as mini-applications inside the main Cake application. They include their own models, views, and controllers, and they make it possible to reuse an entire application within other applications.
Cake comes with no built-in plugins. Thus, only third-party applications can be used inside an existing Cake application. Of course, you may build your own plugins to fit your needs, but be aware that plugins are available online at various locations. The Bakery (http://bakery.cakephp.org) and CakeForge (%www.cakeforge.org) host plugins along with other Cake applications, components, helpers, and more. The Bakery also hosts articles explaining how developers wrote their plugins—which can be useful in learning advanced CakePHP methods.
Third-party plugins save time. Because they follow the MVC structure, they can do much more than a component or helper alone. A plugin may contain its own models and therefore work with the database in ways that a component or helper doesn't. Often, running a complex method for an application is as simple as dropping a plugin in the app/plugins directory and tweaking some settings in the application to get it running.
Installing a Third-Party Plugin
Plugins are fairly simple to install because of their design. Simply put, they are self-contained folders that can be dropped in the app/plugins directory and referenced in the model, view, or controller. They should be written so that they require little configuration. Sometimes a plugin may require a database table to be set up to work correctly, or it may need you to specify some global variables or settings in the core configuration. Whatever the case, the plugin will generally come with its own installation notes that should be fairly simple to follow. I'll show how to install an Ajax chat room plugin by Pseudocoder in your blog application to show how it's done.
First, you must obtain the plugin code. Pseudocoder's Ajax Chat plugin is available at http://sandbox2.pseudocoder.com/demo/chat. You should end up with a compressed file that contains a folder with some model, view, and controller files inside.
You should notice that this plugin calls for the Prototype JavaScript library to be running in the application. I have already gone through installing Prototype in the default layout, so you shouldn't have to change anything in the layout for this plugin to work. However, you may still want to double-check that Prototype is running correctly in the application. Open the app/views/layouts/default.ctp file, and look for the Prototype include line:
<?=$javascript->link('prototype.js'),?>
Also make sure the prototype.js file is located in the app/webroot/js folder. With these two settings in place, the Ajax Chat plugin is ready to be installed.
Place the contents of the downloaded file in the app/plugins folder. The Ajax Chat plugin also uses its own database table, so you will need to run the SQL query to generate the appropriate table and fields. Pseudocoder makes this SQL available on its web page, which you already may have noticed when downloading the plugin. To save you time, Listing 13-1 contains the necessary SQL to build the table. Be sure to create the chats table in MySQL before running the plugin in the application; otherwise, errors will occur.
Listing 13-1. The chats Table to Be Used by the Ajax Chat Plugin
CREATE TABLE  `chats` (

  `id` int(10) unsigned NOT NULL auto_increment,

  `key` varchar(45) NOT NULL default '',

  `handle` varchar(20) NOT NULL default '',

  `text` text NOT NULL,

  `ip_address` varchar(12) NOT NULL default '',

  `created` datetime NOT NULL default '0000-00-00 00:00:00',

  PRIMARY KEY  (`id`),

  KEY `KEY_IDX` (`key`)

);
The plugin is now installed for use in your Cake application. To use it, you will need to call its actions and such in your own controllers or models, depending on the plugin's methods. This particular plugin is run in the view by calling its helper functions. Because the plugin needs more than just the helper to work, the necessary controllers and models are included as well, but you won't even notice those because of the way the plugin was designed.
Let's build a chat action in your application. In the Posts controller, create the chat() action, and get its view working (app/views/posts/chat.ctp). When accessing this action, the view should turn up a blank page with maybe a title at the top, so no more is necessary in the action itself.
The Ajax Chat plugin requires its own helper that must be made available to the controller like any other helper, so include this in the helpers array along with the Ajax helper:
var $helpers = array('Ajax','chat/AjaxChat'),
The last step is to call out the Ajax Chat helper in the view with a simple command:
$ajaxChat->generate('chatroom'),
Now when you fire up the Chat action in the Posts controller, the Ajax Chat plugin should automatically launch an Ajax chat room on the page. Literally, with only a couple lines of code and a SQL query you were able to launch a mini-application inside your own blog.
Creating Custom Plugins
Whether you use Cake plugins as add-ons to your projects or you want to contribute to the Cake community by distributing your own mini-applications, you will need to customize the plugin beyond what I've already explained. To begin writing a custom plugin, create a folder named after the plugin in lowercase letters. All the controllers, models, and views will be stored inside this folder. All plugins will need to have two additional files: the {plugin}_app_controller.php and {plugin}_app_model.php files where {plugin} is the name of the plugin in lowercase letters. These files will contain the class names and extensions that allow Cake to utilize the rest of the plugin's resources, so naming these files correctly is important for the plugin to function correctly.
The basic plugin will contain an App controller; an App model; and folders for controllers, models, and views. The organization mimics the overall Cake application structure, so any plugin helpers will be stored in the plugin's views/helpers directory, and so forth (see Listing 13-2). Be sure to replace {plugin} with the name of the plugin.
Listing 13-2. The Basic Plugin File Structure
{plugin root}/

    {plugin}_app_controller.php

    {plugin}_app_model.php

    controllers/

        {controller name}_controller.php

    models/

    views/
Naming Convention for Plugin Elements
Listing 13-2 shows the basic file structure inside the plugin's root directory. The naming convention for plugin elements is slightly different from the standard convention for naming other Cake resources. Table 13-1 shows how to name plugin elements.
Table 13-1. Naming Conventions for Plugin Elements
Individual view files do not change naming conventions in plugins. In other words, they are named just like standard Cake view files. The Events views, for example, would be stored in the app/plugins/calendar/views/events folder. Individual plugin views are then named after the action: index.ctp, and so forth.
Not only do some file names for plugins need to be adjusted to work properly; so do the class names in the files. For the plugin not to conflict with the surrounding Cake application file names and class names, the naming conventions and syntax must be slightly adjusted. Instead of naming the class AppController, for instance, the class name will need to be prepended with the name of the plugin. A plugin named Calendar would need to have its class names named after the plugin. For example, the App controller would be named CalendarAppController, and the App model would be named CalendarAppModel. Other elements used by the plugin should have their class names adjusted depending on what type of element they are.
Controllers and models extend the plugin's App controller and App model, respectively (see Listing 13-3). Thus, the class name must reflect this extension when the plugin classes are instantiated.
Listing 13-3. An Example of a Plugin Controller Extending the App Controller
1    <?

2    class EventsController extends CalendarAppController {

3        var $name = 'Events';

4        var $uses = array('Event'),

5    }

6    ?>
Notice that line 4 of Listing 13-3 shows the plugin controller using the $uses class attribute to specify the corresponding model. Though Cake should automatically pick up the appropriate models and views, consistently setting the $uses array will allow the plugin to be more portable and reduces the risk of the plugin controller conflicting with the surrounding application's namespaces.
Like the plugin controller, the plugin model extends the App model and has its naming syntax adjusted to work as a plugin (see Listing 13-4).
Listing 13-4. An Example of a Plugin Model Extending the App Model
<?

class EventModel extends CalendarAppModel {

    var $name = 'Event';

}

?>
Helpers, components, behaviors, and DataSources may also be used as part of a plugin. Their naming conventions generally remain the same as when used as elements of a Cake application and not as plugin elements. Refer to Table 13-1 for information on how to name other plugin classes and what objects they extend.
Running Plugin Actions
Once a plugin is installed in your Cake application, you may access its actions by adding the plugin name plus the action and parameters to the URL. The Events controller used in Listing 13-3 could be called in the blog application with the following URL:
http://localhost/blog/calendar/events
Of course, the action and parameters also follow:
http://localhost/blog/calendar/events/view/01/2009
Controllers in the surrounding Cake application can run a plugin's controller actions using the requestAction() function:
$events = $this->requestAction(array('controller'=>'CalendarEvents','action'=>

'getEvents'));
Using Plugin Layouts
By default, the plugin will use the default layout in the surrounding application's app/views/layouts directory. Specifying a layout stored in the plugin is simple: just use the $layout class variable in either the action or the controller. Be sure to add the plugin name to the layout setting. Listing 13-5 gives an example of how to do this.
Listing 13-5. Using a Plugin Layout in the Plugin Controller
<?

class EventsController extends CalendarAppController {

    var $name = 'Events';

    var $layout = 'Calendar.default';

}

?>
The Calendar Plugin
Now that I've explained plugins and how to create one, let's build a plugin for the blog application. This Calendar plugin will be very simple: the author of the blog will store different events in the database, and the user will be able to visit a page showing a month with links to each event. For this plugin to be portable, I will approach writing it from a general standpoint. In other words, I won't necessarily be thinking of the blog application when writing the plugin, though ultimately the plugin will be implemented in the blog.
Setting Up the Files and Folders
Remember that the Calendar plugin will need the controllers, models, and views folders as well as the App controller and App model for it to work properly. In each of these files, the syntax will have to be adjusted so that they all work as a plugin and not as a Cake application element.
Create the plugin root folder, and name it calendar after the name of the plugin. In this folder, create all the basic files and folders:
calendar/

    calendar_app_controller.php

    calendar_app_model.php

    controllers/

        events_controller.php

    models/

        calendar_event.php

    views/

        events/
In the calendar_app_controller.php file, be sure to include the appropriate class names:
<?

class CalendarAppController extends AppController {

}

?>
The App model will also need to be named correctly:
<?

class CalendarAppModel extends AppModel {

}

?>
Without the App controller and App model, Cake will not be able to connect to the plugin's controllers, models, and views. By naming the classes in the plugin's App controller and App model files, I've made sure Cake knows how to use the plugin and by what name the various elements of the plugin will be called.
The rest of the plugin will be written as though it were a basic Cake application. Of course, you must remember to name the customized controllers, models, and views according to the plugin syntax.
Create the Events Table
The Calendar plugin will need to store data, so let's build an events table in the database. Listing 13-6 contains the SQL needed to create this table.
Listing 13-6. The events Table for the Calendar Plugin
CREATE TABLE  `calendar_events` (

  `id` int(11) unsigned NOT NULL auto_increment,

  `name` varchar(255) NULL,

  `date` datetime NULL,

  `details` text NULL,

  PRIMARY KEY  (`id`)

);
Notice that the table stores only the event's date and time with some details. The name field will contain the text the user will click to read more details about the event. To keep the records from being duplicated, the table includes an ID field that is set to auto_increment. Next, connect the plugin to this table by creating a plugin model.
Create the Event Model
The calendar_events table will need a model with which to connect. Because the table is named with an underscore, the model name will need to be camel-cased. Create a file named calendar_event.php, and store it in the app/plugins/calendar/models directory. Then paste into this file the contents of Listing 13-7.
Listing 13-7. The CalendarEvent Model
1    <?

2    class CalendarEvent extends CalendarAppModel {

3        var $name = 'CalendarEvent';

4        var $uses = array('CalendarEvents'),

5    }

6    ?>
Notice that on line 2 this model extends the plugin's App model, not the surrounding application's App model. Line 3 assigns the model a name, and line 4 sets the $uses array to CalendarEvents, which ensures that the model will connect to the calendar_events table correctly. Lastly, create the controller that will run the plugin.
Create the Events Controller
The Events controller will contain all the actions for the Calendar plugin since the plugin itself is going to be fairly basic. To get this controller working inside the plugin, you must extend the Calendar App controller and provide actions to perform the plugin's logic. Listing 13-8 contains the initial content of the Events controller. Write this code to a new file called app/plugins/calendar/controllers/events_controller.php.
Listing 13-8. The Initial Contents of the Calendar Events Controller
<?

class EventsController extends CalendarAppController {

    var $name = 'Events';

    var $uses = array('CalendarEvent'),

}

?>
To launch this new plugin controller, enter the following URL:
http://localhost/blog/calendar/events
and you should see an error screen asking you to create some actions in the controller. At this point, you should give some consideration to exactly how the plugin should work. The Index action, which is the default action, will show the user the current month's events in a calendar. The Add action will allow the administrator of the web site to write events to the database, and the Edit action will provide access to previously saved events. The View action will have a month and year rather than an ID number, so this action will need to run some more complex find queries through the model. Each of these actions will require views for displaying the results.
Building the Add and Edit Actions
To get started with the Events controller, let's build the actions that allow for adding and editing events to the database. These actions will follow the standard method used by the Bake script. Listing 13-9 demonstrates what to add to the Events controller for these actions to work.
Listing 13-9. The Add and Edit Actions in the Events Controller
1    function add() {

2        if (!empty($this->data)) {

3            $this->CalendarEvent->create();

4            if ($this->CalendarEvent->save($this->data)) {

5                $this->Session->setFlash(__('The Calendar Event has been saved'

, true));

6                $this->redirect(array('action'=>'index'));

7            } else {

8                $this->Session->setFlash(__('The Calendar Event could not be

saved. Please, try again.', true));

9            }

10        }

11    }

12

13    function edit($id=null) {

14        if (!$id && empty($this->data)) {

15            $this->Session->setFlash(__('Invalid Calendar Event', true));

16            $this->redirect(array('action'=>'index'));

17        }


18        if (!empty($this->data)) {

19            if ($this->CalendarEvent->save($this->data)) {

20                $this->Session->setFlash(__('The Calendar Event has been saved

', true));

21                $this->redirect(array('action'=>'index'));

22            } else {

23                $this->Session->setFlash(__('The Calendar Event could not be

 saved. Please, try again.', true));

24            }

25        }

26        if (empty($this->data)) {

27            $this->data = $this->CalendarEvent->read(null, $id);

28        }

29    }
Of course, these actions require accompanying views for them to run properly. These views, too, will follow the standard method used by Bake. Listing 13-10 shows the code for the Add action, and Listing 13-11 provides the same for the Edit action. Save these views in the app/plugins/calendar/views/events directory as add.ctp and edit.ctp.
Listing 13-10. The Contents of app/plugins/calendar/views/events/add.ctp
<div class="calendar_events form">

<?=$form->create('CalendarEvent',array('url'=>'/calendar/events/add'));?>

    <fieldset>

         <legend>Add Calendar Event</legend>

        <?=$form->input('name'),?>

        <?=$form->input('date'),?>

        <?=$form->input('details'),?>

    </fieldset>

<?=$form->end('Submit'),?>

</div>
Listing 13-11. The Contents of app/plugins/calendar/views/events/edit.ctp
<div class="calendar_events form">

<?=$form->create('CalendarEvent',array('url'=>'/calendar/events/edit'));?>

    <fieldset>

         <legend>Edit Calendar Event</legend>

        <?=$form->input('id',array('type'=>'hidden'));?>

        <?=$form->input('name'),?>

        <?=$form->input('date'),?>

        <?=$form->input('details'),?>

    </fieldset>

<?=$form->end('Submit'),?>

</div>
Notice that in Listings 13-9 and 13-10 the Form helper is used with the URL option set to the path of the Calendar plugin's Events controller. This not only makes the plugin work correctly but also allows the plugin to be more portable. By specifying the path when creating the form, the plugin will point to itself and not accidentally search for a controller or model in the surrounding Cake application with which to save the form data.
Launch both the Add and Edit actions to make sure they run correctly. Also, add some test events to the database for use when building the Index and View actions. You should see a screen similar to Figure 13-1.
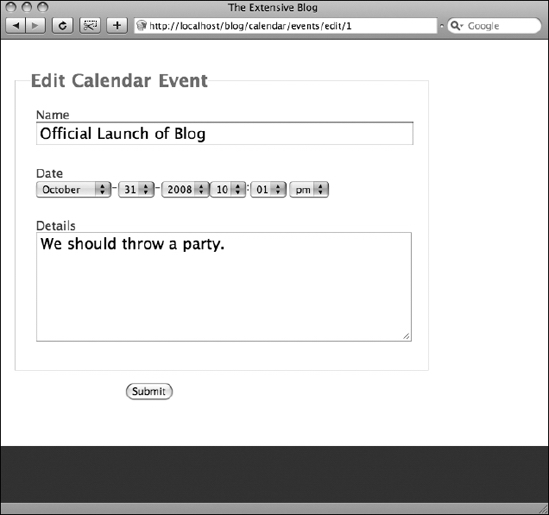
Figure 13-1. Editing an already saved event. Notice that the default layout in the blog application is applied here, not a layout in the Calendar plugin.
Building the Index Action
Normally the Index action is the easiest to build because it generally displays a list of records in the database. This plugin, however, is one that will require displaying a calendar of some sort. Thanks to inconsistencies in the calendar year, generating a calendar will take more work than simply running through a list of records. The Index action will have to create a table with rows for each week of the month and then display each day of the week; at the same time, the action must search out any events for the given day and insert those into the cell. Not only the Index action but also the View action will generate a calendar. This sounds like a perfect situation for building a helper function because of all the calculations required in the view.
The Calendar Helper
In the app/plugins/calendar/views directory, create a new folder named helpers, and insert a new file named calendar.php there. This file will contain a couple of custom helper functions that primarily render a month's view based on the parameters passed to it. In the Index and View actions, we'll set these parameters and then pass them along to this helper rather than render a calendar in each view file. Because I intend to perform logic in the view, I had better organize the Calendar plugin by using a helper instead of an element. Remember that helpers serve to perform logic in the view, whereas elements make basic displays, or view templates, for use across multiple views.
Rendering the month will be a two-step process. First, the helper function will cycle through the weeks of the month, and second, it will cycle through each week. Depending on the month and the year, the first day of the month will vary, so the helper must create some variables to figure out on what day of the week the first day of the month lands and then also figure out the weekends. In the Calendar helper, let's begin by inserting the lines shown in Listing 13-12.
Listing 13-12. Initializing Some Variables to Be Used by the app/plugins/calendar/views/helpers/calendar.php Helper
1    <?

2    class CalendarHelper extends Helper {

3        var $helpers = array('Html'),

4

5        function render($events=array(), $month=null, $year=null) {

6            //Initialize variables for this function =>

7            $firstdate = mktime(0, 0, 0, $month, 1, $year);

8            $lastdate = mktime(0, 0, 0, $month+1, 0, $year);

9            $firstday = strftime("%a", $firstdate);

10            $day = 1;

11            $days_array = array(

12                1=>'Sun', 2=>'Mon', 3=>'Tue', 4=>'Wed', 5=>'Thu', 6=>'Fri', 7

=>'Sat',

13                8=>'Sun', 9=>'Mon',10=>'Tue',11=>'Wed',12=>'Thu',13=>'Fri',14

=>'Sat,'

14                15=>'Sun',16=>'Mon',17=>'Tue',18=>'Wed',19=>'Thu',20=>'Fri',21

=>'Sat',

15                22=>'Sun',23=>'Mon',24=>'Tue',25=>'Wed',26=>'Thu',27=>'Fri',28

=>'Sat',

16                29=>'Sun',30=>'Mon',31=>'Tue',32=>'Wed',33=>'Thu',34=>'Fri',35

=>'Sat',

17                36=>'Sun',37=>'Mon',38=>'Tue',39=>'Wed',40=>'Thu',41=>'Fri',42

=>'Sat'

18            );
Line 7 in Listing 13-12 uses the mktime() function to assign a Unix timestamp to the variable $firstdate. Notice that variables named $month and $year are used to pass the timestamp as month and year values. The first day of the month is used here as well. The last date of the month is also set as a timestamp and assigned to $lastdate. This one is a little bit more complicated: essentially, mktime() is told to provide the timestamp for the following month's day zero, which is the same as the current month's last day. Because each month has a different number of days, this is much handier than trying to specify each month (for example, the last day of February is the 28th except on leap years, the last day of March is the 30th, but the last day of April is the 31st, and so on). Now with timestamps for the first day of a given month and the last day figured out, the helper can iterate through the difference in days and create a table cell for each one.
The layout of the days of the week will not change; in other words, the cells for Sunday will always be the first ones of their respective rows, and each row will represent a week. The trick is to get the dates of the month, which do change from month to month and year to year, to appear in the correct day of the week. Lines 11–18 are the $days_array array, which is a static set of days of the week as they will appear in the calendar. This array will be used to make sure that the helper's iteration of the days in the month breaks on the weekend at the same time the table cells do.
Line 10 contains the $day variable, which here is set to 1. This value represents the current day in the iteration. Each time a table cell is rendered for a day of the month, the $day variable will be called to display the date; then the value will increase by 1 for the next day, and so on.
Line 9 is key to getting the iteration started on the right day of the week. It uses the strftime() function to get a three-letter representation of the day of the week the timestamp $firstdate lands on. Later, this value will be compared with the $days_array values to make sure the first date is placed in the correct cell.
Rendering the First Week of the Month
Let's begin the iteration by placing Listing 13-13 into the Calendar helper.
Listing 13-13. Starting the Month Table and Iterating Through the First Week of the Month
19 $out = '<table class="calendar" cellspacing="0">';
20 $out .= $this->Html->tableHeaders(array('Sun','Mon','Tue','Wed','Thu',
'Fri','Sat'));
21 /*** WEEK ONE ***/
22 $out .= '<tr>';
23 for ($i=1; $i<=7; $i++) {
24 if ($day<=1 && $firstday != $days_array[$i]) {
25 $out .= '<td> </td>';
26 } else {
27 $out .= '<td>'.$day.'<br/>';
28 $out .= $this->events($month,$day,$year,$events);
29 $out .= '</td>';
30 $day++;
31 }
32 }
33 $out .= '</tr>';
Throughout the rest of this function, the $out variable will be assigned all the output data to be rendered in the view. Notice that line 19 in Listing 13-13 instantiates this variable, and every other time $out is used, new values are appended to its existing contents. Line 19 starts a new table, and line 20 uses the HTML helper to write the table's header cells. Notice that these header cells contain text telling the user which column represents which day of the week.
Lines 22–33 are the first iteration through week one. Notice that this iteration starts with a table row element (<tr>) and ends with the closing tag to finish the row. Line 23 starts a loop for each cell in this row, 1 representing the first cell, or Sun, and 7 representing the last, or Sat. Line 24 checks for where the first day of the month falls. If $day is less than or equal to 1 (in other words, if at this point in the iteration $day is set to the first date of the month) and the $firstday timestamp doesn't equal the current day (as specified in $days_array), then the element will display a blank cell. Otherwise, it will create a table cell with the $day value displayed along with any events stored in the database for that day. Such a cell is created with lines 27–30. When a day is displayed, the next day will become the new value for $day, so line 30 increases $day by 1.
Notice that line 28 uses a helper function, $calendar->events(), which has not yet been created. This function will cycle through the $events array, which will be the results from the Events controller. These results come from running a find request in the database for associated events and passed to the helper in line 5 of Listing 13-12. For each event in this array that matches the current day, month, and year in the iteration of week one in Listing 13-13, the $calendar->events() function will return to be displayed in the current day's cell. Since this operation of cycling through the $events array will be repeated for other weeks, it's best to write it as another helper function rather than write the same operation over again. We'll build the $calendar->events() function later. For now, the $out variable is set to pass a new table to the view with one row representing the first week of the month and any events found in the database for this week.
Rendering Weeks Two and Three
Like rendering the first week of the month, let's now add weeks two and three to the helper with Listing 13-14.
Listing 13-14. Weeks Two and Three in the Calendar Helper
35        /*** WEEK TWO ***/

36        $out .= '<tr>';

37        for ($i=8; $i<=14; $i++) {

38            $out .= '<td>'.$day.'<br/>';

39            $out .= $this->events($month,$day,$year,$events);

40            $out .= '</td>';

41            $day++;

42        }

43        $out .= '</tr>';

44

45        /*** WEEK THREE ***/

46        $out .= '<tr>';

47        for ($i=15; $i<=21; $i++) {

48            $out .= '<td>'.$day.'<br/>';

49            $out .= $this->events($month,$day,$year,$events);

50            $out .= '</td>';

51            $day++;

52        }

53        $out .= '</tr>';
Because each cell of weeks two and three must contain a date (in other words, there are no months where these weeks have a starting date or an ending date for the month), checking for the current value of $day is not necessary. The value of $i was last set by week one's loop, so week two begins its loop with values between 8 and 14. The rest of weeks two and three closely resemble what is happening in the loop for week one.
Rendering Week Four
Depending on the year, some months may end on their fourth week. So, for week four, checking for an ending date is necessary. See Listing 13-15 for week four's loop, and paste it into the helper.
Listing 13-15. Week Four
55 /*** WEEK FOUR ***/
56 $out .= '<tr>';
57 for ($i=22; $i<=28; $i++) {
58 if (strftime("%d",$lastdate) < $day) {
59 $out .= '<td> </td>';
60 } else {
61 $out .= '<td>'.$day.'<br/>';
62 $out .= $this->events($month,$day,$year,$events);
63 $out .= '</td>';
64 $day++;
65 }
66 }
67 $out .= '</tr>';
Week four is similar to the other weeks except for lines 58–59 of Listing 13-15. Line 58 checks to see whether the timestamp saved in $lastdate is less than the value for $day. If so, it will output a blank cell (line 59).
Rendering Weeks Five and Six
Not all months will have a fifth week, but some will. In some exceptional cases, there will be months that have a sixth row, so the helper will at least have to accommodate such occurrences. Notice that Listing 13-16 contains loops for weeks five and six and that these are almost the same as previous loops. Where they differ is in checking whether the current month has a fifth or sixth week. If not, the loop won't be performed.
Listing 13-16. Weeks Five and Six
69 /*** WEEK FIVE ***/
70 if ($day < strftime("%d",$lastdate)) { /* check if there is a fifth row */
71 $out .= '<tr>';
72 for ($i=29; $i<=35; $i++) {
73 if (strftime("%d",$lastdate) < $day) {
74 $out .= '<td> </td>';
75 } else {
76 $out .= '<td>'.$day.'<br/>';
77 $out .= $this->events($month,$day,$year,$events);
78 $out .= '</td>';
79 $day++;
80 }
81 }
82 $out .= '</tr>';
83 }
84
85 /*** WEEK SIX ***/
86 if ($day < strftime("%d",$lastdate)) { /* check if there is a sixth row */
87 $out .= '<tr>';
88 for ($i=22; $i<=28; $i++) {
89 if (strftime("%d",$lastdate) < $day) {
90 $out .= '<td> </td>';
91 } else {
92 $out .= '<td>'.$day.'<br/>';
93 $out .= $this->events($month,$day,$year,$events);
94 $out .= '</td>';
95 $day++;
96 }
97 }
98 $out .= '</tr>';
99 }
Notice that Listing 13-6, which contains the SQL for creating the Calendar Events table, calls for a field named details. This is so that when an event appears in the calendar, the user can click it, and more details will be provided. So far, the $calendar->render() function has taken care of rendering the calendar and displaying events matching each day of a given month. However, the details saved for each event must be provided by the helper, which has not been written yet. Next, close out the month table now that the iterations through each week have been written in the function; then output the contents of the details field for each event using Listing 13-17.
Listing 13-17. Rendering Event Details
101        $out .= '</table>';

102

103        /*** RENDER EVENT DETAILS ***/

104        if (isset($this->Details)) {

105            foreach ($this->Details as $id=>$detail) {

106                $out .= '<div id="event_details_'.$id.'" style="display: none

;" class="_cal_event_detail">';

107                $out .= '<b>'.$detail['name'].'</b>';

108                $out .= '<p>'.date('g:i a',strtotime($detail['date'])).'</p>';

109                $out .= '<p>'.$detail['details'].'</p>';

110                $out .= '</div>';

111            }

112        }
Listing 13-17 uses a class attribute that hasn't been specified yet called $this->Details. This is because the $calendar->events() function, which was used to fetch matching events in the $events array earlier, will also pull the contents of details for any matching records and place them into the $this->Details array. Listing 13-17 then loops through the details array and outputs a <div> element for each set after the calendar. Notice that line 106 assigns the unique $id value to the <div> element's ID and uses the style attribute to hide the whole element. In the link provided for each event in the calendar, later you'll use this $id value to display the matching hidden <div>, thus displaying the details for the event when clicked.
The rest of this loop prepares the contents of the details array to be readable in the view. All that's left for the $calendar->render() function is to output the contents of the $out variable. See Listing 13-18 for how to close out this function.
Listing 13-18. Closing Out the $calendar->render() Function
113        return $this->output($out);

114    }
Before setting up the $calendar->events() function, the class variable $Details must be defined in the helper class. Scroll up toward the top, and insert the following line after the $helpers array definition:
var $Details = array();
Now when the $calendar->events() function is used by the $calendar->render() function, it will propagate the $Details array with each event's contents of the details field. The last step for the Calendar helper is to build the $calendar->events() function.
Building the Events Function
As the $calendar->render() function loops through the various weeks for a given month, it uses another function to fetch any matching events from the $events array. Listing 13-19 shows this function; paste it into the Calendar helper after the $calendar->render() function.
Listing 13-19. The $calendar->events() Function
116    function events($month=null, $day=null, $year=null, $events=array()) {

117        $stamp = mktime(0,0,0,$month,$day,$year);

118        $out = '<ul>';

119        foreach($events as $event) {

120            $event_stamp = strtotime($event['date']);

121            $event_stamp = mktime(0,0,0,date('m',$event_stamp),date('d',

$event_stamp),date('Y',$event_stamp));

122            if ($event_stamp == $stamp) {

123                $out .= '<a href="#" onClick="$('event_details_'.$event

['id'].'').style.display = 'inline';">';

124                $out .= '<li>'.$event['name'].'</li></a>';

125                $this->Details[$event['id']] = $event;

126            }

127        }

128        $out .= '</ul>';

129        return $this->output($out);

130    }
This function takes a preformatted $events array and detects any of its values that match the provided $month, $day, and $year. When the function finds a matching event, it copies the contents of the event's details field to the class array $Details, thus making the details available for any function in the Calendar helper. These details are displayed in the view in lines 104–112 of Listing 13-17. The function also generates an HTML list element and returns the list to its parent function (which so far is only the $calendar->render() function). Because it is currently used by the $calendar->render() function, this list of events will appear within the day cell in the month's table as the View and Index views render the month.
Notice that two timestamps are created to detect matching events: $stamp and $event_stamp. The $event_stamp represents each event's date value; if this value matches the timestamp of the given $month, $day, and $year values, then the function will add the event to the list and its details to the $Details array. The actual loop through the $events array happens on lines 119–127. Remember how the $calendar->render() function generated the hidden <div> elements for displaying event details? Well, line 123 contains the necessary JavaScript for the event's link to display the corresponding hidden <div> element. You could change this to include an animation effect such as scrolling down, depending on your own taste, but at least line 123 shows how the helper provides the user with the requested details. All that is left now is to complete the Index action and view.
With the Calendar helper able to render a calendar with events, links, and details, the Index action is now ready to request events from the database and pass them through the Calendar helper in the view. Listing 13-20 shows the Index action for the app/plugins/calendar/controllers/events_controller.php file.
Listing 13-20. The Index Action in the Events Controller
1    function index() {

2        $events = Set::extract($this->CalendarEvent->find('all',array(

'conditions'=>array('MONTH(CalendarEvent.date)'=>date('m'),'YEAR(CalendarEvent.

date)'=>date('Y')))),'{n}.CalendarEvent'),

3        $this->set(compact('events'));

4    }
Line 2 of Listing 13-20 may look a little confusing, but actually it is just a typical find request for the model. It uses the Set::extract() function to clean up the array for the helper. I've opted to use this to demonstrate one method for cleaning up arrays. Recall that Cake automatically formats model results into arrays that follow a specific structure. To simplify the code in the $calendar->events() function, you can use Set::extract to take the results from the find() function and remove the CalendarEvent key from the array. For example, if the find returned two events, the result array would by default be formatted something like this:
$events = Array(

     [0] => Array(

         [CalendarEvent]=> Array(

            [id] => 1

            [name] => Test Event 1

            [date] => 2008-12-25 01:00:01

            [details] => Merry Christmas

            )

        ),

    [1] => Array(

        [CalendarEvent] => Array(

            [id] => 2

            [name] => Test Event 2

            [date] => 2009-01-01 01:00:00

            [details] => And a happy new year

            )

        )

    );
If you passed this same result set through Set::extract() with the following command:
$events = Set::extract($events,'{n}.CalendarEvent'),
then the resulting array would be formatted like this:
$events = Array(

    [0] => Array(

        [id] => 1

        [name] => Test Event 1

        [date] => 2008-12-25 01:01:00

        [details] => Merry Christmas

    ),

    [1] => Array(

        [id] => 2

        [name] => Test Event 2

        [date] => 2009-01-01 01:00:00

        [details] => Happy New Year

    )

);
Simply put, Set::extract() cleans arrays by reformatting the array. Here in the Calendar plugin, this method of invoking Set::extract() makes looping through the $events array a little easier. More than anything, be advised that Set::extract() is available in your Cake applications or plugins and can help clean up nested arrays. Alternatively, in many cases, you would have to produce your own loops to sift through nested arrays.
Line 2 also uses some SQL syntax to search the date field. Notice that the query searches for events that match the current month and year. By wrapping MONTH() around the field name, Cake knows to run the right SQL query for datetime fields. In other words, by providing an integer representing the current month, the model will search the database for a matching month in the date field without needing a full datetime string. Wrapping YEAR() also works to find the correct year in the date field. The result set will be limited to just those events that occur this month and year.
Line 3 sends the results as the $events array in the view. In the app/plugins/calendar/views/events/index.ctp file, you can now use the $calendar->render() function to take this array and place its contents in the calendar with one string of code. First, make sure the Events controller has access to the Calendar plugin by including it in the $helpers class array near the top of the controller:
var $helpers = array('Calendar'),
Next, create the app/plugins/calendar/views/events/index.ctp file, and paste Listing 13-21.
Listing 13-21. Contents of the Index View
<h2><?=date('M').' '.date('Y'),?></h2>

<?=$calendar->render($events,date('m'),date('Y'));?>
Launch the event's Index action in the browser, and you should see a calendar rendered with any test events you may have saved for that month (see Figure 13-2). Remember that this calendar is displayed in the surrounding application's layout, not its own layout. Therefore, if you want to change the styles for the calendar, you will need to edit the application's styles, not the plugin's styles. Of course, you could build into the plugin a layout with its own styles, but this could get in the way of another application's views should you distribute the plugin. It's better to stick to the surrounding application's layouts and style sheets than to force the plugin to look a certain way regardless of its parent application.
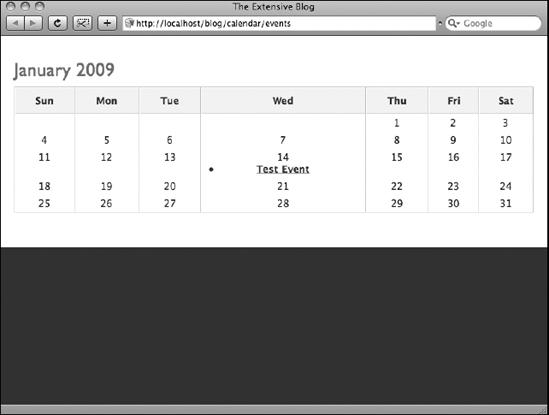
Figure 13-2. The $calendar->render() function at work with the Index action view
Building the View Action
Most of the work for the View action was done while building the Index action. Where this action differs from the Index action is that it bases its calendar on passed month and year values. The same process of formatting the calendar around the result set from the Calendar Events database occurs in the View action as well, so the $calendar->render() function is referenced all the same. Listing 13-22 contains the View action to be added to the app/plugins/calendar/controllers/events_controller.php file.
Listing 13-22. The View Action for the Events Controller
1    function view($month=null,$year=null) {

2        if (!$month || !$year || !is_numeric($month) || !is_numeric($year)) {

3            $month = date('m'),

4            $year = date('Y'),

5        }

6        if ($month > 12 || $month < 1) {

7            $month = date('m'),

8        }

9        $events = Set::extract($this->CalendarEvent->find('all',array(

'conditions'=>array('MONTH(CalendarEvent.date)'=>$month,'YEAR(CalendarEvent.

date)'=>$year))),'{n}.CalendarEvent'),

10        $this->set(compact('events','month','year'));

11    }
Notice that line 1 includes passed parameters that will come from the URL representing a month and year. Lines 2–5 check to make sure these values exist; if not, it defaults to the current month and year. Line 6 makes sure that the provided month value is between 1 and 12; if not, it sets $month to the current month. Line 9 is identical to Listing 13-20's line 2 except that it uses $month and $year instead of the current month and year. Line 7 also differs from Listing 13-20's line 3 in that it passes along $month and $year to the view.
The corresponding view will also be similar to the Index view. Create the app/plugins/calendar/views/events/view.ctp file, and paste Listing 13-23. This will complete the plugin and allow the parent application to provide calendar views by requesting plugin actions or pointing links to the plugin.
Listing 13-23. The View Action's View
<h2><?=date('M',mktime(0,0,0,$month,1,$year)).' '.$year;?></h2>

<?=$calendar->render($events,$month,$year);?>
Launch the View action by providing a month and a year as parameters, and check for test events to appear in the correct dates. You should be able to enter any integer for the month and year, and the plugin will render a calendar for those values (see Figure 13-3).
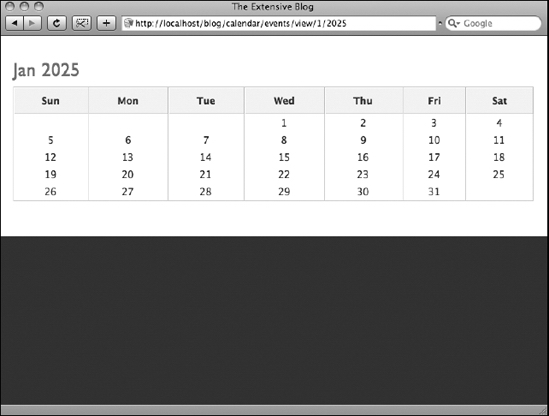
Figure 13-3. The Calendar plugin using the View action to render a calendar for January, 2025
Summary
Plugins are like mini-Cake applications that you can bring into any other Cake application. They are useful as third-party resources like Pseudocoder's Ajax Chat plugin but can also help with in-house applications that may need to use the same processes in several Cake projects. I explained how to build a custom plugin by writing the Calendar plugin, which renders calendars for any Cake application based on an events database table. This plugin uses controllers, models, views, and helpers to create a simple calendar view and can extend other Cake applications to handle calendar processes. The next chapter will discuss how to extend one of the most challenging but also efficient aspects of web application development: data handling. Using behaviors and DataSources, you will be able to connect your Cake applications to new data sources and work with data more efficiently.