
PART 2
Developing CakePHP
Applications
CHAPTER 4
Naming Files and
Designing the Database
In the previous chapter, I discussed how Cake was able to wrap some standard web functionality around the database structure to produce a to-do list application. Although you could change some things in the application to improve the user experience, overall Cake handles the typical operations of adding, deleting, editing, and viewing records in the database without much code. This is possible because of an important aspect of Cake: convention. Because you followed Cake's conventions when naming and setting up the database table, when creating the model and controller files, and when entering the URL in the browser to run the application, Cake was able to piece together your various operations and deliver a handy web program in little time.
Convention Over Configuration
Cake's developers adhered to "convention over configuration" when building the core, meaning they intended not only to provide a framework chock-full of features and functions but to develop an overall method for building web applications. In other words, their philosophy is that how you go about developing web programs is just as important as what you are building. For example, this is why the app folder is structured the way it is—to provide conventions for dividing up the operations of the web application into more standardized areas and to provide conventions for which parts of the application serve which functions. The conventions you learn when using Cake can save you just as much time as the useful tools that come with Cake.
Intercepting Cake
An effective way of visualizing the "convention over configuration" idea is to imagine the frame of a house. None of the appliances, wiring, walls, windows, or doors is present; only a wood frame that delineates the structure of the house is present. If the construction crew was to suddenly assemble the house without your input, they would naturally place doors in certain areas, place windows in other areas, and finish the walls with particular materials.
This is how Cake is assembled when the application launches. It has an overall convention for how it pieces together the application, and knowing that the main objective of the framework is to produce a web-based application, it will automatically go about it in a certain way. In dealing with the controllers, for example, Cake will render its own scaffold or look for specific view files unless you intercept it and tell it otherwise.
Other frameworks such as the Zend Framework and Struts go about building applications in a different way. Imagine that the construction crew gave you a catalog of possibilities from which to furnish the house, but in the end, they make you do the assembly work. Some frameworks give you a large array of functions and tools to use in your application but leave the configuration up to you. In a sense, you could use these frameworks in any previously built PHP application because they aren't there to supply you with a specific convention; they are just nice collections of typical web application operations bundled together.
Cake, in a sense, is one large (rather blank) PHP object, and your job is to add, here and there, your custom pieces to that object. This object has the capability of providing you with many tools, like the many possible configurations of a house, but by default few of these tools are executed. You draw on them as you extend objects with your own classes and functions.
Because of the convention the Cake developers used to build the framework, there is an expected method by which you extend Cake's objects. From naming tables in the database to coding large chunks of operations, keep in mind that each time you stick to convention, you avoid having to specify with lines of code where the different pieces of your application are located and how they should be assembled.
Starting with the Database
Conventions in Cake begin with the database. If you start with designing how your application will store and work with data, then the rest of the code can more easily fall into place. If you go wrong, however, then you will most certainly discover bugs in the application that will need adjustment to conform to Cake's conventions. Before I show how to build more elaborate Cake applications, I will take the time to nail down Cake's MVC structure and other naming and database conventions.
MVC Default Behaviors
When a Cake application launches, various PHP objects that are already assembled in the Cake libraries are run. The advantage of the MVC structure is that models, views, and controllers are specifically designed for specific operations. Thus, a model, by virtue of being a model and not something else, is automatically expected to do some database operations. These default operations could be mere placeholders, or they could have some default functions, depending on how the framework operates when launched.
Cake automatically assembles an object for each part of the MVC structure. The Controller object automatically behaves a certain way when called, the Model object does as well, and so on. You extend objects in PHP when you create a new instance of a class object and specify that this instance is an extension of an existing object. For example, you can create your own AppController object as an extension of the Controller class object like this:
class AppController extends Controller {
PHP's syntax is such that you add on extends and the name of the class object to be extended, which in this case is the Controller object. Thus, when the AppController object is called, everything contained in the Controller object is now called as well.
When the controller class object is called, it will automatically look for a model and a view to do its work. You specifically choose the controller to launch by the URL you enter, but you cannot enter a URL to call only a model or a view. Cake's dispatcher will funnel all requests through the Controller object, so you must place other objects in the way to intercept the default actions that object will perform when called. If you enter a URL and the dispatcher cannot find a controller object that matches the name in that URL, then the Controller object, by default, is set to display an error message. Knowing these default behaviors and knowing where you can intercept them and install your own methods are what coding in Cake is all about.
In the model, for example, each time a record is saved to the database, certain functions are executed. You can intercept this default behavior by entering the beforeSave() function in the model with some of your own logic. This intercepts the default save() function the Model object uses to insert records into the database and allows you to check the data against your own custom parameters before saving them.
As the dispatcher resolves URLs, it will look to files named appropriately, and otherwise it will return errors. When controller actions are run, the Controller object looks for specific view files stored in the appropriate area for the controller to execute properly. Throughout the entire Cake application, certain conventions are at work. In a way, the main content of this book is to spell out all these conventions and how to work with them to produce web applications. First I'll describe how to name files and how to name class objects in these files appropriately. By placing files in the correct areas with correct names and containing correct class names, Cake will know that you are intercepting its default operations and will execute your custom objects instead. The more objects you extend from Cake's default objects, the more elaborate the application.
Naming Conventions
Simply put, if you don't name your files correctly, Cake won't be able to piece the different parts of the application together and will supply you with error messages. Each element of the site must follow certain naming conventions so that when Cake looks for a needed resource, it can find it and run it.
You probably noticed in Chapter 3 that you gave certain names to the model and controller files to make the to-do list application work. I explained that these files have to match up with the table in the database and contain some typical naming schemes when entering PHP code. What if you needed some more elaborate naming schemes to meet the demands of your project? The following are the basic rules for naming files in Cake and how to incorporate more complex names into your Cake application for more custom needs.
Naming Controllers
Each controller name must match a database table name. If you decide to create controllers with names other than tables of the database, you should actually not create a controller but use a component instead (you'll learn more about components in Chapter 11). The names of database tables as well as controllers are lowercase and in plural form. For example, a table containing records for orders in a shopping cart application would be named orders. The controller file takes the name of the table it matches and appends an underscore and the word controller, and it is a PHP file, so it will carry the .php extension. Thus, the Orders controller would be named orders_controller.php and would be stored in the app/controllers folder.
In the controller file you will need to extend the AppController object already being called by Cake when the application is launched. To do so, another important convention is at work. Listing 4-1 shows how to name the controller class in the file and how to extend the AppController object.
Listing 4-1. Inside the Controller
1    <?

2    class RecordsController extends AppController {

3    }

4    ?>
Notice that on line 2 in Listing 4-1 I've extended the AppController object by starting a new class and naming the class RecordsController. The name of the class will always need to match up to the file name of the controller and be camel case1 with the word Controller. If, for example, this controller were for the orders table, line 2 would contain the class name OrdersController, and the file name would be orders_controller.php.
If you follow this convention, Cake will be able to dispatch the request to the correct controller and run the correct action.
Naming Models
Models are named like controllers except they represent interacting with one instance of the database table at a time, so they will take on a singular, not plural, form. Using the earlier shopping cart example, the corresponding model for the orders table would be named order.php and be stored in the app/models folder. Notice that for models, you do not append an underscore plus model to the file name.
In Listing 4-2, you can see a similar beginning code structure for the model PHP file that you use in the controller file; I've created a new class object that extends the AppModel object created by Cake, and I've named it Record in conjunction with the naming convention that model names be singular. In the Order model, line 2 would change to a class named Order, thus linking it to the orders database table.
Listing 4-2. Inside the Model
1    <?

2    class Record extends AppModel {

3    }

4    ?>
__________
1. Camel case is used frequently in Cake as a convention for naming classes. Sometimes called medial capitals, it is the practice of joining words or phrases without spaces and capitalizing them within the compound. Think of the uppercase bumps in the word like humps of a camel.
Naming Views
When the controller renders views, Cake will automatically look for a file with the same name as the action. Views correspond to actions contained in the controller script and are housed in a folder named after the controller. The first step in creating a view to be used as output for a controller script is to create the folder in app/views that matches with the name of the controller.
View folders are lowercase and plural just like the naming convention for database tables. For the orders_controller.php file, you would create the folder app/views/orders.
View files match actions in the controller, so they must be named accordingly. When a controller action is called, Cake will automatically search for a corresponding view following a specific naming scheme. Using the Orders example, let's say you wanted the user to be able to see the order before placing it. So, you create an action in the orders_controller.php file called review. In this action (which is literally a PHP function in the controller script), you pull some variables together and send them to the view following the MVC structure. Cake will automatically search for a view called app/views/orders/review.ctp (.ctp is the common extension for all Cake views, not .html or .php).
Table 4-1 contains a breakdown of the naming conventions for model, controller, and view files. Notice that the view files are named after a matching action in the controller and that the folder name containing the views matches the name of the controller.
Note The earliest versions of Cake used the file extension .thtml for view files, but this was changed to .ctp for CakePHP 1.2. If you do come across older Cake applications, be sure to change these view files' extensions to the now standardized .ctp extension.
Table 4-1. MVC Elements and Their Naming Conventions for the records Database Table
| Type | File Name | Extension | Class Name | Directory Where Stored |
| Model | record |
.php |
Record |
app/models |
| Controller | records_controller |
.php |
RecordsController |
app/controllers |
| View | {matches action |
.ctp |
app/views/records |
More Than One Word in the Name
Perhaps you need to name a database table that uses more than one word. In short, you can use more than one word by separating each word with an underscore. A table, then, containing special orders would be named something like special_orders, not specialorders or specialOrders. But, for Cake to link up to this table, the controllers, models, and views also need to follow suit. Camel-cased titles for the words tell what Cake will seek out when running the controllers, models, and views. See Table 4-2 for an example of what the various names would be for MVC elements matching up with the list action for a database table named special_orders.
Table 4-2. MVC Elements' Names for the special_orders Database Table
| Type | File Name | Class Name | Directory Where Stored |
| Model | special_order.php |
SpecialOrder |
app/models |
| Controller | special_orders_ |
SpecialOrdersController |
app/controllers |
| View | list.ctp |
app/views/special_orders |
Naming Other Cake Resources
As another matter of convention over configuration, Cake divides up other important resources in much the same way that it does with models, views, and controllers. For instance, if more than one controller needed to use the same actions, then you could create a component. The controllers could essentially run an include of the component and run the actions as if they were individually contained in the controller. Other resources act in the same way. A view to be used by multiple views is stored in what's called an element, and so on. Each of these resources has its own naming conventions.
Later, you'll make full use of each of these resources. While I'm discussing naming conventions in Cake, it's worth familiarizing yourself with the conventions for other Cake resources.
Components
Component files contain actions or functions that can be used across all the controllers. A component typically aims to provide tools to accomplish a main objective. For example, you may want to organize a set of functions that manage all the e-mail your application must send. Various controllers may need to run an e-mail function here and there, so rather than write the e-mail process into the individual controllers, it's best to house all the e-mailing in a component file. By doing so, you effectively keep all your e-mailing functions in one place in the same manner that by using models you separate out all your database functions.
Components can be fully customized to meet your needs. In fact, a growing repository of third-party components are available on the Web from other Cake developers, which proves helpful in borrowing tasks from other projects and reducing the amount of code you assemble yourself.
The file name of a component can be anything, but like models, views, and controllers, more than one word in the name must be separated by underscores and camel case when naming the class object.
Cake comes with a built-in e-mail component, but for the sake of the previous example, if you were to create an e-mail component of your own, you could name the file email.php and place it in the app/controllers/components directory.
In the file, you would need to create a new component class using the following syntax:
class EmailComponent extends Object {
Notice that the name of the class object is camel cased just as in the controller, and it extends the class Object. Later, you'll assemble some customized components to be used in more complex applications.
Helpers provide functionality that is used across multiple views. Imagine creating functions in a script that pertain only to final output. You could extend these functions to include various settings that would make the process repeatable throughout the entire application.
Take an HTML link, for example. You could write the link in the view file manually:
<a href="/blog/posts/view/55">Read Post 55</a>
However, you may want the application to manage the links and dynamically generate the paths. In this case, writing static HTML links would not work. Here's where writing helpers or using one of Cake's built-in helpers can dramatically save you time and effort. A specific link function inside a helper contains a set of parameters that can change depending on the specific attributes of the view (like the text to be linked and the destination of the link). The process of writing the <a> tag around a path, configuring a path to work with Cake's system, and outputting the text to be clicked does not change, so this can be repeated whenever a link needs to be written. Using the HTML helper (which is a default helper in Cake) can accomplish this:
<?php echo $html->link('Read Post 55','/posts/view/55'),?>
Now, no matter where the Cake application is stored, links created by the $html->link() function will not break because their paths are checked and routed by Cake. If you wanted to alter the display of all links, you could go into the helper and rewrite the function once rather than search for each instance of a link.
Helpers simplify HTML output in significant ways. Imagine reducing to one string of code a complete set of radio buttons or check boxes for an HTML form or truncating news articles with one line. For example, Cake's Form helper can take an array of values (say, $data) and turn out radio buttons ready to be used and submitted back to the controller with one line:
<?php echo $form->radio('data'),?>
Because helpers are set apart for use in the views, they are stored in the app/views/helpers directory. The file name convention is just like components, and they carry the .php extension. When naming the helper class object, the following syntax is used:
class SpecialHelper extends Helper {
Like controllers and components, the name of the helper class is camel case and includes the word Helper, and the class is an extension of the object class Helper. For example, if you were to create a custom helper for e-mailing customers, you might create the app/views/helpers/email.php file and name its class:
class EmailHelper extends Helper {
Elements
An element contains presentation output that can be pulled into multiple view files. Anything contained in the element will be displayed in the view depending on where in the view's markup the element is called. Variables can be passed to elements and displayed like how the controller sends variables to views.
Elements are named like controller actions and view files and are stored in the app/views/elements directory. For instance, a menu bar could be maintained in an element named menu.ctp and called in any of the views. Then, should you need to change a menu item or a link in the menu, rather than change it for every view in the application, you would need to edit only the menu.ctp file.
Helpers and elements differ in that helpers work with view logic, whereas elements are more like chunks of HTML that repeat throughout the views. A menu bar would likely require less logic (maybe a couple of variables) and would not contain a series of functions to be rendered. As an element, the menu bar would work well because multiple views would need to use it. Creating pie charts or graphs, however, would require several processes and more logic and therefore would be better suited as a helper than as an element.
Layouts
Many web sites maintain the same overall design from page to page with only specific areas changing content depending on the page. Rather than store in each view file this overall design, you can create a layout file to be used by the entire application or one controller action at a time.
Layouts are stored in the app/views/layouts directory and contain presentation output like views and elements. They perform minimal logic and mainly serve to wrap HTML around changing views. A layout's file name can be anything but must be lowercase and have the .ctp extension.
Behaviors
When interacting with the database, sometimes the model will need to perform more complex processes than simply adding, updating, or deleting records. In some applications, deleting a record will require performing other manipulations to other tables and records, and so on, with other database operations. Cake resolves this issue with behaviors, which are classes that may be called by models when performing model functions.
Behaviors are stored in the app/models/behaviors directory and can be named anything following the same rules for naming helper files and components. They must have the .php extension. In the file, behavior class names are set with the following syntax:
class SpecialBehavior extends ModelBehavior {
By using behaviors to store complex or customized model operations, you give the application's models more consistency.
DataSource
In this book I've stuck with MySQL as the main choice for database handling because it is often bundled with PHP. Many applications, however, need to store data in other sources. From PostgreSQL to a customized database engine, Cake is fully capable of handling other data sources. Even creating web services and talking with enterprise APIs such as Facebook or eBay can be handled in Cake. These types of operations are handled with DataSources, or, in other words, files that execute functions that talk with a source that stores or supplies data to the application.
The DataSource abstracts the sending, retrieving, saving, and deleting data to the model so that the model really behaves the same regardless of what external source processes the data. Cake comes preinstalled with the following datasources, so you won't have to write from scratch your own if you intend to use one of these to handle your application's data:
- MySQL
- PostgreSQL
- IBM DB2
- Microsoft SQL Server 2000
- Oracle 8
- SQLite
- ADOdb
When creating custom DataSource, make sure the file name is lowercase and has _source.php appended. An XML DataSource could be named, for example, xml_source.php and would be placed in the app/models/datasources directory. Naming the class object in the DataSource file (in this case, for the XML DataSource) is done with the following syntax:
class XmlSource extends DataSource {
When retrieving or saving data to a source outside your main database configuration source, DataSources can handle all the back-and-forth processing so that the model functions don't have to handle connection or request parameters unique to the DataSource.
Best Practices
Naming conventions in Cake do have specific rules that make it possible for Cake to assemble the various pieces of the application without too much code. Remember the saying "Just because you can doesn't mean you should" when naming files and database tables. The following are some suggestions for best practices when trying to decide upon names for elements of the application.
Keep File Names from Conflicting with Cake Resources
Avoid naming tables in the database that might conflict with a name of a Cake framework element. An example might be naming a table views or controllers.
Other conflicting names include class objects in Cake's libraries such as pages or files. Find a suitable name that can mean something similar such as records or images, or use underscores to add another word to the title such as web_pages or plain_text_files, and this will spare you the trouble of confusing Cake's dispatcher or confusing other developers who might work with your application. Sometimes when looking for help in the Cake community, it will be useful to give specifics. If your names overlap with other Cake objects, you may be asked to clarify.
Use Routes Rather Than Controllers
Some developers create a controller to handle logic alone without connecting it to a database table. They might name a controller cart or blog to create a separate wing of the application. Or they manipulate the names of their controllers for the sake of friendly URLs. In Cake, controllers are best suited for linking up with specific database tables. For example, you may want to build a blog that has a URL structure that goes something like this:
http://localhost/blog/view/5/sep/2008
So, how is this URL possible when there is no table named view in the database and the controller must match up with a database table?
You can customize how the dispatcher handles all URLs by editing the app/config/routes.php file. In this case, it would be best to build your database following convention and then go into the routes.php file and create some URL aliases that point to the appropriate controllers. You could create a table named posts in the database that stores all the blog posts and write an action in the posts_controller.php file that pulls the date from the URL and renders a view for the retrieved post. Then, in routes.php, you could write in a route for all URL strings that start with /view to point to the Posts controller and pass along the date parameters. If this makes little sense now, don't worry—you'll deal with Cake's routing possibilities in more detail in Chapter 10. Just make sure that you stick to convention first when thinking of how to name your database tables and consequently the controllers and models. Later you can work with routing to ensure that the URLs are structured to your liking.
Name Actions for People, Not Code
Actions appear in controllers and perform a set of operations that follow PHP syntax for functions. They also will link up with a view file to render output to the browser. Knowing how the action name might appear in a URL is important when deciding on how to name functions in the controller. For web sites that aim to be user-friendly and optimized for search engines, their action names might be more important than an internal reference name for the application alone.
A good rule of thumb for naming controller actions is to write names as if you had to spell it out over the phone. E-mail addresses with lots of nonalphanumeric characters (such as underscores and dashes), for instance, are frustrating when spelling them out to someone. Simplicity is best especially when the name will appear in a URL that will be repeated through verbal communication, on paper, or for a search engine.
Be Careful Using PHP Function Names as Action Names
Another important point is that actions can have conflicting names with PHP functions. Naming an action date, for instance, would conflict with the PHP date() function. Generally, you can get around this problem by naming actions that are specific to the general logic the action will perform. When that logic does coincide with the kind of logic found in other PHP functions, it's only really a matter of trying the action on a case-by-case basis to see whether it conflicts with PHP. Many PHP editing programs highlight PHP functions with a different color, which may also help when trying action names.
Poorly Designed Databases
Ambitious web applications will certainly call for complicated database design. All too often developers try to find a way to fit every piece of data into a field without building associations between tables. Or, rather than store a reference to a record in another table, some developers build scripts that write information into a text field. Worse yet, some developers write a static list in the HTML of the site and change the list manually depending on where the list appears in the application. Not only do these methods make updating the code of the application more cumbersome and less portable, they also don't fit into the paradigm of Cake's rapid development methodology. Poorly designed databases can adversely affect Cake's rapid development qualities and turn up errors or dead ends that lead to time wasted on forcing you to accommodate a bad database.
Why Good Database Design Matters
Much of Cake's rapid development functionality comes from conventions that are tied to how the database is designed. Not only does a good database design matter for the scaffolding feature or the Cake console, but it is the very bread and butter of Cake's data handling. The interactions between different kinds of data will affect the time it will require to use that data throughout the application. In theory, the database should separate data into categories that work off each other, rather than the MVC structure separating roles of operations into different areas.
Cake relies on the process of database normalization for its naming conventions and model functions. Normalization is the technique of designing relational database tables in an effort to minimize duplication and safeguard the database against structural problems. By normalizing your database, you produce an effective schema that improves your Cake application and saves you from data anomalies that can cause data-handling errors.
To contrast poor and good database design or, in other words, to explain why database normalization is so important, I'll discuss a social networking application scenario. For sites that give users web pages of their own, a lot of data will need to be stored. A poor database would have a record for each user's profile and a field for each item in the profile: user's name, e-mail address, home page address, favorite book 1, favorite book 2, image, avatar-sized image, slogan, description, friend 1, friend 2, and so on. When fetching the user's profile in the URL, a bad database wouldn't have any kind of unique ID, so the record would be pulled by the username.
This scenario is problematic because the number of fields is static. The user cannot add more than two books or two friends unless the developer manually adds more fields. Also, the number of fields would get large quickly the more the developer adds functionality to the application. Back-end database maintenance would be frustrating with a high number of fields. Field names such as favorite_book_1 are clumsy and make it more difficult to organize the code when processing data. Also, without a unique identifier to differentiate the profile records, the possibility exists that the username could get duplicated and thus break the queries that would seek to fetch a user's profile. In theory, without some unique identifier for a record, that record could potentially get forever lost in the database and would not be retrievable.
On the other hand, a good database design would separate different categories of data into different tables. There would be a table for profiles, another for books, and another for users. The users table would store some basic information such as a username and password as well as an e-mail address. As users interact with others through the site, they could select other users to be their friends, and rather than saving that association as a field in the profiles table, another table could store the associations. A profile would be able to display any number of books in the books table by storing the associations in a separate table like the users' friends. In this way, the database stores associations as well as individual records. This fact is important for Cake development because of how it separates data into categories and allows for associations to exist between categories. Cake's fundamental design of separating various operations into different areas allows for tighter control of each of these tables in controllers, models, and views of their own.
Feature Creep and Cake
Consider the phenomenon of feature creep before designing the database. Feature creep occurs when a project is under way and contributors to the project realize potential for new features based on existing features in the uncompleted project. Before long, the contributors end up requesting so many features that the project becomes much more complicated than at the outset.
Cake will help with feature creep because of the specific areas that are devoted to specific functions. However, if the database is not equipped to handle feature creep, then taking advantage of Cake's flexibility later might not be possible and may necessitate rewriting the application. The trick is to design the database to use associations rather than individual fields for all categories of data. Cake handles associations wonderfully and will dramatically reduce the amount of database querying required to handle complex data structures.
Table Associations
A good web application that illustrates Cake's rapid development functionality and table associations is a blog. Here, you will build a simple blog application using the scaffolding feature to test associations. Later, you'll expand the blog to take on more powerful features. Mastering table associations and how they work in Cake is essential for pulling in advanced features that matter for complex web sites. A simple blog application will help us discuss table associations in an easier way and should help you if you're unfamiliar with table associations to be better equipped to use Cake.
Create a new Cake application in your localhost root named blog. It should have the standard Cake 1.2 libraries and folders inside. As you walk through building this blog, remember how to launch the application in the browser. I'll reference a controller, and that will be executed by calling it in the URL with the correct string, like http://localhost/blog/posts.
The Database Design
Create three tables in the blog's database: posts, comments, and users. Listing 4-3 contains the MySQL query to create fields in the tables.
Listing 4-3. The SQL Table Structures
CREATE TABLE `posts` (

  `id` int(11) unsigned NOT NULL auto_increment,

  `name` varchar(255) default NULL,

  `date` datetime default NULL,

  `content` text,

  `user_id` int(11) default NULL,

  PRIMARY KEY  (`id`)

);


CREATE TABLE `comments` (

  `id` int(11) unsigned NOT NULL auto_increment,

  `name` varchar(100) default NULL,

  `content` text,

  `post_id` int(11) default NULL,

  PRIMARY KEY  (`id`)

);


CREATE TABLE `users` (

  `id` int(11) unsigned NOT NULL auto_increment,

  `name` varchar(100) default NULL,

  `email` varchar(150) default NULL,

  `firstname` varchar(60) default NULL,

  `lastname` varchar(60) default NULL,

  PRIMARY KEY  (`id`)

);
The users table will contain a running list of available authors of blog posts. When a post is created, it will be assigned an author from the users table. Notice that there is a field in the posts table named user_id. This will match up with the id field in the users table, thus linking an author to the post. Also, in the comments table, each comment will be assigned to a post in the same manner. In this case there is a field named post_id, which will match up with the id field in the posts table.
In the models, you will spell out these associations so Cake can pull them together. What's more, you can test how well you've specified the associations using the scaffolding feature. As noted earlier, one main idea in Cake application building is to start with the Cake objects and build out. In general, you will design your database structure first, test their associations in the scaffolding, and then build out with your own code to enhance the application.
"Belongs To"
When associating tables, you need to tell Cake what type of relationship each table has with the others. This blog will have a "belongs to" relationship in a couple of tables. First, since each blog post will have an assigned author, each blog post "belongs to" one user. In other words, the posts table "belongs to" the users table. You have placed a user_id field in the posts table as a way to save this relationship. For each record in the posts table, one of the records from the users table will be saved by assigning one of its IDs to user_id.
To build this relationship into the models, first create the Post model as app/models/post.php. Listing 4-4 contains the model's code to assign it a "belongs to" relationship with the User model.
Listing 4-4. The Post Model
1    <?

2    class Post extends AppModel {

3        var $name = 'Post';

4        var $belongsTo = array('User'),

5    }

6    ?>
Line 4 of Listing 4-4 shows how to enter a "belongs to" relationship in Cake. You do this by assigning an array of models that are part of the relationship to the current model. The class object variable Cake uses to build "belongs to" relationships is the var $belongsTo attribute.
In any Cake application, "belongs to" relationships are made by following the code on line 4. You can add relationships by including them in the array syntax.
className Parameter
A possible key to be included with the $belongsTo settings is className. Simply put, className is the model to which the current model belongs. In this case, it would be set to User, meaning the class name of the users table's model. If you decide to abandon Cake's model naming conventions or if there is a complex reason for naming a model other than the standard Cake convention, then you will need to specify the name in this setting; otherwise, Cake will not be able to link the association on its own.
foreignKey Parameter
This key sets the foreign key found in the related model. This setting is useful for specifying multiple "belongs to" relationships.
conditions Parameter
This key contains a SQL string that filters related model records. Generally, it will contain an equals/not-equals SQL statement for a field (for example, Post.published = 1).
fields Parameter
By default, Cake will return all fields from the associated table. In this case, all fields from the User record, which is associated with the current post, will be fetched and made available to the Post model. You can limit this by using the fields key.
You can set these keys to your own values by assigning them as an array to each item in the $belongsTo array. Listing 4-5 shows the Post "belongs to" relationship with all keys displayed.
Listing 4-5. BelongsTo Keys Are Assigned to the Post::User Relationship
var $belongsTo = array(

    'User'=>array(

        'className'=>'User',

        'foreignKey'=>'user_id',

        'conditions'=>null,

        'fields'=>null

        )

    );
"Has One"
Each relationship with association mapping must be specified in both directions. In other words, just saying that posts belong to users is not enough. You must also specify in the User model how users are associated to any other table. In this case, a user will "have many" posts. Three relationships are possible—"has one," "has many," and "has and belongs to many." First I'll discuss the "has one" association.
This relationship is exactly a one-to-one relationship. In applications that assign profiles to users, such as social networking web sites, the "has one" relationship is used. Each user has one profile, and one profile belongs to just one user.
To establish the "has one" relationship, you set the $hasOne attribute like you did with $belongsTo in the Post model (see Listing 4-6).
Listing 4-6. The $hasOne Attribute String That Sets a "Has One" Relationship in the User Model
var $hasOne = array('Post'),
className Parameter
For a "has one" relationship, className should always be set to the model that contains the belongsTo attribute pointing to the current model.
foreignKey, conditions, and fields Parameters
These are similar to the "belongs to" foreignKey, conditions, and fields parameters. Set them to add more specific control to the "has one" relationship.
dependent Parameter
When deleting records in a "has one" relationship, you may want both sides of the association to be deleted. For example, when a user has one profile and the user is deleted, you may want the associated profile to be deleted also. In these cases, the dependent key allows you to do this easily. By default, it is set to false. Set dependent to true to delete records in both tables when the delete action is run through the associated model.
In the blog you are building, you have no need of a "has one" relationship. We will make use of another important relationship in Cake: "has many."
"Has Many"
You've created the Post model; it's time to make the User model. Create the User model in the app/models directory and work in the code shown in Listing 4-7.
Listing 4-7. The User Model
1    <?

2    class User extends AppModel {

3        var $name = 'User';

4        var $hasMany = array('Post'),

5    }

6    ?>
For your blog, each user will have many posts. Even if a user enters only one post, you would still want the relationship to be capable of saving more than one post per user. By telling the User model that multiple post records are associated with it, and by completing the relationship in the Post model with the belongsTo attribute, Cake can now link the two together.
For more control, you may want to enter more parameters for the "has many" relationship.
className, foreignKey, conditions, and fields Parameters
These parameters specify the same things as described in the "belongs to" relationship earlier.
dependent Parameter
This setting behaves similarly to how it is described for the "has one" relationship. In the "has many" relationship, setting dependent to true will work recursively. In other words, if you set the $hasMany attribute in the User model to dependent=>true, then whenever a user is deleted, all posts ever assigned to that user will be deleted as well.
order Parameter
You can control the sorting order of the associated records by entering SQL syntax in this parameter. For example, in the User model, you could set order to Post.datetime ASC, and it would order all associated posts by their date and time in ascending order.
limit Parameter
Some database requests may return a substantial number of associated records. You may want to limit the number of returned records to cut down on server load time. You can do this by setting this parameter to a value representing the maximum number of associated records Cake will fetch from the database.
To produce even more customized results, you may enter a SQL string in the finderQuery key, and it will run when the associated records are queried. You really should need to use this option only if your application requires a high level of database customization. Most of the time, you will be able to work just fine using Cake's built-in model functions.
The "has many" relationship is extremely useful for helping to design effective databases. If you know that you intend to put a select menu in your application for a series of options that will be stored in the database, the "has many" relationship can help you do so without writing a static list in HTML. Instead, you could build a table to store those options and associate them through the models using a "has many" relationship. Then, no matter what may happen with feature creep or with adding or deleting options from the list, you can rest assured the application isn't broken and can handle the changes. It's built on a database, not on static forms, meaning that the application is dynamic and can change easily.
Testing the Associations
An easy way to test the associations in your database is to use the scaffolding feature. You have already created the Post and User models; now let's see how those associations hold up. You will need to create controllers to run the scaffold.
Create the posts_controller.php file in the app/controllers directory, and insert the code shown in Listing 4-8.
Listing 4-8. The Posts Controller File
1    <?

2    class PostsController extends AppController {

3        var $name = 'Posts';

4        var $scaffold;

5    }

6    ?>
To test the User model, you will also want to build a scaffold around the users table. To do this, create the file app/controllers/users_controller.php and insert the code shown in Listing 4-9.
Listing 4-9. The Users Controller File
1    <?

2    class UsersController extends AppController {

3        var $name = 'Users';

4        var $scaffold;

5    }

6    ?>
Let's add a couple of test users to the users table by launching the Users controller and clicking the Add link. My screen when doing this appears in Figure 4-1; yours should be similar.
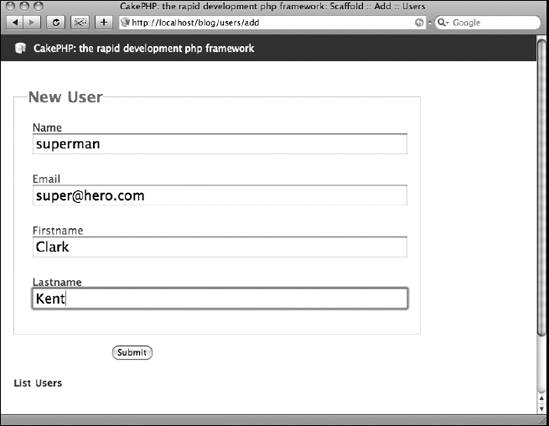
Figure 4-1. Adding a test user to the database using Cake's scaffolding
Now that there are a couple of users in the database, you can test whether those users get associated with the posts table. Launch the Posts controller, and click Add to insert a new post. If the association is working right, you should see a select menu that is populated with associated records in the users table; Figure 4-2 shows how this menu appears on the New Post screen.
If the association weren't working correctly, you'd see an empty input text box rather than a select menu for the user. That would indicate that Cake is asking you to fill in the user_id field with your own variable data. Notice that when you save the post, the list screen for the Posts controller displays the name of the user, not an ID number. This is another indication that Cake is picking up the association properly.
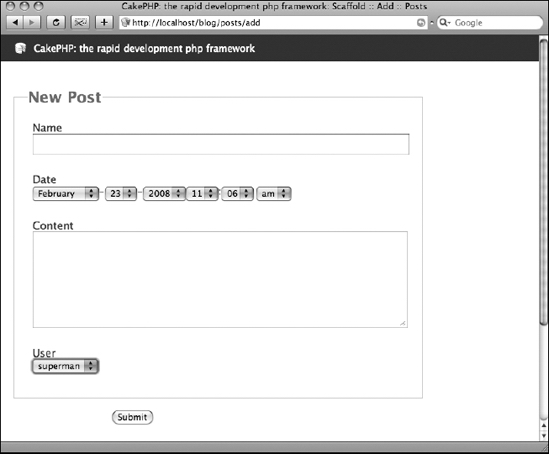
Figure 4-2. The User menu is populated with actual records from the users table.
Conventions for Establishing Table Associations
As mentioned earlier, you can manually set the foreign key for the relationship. In other words, you can name the fields that store the associated ID however you want. However, Cake does have some naming conventions for working with table associations that make it possible to leave out the foreignKey parameter and other settings, thus reducing the amount of code to build associations.
I have already mentioned that table names in the database ought to be pluralized. For a "has one" or "has many" relationship, you will need to enter a field that will store the associated record's ID value. This field's name follows a naming convention, specifically that it must be named after the model from which the ID comes. You must also append an underscore and id to the field name for Cake to recognize this as the associated foreign key. Notice that when you created the posts table, you followed this convention when adding the user_id field. By doing so, you could leave out the foreignKey parameter when setting the $belongsTo and $hasMany attributes. With the tables being named properly as well as the foreign keys, Cake automatically found the associations and made them available in the scaffolding. No specific code was necessary.
"Has and Belongs to Many"
The final association Cake can recognize for database table relationships is the "has and belongs to many" relationship. This relationship is powerful but also a little difficult to master. The more you experiment with "has and belongs to many" associations, the easier it will be to use them in your applications.
In short, I've already discussed a one-to-one relationship with the hasOne association, and the hasMany association shows you how a one-to-many relationship is managed in Cake. What about a many-to-many relationship?
Many-to-Many Relationships in Cake
Many web sites use tags to order their content. Many blogs, rather than assigning one category to a post, will have a list of tags that can be assigned multiple times to multiple stories, and vice versa. This is a many-to-many relationship between posts and tags. One post can have many tags, and each tag can belong to many posts.
Structurally, the database can handle many-to-many relationships only if there is a third table that saves these associations. In the post-to-tag example, a third table named something like posts_tags would be created. In it would be just two fields: post_id and tag_id. By having a third table, you maintain the flexibility needed to list as many relationships as the application would need to save; there is no limit to the number of associations in either direction because the third table can continually save more records.
As you can imagine, Cake saves a great deal of time in managing this association. Just like the $hasOne and $hasMany attributes, you create a "has and belongs to many" association by entering the $hasAndBelongsToMany attribute in the model.
You can also test "has and belongs to many" associations in the scaffold. Rather than view a select menu for a one-to-many relationship, Cake's scaffolding will render a multiple-select menu. In this way, you can test the association in the same manner that you tested the "has many" relationship earlier.
Applying and Testing This Relationship with the Blog
Let's add a "has and belongs to many" relationship to the blog application. To do this, you will need to create a new table in the database. See Listing 4-10 for the SQL syntax to create the tags table.
This tags table will hold category tags to better organize your blog posts. The name field will be an alphanumeric field to be used in accessing the tag through the URL. The longname field will store the category's display title for use in links and page headings.
Because the tags table will be linked with posts in a "has and belongs to many" relationship, you must create another table to hold those associations. This table name will follow Cake's naming conventions. For "has and belongs to many" tables, the name must be arranged in alphabetical order with each associated table's name separated by an underscore. Inside the table, you provide the foreign key and associated foreign key as fields with names following the same convention for one-to-many relationships. In this case, the field names will be ordered alphabetically, with post_id first and tag_id second. Use Listing 4-11 to create the new posts_tags table.
The Tag model is absent, so create that next as the app/models/tag.php file. Paste Listing 4-12 into the new Tag model file.
Listing 4-12. The Tag Model
1    <?

2    class Tag extends AppModel {

3        var $name = 'Tag';

4        var $hasAndBelongsToMany = array('Post'),

5    }

6    ?>
Next, you will have to establish the association in the Post model as well. Adjust this model to reflect the "has and belongs to many" relationship, as shown in Listing 4-13.
Listing 4-13. The Post Model with the $hasAndBelongsToMany Attribute Set
1    <?

2    class Post extends AppModel {

3        var $name = 'Post';

4        var $belongsTo = array('User'),

5        var $hasAndBelongsToMany = array('Tag'),

6    }

7    ?>
Last, create the Tags controller with the scaffolding so that you can add tags to test the "has and belongs to many" relationship. Listing 4-14 contains the code for the new Tags controller file.
Run the Tags controller to add some placeholder tags for the test. Add more than one to make the test more effective (since the relationship you are testing is many-to-many). Everything is in place for a "has and belongs to many" relationship. Launch the Posts Add action to create a new post, and you should see a multiple-select area populated with the tags' names from the tags table, like Figure 4-3.
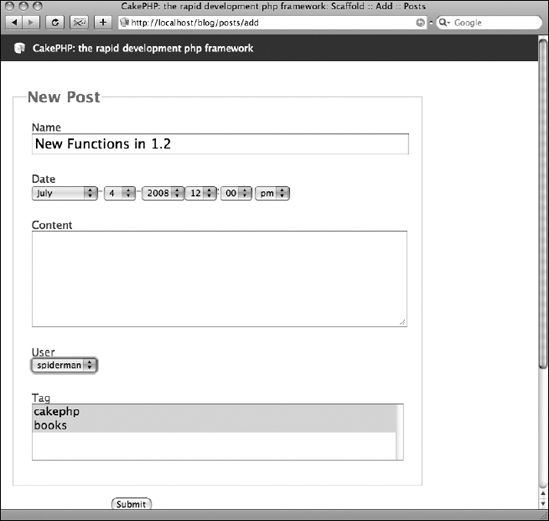
Figure 4-3. Testing the "has and belongs to many" relationship for tags and posts
The multiple-select box with the names appearing correctly indicates that Cake has picked up the relationship effectively and is pulling the appropriate data from the tags table. To test the relationship going the other direction, create a couple of posts and then access the Tags Add action. You should see there a multiple-select box as well with the associated posts highlighted, as shown in Figure 4-4.

Figure 4-4. In the Tags Add view, the post's data is displayed in the multiple-select box.
Both tags and posts have shown the relationship in the scaffolded views. The models are working with each other correctly, so you can now begin manipulating the views to improve the application's design, flow, and features. To provide better control over the "has and belongs to many" relationship, the following parameters are available.
className Parameter
This name corresponds to the associated model. In the Posts::Tags example, the Post model would need className set to Tag.
joinTable Parameter
Remember how you created a third table to house all the associations for posts and tags? This is referred to as the join table and can be manually set using the joinTable parameter. For the blog, you would set this to posts_tags, named after the table, not the models.
foreignKey and associationForeignKey Parameters
The current model's key in the join table is associationForeignKey, which in this case would be post_id for the Post model. The foreignKey parameter is for the other model, that is, tag_id for the Post model. Set these for when you must specify multiple "has and belongs to many" relationships in a single model.
conditions, fields, order, and limit Parameters
These parameters behave like all other associations. Set manual SQL conditions, limit the returned fields, set the sorting order of the returned results, and limit the maximum amount of records to be returned with these parameters.
Beyond the Scaffold
Understanding basic installation routines, understanding naming conventions, and using table associations for good database organization will improve your development time and help you get off the ground with your project much more quickly. However, every application will need to move beyond the scaffold before it is ready for deployment. Indeed, the scaffolding feature is really intended for what I covered in this chapter: testing table associations without needing to code any HTML and providing a basic structure to tinker with a few application ideas before getting too deep in programming the site.
Chapter 5 will introduce to you the Bake script, a handy console program that runs much like the scaffold but supplies you with editable code from which you can expand your application. You'll improve the blog and adjust the views to bring it more in line with a production-level Cake application. As always, I recommend you practice using the table associations a few times with other scenarios, bringing in the parameters for each association, and customizing the association to get a feel for the models and good database design. The quicker you can take an application from zero to running the scaffold with advanced table associations, the more comfortable you'll feel with the MVC structure and the fundamental process Cake applications follow.
You may have noticed that I left the comments table out of the tutorial for this chapter. This was to allow you to try building a "has many" relationship for the posts and comments tables on your own. In this exercise, associate comments with posts by using the appropriate relationship, and test the association using the scaffold. Be sure to check for errors by running the controller from both ends of the association.
Summary
Cake uses naming conventions to simplify building an application. By adhering to the "convention over configuration" paradigm, Cake provides you not only with dozens of useful functions and code-cutting methods but also with an overall method for organizing the resources the application will use. How to name models, views, and controllers, as well as several other Cake resources such as helpers, elements, and components, is an essential aspect of learning Cake. Not only will you need to structure your application following Cake's conventions, but how you design the database also matters for taking advantage of the framework. Database normalization is key to designing a schema that best fits Cake's conventions and is essential for working with the models correctly. When you use the various relationships in your database (one-to-one, one-to-many, and many-to-many), Cake is able to do much of the difficult work in mapping the data and making them available in the application.