
CHAPTER 14
DataSources and Behaviors
Cake's core set of resources strictly adhere to the MVC paradigm, meaning that all output is configured by the view, all data handling is managed by the model, and all business logic is handled by the controller. At this point, however, you're aware of how much the model, view, and controller work together to run as an application. The view doesn't act alone without the controller providing needed variables, the controller doesn't process its logic without the help of the model, and so on. The degree to which these resources work together depends on the unique processes employed by the application. Because the MVC elements work together (more or less simultaneously), you could possibly manipulate one element to perform the work of another. For instance, the model could create output strings to be passed to the view, like HTML tags and form fields. This might work in the short run, but if you were to distribute this application later, it would prove difficult for other Cake developers to work with. Keeping Cake applications portable requires sticking to the MVC structure as much as possible.
But having only model, view, and controller files presents one potential problem: these files could get overdone, meaning that the more complex the application becomes, the more disorganized these resources could appear. True, all data handling is restricted to the model, but what if you want to work with multiple sources of data, such as an XML file here and two different database systems there? In this situation, the model would need to include a large number of connection functions, not to mention find, read, delete, and other necessary data-handling methods. Before long, the MVC structure would begin to lose one of its key advantages: lightweight organization, especially in cases where the application is more elaborate.
Rather than accept the need for very large model, view, and controller files, the Cake developers built into the framework resources that extend the MVC structure. I've already discussed a couple of these extensions, such as helpers and components, in previous chapters. By extending the MVC structure, model operations are kept to the model, and view and controller operations are kept to their respective places—but the model, view, and controller files don't get overloaded with functions and data that are repeated throughout the program. Just as basic application procedures (such as working with data and supplying output to the user) get separated by using models, views, and controllers, more complicated procedures (such as producing dynamic views) get separated from their respective resources. In other words, helpers and components provide a second layer to working with views and controllers, respectively. Table 14-1 illustrates resources in Cake that extend the MVC layout.
Table 14-1. Cake Resources That Extend the MVC Layout
| Main Layer Resource | Background Layer Resource(s) |
| Model | Behavior; DataSource |
| View | Helper |
| Controller | Component |
By using helpers, you keep the individual views from getting too bloated, and you make detailed output procedures available to other views across the application. Helper functions are processed in the background layer, or while the view is being rendered. Components provide a similar service to the controller by separating out a suite of functions that perform detailed operations. Figure 14-1 shows how the helper extends the view.
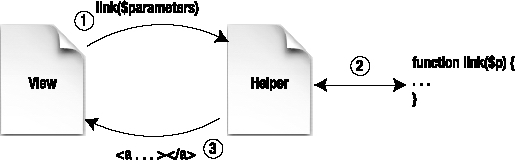
Figure 14-1. The helper extends the view by housing more elaborate functions that would otherwise clutter the view.
This is the process:
- The view calls the
$html->link()function to render a link and provides variable parameters for the helper. - The
link()function processes the passed parameters and pieces together the final output to be used in the view. - The HTML helper sends the final
<a>element with all the text and attributes back to the view.
The example in Figure 14-1 shows how the view is trimmed down by placing the repetitive task of generating links into the helper. In other words, rather than place the $html->link() function's procedure into the view, Cake keeps it in one place, thus making it accessible to the whole application and at the same time minimizing the amount of code in the view file. This chapter explains how to use two resources that extend the model in the background layer just as helpers and components extend the view and controller.
Extending the Model with DataSources and Behaviors
The first of these resources are DataSources.1 These are resources that connect to extra datasources in the background and provide data to the model. By using DataSources, you allow the model to work normally, without filling it up with connection, find, read, and other data-handling operations. The model can reference DataSource functions rather than perform the extra connecting itself.
The second resources that extend the model are behaviors. These are classes that allow the data used by the model to "behave" differently. In short, some data-processing methods go beyond table associations and simple callbacks; they may perform multiple tasks with the data as the data is saved, for instance. Behaviors are invoked when several updates need to be performed simultaneously across the database. Later, I'll describe how to use some of Cake's built-in behaviors to apply a tree structure to the blog application's tags.
Because extending the model is generally the most complicated of resources, this chapter will probably include some of the most difficult concepts to master when learning Cake. Just remember what the overall goal of the resource is and why it's available in Cake in the first place. Your application may not call for an added behavior for your model or a datasource beyond the typical MySQL setup, but knowing what these resources can do and how they work in Cake will almost certainly come in handy at some point.
Working with DataSources
So far in this book we've used only MySQL to work with data, but there certainly are other ways to store data for the application. PostgreSQL, Sybase, Oracle, and Microsoft SQL Server, to name a few, are some of the most popular database systems, and getting Cake to work with them may be important if the project requires it. Fortunately, Cake comes with some built-in DataSources that allow the application to connect to these other systems.
DataSources not only help with other database engines, but they also can be customized to work with other data formats. Reading XML, CSV, or other formats may be accomplished with DataSources. The application can also use other server systems such as LDAP or IMAP through DataSources. Many web applications use some kind of web service API to work with client-side programs that do not use HTML. Combining the power of a Cake application and client-side software can be done with DataSources as well.
The main goal of DataSources is to handle all the connection methods for the model and to provide the model with convenience functions to keep the amount of code in the model as low as possible. These convenience functions, though, do relate to talking with the datasource and not just any model-type procedure. In other words, you want the model to be able to stick to the read() function rather than have to perform the step-by-step process of reading a record in whatever unique way the current datasource may require. As much as possible, the model shouldn't have to change its current methods to accommodate a particular datasource. For example, Figure 14-2 shows how the MySQL DataSource extends the model so that the model doesn't have to figure out the necessary SQL query strings and perform the connection methods for the database.
__________
1. Defining DataSources can be tricky in Cake. In general, a datasource (lowercase) is any source for supplying or saving data. So, MySQL is a datasource, as is an XML file or pulling data from an LDAP server. Cake's method for connecting to these datasources is through a resource file called a DataSource, which is not the same as the source of data. To provide consistency in this chapter, I'll stick with DataSource, the camel-cased word, to refer to Cake's resource file and the lowercase word, datasource, to refer to the actual source of data. Simply put, in Cake you use DataSources to connect to datasources such as MySQL, XML files, and LDAP servers.
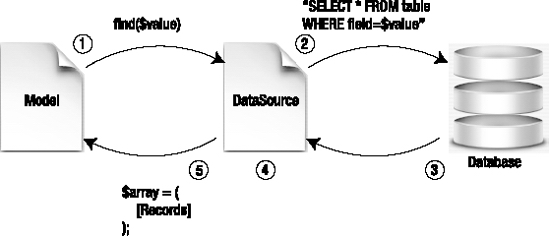
Figure 14-2. The MySQL DataSource pieces together the connection strings and database queries for the model.
Here's the process:
- The model runs one of its functions, which gets sent to the DataSource; in this case,
find()is invoked, and the contents of$valueare sent. - The DataSource pieces together a query string based on the language of the source, connects to the source, and runs the query; in this case, the MySQL DataSource runs a query like
"SELECT * FROM table WHERE field=$value". - The datasource returns a result set; here, the MySQL DataSource performs some
mysql_fetch_array()functions and loops through the result set from the database to get the final results. - Once the final results are obtained, the DataSource formats the set for use in the model. This will usually be an array of some kind.
- The formatted array or result set is sent back to the model. The model then uses the data for its own purposes.
Using Built-in DataSources
Cake's built-in DataSources include support only for relational database systems. Because they act as a layer between the model and the database, no additional DataSource functions are invoked in the model. To change from one DataSource to another, simply adjust the database configuration file.
The first step in changing the main DataSource for the application is to set the driver parameter in app/config/database.php. Open this file, and you'll find the DATABASE_CONFIG class; it should contain the original settings you used when first setting up the blog application (see Listing 14-1).
Listing 14-1. The DATABASE_CONFIG Class in app/config/database.php
1    class DATABASE_CONFIG {

2        var $default = array(

3            'driver' => 'mysql',

4            'persistent' => false,

5            'host' => 'localhost',

6            'port' => '',

7            'login' => 'root',

8            'password' => 'root',

9            'database' => 'blog',

10            'schema' => '',

11            'prefix' => '',

12            'encoding' => ''

13        );

14    }
Lines 2–13 of Listing 14-1 contain the $default variable that tells Cake where to connect to the default datasource. The blog application currently connects to MySQL through the built-in MySQL DataSource. This is set in line 3 with the driver parameter. By changing this to another driver, Cake will use the new corresponding DataSource instead of MySQL. Table 14-2 shows a list of available driver options that you can use depending on the DataSource you want to connect with.
Table 14-2.
Driver Options Available for the DATABASE_CONFIG Class
| Driver Parameter | DataSource | Minimum PHP Version Requirement |
db2 |
IBM DB2, Cloudscape, and Apache Derby | PHP 4 |
mssql |
Microsoft SQL Server 2000 and higher | PHP 4 |
mysql |
MySQL 4 and 5 | PHP 4 |
mysqli |
MySQL 4 and 5 improved interface | PHP 5 |
oracle |
Oracle 8 and higher | PHP 4 |
postgres |
PostgreSQL 7 and higher | PHP 4 |
sqlite |
SQLite | PHP 5 |
adodb-[drivername] |
ADOdb interface wrapper | PHP 4 |
pear-[drivername] |
PEAR::DB wrapper | PHP 4 |
To get an idea of how these DataSources work with their respective systems, you can open the files themselves. The cake/libs/model/datasources/dbo folder stores the DataSource files that Cake uses when you change the driver parameter to one of those listed in Table 14-2. Should you set driver to something other than what is stored in this directory, you would need to manually provide the DataSource code for Cake to work. When building a custom DataSource, which I'll describe in this chapter, consulting these built-in DataSources can sometimes be helpful. In them are great examples of how to preserve the model layer; all the models behave the same regardless of the DataSource being used.
Building a Custom DataSource
Writing a custom DataSource requires a little more than writing other resources in Cake. You may be used to the usual routine of creating Cake files—first, create a new file with the appropriate file name and in the appropriate location; second, type the correct class name in the file; last, add to the file your customizations and methods. With DataSources, however, a couple of additional tasks are required to get them working in your application. You'll need to define the DataSource in the application's database configuration file: app/config/database.php. Then you'll need to define the DataSource in the model that calls it.
To walk you through writing a custom DataSource, let's build an XML DataSource for the blog application. This DataSource will open an XML file that is formatted to include stories for the blog and will prepare the file's contents for inclusion in the database. In a more ambitious (theoretical) project, this process could be amplified to include saving all the blog's information; you could bypass using a database altogether in favor of writing everything as XML to a file. Here, though, the DataSource will remain simpler and allow for simple updates. For instance, you may want to write your blog posts in an external editor and not directly to the database through a web browser. In your word processor you could export the posts as XML files and then import them to the blog with the XML DataSource in this chapter. Whatever the case, building the XML DataSource will at least demonstrate how to extend the capabilities of the model and how to customize a DataSource in the first place.
Creating the DataSource File
DataSources are stored in the app/models/datasources folder and are named in lowercase with _source.php appended to the end. To give the DataSource a title with more than one word, be sure to use the underscore character as a separator in the file name.
Create the XML DataSource file, and open it for editing: app/models/datasources/xml_source.php. The DataSource must be set up as a class object extending the DataSource object. Copy the contents of Listing 14-2 to the new app/models/datasources/xml_source.php file.
Listing 14-2. The XML DataSource Class
1    <?

2    class XmlSource extends DataSource {

3        var $description = 'XML DataSource';

4    }

5    ?>
Line 3 of Listing 14-2 contains the $description variable. Use this variable to provide a one-line description of the DataSource.
Starting with a Minimum Skeleton
DataSources differ from other resources in that they require several functions to be present, even if those functions do not contain any logic. Without this "skeleton" of basic functions, the model class will encounter errors. After line 3 of the xml_source.php file, paste Listing 14-3, which contains the necessary DataSource functions.
Listing 14-3. The Main Skeleton for DataSource Files
5    function __construct($config=null) {

6        parent::__construct($config);

7        $this->connected = $this->connect();

8        return $config;

9    }

10

11    function __destruct() {

12        $this->connected = $this->close();

13        parent::__destruct();

14    }

15

16    function connect() { }

17

18    function close() { }

19

20    function read() { }

21

22    function query() { }

23

24    function describe() { }

25

26    function column() { }

27

28    function isConnected() { }

29

30    function showLog() { }
Each of these functions may be called by the model as both the DataSource and the model work together. Even though the functions listed on lines 16–30 of Listing 14-3 don't yet contain any logic or parameters, their being entered in the DataSource keeps the model from calling a function that doesn't exist. True, when the model calls read() or query(), for instance, it will receive a null response, but this at least won't potentially result in a Warning: Function does not exist error. Later, you'll extend these skeleton functions as needed.
Two functions, however, not only are present as part of the skeleton but are key for the DataSource to work at all: __construct() and __destruct(). These functions are written in Listing 14-3 as lines 5–14. More could be included in them, but for the moment they contain the very basics for the DataSource to work. When the DataSource object is instantiated, Cake needs to pass along parameters from app/config/database.php to the object. In a sense, Cake "binds" the DataSource through the __construct() function and the $config variable. If __construct() isn't working with $config, Cake will not establish the binding correctly, and consequently the model won't be able to "talk" to the DataSource. In a minute you'll configure the $config variable in database.php, but for now the __construct() function has to include the basic code to handle the DataSource configuration Cake will use later.
Lines 6 and 13 of Listing 14-3 call out the parent object as part of this binding process. Notice that the parent object's constructor and destructor functions pass along the $config variable. By using these functions in this way, you keep settings in Cake's core configuration from conflicting with any existing DataSource parameters. In other words, Cake will link the right settings with the right DataSource.
Both __construct() and __destruct() use other functions—connect() and close(), respectively—which as yet don't do any connecting or disconnecting. This is only the case here because the actual method of connecting to the datasource is specific to the source itself. In this example, connect() will later open the XML file and will return a true or false result depending on how effective it is at finding and opening the file. This could change if, for example, this DataSource connected to a database—the method of connecting would be entirely different and therefore would require a different set of instructions for connect() to be able to establish a connection and return a response.
The object variable $connected in line 7 is referenced by the model to determine the status of the DataSource. When true, $connected tells the model that the DataSource is working correctly. Later, the destructor will set $connected to false, which will be the last method called for the DataSource. Together, __construct(), __destruct(), and the $connect object variable establish a connection with the datasource, indicate the status of the connection, and terminate the connection.
Setting Up the Database Configuration to Include the DataSource
As mentioned earlier, just creating the DataSource file and including the minimum skeleton of functions doesn't automatically include the DataSource in the application. Like the helper, the DataSource must be included with some code elsewhere in the application to work correctly. Though including helpers is done in the controller, DataSources differ in that they are included in the DATABASE_CONFIG class in app/config/database.php.
Paste the array in Listing 14-4 into app/config/database.php after the $default array to provide the necessary DataSource configuration.
Listing 14-4. The $xml Configuration Array
1    var $xml = array(

2        'datasource' => 'Xml',

3        'file' => 'data.xml'

4    );
Line 1 of Listing 14-4 instantiates a new object variable named $xml. This could be named whatever you like, but remember to link the datasource parameter in line 2 to the name of the DataSource. I've named the XML DataSource class XmlSource (see line 2 of Listing 14-2), so Xml is the necessary value to be set in the datasource parameter. The rest of the $xml array contains any keys and values you want to pass to the DataSource. Lines 5 and 6 in Listing 14-3 use the $config variable; this will be the same as the matching array from database.php, which in this case is the $xml array. This DataSource will need to connect to the XML file data.xml. Later, you'll provide this file as app/webroot/files/data.xml. By specifying this parameter in the database configuration file, I've adhered to the consistency in the Cake application; all the datasource connections are defined in one place, the database.php file. Now that the database.php file includes the configuration settings for the XML DataSource, the model can work with the DataSource.
Using the DataSource in the Model
A couple of key setup routines have to be accomplished before the DataSource and model can begin working together:
- The DataSource file must be appropriately named and placed in the
app/models/datasourcesfolder. - The DataSource class must be appropriately named and set to extend the
DataSourceobject. - The DataSource file must include at least a minimum set of functions outlined in Listing 14-3.
- The database configuration file must define the DataSource in an object array.
- This same object array must be referenced by the
setDataSource()function in the model. - The DataSource object must be instantiated in the model with the
getDataSource()function.
At this point, you've completed steps 1–4 in setting up the DataSource. Notice that steps 5 and 6 are accomplished in the model. Let's open the app/models/post.php file and get the XML DataSource working there.
Listing 14-5 contains the xmlFindAll() function to be placed in the post.php file. This function uses the XML DataSource to return an array of values in the data.xml file.
Listing 14-5. The xmlFindAll() Function in the Post Model
1    function xmlFindAll() {

2        $this->setDataSource('xml'),

3        $xml = $this->getDataSource();

4        return $xml->findAll();

5    }
Notice that lines 2–3 of Listing 14-5 accomplish the last steps of the DataSource setup routine. Line 2 uses the setDataSource() function to link the $xml array in app/config/database.php to the model. When this line is called, the XML DataSource __construct() function is automatically run, and the $xml array is passed to this function as the $config array. The setDataSource() function not only links up the model to the DataSource but also makes it the main driver for the model. In other words, the MySQL driver/DataSource is no longer being run in the model while the XML DataSource is being used. Whenever the controller calls on the model to connect to the default DataSource, this instance of the XML DataSource object is destroyed, and the __destruct() method is automatically invoked.
Line 3 assigns the XML DataSource object to the variable $xml. From now on in the model, any function in the DataSource file may be run by referencing the new $xml object, which is done in line 4; the $xml->findAll() function will be the same as the findAll() function you'll later insert into the DataSource.
When the controller calls the xmlFindAll() function, the model will return a set of values to be used in the controller and view. Notice that this model function doesn't have all the connection code that will soon appear in the DataSource. This will keep the model trim and able to deal with the data rather than managing all the connections to the datasource.
Reading the XML File
Now that the setup routine is complete and the model is ready to begin using DataSource functions, you're ready to put the DataSource to work. Right now the findAll() function does nothing. Before it can do any reading, the connect() function on line 16 in Listing 14-3 must connect to the XML file and fetch its contents for use in the DataSource. Replace connect() with Listing 14-6 to provide the DataSource with the necessary connection method.
Listing 14-6. The Improved connect() Function in the XML DataSource
16    function connect() {

17        App::import('Core','File'),

18        $this->FileUtil =& new File(WWW_ROOT.'files/'.$this->config['file']);

19        $this->File = $file->read();

20        if (!$this->File) {

21            return false;

22        } else {

23            return true;

24        }

25    }
Throughout the DataSource file, the configuration array defined in app/config/database.php will be available as the object variable $config. Don't confuse this variable with the $config variable used by the __construct() function from Listing 14-3. In fact, the result of the constructor method—or, in other words, the returned value in the __construct() function—is assigned to the standard object variable $config for the DataSource. This means that anywhere in the rest of the DataSource (except the __construct() function), the configuration values returned by the constructor are available as $this->config. It just so happens that __construct() performs the necessary method to fetch the $xml array from app/config/database.php and return it as $this->config for the DataSource to use. The connect() function in Listing 14-6 uses $this->config to retrieve the datasource's file name. Notice that line 18 calls for this file name in the File utility. Using the WWW_ROOT global variable, line 18 also contains the path to the file relative to Cake. In this case, the file will need to be stored in the Cake file system as app/webroot/files/data.xml. Of course, $this->config['file'] corresponds to $xml['file'] defined on line 3 of Listing 14-4.
Thanks to the File utility class, reading the contents of app/webroot/files/data.xml is a snap. Line 18 grabs the file itself and assigns it as part of the File utility's class object. Then, on line 19, the File utility's read() function is used to read the contents of the file and assign them to a class variable named $File. You may have noticed that this variable hasn't yet been defined; do that by inserting the following string under the $description class variable shown in line 3 of Listing 14-2 (or in line 3 of the current XML DataSource file):
var $File = null;
Assigning the contents of the file to an object variable as opposed to a standard variable is important for making sure that all the other functions in the DataSource have access to this file. For this same reason, the resulting File utility object ought to be made available to the rest of the DataSource as well. This is done in line 18 by assigning the new File object to the instance variable $FileUtil. This, too, needs to be defined in the class to work correctly. Insert this definition near the $File definition:
var $FileUtil = null;
Later, the __destruct() and close() functions will close the data.xml file to keep the application's load on the server to a minimum. These functions will need the File utility object, which is accessible outside the connect() function because I've assigned it to the $FileUtil instance variable.
The connect() function has essentially performed a connection method by providing the file contents of data.xml to the rest of the DataSource. All that's left for this function is to return a true or false result to the constructor. Lines 20–24 check for any content in the $File variable and return this result. Now that the data.xml file has been opened and its contents made available to the rest of the DataSource, you're ready to move on to the findAll() function called by the model.
Disconnecting from the XML File
For good measure, the DataSource should include a method for disconnecting from the source. The __destruct() function defined in Listing 14-3 already does this, except that the close() function it calls has nothing in it yet. Replace the close() function (which should now appear on line 29 of the app/models/datasources/xml_source.php file) with the contents of Listing 14-7.
Listing 14-7. The Improved close() Function
29    function close() {

30        if ($this->FileUtil->close()) {

31            return false;

32        } else {

33            return true;

34        }

35    }
The result of this function may seem backward only because a false result usually means that the method failed. In this case, returning false sets the $connected class variable to the proper value; it tells the model that the connection status is disconnected, or zero.
Line 30 of Listing 14-7 uses the File utility class function close() to close the data.xml file. Simply put, if this is accomplished, then all close() has left to do is report false to the destructor, which is done on line 31.
Before the DataSource parses the XML file, let's give it something with which to work. Paste something like the contents of Listing 14-8 into the app/webroot/files/data.xml file. Notice that Listing 14-8 is formatted as XML 1.0 standard tags named after fields in the current posts table in the database.
Listing 14-8. Contents to be Added to the data.xml File
<?xml version="1.0" encoding="UTF-8"?>

<blog>

    <post>

        <id></id>

        <name>Writing Posts in XML is a Snap</name>

        <date>2008-11-08 12:00:01</date>

        <content>Using the XML utility class in Cake with the Set::reverse()

 function makes parsing XML easy.</content>

        <user_id>1</user_id>

    </post>

    <post>

        <id></id>

        <name>More XML Posts, Not so Bad</name>

        <date>2008-11-08 12:00:02</date>

        <content>Using the XML utility class in Cake with the Set::extract()

 function makes parsing XML easy.</content>

        <user_id>1</user_id>

    </post>

</blog>
Aside from the XML specification string on line 1 of Listing 14-8, the tags used here are structured hierarchically like the posts table: the <blog> tag is named after the name of the database; <post> is used for each row in the posts table; <id> corresponds to the ID field, and so on, through <user_id>. Once these tags are parsed by the findAll() function, an array will be passed to the model just like when the default MySQL DataSource passes a result set from the database.
Currently, this same content in Listing 14-8 is assigned to $File upon connecting to the data.xml file. All the read() function has to do is parse through these XML tags and format the array for the model accordingly. Listing 14-9 contains the findAll() function that parses the XML. Paste this into the XML DataSource file.
Listing 14-9. The findAll() Function
37    function findAll() {

38        App::import('Core','Xml'),

39        $xml = Set::reverse(new Xml($this->File));

40        return Set::extract($xml,'Post'),

41    }
Thanks to the XML utility class (which is imported into the function on line 38 of Listing 14-9), parsing through all those XML tags is made much easier. Line 39, for instance, creates a new XML utility class object from the contents of $File, which currently contains the contents of the data.xml file. With this object, XML utility functions are available to the DataSource such as counting the number of child nodes for a particular tag, pulling names and values from the XML data, and so forth. A handy method for cutting down on the number of loops through all those tags and nodes is to use the Set utility class, which is done on lines 39 and 40.
The Set utility contains several functions for working with result sets of data. Cake's core libraries use this utility when constructing the arrays that make $this->data and $this->params, which has proven useful in earlier chapters when we explored the Form helper and managing form submissions. Using Set not only cuts down on the number of operations needed to construct Cake-friendly data arrays but can be used with the XML utility to piece together an array of data from the XML file that matches the standard arrays used in the model.
On line 39, Set::reverse() is used together with a new instantiation of the XML utility class object to create a Cake-friendly array out of the XML tags. The Set::reverse() function is used here because it converts objects into arrays.
This array would vary in its structure depending on the hierarchy in the XML file and can even be inconsistent depending on how many <post> tags appear in $this->File. To guarantee that the same structure is applied to the array, the Set::extract() function is used on line 40. In short, Set::extract() takes the $xml array formatted by Set::reverse() on line 39 and looks for array keys named Post. It then extracts each of those nested arrays and constructs a new array out of the results. This array is then forwarded to the model with the return command.
If you wanted to get more elaborate with this XML file, you could explore the XML utility in more depth and use more of its functions. Assigning attributes to tags, for example, could extend the XML file to include more types of data, not to mention more associations within the file with the use of other tags (like <user> or <tag> to match the users and tags tables in the current database). For the moment, the XML DataSource parses the data.xml file for use in the controller and view. All that's left is to display the data and make it accessible for the user.
Viewing the Data
The XML DataSource and the model are now working correctly. Viewing the XML data in data.xml is now as simple in the controller and view as fetching data from the database. In the Posts Index action in app/controllers/posts_controller.php, use the xmlFindAll() function from the Post model to run a "find all" query of the new datasource by inserting the following line:
$this->set('xml',$this->Post->xmlFindAll());
The parsed XML is now available in the Index view as $xml. Use the debug() function to view its contents. You should get the following results:
Array

(

    [0] => Array

        (

            [Post] => Array

                (

                    [name] => Writing Posts in XML is a Snap

                    [date] => 2008-11-08 12:00:01

                     [content] => Using the XML utility class in Cake with the

Set::reverse() function makes parsing XML easy.

                    [user_id] => 1

                )

        )


    [1] => Array

        (

            [Post] => Array

                (

                    [name] => More XML Posts, Not so Bad

                    [date] => 2008-11-08 12:00:02

                     [content] => Using the XML utility class in Cake with the

Set::extract() function makes parsing XML easy.

                    [user_id] => 1

                )

        )

)
This array looks just like those you're used to in Cake. In the Index view, you can add these results to the list by running a loop just like the current loop for the $posts variable. Of course, in the app/webroot/files/data.xml file, I left the <id> tags blank; you'll have to set those manually or build an auto_increment method into the DataSource to provide a unique ID for each post in the XML file.
Not only can DataSources connect with external files, but they can also be used for pulling data from just about anywhere, such as a web service, e-mail, or some legacy system. This tutorial explored using XML as an external datasource and demonstrated how extending the model in this way actually improves the code and maintains better order throughout the framework. Third-party DataSources by other developers are already available online; you might want to try installing one as practice for using DataSources in your Cake applications.
Working with Behaviors
Another way to extend the model is with behaviors. Behaviors provide "rules" for models, like the rules you may set on your mail program to apply to your incoming mail. For example, you may want the model, when updating a record in the database, to perform multiple calculations of the data on the fly and not only update one record or a couple of associated records but perform a series of updates across the database. Using a behavior, rather than building into the model all the necessary functions to manage this kind of updating, keeps repetitive tasks in a separate resource file and makes the model more versatile by allowing multiple models to access more complicated processes without bogging them down. Cake comes with four built-in behaviors: ACL, Containable, Translate, and Tree. In this chapter, I'll explain how to use the Tree behavior to improve how the blog categorizes posts. Creating custom behaviors is actually simpler than making your own DataSources; understanding how the built-in behaviors work will make crafting your own behaviors much easier.
Using the Tree Behavior to Categorize Blog Posts
The blog application uses the tags table to manage multiple tags to be applied to a post. What if you wanted to create a hierarchy of tags, or a "tree" of data of some kind? One tag could then become a "parent" of another tag, and a series of tags could be assigned as "children" to one tag. Then, once a tag is assigned to a post, by clicking the parent tag, all the associated posts for that parent tag and its child tags would be listed for the user. This method for working with hierarchical data is more effective than building several relational databases to manage the hierarchy. Fortunately, Cake comes with the Tree behavior that maintains a tree of data dynamically.
Inserting Required Fields into the Tags Table
Using the Tree behavior requires that the database table associated with the behavior be organized a certain way. In this case, the tags table will need to include a couple of extra fields for the Tree behavior to save its own parameters. Wherever you use the Tree behavior, remember to provide these three fields:
parent_idlftrght
The left and right fields, or lft and rght, are used by the Tree behavior to organize the position of the node in the tree. The parent_id field links with the ID of the record in the table that behaves as the parent node of the current record. Currently, the tags table doesn't include these fields. To prepare the blog to use the Tree behavior, replace the tags table following the specifications in Listing 14-10.
Notice that Listing 14-10 doesn't call the left and right fields by their default values lft and rght; these may be set to whatever name you choose, and here I've opted for left and right. Later, when calling the Tree behavior in the model, I'll specify these field names.
Baking a New Tags Controller and Views
Now that the tags table includes the required fields for the Tree behavior to function correctly, the Tags controller and views will need to be regenerated. Use Bake to create a new controller—make sure not to use admin routing, scaffolding, additional components, or additional helpers; do make sure to use sessions and to create the basic view methods (index, edit, add, view). The new Tags controller should have the code shown in Listing 14-11, or something very similar.
Listing 14-11. The Baked Tags Controller
1    <?php

2    class TagsController extends AppController {

3

4        var $name = 'Tags';

5        var $helpers = array('Html', 'Form'),

6

7        function index() {

8            $this->Tag->recursive = 0;

9            $this->set('tags', $this->paginate());

10        }

11

12        function view($id = null) {

13            if (!$id) {

14                $this->Session->setFlash(__('Invalid Tag.', true));

15                $this->redirect(array('action'=>'index'));

16            }

17            $this->set('tag',$this->Tag->read(null,$id));

18        }

19

20        function add() {

21            if (!empty($this->data)) {

22                $this->Tag->create();

23                if ($this->Tag->save($this->data)) {

24                    $this->Session->setFlash(__('The Tag has been saved', true));

25                    $this->redirect(array('action'=>'index'));

26                } else {

27                    $this->Session->setFlash(__('The Tag could not be saved.

 Please, try again.', true));

28                }

29            }

30            $posts = $this->Tag->Post->find('list'),

31            $this->set(compact('posts'));

32        }


33

34        function edit($id = null) {

35            if (!$id && empty($this->data)) {

36                $this->Session->setFlash(__('Invalid Tag', true));

37                $this->redirect(array('action'=>'index'));

38            }

39            if (!empty($this->data)) {

40                if ($this->Tag->save($this->data)) {

41                    $this->Session->setFlash(__('The Tag has been saved', true));

42                    $this->redirect(array('action'=>'index'));

43                } else {

44                    $this->Session->setFlash(__('The Tag could not be saved.

Please, try again.', true));

45                }

46            }

47            if (empty($this->data)) {

48                $this->data = $this->Tag->read(null, $id);

49            }

50            $posts = $this->Tag->Post->find('list'),

51            $this->set(compact('posts'));

52        }

53

54        function delete($id = null) {

55            if (!$id) {

56                $this->Session->setFlash(__('Invalid id for Tag', true));

57                $this->redirect(array('action'=>'index'));

58            }

59            if ($this->Tag->del($id)) {

60                $this->Session->setFlash(__('Tag deleted', true));

61                $this->redirect(array('action'=>'index'));

62            }

63        }

64    }

65    ?>
Next, use Bake to create the Action views for the Tags controller. You should end up with the app/views/tags folder with add.ctp, edit.ctp, index.ctp, and view.ctp files inside. With the Tags controller and views working properly, the blog now has a basic interface for adding, editing, and deleting tags. The Tag model already has the "has and belongs to many" relationship built into it, so tags can also be associated with specific blog posts. Here is where the Tree behavior will come in—rather than build into the application a mechanism whereby the user can click a tag and retrieve a list of related posts, the Tree behavior will be used as well. Thus, when clicking a tag, the user will not only get a list of associated posts but also a list of associated tags' posts.
Using the Tree Behavior in the Model
With the database ready to handle the Tree behavior and a baked controller with views, the model is ready to call out the behavior. This is done using the $actsAs property in the model. Open app/models/tag.php, and insert the $actsAs property near the $hasAndBelongsToMany property. The value set in $actsAs corresponds to the behavior being used; in this case, $actsAs is set to Tree. Once you have entered the $actsAs property, your Tag model should appear like Listing 14-12.
Listing 14-12. The Tag Model with the Tree Behavior Included
1    <?

2    class Tag extends AppModel {

3        var $name = 'Tag';

4        var $actsAs = array('Tree'=>array(

5            'left'=>'left',

6            'right'=>'right'

7        ));

8        var $hasAndBelongsToMany = array('Post'),

9    }

10    ?>
Lines 5 and 6 in Listing 14-12 show how I've specified the left and right field names. Since I didn't use the default names lft and rght, I've had to assign an array to Tree on line 4 and include the left and right parameters shown in lines 5–6. The values assigned to these parameters correspond to the field names of the left and right fields in the tags table, which in this case is left and right, respectively.
To attach multiple behaviors to the model, simply continue the $actsAs array. For example, if I wanted to attach a custom behavior as well as the Tree behavior to the Tag model, I would enter something like this:
var $actsAs = array('Tree','MyBehavior'),
Each behavior name in the array can also include a set of parameters like those shown in Listing 14-12; just assign an array as a value to each behavior name:
var $actsAs = array(

    'Tree'=>array(

        'left'=>'left',

        'right'=>'right'

    ),

    'MyBehavior'=>array(

        'recursive'=>1

    )

);
Now that the $actsAs property is set to Tree, and the appropriate field names for the left and right fields are set in the parameters array, nothing else needs to be done in the model. All the Tree behavior's functions are accessible in the controller or model, which is the next task for getting the tags organized hierarchically.
When the Tags views were generated by Bake, they included behavior fields (parent_id, left, and right). These might conflict with the Tree behavior if they stay as part of a form submission, so it's important they be removed from the views. Find the Form helper functions in each of the baked views that call one of the behavior's fields, and remove them from the file. You should be left with the name field only and, in some instances, the id field.
Next, to give a tag a parent node, the Add and Edit views must have a way of selecting a parent ID. To do this, place a select menu containing a list of Tags in the Add and Edit views. For this menu to work, you will first have to generate a Tags list in the controller and then use the Form helper to render the select menu in the view. Open app/controllers/tags_controller.php, and add the following line to the Add and Edit actions:
$tags = $this->Tag->find('list'),
Now that a list of tags is available as the $tags array, pass the variable to the view by rewriting the set() function to include both $posts and $tags:
$this->set(compact('posts','tags'));
In the Add and Edit views, use the Form helper to provide the select menu. Remember that it will need some added parameters to work correctly with the controller. Listing 14-13 includes the $form->input() function that renders the select menu. Add Listing 14-13 to app/views/tags/add.ctp and app/views/tags/edit.ctp in place of where Bake wrote the parent_id form input field.
Listing 14-13. The parent_id Select Menu in the Add and Edit Views
1    echo $form->input('parent_id',array(

2        'label'=>'Parent Tag',

3        'type'=>'select',

4        'options'=>$tags,

5        'empty'=>'- No Parent Tag -'

6    ));
Notice that on line 1 of Listing 14-13, the field name passed to the Form helper is parent_id, which corresponds with the parent ID field in the tags table. The rest of Listing 14-13 contains parameters that tell the Form helper to render a select menu (on line 3 with the type parameter), to use the $tags array passed by the controller as the options in the menu (on line 4 with the options parameter), to make the first and NULL option of the menu - No Parent Tag - (on line 5 with the empty parameter), and to give the menu the label Parent Tag instead of the default label (on line 2 with the label parameter).
To test the Tags Add and Edit views, let's add some categories to the tags table. For your information, I've included the following names with their respective IDs in Table 14-3; of course, you can enter whatever values you like.
Table 14-3. Some Sample Tags to Test the Controllers, Views, and Eventually the Tree Behavior
| ID | Name |
| 1 | CakePHP |
| 2 | PHP |
| 3 | Programming |
| 4 | Web |
| 5 | Frameworks |
Table 14-3 shows tags that can be easily ordered into a data tree. For example, "CakePHP" relates to "PHP" as a child node; "PHP" is a child of "Programming," as are "Web" and "Frameworks." The Tree behavior will allow you to assign the parent tags to each tag accordingly. Before it can do this, however, you'll have to make sure that the $this->data array contains the right parent ID name and value for the model to pass along the results of the select menu correctly. If $this->data['parent_id'] isn't set in the first place, no tags will have parents, and the Tree behavior won't be able to manage the data as you want. So, in the Edit action, use the debug() function to display the contents of $this->data, like so:
<? debug($this->data);?>
Next, open a tag record in the Edit view by entering a URL that matches one of the tags, something like http://localhost/blog/tags/edit/1. You should see the debug() function display $this->data, as shown in Listing 14-14.
Listing 14-14. The Contents of $this->data After the parent_id Field and Select Menu Has Been Added
1    Array

2    (

3        [Tag] => Array

4        (

5            [id] => 1

6            [parent_id] => 2

7            [left] =>

8            [right] =>

9            [name] => CakePHP

10        )

11        [Post] => Array

12        (

13            [0] => Array

14            (

15                [id] => 1

16                [name] => New Cake 1.2 Functions

17                [date] => 2008-01-01 01:01:01

18                [content] => Some snazzy new functions are now available in

1.2 that you should check out!

19                [user_id] => 1


20                [PostsTag] => Array

21                (

22                    [id] =>

23                    [post_id] => 1

24                    [tag_id] => 1

25                )

26            )

27        )

28    )
Notice that the associated post shows up in the $this->data['Post'] array (lines 11–27 of Listing 14-14) because of the hasAndBelongsToMany association already set up in the Post and Tag models. This array would be much larger if more posts were associated with the current tag, but Listing 14-14 at least shows how $this->data will contain these associated records. What I'm looking for in this array, however, is not the associated posts but the parent_id field. So, since I already selected a parent node from the Parent Tag select menu and saved the tag, $this->data shows that the value was saved properly; line 6 of Listing 14-14 shows that the ID value of 2 is now saved in the parent_id field for this current record.
Now that the Parent Tag select menu is working in the Edit view and saving the selected value in the parent_id field, paste the same line of Form helper code into the Add view file:
echo $form->input('parent_id',array('label'=>'Parent Tag','type'=>'select',
'options'=>$tags,'empty'=>'- No Parent Tag -'));
Fetching All Related Posts When a Tag Is Viewed
The Add and Edit views now support assigning parent tags, which the model saves in the parent_id field. Because the model is behaving like a data tree (see Listing 14-12), the Tree behavior automatically analyzes the tags table and each tag's parent node ID value and then assigns a left value and a right value. When creating and editing tags, you can now choose each tag's parent from a list of existing tags, and the Tree behavior does all the rest of the work. The only remaining task is to use the Tree helper to retrieve associated posts when a tag is called by the user.
Use the children() function to perform a find request of the provided tag ID and all of its associated tags. Depending on what parameters we provide, children() can also retrieve not just a list of these tags but all of their related posts as well. Replace the current View action in app/controllers/tags_controller.php with Listing 14-15.
Listing 14-15. The View Action with the children() Function Included
1    function view($id = null) {

2        if (!$id) {

3            $this->Session->setFlash(__('Invalid Tag.', true));

4            $this->redirect(array('action'=>'index'));

5        }

6        $children = $this->Tag->children($id,null,null,null,null,null,1);

7        $tag = $this->Tag->read(null,$id);

8        $this->set(compact('children','tag','list'));

9    }
Notice on line 6 of Listing 14-15 how the Tree behavior function children() is being used like any other model function. If the $actsAs property were not set to Tree in the Tag model, then this line would break; or, at least, the model would search for a custom function in app/models/tag.php named children(). But because the Tree behavior has been applied to the current Tag model, all of its functions are accessible in the controller by referencing the model, as in line 6 of Listing 14-15.
Let me explain the children() function. This function is how the Tree behavior performs the find request described earlier to return child nodes for a given record.
children( &$model, id[mixed], direct[bool], fields[mixed], order[string],
limit[int], page[int], recursive[int] )
id: The ID of the parent node record.
direct = false: Whether to return only the direct, or all, children. When set totrue, returns only the direct child nodes, not child nodes of children also; when set tofalse, will return any and all child nodes of current parent.
fields = null: Either a single string of a field name or an array of field names; used to limit the returned fields from the find query.
order = null: SQL order conditions, for example,name DESC; defaults to the order in the tree.
limit = null: Used for calculating the number of items per page of data; entered as anSQL LIMITclause.
page = 1: The page number; used for accessing paged data.
recursive = −1: When fetching associated records, used to specify the number of levels deep to be returned; corresponds to the recursive parameter used in model functions likefind()andread().
On line 6 of Listing 14-15, the children() function is invoked using the id and recursive parameters. By entering null values for the other parameters in between, I've told the Tree behavior to stick with its defaults otherwise. Without changing the recursive parameter, the function would have provided the controller only with an array of child tags, not an array of those tags and their associated posts. So, you can see that line 6 sets the recursive value to 1 rather than the default value of −1.
The Tags controller now provides the view with an array of related tags and their associated posts. Let's loop through this array in the app/views/tags/view.ctp file to display the posts. Somewhere in this file (around line 16), insert Listing 14-16, which contains this loop and displays an HTML link for each associated post.
Listing 14-16. Displaying Each Related Post As a Link in the View
1    <? if (isset($children)): ?>

2    <? foreach($children as $child): ?>

3    <? foreach($child['Post'] as $post): ?>

4        <?=$html->link($post['name'],array('controller'=>'posts','action'=>

'view','id'=>$post['id']));?>

5    <? endforeach;?>

6    <? endforeach;?>

7    <? endif;?>
You can see that Listing 14-16 is a loop through the $children array passed by the controller (as shown in Listing 14-15). Because I'm interested only in displaying all related posts to the supplied tag, I've looped through each post contained in each tag record, so both lines 2 and 3 contain a foreach() function. Lines 1 and 7 are a way for testing whether anything is present in the $children variable to begin with. Using the HTML helper on line 4 let me render a link for each post that is reverse-routed and contains the post's name. To adjust how each post is displayed, just retool line 4 to meet your own styles; the full contents of the post record are available as $post at this point in the process.
That's it! Thanks to the Tree behavior and its children() function, all related posts, including those of related child tags, are displayed in this view. By applying this same process to other areas of the blog, the user could more quickly access categorized posts. And since the Tree behavior is managing the hierarchy, the work for the administrator is reduced by having only to set the parent ID value in the Tags Add and Edit views. The Tree behavior also let me bypass writing my own set of functions to find the child nodes and their associated posts.
Using Other Tree Behavior Functions
Like the children() function, other Tree behavior functions may be called in the model or controller by referencing the model. This is done in the controller by entering the model name and calling out the Tree behavior function desired, not by entering the name of the behavior:
$this->Model->children($id); // this will work

$this->Model->Tree->children($id); // this will not work
In the model, the model name is left out, as with referencing other model functions, like so:
$this->children($id); // this will work

$this->Tree->children($id); // this will not work

$this->Model->children($id); // neither will this
childCount
The childCount() function returns the number of child nodes for a given parent ID.
childCount( &$model, id[mixed], direct[bool] )When id is set to false, all top-level nodes will be read; otherwise, it will read only the supplied ID node as the parent; when direct is set to true, only direct children are counted.
This function is a convenience method for returning a hierarchical array to be used in making HTML select boxes or breadcrumbs.
generateTreeList( &$model, conditions[mixed], keyPath[string],

valuePath[string], spacer[string], recursive[int] )
conditions = null: SQL conditions as a string or as an array (similar to conditions used in thefind()model function)
keyPath = null: A string path to the key, for example,{n}.Tag.name
valuePath = null: A string path to the value; similar tokeyPath
spacer = '_': For each level that a node falls under the parent, this character will be placed before the returned list item; for example, the grandchild of the parent node would be returned with two spacers in front of the name
recursive = −1: The recursive value for the returned data
moveUp and moveDown
To reorder a given node without changing its parent, use the moveUp() and moveDown() functions.
moveUp( &$model, id[int], number[mixed] )

moveDown( &$model, id[int], number[mixed] )
These functions move the node id, or in other words, dynamically adjust the left and right fields, based on the value set in number. If number is set true, moveUp() will set the node to the topmost, or first, position; moveDown() will set the node to the last position.
getParentNode and getPath
To fetch the parent of a given child node, use getParentNode(). Simply provide an ID for a given node, and this function will find its parent and return the contents. To retrieve the path to a given node, supply the ID of the record, and getPath() will return an array of the topmost node down to the current one. This function is handy for displaying breadcrumb links.
recover, removeFromTree, setParent, setup, and verify
Recovering a corrupted tree, meaning that the left and right fields are realigned by the Tree behavior, is done with the recover() function. No passed value is necessary when calling recover(); just make sure that the database table in question is set up properly in the $actsAs property.
To remove a node from the tree, use removeFromTree(). Simply provide the node ID, and this function will remove the node from the tree and re-parent all the remaining children up one level.
Normally, as already demonstrated in this chapter, the Tree behavior automatically assigns the parent so long as parent_id is properly set up in the view and passed to the model through $this->data. However, the setParent() function is available as a backward-compatible method for assigning a parent manually. When used, setParent() takes the ID value provided as its first parameter and assigns the matching record as the parent of whatever record is currently being saved. This function should be used when the model is undergoing a save.
To manually adjust the settings used in $actsAs in an action or model function, use the setup() function. The first parameter must be an array with the same structure as the $actsAs property; in other words, set an array just as you would format the $actsAs property and pass it to setup(). Then the new settings will be applied to the model when invoking behaviors.
To test whether a model has a valid tree, use the verify() function. No parameters here are necessary. Simply call out this function in the model or controller, and it will return a true value if the model has a valid tree.
Using the ACL and Translate Behaviors
So far, I've explained the Tree behavior at length to demonstrate how to use a behavior in your Cake application. Without adding any more than one line of code (specifically, setting the $actsAs property), you were able to extend the model to behave differently. On the fly, the Tree behavior adjusts the tags to include associations between them, and you don't have to write any more functions in the model to maintain the data tree (unless, of course, you want to beef up the tree to include more methods and structures). But, in relatively little time, you can add basic tree structures to your database.
Other behaviors work in a similar fashion, meaning that they perform similar tasks for the model that make it easier to move data around. Unfortunately, the other two built-in behaviors, namely, ACL and Translate, are much more complicated than the Tree behavior. (The Containable behavior is easy to use, but I'll get into more detail on this behavior in a moment.) The very nature of managing access control lists (which is what ACL stands for) is one of the most complex tasks of establishing user control in an application. Delving into this behavior would certainly be useful for many developers, but it would also go beyond the scope of this book. I'll simply bring it to your attention and encourage you to take a look at this built-in behavior if your application calls for a detailed hierarchy of various user groups and individual users.
The Translate behavior also involves more complicated methods for working it into your application. A tutorial for this behavior would go beyond the general purpose of this book because it would require knowledge of another language (as well as English). So, keep in mind that if your project requires complicated data mapping for changing language settings, the Translate behavior is your best bet for working with those methods in a dynamic fashion. In short, Translate can map field names, routes, and more on the fly.
Using the Containable Behavior
By supplying the model with specific find conditions, you can effectively search through the database and filter out exactly what you don't want in the result set. Not only can you avoid writing and looping through complex queries by sticking with Cake's model functions, but you can work with a normalized database and expand your application to accommodate more elaborate schemas. But with all of these possibilities, you may notice that constructing find conditions that work with the database to give you precisely what you need can become difficult in its own right. Or, worse yet, you may find yourself writing complex loops or helper functions to filter through the data in the view, especially when you end up with elaborate many-to-many associations.
It's best to let the model provide the controller and view with the exact pieces of data, but when complex associations are used, extra find methods must be employed. This is where the Containable behavior comes in—it applies filtering methods to associated models and records that allow you to be more specific when retrieving associated data.
As with all other behaviors, Containable must be included in the $actsAs property. To illustrate how Containable works, consider how some of our blog application's tables are arranged: posts have many comments, tags have and belong to many posts, and users have many posts. Now, consider this scenario: suppose you wanted to fetch a post based on a specific comment author from the Post model. Containable makes this operation simple. In the controller, you could enter the following:
$this->Post->find('all', array('contain'=>'Comment.name = "Superman"'));
This string would return all posts that contain a comment whose name value is set to Superman.
Containable can also "contain" associated models, meaning you can restrict the result set to a specific model without using unbindModel() or changing the recursive parameter. For example, if you wanted to retrieve all the posts in the database but only the associated comments (not associated tags), Containable could simplify that operation with the following:
$this->Post->find('all',array('contain'=>'Comment'));
Without Containable, you'd need to use unbindModel() to produce the same result, like so:
$this->Post->undbindModel(array('hasAndBelongsToMany'=>'Tag'));

$this->Post->find('all'),
Containable can also return specific fields in associated result sets. For instance, you may want only the name of the post's author and not the additional fields in the users table (like password and role). Using the following:
$this->Post->find('all',array('contain'=>'User.username'));
will still provide you with the associated user for each post but include only the username and id fields. An example array for one returned post using Containable in this way would look like this:
Array

    (

         [Post] => Array

             (

                  [id] => 1

                  [name] => A Sample Post Title


                  [date] => 2008-12-01 00:00:00

                  [content] => Sample content.

             )

          [User] => Array

              (

                   [id] => 1

                   [username] => sampleuser

                  )

    )
Notice that only the ID and username have been returned in the User array. With Containable, you can apply more specific rules to the find operations the model performs and significantly reduce the amount of data that gets passed around your application, not to mention the amount of work done in the controller or view to process the result sets.
Attaching and Detaching Behaviors
Whenever dealing with data, any application can get inundated with information. Not just in web development but in programming in general, managing memory and CPU load is essential for keeping the program running at optimum performance. In the case of web development, anything you can do to decrease the load on the server will improve the user experience, especially since speed is a factor when considering how a user interacts with the site. The model trims the amount of data that gets pulled from across the datasource by making use of detailed find conditions, recursive settings, and its bindModel() and unbindModel() functions. In a similar way the model can curb its load on the server by efficiently attaching or detaching behaviors. Other reasons for attaching and detaching behaviors exist that generally center on streamlining the application, whether to decrease server load or to clean up code. A few functions are built into the model to manage how much it uses behaviors and which behaviors get used.
Detaching and Disabling Behaviors
There are two ways to trim down a model's use of a behavior: make the model "turn off" all a behavior's callbacks or make the model stop completely from adopting the specified behavior. The disable() and detach() functions, respectively, perform these tasks. Simply provide an array containing the name of each behavior to be either disabled or detached from the current model. The only catch is that these functions are called through the Behaviors class:
$this->Tag->Behaviors->detach(array('Tree'));
So, to completely remove a behavior from working in the current model, use the detach() function; to limit the callback responses the behavior will send to the model, use the disable() function. When disable() has been used, model functions may still use the behavior's functions. Just remember that automatic callback processes, such as when a record is saved to the database, will not run; these processes will have to be called manually in the model.
Attaching and Enabling Behaviors
Just as with detach() and disable(), you can tell the model manually when and where to use certain behaviors. With enable(), you tell the model to allow the behavior to begin working during callbacks. This means that the model will automatically consult the behavior as it performs callback methods such as saving to the database or deleting a file from the database. The attach() function is used to start the behavior. Settings here are passed along just as in the $actsAs array. Simply format an array as you would the $actsAs property, and place it as the first parameter in this function.
To test whether a specific behavior has been enabled or disabled (not necessarily attached or detached), use the enabled() function. This contains the name of a behavior and checks whether it is enabled in the model. The enabled() function will return either a true value or a false value indicating whether the specified behavior is enabled.
Writing Custom Behaviors
Conventionally, behaviors are used for extending the model, so they should not contain any logic that would normally appear in a controller or component. Here's a simple checklist for determining whether the particular task or set of tasks ought to be performed by a behavior:
- Does the task involve handling data for the model?
- Does the task do more than perform data validation?
- Does the task perform more than one query when fetching data?
- Does the task work with present data (in other words, it doesn't need to perform connection methods that ought to be managed by the DataSource)?
- Does the task involve more than a basic save, read, update, or delete method (in other words, are multiple updates required when dealing with one record of data, and so on)?
If you answer "yes" to all of these questions and you can't find a built-in or third-party behavior that matches the task, then you ought to write a custom behavior. Unlike DataSources, behaviors don't require a specific skeleton to work. They only need to be named conventionally, stored in the right directory, and called appropriately in the model. The model can use behavior functions in much the same way as the controller uses component functions. However, by writing certain callback functions in the behavior, you can run specific processes whenever the parent model does any of its own saves, updates, or deletions.
Setting Up the Behavior File
Like other resources in Cake (which you are probably used to creating by now), behaviors follow a specific convention. First, the file name follows the same naming convention as models: it has a lowercase name, with multiple words separated by underscores, and the .php extension. Second, the file must be stored in the app/models/behaviors directory. Lastly, the behavior must have the correct class name written; see Listing 14-17 for an example of a basic behavior.
Listing 14-17. An Example of a Basic Behavior File
<?

class UpdateBehavior extends ModelBehavior {

    function setup(&$model, $config=array()) {


    }

}

?>
Notice that the behavior class extends ModelBehavior and includes the setup() function. This function is called as a startup function when the behavior is instantiated. The parent model as an object is accessible in this function through the use of the &$model parameter, meaning that throughout setup(), everything in the parent model including its properties and functions can be called with $model. For example, $model->data in the setup() function would contain the current model's $this->data array. Performing data methods such as saving to the database or running a query can be done in the behavior by using the standard model functions, like so:
$rows = $model->find('all',array('conditions'=>array('id'=>$config['id'])));
Using DataSources in Behaviors with ConnectionManager
If your custom behavior must use a DataSource other than one available in the $model class object, then you must use the ConnectionManager utility to create an object of the DataSource. Listing 14-18 demonstrates the easiest way to do this.
Listing 14-18. Using the ConnectionManager Utility to Instantiate a DataSource in a Behavior
$db =& ConnectionManager::getDataSource($model->useDbConfig);
Notice that Listing 14-18 used the parent model object; this can be done only if the behavior function using ConnectionManager has the &$model setting as its first parameter.
With Listing 14-18, $db becomes the DataSource object to be used in the behavior. Just as the model uses a DataSource, the behavior can now work directly with the DataSource. For example, the behavior can invoke the XML DataSource you built earlier in the chapter with the following:
$xml =& ConnectionManager::getDataSource($model->useDbConfig['xml']);
and then run a find-all operation with the $xml->findAll() function.
Performing Callbacks in the Behavior
The Tree behavior, as you probably noticed, performed some functions when the model saved tags. By simply providing the model with a parent_id value when saving a tag, the Tree behavior automatically assigned the record a parent value and ordered the tree. These kinds of automatic methods are performed when using certain callback functions in the behavior. In other words, for all saves that the parent model will perform, the behavior will execute the beforeSave() callback function, so long as the behavior is attached to and enabled in the model. You can have the behavior automatically perform any logic for the model by using callback functions listed in Table 14-4. Remember that the parent model is available in the callback function as &$model.
Table 14-4. Callback Functions in the Behavior
| Function Name | When Called |
afterDelete(&$model) |
After the model successfully deletes a record or set of records. |
afterFind(&$model, $results, $primary) |
After the model performs a find; can be used to modify results returned by find(). If the model is being queried through an associated model, then $primary will be set to false. |
afterSave(&$model, $created) |
After the model successfully saves a record or set of records; $created is set to true if a new entry was saved. |
beforeDelete(&$model, $cascade) |
Before the model deletes a record; if $cascade is set to true, records depending on the current one are also deleted. |
beforeFind(&$model, $query) |
Before the model performs a find; $query is an array containing the find conditions. |
beforeSave(&$model) |
Before the model saves a record or set of records. |
beforeValidate(&$model) |
Before the model validates data. |
Things to Keep in Mind When Writing Behavior Functions
Behaviors are simple to build, though they can be as complex as any other Cake resource. Generally, they will contain only functions and some properties, or class variables, that simplify handling data for the model. These functions behave like helper functions in that they finish by returning either a set of values, an array, or a boolean value. Only when the ConnectionManager is used to connect to a DataSource or certain callback functions are written will the behavior interact directly with the datasource. The rest of the time, the behavior serves to house processes that would otherwise bog down the model.
Summary
Conventionally, the model deals with all the data while the controller handles all the logic of the application. To better extend the model, Cake includes two resources that separate out repetitive functions: DataSources and behaviors. Through DataSources, you can provide the model with all the connection and querying processes in a background layer of sorts and allow the same finding, updating, saving, and deleting methods to appear in the model without changing the code there.
In this chapter I explained how to build a simple XML DataSource that automatically opens an XML file, parses the XML, and displays each record there as a blog post. Through behaviors, you can provide the model with more complicated data-handling methods or methods that happen simultaneously without bogging down the model. By using the built-in Tree behavior to better organize tags, the blog application now has a more efficient hierarchy of categories. The user also benefits by you using the Tree behavior; when clicking a category, not only does the user see a list of posts directly associated with the tag but all posts associated with child tags as well. The Containable behavior, which is used to "contain" associated models—or, in other words, restrict the result set in specific ways to provide you with exactly the data values you want—also allows you to extend the functionality of the model. I showed some simple ways of using Containable in your application.
Writing custom behaviors allows you to house these types of model functions in a type of extension and thus streamline your application even more. Now that you've used all of Cake's resource files and have worked in the MVC structure, all that's left is to wrap up the blog application.