
CHAPTER 8
Implementing Ajax Features
In recent years Ajax has become a more common method for handling requests among popular web sites. In short, Ajax makes it possible for the user to interact with the web site without waiting for the page to load or refresh. By working with HTTP requests this way, the web site behaves more like a desktop application. Methods that were thought to be impossible for web browsers have not only changed the Internet landscape but are turning the tides on software development. Many developers call this phenomenon the rise of "Web 2.0." However, building a rich Web 2.0 application is no simple task and usually requires a heavy dose of JavaScript. With Cake's help, you can bring common Ajax procedures into an application without much headache, and the amount of JavaScript you will have to use is minimized.
In this chapter, you will use the Ajax helper to build a comments section for your extensive blog application. Users will be able to add comments and vote other users' comments up or down, all without waiting for the page to reload or refresh. Along the way, I'll mention the possibilities of the Ajax helper and also introduce some Ajax methods that go beyond the scope of this helper. This chapter won't dive into all the possibilities Ajax provides, simply because that could be a book all by itself, but it will explain how Ajax can work in a Cake application and open up the door to other more complex methods you can try on your own. Let's first examine how Ajax is supposed to work and then use it to improve your blog.
How Ajax Works
In Chapter 6 I discussed asynchronous sequences and how Cake uses the render() function to pull a view without loading the whole page. In your blog application, you'll use Ajax to manage comment submissions in this way, meaning that the user will submit a comment, and they will see the comment post to the page instantly. In other words, the comments form will disappear, the text of the comment will appear below any other previously posted comments, and everything else on the page will remain in place. Figure 8-1 shows how Ajax works behind the scenes to add comments to a given post.
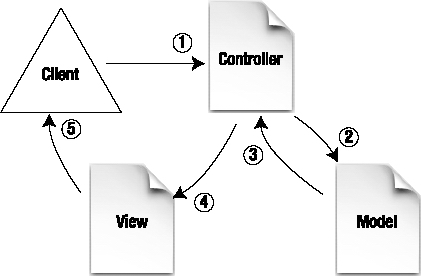
Figure 8-1. The Ajax flow for submitting a comment asynchronously
This figure looks almost identical to a typical flow in Cake. But it does differ in a couple of important ways:
- When the form is submitted to the controller in this step, it is done using the Ajax helper. This means that the form data is collected by a JavaScript function and passed to the controller without changing the state of the browser.
- The controller handles the form data as it would a typical response. It sends data to be saved to the model and checks for invalidations.
- The model saves the data in the database and returns a successful response.
- Rather than display the view normally, the controller uses the
render()function to pass the output along as an Ajax response. The view file is fetched normally, but its contents are rendered in the waiting HTML element. In other words, the Ajax helper observes the response and places whatever is returned in a specified HTML element (for example, a<div>or<span>element). - The view is sent back to the client and, thanks to JavaScript, is displayed within the page, not replacing the whole page as a normal HTTP response would do.
In the blog application, the user will enter some data into a couple of form fields and then click Submit. The form will be passed along in the background because the Ajax helper intercepts the HTTP request and, with the help of JavaScript, does all the server-side processing without refreshing the page. You will render the view inside the web page rather than replace the page because you will tell the Ajax helper where in the page to update once the server responds. This area will be the whole comments section, allowing you to dynamically add the user's comment to the rest of the post's comments without refreshing the browser.
Working with Ajax Frameworks
Just as Cake helps reduce the amount of PHP code needed to run a script, some Ajax frameworks cut down on the amount of JavaScript needed to perform Ajax methods. These frameworks are worthwhile because tackling Ajax can be extremely complex. It's better to take advantage of open source Ajax frameworks than pull open that 500-page JavaScript primer.
Some of the most popular Ajax frameworks include the following:
- Prototype (%www.prototypejs.org)
- jQuery (%www.jquery.com)
- Adobe Spry (http://labs.adobe.com/technologies/spry)
- MooTools (%www.mootools.net)
Any of these frameworks can be used in Cake, but the Ajax helper currently works only with Prototype. Later, I'll use jQuery to run some Ajax methods in Cake, but it will be done without the Ajax helper.
Using the Ajax Helper
Cake comes standard with the Ajax helper—a nifty set of methods for simplifying the code you enter in the view to make Ajax requests work properly. Like other helpers, it has more than a dozen useful functions (see Table 8-1) that can be called to reduce a process usually to a single string.
Table 8-1. Functions in the Ajax Helper
| Function | Description |
afterRender() |
Includes code blocks after a view has been rendered |
autoComplete() |
Creates an autocomplete text field |
div() |
Creates a <div> element for Ajax updates |
divEnd() |
Closes an Ajaxed <div> element |
drag() |
Creates a draggable element; requires the Scriptaculous animation libraries |
drop() |
Creates a droppable element; requires Scriptaculous |
dropRemote() |
Creates an area that triggers an Ajax response when a draggable is dropped onto it |
editor() |
Creates an editor control that is swapped for the element when triggered by the user; requires Scriptaculous |
form() |
Creates a form element that runs in the background when submitted |
isAjax() |
Returns true if the current request is a Prototype update |
link() |
Creates a link to run an Ajax call |
observeField() |
Triggers an Ajax response when the observed field is changed |
observeForm() |
Observes a form and triggers an Ajax response when changed |
remoteFunction() |
Creates Ajax functions to be run, usually in conjunction with a link() event |
remoteTimer() |
Triggers an Ajax response at a specified time interval |
slider() |
Creates a slider control; requires Scriptaculous |
sortable() |
Makes lists or other objects sortable; requires Scriptaculous |
submit() |
Renders a form submit button that triggers an Ajax form submission |
Like all other helpers, the Ajax helper must be initialized in the controller by including it as a value in the var $helpers array:
var $helpers = array('Html','Form','Ajax'),
Then, in the view, the Ajax helper functions are called by using the $ajax object. For example:
$ajax->submit();
Of course, parameters are passed to the function, depending on the function being used.
$ajax->submit('Submit',array('url'=>'/comments/add','update'=>'comments_add'));
Preparing the Ajax Helper
Before you can use the Ajax helper, one or two important steps must be taken that are unique to this helper. Because it depends on Prototype, you must ensure that Prototype JavaScript files are included in each page. You will also need to make these scripts accessible for all the views that could potentially use the Ajax helper.
Installing Prototype
Download the latest version of Prototype from %www.prototypejs.org/download. You should end up with a JavaScript file named something like prototype-1.x.x.x.js. Place this file in the app/webroot/js folder. It is now accessible by the whole application. To finish installing Prototype, you need to edit the default layout. Somewhere between the <head> tags in the app/views/layouts/default.ctp file, include the following line:
$javascript->link(array('prototype'));
Here, you are using the JavaScript helper to produce a link to the JavaScript file. These links appear something like this to include the script in the web page:
<script type="text/javascript" src="/js/prototype.js"></script>
Of course, the JavaScript helper automatically produces the correct URL to the JavaScript file.
Including the JavaScript Helper in the App Controller File
If you went ahead and refreshed the application, you may have noticed the following error:
Undefined variable: javascript [APP/views/layouts/default.ctp, line 5]
This error occurs whenever the helper is not initialized properly. In this case, you're trying to use a helper in the layout file, and since the default layout is meant to be called for all controllers, you will need to initialize the JavaScript helper in all controllers.
There is a way around going into each controller individually. By creating your own App controller file, you can place functions to be used by all controllers in it and thereby cut down on redundant code. To do this, however, there are some conventions to be used so that Cake can recognize the App controller.
The location of the App controller is app/app_controller.php. Like other controllers, the file must include the proper PHP code to create a new instance of the App controller object:
<?

class AppController extends Controller {

}

?>
Making Helpers Available for the Whole Application
In the App controller, you can also include any helpers that may be used in any or all controllers. This is done, as in an individual controller, by assigning a list of helpers in the array of the var $helpers attribute.
For the sake of your blog application, let's go ahead and include all the helpers you will need to use. Insert the following line into line 3 of the new App controller:
var $helpers = array('Html','Form','Ajax','Javascript'),
The $javascript->link() function in the default layout file should now work properly. Generally, when using helpers in layouts, you should use the App controller to include those helpers; it will save you from having to do helper includes in every controller.
Adding Comments to the Blog
Before you can use the Ajax helper to handle user comments, you will need to create the table to store the comments in the database. Make the new table with the name comments in the database, and create the fields shown in Listing 8-1.
Listing 8-1. SQL for Creating the comments Table
CREATE TABLE `comments` (

    `id` int(11) unsigned NOT NULL auto_increment,

    `name` varchar(255) default NULL,

    `content` text,

    `post_id` int(11) unsigned,

    PRIMARY KEY (`id`)

);
Next, create the Comment model with the code shown in Listing 8-2.
Listing 8-2. The Comment Model
<?

class Comment extends AppModel {

    var $name = 'Comment';

    var $belongsTo = array('Post'),

}

?>
Notice that this model has the belongsTo association with the Post model. To bind this association, you will need to edit the Post model to include the "has many" relationship. Open the Post model, and insert the following line to complete the association:
var $hasMany = array('Comment'),
For good measure, create the Comments controller in app/controllers/comments_controller.php, and paste in the code shown in Listing 8-3.
Listing 8-3. The Comments Controller
<?

class CommentsController extends AppController {

    var $name = 'Comments';

}

?>
The Comments controller, as well as the matching table and model, are now prepared properly for use in the application. Now you can work comments into the blog by inserting some Ajax helper code in the Posts views and controller.
Working Ajax into the View
Using the Ajax helper requires that the Prototype framework be included in the web page. You've done this by installing the Prototype script in the app/webroot/js folder and also providing a link to that file in the app/views/layouts/default.ctp file. You've also made the helper available in the App controller. Working Ajax into the individual view that will be using the helper is now easy to do.
Displaying Comments
Remember that the Ajax output will be inserted into an HTML element of your choosing. Whatever element you use in the view to handle this output is where all the action will take place. <div> and <span> elements are for any generic block-level or inline content, respectively. Let's create a <div> to handle all the Ajax output for comments in the Posts view. Open app/views/posts/view.ctp, and at the bottom of the file create the <div> to be the target of the Ajax handling.
In Listing 8-4, I've left space on line 9 for an iteration of comments as well as an Ajax form to submit a new comment. To pull associated comments and make them available here, you will need to edit the View action in the Posts controller.
Listing 8-4. Adding the Comments Section to the Posts View
6    <hr/>

7    <h2>Comments</h2>

8    <div id="comments">

9

10    </div>
Listing 8-5 is almost the same as before, except I've tweaked the lines after line 6. Line 7 fetches the requested post record, and line 8 fetches the comments associated with the current post. Line 9 uses the set() function to pass those variables along to the view.
Listing 8-5. The Adjusted View Action to Provide Associated Comments for the View
1    function view($id = null) {

2        if (!$id) {

3            $this->Session->setFlash('Invalid Post'),

4            $this->redirect(array('action'=>'index'));

5

6        }

7        $post = $this->Post->read(null,$id);

8        $comments = $this->Post->Comment->find('all',array('conditions'=>array(

'Post.id'=>$id)));

9        $this->set(compact('post','comments'));

10    }
Back at line 9 of Listing 8-4, you can now plug in a loop to display the contents of the $comments array (see Listing 8-6).
Listing 8-6. The Comments Loop in the Posts View
9    <? foreach($comments as $comment): ?>

10    <div class="comment">

11        <p><b><?=$comment['Comment']['name'];?></b></p>

12        <p><?=$comment['Comment']['content'];?></p>

13    </div>

14    <? endforeach;?>
The loop follows the conventional structure of the find() results in line 8 of Listing 8-5. Notice on line 11 in Listing 8-6 that the array is formatted to include the Comment key, which corresponds to the name of the Comment model and the name and content keys, which match up with fields in the table. I've also used lines 10 and 13 to instantiate a <div> element to be designed with CSS for better display.
In the database, create some test comments and refresh this post. You should get a similar screen to Figure 8-2.
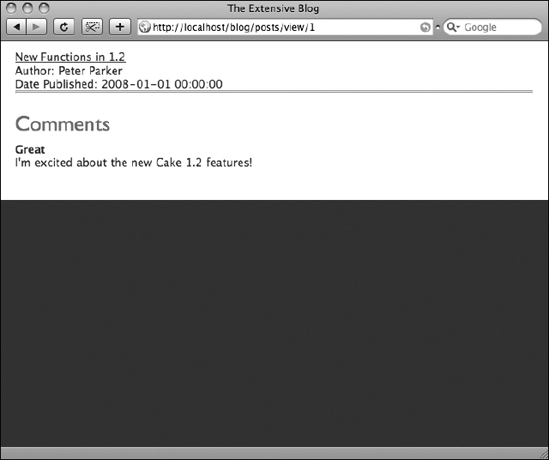
Figure 8-2. Comments now displayed in the Posts view
Using an Ajax Form
Now after line 14 in the app/views/posts/view.ctp file, you can include a form for adding comments. When doing so, you'll use the Ajax helper so that when the user submits a comment, it updates the <div id="comments"> element without refreshing the whole screen.
To work Ajax into this view, insert the Ajax form shown in Listing 8-7 into the view file.
Listing 8-7. The Add Comments Form
15    <?=$ajax->form('/comments/add','post',array('update'=>'comments'));?>

16    <?=$form->input('Comment.name'),?>

17    <?=$form->input('Comment.content'),?>

18    <?=$form->input('Comment.post_id',array('type'=>'hidden','value'=>

$post['Post']['id']));?>

19    <?=$form->end('Add Comment'),?>
Line 15 in Listing 8-7 does all the Ajax magic for you. Notice that the parameters you are supplying in the $ajax->form() function tell it to first send the form data to the Add action in the Comments controller.
The second parameter specifies what method to use when sending the form data. This is currently set to post but could be changed to get if desired.
The third parameter is the options array containing keys and values that correspond to possible features in the function. Here, you've assigned the value comments to the key update. What this means is that the $ajax->form() will update the <div> with the ID of comments. You have already created the <div id="comments"> on line 8 of the view file.
Lines 16–19 work like typical Cake form elements; they use the Form helper to create fields that correspond to fields in the comments table. Notice that I've included the model name in the field (Comment.) to specify that these fields are part of the Comment model, not the current Post model.
The only thing tricky about lines 16–19 is how the current post ID is passed to the Comments controller on line 18. Simply put, you made a hidden form element named after the post_id field in the comments table and assigned it the value contained in the $post['Post']['id'] variable.
That's all there is to it! When users come to a post in the blog, they will see a list of comments previously submitted as well as a set of form fields with which to supply their own comment. When the user clicks Add Comment, the form will submit in the background.
At this point, there is only one problem—the Comments controller is not yet ready to handle the submitted form. The next step is to work Ajax into this controller by tweaking the Add action.
Working Ajax into the Controller
The current Comments controller contains nothing but the $name attribute. Let's add the Add action to it, but with Ajax in mind (see Listing 8-8).
Listing 8-8. The Add Action in the Comments Controller
1    function add() {

2        if (!empty($this->data)) {

3            $this->Comment->create();

4            if ($this->Comment->save($this->data)) {

5                $comments = $this->Comment->find('all',array('conditions'=>

array('post_id'=>$this->data['Comment']['post_id']),'recursive'=>-1);

6                $this->set(compact('comments'));

7                $this->render('add_success','ajax'),

8            } else {

9                $this->render('add_failure','ajax'),

10            }

11        }

12    }
Lines 1–4 of Listing 8-8 are just like the baked Add action: they check for supplied data found in the parsed $this->data array, they create a new record in the database if data has been supplied, and they run the save() function in the model to insert the data into the new database record and check for a successful result from the model. Lines 5–7 are executed when a successful save has occurred, and line 9 is called only upon a failed save. (You could, if you wanted, run data validation in the model, and the controller would be prepared to handle the results.)
So, assuming that the supplied comment was saved successfully, then you would want to fetch all the comments in the database, including the newly added one, and display them in the <div id="comments"> element. Therefore, you must run a database query to pull the comments and pass that along to the view. Line 5 does this with the find() function; it pulls all comments with a post_id equal to the value supplied in the hidden form element you created in line 18 of Listing 8-7. I've also set the recursive value to −1 so that each comment in the resulting array doesn't include the entire contents of the associated post; you want the comments themselves without their associations. Line 6 passes the results of the find() function to the view.
Rendering for Ajax
The secret of making Ajax work in the controller is nothing more than using the render() function to bypass the typical view-rendering mechanism in the MVC structure of Cake applications. In line 7 of Listing 8-8, you use the render() function, with a second parameter to specify that the output is of the Ajax type. By including this parameter, you instruct Cake to disable its viewing mechanism and send only the view's output (not the layout as well) to the waiting JavaScript event. You must create a corresponding view file in the app/views/comments folder to be used by the controller and displayed in the <div id="comments"> element back in the Posts view.
Create the app/views/comments/add_success.ctp file. This file will be rendered to complete the Ajax form submission, so it will need to also iterate through the $comments array as does the app/views/posts/view.ctp file. Paste Listing 8-9 into the add_success.ctp file.
Listing 8-9. The add_success.ctp File
<? foreach ($comments as $comment): ?>

<div class="comment">

<p><b><?=$comment['Comment']['name'];?></b></p>

<p><?=$comment['Comment']['content'];?></p>

</div>

<? endforeach;?>
You should now be able to add comments to a post without the page being reloaded, like you see in Figure 8-3.

Figure 8-3. The Post's comments displayed asynchronously
Line 9 of Listing 8-8 calls for another view file in case an error occurs during the form submission. To accommodate this, create app/views/comments/app_failure.ctp, and insert some kind of error message there:
<p><b>Sorry, but your comment could not be added to this post. Please try again

later.</b></p>
You could also include the form in case the user wanted to immediately try again. In this case, the code would the same as Listing 8-7.
Using Other Ajax Helper Functions
Sometimes you may need to use a different method for submitting forms with Ajax. Or, depending on the task, you may not even need to submit a form but perform another process with Ajax. There are a variety of other Ajax helper methods for these needs.
The submit() Function
In Listing 8-7, you created an Ajax form using the $ajax->form() function. Another way of submitting a form with Ajax is by using the $ajax->submit() function. This method will work almost exactly as the form() function does, except that in the view you make the submit button—rather than observing a change event in the form—trigger the Ajax process.
Two lines in Listing 8-7 will need to change: the form tag itself and the submit button. See Listing 8-10 for how I've changed these tags from how they appear in Listing 8-7 to use the $ajax->submit() function.
Listing 8-10. Using the $ajax->submit() Function to Submit a Form in the Background
15    <?=$form->create('Comment',array('action'=>'add','onSubmit'=>'return

false;'));?>

16    <?=$form->input('Comment.name'),?>

17    <?=$form->input('Comment.content'),?>

18    <?=$form->input('Comment.post_id',array('type'=>'hidden','value'=>$post

['Post']['id']));?>

19    <?=$ajax->submit('Add Comment',array('url'=>'/comments/add','update'=>

'comments'));?>

20    </form>
Note that line 15 of Listing 8-10 has changed from the $ajax->form() function to the $form->create() function. You've added the onSubmit key in the options array and passed the value return false; to this attribute. This will keep the form from sending a synchronous HTTP request when a form event occurs.
All but lines 19–20 have remained the same as before. The $ajax->submit() function is similar to the $ajax->form() function in that it uses an options array to pass some important parameters. These parameters specify where to send the form (the url parameter) and which HTML element receives the Ajax response (the update parameter). Line 20 is simply closing out the form.
When used in this way the same Ajax process is accomplished, but with the $ajax->submit() function. Some customized JavaScript functions may interrupt the form observe event, and in these cases using the $ajax->submit() function may prevent those hiccups. Other advantages of using the $ajax->submit() function over the $ajax->form() function include the ability to use multiple Ajax events within a form. With the $ajax->form() function, some Ajax calls such as autofill can trigger the JavaScript event observation. When using multiple Ajax calls within a form, the $ajax->submit() function usually bypasses any conflicts that could occur with $ajax->form().
The link() Function
Many Ajax methods don't require any form data. The simplest Ajax call is one that simply sends a parameter to a script and returns a response in the background. These types of Ajax processes can be managed with the $ajax->link() function. You can build this function into the blog by creating a community voting mechanism for each comment.
Add the votes field in the comments table with this SQL:
ALTER TABLE `comments` ADD `votes` int(11) DEFAULT '0' ;
You'll add an Ajax link in each comment box that, when clicked, will either add 1 to the value in votes or subtract 1 from it. The new total will be sent back to the browser and updated in the comment box.
Copying Some Helper CSS
The design of the voting links will need to be crafted in the CSS files the application is currently using. Without some CSS to help you out here, the tool will look confusing and will also get in the way of understanding the $ajax->link() function, so let's add some CSS to improve the design. I've provided some styles in Listing 8-11 you can use if you'd like.
Listing 8-11. CSS Markup for the Voting Tool
.comment {

    border: 1px solid #ccc;

    border-width: 1px 0px 0px 0;

    clear: both;

    width: 500px;

}


.comment p {

    float: left;

    clear: left;

}


.vote {

    width: 50px;

    height: 20px;

    background-color: #fffdc3;

    text-align: center;

    font-size: 16px;

    font-weight: bold;

    padding: 15px 0 15px 0;

    float: right;

}


.cast_vote {

    height: 50px;

    float: right;

}


.cast_vote ul {

    list-style-type: none;

}


.cast_vote ul li {

    font-size: 9px;

    margin: 5px 0 5px 0;

}
If you wanted to tinker with this design to fit your own style, by all means do so. But the CSS in Listing 8-11 should at least help you see the various elements at work in the voting feature.
Using the link() Function in the View
Next, inside the <div class="comment"> element in the app/views/posts/view.ctp file, you will need to supply some code to display the voting links and total votes. Starting on line 11, insert the lines shown in Listing 8-12.
Listing 8-12. The View Code to Display Voting Links and Total Votes
11    <div id="vote_<?=$comment['Comment']['id'];?>">

12        <div class="cast_vote">

13            <ul>

14            <?=$ajax->link('<li>up</li>','/comments/vote/up/'.$comment

['Comment']['id'],array('update'=>'vote_'.$comment['Comment']['id']),null,false);?>

15            <?=$ajax->link('<li>down</li>','/comments/vote/down/'.$comment

['Comment']['id'],array('update'=>'vote_'.$comment['Comment']['id']),null,false);?>

16            </ul>

17        </div>

18        <div class="vote"><?=$comment['Comment']['votes'];?></div>

19    </div>
Line 11 of Listing 8-12 appends the comment's unique ID to vote_ to provide you with a uniquely identified <div> element to update. The Add Comments form already will perform some Ajax, so to avoid any collisions in updating elements, I've ensured that the ID of each comment is unique.
Most of the markup in Listing 8-12 is to organize the design of the feature so as to be accessible to the user and so it can be changed to fit the design of your own site. But the $ajax->link() function has been included in lines 14 and 15. It behaves similarly to the $html->link() function used in baked views, with the first parameter being the text to be displayed and the second parameter being the href attribute. The href is set to a controller action you haven't created yet called Up or Down and passes along through the URL the comment ID to receive the vote. When this link is clicked, rather than perform a standard HTTP link request, Cake will provide some Prototype functions to perform the request in the background and receive the response. Notice that in the options array of this function you've set the update element to the same value as line 11: vote_ and then the unique ID of the comment.
Creating Voting Actions in the Controller and Model
The Vote action, which is referenced in lines 14–15 of Listing 8-12, doesn't exist yet; let's create it in the Comments controller. This action will be rather simple: add or subtract 1 from the votes field in the comments table and return a total votes value to the view. Of course, this action will use the render() function to render the views in Ajax mode.
Use Listing 8-13 to add the Vote action to the Comments controller.
Listing 8-13. The Vote Actions in the Comments Controller
1    function vote($type=null,$id=null) {

2        if ($id) {

3            $votes = $this->Comment->vote($type,$id);

4            $this->set(compact('votes'));

5            $this->render('votes','ajax'),

6        }

7    }
Recall that one Cake best practice is to make the model "fatter" than the controller if possible; that is, you should add code to the model instead of the controller if possible. I've put this principle to work in line 3 of Listing 8-13 by creating my own model function vote(), and I've passed the parameters supplied in the $ajax->link() functions of lines 14–15 of Listing 8-12. This function will do all the work with the database to both fetch the votes and update the number of votes for the comment. It will need to know whether it is a vote up or down and which comment to update, which has been passed through the controller variables $type and $id.
Listing 8-14 contains the model function vote(), which will do the database work to make the vote happen. Add this to the Comment model after the other attributes and associations.
Listing 8-14. The vote() Model Function in the Comment Model
1    function vote($type=null,$id=null) {

2        if (!$id) {

3            return "-";

4        } else {

5            $votes = $this->read(null,$id);

6            $votes = ($type == 'up' ? $votes['Comment']['votes']+1 : $votes

['Comment']['votes']-1);

7            $this->id = $id;

8            $this->saveField('votes',$votes);

9            return $votes;

10        }

11    }
Line 5 of Listing 8-14 pulls the number of votes for the supplied comment ID from the database. Line 6 adds or subtracts 1 from the total depending on the type of vote. Lines 7–8 save the result to the database using the saveField() function. This function allows you to update only one field (or column) in the row rather than format the whole $this->data array for the more common save() function. Of course, you need to tell the model which record to update, and this is done at line 7 by setting the ID attribute. Finally, at line 9, the new total is returned to the controller to be displayed in the view.
Creating the Votes View
The last step is to create the view to be rendered by the controller action in line 5 of Listing 8-13. This will be simple enough: it will only need to display the passed value inside the same <div> element used in the Posts view. Listing 8-15 contains the code for the app/views/comments/votes.ctp file.
Listing 8-15. Displaying the New Total with the Votes View
<div class="vote"><?=$votes;?></div>
Go ahead and refresh the Posts view, and click the Ajax links to vote comments up and down. The total number of votes should automatically change in the background without any page reloads, and this was all done without submitting any forms, like in Figure 8-4. Using the $ajax->link() function allows you to do similar asynchronous tasks easily in a way that's often easier and more fun for the user. And it sure beats trying to code by hand all the JavaScript that makes this possible.
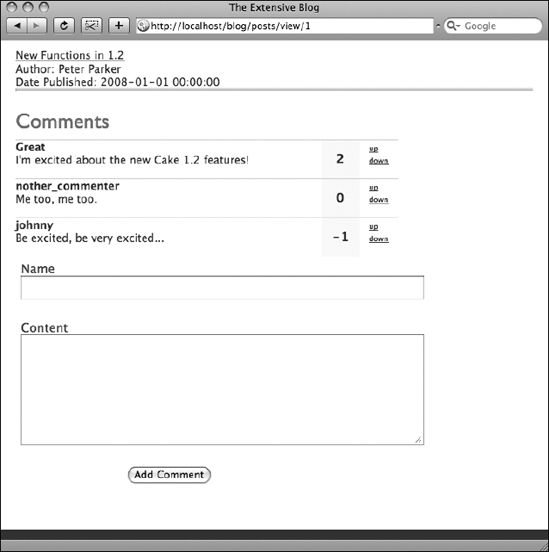
Figure 8-4. Ajax voting is now working in the comments section.
Doing More with the Ajax Helper
You have barely scratched the surface of the possibilities that the Ajax helper opens up. As you can see in Table 8-1, the Ajax helper includes much more than the form(), submit(), and link() functions. True, these functions are useful because they allow you to discuss the main concepts of using Ajax in a Cake application. What about using Ajax with animation frameworks? Or building fancy Web 2.0 features such as a drag-and-drop shopping cart or a slider tool that adjusts sizes of HTML elements? When considering how you want to bring Ajax into your Cake application, remember some of these fundamental steps.
Passing JavaScript with the Options Array
Look for the options array in various helper functions, even in non-Ajax helpers when bringing in more complex or customized JavaScript functions. By using this array, you can pass on JavaScript functions to the HTML element being rendered by the helper that work with more complex Ajax methods. For instance, if I wanted to craft my own JavaScript function, I could call that function with the options array like this:
$form->input('OK',array('type'=>'button','onSubmit'=>'alert('Hello World'),'));
Not only did I pass along the parameter saying what type of form input field the helper should render (in this case an HTML button), but I also assigned the JavaScript alert() function to the element by keying the HTML attribute onSubmit and giving it a value.
Using the options array is generally more effective than using raw HTML. Usually the helpers can provide a uniform linking system or display mechanism that cuts down on the headache of keeping the application consistent. Also, getting used to the look and flow of helper strings can be more aesthetic for the eyes, especially if you favor PHP syntax over HTML markup. Probably the most important reason for sticking with helpers, even for custom JavaScript and Ajax calls, is to prevent duct-taping your application. In other words, you're working in Cake, and the framework is strong enough to lessen your code. Too often developers settle for a hack or for a deprecated method to get a complex process working right. Don't overlook how Cake's helpers can contribute to your process. You'll find more features than you might have been expecting to help you through the challenge.
Prototype vs. jQuery
In recent months, the jQuery framework has increased in popularity and in functionality. Many Cake developers have begged for Cake to be rewritten around this framework rather than Prototype. At the time of writing, rumors are floating around that jQuery will eventually replace Prototype in the Ajax helper. Whatever the case, the Ajax helper is destined to go on working the same way; you just may need to install a different library in the app/webroot/js folder.
Regardless of the direction Cake will take, both frameworks offer some important features that every serious Ajax developer will want to consider. Again, you can pull in their functions by using the options array in various helper functions. For example, using jQuery's form plugin, I can upload a file with the Form helper:
<?=$form->button('Upload',array('onClick'=>'$('#storyEditForm').ajaxSubmit({

target: '#storyTextUpload',url: ".$html->url('/stories/text').''}); return

false;'));?>
There's definitely more to this function than what is included here, but this example does illustrate how to assign a jQuery function to the onClick event in the $form->button() function. Provided that my controllers are using the render() function in Ajax mode, Cake can run its logic through the MVC structure as normal and still use an Ajax library outside the Ajax helper.
Uploading Files with jQuery
We couldn't possibly explore every possible Ajax method available in Cake. However, one of the most common needs of web applications is some kind of file upload. This task can be rather cumbersome, especially when you want to manage file uploads with Ajax. Many of the Ajax frameworks don't support file input elements because of the way they serialize HTML forms. JavaScript can't place the file contents into a string, which is how many of these frameworks submit form data. Fortunately, jQuery's Form plugin can handle file uploads, making it possible to integrate uploading with Ajax.
Because jQuery currently is not part of the default Ajax helper, adding a file upload feature to your blog will demonstrate how to incorporate a non-Prototype framework into Cake.
Installing jQuery and the Form Plugin
Remember that you must install the JavaScript libraries to be called manually. Download the latest version of jQuery as well as the Form plugin. The following links should help in locating those files:
- jQuery: http://docs.jquery.com/Downloading_jQuery
- Form plugin: http://jqueryjs.googlecode.com/svn/trunk/plugins/form/jquery.form.js
Next, you have to place the necessary files into the app/webroot/js directory and make them available in the default layout. The trouble is that jQuery may conflict with Prototype, which you have used to provide the comments voting and submissions, so let's add some logic to the default layout to detect whether it's running the Posts Add action or something else.
Open the default layout (app/views/layouts/default.ctp), and replace the JavaScript helper line referencing Prototype with the following line:
<?=($this->params['controller'] == 'posts' && $this->params['action'] ==

'add' ? $javascript->link(array('jquery.js','jquery.form.js')) : $javascript->

link('prototype'));?>
Now when the Posts Add action is fired, jQuery will be initialized, not Prototype. But Prototype will remain the default script for all other actions, thus not conflicting with the comments section.
Creating the Posts Add Action
Perhaps an author of the blog has already typed a post in a plain-text file and wants to upload it to the blog. Let's create a file upload mechanism that can analyze a plain-text file and insert it into the Content field in the Posts Add action to facilitate creating new posts.
Open the app/views/posts/add.ctp file (which should have already been baked) and replace its contents with Listing 8-16.
Listing 8-16. The File Upload Feature in the Add Action
1    <div class="posts form">

2    <?=$form->create('Post',array('name'=>'postAddForm','id'=>'postAddForm',

'type'=>'file'));?>

3        <fieldset>

4             <legend>Add Post</legend>

5            <?=$form->input('name'),?>

6            <?=$form->input('date'),?>

7            <?=$form->input('content'),?>

8        <div id="postTextUpload">

9            <?=$form->input('content', array('label'=>'Content ','rows'=>'15',

'cols'=>'75'));?>

10            <?=$form->input('upload_text',array('label'=>'Upload Text File ',

'type'=>'file'));?>

11            <?=$form->button('Upload Text',array('onClick'=>

'$('#postAddForm').ajaxSubmit({target: '#postTextUpload',

url: "'.$html->url('/posts/text').''});return false;'));?>

12        </div>

13        <?=$form->input('User'),?>

14        <?=$form->input('Tag',array('type'=>'select','multiple'=>'checkbox'));?>

15        </fieldset>

16    <?=$form->end('Submit'),?>

17    </div>
Line 2 of Listing 8-15 assigns the form the ID of postAddForm, which will be needed for jQuery to collect the form data. This line also sets the type attribute to file so that the form includes the enctype="multipart/form-data" attribute for the form submission to work correctly.
Notice that I've wrapped a <div> element around the Content field starting on line 8 so that I can replace the current field with a filled one after the file is uploaded.
Line 10 contains the actual file input field. With the Form helper, you need specify only that the input type is equal to file to render a file input field.
Line 11 is where all the Ajax happens. By setting the onClick attribute to a jQuery-formatted string containing all the necessary code, the Form helper will be able to render a button containing the necessary JavaScript to execute an Ajax method through jQuery. This syntax follows the form submission method used in the jQuery Form plugin.
Creating the Posts Controller Text Action
When the file is chosen and the user clicks the Upload Text button, jQuery will submit the whole form to the text action in the Posts controller because of the URL parameter you wrote in the onClick event.
So, in the app/controllers/posts_controller.php file, you'll need to include the function shown in Listing 8-17.
Listing 8-17. The Text Action in the Posts Controller
1    function text() {

2        if (!$this->data['Post']['upload_text']) {

3            $this->set('error','You must select a text (.txt) file before you

can upload.'),

4            $this->render('text','ajax'),

5        } else {

6            App::import('Core','File'),

7            $file =& new File($this->data['Post']['upload_text']['tmp_name']);

8            if ($this->data['Post']['upload_text']['type'] != 'text/plain') {

9                $this->set('error','You may only upload text (.txt) files.'),

10                $this->render('text','ajax'),

11            } else {

12                $data = h($file->read());

13                $file->close();

14                $this->set('text',$data);

15                $this->render('text','ajax'),

16            }

17        }

18    }
Line 2 of Listing 8-17 checks for any contents in the upload_file field. File uploads will still be automatically parsed by Cake, which is more secure than using the PHP $_FILES array. To facilitate file handling, Cake's core includes a series of File class functions. But to use these functions in the controller, since they're not component classes, helpers, or other Cake elements, you must instantiate a new File class; this is done in line 6 with the App::import() function. On line 7, the File utility is assigned to $file as a class object; now, throughout the action, the $file object will provide you with Cake's core File functions. Also, the $file object will represent the uploaded file itself, so when you have to maneuver through the upload, it will be much easier to save the data to the server.
Line 8 checks to see whether the file is the right MIME type ("text/plain" for plain-text files). Lines 12–15 handle the file itself. Now, in this action, you need only to retrieve the contents of the file and make them available in the Contents field. So line 12 just reads the file and places the contents in the $data variable. Line 13 closes out the file, and lines 14–15 make the $data variable available in the app/views/posts/text.ctp view file. Line 15 takes care to render the view in Ajax mode so as to not trigger Cake's synchronous rendering engine.
All that's left is to swap out the Content field with a new propagated one; this is done in the Text view file, which you haven't created yet.
Writing the Text View
Create the app/views/posts/text.ctp file, and paste Listing 8-18 into it.
Listing 8-18. The Text View File
1    <? if (!empty($error)): ?>

2        <p><?=$error;?></p>

3        <?=$form->input('Post.content', array('label'=>'Content','rows'=>'15',

'cols'=>'75'));?>

4    <? else: ?>

5        <p>Upload successful</p>

6        <?=$form->input('Post.content',array('label'=>'Current Text ',

'value'=>$text,'rows'=>'15','cols'=>'75'));?>

7    <? endif;?>

8    <?=$form->input('Post.upload_text',array('label'=>'Upload Text File ',

'type'=>'file'));?>

9    <?=$form->button('Upload Text',array('onClick'=>'$('#postAddForm')

.ajaxSubmit({target: '#postTextUpload',url: "'.$html->url('/posts/text')

.''}); return false;'));?>
Listing 8-16 mimics the Posts Add view, except that it adds an error check (and displays the error message) and supplies the Content field with the file upload contents (available in the $text array from the controller).
Now you should be able to upload the contents of a plain-text file and make them available instantly in the Add action without reloading the page. Thanks to jQuery and its Form plugin, you can do this in Ajax. Unfortunately, the Ajax helper doesn't allow for jQuery functions or file uploads yet, so you had to provide the JavaScript functions to make it happen in the onClick attribute.
More Ajax Features
The world of Ajax is continually expanding. Several open source projects have made previously expensive or complex libraries available to the masses. As Ajax methods continue to improve, you can rest assured that Cake's structure will remain open to Ajax and allow those methods to be brought into your Cake applications. Hard-coding the onClick and other DOM events certainly extends the capabilities of the Cake application, but by practicing with other Ajax helper functions, you can take care of most common Ajax processes with Cake.
Summary
In this chapter, we discussed how Cake simplifies Ajax methods with its built-in Ajax helper. You built a comments feature into your blog application that allows the user to add a comment to a blog post and also provides users with a way to vote on those comments. Currently, Cake's Ajax helper is built on the Prototype JavaScript library, and this chapter explained how to work Prototype into your Cake application. Using other Ajax frameworks like jQuery is also possible in Cake but is done outside the Ajax helper for most methods. I showed how to use jQuery to upload a text file, which is just one feature you could add from another Ajax framework. The Ajax helper is just one of the many helpers available in Cake. Chapter 9 will explain helpers in more detail, including the HTML and Form helpers, as well as how to create a custom helper of your own.