Frames divide a browser window into two or more separate pieces or panes, with each pane containing a separate web page. One of the key advantages that frames offer is that you can load and reload single panes without having to reload the entire contents of the browser window. A collection of frames in the browser window is known as a frameset.
A frameset divides the window into rows and columns (rather like a table). The simplest of framesets might just divide the screen into two rows, whereas a complex frameset could use several rows and columns.
There is also a special kind of frame called an iframe which is a single window that can sit anywhere inside a page.
In this chapter you learn the following:
How to create a frameset document with multiple frames
How to create inline frames (or iframes), which are single windows that sit within another page
How to deal with users whose browsers cannot use frames
Note
I should warn you early on that there are actually very few cases in which most developers consider using frames. I will explain the main reasons why in the second section of this chapter, after showing a simple example that helps you understand what frames are. You are more likely to use iframes, which are covered near the end of the chapter.
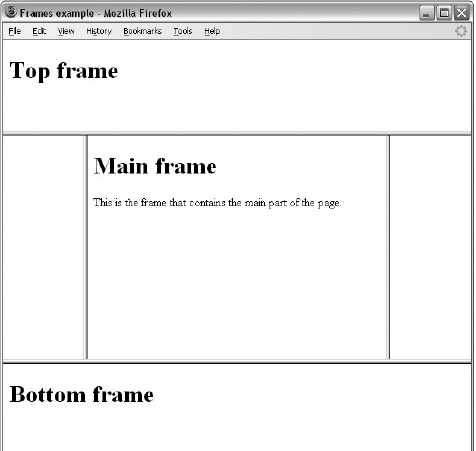
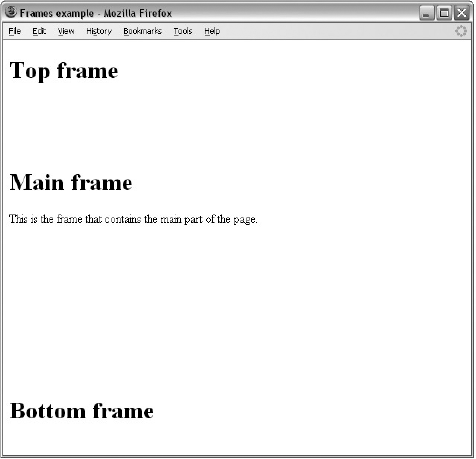
To help you understand frames, let's look at an example. Figure 6-1 shows you a frameset document in a browser. This frameset divides the page into three parts, and each separate part of the page is a separate XHTML document.

You may remember from Chapter 1 that you can start an XHTML page with a DOCTYPE declaration to explain which version of XHTML you are using: transitional, strict, or frameset. When creating a page that uses frames, you should use the frameset DOCTYPE declaration because you will be using a few elements in different ways than other XHTML documents.
First, you use the <frameset> element instead of the <body> element, as this defines the rows and columns your page is divided into. Each frame is then represented by a <frame> element.
You also need to learn the <noframes> element, which provides a message for users whose browsers do not support frames.
To get a better idea of how frames work, here is the code for the frameset shown previously in Figure 6-1 (ch06_eg01.html):
<?xml version="1.0" encoding="iso-8859-1"?>
<!DOCTYPE html PUBLIC "-//W3C//DTD XHTML 1.0 Frameset//EN"
  "http://www.w3.org/TR/xhtml1/DTD/xhtml1-frameset.dtd">
<html>
<head>
  <title>Frames example</title>
</head>
<frameset rows="150, *, 100">
    <frame src="top_frame.html" />
    <frame src="main_frame.html" />
    <frame src="bottom_frame.html" />
    <noframes><body>
      This site uses a technology called frames. Unfortunately, your
      browser does not support this technology. Please upgrade
      your browser and visit us again!
    </body></noframes>
</frameset>
</html>
If you look at the start of the code, you can see the frameset DOCTYPE declaration is used, which allows you to use these frame-related elements in the rest of the page. The <body> element has been replaced with the <frameset> element; also, there should be no markup between the closing </head> tag and the opening <frameset> tag, other than a comment if you want to include one.
As you will see shortly, the <frameset> element must carry the two attributes rows and cols, which specify the number of rows and columns that make up the frameset. In our example there are just three rows, the first being 150 pixels high, the third just 100 pixels high, and the second taking up the rest of the page (the asterisk is used to indicate that the remaining part of the page should be used in this place).
<frameset rows="150, *, 100">
Inside the <frameset> element are the empty <frame> elements. The <frame> elements indicate a URL of the document that will be loaded into that frame; the URL is specified using the src attribute (this is very similar to the way an image file is specified in an <img> element). There is also a <noframes> element whose contents will be displayed if the user's browser does not support frames.
In this example, the pages that are loaded into the top frame, middle frame, and bottom frame are:
top_frame.htmlmain_frame.htmlbottom_frame.html
To see a slightly more complicated example, take a look at Figure 6-2, which uses another frameset in the middle frame containing vertical frames.
Before you take a closer look at the syntax, let's just have a look at when you might want to use frames.
It is quite rare to see frames in use these days. Personally, there are very few (if any) circumstances in which I would suggest that you use frames in a page. Here are some of the drawbacks you should be aware of when it comes to using frames:
One of the fundamental concepts when the Web was created was that every page should correspond to a single URL — with a frameset you have a single page made up of several URLs.
Search engines can have difficulty indexing the content of individual frames; some just index the frameset document. This means that the only content that they see is the contents of the
<noframes>element, so you should include any content or keywords that you want indexed within the<noframes>element (not just a message that warns users that the site uses frames).Imagine you put your logo and links between pages of the site in one frame, and the content of the site in a second frame; these are just two normal web pages. Should a search engine find the URL for one of these pages (perhaps someone else links directly to one of these pages), the search engine would show only the content of the individual frame — not the frameset document — so the user might see only the navigation or only the content.
The browser's Back button might not work as users expect (taking them to something else).
Some smaller devices cannot cope with frames.
If you have a frame that contains navigation, then it's hard to indicate which page is "on" (because content could load in one frame without telling the navigation frame which page it is showing).
You need to have a separate web page for each frame in the browser window, which means your site will be made up of more pages, making maintenance more difficult.
It's much harder for users with screen readers to navigate pages that use frames.
The cases in which you are most likely to want to consider using frames include:
If you want to display a lot of content in one single page and you cannot split the document into separate pages, then a frame might be useful to create a navigation bar that links to the subsections of the long document.
When you have a lot of data in one part of the page that you do not want the user to have to reload while another part of the page changes. Examples might include a photography site where you have lots of thumbnails in one frame, and the main picture in another. Rather than reloading the thumbnails each time a visitor wants to look at a new main picture, the browser can just reload the main picture.
In both cases, you can achieve the same results using JavaScript.
While you know my opinion on frames, you may have a project that requires them, so let's take a look at the syntax for using frames in a little more detail.
The <frameset> element replaces the <body> element in frameset documents. It is the attributes of the <frameset> element that specify how the browser window will be divided up into rows and columns. These attributes are as follows:
colsspecifies how many columns are in the frameset.rowsspecifies how many rows are in the frameset.
The <frameset> element contains a <frame> element for each frame of the document (each cell of the grid constructed by the <frameset> element) and a <noframes> element to indicate what should be displayed if the user's browser does not load frames.
In addition to the rows and cols attributes, the frameset element can also take the following attributes:
class id onload onunload rows style title
Most browsers also support the following attributes (which are covered here because of their popularity), even though they are not part of the XHTML specification.
onblur onfocus border bordercolor frameborder framespacing
The cols attribute specifies both the number of columns in the frameset and the width of each column. Because you have to specify the width of each of the columns (separated by a comma), the number of values you provide automatically tells the browser how many columns there are in the frameset. For example, here are three values indicating that there are also three columns:
cols="20%, 60%, 20%"
Here, the first column takes up 20 percent of the width of the browser window, the second takes up 60 percent, and the third takes the last 20 percent.
You can specify the width of a column in four ways:
You can mix and match these different ways of specifying column widths, but if you do mix them you should be aware of the precedence they take (discussed after the four methods).
If you do not specify a cols attribute, the default value is 100 percent, so if you do not add the cols attribute, then there will be one column that takes up 100 percent of the width of the browser.
To specify the width of a column in pixels, you just use a number. (You do not need to use px or any other characters after the number.) For example, here are three columns: the first is 100 pixels, the second is 500 pixels, and the third takes up the remainder of the page (using the wildcard symbol *).
cols="100, 500, *"
If you just use pixels for each of the columns, and the width of the window is less or more than the specified values, then the browser will adjust the width of each column in proportion to the width of the browser window. So, if you want three columns of 100 pixels, you might try to specify it like this:
cols="100, 100, 100"
However, if the browser window were 600 pixels wide, you would end up with three columns of 200 pixels. Therefore, if you really want to specify fixed widths that won't grow, use a wildcard character after the third column and either make the content of the fourth frame blank (or do not include a <frame> element for it):
cols="100, 100, 100, *"
Interestingly, if you have four columns 200 pixels wide, and the browser window is only 600 pixels wide, your columns would all be squashed proportionately to 150 pixels wide; the window will not use scrollbars to make the page 800 pixels wide.
To specify the width of a column as a percentage of a window you use a number followed by the percent sign. For example, the following attribute value specifies two columns, one of 40 percent and another of 60 percent of the browser window:
cols="40%, 60%"
If you specify widths as percentages, and they add up to more or less than 100 percent, the browser will adjust widths proportionately.
As an alternative to percentages, you can use relative widths of the browser window, which are best illustrated with an example. Here, the window is divided into sixths: the first column takes up half of the window, the second takes one-third, and the third takes one-sixth:
cols="3*, 2*, 1*"
You can tell that the window is divided up into sixths by adding up the values of the relative widths.
The asterisk, or wildcard symbol, indicates the "rest of the window." Here, the first column is 400 pixels wide and the second frame takes up the remainder of the browser window:
cols="400, *"
If two rows or columns are given the wildcard symbol, then the remaining width is divided by these two columns.
If you mix measurements, you should be aware that widths specified in pixels always take priority over percentages, relative widths, and the wildcard symbol. Consider the following example with three columns:
cols="250, *, 250"
If the browser window is only 510 pixels wide, then the center frame will be only 10 pixels wide. This demonstrates that you have to be careful when designing framesets, otherwise there might not be enough space for users to see what you want them to see.
Furthermore, if the user resizes his or her window to less than 500 pixels wide, the browser will try to show as much of the columns defined using absolute widths as possible, ignoring any columns defined using relative widths.
Whenever a user resizes his or her window, percentages and relative widths are recalculated, but absolute widths remain the same.
Remember that each column should have a corresponding <frame> element. If you specify too many columns and not enough frame <frame> elements, the rightmost columns end up being a blank space; whereas if you specify too many <frame> elements the extra ones will be ignored.
The rows attribute works just like the cols attribute and can take the same values, but it is used to specify the rows in the frameset. For example, the following rows attribute will specify three rows: the top row should be 100 pixels tall, the second should be 80 percent of the screen, and the bottom row should take up the screen that is left (if anything):
rows="100, 80%, *"
The default value for the rows attribute is 100 percent, so if you do not specify a rows attribute, one row will take up 100 percent of the height of the browser.
Most common browsers (such as IE, Firefox, and Safari) support some very important extensions to the <frameset> element that really deserve mention here. As you may have noticed in the first example, by default, a frame creates a border and you will likely want to control the appearance of this border. While you can now use CSS to control these properties, you may come across some of these attributes if you look at older code that uses frames.
The border attribute specifies the width of the border of each frame in pixels.
border="10"
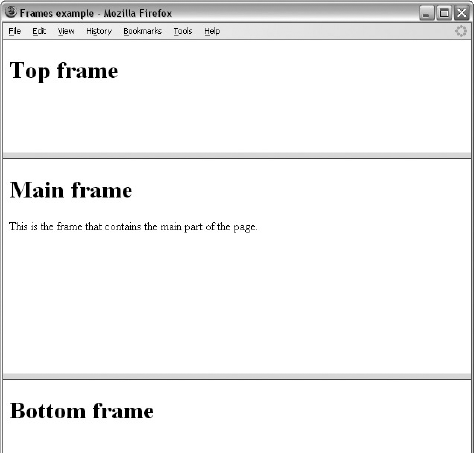
Figure 6-3 shows you what the first example looks like with a border of 10 pixels. If you compare this with Figure 6-2, you will be able to see a taller gray line between each of the frames (ch06_eg02.html):
If you do not want a border, you can give this attribute a value of 0.
When you are first creating a frameset document, it can be a good idea to set this attribute to have a value of 1, even if you do not want borders, as it makes it easier to see where the frames are; you can easily remove them by altering this one attribute on the <frameset> element.
The frameborder attribute specifies whether a border should be displayed between frames. The following indicates that there should not be any borders (which is the same as if the border attribute is given a value of 0):
frameborder="0"
The table that follows shows possible values for the frameborder attribute.
Value | Purpose |
|---|---|
| Indicates borders should be shown, the default value ( |
| Indicates borders should not be shown ( |
Figure 6-4 shows what the frames would look like without a border — you cannot see where one frame ends and another begins unless you have different background colors or background images for the pages in the frames (ch06_eg04.html).
The framespacing attribute only works in Internet Explorer; it specifies the amount of space between frames in a frameset. The value should be given in pixels and the default value is 2 if not otherwise specified.
framespacing="25"
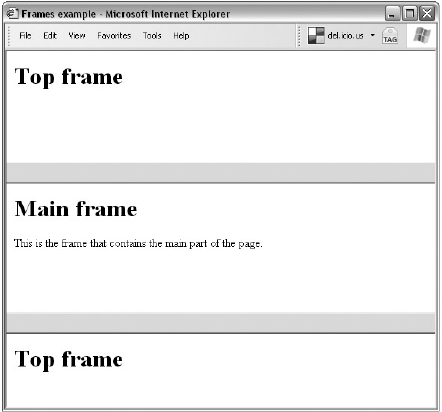
Figure 6-5 shows what the first example from this chapter (shown in Figure 6-1) would look like with a framespacing attribute indicating a 25-pixel gap between frames (ch06_eg05.html).
Several other browser-specific attributes are covered in Appendix I.
The <frame> element indicates what goes in each frame of the frameset. It is always an empty element, and therefore should not have any content, although each <frame> element should always carry one attribute, src, to indicate the page that should represent that frame.
The <frame> element can carry any of the universal attributes and the following attributes:
frameborder marginwidth marginheight noresize scrolling longdesc src name
There are no CSS styles related to the <frame> element.
The src attribute indicates the file that should be used in the frame.
src="main_frame.html"
The value for the src attribute is a normal web page, so you must have a corresponding page for each <frame> element.
While the value of this attribute will generally be a file on your server, its value can be any URL, so you can use the src attribute to specify another site.
You might find that some search engines on the Internet (such as the image search on Google) will create a frameset whereby the top of the page remains the search site and the bottom of the page is the page of the site that features the image.
If you use a frame like this, it is good practice to offer a link that will close the top frame and allow the viewer to view just the content of the main frame (as Google does).
The name attribute allows you to give a name to a frame. The name is used when you create links in one frame that load pages into a second frame, in which case the second frame needs a name to identify itself as the target of the link. You will see more about making links between frames later in the chapter.
name="main_frame"
You should note that the name attribute has not been replaced by the id attribute (as opposed to the way that the name attribute on some other HTML elements was replaced by the id attribute when XHTML was introduced as the successor to HTML).
The frameborder attribute specifies whether or not the borders of that frame are shown; it overrides the value given in the frameborder attribute on the <frameset> element if one is given, and the possible values are the same. The table that follows shows the possible values of the frameborder attribute.
Value | Purpose |
|---|---|
| Indicates borders should be shown, the default value. ( |
| Indicates borders should not be shown. ( |
The margin is the space between the three-dimensional border of a frame and its contents.
The marginwidth attribute enables you to specify the width of the space between the left and right of the frame's borders and the frame's content. The value is given in pixels.
The marginheight attribute enables you to specify the height of the space between the top and bottom of the frame's borders and its contents. The value is given in pixels.
marginheight="10" marginwidth="10"
By clicking and dragging on the borders of a frame, you are usually able to resize that frame. This is helpful if users cannot read everything in a frame, but it does make it harder for the designer to control the layout of the page.
The noresize attribute prevents a user from resizing the frame. It should take a value of noresize:
noresize="noresize"
Bear in mind that if you use the
noresizeattribute, users who cannot see the entire content of a frame can't resize the frames to view the missing material.
If the content of a frame does not fit in the space it has been allocated, the browser will likely provide users with scrollbars so they can read the rest of the content for that frame.
You can control the appearance of the scrollbars that appear on the frame using the scrollbar attribute:
scrolling="yes"
This attribute can take one of three possible values, as listed in the table that follows.
Value | Purpose |
|---|---|
| Indicates that the frame must always contain a set of scrollbars whether or not they are required, although IE just shows a vertical scrollbar and Firefox acts as if it were just set to |
| Indicates that the frame must not contain a set of scrollbars even if the content does not fit into the frame. |
| Indicates that the browser should include scrollbars when the content does not fit in the frame, but otherwise should not show them. |
The longdesc attribute enables you to provide a link to another page containing a long description of the contents of the frame. The value of this attribute should be the URL pointing to where that description will be found.
longdesc="framedescription.html"
The W3C indicates that the value of this URL must not be an anchor within the same page.
If a user's browser does not support frames (which is very rare these days), the contents of the <noframes> element should be displayed to the user.
You should place a <body> element inside the <noframes> element because if a browser does not understand the <frameset> element, it should ignore the <frameset> element and the <noframes> element, then display what is inside the <body> element contained in the <noframes> element.
You should think very carefully about how you phrase the contents of this element. You should not just write something like this element:
<noframes><body>This site requires frames.</body></noframes>
First, this will make little sense to average users as it is unlikely that they have studied XHTML and know what frames are. Rather, you should offer a more descriptive example content, along these lines:
<noframes><body>This site makes uses of a technology called frames.
Unfortunately, the browser you are using does not support this technology.
We recommend that you update your browser. We apologize for any
inconvenience this causes.</body></noframes>
Second, because search engines have difficulty indexing the content of the individual frames, you can add information that they will understand inside the <noframes> element to help them to record what your site is about.
You can use other XHTML markup within the <body> element if you want to present your message nicely.
One of the most popular uses of frames is to place navigation bars in one frame and then load the pages with the content into a separate frame. This is particularly helpful in three situations:
When your main document is very long and the navigation bar provides shortcuts to parts of the main document (acting like a table of contents that is always in view).
When your navigation bar contains files that take a while to load (such as thumbnails of photographs in a gallery). By using frames, the user does not need to reload the navigation bar each time he or she views a new page.
When you do not want to reload the whole page.
As you have already seen, each <frame> element can carry the name attribute to give each frame a name. This name is used in the links to indicate which frame the new page should load into. Consider this very simple example:
<frameset cols="200, *">
  <frame src="frames/linksNav.html" />
  <frame src="frames/linksMain.html" name="main_page" />
</frameset>
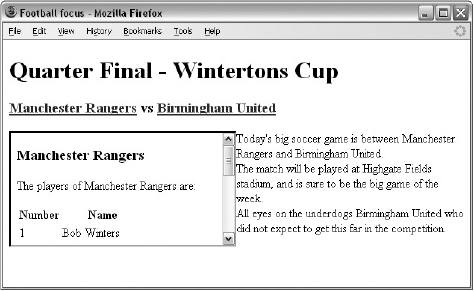
There are two columns in this example, and only one row. The left-hand frame containing the navigation bar is 200 pixels wide. The right-hand frame where the content goes takes up the remaining part of the page. When you click on the links in the left-hand frame, the content opens up in the right-hand frame as you can see in Figure 6-6:
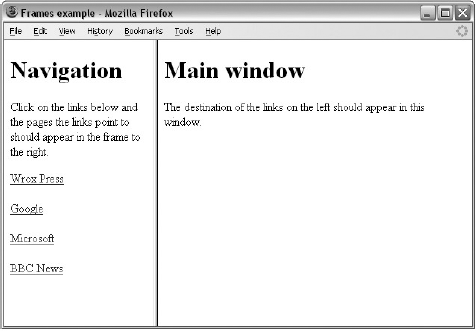
In order to specify that links should open up in the right-hand frame, the second <frame> element (which creates the right-hand frame) carries a name attribute whose value is main_page. The links in the navigation carry the target attribute whose value is set to main_page to indicate that the links should open in the <frame> element whose name attribute has a value of main_page. Here are the links in the linksNav.html file:
<a href="http://www.wrox.com" target="main_page">Wrox Press</a><br /><br />
<a href="http://www.google.com" target="main_page">Google</a><br /><br />
<a href="http://www.microsoft.com" target="main_page">Microsoft</a><br /><br />
<a href="http://news.bbc.co.uk/" target="main_page">BBC News</a><br /><br />
The target attribute can also take the attribute values listed in the table that follows.
If you are creating links to external pages, you should usually use the _top value for the target attribute so that the external site replaces your whole site; after all, your users probably don't want to view other web sites in frames of your site. Or, if you do not want the user to leave your site, you should open external sites in new windows.
Note
Forgetting to add the name attribute to the <frame> element or the target attribute to the <a> element are the most common reasons why beginners have problems creating web sites that use frames. If either is missing, the browser just loads the link in that frame.
You can set a default target frame using the <base> element in any page that contains links that should open in another frame (the <base> element lives inside the <head> element). The <base> element should carry an attribute called target, whose value is the name for the frame you want the content to be loaded into. So you could add the following to linksNav.html to specify a default frame target:
<head>
  <base target="main_page" />
</head>
You have seen that a single frameset gives you a fixed grid-like structure of rows and columns rather like a table. If you want to create a more complex design, you might choose to use a nested frameset.
You create a nested frameset by using a second <frameset> element in the place of one of the <frame> elements. Take a look at the following example (ch06_eg07.html):
<frameset rows="*, 300, *">
<frame src="frames/top_frame.html" />
<frameset cols="*, 400, *">
<frame src="frames/blank.html" />
<frame src="frames/main_frame.html" />
<frame src="frames/blank.html" />
</frameset>
<frame src="frames/bottom_frame.html" />
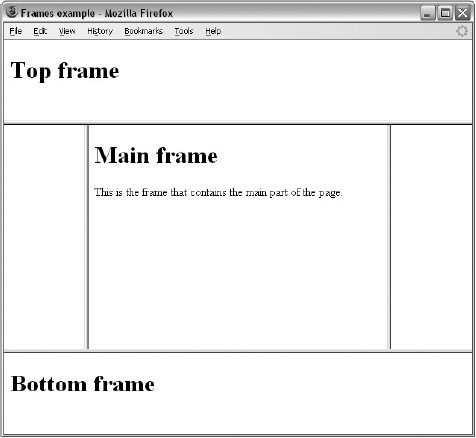
</frameset>This example creates a set of three rows. In the middle row is a nested frameset with three columns. You can see that the two side columns actually share the same file. Figure 6-7 shows what this example looks like in a browser.
Try It Out: A Frame-Based Play Viewer
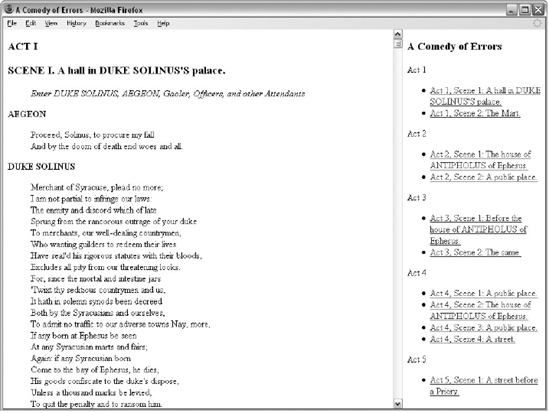
We don't have a need for frames on our café site, so in this Try It Out you're going to create a frame-based viewer for finding the different acts of Shakespeare's A Comedy of Errors.
The idea behind the viewer is that you have one long page that contains the entire play, and then there is a frame on the right that allows you to navigate between the scenes of the play.
Before you start to build the example, it would help to have a look at what you are going to create. You can see the page in Figure 6-8.
Three files actually make up this example:
viewer.html, which contains the frameset for play and navigationnavigation.html, which is the right-hand framecomedyoferrors.html, which is the page with the play
You will work through these pages in this order:
Start your text editor or web page editor and create a skeleton of a frameset document, remembering that this will be slightly different from the documents you have been creating so far. The following code is for
viewer.html:?xml version="1.0" encoding="iso-8859-1"?> <!DOCTYPE html PUBLIC "-//W3C//DTD XHTML 1.0 Frameset//EN" "http://www.w3.org/TR/xhtml1/DTD/xhtml1-frameset.dtd"> <html xmlns="http://www.w3.org/1999/xhtml"> <head> <title>A Comedy of Errors</title> </head> </html>Divide the page up into two frames. The one on the right is fixed at 200 pixels wide, while the one on the left takes up the remaining part of the screen.
As you can see, this requires the use of a
<frameset>element instead of a<body>element, which divides the page into the two columns.The
<frameset>element holds two<frame>elements, one for each column.<frameset cols="*,250"> <frame src="comedyoferrors.html" name="main_page" /> <frame src="navigation.html" scrolling="no" /> </frameset> <noframes><body> This site uses a technology called frames. Unfortunately, your browser does not support this technology. Please upgrade your browser and visit us again! <a href="comedyoferrors.html">Click here to view A Comedy of Errors without links to scenes.</a> <body></noframes>The A Comedy of Errors file is created for you (you probably don't have time to type it all out), but it is worth noting that it contains
idattributes that indicate the start of each section. The next step is to create a new file callednavigation.htmlto form the content of the navigation frame in the right pane.This is just a normal XHTML document, so start the skeleton as you usually would.
<?xml version="1.0" encoding="iso-8859-1"?>
<!DOCTYPE html PUBLIC "-//W3C//DTD XHTML 1.0 Transitional//EN"
"http://www.w3.org/TR/xhtml1/DTD/xhtml1-transitional.dtd">
<html xmlns="http://www.w3.org/1999/xhtml">
<head>
  <title>Navigation</title>
</head>
<body>
</body>
</html>
In the
navigation.htmlpage, there are links to each scene in each act of the play. Note how thetargetattribute has a value ofmain_frameto ensure that the link opens in the left-hand pane:Act 1 <ul> <li><a href="comedyoferrors.html#act1_scene1" target="main_frame">Act 1, Scene 1: A hall in DUKE SOLINUS'S palace.</a></li> <li><a href="comedyoferrors.html#act1_scene2" target="main_frame">Act 1, Scene 2: The Mart.</a></li> </ul>Try the file by opening
viewer.html; the result should look like the screen shot you saw at the beginning of the chapter.
There is another kind of frame known as an iframe (sometimes referred to as an inline frame or floating frame), which can appear anywhere within a standard XHTML page; it does not need to appear either in a <frameset> element or even in a document that uses the frameset document type declaration.
An iframe acts like a window cut into an XHTML page through which you can see another web page. You can specify the URL of the page to appear in the window, the width and height of the window, and whether or not it should have borders. Any text that surrounds the frame would flow around it in the same way text can flow around an image. You create an iframe with the <iframe> element, and you specify the URL of the page to appear in the iframe using the src attribute (just as you would with an image).
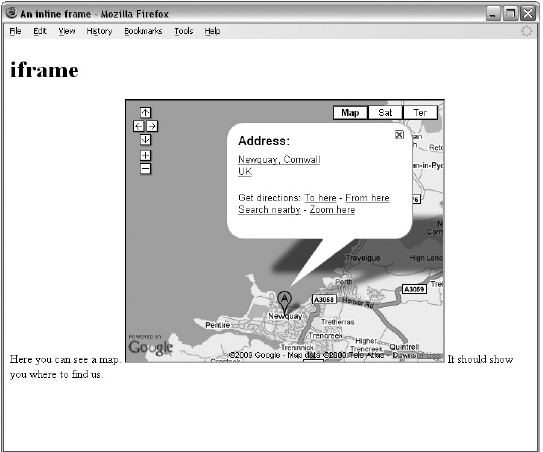
The following is a simple example of a floating frame. If you look at the src attribute you can tell that the iframe embeds a Google map into the page, while the width and height attributes indicate the size of the iframe (ch06_eg08.html):
<body>
<h1>Floating frame</h1>
<p>Here you can see a map.
  <iframe src="http://maps.google.co.uk/maps?q=Newquay,+Cornwall,+United+
Kingdom&
    output=embed"
    width="425" height="350">
    Cannot see the map?
    <a href=" http://maps.google.co.uk/maps?q=Newquay,+Cornwall,+United+
Kingdom">
    Click here to view our location on Google Maps</a>.
  </iframe>
It should show you where to find us.</p>
</body>
When creating an iframe, you should use both an opening <iframe> tag and a closing </iframe> (it should not be an empty element). Anything between these is shown only to those whose browsers do not support iframes (in this example you can see that a link to the map has been offered to users that do not see the iframe). If your iframe contained information that you would want a search engine to index, you could include the text that you want it to index in here.
You can see what this page looks like in Figure 6-9.
Let's take a closer look at the syntax for the <iframe> element.
The <iframe> element sits in the middle of a normal XHTML page to create an inline frame. The only attribute it must carry is the src attribute, whose value is the URL of the page to be included (wherever the <iframe> element is in the document), although it is also good to add the height and width attributes to control its size. Remember that this element does not have to be part of the frameset document type.
In addition to the universal attributes, the <iframe> element can carry these attributes:
align height width frameborder longdesc marginwidth marginheight name
scrolling src
There are no events or CSS styles that are particular to the <iframe> element.
The src attribute is required on the <iframe> element as it indicates where the browser can find the page to show in the iframe, just as it does on the <frame> element.
The align attribute indicates how the text that is outside of the floating frame will appear. It can take one of the values listed in the table that follows.
Value | Purpose |
|---|---|
| The frame will be aligned with the left margin of the page, allowing the text to flow around it to the right. |
| The frame will be aligned with the right margin of the page, allowing the text to flow around it to the left. |
| The top of the frame will be inline with the text around it. |
| The middle of the frame will be inline with the text around it. |
| The bottom of the frame will be inline with the text around it (the default setting as you can see from Figure 6-9). |
The height and width attributes enable you to specify the height and width of a frame just as you would with an image.
height="250" width="500"
The value of the height and width attributes can be given in pixels (as in the preceding line of code) or in percentages of the browser or parent element if it is contained by another element (as in the line of code that follows).
height="20%" width="40%"
Keep in mind, however, that users with different screen resolutions will see different amounts of the screen. If you do not specify a height or width, the browser works out a size based on the full size of the screen.
The frameborder attribute specifies whether the borders of the frame are shown; the value should be the number of pixels the border should be. A value of 0 means that there would be no border.
frameborder="0"
The longdesc attribute allows you to specify a link to another page where there is a description in text of what would otherwise be in the frame. This is particularly helpful if you are putting images, charts, or graphs in the frame, as they make your site accessible to those with visual impairments. It can also be used if the user is having trouble loading the frame.
longdesc="../textDescriptions/iframe1.html"
The marginheight and marginwidth attributes allow you to specify the distance in pixels between the border of the frame and the content of the frame.
marginewidth="8" marginheight="8"
The marginwidth attribute allows you to specify the distance between left and right borders and the content, while the marginheight attribute specifies the distance between top and bottom borders and the content.
If the iframe is not big enough to show all of the content, then the scrolling attribute specifies whether the frame should have scrollbars (just as it does for the <frame> element).
Try It Out: Adding a Map to the Café
In this example you will use an iframe to add a Google map to the contact page of the Example Café.
Open the contact page for the Example Café. The map will go just before the link to the Google Maps web site:
<h2>Contact</h2>
  <p><address>12 Sea View, Newquay, Cornwall, UK</address></p>
  <p><a href="http://maps.google.com/maps?q=newquay">Find us on Google
    Maps</a></p>
  <p><a href="mailto:[email protected]">Email Example Cafe</a></p>
Go to
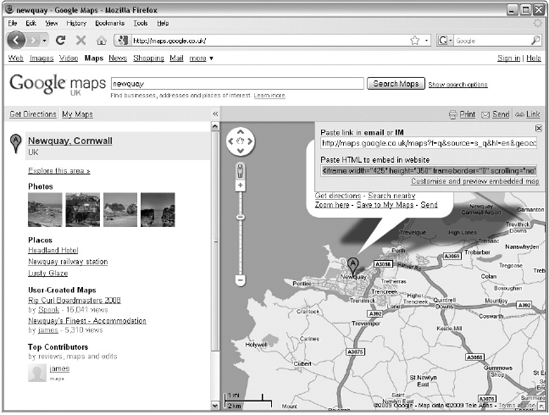
maps.google.comand enter a location for your café. When you have a map loaded, click the link that says "link" just above the top right-hand corner of the map. You should see a textbox containing an iframe, as in Figure 6-10.After the first paragraph, paste the code from the Google Maps site. You may find that there is a lot more code than we used in the version earlier in the chapter.
<iframe width="425" height="350" frameborder="0" scrolling="no" marginheight="0" marginwidth="0" src="http://maps.google.co.uk/maps?source=ig&hl=en& q=Newquay,+Cornwall,+United+Kingdom&ie=UTF8&cd=1& geocode=FShAAQMdHG-y_w&split=0&sll=53.800651,−4.064941& sspn=6.881357,14.941406&ll=50.420058,−5.079117& spn=0.018513,0.038624&t=h&z=14&iwloc=A&output=embed"> </iframe><br /> <small> <a href="http://maps.google.co.uk/maps?source=embed&hl=en& q=Newquay,+Cornwall,+United+Kingdom&ie=UTF8&cd=1& geocode=FShAAQMdHG-y_w&split=0&sll=53.800651,−4.064941& sspn=6.881357,14.941406&ll=50.420058,−5.079117&spn=0.018513, 0.038624&t=h&z=14& iwloc=A" style="color:#0000FF; text- align:left"> View Larger Map</a></small>Note how this code uses the attributes we have met:
widthandheightspecify the size of the frame.The
frameborderattribute has a value of0so that the iframe does not have the default border.The scrolling attribute is set to
nobecause the map is larger than the size of the window and you do not want scrollbars on this frame.marginheightandmarginwidthhave a value of0to prevent gaps inside the frame.This is followed by a long URL that contains a lot of information about the location even though the following would be enough:
http://maps.google.co.uk/maps?q=newquay,+Cornwall,+United+Kingdom&output=embed
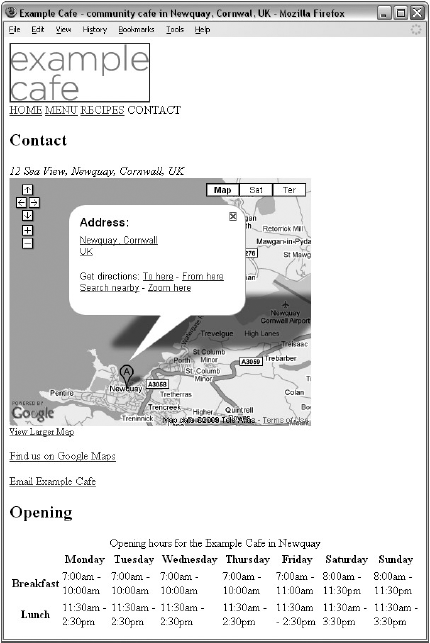
Your new contact page should look like Figure 6-11.
In this chapter, you learned about frames, which allow you to divide a browser window into separate panes. Each of these panes contains a discrete XHTML document that can be loaded and reloaded separately from the other frames.
Frames are particularly helpful if part of your page's content remains the same while the main body changes; for example, when either the main body is long (and you want the navigation to remain in view) or the navigation takes a long time to load (and you do not want to reload it for each page).
The chapter covered two types of frames:
The more traditional frameset document, which uses the
<frameset>element to divide the screen into rows and columns. The<frameset>element then contains a<frame>element corresponding to each part of the window. These frames belong to the frameset document type and require a differentDOCTYPEdeclaration than other XHTML documents because the<frameset>element replaces the<body>element.The more recent inline or floating frame, which lives in a normal XHTML page, and allows only the content of the frame to be reloaded. Inline frames can appear anywhere within the document.
As I have already mentioned, frames are often replaced by the use of JavaScript (or AJAX) to reload parts of pages.
The answers to all of the exercises are in Appendix A.
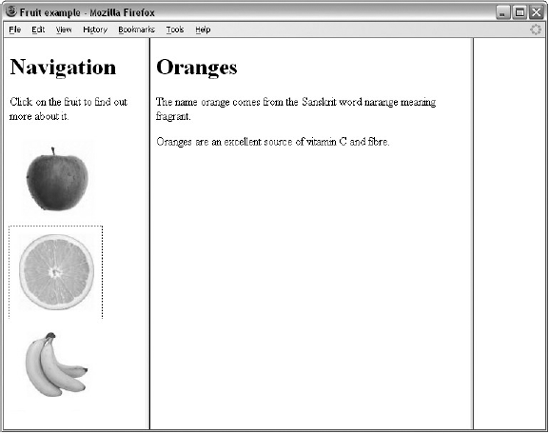
Create a frameset like the one shown in Figure 6-12, where clicking a fruit loads a new page in the main window. When the page loads in the main window, it will carry the details for the appropriate fruit (to save time, you can use the images and fruit description pages in the code download, but try to create the frameset and navigation on your own).
Create an
<iframe>like the one shown in Figure 6-12, where you can load two different documents inside the iframe window in the current page.