Once you've created your web site, you'll want to make it available for everyone to see. In this chapter, you are going to look at preparing your site for the public, putting it on the Web, and telling people about it once it is live.
You will learn some checks and tests to perform before you put your site on the Web including validating your documents, checking links, and ensuring that the site works in different browsers.
When you are ready to share your site with the public, you will need to arrange hosting. In order to help you choose the right hosting company and, indeed, the right package from a hosting company, you need to learn the key terminology used by these companies. Therefore, I will explain what terms such as shared and dedicated hosting are, how much space or bandwidth you need, and so on.
Once your site is ready for the public to see, you will then want to ensure they know about it! You will want to ensure that it is indexed by the major search engines, such as Google and Yahoo. You might also consider a number of other strategies to let people know you are out there, such as pay-per-click advertising (from the likes of Google's AdWords or Yahoo! Search Marketing). After putting all the hard work into creating a site, you want it to be a success.
When visitors come to your site, you can learn a lot, such as how many people have looked at the site, which pages are most popular, and how visitors found your site. Web analytics helps you track and decipher this information, and I will introduce you to a web analytics tool from Google called Google Analytics, which is free.
We will finish up by looking at some other technologies that you might like to consider learning once you are comfortable with what you have covered in this book.
But before you look at all of this, you need to learn one final element that provides information about documents and their content — the <meta> element.
In this chapter, you learn how to do the following:
Perform tests to ensure your site will work as you intended
Find a host to make sure your site can be accessed by everyone on the Web
Move your site from your computer to your host's web server using FTP
Submit your site to search engines
Increase visitor numbers
Use pay-per-click advertising
Discover other technologies you might like to look at next
Control different versions of your site so that you can make changes without making mistakes
Before you start looking at how to test your site, you need to learn about one last tag — the <meta> tag. Meta tags live in the <head> rather than the <body> of a document and contain information about a document (rather than information that is part of the document that you would see in the browser window). The information can be used for a number of purposes including helping search engines index your site, specifying the author of a document, and, if the document is time-sensitive, specifying when the page should expire.
The <meta> element is an empty element and so does not have a closing tag. Instead, <meta> elements carry information within attributes, so you need a forward slash character at the end of the element. For example, here is a <meta> element that provides a description of a computer bookshop web site:
<meta name="description" content="Buy computer programming books
    to learn HTML, XHTML, JavaScript, ASP.Net, PHP" />
The <meta> element can take eight attributes, four of which are universal attributes — dir, lang, xml:lang, and title. The other four, however, are specific to the <meta> element:
The name and content attributes tend to be used together, as do the http-equiv and content attributes. These pairings will be addressed next.
The name and content attributes specify properties of the entire page. The value of the name attribute is the property you are setting, and the value of the content attribute is the setting that you want to give this property.
Here you can see a <meta> element where the name attribute indicates that you are going to specify a description for the page, and the content attribute is where this description of the page goes:
<meta name="description" content="Buy computer programming books to
learn HTML, XHTML, JavaScript, ASP.Net, PHP" />
The value of the name attribute can be anything; no restrictions are published in any standards. Therefore, if you need to add your own information about a document and its content, you can use this element. Some predefined values for this attribute that are commonly used are:
description: Specifies a description of the pagekeywords: Contains a list of comma-separated keywords that a user might search on to find the pagerobots: Indicates how search engines should index the page
The description and keywords properties can be used by programs called crawlers, bots, or spiders, which most search engines use to help index web sites. Therefore, they're worth adding to any web page. These programs go through web sites, adding information to the databases used by the search engines, following links as they come across them, indexing those pages, and so on — this is how search engines manage to index so many sites.
You have already seen an example of giving the name attribute a value of description, and using the content property to specify a sentence that describes the site. Some search engines display the value of the description property in their search results.
A description should be a maximum of 200 characters long, although some search engines, such as Google, display only the first 100 characters. Therefore, you should try to get across the main content in the first 100 characters.
For example, here is the <meta> tag showing the description of the Wrox Press homepage (at the time this book was being written):
<meta name="description" content="Wrox.com has all the coding and
programming resources you need. Find books, articles, and other IT content,
programmer to programmer (p2p) forums, and free code downloads!" />
And here is the description that you will see if you type Wrox into Google:
"Wrox.com has all the coding and programming resources you need. Find books, articles, and other IT content, programmer to programmer (p2p) forums. . . ." |
The keywords property was created to supply a list of words that a search engine could use to index the site. In practice, search engines take very little (if any) notice of this anymore, although many sites will still provide keywords in this manner. For example, an online computer bookstore might use keywords such as this:
<meta name="keywords" content="computer, programming, books, web, asp,
asp.net, C#, vb, visual basic, c++, Java, Linux, XML, professional,
developer, html, html, css, xslt, access, sql, php, mysql" />
A rough guideline to the limit of the text should be around 200 characters. You should never use words that do not directly relate to the content of the site. Ideally, the same keywords should also appear in the text for that page.
You could also use the lang attribute in conjunction with the description and keywords to indicate the language they are using, or to offer keywords in multiple languages. For example, here are the keywords in U.S. English:
<meta name="keywords" content="computer, programming, books"
lang="en-us" />
And again in French:
<meta name="keywords" content="livres, ordinatteur, programmation"
lang="fr" />
And finally in German:
<meta name="keywords" content="programmieren, bucher, computers"
lang="de" />
As I mentioned earlier, many search engines use programs to index web pages on their behalf. You can use the name attribute with a value of robots to prevent one of these programs from indexing a page or from following links on the page (because many of these programs follow the links they find on your site and index those, too). For example, you probably would not want a search engine to index any pages that you are still developing, or which you use to administerthe site.
Here you can see that the <meta> element tells search engines not to index the current page or to follow any of the links on it to index those.
<meta name="robots" content="noindex, nofollow" />
The content attribute can have the values shown in the table that follows.
Meaning | |
|---|---|
| Index all pages. |
| Index no pages. |
| Index this page. |
| Do not index this page. |
| Follow links from this page. |
| Do not follow links from this page. |
By default the values would be all, index, and follow, allowing web crawlers to follow any link and index all pages.
If you want to prevent pages from being indexed you should use this technique in conjunction with a file called robots.txt, which is discussed in the "robots.txt" section later in this chapter.
The http-equiv and content attributes are paired together to set HTTP header values. Every time a web browser requests a page, HTTP headers are sent with the request, and each time the server responds sending a page back to the client, it adds HTTP headers back to the client:
The headers sent from a browser to a server when it requests a page contain information such as the type of browser, the operating system, the screen resolution, the date, the formats the browser will accept, and other information about the user's configuration.
The headers returned from a server to a web browser contain information such as the type of web server, the date and time the page was sent, and the date and time the page was last modified.
Of course, the headers can contain much more information, and using the <meta> tags is one way of adding new headers to be sent with the document. For example, you might want to add a header to indicate when the page should expire (no longer be valid) — which is especially helpful if the document contains things such as special offer prices which you know will expire on a certain date — or to refresh a page after a period of time.
It can be important to expire pages because browsers have something known as a cache, a space on the hard drive where they store pages of web sites you have visited. If you go back to a site you have already visited, the browser can load some (or all) of the page from the cache rather than having to retrieve the whole page again. This is done because it can make the page load quicker (since the browser does not have to collect as much data).
Here you can see a <meta> tag that will cause the page to expire on Friday, April 16, 2011, at 11:59 (and 59 seconds) p.m. Note that the date must follow the format shown.
<meta http-equiv="expires" content="Fri, 16 April 2011 23:59:59 GMT" />
If this were included in a document and the user tried to load the page after the expiry date, then the browser would not use the cached version; rather it would try to find a fresh copy from the server. This helps ensure that users get the latest copies of documents and thereby prevents people from using out-of-date information.
You can prevent some browsers from caching a page altogether using the value pragma for the http-equiv attribute and a value of no-cache for the content attribute like so:
<meta http-equiv="pragma" content="no-cache" />
You can set a page to refresh after a certain number of seconds using the following <meta> tag, which gives the http-equiv attribute a value of refresh:
<meta http-equiv="refresh"
content="10;URL=http://www.wrox.com/latest.aspx" />
This will cause the page to refresh itself after 10 seconds. You can see the number of seconds given as the first part of the value for the content attribute, which is followed by a semicolon, the keyword URL, an equal sign, and the address of the page to be refreshed.
You can even refresh to a different page. For example, if your site moves from one domain to another, you can leave a page up for visitors who go to the old domain saying that you have moved and that the user will be redirected automatically in five seconds.
When you use this technique to reload the same page it is referred to as refreshing the page, while sending the user to a new page or site is called redirecting the user.
It is generally considered bad practice to refresh entire pages, in particular because someone might be in the middle of reading the page when you refresh it. It is important to bear in mind that some people will not read a page at the same speed as others (especially if they have a screen reader to read the page to them, in which case the page's automatically refreshing would be very frustrating). The one exception to this rule would be sites such as sports results, online chat applications, or auction sites where parts of the page refresh so that the user has the latest information — although this kind of refresh is done using very different techniques.
You can set the name of the author of the document using a value of author for the http-equiv attribute and then using the author's name as the value of the content attribute, like so:
<meta http-equiv="author" content="Jon Duckett" />
Character encodings indicate the character encoding that was used to store the characters within a file. You can specify the encoding used in a document with a <meta> tag whose http-equiv attribute has a value of Content-Type. The value of the content attribute should then be the character encoding used to save the document; for example:
<meta http-equiv="Content-Type" content="ISO-8859-1" />
Here you can see that the document was written using the ISO-8859-1 encoding. You will see more about character encodings in Appendix E.
The scheme attribute is not yet widely supported, although it was created to allow web page authors to specify a scheme or format for a property value. For example, if you are working with dates, you can write them in several ways. In the U.S., the date format is commonly written mm-dd-yyyy, whereas in Europe it is written dd-mm-yyyy. So, you might use the scheme attribute to indicate a date format. In the U.S., you could use the following:
<meta scheme="usa" name="date" content="04-16-1975" />
In Europe, you might use the following:
<meta scheme="Europe" name="date" content="16-04-75" />
The use of the scheme attribute does assume that the processing application understands the value of the scheme attribute and name attribute — and given that the mainstream browsers would not understand this, it would fall upon either a script or a custom application to interpret the use of this element.
Having taken a look at the <meta> element, it is time to start preparing your site for the public to visit.
Most web page authors build their first sites on their desktop or laptop computer. The site usually works well on that machine, but different visitors to the site will be using different operating systems and browsers, viewing the pages on different-sized monitors, and connecting to the Internet with different connection speeds. With all this in mind, it is sensible to perform some tests on the site before setting your site loose for everyone to look at.
So, the two stages of testing are as follows:
These tests help ensure that as many people as possible view your site as you intended them to.
One of the best ways to ensure a site will work on the majority of browsers is to validate your code and make sure that you have stuck to the rules of the language. A validator will check things such as whether you have closed all tags correctly, that the attributes you have used are actually allowed on that element, and so on. All it takes is for you to miss something as simple as one closing </td> tag and, while the page may look fine on your browser, it will not necessarily work on someone else's computer.
It is helpful to try to validate the first page you build of each site, as it is quite tempting to copy and paste parts of your code from one file to the other and use your first page as a template for other pages of the site. If you have an error in your template page and you use it to create all the other sites before you test it, you might have to amend every page.
As discussed in Chapter 1, each version of HTML and XHTML has a set of rules that govern that version of the language, known as a DTD or schema. A validator can check whether a web page obeys the rules of that DTD or schema. Therefore, by validating your pages you will know if you have left out a tag or other important part of the markup. It is the DOCTYPE declaration at the start of your page that will tell a validation tool which DTD or schema your page should match the rules of.
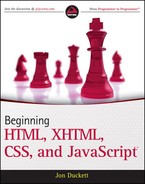
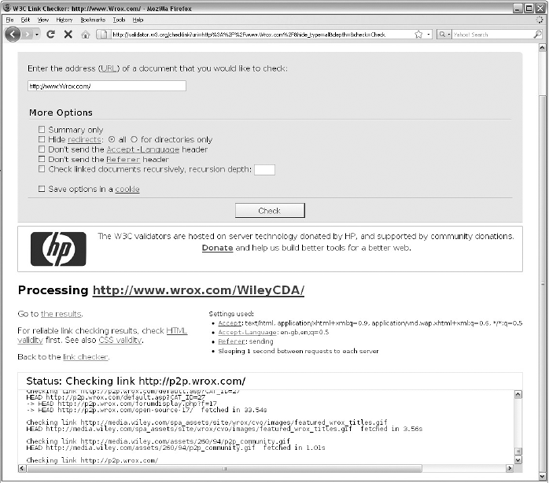
The W3C (the body that oversees development of HTML, XHTML, and CSS) has a free online validation tool at http://validator.w3.org/. It allows you to enter a URL for a site or upload a page from your computer as shown in Figure 13-1.
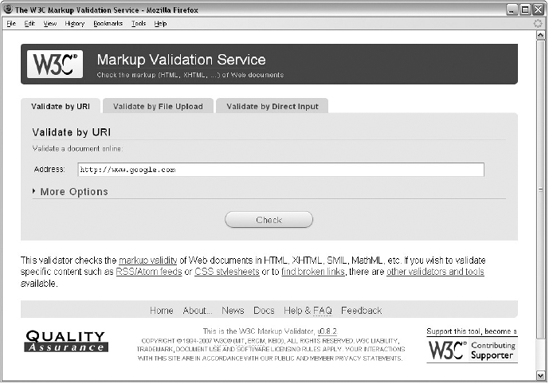
It will then tell you if there are errors in your document; you can see examples of this in Figure 13-2.
While the W3C validation tool is very helpful — and free — having to validate each page individually can take a while.
Many web page authoring tools, such as Dreamweaver, contain tools that allow you to validate your entire site.
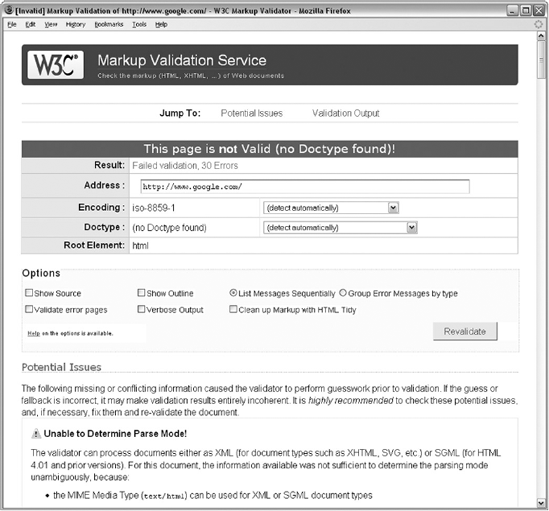
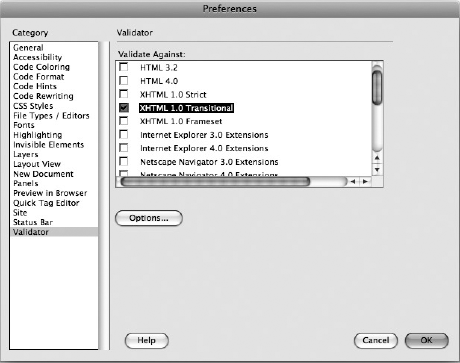
Dreamweaver (which appears to be the most popular authoring tool among web professionals) introduced good validation features for XHTML pages in its Dreamweaver MX version (far better than the validation offered by earlier versions of Dreamweaver). Validating a page is as simple as saving it and then pressing Shift+F6; you should see errors appear in the results panel, asin Figure 13-3.
For this to work correctly you must have the right settings in Dreamweaver. To get the settings, you can right-click in the results panel and choose the setting dialog box (or Option-click on a Mac). You will then see a whole range of document standards appear in the new Preferences dialog box. You want to make sure that each option is unchecked except the version you want to check against. So, if you are trying to validate Transitional XHTML 1.0, you must have only that box checked, as shown in Figure 13-4.
It is important to check your links both before your site goes live and after you have published it on the Web. There are several online tools to help you check links; some of them charge, although there are some free link-checking services such as:
You can also use the Link Valet tool to check whether any site you link to has been changed since a specified date. This can be very helpful because an external site might restructure its pages, and the old URL will no longer be valid, or it might start publishing content you no longer wishto link to.
In Figure 13-5, you can see the results of a single page validated with the W3C's link validator.
The results from these services might appear quite verbose, but you should be able to tell which links are bad by looking for some kind of highlighting — which tends to be in red for broken or questionable links.
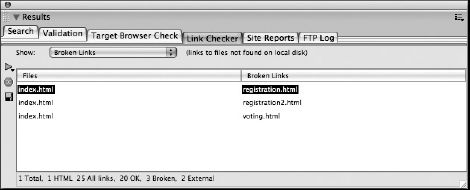
Dreamweaver also contains its own link-checking tool. You can access this from the Results menu or by pressing Control+Shift+F9.
There are options to check a page, a folder, or a whole site. Once Dreamweaver has found your broken links you can fix them in either the Results window or the Properties window as shown in Figure 13-6 (or by going into the code for the relevant page).
Ideally you would already have checked that your color palette had enough contrast to ensure those who suffer colorblindness can still view the site. But if you have not yet done this there are some handy tools here:
Chapter 14 contains a list of techniques to help ensure that your site meets accessibility requirements. This not only helps make sure you reach any potential audience that may suffer from visual or physical disabilities, but also has the benefit that your site is likely to work better on the ever-increasing range of devices that can be used to access the Web.
There are some online tools that help check whether your site meets some of the accessibility requirements, although they cannot check for all aspects of accessibility. For example, these tools can check whether you have used alt attributes on each image, but they cannot tell whether the alternative text will make sense to someone who cannot see the image. Here are two of the online tools that you can use to help check whether your site is accessible:
A very good reference on the topic of accessibility is Web Accessibility: Web Standards and Regulatory Compliance by Jim Thatcher, et al. (Friends of Ed, 2006).
Even if you write your pages to the letter as far as the recommendations go and your pages validate perfectly, different versions of browsers on different operating systems behave differently. The page that looked perfect on your monitor just doesn't look the same on a friend's or colleague's monitor. So, you should always try to test your web page on as many different browsers and platforms as possible. You should, at the very least, have the latest versions of Internet Explorer and Firefox on your computer, and ideally Opera and Safari too.
I would also recommend checking your site in Internet Explorer 6. (At the time of this writing, I was working on a popular web site that still had 16 percent of visitors using IE6, and it does not always show your site as you might expect.) Unfortunately, you are able to install only one version of Internet Explorer on a single computer (unless you have a partition running a second version of Windows or run a Windows emulator), and you are likely to want the latest version for day-to-day use. If you have an old PC lying around, you can keep older versions of browsers on that and use it to test your pages once you have built them. If you need to download an old version of a browser, try http://browsers.evolt.org/.
Some web sites and services offer to take screenshots of each page of your web site on many different versions of several makes of browser for you, so that you can check how the pages appear in different browsers. However, this can be quite expensive and time consuming. Examples include:
Another great way to check that a site is working is to ask all your friends to check it before it goes live. At least one or two of them will have different browsers or operating systems, if you're lucky. Ask them to check what it looks like and send you a screenshot of a couple of pages in their browser. If you want to, you can even offer a small prize to one lucky tester as an incentive for them to test your site.
If you are able to, get people who have not been involved in the project to test your site before it is released to the public. This is important because what might seem perfectly obvious to you is not always so clear to someone who is coming to the site for the first time. By the time you have built the site, you will be so close to the designs and workings that it will be very difficult to look at it with the same objectivity as someone who has never seen it.
You want to sit your participants down in front of the site and ask them to perform the tasks. Ideally, the people performing this kind of test on your site would be your target audience.
In Chapter 9, you may remember that we discussed the idea of creating personae that reflect your target audience, and that these actors should have roles that they want to achieve when coming to your site.
You can use these roles again when testing your site. For example, you might have a site that sells bikes and you could ask users to complete the following tasks:
Find a bike they think would be suitable for their 8-year-old daughter
Work out how much a particular model of bike costs
Find out how to visit the store and when it's open
Check whether a helmet meets a certain safety standard
You should only ask each tester to perform around five tasks; any more than this and they will be getting used to the layout and operation of the site.
You should just watch what the users do. You must resist all temptation to intervene at any point, even if you want to ask what someone is trying to do or want to tell them how to get to something you think they are trying to find. (As soon as you start talking to them, you affect their normal behavior — and you won't learn as much.)
Watching where people go to achieve these tasks, how long they spend on each page, and how they navigate can teach you a lot about your site.
Some people prefer to watch silently while participants perform these tasks. Others ask participants to talk their way through what they are doing. In this second scenario (sometimes known as the talking-aloud protocol), you need to make sure that users talk their way through every thought process. You often get broken sentences, but you can get an idea of what you expect of them by performing the task first yourself on a different site. Here is an example of a transcript you might end up with:
"I'm supposed to look for a bike for Julia."
"Looking at . . . home, store . . . "
"Clicking on store . . . "
"List of brands appears on the left, not heard of many of these."
"Pictures on right saying men's bikes, women's bikes, boys' bikes, girls' bikes . . . ?"
"Click on picture for girls' bikes . . . "
"Shows ages, so click on 'first bikes' . . . "
"Looking at pictures . . . "
"This one looks good; click on that picture . . . "
"Doesn't do anything . . . thought it would show more information about it . . . "
"Click on Raleigh Butterfly."
"There, that one looks fine."
You could consider setting up a video camera over the user's shoulder so that you can see the screen and also record their voice, as long as it doesn't put the user off too much. Again you must resist the temptation to interrupt if users are doing something that is not what you think they should be doing in order to achieve the task — after all, in this example you learned that the user expected to be able to click on the image of the bike to see more details, but couldn't.
If you have the time and budget, then there is a lot more you can do in terms of testing. But many web developers avoid doing any testing because they feel that they do not have the time and budget, and if you find yourself in this situation, you can find out a lot about your site and how it will be used by simply watching a small group of people perform basic tasks.
If you are working on a commercial site, it can often help to hire a proofreader to check all your text. Silly typos can affect people's impression of the site you built and make both you (and the client, if you are developing the site for someone else) look less professional.
If your client finds errors throughout the site, you appear careless — even if the client supplied the error-ridden copy for the site.
Your site should now be ready for the public to view it, so in this section we will look at how to get it on the Web. In order to do this you will need to get a domain name and hosting space, and you will have to transfer the site to the new server using an FTP program.
The domain name is the part of the web address you commonly see after the letters www. For example, Wrox Press uses the domain name wrox.com, whereas Amazon uses the domain name amazon.com in the U.S., amazon.co.uk in the U.K., amazon.de in Germany, and so on.
You can register your domain name with a domain registration company, of which there are hundreds; just search on your favorite search engine and you will find plenty. Most companies go for the suffix .com, but several other suffixes are available. For example, there are country-specific domain suffixes (also known as top-level domains) such as .co.uk for the UK, .de for Germany, .com.au for Australia, and .ru for Russia. You should choose a country-specific domain only if you are based in that country. Indeed, some domain names can only be bought by people with registered companies in that country. Then there are also suffixes such as .me.uk, which is for personal sites; .info, which is for information-based sites; and .org, which is for registered organizations. (Unless you are working for a large multi-national corporation, you do not need to purchase all available suffixes for your domain name.)
Before you register your name, you need to see if it is available; all domain name registration companies should have a form that allows you to search to see if your domain name is available. You might find this a frustrating process, as an incredibly high proportion of the .com domain names you might think of have been taken already, as well as most popular words (even combinations of popular words).
You might also like to check that the name of your site is not very similar to that of someone you would not want to be associated with, just in case the user mistypes the URL. For example, you would not want a children's site to have a very similar URL to an adult-content site.
You can order your domain name without actually having a site ready; this is known as domain parking. You order the name as soon as you know you are going to create the site (after all, you will probably want to use the URL in the site design, and will therefore need to order it before you start designing the site), but you do not put anything up there until you have built the site.
Several domain-name registration companies also offer hosting (hosting is covered in the next section), but you do not (generally speaking) have to order your domain name from the same people that host your site. You can get the domain name registration company to point the domain to your hosting company's servers (usually there is a control panel on the site you registered the name with where you specify where your domain name actually points).
Your domain name should be easy to remember. Avoid names that are so long that users will find them hard to remember or too long to type in. For example, if you were called the Sydney Slate Roofing Services Limited, you might choose a domain such as www.SydneySlate.com rather than www.SydneySlateRoofingServicesLimited.com.
When you register the domain name, you will also be able to use this for your e-mail addresses. For example, if you choose the domain www.example.com, then no one else will be able to use the e-mail address [email protected] without your permission. (Unfortunately, it is possible for spammers to make e-mails appear as if they come from your domain, simply by changing the "from" address in their e-mail programs, and there is nothing you can do to prevent this.)
You already know that in order to view a web page, a browser requests a page from a web server. The web server is a special computer that is constantly connected to the Internet.
When you access a page using a domain name, such as www.example.com/, something called a name server changes the name into a number. The number (known as an IP address) uniquely identifies a machine on the Web and this machine holds your web site.
So when you are ready to put your site out on the Web, you are going to need some space on a web server. Hundreds of companies will allow you to put your web site on their servers and will, of course, charge you for the service. The service is known as web hosting because the company hosts your site for you.
Some ISPs will give you a small amount of web space free when you choose them to access the Internet. There are also other sites that offer free hosting (these are often paid for by the use of pop-up advertisements that appear when your pages load). For a personal site you may need only a small amount of web space and you might be prepared to put up with any pop-up ads that come with the free service. For commercial sites, however, it is better to choose some paid hosting — which can still be very cheap but will not serve advertisements.
As I said, literally hundreds of companies offer web hosting, and it can seem like a minefield deciding which to go with. Following is a discussion of the key points you need to understand and consider when choosing a site (these points are listed here in alphabetical order, rather than in order of importance):
Backups: You should check whether your host performs backups on your sites and, if so, how often. A backup is simply a copy of the site taken in case there is a problem with the computer it is on.
Some companies will only create backups so that they can restore your web site in the event of a server breaking down. Others will also allow you access to backups (which can be handy if you accidentally break the site, because you can go to the backup and get an older version that you know worked).
If your site changes regularly, you will want to look for frequent backups (daily at least), and you would want the hosting provider to do this automatically. But if the site does not change regularly, you may be prepared to create a backup yourself, and do it less often.
Bandwidth: This is the amount of data you are allowed to use on your site. If the average size of one of your web pages is 75KB including images, and you get 100 visitors to your site per month, with each visitor looking at 10 pages, you will need at least 75000kb (or 75MB) of bandwidth per month. In reality, you will find that hosts often allow a lot more than this, but it gives you an idea of how to calculate bandwidth.
The tricky part of deciding how much bandwidth you will need is to judge how successful your site will be. You can never predict how popular your site will be, and if it is mentioned in a popular newspaper or magazine, it can suddenly get a lot more traffic. Most hosting companies will charge you an extra fee if you exceed the bandwidth allocated on your account, and their web site will usually tell you how much bandwidth you have used in a month.
Country: You might want to consider which country your site is hosted in. It is best to host the site in the same country where you expect the majority of your visitors to be because the data has less distance to travel, which should make your site appear to those users more quickly. If you are setting up a site for an Australian market, for example, you would ideally host the site in Australia as it would be quicker for Australian visitors to load the pages than if it were hosted in Europe. In practice, however, you are rarely likely to see much of a performance difference.
Data centers: Data centers are where the hosting company will have its servers (and it may be a different building from where the company's offices are). A lot of companies say that they have multimillion-dollar data centers, but this does not necessarily mean your hosting company is a big operation, because most hosting companies hire space in a large data center that is shared by many companies.
Disk space: This is the amount of space you get to store files on the computer that serves your site. You will usually see a figure given in MB (megabytes) or GB (gigabytes) The disk space governs how large your site can be; you must have more disk space than the total size of all of the XHTML, CSS, script files, and images that make up your site. You can check how large your web site is by simply looking at the size of the folder that your site is in (as long as you do not have any other files in that folder).
E-mail accounts: Hosting companies generally provide e-mail services with web hosting. You need to consider two factors here: the size of mailbox you are allowed, and the number of mailboxes you are given. Some hosts give you unlimited mailboxes but set a maximum amount of storage space across all of them, so if you have five mailboxes and only 100 megabytes of space to share among them, each account can hold only 20MB at capacity. Some hosting companies allow you only a few mailboxes, but will allow a fixed amount for each mailbox (say 100MB each). Finally, some hosting companies allow you to take up the amount of space you have allocated for your domain with mail, so the only limit is your storage limit.
Shared versus dedicated hosting: The cheaper web hosting is nearly always provided on what is known as a shared host. This means that your web site is on the same physical computer as many other sites. Because the smaller sites do not have as many visitors, the computer can easily cope with hosting several sites. However, larger sites that receive many thousands of visitors a day or serve large files (such as music downloads or a lot of heavy graphics) require extra bandwidth and take up more resources on that server. When visitors to your site start to request a lot of large files, the amount of data you are sending to them could exceed the bandwidth limit set on your account, and this is likely to result in increased charges. Therefore, if your site becomes extremely popular, it may be less expensive to get your own server, which is known as a dedicated server because it is dedicated to your use.
Some of the very popular sites on the Web are actually hosted across several servers — the site may be so busy that one computer alone cannot handle the traffic, or one machine may require maintenance so there are others to take the strain. Banks, large online stores, and multinational corporations are examples of sites that would use this kind of setup — known by many names including a load-balanced server or cluster of servers, a web farm, or a cloud platform.
Some companies will offer to host your site on a cluster or cloud, which means that they have several sites on the same set of servers (generally this is more reliable than having several sites on one single server).
Don't be put off by this talk about dedicated or load-balanced servers. Generally, if your site is so popular that you require your own dedicated server, you should be making enough money from it to warrant the extra cost.
Statistics packages: Every time a user requests a file from your site, the web server can store certain details about the user — for example, the IP address, browser version, language of the operating system, and so on. This information comes in the HTTP headers from the browser, and is stored in what is known as a log file. Statistics packages can look at the log files that contain this information and interpret some very useful information from them. For example, you can see how many pages you have served to visitors, what users typed into search engines to find you, and what the most common page people leave your site from is. All this information helps you understand what users are doing on your site and can help you improve the site and the number of visitors it receives. You learn more about statistics packages later in the chapter.
Uptime: Uptime refers to the percentage of time your web server is working and available for people to look at your site. You will generally see figures such as 99 percent uptime, which means that, on average, 99 out of every 100 minutes your site will be available. But then that also means that your site might be down for 1 percent of the time, which could be 87.6 hours per year, or four days. If your site is your main source of income, you should find an alternative with more uptime.
Unless you are a running a very large company, it is rarely worth the investment of running your own servers because you are likely to need someone capable of administering the machines and taking care of them on a regular basis. If you decide that you do need your own dedicated servers, several hosting companies will manage a server on your behalf, updating it with new patches for the operating system to fix security holes when needed — this is known as a managed dedicated server. While this is still expensive, you will generally find it cheaper than hiring someone yourself to manage your servers.
Once you have paid for some space on a web server, you need to be able to get the files that make up your web site onto this computer — which can be on the other side of the world. The most efficient way to do this is using FTP.
FTP stands for File Transfer Protocol. The Internet uses a number of different protocols for sending different types of information. For example, HTTP (Hypertext Transfer Protocol) is used for transmitting hypertext files, which are better known as web pages (that's why most web addresses start with http://). FTP is a protocol used to transfer binary files across the Internet and is much quicker at sending whole web sites to a server than HTTP.
Most hosting providers actually require that you use FTP to transfer your pages onto their servers, which means that you need an FTP program (sometimes referred to as an FTP client) to put your files on a server.
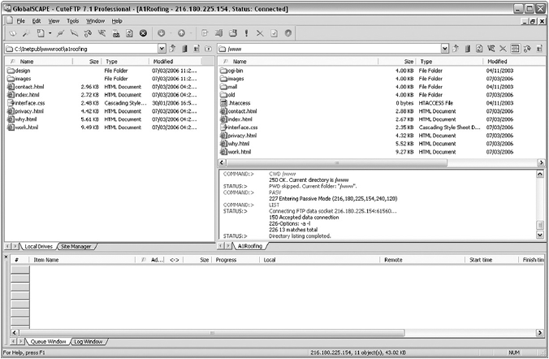
FTP programs usually have two windows, each with a file explorer. One represents the files and folders on your computer; the other represents the folders on the web server. In Figure 13-7, you can see the folders on my computer, and on the right you can see those on a web server.
The table that follows shows some of the most popular FTP programs.
Product Name | URL | OS |
|---|---|---|
FireFTP | Windows and Mac OS X | |
Cute FTP | Windows and Mac OS X | |
FTPX | Windows | |
Fetch | Mac | |
Transmit | Mac |
Each of the programs is slightly different, but they all follow similar principles.
When you register with a host, this host will send you details of how to FTP your site to its servers. This will include:
An FTP address (such as
ftp.example.com)An FTP username (usually the same as your username for the domain)
An FTP password (usually the same as your password for the domain)
Figure 13-8 shows you how these are entered into the FTP program called Transmit on a Mac.
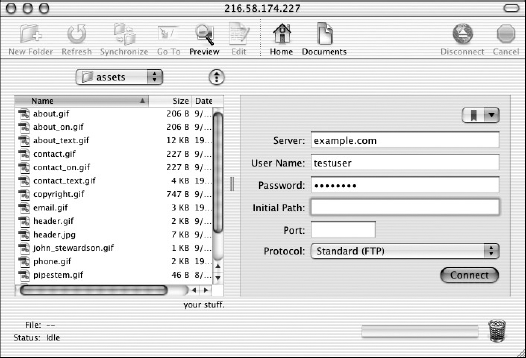
Some hosting companies allow you to use a variant of FTP called SFTP or secure FTP. This is considered to be more secure than standard FTP because the username and password are encrypted when they are sent to the server. If your host supports this option, it is a good idea to use it.
Because a lot of people develop their first site on a desktop or a laptop computer they often use relative URLs for all links, images, style sheets and scripts, rather than absolute ones (because they do not have a full URL for the site yet). This is very helpful because it means that the links will work on a web server of the hosting company without any changes.
When developing a site on your desktop machine, the address bar of your browser might contain something like this:
C:Documents and Settingsadministratorwebsitesexamplesiteindex.html
But when you are ready to make the switch to the new site, you are going to want it to appear here:
http://www.example.com/index.html
If you are using relative URLs to link to all of your other pages, images, script files, and so on, then moving a site to a new folder or even a new URL will not be a problem. However, if you hard-code your paths, you may find that links, images, and other files do not load. For example, suppose you used an image for the logo of your site, and used the full file path in the src attribute, like so:
<img src=" C:Documents and Settingsadministratorwebsites
examplesitemagesour_logo.gif" alt="Our Logo" />
This image would not be loaded when you move the site to a server. It is better to use something like this:
<img src="images/our_logo.gif" alt="our logo" />
Now, as long as the images folder is within the directory that this page lives in, the image will be loaded, no matter where the site is moved.
Now that your site is on the server where the public can see it, you should check your pages thoroughly again to ensure they appear as you intended. Remember to check that all of the links work and that the images and other files are loading. You should consider running a link checking tool (like the ones discussed earlier in this chapter) again to help check whether links are working. Once you are happy that the site is functioning properly, you can start to tell the world about it.
Now that you have built your site and put it up on the Web, you want people to discover it. When creating a web site, many people take the "build it and they will come" approach, expecting people to just find their site (perhaps through search engines such as Google). There are, however, many things you can do to help promote your site and significantly increase the number of people who will see it.
There are whole books devoted to web marketing (and many web sites), but here are some pointers for how to make more people aware of your site.
The first thing to do is to mention your URL wherever you can. For a start, if you have any printed material, from business cards and letterheads to brochures, posters and adverts, include your URL on them. Likewise, ensure that you have it on your e-mail signature.
Entertaining or informative content is one of the best reasons for people to come to your site. If you are able to, creating regular content not only gives people more reasons to come to your site (because you are regularly adding new material that may be of interest to new people), but it also gives people who have found your site a reason to come back regularly.
If you want people to come back regularly, it is important to give people an idea of how often the site is updated. This can be done through some fairly simple means such as adding the date that the items are published under headlines (as you see on many blogs), or by spelling out how often the site is updated.
If you have any particularly interesting or noteworthy news that you think would benefit from a Press Release, then you can consider writing one and submitting it to a PR news service such as PR Web (www.PRweb.com). Other journalists and bloggers may pick up on your article and mention it.
Some site owners will allow other web sites to republish content that they have written in return for a link back to their web site. If you want to do this you can tell visitors that this is an option at the bottom of your articles, and go out and offer your content to other sites.
Many industries and hobbies have their own forums and online communities. You can also find groups of people interested in the same topic on social networks, such as Facebook and LinkedIn.
If you become a part of any online community that is relevant to your site, you can build your profile amongst the community. By having your URL on the signature and profile page of sites you post to, or on your social network profile pages, more people become aware of your site, and they may be regularly reminded of it.
It is very important when becoming part of an online community that you do not just post messages when you have something to say about your site or have added something new to it. As with any community you should get involved in the conversations and reply to other people's posts offering advice where you can (giving back to the community, not just using it to promote your site).
Many trades and hobbies have at least one site that lists all other sites in that field. Try to find out if there are any sites that relate to the subject of your site and ask those sites to link to you.
Some trade directories charge for listings; if this is the case ask their monthly traffic and average number of visits you can expect per month from your listing before handing over any money. You may then want to suggest a trial period before handing over a full year's subscription (you will see how to track how many people come from such sites shortly).
Many smaller sites offer reciprocal links; that is, they will link to you in return for your linking to them. It is a way for everyone to boost traffic. If you do this, make sure that you are not putting someone on the front page of your site when they are going to put a link to you tucked away on a page that few people will come across — the term is reciprocal linking, after all.
While it is good to have as many people linking to your site as possible, you will tend to get better trafic from sites that cover topics relating to the subject of your site.
Use a few search engines to search for competing sites or company names and see who is linking to and talking about them — the sites that link to your competitors may well link to you, too, if you ask.
You have probably seen links like those shown in Figure 13-9 on many web pages, encouraging users to bookmark a page on services such as Delicious or Stumble Upon, or to vote for the page on sites like Digg.
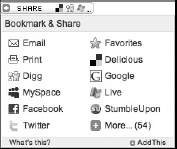
While most of the sites shown in this button in Figure 13-9 will have pages that describe how to link to each of them individually, a far simpler and quicker way to add these options to your site is using a web site called www.addthis.com/(this site provides very simple tools to create a link like this encouraging visitors to share the site with others).
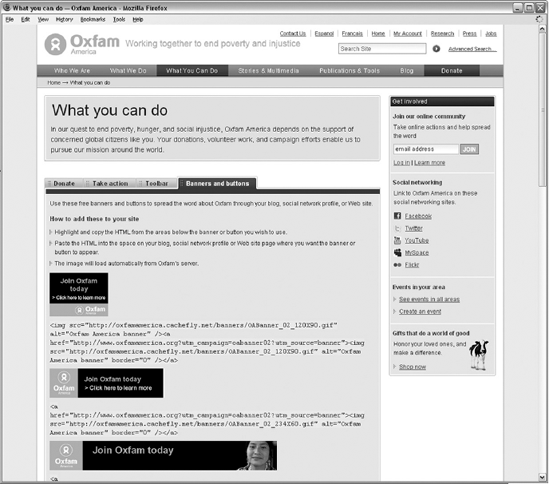
You can also provide a page with buttons or banners that make it easy for other sites to link to you. This is more likely to happen with hobby sites than with commercial ventures, but people who create sites in their spare time will often link to other special-interest sites. If you provide them with attractive images, and show them the code to add the images and links to their site, they are more likely to include these ads. Figure 13-10 shows some examples from the Oxfam web site.
When you have searched on Google you will probably have noticed the links down the right-hand side of the page like those in Figure 13-11.
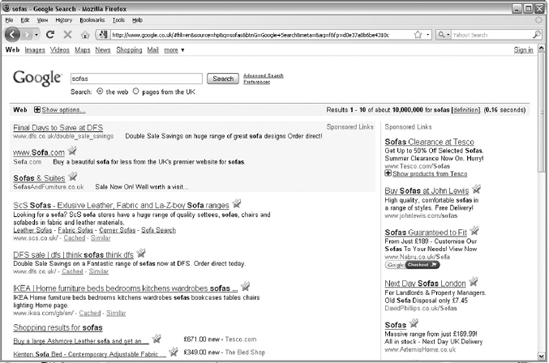
These are examples of what is known as pay-per-click advertisements, so called because the advertiser only pays each time someone clicks on the ad.
Google's pay-per-click advertising system is called AdWords, and in order to advertise, you specify a set of keywords that relate to your site (and create your ad copy). The ad will only appear when someone searches on one of these keywords.
There are two main factors that determine the order in which your advertisements will appear:
The amount you are prepared to pay each time someone clicks the ad.
The number of people who actually click on your ad. If users do not click the ad, then it slips down in position no matter how much you pay, because Google stands to make more money if ten people click a cheaper link than if one person clicks a slightly more expensive link. Also Google wants to remain as relevant as possible to visitors, so it will prioritize the most popular links.
This can be a very cost-effective way to generate traffic to your site. Yahoo offers a similar service called Yahoo! Search Marketing, and Microsoft has a system called adCenter.
Display advertising is a term used to describe advertisements where you pay for your ad to appear on a particular site. It is most commonly associated with banner ads.
Companies are charged for display ads in two common ways. First, there is the cost-per-thousand impressions confusingly named CPM (which stands for cost per mille). Second, you may be charged to occupy a space on a page on a per month or per year basis.
If you do take out display advertising it is worth noting that click-through rates on display ads are very low.
Remember that a lot of web users are immune to advertising and just scan pages to find what they really want. If you are going to create a banner, make sure it's visually attractive and gives people a clear incentive for clicking on it. You want people to want to click on your ad so it's worth the money you are spending to have it appear on other sites.
Some current thinking suggests that online display ads are more suited to brand awareness than achieving specific actions such as getting people to visit your site, because click-through rates are very low. It is not uncommon for display ads to have less than 1 percent of the people viewing the ad visiting the site.
If you have regularly changing content, consider adding an e-mail newsletter feature to your site. By encouraging people to sign up for e-mail updates you can regularly remind them about your site and tell them what has changed.
Some good tools for creating and managing e-mail lists are:
www.CampaignMonitor.comwww.MailChimp.com
Both of these tools not only help you send e-mails to visitors, but also help you create subscription forms so that visitors can easily sign up to your newsletter.
Near the form where people can subscribe to your newsletter, it is a good idea to explain to visitors the incentives for signing up and tell them the benefits of giving you their e-mail address.
You can also consider approaching other complimentary companies to see if they would mention you in their newsletter in return for a mention on yours.
Now that people are coming (you hope) to your site, you can learn a lot about what they are doing on the site and how they found you.
As soon as you have people coming to your site, you should start looking at how they found you, what they are looking at, the operating system and browser they are using, and when they are leaving.
There are two main ways to learn about the visitors to your site:
When any file is requested from a server, it can create a log file to record information about the browser that requested the page. Many hosting companies will then provide tools that allow you to analyze these log files and give you information about your visitors (which tool they offer varies between hosting companies but the tools will offer similar features).
Analytics software uses a script that records similar information to that available in log files into a database. It also provides tools to analyze this information.
Personally, I install analytics software for all sites I develop. For most small and medium sized sites, I use Google Analytics, which is a free service offered by Google (www.Google.com/analytics). The terms used in site analysis can be confusing; for example, you may have heard people say that a site gets 10,000 hits. This can be quite misleading. The term "hit" refers to the number of files that have been downloaded from the site — and every image counts as a file in this total as well as the XHTML pages. Thus, a single web page with nine images will equal ten hits (and some graphics-intensive pages can have over 30 images for each page that is served). Therefore, it is generally more helpful to look at page views rather than hits, as this represents the number of pages that have been viewed on your site.
You may also come across the term "visits." You should be aware, however, that different statistics packages calculate visits in different ways. Some count every visitor using the same IP address as the same person — so if there are ten people, all of whom work in the same building, looking at the same site at once, then that might look like only one user instead of ten. Different packages also tend to count visits as different lengths of times; some packages remember an IP address for a whole day, so if the same person comes to the site in the morning and then again in the evening it is counted as just one visit. Others will remember the IP address for only 15 minutes.
You will also find that some advertisers will ask for the number of unique visitors you receive each month — again different statistics packages can count unique users in different ways, so this figure can be a little misleading.
Figure 13-12 shows you an example of a report from Google Analytics.
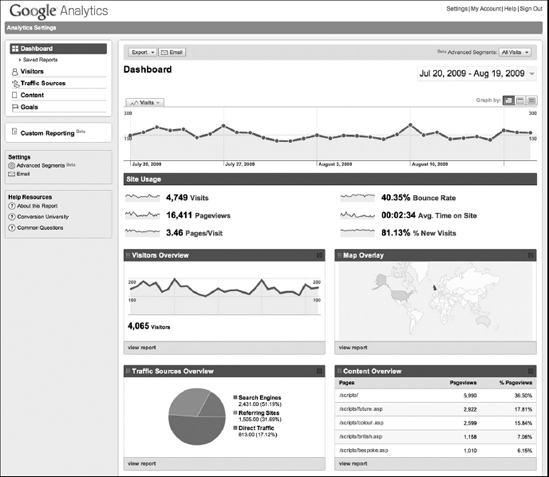
There is an incredible amount of information available, but here are ten things I always look at first when studying a Google Analytics report for a site:
Pageviews: This shows the total number of pages all visitors have viewed on your site.
Visits: This shows the number of times people have visited your site over a given period.
Unique visits: This totals the number of visitors who have visited the web site overa given period, with each visitor counted only once. This is important because whencompared with total visits you can get a good idea of how many people are returning to your site regularly.
Referrers: These are the sites that are sending visitors to your site, and will include a mix of sites that link to you and search engines. If a site is sending you a lot of traffic, you might like to get in touch and see if you can work together to ensure that the traffic keeps flowing.
Search terms: These are the terms that people are entering into a search engine such as Google before visiting your site. This can be particularly helpful in letting you know how visitors describe the things they are looking for (because visitors often use very different terminology to site owners).
User's browser, operating system, and screen resolution: This is important because it shows you which browsers and operating systems you should be checking your site on.
Top content: This shows the most popular pages and sections of your site.
Top entry pages: This shows the most popular pages that people first see when coming to your site (you can often find that referrers and search engines send visitors to specific pages on your site rather than the homepage).
Top exit pages: This shows the pages that people left on (if a lot of people are leaving on the same page, then it is probably a good idea to consider changing that page).
Bounce rate: This is the number of people who left on the same page they arrived on (if a lot of people are leaving from the same page they arrived on, it suggests that the content is not what people were looking for or that the page did not sufficiently encourage people to look around after they arrived at the page and to explore more).
Google Analytics lets you specify the timeframe you want to look at this data for. I find that looking at monthly reports gives me a good overview and starting point for a site's traffic.
You can also instruct it to e-mail you reports on a daily, weekly, or monthly basis, which saves you having to log in to check the statistics each day.
The ability to track where visitors come from using tools such as Google Analytics means that in addition to discovering where people are coming from, you can also measure the success of marketing activity, which allows you to determine the return on your investment (ROI).
In addition to ascertaining whether your marketing investment has paid off in terms of financial cost, you should also consider the time it took you to initiate the marketing activity. For example, you may spend $100 in a month on Google AdWords and it could take you half a day to set it up, write your ads, and check in again a few times while the ads are running. In this instance, it may be more cost-effective to spend 10 minutes writing to a few bloggers who might create a lot more traffic for you at no cost.
So, wherever you can, try to ensure that you are able to measure the performance of each kind of marketing and awareness activity you perform. In addition to looking at referrers, Google Analytics allows you to add the following extra information to your URL so that you can measure the effectiveness of links.
Term | Description | Query String Property |
|---|---|---|
Campaign source | The referring site |
|
Campaign medium | Such as blog, e-mail, PPC, display |
|
Campaign term | Keywords for the campaign |
|
Campaign content | Used to differentiate multiple links from similar campaigns |
|
Campaign name | A readable term you can use to determine the source |
|
There is a handy tool that Google offers to add these links to your URL — just search for Google Analytics URL Builder. Here is an example of a URL with additions to say that a display advert had been added to www.referrer.com for a campaign about cheddar cheese:
http://www.example.com/?utm_source=referrer.org&utm_medium=display&utm_term
=cheese&utm_content=cheddar&utm_campaign=taste%2Bthe%20cheese
You've learned all about XHTML and CSS, made a good start at learning JavaScript, and learned how to put your site live on the Web. That is probably enough for now, so you might wonder why there is a section entitled "What Next?" This section covers two topics:
Tools you can use to add powerful features to your site, using knowledge you already have
What technologies might be appropriate to learn next
So, the first part of this final section will look at services provided on the Web that you can use to enhance your site. You learn about blogs, discussion groups or forums, search, and e-mail newsletters. While these might all sound complicated — and they are advanced features — they can be remarkably easy to implement and you will see how they can be powerful and impressive features on any site.
The second will then look at some other technologies you might like to consider learning.
There are lots of companies and individuals who create software that you can use on your web site: blogs, message boards, content management systems, e-mail newsletters — the list is (almost) endless. They allow you to add complex features to your site that would take a lot of time and experience to create yourself. Many web design firms use off-the-shelf software, and customize it for their clients (rather than building applications from scratch).
You may find some of these tools will help you create a more advanced web site, and what you have learned in this book will help you take control of the appearance of these tools and make them fit in with the sites you design.
Generally the tools discussed in this section are provided in one of two ways (or sometimes both):
Services: The software is run on platforms that are hosted and managed by the company that sells the service. You will get a unique log on to the service.
Code: Those that provide the code for you to run on your own web site.
Some companies charge for a license to use the software on your site, but there are also a lot of free options out there.
Many hosting companies will allow you to add some of the software discussed in this section to your site using what are known as "one-click-installations," where you only need to press one button on the control panel for your web site to have them install the tools.
The word "blog" is short for weblog. Blogs were initially devised as a way to add online journals or diaries to a personal web site. The idea behind blogs was to allow users to easily add new entries or posts to their web site without having to manually code the page (sometimes called one-click publishing).
The posts are added to the site in a chronological order, and while they are often used for online diaries or journals, they have been used for a wide variety of other purposes, such as a way for people to add news, posts about a topic of shared interest, links, and so on to their site.
Some blogging platforms are very simple to use. For example, to set up a Posterous blog, you just e-mail them with your first post, and they reply once the service has been set up for you with details of how to work with the platform. Here are some examples of hosted blogging services:
Some other blogging platforms offer a lot more functionality, although the extra power comes at a price of them being more complex to learn. Both of these are provided as software (although Wordpress.com offers a hosted version of WordPress, too):
Both of these blogging platforms actually offer far more functionality that makes them entire content management systems (applications that make it easier for non-programmers to upload and edit the content of their web site). Individual developers have also extended these platforms with more features and functions (such as events calendars, advertising tools, mailing lists, and more).
Discussion boards or forums allow users to post questions or comments and then have other users reply to them. They are a great way to add a community feeling to your site, and also provide new content to your site without adding it yourself. They can also attract visitors back to your site at regular intervals.
You may choose to break down your subject area into different sub-topics. For example, if you were running a site about a particular type of car you might have one discussion group for technical questions and answers about fixing problems with that model of car, you might have another forum that allows users to indicate when they are buying or selling parts for that car, and a third area for general chat about the cars.
One of the great things about discussion boards is that, if your site gets known for answering questions, people will come to that site whenever they have a problem. You may well have to start the community off by answering all the questions yourself, but with luck, other members will soon start adding their thoughts.
There is more forum software available to install on your own server than there are services. The following table shows you some examples:
Product | Web site | Format |
|---|---|---|
PHPBB | PHP Code | |
VBulletin | PHP Code | |
AspNetForum |
| ASP.NET Code |
Active Forums | ASP.NET Code | |
Zeta Boards | Hosted | |
Pro Boards | Hosted |
You should be aware that you may be held legally responsible for what people write on your discussion board. If someone takes offense to something written on a board or forum on your site, you can be held accountable as the publisher of the content on the Web — even if you do not share the opinion of the person who wrote the item.
Some discussion boards get around this by allowing the owner to moderate each post (read it before allowing it to go on the site); others simply regularly check the site for offensive material and remove any posts they consider offensive as soon as possible.
As mentioned in Chapter 10, you might want to add a search utility to your site. In Chapter 10, you saw that you can add a Google search utility to your site, and you can even customize the search by going to www.google.com/coop/cse/. Another site that offers a free customizable search service is the Atomz service at www.Atomz.com/.
The addition of a search facility to your site can mean the difference between users finding what they hoped to find or simply giving up and leaving. With both the Google and Atomz services, you are given the code for a form that will allow users to send queries to the respective company's web site. The company's servers will then return a page to your users with the results of the search. Both services allow you to create custom headers for the page so that it contains your branding, although the company's servers generate the results.
Getting visitors to sign up to an e-mail newsletter is a great way to remind people of your site and drive regular traffic. The problem with e-mail newsletters is sending attractive campaigns out to the people who have signed up.
The e-mail programs that you run on your desktop or laptop computers will not allow you to create the kind of attractive e-mails that many companies send out (which are created in HTML). To send HTML e-mails you can look at a third-party service.
I also tend to recommend using an e-mail service rather than installing e-mail software on your server because the e-mail services will have a lot higher delivery rates. If you send bulk e-mails from a server used for shared hosting, it is less likely that your e-mails will get through to the intended recipients.
Such services charge based on the size of your e-mail list, and some have an additional charge per newsletter you send. Two popular services (which were introduced earlier in the section on promoting your site) are:
It is important to remember that people must subscribe to receive your newsletter. You cannot just upload all of the contacts from your address book to these services. To help increase subscribers, most e-mail services will provide forms which you can drop into your site that allow people who visit your site to subscribe to your newsletter.
You should also be aware that e-mail clients are not as advanced as web browsers. Therefore you should not use external CSS style sheets; rather you should use inline CSS rules in the style attribute on those elements or old-style HTML markup that can control presentation of elements (which is covered in the appendix on deprecated markup). Finally, you should never be tempted to use scripts or videos in e-mails, although you can link to web pages that use both.
This section provides an introduction to some other technologies, what they can do, and how you can make use of them on web sites. I hope this helps you decide what technology you might want to start learning next when you have gained experience with everything you've learned in this book.
You've already seen the very basics of what a programming language such as JavaScript can do in a browser, but when a programming language is used on a web server, it becomes even more powerful.
Any time you want to collect information from a visitor to your site and return a page that is customized for that visitor, you will want to look at server-side programming. Here are some examples of applications where different users will need different pages:
Shopping online: Users browse through a catalog of products and select which ones they want. Their choices are often reflected in a shopping basket displayed on each page. After they have chosen what they want, they provide their payment details and contact/delivery details. At the same time, the people running the store are likely to have a browser-based interface that allows them to add new products to the site (rather than having to create each new page and link to it individually).
Checking train times: The user enters the point he or she is traveling from and the destination, along with preferred travel times. The application then creates a page that contains the requested journey times.
Discussion boards and forums: The examples you have already seen mentioned in this chapter of discussion boards and forums rely on another company's server-side programming and code to handle all of the posts.
Searching for content on a site: The user enters a term into a form that he or she wants to search, which is then sent to the application on the server. The application creates a page that contains results the user inquired about.
One thing that all these types of applications have in common is that the scripts on the server are being used to store information in, and read information out of, a database. (You can think of a database being a little like a set of spreadsheets where information is stored for use in many kinds of applications.) You will learn more about this shortly in the section "Content Management."
You can work in several different server-side languages and environments, such as ASP.NET and PHP, both of which offer very similar capabilities. Generally speaking (although there are exceptions to the rule):
ASP.NET runs on Microsoft IIS and Windows servers.
PHP runs on UNIX servers.
You can code these pages on your desktop computer with the right software installed, but you will want to host the finished web site on a web server.
The first applications created using a script on a server were known as CGI scripts. You may still see
CGIorCGI-binin the URL of some applications. However, the languages discussed here are in far higher demand.
Different developers will have different opinions about which language to choose. Most people learn one language and environment and stick to it (although to a certain degree it is much simpler to learn a second language and environment when you already understand one and know what can be done with server-side scripting languages).
If you are learning a technology in order to get a job, then it's a good idea to keep an eye on job advertisements. You will be able to track the technologies employers are asking for and also (if you look regularly) you will be able to see the emerging technologies early on — first there will be only one or two mentions of these technologies, and then the mentions will come more regularly. Job ads can therefore be quite a good barometer for technologies you should consider learning. (And if your boss catches you looking at job ads, you've got a great excuse — you're just researching which technologies are going to be more popular in the near future.)
One of the key aspects of many sites is a content management system. This is actually a fancy name for something that will allow you to easily update the content of your web site without actually having to create a new page for each new article, posting, or product for sale.
Content management systems tend to be based on a relational database. Relational databases contain one or more tables, each of which is like a spreadsheet. Figure 13-13 shows you a database used on a site about music. (This "example" site is adapted from an actual one.)
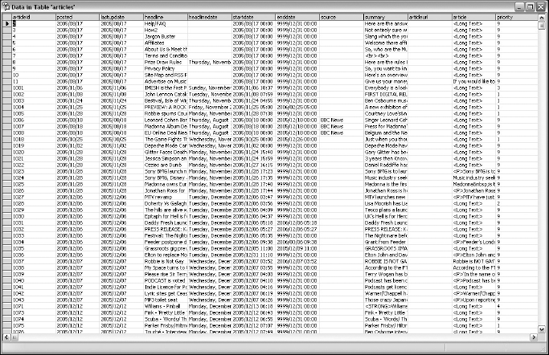
You can see that there are several rows in this table, each containing the details of a different advertisement. The columns each contain different information about the article in that row:
articleidis a number used to uniquely identify each article in the system.postedis the date the article was posted.lastupdateis the date that the article was last updated.headlineis the headline for the article.headlinedateis the date that the article says it was written on.startdateis the date the article should be published on.enddateis the date that the article should stop being available on the site (several of the articles have the date set to the 31 December 9999 — so if the site is still around then, the managers will have to do something about the dates, but until then the article will remain published).
This table actually contains a lot more fields, but this gives you an idea of how the information is stored. When users come to the site that uses this database, they will navigate through categories to find the items they are interested in. Rather than having a page containing the details of each article, the site contains only one page that displays all news articles, called article.aspx. This is like a template for all the articles, and the title, headline date, and article are added into the page at the same place in each article. You can see an example of an article in Figure 13-14.
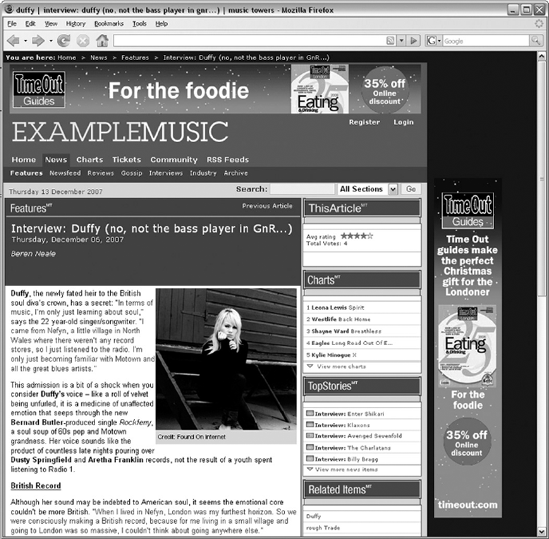
The structure of the URL for this article is the key to how this template-based system works:
http://www.example.com/news/features/article.aspx?a=1496
The article.aspx page is requested, and when it is requested, the article identifier 1496 is also requested. This corresponds with the number in the first column of the table in Figure 13-13. All the details of this article are then placed into the template. So, where the text says "Thursday December 6, 2007" this is the headline date field from the database.
Some sites contain the headlines in the URL rather than an article ID, for example:
http://www.example.com/news/features/Interview-Duffy-(no-not-the-bass-player-in-GnR)
Here you can see that the title of the article is used in the URL rather than the ID, which is known as URL rewriting. Behind the scenes, the URL is compared to the database, and it will know to return the article whose headline matches the end part of the URL.
This approach is also what makes it possible for many authors to update the same site without having to know how to code each individual page. They simply log into an administration tool that allows them to submit articles using a simple form. Figure 13-15 shows one of the pages that enables users to enter new articles.
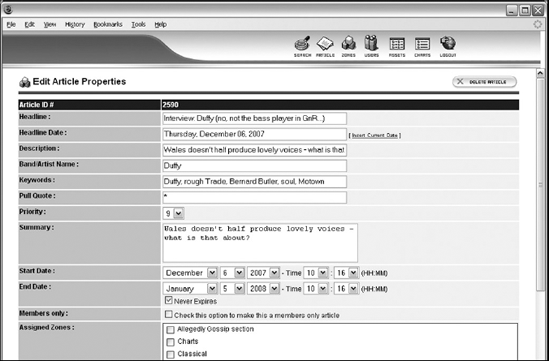
This approach of storing content in a database is employed in many different types of sites. For example, auction sites such as eBay store each item for sale in a row of a database; likewise, e-commerce stores tend to store product details in a database, with each product stored in a row of one of the tables. When these sites use a row of a table for each article or product, new articles or products can be added to the database using XHTML forms (rather than having to hand-code pages or manually update the database).
Flash is used on web sites for animated content, audio, and video. In order to view Flash files, users need the free Flash plug-in — known as the Flash Player — installed on their computers. Statistics from several sources suggest that over 90 percent of the computers connected to the Web have this installed.
In order to create Flash files, you need to purchase a special authoring tool made by Adobe. If you are considering learning Flash, you can download a free trial version from the Adobe web site to start practicing. It is a very powerful tool, and there are lots of examples of what you can do using Flash at the following sites:
www.adobe.com/products/flash/www.flashkit.com/gallery/
Very few sites need to be designed completely in Flash. It is much more common to see parts of pages created in Flash (such as banner ads and animations). This is partly because it is much quicker to develop a site in XHTML and partly because fewer people have the skills to integrate Flash with databases than do with XHTML.
Learning how to deal with text, illustrations, photos, and images correctly is very important if you are going to be involved with designing web pages as well as coding them. There are two key types of graphics packages you might want to learn:
A photo editing and manipulation package such as Adobe Photoshop or the "lite" version, Photoshop Elements.
A vector art package such as Adobe Illustrator or Macromedia Freehand. These work with vector graphics (line drawings created using coordinates), which are then filled in with colors.
Adobe Photoshop is by far the most popular graphics program used for developing web graphics, and a lot of people use this program to design entire sites. You need only look at job ads for web designers and you'll see that knowing Photoshop is often a prerequisite.
Photoshop not only allows you to work with photos, but it can also be used to create text and logos (although an experienced designer would usually favor a vector graphics program when it comes to creating logos and diagrams from scratch). It will then take these images and create optimized versions of them ready for the Web with smaller file sizes for quicker downloads.
When working in Photoshop, you can create an image built up from many layers — each layer is like a piece of clear film over the first image you start with, allowing you to make changes on top of the image.
When you have experience with a photo package, you might want to learn a vector image package, especially if you are going to be creating lots of logos or diagrams. Vector packages are of little use when it comes to working with photos, but they are great for doing line-based work. By their nature, vector graphics scale very well, and logos are often created in a vector format because they allow you to scale a logo to a large size for a poster or shrink it down for a small web graphic. By contrast, if you blow up a bitmapped image (the type used in Photoshop) to a very large size it will look grainy — you will be able to see all of the pixels that make up the image.
Of course, there are many other technologies you could learn, but the ones discussed in this section offer you the next logical steps in your web development career. If you want to work more with graphics, Photoshop or Flash are a good place to start. If you want to work more on programming, consider moving onto a server-side programming language.
In this chapter, you have seen how to prepare your web site for a waiting world. You started off learning about the <meta> tags that you can use to add content about your documents (such as the author, expiration date, or default scripting language) — hence the name <meta> tags; they contain information about the web page rather than being part of the content of the page.
You then learned about different sorts of tests that you should perform on your pages. These tests included validating your pages (to make sure that your markup is written according to the relevant recommendations and that you are following the rules you should), checking links to make sure all of them work and are not pointing to the wrong place, and checking that your site meets accessibility guidelines.
Next, you looked at the potential minefield of choosing a host on whose servers you can put your web site. This ever-changing market is hard to keep up with, but it can be well worth checking on a few hosts rather than going with the first one you find. New deals with more storage, greater bandwidth, larger mailboxes, and newer features are coming out all the time, so it pays to shop around.
Once your site is live, you will want people to come and look at it. You should try to attract new visitors through a combination of techniques, and this is an ongoing process that requires regular attention.
You can also gain valuable information about your visitors by using statistics packages that analyze your log files, working out how people came across your site, how many pages they looked at, what terms they searched on in search engines to arrive at your site, and so on.
The final part of the chapter looked at where you can go next with your site. You saw that there are services such as blogs, discussion boards, and search features that have already been developed by companies that allow you to integrate these services into your site. If you are interested in programming, you should consider learning a server-side language such as ASP.NET or PHP. Alternatively, if you are more interested in the visual appearance and design of sites you should consider learning a graphics program such as Adobe Photoshop, and possibly some animation software such as Flash.
This book has covered a lot, and the best way to make sure you have understood it properly is to get out there and build some sites. Perhaps you can create a site about a hobby or interest of yours, or maybe you can create a site for friends who run their own small business.
Remember that if you like the way someone has done something on a site (perhaps you like the layout, or the size and type of font used) you can simply go to the View menu on your browser and select the option to display the source for the page. While you should never copy someone else's design or layout, you can learn a lot from looking at how other people have built their sites. But remember that they might not be using XHTML; a lot of pages are out there that were built using earlier versions of HTML. HTML is not as strict about how you write your pages, and there are a lot of coders who are not as aware of such things as which elements require closing brackets, when to use quotes for attributes, or how to use CSS well.
While this more relaxed way of coding may seem easier, by being strict with how you use markup, separating as much of your markup from styling as possible, and using JavaScript only to enhance pages, you end up with pages that will be available to more browsers and more people for a longer time.