In this chapter, you'll learn how to add images, animations, audio, and video to your site. This should start to breathe some life into the pages we've been creating so far.
You will start by learning how to add images to your documents using the <img> element. You also learn how to make an image a link, and even how to divide an image up into sections so that different parts of the image link to different pages — this is known as an image map.
Then we'll take a look at some of the main image formats that are used on the Web (JPEG, GIF, and PNG) and learn which image format to use for different types of images. This is very important because it can greatly affect the speed with which your web pages load (and as we all know, slow web sites frustrate users).
Once we have finished with images, we'll go on to look at how to add some more multimedia content to your site in the form of Flash, video, and audio. In doing so, we will meet the <object>, <param>, and <embed> elements. As you will see, Flash is used to embed more video and audio into web pages than any other technology.
By the end of the chapter, your pages should be looking a lot more exciting.
Images are added to a site using the <img> element, which has to carry at least two attributes: the src attribute, indicating the source of the image, and an alt attribute, which provides a description of the image.
For example, the following line would add the image called logo.gif into the page (in this case, the image lives in a directory called images). You can find this code at ch03_eg01.html.
<img src="logo.gif" alt="Wrox logo" />
Figure 3-1 shows you what this image looks like in a browser.
In addition to carrying all the universal attributes and the UI event attributes (which you met in Chapter 1), the <img> element can carry the following attributes:
src alt align border height width hspace vspace ismap usemap longdesc name
The src attribute tells the browser where to find the image. The value is a URL and, just like the links you met in the last chapter, the URL can be an absolute URL or a relative URL.
<img src="logo.gif" />
Generally speaking, images for your site should always reside on your server. It is not good practice to link to images on other sites because if the owner of the other site decides to move that image, your users will no longer be able to see the image. Since the images are on your server, rather than being an absolute URL, the value is more likely to be a relative URL that uses the same shorthand notations you met in the last chapter when relative URLs were introduced.
Most web page authors create a separate directory (or folder) in the web site for images. If you have a very large site, you might even create different folders for different types of images. For example, you might keep any images that are used in the design of the interface (such as logos or buttons) separate from images that are used in the content of the site.
The alt attribute must appear on every <img> element and its value should be a text description of the image.
<img src="logo.gif" alt="Wrox logo" />
Often referred to as alt text, it is important that the value of this attribute really describe the image because:
If the browser cannot display the image, this text alternative will be shown instead.
Web users with visual impairments often use software called a screen reader to read a page to them, in which case the alt text describes the image they cannot see.
While search engines are very clever, they cannot yet describe or index the contents of an image; therefore, providing a text alternative helps search engines index your pages and helps visitors find your site.
Sometimes images do not convey any information, and are only used to enhance the layout of the page.(For example, you might have an image that is just a decorative element but does not add any information to the page.) In such a case, the alt attribute should still be used but given no value, as follows:
<img src="stripy_page_divider.gif" alt="" />
The height and width attributes specify the height and width of the image, and the values for these attributes are almost always shown in pixels (if you are not familiar with the concept of pixels, we will look at this in the section "Choosing the Right Image Format" later in the chapter).
<img src="logo.gif" alt="Wrox Logo" height="120" width="180" />
Technically, the values of these attributes can be a percentage of the browser screen. Or if the image is inside an element that takes up only part of the page, known as a containing element, then it would be a percentage of the containing element. If you do use a percentage, the number will be followed by a percent sign, but this is very rare, and showing an image at any size other than the size at which it was created can result in a distorted or fuzzy image.
Specifying the size of the image is considered good practice, so you should try to use these attributes on any image that you put on your pages. It also helps a page to load faster and more smoothly, because the browser knows how much space to allocate to the image and it can correctly render the rest of the page while the image is still loading.
While you can tell the browser to display images smaller or larger than they really are (by telling the browser that the width and height are different from what they really are), you should avoid doing this because your image will not be as clear. Rather, you should aim to create versions of images at the same size that you will use them on your web pages. Programs such as Photoshop, Photoshop Elements, Paint Shop Pro, or GIMP will help you do this.
It is also important not to use images that are bigger than they are shown on screen (for example, you should not use an image that is 800 pixels by 800 pixels if you will only be showing it at 100 pixels by 100 pixels on the screen), because the smaller an image, the smaller the size of the file (in terms of kilobytes). And the smaller the file size, the quicker the image loads in the browser. Also, when it comes to putting your site on the Web for others to see, it might save you money because you are often charged in relation to the total size of all the files you send to the people who visit your site.
Likewise, it is important not to show images larger than they really are. If you had a small image (say 100 pixels by 100 pixels) and tried to display it much larger (say 300 pixels by 300 pixels) it would appear grainy.
While it is not a good idea to do so, if you just specify the height or width attribute and leave out the other one, your browser will show the image to scale. Assume for a moment that you had an image that was 200 pixels wide by 100 pixels tall. If you just specified the width of the image as 200 pixels, it would try to show the image at its correct size: 200 pixels wide by 100 pixels tall. However, if you said that the image was 100 pixels wide and did not specify the height, the browser would try to make the image 50 pixels tall. Because it is 50 percent the width of the original image, it would display the image at 50 percent of its height. In other words, it maintains the aspect ratio of an image (its width divided by its height).
You could even distort images by providing a different width in relation to height.
Figure 3-2 shows an image at its actual size (top: 130 pixels by 130 pixels); the image magnified (middle: the width attribute is given a value of 160 pixels); and the image distorted (bottom: the width attribute is given a value of 80 pixels and the height attribute a value of 150 pixels).
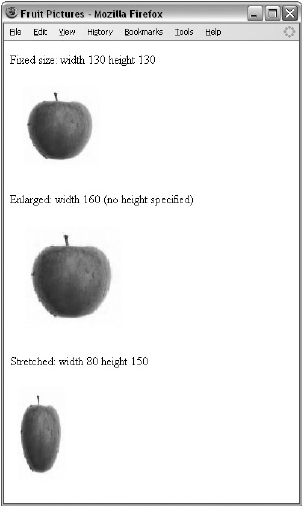
Here is the code for this example (ch03_eg02.html):
<p>Fixed size: width 130 height 130</p>
<img src="images/apple.jpg" alt="Photo of red apple" width="130"
    height="130" />
<p>Enlarged: width 160 (no height specified)</p>
<img src="images/apple.jpg" alt="Photo of red apple" width="160" />
<p>Stretched: width 80 height 150</p> <img src="images/apple.jpg" alt="Photo of red apple" width="80" height="150" />
The rest of the attributes in this section are either deprecated (being phased out of use) or are rarely used, but they are mentioned here because you may come across them in older pages.
The align attribute was created to align an image within the page (or if the image is inside an element that is smaller than the full page, it aligns the image within that element).
<img src="images/cover.gif" alt="Book cover" align="left" />
The align attribute was particularly used by authors who wanted text to flow around an image; if you look at Figure 3-3 you can see three examples of text around the same image.
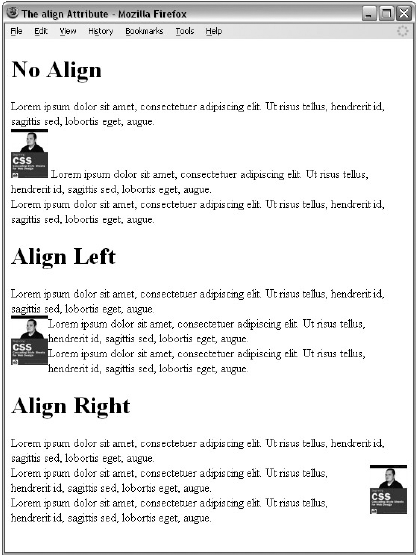
The align attribute can take one of the values in the table that follows. You may also come across the values absbottom, texttop, absmiddle, and baseline, which are not part of the XHTML specification; rather, they were added by the browser manufacturers and therefore can produce inconsistent results.
Purpose | |
|---|---|
| The top of the image is aligned with top of the current line of text. |
| The middle of the image is aligned with the current text baseline. |
| The bottom of the image is aligned with the baseline of the current line of text (the default), which usually results in images rising above the text. |
| The image is aligned to the left side of the containing window or element and any text flows around it. |
The image is aligned to the right side of the containing window or element and any text flows around it. |
A border is a line that can appear around an image or other element. By default, images do not have borders, so you would only have used this attribute if you wanted to create a border around an image. The border attribute was created to specify the width of the border in pixels:
<img src="images/logo.gif" alt="Wrox Logo" border="2" />
Although images on their own do not have borders, you should be aware that Internet Explorer gives images a border when they are used as links; as a result, you commonly see code where border="0" is used on images that are used inside links. This attribute has been replaced by the CSS border property.
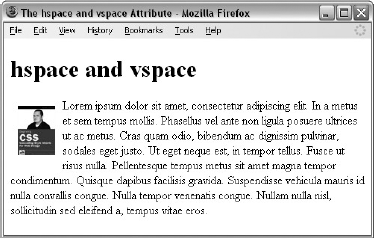
The hspace and vspace attributes can be used to control the amount of white space around an image.
<img src="images/logo.gif" alt="Wrox Logo" hspace="10" vspace="14" />
The value is the amount in pixels of white space that should be left around the edge of the image. It is similar to the image having a border around the image that is the same color as the background of the page. Before CSS, the hspace and vspace attributes were particularly helpful; they could create a gap between an image and text that flows around it. Without such a gap, the text becomes hard to read and doesn't look as professional. Figure 3-4 illustrates this idea (ch03_eg04.html).
These attributes have been deprecated, and you can achieve the same result by using the border or margin properties in CSS.
The ismap and usemap attributes are used with image maps. Image maps are covered in the "Image Maps" section later in the chapter.
The longdesc attribute is used to indicate the URL of a document (or part of a document) containing a description for the image in more detail.
longdesc="../accessibility/profit_graphs.html"
Sometimes images can contain a lot of information — in particular graphs and charts. By providing a long description of the image, not only are you helping search engines understand information that they would not otherwise be able to process, but you are also helping those users who cannot see the image (because of visual impairment).
Unfortunately, the longdesc attribute is not supported by any of the major browsers, so in the meantime it is acceptable to place a link next to the image that takes you to a long description of the image. The link just has a letter D between the opening <a> tag and closing </a> tag (which stands for description). You can see an example of this in Figure 3-5 (ch03_eg05.html), where the link points to a description at the bottom of the same page. This is just like the internal links you met in the last chapter; if the entire page fits into the browser window you will not see anything happen, but if the page is longer than the browser window, when the user clicks on the link the browser will scroll to the bottom of the page.

The name attribute allows you to specify a name for the image so that it can then be referenced from script code. It is the predecessor to, and has been replaced by, the id attribute.
name="image_name"
Try It out: Adding Images to a Document
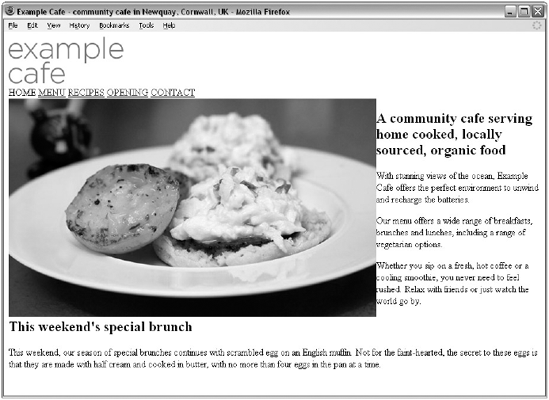
In this example, you're going to add some images to our café example. We will add a logo for the café, and also a picture of the special brunch offer. So, open the homepage in a text editor or web-page authoring tool and follow these steps:
Replace the
<h1>heading with the logo.gif that is in the images folder of the sample application.<img src="images/logo.gif" alt="example cafe" width="194" height="80" />
The
srcattribute indicates the URL for the image. The URLs in this example are all relative URLs pointing to animagesdirectory that is inside the folder that the example page is in.The
altattribute should be used on every<img>element you write. The contents of thealtattribute will be shown if the browser cannot load the image and will describe the image to those who have vision impairments and cannot see it. It will also help search engines understand the content of your site.Add the following after the navigation and before the
<h2>element:<img src="images/scrambled_eggs.jpg" width="622" height="370" alt="Photo of scrambled eggs on an English muffin" align="left" />
The
widthandheightattributes tell the browser how big the image should be displayed. By including these attributes, the browser can lay out the page more smoothly, because it can continue to display other items on the page in the correct place without waiting for the image to download. While you can use these attributes to stretch or scale up an image, it is best to have the image the size you want to use it. If you want to make the image smaller, you should save a new version of it rather than just using these attributes. This will save your viewers' time and bandwidth.Save the file and open it in your browser. You should end up with something that resembles Figure 3-6.
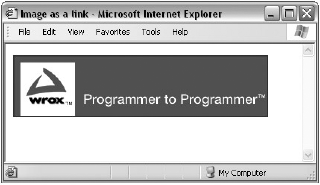
It's easy to turn an image into a link; rather than putting text between the opening <a> tag and the closing </a> tag (as you saw in the last chapter), you simply place an image inside these tags. Images are often used to create graphical buttons or links to other pages, as follows (ch03_eg06.html):
<a href="../index.html" title="Click here to return to the home page">
  <img src="images/logo.gif" width="338" height="79" alt="Wrox Logo" />
</a>
You can see what this looks like in Figure 3-7. This screenshot was purposely taken in IE to show you how IE draws a blue border around any image that is inside an <a> element. There is nothing in the XHTML specification that says a border should be drawn around images that are links, and none of the other browsers do this.
This border doesn't look very nice, so you could use the border attribute on the <img> element with a value of 0 pixels, or preferably use CSS to indicate that any <img> elements that are inside an <a> element should have no border (you learn how to do this in Chapter 7).
Image maps allow you to add multiple links to the same image, with each link pointing to a different page. They are particularly helpful when the image needs to be divided up in irregular shapes (such as maps). Each of these clickable areas is known as a hotspot.
In practice there are relatively few times when you will need to use an image map, but they are covered here because they are a type of image that can act as a link. Feel free to skim over this section to the discussion of file types and come back to the topic of image maps if you ever need to learn how to create one.
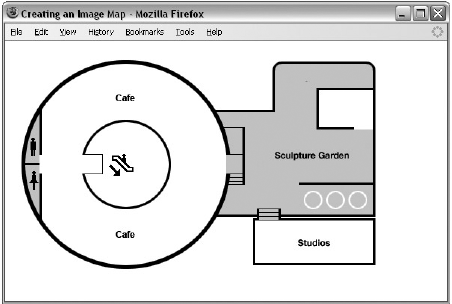
Figure 3-8 shows a GIF that you will see turned into an image map. When users click the circle, they see a page about the cafe; when they click the garden, they see a page about the sculpture garden, and when they click the studios, they see a page about the studios.
Obviously, you do not want to make hotspots too small; otherwise users would have difficulty in selecting the area they want. If this happens, they will soon get frustrated and leave your site. Image maps can also be difficult for people with visual impairments and motor control difficulties to navigate, so if the image map is an important tool for visitors to your site you should also offer text links as an option, too (and indicate the presence of these links in the alt text).
The way that image maps work is based upon x and y coordinates, measured from the top left-hand corner of the image. These coordinates are used in two ways:
To specify where the hotspots are
To work out where the user is clicking on the image.
By comparing the coordinates of the hotspots with the coordinates where the user clicks, the user can be sent to the link specified for that hotspot.
There are actually two types of image maps, both of which do the same job. The difference is how they work out which hotspot you clicked on.
Client-side image maps: The web browser works out which part of the image the user has clicked on and takes the user to the appropriate page.
Server-side image maps: The browser sends the server the coordinates, saying which part of the image the user clicked on, and these are processed by a script file on the server that determines which page the user should be sent to.
Client-side image maps use XHTML code to tell the browser how the image will be divided up; then the browser can tell what part of the image someone clicks on and can send the user to the appropriate link. There are two methods to create a client-side image map:
Let's look at each in turn.
This is the earlier of the two ways to create client-side image maps, and has been supported in browsers since Netscape 4 and IE4. The image that is going to form the map is inserted into the page using the <img> element just like any other image. An attribute called usemap is then added to the <img> element to indicate that this image needs to use the information held in the corresponding <map> element to turn the image into an image map. The <map> element then contains the information used to tell the browser how to split up the image so that it can send the user to the correct page.
The value of the usemap attribute begins with a pound or hash sign, followed by the value of the name attribute on the <map> element it uses.
The <map> element usually follows directly after the <img> element. It needs to carry only thename attribute to identify itself. The <map> element then contains two or more <area> elements, and it is these <area> elements that actually define the clickable hotspots.
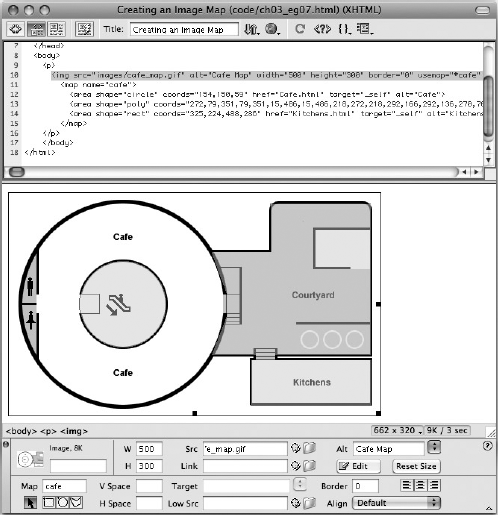
The <area> element does this by specifying the shape and the coordinates that define the boundaries of each clickable hotspot. Here's an example from the image map that was used for the image inFigure 3-8 (the code for this example is in ch03_eg07.html).
<img src="cafe_map.gif" alt="Cafe Map" width="500" height="300"
  border="0" usemap="#cafe" />
<map name="cafe">
  <area shape="circle" coords="154,150,59" href="cafe.html" target="_self"
    alt="Cafe" >
  <area shape="poly" coords="272,79,351,79,351,15,486,15,486,218,272,218,292,
    166,292,136x,270,76" href="courtyard.html" target="_self"
    alt="Courtyard" />
  <area shape="rect" coords="325,224,488,286" href="kitchens.html"
    target="_self" alt="Kitchens" />
</map>
If you look at the <img> element, the value of the usemap attribute is #gallery; this corresponds to the value of the name attribute on the subsequent <map> element. Inside this, the <area> elements actually define the sections of the image that are clickable.
If you look at the <area> elements, the shape attribute indicates what kind of shape the hotspot will be, while the coords attribute specifies the position and size of the shape. For example, here the shape is a rectangle, and the coords attribute indicates the top-left and bottom-right corners of the rectangle:
<area shape="rect" coords="325,224,488,286" href="workshop.html"
    target="_self" alt="Artists workshops" />
The href and target attributes perform exactly the same function that they do when used on the <a> element. The attributes that the <area> element uses to create image maps are covered in the material that follows.
accesskey alt shape coords href nohref target tabindex taborder notab
The value of the shape attribute actually affects how the browser will use the coordinates specified in the coords attribute, and is therefore required. If you do not specify a shape attribute, the default value is a rectangle.
The table that follows shows the possible values of the shape attribute.
Value | Shape Created |
|---|---|
| The whole of the image not defined in an area (should be specified last) |
| Rectangle |
| Polygon |
| Circle |
You are better off using the abbreviated versions of the values, as they are better supported in older browsers. The value default should be used on the last <area> element if you want to indicate any sections of the image not otherwise indicated by an <area> element that has defined an area — it's like a catch-all for the rest of the image.
The coords attribute specifies the area that is the clickable hotspot. The number of coordinates you specify depends on the shape you are creating (and have specified in the shape attribute).
A rectangle contains four coordinates. The first two coordinates represent the top left of the rectangle, and the second two the bottom right.
A circle contains three coordinates; the first two are the center of the circle, while the third is the radius in pixels.
A polygon contains two coordinates for each point of the polygon. So a triangle would contain six coordinates, a pentagon would contain ten, and so on. You do not need to specify the first coordinates again at the end because the shape is automatically closed.
Some web authoring and image-editing programs will help work out the coordinates of an image map for you; they provide a tool that allows you to select the areas you want to turn into a map and they use those shapes to create the coordinates for you. Figure 3-9 shows you Dreamweaver's Image Map tool — because each program is different, you should look in the help files for that program to see how yours creates an image map.
If you have two areas that overlap each other, the first one in the code will take precedence.
The href attribute works just like the href attribute for an <a> element; its value is the URL of the page you want to load when the user clicks that part of the image.
If you do not want part of the image to link anyway, you should use the nohref attribute on that space to indicate that the area will not take you anywhere. If you use this attribute, you should give it a value of nohref. For example, if you wanted to make sure that the Kitchens area of the map did not link anywhere, the <area> element representing it should look like this:
<area shape="rect" coords="325,224,488,286" nohref="nohref" />
The alt attribute specifies a text alternative for that section of the image and works just like the alt attribute on the <img> element. It will actually override the alt text specified for the image when the user rolls over the area.
The target attribute specifies which frame or window the page should be loaded into. Possible values are the same as for the target attribute of the <a> element.
The tabindex attribute allows you to specify the order in which users can tab through items on a page. The value is a number between 1 and 32,767. It is discussed in full in Chapter 5.
HTML 4 started to promote the use of the <object> element rather than the <img> element for adding image maps to your documents (although you can still use the <img> element in Strict XHTML 1.0). Unfortunately, IE8, Firefox 3, and Safari 3 were the first versions of major browsers to support the creation of image maps using this approach, so for the moment you are better off sticking to the method described in the previous section, but I will describe the new technique anyway so that you know how it works.
The technique is very similar to the one you just met, but this time it is the <object> element that carries the usemap attribute (whose value is the value of the name attribute on the <map> element preceded by the pound or hash sign). Inside the <object> element, you use the familiar <map> element with the name attribute. Then inside the <map> element are standard <a> elements rather than <area> elements.
<object data="cafe_map.gif" type="image/gif" alt="Cafe Map" width="500"
   height="300" border="0" usemap="#cafe" />
<map name="cafe">
  <a shape="circle" coords="154,150,59" href="cafe.html" target="_self">Cafe</a>
  <a shape="poly"
coords="272,79,351,79,351,15,486,15,486,218,272,218,292,166,292,136,270,76"
    href="courtyard.html" target="_self">Courtyard</a>
  <a shape="rect" coords="325,224,488,286" href="kitchens.html" target="_self">
     Kitchens</a>
</map>With server-side images, the <img> element sits inside an <a> element just like any image that is a link. But the <img> element carries a special ismap attribute, which tells the browser to send the server x, y coordinates representing what part of the image the user's mouse was on when he or she clicked the image map. Then a script on the server is used to determine which page the user should be sent to, based on the coordinates fed to it.
For example, look at the following link, where the <img> element carries the ismap attribute with a value of ismap:
<a href="../location/map.aspx"><img src="../images/states.gif" alt="map
of US States" border="0" ismap="ismap" /></a>
Now, if the user clicks the image 50 pixels to the right of the top-left corner of the image and 75 pixels down from that same corner, the browser will send this information with the URL like so:
http://www.example.org/location/map.aspx?50,75
You can see the coordinates appended at the end of the URL that is specified in the <a> element.
If you look at the code for other people's image maps, you may see some image maps whose
ismapattribute does not have a value. This is because in early versions of HTML, the attribute did not require a value. However, in XHTML every attribute requires a value, so the value of theismapattribute becameismap. A server-side image map needs something on the server (a script, map file, or application) that can process the coordinates and determine which page the user should then be sent to. Because server-side image maps are processed on the server, the implementation of them is not covered by HTML or XHTML recommendations, and unfortunately there is not space to cover different possible implementations for each different platform here.
Images and graphics can really bring your site to life, but it is important to learn how to prepare images for the Web. Otherwise, they can significantly increase the time it takes for a page to load.
When writing sites on your desktop or laptop computer, you may not realize how long a page will take to load; files that are sitting on your computer will load a lot faster than they would if they were on the Internet. Therefore, choosing the right image format and saving your images correctly will ensure that when you put your site on the Web for people to see, it will not be unnecessarily slow — and this should result in happier visitors. That is why we're going to round off this section on images by spending a few pages learning about image formats and how to pick the right one.
For practice purposes, you can download images from other sites by right-clicking the image (or Ctrl-clicking) and selecting either the
download image to diskorsave image asoptions. Remember, however, that images are subject to copyright, and you could land yourself in legal trouble if you use other people's images on your site.
Most static images on the Web are classified as bitmapped images. Bitmapped images divide a picture into a grid of pixels and specify the color of each pixel individually. If you look very closely at your computer screen you may be able to see the pixels that make up the screen. There are several different bitmap formats; common ones include JPEG, GIF, TIFF, PNG, and the rather confusingly named bitmap or BMP.
If you look at Figure 3-10, you can see an example of a bitmap image with one section that has been modified so that you can see how pixels make up the image.
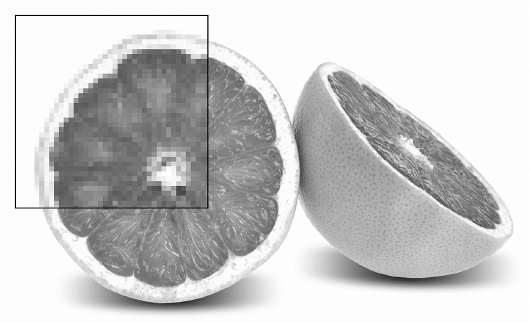
The number of pixels in every square inch of the image is referred to as the resolution of the image. It is normal to save images that will be used on the Web at a resolution of 72 pixels per inch as this corresponds with the number of pixels in a square inch on your computer screen. By contrast, images used in print are usually supplied to printers at 300 dots per inch.
The more pixels or dots per inch an image contains, the larger the size (in KB) of the file, and the larger the file, the longer it takes to transfer over the Web. Therefore, any images that you use on the Web should be saved at a resolution of 72 dots per inch. If you saved them any larger, this would create unnecessarily large files that would take longer to download.
Note that while you can easily save an image that is 300 dots per inch at 72 pixels per inch for the Web, you cannot simply increase an image from 72 pixels per inch to 300 dots per inch, because you do not know what color the 228 pixels that are missing from every square inch should be. If you just try to increase the resolution of the image, it will often look grainy. Therefore, when you have a high-resolution 300-dots-per-inch picture, you should make a copy of it for use on the Web and keep the original version separately.
Browsers tend to support three common bitmap graphics formats, and most graphics programs will save images in these formats:
GIF: Graphics Interchange Format (pronounced either "gif" or "jif")
JPEG: Joint Photographic Experts Group Format (pronounced "jay peg")
PNG: Portable Network Graphics (pronounced "pee en gee" or "ping")
Let's take a quick look at each of these, because understanding how the format works helps you choose how to save an image.
GIF (or Graphics Interchange Format) images are created using a palette of up to 256 colors, and each pixel of the image is one of these 256 colors. Every different GIF image can have a different palette of 256 colors selected from a range of over 16 million colors. The program that saves the image also selects the palette that will best represent the images.
The GIF file stores the palette of colors in what is called a lookup table, and each pixel references the color information in the lookup table rather than each pixel having to specify its own color information. The advantage of this technique is that, if many pixels use the same colors, the image does not have to repeat the same color information and the result is a smaller file size. This makes GIF images more suited to graphics (where there are often areas of the same color — known as a flat color) and less suited to photographs (where there are often many more different colors).
This way of storing images is known as an indexed color format. Figure 3-11 shows a GIF file being created in Adobe Photoshop. You can see the color palette that is being used for this image represented in the set of squares halfway down the image on the right.
If a GIF contains fewer than 16 colors (in which case it can be referred to as a 4-bit GIF), the image will be less than half the file size of a GIF using 256 colors (known as an 8-bit GIF). Therefore, if you are creating an image that uses fewer than 16 colors, it is worth checking whether your program automatically saves your image as a 4-bit GIF, because this will result in a smaller file that's quicker to download than an 8-bit GIF.
Even if your image looks as though it just features two colors, say a black and white line drawing, it may use many more colors. For example, if you have a line drawing where the edges have been smoothed out by the graphics program (a process known as anti-aliasing), your image will contain more than two colors, because the edges use a variety of other colors to make them look smooth.
If the GIF needs to use more than 256 colors, then most graphics programs, when saving GIFs, will use a technique called dithering to better represent the extra colors. This means that they use two or more colors in adjacent pixels to create an effect of a third color. Dithering has the following two drawbacks:
If you place a flat color next to a dithered color you will be able to see where the change occurs (because the dithered color is really made up of more than one color).
It can result in some banding in colors. For example, when there is a smooth transition between one color and another color (referred to as a gradient), many more than 256 shades may be required to show the gradient; therefore, dithering would be used, but the result might be that the smooth gradient now looks like a series of stripes.
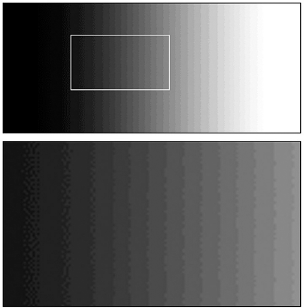
Figure 3-12 illustrates how even a simple gradient, when saved as a GIF, can result in banding because the image contains more than 256 colors. The bottom part of this image zooms into an area of the gradient where you can see that the gradient had vertical lines rather than a smooth transition from black to white.
Because GIFs support only 256 colors and have to use dithering to achieve any further colors, they are not really suitable for detailed photographs, which tend to contain many more than 256 colors. If you have a photograph, gradient, or any image with similar shades of the same color next to each other, you are often better off using a JPEG, which can support unlimited colors, or sometimes a PNG — both of which you'll learn about shortly.
GIFs do have another handy feature: you can specify one or more colors in a GIF to represent a transparent background — in parts of the image that are the specified colors, the background will be allowed to show through.
This technique works best with images that have perfectly straight edges, because when you have a curved edge, an image editing program will often anti-alias the edge (use several shades) to make the image look smooth, as shown in Figure 3-13.
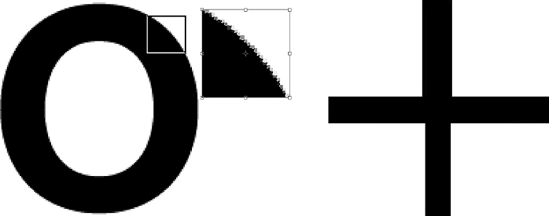
However, in a transparent GIF each pixel is either on or off, opaque or transparent — there are no degrees of transparency. As a result, if you try to use it with curved corners, the corners may appear pixelated. To help overcome this problem, you should try to make the transparency color as close to the background color as possible (or if you are using Photoshop, you can use the matte feature).
Figure 3-14 shows how a pixelated effect is created when a GIF is not created on a suitable background (notice the lighter pixels around the corners in particular).

To make GIF files smaller, they are compressed using a technique called LZW compression, which scans rows of the image looking for consecutive pixels that share the same color. When it comes across pixels that are the same color it indicates that, from this point, x number of pixels should be written using the same color.
LZW compression is known as a lossless compression technique because no data is lost and therefore there is no loss of quality. This is contrasted with lossy compression techniques where some of the data is discarded during compression and therefore cannot be recovered from the compressed file.
GIF images can store more than one frame (or copy of the image) within a file, allowing the GIF to rotate between the versions/frames and create a simple animation. It works in a similar way to a flip-book animation, where the drawing on each page of the book changes slightly from the previous one, so that when a user flips the pages it looks as if the images are moving.
This works well if your animated image contains large areas of flat color, since when the image is compressed after the initial frame has been recorded only the pixels that have changed need to be stored with each subsequent frame. It is far less suitable, however, for photographic images because many more of the pixels change, resulting in a very large image.
It is also worth mentioning that attention-grabbing animated GIFs are often frowned upon by professional web designers, who tend to use them only sparingly.
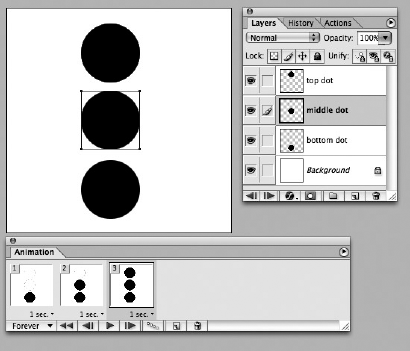
Figure 3-15 shows you an animated GIF being created in Adobe Image Ready. The window on the right shows you that there are three dots on separate layers of the image. The window at the bottom shows you that in frame 1 of the animation, only the bottom dot shows, in frame two the bottom and middle dots show, and in the third frame all three dots show. Under each frame of the animation you can see how long each frame should appear (in each case it is 1 second).
The JPEG image format was developed as a standard for storing and compressing images such as photographs that use a wide range of colors. When you save a JPEG, you can usually specify by how much, if at all, you want to compress the image — which depends upon the image quality you want. The process of compressing a JPEG involves discarding color data that people would not normally perceive, such as small color changes. However, because the image format discards this data when the image is compressed, some of the data is lost and the original cannot be recreated from a compressed version — hence it is known as lossy compression.
The amount of compression you apply will change from image to image, and you can only judge how much to compress a JPEG by looking at it. Hence the size of the file varies depending upon how much you compress the image. When you are saving the image, you will often be asked for a percentage of quality to be used; 100 percent does not compress the picture at all, and for a photo you can often get down to around 60-70 percent (but not usuallymuch lower). Some programs use words such as excellent, very good, good, and so on instead of percentages to describe the image quality.
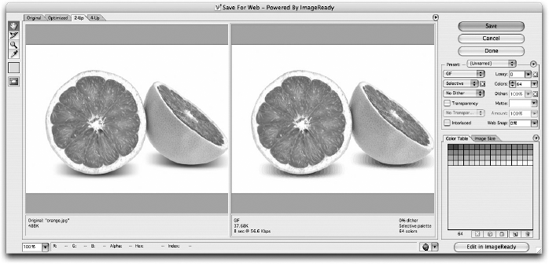
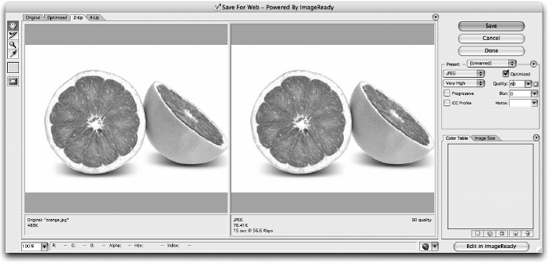
A good image-editing program enables you to compare the original image side by side with the compressed version as you choose how much compression to add. Figure 3-16 shows you how Adobe Photoshop lets you compare two versions of the image next to each other as you prepare to savethe JPEG for the Web. On the left, you have the original image, and on the right is the version that it is saving for use on the Web.
Because the JPEG format was designed to work with photo-realistic images, it does not work so well with images that have large amounts of flat color, or high-contrast hard edges (such as lettering and line drawings). As you increase compression in a JPEG you may also see banding start to show in colors that are very similar.
The Portable Network Graphics format is the most recent format on the block. It was developed in the late 1990s because the company that owns the patent for GIFs (Unisys) decided to charge companies that developed software for creating and viewing GIFs a license fee to use the technology. While web designers and web surfers are not directly affected by this charge, the companies that make the software they use are.
The PNG format was designed for the same uses as GIF images, but while it was being created the designers decided to solve what they thought were some of the disadvantages with the GIF format. The result is two types of PNG. The 8-bit PNG has the same limitations as an 8-bit GIF — only 256 colors, and when transparency is used each pixel is either on or off. Then there is the enhanced PNG-24, a 24-bit version, which has two major advantages:
The number of colors available for use in an image is not restricted, so any color can be included without losing any data.
A map (like the lookup table that indicates the color of each pixel in GIFs) is used to provide different levels of transparency for every pixel, which allows for softer, anti-aliased edges.
Furthermore, all PNGs tend to compress better than a GIF equivalent. The real drawback with the PNG format, however, is that some older browsers that are still in use today do not fully support the format. While basic support was offered in early versions of browsers, some of the more advanced features took longer to be implemented. For example, Internet Explorer was unable to deal with transparency correctly until version 7.
You will usually want to save the images for your site in the format that best compresses the image and therefore results in a smaller file size. Not only will your pages load faster, but you can save on the charges to host your site.
Usually one or another format will be the obvious choice for you. The rule of thumb is:
Use JPEGs for photo-realistic pictures with a lot of detail, or subtle shade differences you want to preserve.
Use GIFs or PNGs for images with flat color (rather than textured colors), and hard edges, such as diagrams, text, or logos.
Look at the following images (see Figure 3-17) — one a photograph of autumn leaves, and the second the logo of a fictional company called Wheels that uses only two colors.

The following table shows you the file size of each of these saved as a GIF and as a JPEG (where the JPEG is saved at 60 percent quality).
Image | JPEG | GIF |
|---|---|---|
| 54.81k | 116.3k |
| 8.26k | 6.063k |
As you can see, the Wheels logo has areas of flat, plain color, whereas the photo of the forest uses lots of different shades. Therefore, the logo is better suited to the GIF or PNG formats, while the photo of the forest with all its shadows is suited better to the JPEG format.
Good image editing software is very helpful if you use a lot of images on your site. Adobe Photoshop is the most popular software used by professionals, although it is very expensive. There is, however, a limited functionality version called Photoshop Elements that includes many of the common features — including the Save for Web options. Two other popular image-editing programs are Paint Shop Pro (available from Corel at
www.corel.com) and a free image-editing program called Gimp (which you can download fromwww.gimp.org).
If you have to include many large, complex photographic images on your site, it's good practice to offer users smaller versions of the images when the pages first load and then add a link to the larger version. These smaller images are often referred to as thumbnails, and you will usually see them in image galleries or on pages that contain summaries of information (such as the homepages of news sites and pages that list several products, from which you link to a page with more detail and larger images). Figure 3-18 shows you an example of using thumbnails in an image gallery (the small images at the bottom are smaller in physical size and file size than the counterparts that will show at the top).

When creating the smaller version, scale the image down in an image-editing program. Do not simply alter the width and height attributes of the <img> or <object> elements, because users still have to download the full-sized image even though they are getting to see only a smaller version of it. (The full-sized image takes longer to download.) By creating a special thumbnail of any smaller images you use, your pages will load a lot quicker.
You may hear of a format called Vector format, which is more popular in illustration and animation software. Flash, SVG, and Silverlight all employ vector graphics. Vector formats store information in terms of coordinates, between which lines are drawn. Inside these lines a colored fill may be specified. Because they are based on coordinates, it is easy to increase the physical size of the image by increasing the gap between each point that the coordinates are plotted against. By default, browsers do not support Vector formats without the use of a plug-in. You learn more about plug-ins when we come to look at Flash later in the chapter.
Having spent the first half of the chapter looking at adding images to your web pages, in the second half of the chapter we are going to look at adding Flash animations, video, and audio to your pages. Collectively, these are often referred to as rich media.
When it comes to showing Flash animations, video, and audio on your site, things get a little more complicated for two reasons:
First, there are many different formats to learn about. Flash is fairly easy because there is just the one format for Flash animations, but there are many different formats for video, including AVI, Flash Video, MPEG, QuickTime, and Windows Media, and several formats for audio such as MP3 and WAV.
Second, while browsers are built to display text and images, they do not automatically show the different formats of rich media. Instead browsers rely on additional programs known as players or plug-ins, and these players do not play every format (just as a DVD player would not be able to play a VHS video or a vinyl record). So, your choice of which format to use might be restricted by how many people have the player installed.
Some plug-ins are installed by default when you get a new computer, and when they are not installed users can download them (usually for free) from the web sites of the companies who make them. For example, the Flash plug-in is usually installed on new computers, but it can also be downloaded for free from the Adobe web site.
When considering which format to use for your rich media, you will want to consider the number of people who are likely to have the required plug-in installed on their computers. This is important because you cannot assume that people will download a plug-in just to access some content on your site.
In the next version of HTML (HTML 5) you are likely to see two new elements:
<audio>for adding audio files to web pages and<video>for adding video files. The<audio>element will be used to make it easier to add MP3 and WAVE files to pages; however, at the time of this writing the browser manufacturers were having trouble agreeing on the format of videos specified as using the<video>element. In either case, it is likely to take several years before either of these elements is widely used, because it will take a long time for web users to adopt the new browsers that will support these elements. (HTML 5 is discussed in more detail inChapter 14.)
In order to show rich media on your pages, you will need to learn a new element, the <object> element. We will have a detailed look at the <object> element at the end of the chapter when we have looked at how to use some of the different formats of rich media. But for now, you just need to know that the <object> element can tell the browser several things, including:
The name of the file and where to find it
The format of the file
The type of plug-in used to play the file
Inside the <object> element, you can use the <param> element to pass extra information to the player (for example, you might want to tell a player to start playing automatically when the page loads, rather than waiting for the user to press a play button).
The <param> element is not the only markup you are likely to see inside the <object> element. But any other markup you see inside the <object> element is only likely to be shown if the browser cannot render the object (and the most common reason why it would not render the object would be because the required player is not installed). For example, you will commonly see the <embed> element used inside the <object> element.
Strictly speaking, the <embed> element was never part of the HTML or XHTML specifications, but years ago Microsoft used the <object> element for a technology called ActiveX (which only worked in IE), and as a result, other browser manufacturers used the <embed> element to embed items such as audio and video in a page instead. Therefore, you often find the <embed> element included inside the <object> element to ensure that if an older browser does not understand the <object> element it can try to display the content using the <embed> element.
When the <embed> element has to pass extra information to plug-ins, rather than using the <param> element it uses attributes; you will see examples of this shortly.
So for the remainder of this chapter we are going to look at:
How to add Flash animations into your web pages
How to display video in your web pages (and which format you should use)
How to add audio to your pages (and which format you should use)
The syntax of the
<object>element.
When looking at video and audio, we will have a discussion about the different formats you can use, and the players that you need in order to play the different formats.
Flash started off as a way to add animations into web pages, but quickly evolved to offer a high level of interactivity and the ability to deal with images, audio, and video. Now, not only is Flash widely used to add animation and interactivity to web pages, it is also the most popular way of displaying audio and video within web pages (for example, most of YouTube's and MySpace's video and audio is provided in Flash).
Most Flash files are created using the Flash authoring environment, which Adobe charges for, although there are a lot of sites that offer tools such as MP3 players, video players, slideshows, and more, all written in Flash, which you can use on your site without purchasing a copy of this program. While creating your own Flash files from scratch is beyond the scope of this book, I will show you how to include in your XHTML pages Flash files that have already been written.
If you do work on a project using the Flash authoring tool, your projects will be saved with the .fla file extension (and they are commonly referred to as FLA files). But before you can use such a file on the Web you will have to export it in the .swf format. When files have been exported into the .swf format, they go by one of two names, either SWF files or Flash movies (rather confusingly, they can be called Flash movies even if they do not contain any video).
The major browsers don't play SWF files by themselves; rather, they rely on a free plug-in called the Flash Player. The Flash Player is often pre-installed on computers, but it can also be downloaded from the Adobe.com web site. It is estimated that over 98 percent of web users have the Flash Player installed.
Let's briefly recap what you have learned about Flash, as there was quite a lot to take in there:
You pay for the Flash authoring environment that allows you to create and edit FLA files. These files are saved with the
.flafile extension.When you want to use Flash files on the Web, you export them to SWF files or Flash movies. These files have the
.swffile extension.The free Flash Player plug-in needs to be installed in order for the browser to play the SWF files. It is estimated that over 98 percent of people have the Flash Player.
So let's look at the code used to add Flash to a page, by considering three different examples. We will start by looking at how to embed the YouTube player in a page you have written.
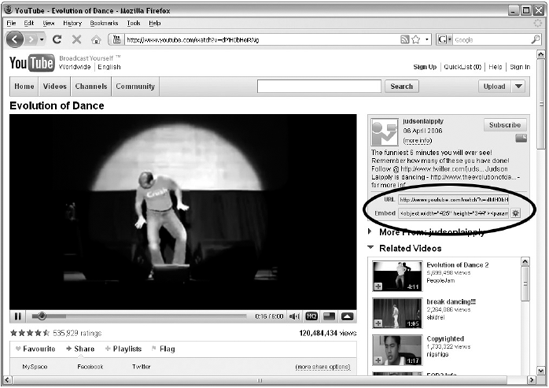
As I mentioned, the YouTube Player is written in Flash, and YouTube has made it very easy for users to embed the YouTube Player on their own pages. This is done simply by copying and pasting a line of code from the YouTube site into any web page; Figure 3-19 shows you where to find this line of code.
If you try this example on your desktop or laptop computer at home, you may get a warning message because the Flash Player is trying to communicate with a server on the Web (which can sometimes be considered a security risk). If you press "OK" the example may work; otherwise you may need to follow the instructions to alter your settings. If you ran this example on a server on the Web, you would not see this error message.
So let's look a little closer at the code YouTube offers to embed videos from YouTube (ch03_eg08.html):
<object width="425" height="344">
  <param name="movie"
    value="http://www.youtube.com/v/dMH0bHeiRNg&hl=en&fs=1"></param>
  <param name="allowFullScreen" value="true"></param>
  <param name="allowscriptaccess" value="always"></param>
    <embed src="http://www.youtube.com/v/dMH0bHeiRNg&hl=en&fs=1"
    type="application/x-shockwave-flash" allowscriptaccess="always"
    allowfullscreen="true" width="425" height="344"></embed>
</object>
On the opening <object> tag, you can see the width and height attributes specify the size of the Flash movie; these behave just like the width and height attributes on the <img> element, indicating how much space this item needs.
We will have a look at all the attributes the <object> element can carry at the end of this section, but it is worth mentioning here that YouTube's use of the <object> element is a little unusual because it does not carry a classid or a type attribute.
Inside the <object> element, you can see three <param> elements, each of which has a name and value attribute:
The first indicates that a movie is to be loaded, along with the URL for the movie.
The second indicates whether the player should allow the user to view the movie in full-screen mode.
The third is a special property which, in this case, is used to ensure that the Flash movie can be played from different web sites (not just from the YouTube servers).
Note that these parameters are specific to this video player and do not necessarily apply to all Flash movies. Other parameters may be specific to a version of Flash; for example, the ability to show full-screen Flash movies was only introduced in Flash 9, which was released in 2006.
As mentioned at the start of this section, an <object> element often contains an <embed> element, and this is no exception. You may have noticed that the <embed> element does not contain any <param> elements; rather, it uses attributes on the opening tag to provide the same information. The first attribute is an src attribute — just like the one used on the <img> element indicating where to find the Flash file.
This is followed by a type attribute indicating that the file is a Flash movie. The next two attributes match the <param> elements you just met. The last two, width and height, specify the size of the Flash movie.
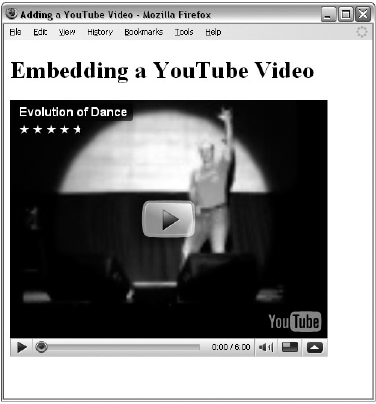
By adding this one line of code to your page, you will see the YouTube Player embedded on your page. The result should look like the screenshot in Figure 3-20.
There are lots of sites that allow you to embed Flash tools in your own pages, for example:
ActiveDen.netfeatures the work of many Flash programmers, including music players, video players, image galleries, and other animations.Flickr.comandSlide.comboth allow you to upload your own pictures to their site and then add Flash slideshows of these pictures to your own pages.Last.fmallows you to add music players to your page that feature songs it has uploaded to its servers.
All these sites provide you with the code that you need to add Flash movies into your pages, but to help you understand that code, I will show you how to add a basic Flash animation that I created to your page.
Copying the code from the YouTube web site is an easy way to add one of its videos to your site, but as I mentioned, the code that you see on the YouTube web site is slightly different from the code you might see used to add other Flash movies to your pages. Therefore, in this section you will see how to add a basic Flash animation to a web page using a slightly different technique. This simple animation was created using Flash 8, and when the FLA file was exported to create the SWF file, Flash also created the code to add the SWF file into a web page.
Flash 8 is not the latest version of Flash, but I am using this version because it demonstrates another way to add a Flash movie to a page using the <object> and <embed> elements, which you are likely to come across if you work with Flash (ch03_eg09.html):
<object classid="clsid:D27CDB6E-AE6D-11cf-96B8-444553540000"
    width="300" height="200"
    codebase="http://download.macromedia.com/pub/shockwave/cabs/flash/
    swflash.cab">
    <param name="movie" value="motion/flash_sample.swf" />
    <param name="play" value="true" />
    <param name="loop" value="false" />
    <embed src="motion/flash_sample.swf" width="300" height="200" play="true"
    loop="false" quality="best" type="application/x-shockwave-flash"
    pluginspage="http://www.macromedia.com/shockwave/download/index.cgi?
    P1_Prod_Version=ShockwaveFlash"></embed>
</object>
One interesting thing to note about this example is that the <object> element specifies classid and codebase attributes, both of which are commonly used on the <object> element (the YouTube example was an exception to this rule).
The classid attribute is there to specify which application should play the file (in this case the classid attribute identifies the Flash Player, but if you wanted to play a file using the Windows Media plug-in, you would use a different value of 6BF52A52- 394A-11D3-B153-00C04F79FAA6).
The codebase attribute specifies where the plug-in or program required to play this file can be found if the user does not have it installed.
Inside are three <param> elements:
The first specifies the Flash movie to play.
The second specifies that the movie should play automatically.
The third indicates that the movie should loop (when it comes to the end, it should start again).
The <embed> element provides similar information, but it does so using attributes:
The
srcattribute indicates where the Flash movie can be found.The
widthandheightattributes indicate how much space the player should take up.The
playattribute indicates that the movie should start automatically when the page loads.The
loopattribute indicates that when the movie has finished playing it should go back to the start and play again.The
qualityattribute indicates how high quality the Flash movie should be (this is not commonly used any more).The
pluginspageattribute indicates where the Flash Player plug-in can be downloaded from if the user does not have it installed.
You can see what this looks like in Figure 3-21.

Recently, there has been a growing trend to use JavaScript to include Flash movies in pages, rather than the <object> and <embed> elements.
When adopting this technique, you create the page using a <div> element to hold the Flash movie and you should use CSS to make sure that the <div> element is the same width and height as the SWF file you want to include (you learn how to set the size of a <div> element in Chapter 7). This <div> element should also have an id attribute to uniquely identify that element.
Inside that <div> element you can use text and images that will be shown to users who do not have Flash installed.
A JavaScript is then added to the page; this script checks whether the browser has the Flash player installed. If it is installed, the JavaScript replaces the content of the specified element <div> with the SWF file.
In fact, the JavaScript not only checks that the user has the Flash player installed, but also that it is the required version. As you might have guessed, over the years there have been several versions of Flash, and the latest versions have new and improved features. But not everyone has the latest version of the plug-in, and if a browser does not have the minimum version required to play the SWF file, then the JavaScript will not attempt to load the Flash, leaving behind the content of the <div> element.
The most popular script for this is called SWFObject, and it can be downloaded from http://code.google.com/p/swfobject/. You do not really need any experience with JavaScript to use this technique. Let's look at an example; we will load exactly the same Flash movie that you saw in the last example, but this time we will use SWFObject (version 2.1) to include it in the page (ch03_eg10.html):
<?xml version="1.0"?>
<!DOCTYPE html PUBLIC "-//W3C//DTD XHTML 1.0 Strict//EN"
    "http://www.w3.org/TR/xhtml1/DTD/xhtml1-strict.dtd">
  <html xmlns="http://www.w3.org/1999/xhtml" lang="en" xml:lang="en">
  <head>
    <title>Adding a flash movie with SWF Object</title>
    <script type="text/javascript" src="swfobject.js"></script>
    <script type="text/javascript">
        swfobject.embedSWF("flash/flash_sample.swf", "flash_movie", "300",
        "200", "8.0.0");
    </script>
</head>
<body>
    <div id="flash_movie">This element can contain content that search
      engines can index, and which is helpful to those who do not have Flash
      installed.</div>
  </body>
</html>
While the code is quite different, in the browser this example looks just like the last one; the only difference is the title of the page indicating that it has been written using SWFObject.
In this example, the <div> element carries an id attribute with a value of "flash_movie" (the id attribute is used to uniquely identify an element within a web page). It is this element that will be replaced with the Flash movie if the user has the appropriate version of Flash player installed.
At the top of the page, you can see two <script> elements. The first includes a separate JavaScript file whose location is specified using the src attribute (just as the src attribute on an image specifies where the image can be found):
<script type="text/javascript" src="swfobject.js"></script>
As you can see, it is loading a file called swfobject.js, and it is this file that does most of the work. You do not need to understand the content of this file or how it works, but if you are curious you can have a look at it in a text editor or any XHTML editing tool. The second <script> element calls the script that was included in the previous line and tells it four things so that it can do its job:
<script type="text/javascript">
    swfobject.embedSWF("flash/flash_sample.swf", "flash_movie",
     "300", "200", "8.0.0");
 </script>
The four parameters being passed in are shown in bold:
"flash/flash_sample.swf"is the location of the Flash movie to be played."flash_movie"is the value of theidattribute of the element that is to be replaced."200"indicates the height of the movie in pixels."8.0.0"is the minimum version of Flash Player required to play the movie.
This approach has two additional advantages not mentioned yet:
It is considered to be better for search engines. Because search engines cannot index Flash content well, they will see the XHTML content that would have been replaced.
It is also considered good for accessibility purposes, because if users have disabled Flash there is alternative content for them.
As I already mentioned, there are several places where you can download Flash movies that you can use on your own sites (without necessarily using the Flash authoring tool). A good starting place is http://ActiveDen.net/, which features works by many authors.
You may have also heard of a technology called Silverlight, which has been developed by Microsoft. Silverlight is very similar to Flash; however, the first version was only released in 2006 and therefore far fewer people have the Silverlight plug-in installed compared with the number of people who have Flash Player installed. Until it has significantly more users, it is unlikely to challenge Flash on mainstream sites.
Now that you've seen how to include Flash movies in a web page, let's look at how to add films and audio into our pages. This starts to get a little more complicated, because while there is only one format for Flash movies (.swf) and one player (Adobe's Flash Player), there are several audio and video formats, many of which require different plug-ins.
One of the easiest ways to feature video on your site is to upload your video to a site such as YouTube, and then embed the YouTube player in your page using the code YouTube provides. However, you might decide that you don't want to have your video on YouTube or you might not want a YouTube-branded player on your site, so let's look at some alternatives.
When you want to play a video on the web there are two things you need to consider:
File format: You need to choose the format of the video, and there are lots of different formats to choose from, including AVI, Flash Video, MPEG, QuickTime, and Windows Media. Which format you choose can influence the size of the file that users have to download and the quality of the picture they get to watch (because the formats use different compression techniques to create smaller files).
Plug-in needed to play that type of file: Different formats require different plug-ins to play the movie. Some plug-ins are more popular than others (and are installed on a greater percentage of computers). Examples include Flash Player, QuickTime Player, RealPlayer, and Windows Media Player.
To tell a browser what kind of video you are going to play, you can use the type attribute on the <object> element. Its value is something known as a MIME type (for example, the MIME type of a QuickTime Movie is video/x-mov). You can think of MIME types as being a little like file extensions, in that they describe the format of the content. The browser can then check if it has a program needed to play that file format — and if so use that program to play the file.
To tell a browser what kind of plug-in to use, you can use the classid attribute. Its value is a rather long set of numbers/letters used to identify that plug-in. For example, the classid of the QuickTime Player plug-in is 02BF25D5-8C17-4B23-BC80-D3488ABDDC6B.
The following table gives a rundown of the most common video formats on the Web, the file extensions they use, the MIME type, and default players on PC and Mac.
File format | File Extension | MIME Type | Default Player PC | Default Player Mac |
|---|---|---|---|---|
Flash Video player |
| Flash Player (often pre-installed) | Flash Player (often pre-installed) | |
MPEG |
|
| (Usually) Windows Media Player | (Usually) Quick Time Player |
Windows Media Video |
|
| Windows Media Player pre-installed | User must download Windows Media components |
QuickTime Movie |
|
| User must download plug-in | QuickTime Player pre-installed |
|
| Windows Media Player pre-installed | User must download Windows Media components | |
|
| Real Player (often needs to be downloaded) | Real Player (needs to be downloaded) |
When it comes to choosing which of these formats to show your video in, for most people the deciding factor is how many people will have the plug-in required to view that format (because you cannot expect people to download a plug-in just to watch a video on your site). For example, a Windows machine is likely to come with Windows Media Player already installed, but the latest versions of Windows Media Player are not being made for Mac. Likewise, Macs come with QuickTime installed, but you are likely to have to download a plug-in to play QuickTime files on a Windows machine. Here is a quick run-down of these formats (in estimated order of popularity).
FLV or Flash video is by far the most popular format for showing videos on the Web, largely because the Flash Player plug-in is installed on more computers than any of the other plug-ins needed to show video. People familiar with the Flash authoring environment can easily create their own video players (which are in turn shown within the Flash Player plug-in), allowing them to control the look and feel of the player. The format also compresses well for use on the Web.
MPEG is a format that takes its name from the group who developed it, the Motion Picture Experts Group. Most computers will have a player capable of playing MPEG movies because they can be played in Windows Media Player or QuickTime Player. The drawback of the MPEG format is that, even though it can be compressed in many ways, files often end up much larger than FLV formats (up to twice the size).
WMV or Windows Media Video is part of the Microsoft Windows Media suite, and requires Windows Media to play it — which comes with new PCs but requires users on other platforms to download a plug-in.
MOV files are based on QuickTime which was initially developed for Mac. It can be played on most other operating systems but again requires users to download a plug-in.
MP4 makes very small file sizes, but users need to install QuickTime to view it.
AVI (audio/video interleaved) was originally developed as a rival to QuickTime for Windows. It is known as a container format because it contains a video compressed with another codec. This means that your computer may play some AVI files, and not others.
RealVideo was one of the first formats used for showing video online. It requires a plug-in called RealPlayer to be installed on the computer. It is free but can be tricky to install. It is rapidly falling in popularity and is generally being replaced by FLV.
Since Flash Video is by far the dominant form of showing video on the web, that is the format we will focus on in this chapter.
There are several reasons why Flash Video is the most popular way to add video to a web site. These include:
The Flash player is installed on more computers that are connected to the Web than players that show other video formats, which means that more people can view the FLV files.
You can easily control the appearance of the player (the controls such as Play and Stop as well as the window around the video) using Flash, which means that people can create branded players.
FLV files compress well, which means that the same piece of video in FLV format can be much smaller than in MPEG−1 format with minimal loss in quality. In turn this means that:
The videos are quicker to load and play.
It costs less to run a web site that uses FLV than one using larger formats, because when you have a web site you are usually charged for bandwidth (the amount of data you send from your site to people viewing it).
Another factor that has contributed to FLV being the most popular video format on the Web would be its use on sites like YouTube and MySpace, which show all their videos in Flash. When you upload a video to one of these sites you can do so in several formats (such as AVI, MPEG, and QuickTime), and the web sites will then convert the videos into the FLV format and play them in their own players.
If you would rather not upload your video to one of these sites, then you need to do two things:
Convert the video from another format (such as AVI, MPEG, or QuickTime) and turn it into an FLV format.
Write or download an FLV player. Remember that these are just Flash movies (like any other SWF file) that are written to play FLV files.
There are two common ways you can convert a video from other formats into FLV format:
Using Adobe software: Since version 8 of Flash, Adobe, which makes the Flash authoring environment, has provided another piece of software specifically for converting video formats to FLV.
Third-party software: There are several companies that have made software to convert different video formats into FLV files. One example is the Riva FLV encoder available from:
http://rivavx.de/?encoder.
Rather than writing your own FLV player, you can download one. There are several players you can use even if you do not own the Flash authoring tool, such as:
Each of these players has its own way of specifying where to find the FLV file (and some also allow you to have playlists of multiple videos), so it is important to check the documentation that comes with the player in order to see how to incorporate the FLV file. There is also a range of other video players, which you can purchase on ActiveDen.net.
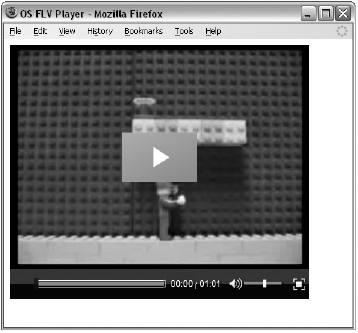
Here you can see an example of an OS FLV player being embedded in a page using the SWF Object technique that you just met in the previous section (ch03_eg11.html).
<head>
  <script type="text/javascript" src="swfobject.js"></script>
  <script type="text/javascript">
    swfobject.embedSWF("flash/os_flv_player.swf?movie=video.flv",
    "flash_video", "400", "340", "8.0.0");
  </script>
</head>
<body>
  <div id="flash_video">The content of this element would be shown
    if the user does not have Flash installed. It should therefore be
    an image and short description of what the video is about.</div>
</body>
You can see what this looks like in Figure 3-22:
When showing any video, you need to be aware of the physical size at which you are showing the video. It might be nice to show the video as large as possible, but the larger the video the larger the file size, and big files can be an issue for a couple of reasons:
The smaller the file, the faster it downloads. Users are less likely to watch videos that take a long time to download, or keep pausing when the viewer is trying to watch them.
The bigger the file, the more "bandwidth" you are using (bandwidth is the total size of files sent to visitors to your site). Because companies that host web sites often charge for bandwidth, you could end up with large bills if your video is popular. (This is a reason why many people will host their videos on sites such as YouTube — not only is it easy to upload video content and put it on your page, it is also cheaper.)
So there is always a balancing act between having a video big enough to show people what you want them to see, but not so big that it will not play smoothly on the average broadband connection.
It is also worth noting that version 9 of Flash introduced an option to make Flash movies play in a full-screen mode, which means that the player takes up the entire screen. In this mode, Flash Player can take a relatively small FLV video and use clever techniques to smooth the picture so that it can be watched at a much larger size. While the results can look a little grainy when sitting close to the computer monitor, the results can be more watchable from a distance. Most recent players have an option that allows users to watch videos in this full-screen mode.
If you have a long video, you might also want to consider splitting it into sections. By doing this you are less likely to pay for viewers to download an entire video that they may not watch to the end.
As with videos, when you want to add audio to your site you need to consider:
File format: Different types of audio files are saved using different compression techniques, which can affect the quality of the recording and file size.
Plug-in needed to play that type of file: As with video, visitors to your site need the right kind of player installed to play your chosen format. Luckily, there is a selection of file formats that you can play on most computers, so this is less of an issue than it is with video.
The most popular file types are:
MP3: This is like the sound part of the MPEG video format. MP3 is one of the most popular formats for music recordings, and combines good compression with fairly good quality. Files are stored with the
.mp3file extension and will play in most browsers. The MIME type for MP3s isaudio/mpeg.WAVE: This format was developed by IBM and Microsoft, and again plays in most web browsers. WAVE files are stored with the
.wavfile extension. Typically, WAVE files are not compressed, so their quality is much better than MP3 (but users need good-quality speakers in order to hear the difference). The disadvantage with the uncompressed nature of the WAVE files is that the file sizes tend to be far larger than MP3s. The MIME type for WAVE files isaudio/x-wav.
Three other formats that are used on the Web, all of which require their own plug-ins, are:
In most cases you should use the MP3 format because it is most widely supported and has largely become the default standard for playing music on the Web, because MP3 files compress to relatively small file sizes while retaining a good sound quality. There are two main exceptions when you might like to look at a different format:
If you need premium-quality audio, and you know that a lot of visitors to your site will have very good speakers attached to their computers (allowing them to benefit from the higher-quality audio), then you might want to consider WAVE files.
If you need to control the number of times users can play the file, or prevent them from passing an audio file to another user, then you might need to consider audio formats that allow for Digital Rights Management or DRM (such as Windows Media Audio or Real Audio). DRM is a complex topic, which is beyond the scope of this book, but there is a lot of information about it online.
If the audio you want to play is not already in MP3 format, there are several tools that can help you create an MP3 from other audio formats. You can just search for "MP3 converter" in your favorite search engine.
You may also come across MIDI files. Rather than storing audio, MIDI files are a little more like a digital version of a score, and are used to tell your sound card (or other synthesizer) information about how to play a piece of music. It can indicate the different parts to be played on different instruments, give tempo information, and suggest how hard each instrument should play each note. The quality of sounds produced depends on the quality of the sound card.
In some browsers, you do not need to download any extra plug-ins to play an MP3 or WAVE file. For example, you can just use the <object> element to include the audio file in the page, and the browser will automatically determine the type of plug-in needed to play your file by checking the value you have given for the type attribute (which is used to specify the MIME type of the file that you want to play).
Unfortunately, this technique is very unreliable because different versions of browsers expect slightly different usage of the <object> element, and there are also several preferences and settings that users can set on their computers that can affect whether a track will play. So even if you can get an <object> element to play an audio file on a page that is running on your computer, you cannot expect it to work the same on other machines.
Getting consistent results can be very problematic. To help reach a greater percentage of browsers, you may see the <embed> element used inside an <object> element. You may even come across examples where the <embed> element has been used without an <object> element, but this is also unlikely to work on as many browsers.
Here is an example of adding an MP3 to a web page; note how the type attribute on the <object> element has the value audio/mpeg (ch03_eg12.html):
<object width="300" height="42" type="audio/mpeg" data="audio/my_music.mp3">
  <param name="src" value="audio/my_music.mp3" />
  <param name="autoplay" value="true" />
  <param name="autostart" value="1" />
  <embed src="audio/my_music.mp3" width="300" height="42" ></embed>
</object>
As you can see from Figure 3-23, you get various results in different browsers. A player will be displayed in some browsers, but not in others, and when one does appear it can look different (and take up a different amount of space) than the next.
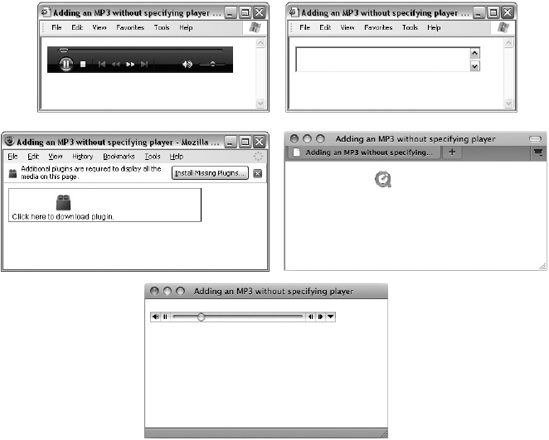
This example also shows that it is possible to control the size that the player appears using the width and height attributes, but it is important to bear in mind that the controls on different players may be of different sizes, so it is best not to make them too small. You may have also noticed the <param> elements that tell the player to automatically start playing when the audio file loads. The first, autoplay, is used by QuickTime Player, while autoStart is understood by Windows Media and RealPlayer. (The <embed> element uses the equivalent attributes.)
Some people try to resolve this problem by specifying which player to use by adding the classid attribute onto the <object> element. As you may remember, the value of this attribute is a long set of numbers/letters that identifies a particular player. However, if you specify a player, and users do not have that player installed, they will not be able to hear the audio without downloading the required plug-ins:
classidfor Windows Media 7+:clsid:6BF52A52-394A-11D3-B153-00C04F79FAA6classidfor QuickTime:clsid:02BF25D5-8C17-4B23-BC80-D3488ABDDC6Bclassidfor Real Player:clsid:CFCDAA03-8BE4-11cf-B84B-0020AFBBCCFA
While it is possible to hide the player (you can use CSS to hide the
<object>element, and the<embed>element can have atypeattribute whose value is hidden), this is generally frowned upon because a user should be given the option to stop any audio that is played on a page.
You may also have come across web sites that simply link to MP3 or WAV files. Some sites do this because it is more likely that the browser will be able to play the file if it links directly to it (rather than using the <object> and <embed> elements). When you click on the link, the browser plays the MP3 or WAVE files in the browser's default media player; for example, the following links would open up the files specified in the href attribute:
<a href="test.mp3">test mp3</a>
<a href="test.wav">test wav</a>
The drawback with both these techniques is that you have no control over the appearance of the player's interface. Therefore, a lot of people again turn to Flash when they want to create a player for audio files.
In the same way that Flash has become the most popular way for showing videos on the Web (because more people have the Flash Player installed than any other media player), it has also become the most popular way to add an MP3 player to a web page. Not only do you have the advantage that it is far more likely to work in a visitor's browser, but you can also control the appearance of the interface for the player, and some Flash MP3 players allow you to create playlists that feature multiple tracks.
While you could write an MP3 player from scratch using the Flash authoring tool, several have already been written and are ready for use in your pages, such as:
http://musicplayer.sourceforge.net/http://www.wimpyplayer.com/http://code.google.com/p/mp3player/http://developer.yahoo.com/mediaplayer/
There are also a variety of customizable players you can purchase from ActiveDen.net.
Here is an example of using the free Music Player from SourceForge.net (ch03_eg13.html):
<object type="application/x-shockwave-flash" width="400" height="170"
    data=" mp3_player.swf?playlist_url=playlist.xspf">
    <param name="movie" value="mp3_player.swf?playlist_url=playlist.xspf" />
</object>
In this example, you can see that the <object> element carries four attributes:
A
typeattribute, indicating that the player is a Flash movie.The
heightandwidthattributes, indicating how much space this player will take up.A
dataattribute, which tells the browser where to find the Flash movie that plays the MP3 files (mp3_player.swf). It also tells the Flash movie where to find a playlist of the MP3s that it should play calledplaylist.xspf(you can find out more about the playlist format if you download the player from SourceForge).
Inside the <object> element is a <param> element. This <param> element again passes the location of the Flash movie and the playlist. Figure 3-24 shows you what this would look like in a browser.
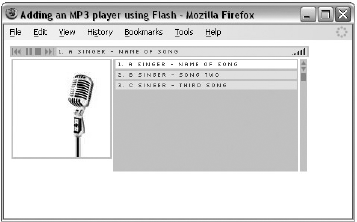
When you download a Flash MP3 player, it is likely to come with the code that the authors of the player recommend you use to embed the player in your page. The various players often require that you set different parameters to control the appearance and settings of the player, so it is best to check the instructions for using the player on the web site you download the player from. For example, some Flash MP3 players allow you to control such things as:
The colors of the player
Setting a list of tracks to play (rather than just one track)
Whether to automatically start the MP3 playing when the page is loaded
When picking a player it is worth looking at the features offered by different players to see which one suits you best.
If your chosen player does not come with instructions for using the player with SWF Object, and you want to use this technique for including Flash in your pages, you can usually adapt the code to work with SWF Object. For example, here is an example of how to include the same Flash MP3 player you just met in your page using SWF Object (ch03_eg14.html):
<head>
  <title>Adding an MP3 player using Flash</title>
  <script type="text/javascript" src="swfobject.js"></script>
  <script type="text/javascript">

swfobject.embedSWF("flash/xspf_player.swf?playlist_url=flash/playlist.xspf",
   "flash_mp3_player", "400", "170", "8.0.0");
  </script>
</head>
<body>
  <div id="flash_mp3_player">Here is where the Flash MP3 Player goes.</div>
</body>Having seen several techniques that allow you to add audio and video to your page, it is important to consider the issue of whether the audio or video should play automatically when the page loads.
More people are likely to watch or listen to a file if it starts up automatically than if they are forced to interact with a player. However, some visitors to your site might leave the page very quickly if the browser starts to play audio when they were not expecting it to (particularly if they are browsing your site at work). If a visitor has anticipated hearing audio on your site, this is less likely to be an issue. (A site owned by a record label or video production company is far more likely to have audio than a site owned by an accountant or a builder.) So when deciding whether to play audio or video when a page loads, consider what your users would expect to see.
If you do automatically play audio or video when a page loads, always offer a clear pause or mute button that allows the user to turn off the sound.
People can tire of hearing the same track repeatedly, so if you expect people to regularly visit your site or spend a long time on it, try to avoid repetitious use of the same tracks, and offer clear options for the user to turn off the music.
If the audio and video files are hosted on your server, you will be paying for the bandwidth of the files being played. Therefore, if the file starts automatically when the page loads, you might be paying for people to watch and listen to files that they aren't interested in.
Because the <embed> element is deprecated, it is covered in Appendix I.
Now that you have seen several examples of how to add rich media to your web pages, we'll finish off the chapter with a closer look at the <object> and <param> elements in the same way that we have covered the syntax of other elements in previous chapters. Because the <embed> element is deprecated, it is covered in Appendix I.
The <object> element can carry all the universal attributes, the UI event attributes, and the following attributes:
archive border classid codebase codetype data declare height width hspace
vspace name standby tabindex usemap
We'll take a look at each of these here, although the ones you will most commonly use are the classid attribute, the type attribute, and the id attributes (discussed in Chapter 1).
The archive attribute is of particular use with Java-based applications. The value should be a space-separated list of URLs to the resources the object needs in order to run (such as Java classes).
The border attribute specifies the width of the border to appear around the object; the value is specified in pixels. However, it is deprecated and you should use the border property in CSS instead.
The classid attribute is designed to specify the type of application that is required (such as the type of media player) in order for the browser to process a file.
For example, when you want to include a Flash movie the classid attribute would use a special value that indicates the object loaded should be the Flash Player. If you wanted to play a QuickTime movie you may indicate that the QuickTime plug-in should be loaded. When you are working with Java, the value of this attribute is likely to be the Java class you want to include.
The following is an example of a classid to embed a player to show a QuickTime movie:
classid="clsid:02BF25D5-8C17-4B23-BC80-D3488ABDDC6B"
If the browser does not have the required plug-in (or other code) required to display the file specified in the <object> element, then the codebase attribute specifies the base URL where a plug-in can be downloaded. The idea is that if the browser cannot display the file it will offer the user the option to download the necessary files. For example, if you were working with Java, it might look like this:
codebase="http://www.example.org/javaclasses/"
The codetype attribute specifies the MIME type of the application or code required to play the file (not to be confused with the MIME type of the file itself). For example, if you wanted to embed an Excel spreadsheet into a web page, you would have a codetype attribute like this:
<object data="sales.xls" codetype="application/vnd.ms-excel">
Browsers can use the codetype attribute to skip over unsupported media types without having to download unnecessary objects. Appendix H covers MIME types.
The declare attribute is used to declare an object without instantiating it. It saves you from having to download an object until it is actually required.
It is a Boolean attribute, and while it does not need a value in HTML, all attributes in XHTML require a value, so you would use the following:
declare="declare"
If the object has a file to process or play, then the data attribute specifies the URL for that file. For example, here is a URL to an MP3:
data="http://www.example.com/mp3s/newsong.mp3"
This is similar to the src attribute that is used on the <img> element, and the value can be a relative URL.
The height and width attributes specify the height and width of an object. The values should be in pixels or a percentage of the containing element. They are treated just like height and width attributes of the <img> element. The use of these attributes should make the page load faster because the browser can lay out the rest of the page without completely loading the object.
The hspace and vspace attributes specify the amount of white space that should appear around an object, just as when they are used with the <img> element. They have been replaced by the margin and border properties of CSS.
The name attribute provides a name that can be used to refer to the object, in particular for use in scripts. It has been replaced by the id attribute in XHTML.
The standby attribute specifies a text string that will be used when the object is loading:
standby="Trailer for Harry Potter 27 is loading"
The value should be a meaningful description of the object that is loading.
The tabindex attribute indicates the tab index of the object within a page. Tabbing order is discussed in Chapter 5.
The usemap attribute indicates that the object is an image map containing defined areas that are hyperlinks. Its value is the map file used with the object. It can be a complete URL to an external file or a reference to the value of an inline <map> element's name attribute. See the "Image Maps" section earlier in this chapter.
The <param> element is used to pass parameters to an object. The kinds of parameters an object requires depend upon what the object does; for example, if an object has to load a Flash MP3 player into the page, you will probably need to specify where the MP3 file can be found. Alternatively, if you are adding a video to a page, your object might allow you to tell it whether to automatically play the video when the page loads, or whether to wait for the user to press a play button in order for it to start.
In addition to the universal attributes and basic events, the <param> element can carry the following attributes:
name type value valuetype
The name and value attributes act as a name/value pair (rather like attributes themselves). The name attribute provides a name for the parameter you are passing to the application, while the value gives the value of the parameter.
Here are a couple of examples, taken from a QuickTime movie. The first parameter indicates the source of the file being loaded to play, while the second indicates that the movie should start playing automatically as it is loading (without the user having to start it):
<param name="src" value="movieTrailer.mov" />
<param name="autoplay" value="true" />
If you were working with a Java applet, you could use the name and value attribute to pass values into a method.
If your object accepts parameters, then the valuetype attribute indicates whether the parameter will be a file, URL, or indeed another object. The table that follows shows the possible values.
Value | Purpose |
|---|---|
| The parameter value is a simple string — this is the default value. |
| The parameter value is a URL. |
| The parameter value is another object. |
In this chapter, you have learned how to make your pages look a lot more exciting by adding images and other multimedia objects.
Images can really add life to a page, but they can also increase the time it takes to load a page. Therefore it pays to save any images you want to show on the Web in either JPEG, GIF, or PNG formats, which compress well (creating smaller files) while retaining quality.
The GIF and PNG formats are the formats of choice for images with flat colors, while JPEGs are better for photographic images and graphics with gradients of the same color.
When looking at images, you also learned how to make image links, and how to create an image map, which divides an image into separate parts that you can click on.
Moving on, you saw how to add Flash movies, video, and audio to your site. You learned that there are two important factors in adding video and audio to your site; first, the format you are going to add the content in (the file type), and second, the kind of technology you would use to play the files.
For adding videos to web pages, you found that FLV is the most popular format, and that FLVs are played in a Flash Movie (which in turn requires the Flash Player plug-in to be installed on your machine).
For audio, MP3 is the most common format, and many web programmers prefer to use Flash to play their MP3 files because it has more consistent results in different browsers, and also allows them to control the appearance of the interface for the player.
Now you should be well-equipped to add images and rich media to your pages, which should make them look more appealing and attract more visitors.
The answers to all the exercises are in Appendix A.
Add the images of icons that represent a diary, a camera, and a newspaper to the following example. All of the images are provided in the
imagesfolder in the download code for Chapter 3.<h1>Icons</h1> <p>Here is an icon used to represent a diary.</p> <img src="images/diary.gif" alt="Diary" width="150" height="120" /><br /> <p>Here is an icon used to represent a picture.</p> Camera image goes here<br /> <p>Here is an icon used to represent a news item.</p> Newspaper image goes here<br />
Your finished page should resemble Figure 3-25.
Look at the images shown in Figures 3-26 and 3-27 and decide whether you are more likely to get smaller file sizes and better quality images if you save them as GIFs or JPEGs.
Go through the files for the sample application and replace the main heading with the logo on each page. On every page except for the homepage, make sure that the image links back to the
index.htmlpage.