
The previous chapter really pushed the limits as far as the amount of information covered without thorough explanations beforehand. I wanted to immerse you in the source code for a game right up front before fully explaining all of the concepts to give you a feel for what is involved in creating a real game. The Asteroids clone was not a great game, and not even very good looking, but it was functional. Java has a robust and feature-rich set of classes for working with 2D vector graphics and bitmaps (explained in the next chapter), making it possible to draw rectangles, polygons, and other shapes very easily. The examples in this chapter again are applets rather than JFrame-based applications. Aside from initialization code, there’s very little difference in the two types of projects, and I want you to become comfortable with both types. Here are the key topics in this chapter:
Drawing and manipulating vector graphics
Using the
AffineTransformclassApplying the translation, rotation, and scaling of shapes
You have already been exposed to a significant number of features in Graphics2D and other classes in java.awt (the Abstract Window Toolkit), such as Rectangle and Polygon. The core of Java’s 2D graphics engine is the Graphics2D class. This class is incredibly versatile for working with vector graphics and bitmapped graphics. For instance, Graphics2D has many methods for drawing images in a variety of ways! In my opinion, this is somewhat of an overkill just to draw images on the screen. But Java is well known for its versatility and convenience. This class knows how to draw rectangles and many other shapes. But it can do a lot more than just draw—it can also move, rotate, and scale shapes!
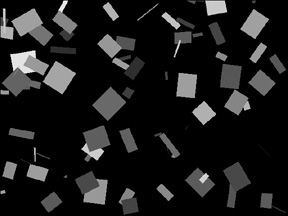
Let’s write a short program to demonstrate. The RandomShapes program is shown in Figure 4.1, and the source code listing follows. I have highlighted all of the important lines of code in bold text, and you’ll learn about the classes, properties, and methods that have been highlighted.
// RandomShapes program
import java.awt.*;
import java.applet.*;
import java.awt.geom.*;
import java.util.*;
public class RandomShapes extends Applet {
    //here's the shape used for drawing
    private Shape shape;

    //applet init event
    public void init() {
        shape = new Rectangle2D.Double(-1.0, -1.0, 1.0, 1.0);
    }

    //applet paint event
    public void paint(Graphics g) {
        //create an instance of Graphics2D
        Graphics2D g2d = (Graphics2D)g;

        //save the identity transform
        AffineTransform identity = new AffineTransform();

        //create a random number generator
        Random rand = new Random();

        //save the window width/height
        int width = getSize().width;
        int height = getSize().height;

        //fill the background with black
        g2d.setColor(Color.BLACK);
        g2d.fillRect(0, 0, width, height);

        for (int n = 0; n < 300; n++) {
          //reset Graphics2D to the identity transform
          g2d.setTransform(identity);

          //move, rotate, and scale the shape randomly
          g2d.translate(rand.nextInt() % width, rand.nextInt() % height);
          g2d.rotate(Math.toRadians(360 * rand.nextDouble()));
          g2d.scale(60 * rand.nextDouble(), 60 * rand.nextDouble());

          //draw the shape with a random color
          g2d.setColor(new Color(rand.nextInt()));
          g2d.fill(shape);
        }
    }
}
This program used the Graphics2D class to translate, rotate, and scale a Shape object randomly, which results in the screen being filled with random rectangles of varying sizes and orientations. This simple program illustrates the base concept behind the Asteroids-style game from Chapter 3—that Java provides the toolset for manipulating 2D graphics, and it’s up to you how you will use these versatile tools.
The RandomShapes program defines a Shape object (called shape) and then uses that basic object to create a Rectangle2D like so:
shape = new Rectangle2D.Double(-1.0, -1.0, 1.0, 1.0);
This works, even though the shape object was originally created as a Shape because Rectangle2D is derived from the Shape class. In other words, Rectangle2D inherits from Shape. This makes it possible to use the Graphics2D method fill to draw a filled rectangle, even though it was defined originally as a basic Shape. For each class, such as Rectangle, there is a floating-point version, such as Rectangle2D. Classes such as Rectangle utilize integer values, while Rectangle2D uses floats and doubles. You can also use the Point and Polygon classes in similar fashion.
The Polygon class is a bit different from Point and Rectangle because it allows you to define the shape yourself using X and Y value pairs. You can construct a polygon with just a single point or a polygon with four points to duplicate the Point and Rectangle classes yourself. Or you can define custom polygons, such as the asteroids and ship in Chapter 3. The asteroid shape (shown in Figure 4.2) was defined like this:
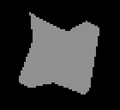
   private int[] astx = {-20,-13, 0,20,22, 20, 12, 2,-10,-22,-16};
   private int[] asty = { 20, 23,17,20,16,-20,-22,-14,-17,-20, -5};
These two arrays define the X and Y points for the polygon. We call a point a vertex, and the plural form is vertices. When you are creating a polygon in this manner, keep in mind that the X and Y arrays must pair up, since every X must go with a Y value to make a vertex.
When you’re ready to draw a shape, whether it is a rectangle, a polygon, or something else, you have two choices. You can use the fill() method to draw the shape with a filled-in color. Or you can use the draw() method to draw the outline or border of the shape in the current color. The color is set with the setColor() method beforehand. Sometimes it can be confusing when you are trying to define the shape of a polygon using the two arrays of X and Y points, so you may want to design the polygon on paper or in a graphics editor first. Figure 4.3 shows the design of a five-sided star-shaped polygon.
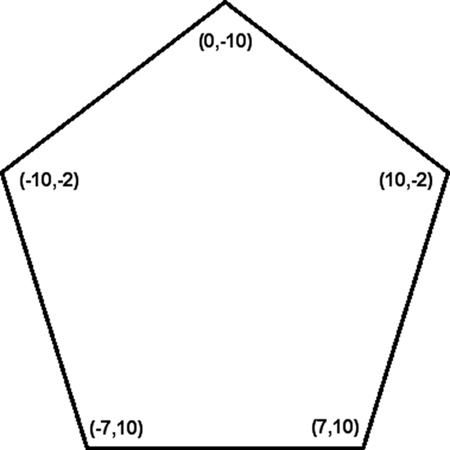
Seeing a diagram of the image can really help, especially when you have a complex polygon in the works. Here are the arrays for defining this polygon. Note how the points directly correspond to the values in the figure.
private int[] xpoints = { 0, -10, -7, 7, 10 };
private int[] ypoints = {-10, -2, 10, 10, -2 };
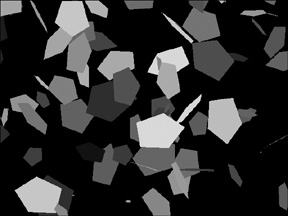
Let’s write a program to demonstrate how to create and draw polygons. The RandomPolygons program will use the five-sided star polygon with random rotation and scaling. The output of the program is shown in Figure 4.4.
// RandomPolygons program
import java.awt.*;
import java.applet.*;
import java.util.*;
import java.awt.geom.*;

public class RandomPolygons extends Applet {
    private int[] xpoints = { 0,-10, -7, 7, 10 };
    private int[] ypoints = {-10, -2, 10, 10, -2 };

    //here's the shape used for drawing
    private Polygon poly;

    //applet init event
    public void init() {
        poly = new Polygon(xpoints, ypoints, xpoints.length);
    }

    //applet paint event
    public void paint(Graphics g) {
        //create an instance of Graphics2D
        Graphics2D g2d = (Graphics2D) g;

        //save the identity transform
        AffineTransform identity = new AffineTransform();

        //create a random number generator
        Random rand = new Random();

        //save the window width/height
        int width = getSize().width;
        int height = getSize().height;

        //fill the background with black
        g2d.setColor(Color.BLACK);
        g2d.fillRect(0, 0, width,height);

        for (int n = 0; n < 300; n++) {
          //reset Graphics2D to the identity transform
          g2d.setTransform(identity);

          //move, rotate, and scale the shape randomly
          g2d.translate(rand.nextInt() % width, rand.nextInt() % height);
          g2d.rotate(Math.toRadians(360 * rand.nextDouble()));
          g2d.scale(5 * rand.nextDouble(), 5 * rand.nextDouble(();

          //draw the shape with a random color
          g2d.setColor(new Color(rand.nextInt()));
          g2d.fill(poly);
        }
    }
}
The preceding programs have used vector rotation to rotate rectangles and polygons by a random value. Now I want to give you a little more direct exposure to this feature by writing a program that rotates a single polygon on the screen using the arrow keys and, alternately, the mouse buttons. The scale factor is set to a fixed value of 20, which you can change if you want. Figure 4.5 shows the output of the RotatePolygon program.
There are a couple of notable differences between this program and the last one. This program just draws a single shape, so there is no need to set the identity transform before drawing. This program implements the KeyListener and MouseListener interfaces, which means that the program must use all of the methods defined in these interface classes, even if you don’t plan to use them. It’s an odd quirk that is inherent to how interface classes work because they are abstract.
// RotatePolygon program
import java.awt.*;
import java.awt.event.*;
import java.applet.*;
import java.util.*;
import java.awt.geom.*;

public class RotatePolygon extends Applet
        implements KeyListener, MouseListener  {
    private int[] xpoints = { 0,-10, -7, 7, 10 };
    private int[] ypoints = {-10, -2, 10, 10, -2 };

    //here's the shape used for drawing
    private Polygon poly;

    //polygon rotation variable
    int rotation = 0;
    //applet init event
    public void init() {
        //create the polygon
        poly = new Polygon(xpoints, ypoints, xpoints.length);

        //initialize the listeners
        addKeyListener(this);
        addMouseListener(this);
    }

    //applet paint event
    public void paint(Graphics g) {
        //create an instance of Graphics2D
        Graphics2D g2d = (Graphics2D) g;

        //save the identity transform
        AffineTransform identity = new AffineTransform();

        //save the window width/height
        int width = getSize().width;
        int height = getSize().height;

        //fill the background with black
        g2d.setColor(Color.BLACK);
        g2d.fillRect(0, 0, width, height);

        //move, rotate, and scale the shape randomly
        g2d.translate(width / 2, height / 2);
        g2d.scale(20, 20);
        g2d.rotate(Math.toRadians(rotation));

        //draw the shape with a random color
        g2d.setColor(Color.RED);
        g2d.fill(poly);
        g2d.setColor(Color.BLUE);
        g2d.draw(poly);
    }

    //handle keyboard events
    public void keyReleased(KeyEvent k) { }
    public void keyTyped(KeyEvent k) { }
    public void keyPressed(KeyEvent k) {
        switch (k.getKeyCode()) {
        case KeyEvent.VK_LEFT:
            rotation- -;
            if (rotation < 0) rotation = 359;
            repaint();
            break;
        case KeyEvent.VK_RIGHT:
            rotation++;
            if (rotation > 360) rotation = 0;
            repaint();
            break;
        }
    }
    //handle mouse events
    public void mouseEntered(MouseEvent m) { }
    public void mouseExited(MouseEvent m) { }
    public void mouseReleased(MouseEvent m) { }
    public void mouseClicked(MouseEvent m) { }
    public void mousePressed(MouseEvent m) {
        switch(m.getButton()) {
        case MouseEvent.BUTTON1:
            rotation- -;
            if (rotation < 0) rotation =359;
            repaint();
            break;
        case MouseEvent.BUTTON3:
            rotation++;
            if (rotation > 360) rotation = 0;
            repaint();
            break;
        }
    }
}
This chapter provided a bridge from the material you were immersed into in the previous chapter to the new concepts you will learn in the next chapter, covering the basics of vector graphics programming. The next step in graphics is to draw bitmaps, and then regular sprites, followed by animated sprites. We have much to learn in upcoming chapters! Here is what we covered in this chapter:
How to use the
Graphics2Dclass to manipulate vector graphicsHow to translate, rotate, and scale vector shapes
The following questions will help you to determine how well you have learned the subjects discussed in this chapter. The answers are provided in Appendix A, “Chapter Quiz Answers.”
Use the following exercises to test your grasp of the material covered in this chapter.
There are many example programs in this chapter that could be modified and experimented upon. Let’s tweak the RandomPolygons program—modify the program so that it draws two different polygons instead of just a single one.
Modify the RotatePolygon program so that it will rotate based on mouse movement instead of button clicks. You will need to implement the Mouse-MotionListener interface (and events) and call the addMouseMotionListener method to gain access to the mouseMoved event. In this event, you can track mouse movement and rotate the polygon accordingly.