
Java has a rich set of features for recording, mixing, and playing sound samples and MIDI sequences using a variety of classes that you will learn about in this chapter. You will learn about Java’s rich set of sound support classes for loading and playing audio files in a variety of formats through Java’s sound mixer. You will then learn about MIDI files and how to load and play them through Java’s MIDI sequencer.
Here is a rundown of the key topics in this chapter:
Loading and playing digital files
Loading and playing MIDI files
Writing some reusable audio classes
Java’s Sound API provides a package for working with digital sample files, which has methods for loading a sample file (AIFF, AU, or WAV) and playing it through the sound mixer. The package is called javax.sound.sampled and includes numerous classes, most of which we will ignore. Some of these classes provide support for recording sound and manipulating samples, so you could write a complete sound-editing program in Java that is similar to full-blown sound-editing programs. One good example is Audacity—a freeware, open-source sound editor that is available for download at http://audacity.sourceforge.net (see Figure 9.1).

The Java Sound API supports the three main audio file formats used in web and desktop applications:
AIFF
AU
WAV
The digital sample files can be 8-bit or 16-bit, with sample rates from 8 kHz to 48 kHz (which is CD quality). Java’s Sound API includes a software sound mixer that supports up to 64 channels for both sound effects and background music for a Java program.
Tip
For the latest information about the Java Sound API, point your web browser to java.sun.com/products/java-media/sound.
The first step to writing some Java sound code is to include the javax.sound .sampled package at the top of your program:
import javax.sound.sampled.*;
If you are using an IDE such as NetBeans, you will see a pop-up menu appear to help you narrow down the class names within javax, which can be very educational. You’ll see that when you type in import javax.sound., the editor will show you the two classes available in javax.sound., which are sampled and midi. By adding .* to the end of the import statement, you are telling the Java compiler to import every class within javax.sound.sampled, of which there are many.
In fact, when working with the sound system, you will need access to several classes, so it is convenient to import the associated packages at the start of a program so those classes are easier to use. For instance, without importing javax.sound.sampled, you would need to create a new sound sample variable using the full class path, such as:
   javax.sound.sampled.AudioInputStream sample =
       javax.sound.sampled.AudioSystem.getAudioInputStream(
       new File("woohoo.wav"));
Could you imagine what it would look like if you had to write all of your code like this? It would be illegible for the most part. Here is what the code looks like after you have imported javax.sound.sampled.*:
AudioInputStream sample = AudioSystem.getAudioInputStream(new File("woohoo.
wav"));
AudioSystem and AudioInputStream are classes within the javax.sound.sampled package and are used to load and play a sample in your Java program. Later in this chapter, when I show you how to do background music, you’ll get the hang of using some classes in a package called javax.sound.midi.
Caution
You may run into a problem with the audio portion of your game, where your source code seems to be well written, without bugs, but you still get unusual errors. One of the most common sources of problems when working with audio data is an unsupported file format error. This type of exception is called UnsupportedAudioFileException and will be discussed later in this chapter.
If the program’s flow runs through the UnsupportedAudioFileException block in your error handler, then the audio file may be encoded with an unsupported file format. The other, more obvious, problem is that the file itself might be missing.
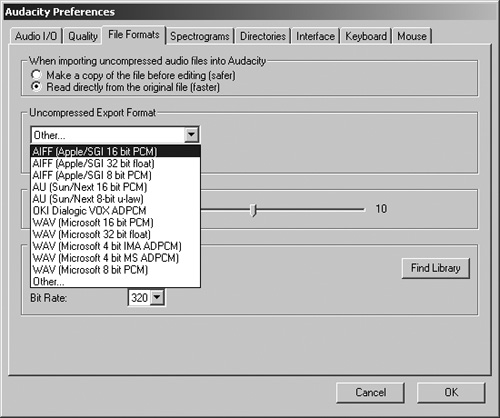
You can check and convert audio files using the freeware Audacity program that I mentioned earlier. Just load up a wary audio file that you suspect is encoded in a weird format, and then save the file to a new format. Figure 9.2 shows the File Formats tab in the Audacity Preferences dialog box. Here you can change the default file format for exporting audio files from the File menu. If you choose the Other option from the drop-down list, you will be presented with even more audio formats, but most of them are obsolete. (For instance, you can save to Creative Labs’ old VOC format, which was popular in MS-DOS games many years ago.) Some of the custom formats require an additional download of a plug-in for that particular sound format.
The key to sound programming is a class called AudioInputStream. This class is used to load a sound file (which can be an AIFF, AU, or WAV file) from either a local file or from a remote URL anywhere on the Internet. An input stream is a source of data. You can create a new instance of the class like so:
AudioInputStream sample;
This statement is usually specified as a global variable within the class, defined up at the top of the class before any methods. You can define this variable as private, public, or protected. (The default, if you do not specify it, is public.) In object-oriented terms, public specifies that the variable is visible to other classes outside the current class, private means the variable is hidden to the outside world, and protected is similar to private, except that subclasses (through inheritance) have access to otherwise hidden variables defined as protected.
The code to load a sound from a file or URL is usually called from a program’s constructor. The method used to load a sound is AudioSystem.getAudioInput-Stream. This method accepts a File, InputStream, or URL; there are two other ways to create an audio stream (AudioFormat and Encoding), neither of which is useful for our needs.
sample = AudioSystem.getAudioInputStream(new File("humbug.wav"));
Note that the return value of this method is an AudioInputStream. Also, since getAudioInputStream does not offer an overloaded version that just accepts a String for a filename, you must pass a File object to it instead. This is easy enough using a new File object, passing the filename to the File’s constructor method. If you want to grab a file from a URL, your code might look something like this:
URL url = new URL("http://www.mydomain.com/test.wav");
sample = AudioSystem.getAudioInputStream(url);
Either way, you then have access to a sound file that will be loaded when needed. However, you can’t just use an AudioInputStream to play a sound; as the class name implies, this is just a source of sample data without the ability to play itself. To play a sample, you use another class called Clip (javax.sound.sampled.Clip). This class is the return value of an AudioSystem method called getClip:
Clip clip = AudioSystem.getClip();
Loading Resources
The code presented here will load a sound file correctly when your Java program is running either on your local PC or in a web browser. However, we need to use a slightly different method to load a file out of a Java archive. This subject is covered in Chapter 16, which covers web deployment.
But I want to prepare you for distributing your Java programs on the web now, so that your programs will already be ready for deployment. To that end, you must replace the new File() and new URL() methods to load a resource (such as an image or sound file) with the following code instead: this.getClass().getResource(). The getResource() method is found in the current class instance, this.getClass(). You will find it most useful if you use this.getClass().getResource() anytime you need to build a URL. Here is a method I’ve written that accomplishes that goal:
   private URL getURL(String filename) {
       URL url = null;
       try {
           url = this.getClass().getResource(filename);
       }
       catch (Exception e) { }
       return url;
   }
Then, when you get to Chapter 16, the programs you’ve written will be ready for web deployment in a compressed Java archive (JAR)! During your explorations of the Java language while writing games and other programs, you will likely come up with many useful methods such as getURL(). You may want to store them in a reusable package of your own designation. The root package might be called jharbour, and then I would add subpackages to this, such as jharbour .graphics, jharbour.util, and so on. Since getURL() is the only custom reusable method repeatedly used in the book, it is more convenient to just include it in every class.
Since we don’t need to pass a parameter to getClip, you might be wondering how this object knows what to play. There’s actually one more step involved because at this point, all you have is a sound clip object with the capability to load and play an audio file or stream. This method actually returns a sound clip object from the default system mixer.
At this point, you have an AudioInputStream and a Clip, so you just need to open the audio file and play it. These steps are both performed by the Clip class. First, let’s open the sound file:
clip.open(sample);
Next, there are two ways to play a clip, using the Clip class. You can use the start() method or the loop() method to play a sample. The start() method simply plays the sound clip.
narrator.start();
On the other hand, the loop method provides an option that lets you specify how many times the clip will repeat, either with a specific number of repeats or continuously. Here is how you might play a clip one time using the loop method:
explosion.loop(0);
Remember, the parameter specifies the number of times it will replay, as it’s a given that the clip will always play at least once using the loop method. Here’s how you can play a clip continuously:
thrusters.loop(Clip.LOOP_CONTINUOUSLY);
You might use this option if you have a music track that you would like to play repeatedly for the soundtrack of the game. Keep in mind, though, that sample files (AIFF, AU, and WAV) are quite large, so you wouldn’t want the user to wait five minutes or longer (especially on dial-up) while the sound file is downloaded by your program from a URL (although it’s not an issue when the program is running as an application). This happens when you call the open() method, so if you try to open a huge sound file it will force the user to sit there and wait for an indeterminate length of time while the clip downloads. This is why I recommend using a MIDI sequence rather than a digital soundtrack for your game’s background music.
Tip
MIDI is the acronym for Musical Instrument Digital Interface. MIDI is a synthesized music format, not a sampled format, meaning that MIDI music was not recorded using an analog-to-digital converter (which is built into your computer’s soundcard). Professional musical instruments use the MIDI format to record notes rather than samples.
You may feel free to use the Clip class’ start() method to play a sound clip, but I recommend using loop(0) instead. This type of call will give you the same result, and it will be easy to modify the method call if you ever want to repeat a sound clip once or several times. For instance, you might use this technique to save some bandwidth. Instead of downloading a two-second explosion sound effect, go for a one-half-second clip, and then repeat it four times. Always keep your mind open to different ways to accomplish a task, and look for ways to optimize your game.
Tip
As you will learn in Chapter 16, the Java Runtime Environment (JRE) provides an attractive applet download screen with a progress bar when you use a Java archive (JAR) to store the applet and all of its media files.
Most of the time you will simply forget about a sound clip after it has started playing. After all, how often do you need to stop a sound effect from playing when there’s a sound mixer taking care of all the details for you? Seldom, if ever. However, if you do need to stop a clip during playback, you can use the stop() method. I suspect the only time you will need this method is when you are looping a sample.
kaboom.stop();
One interesting aspect of the sound classes is that they require that errors be caught. The compiler will refuse to build a program using some of the sound classes without appropriate try...catch error-handling blocks. Since this is a new concept, I’ll quickly explain it.
Java errors are handled with a special error-handling feature called a try.. .catch block. This feature was simply borrowed from the C++ language, on which Java was based. Here is the basic syntax of a try...catch block:
   try {
       //do something bad
   } catch (Exception e) {
   }
When you add error handling to your program, you are “wrapping” an error handler around your code by literally wrapping a try...catch block around a section of code that you need to track for errors. The Java sound classes require try...catch blocks with specific types of error checks. The generic Exception class is used to catch most errors that are not caught by a more specific type of error handler. You can have many catch blocks in your error handler, from the more specific down to the more generic in nature.
Tip
In some cases, a try...catch error handler is required to handle exception errors that a particular method throws (on purpose). In those cases, your program must implement the appropriate error handler (such as IOException).
Another available version of the error handler is called try.. .catch.. .finally. This type of error-handling block allows you to put code inside the finally section in order to perform any cleanup or closing of files. The code in a finally block will be run regardless of whether an error occurred. It gets executed if there are errors and if there are no errors.
For instance, if you are loading a file, you will first check for an IOException before providing a generic Exception handler. The AudioSystem, AudioInput-Stream, and Clip classes require the following error handlers:
IOExceptionLineUnavailableExceptionUnsupportedAudioFileException
Let me show you how to implement an error handler for the audio code you’re about to write for the PlaySound program. The following code is found in the constructor:
   try {
       //source code lines clipped
   } catch (MalformedURLException e) {
   } catch (IOException e) {
   } catch (LineUnavailableException e) {
   } catch (UnsupportedAudioFileException e) {
   }
I’ll be the first person to admit that this is some ugly code. Error handling is notoriously ugly because it adds all kinds of unpleasant-looking management methods and events around your beautifully written source code. However, error handling is necessary and prevents your program from crashing and burning. I like to think of a try...catch block as a rev limiter that prevents a car engine from blowing itself up when a foolish driver hits the accelerator too hard.
Since error handling is a necessary evil, it supports the argument that you may want to put some oft-used code into reusable methods of your own. A couple of methods to load and play a sound file would be useful (and that error-handling code could be bottled up out of sight). It would be logical to encapsulate the AudioInputStream and Clip objects into a new class of your own design with your own methods to load and play a sound file or URL. Later in this chapter you will find source code for a class called SoundClip that does just that.
The Java sound classes are not quite a “turnkey” programming solution, because you must perform several steps to load and play a sound file. I think it would be convenient to write a class that has a collection of sound clips you can load and play at any time from that single class, but I hesitate to “wrap” any Java code inside another class when it is such a heavily object-oriented language in the first place. Let’s just write an example program to see how to put all this code to work. The resulting program, called PlaySound, is shown in Figure 9.3. The relevant code to this chapter is highlighted in bold.
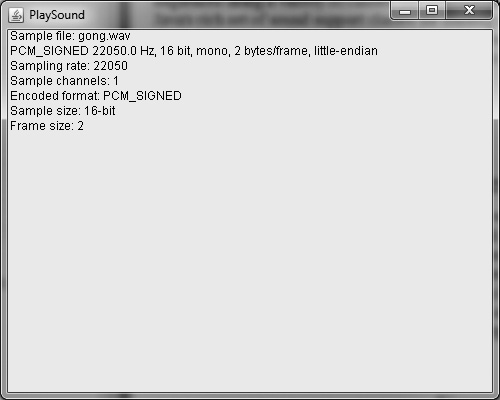
import java.awt.*;
import javax.swing.*;
import java.io.*;
import java.net.*;
import javax.sound.sampled.*;

public class PlaySound extends JFrame {
    String filename = "gong.wav";
    AudioInputStream sample;

   public static void main(String[] args) {
        new PlaySound();
   }
    public PlaySound() {
        super("PlaySound");
        setSize(500,400);
        setVisible(true);
        setDefaultCloseOperation(JFrame.EXIT_ON_CLOSE);

    try {
        sample = AudioSystem.getAudioInputStream(getURL(filename));

        //create a sound buffer
        Clip clip = AudioSystem.getClip();

        //load the audio file
        clip.open(sample);

        //play sample
        clip.start();

    } catch (MalformedURLException e) {
    } catch (IOException e) {
        } catch (LineUnavailableException e) {
        } catch (UnsupportedAudioFileException e) {
        } catch (Exception e) { }

        repaint();
    }

    public void paint(Graphics g) {
        g.drawString("Sample file: " + filename, 10, 40);
        g.drawString(sample.getFormat().toString(), 10, 55);
        g.drawString("Sampling rate: " + (int)sample.getFormat().
            getSampleRate(), 10, 70);
        g.drawString("Sample channels: " + sample.getFormat().getChannels(),
            10, 85);
        g.drawString("Encoded format: " + sample.getFormat().getEncoding().
            toString(), 10, 100);
        g.drawString("Sample size: " + sample.getFormat().
            getSampleSizeInBits() + "-bit", 10, 115);
        g.drawString("Frame size: " + sample.getFormat().getFrameSize(),
            10, 130);
    }

    private URL getURL(String filename) {
        URL url = null;
        try {
            url = this.getClass().getResource(filename);
        }
        catch (Exception e) { e.printStackTrace(); }
        return url;
    }
}
Although using MIDI is not as popular as it used to be for background soundtracks in games, you have an opportunity to save a lot of bandwidth by using MIDI files for background music in a web-based game delivered as a Java applet. On the web, bandwidth is crucial, since a game that takes too long to load may cause a potential player to abandon the game and go elsewhere. For this reason, I would like to recommend the use of MIDI for in-game music when delivering a game via the web. Java supports three types of MIDI formats:
MIDI Type 1
MIDI Type 2
Rich Music Format (RMF)
Loading a MIDI file in Java is just slightly more involved than loading a digital sample file because a MIDI file is played through a sequencer rather than being played directly by the audio mixer. The Sequence class is used to load a MIDI file:
Sequence song = MidiSystem.getSequence(new File("music.mid"));
Although this code does prepare a MIDI file to be played through the sequencer, we haven’t actually created an instance of the sequencer yet, so let’s do that now:
Sequencer seq = MidiSystem.getSequencer();
Note that the Sequencer class can be accessed through MidiSystem directly, but it requires less typing in of code to create a local variable to handle the setup of the MIDI sequencer. Next, let’s tell the Sequencer class that we have a MIDI file available (via the Sequence class):
seq.setSequence(song);
This line of code establishes a link between the sequencer and this particular MIDI sequence file. Now all that remains to do is actually open the file and play it:
seq.open();
seq.start();
At this point, the MIDI sequence should start playing when the window comes up.
The following program listing demonstrates how to load and play a MIDI file in a Java window. The PlayMusic program is shown in Figure 9.4. As you can see, there are some minor details about the MIDI file that are displayed in the window, which is basically just an easy way to determine that the MIDI file has been loaded correctly. The key portions of code are highlighted in bold.
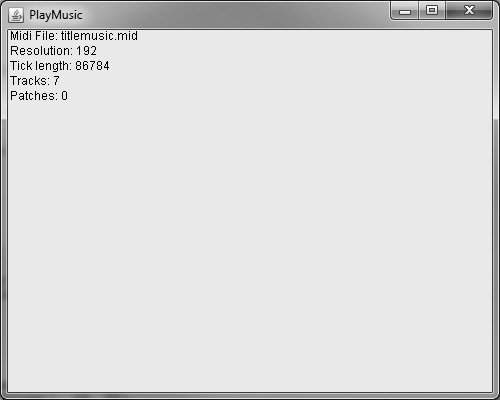
import java.awt.*;
import javax.swing.*;
import java.io.*;
import java.net.*;
import javax.sound.midi.*;

public class PlayMusic extends JFrame {
    String filename = "titlemusic.mid";
    Sequence song;

    public static void main(String[] args) {
        new PlayMusic();
    }

    public PlayMusic() {
        super("PlayMusic");
        setSize(500,400);
        setVisible(true);
        setDefaultCloseOperation(JFrame.EXIT_ON_CLOSE);
       try {
           song = MidiSystem.getSequence(getURL(filename));
           Sequencer sequencer = MidiSystem.getSequencer();
           sequencer.setSequence(song);
           sequencer.open();
           sequencer.start();

       } catch (InvalidMidiDataException e) {
       } catch (MidiUnavailableException e) {
       } catch (IOException e) { }

       repaint();
    }

    public void paint(Graphics g) {
        g.drawString("Midi File: " + filename, 10, 40);
        g.drawString("Resolution: " + song.getResolution(), 10, 55);
        g.drawString("Tick length: " + song.getTickLength(), 10, 70);
        g.drawString("Tracks: " + song.getTracks().length, 10, 85);
        g.drawString("Patches: " + song.getPatchList().length, 10, 100);
    }

    private URL getURL(String filename) {
        URL url = null;
        try { url = this.getClass().getResource(filename); }
        catch (Exception e) { e.printStackTrace(); }
        return url;
    }
}
Now that you understand how to load and play sound clips and sequence files, let’s put all of this useful (but scattered) code into two reusable classes that can be easily dropped into a project and used. Instead of dealing with all of the Java sound classes and packages, you will be able to simply create a new object from the SoundClip and MidiSequence classes, and then load up and play either a sample or sequence with a couple lines of code.
I should disclaim the usefulness of these classes for you, so you will know what to expect. Java’s Sound API has a sound mixer that works very well, but we can’t tap into the mixer directly using the Clip class that I’ve shown you in this chapter. The sound files that you load using the Clip class do support mixing, but a single clip will interrupt itself if played repeatedly. So, in the case of Galactic War, when your ship fires a weapon, the weapon sound is restarted every time you play the sound. However, if you have another clip for explosions (or any other sound), then it will be mixed with any other sound clips currently playing.
In other words, a single Clip object cannot mix with itself, only with other sounds. This process works quite well if you use short sound effects, but can sound odd if your sound clips are one second or more in length. (They sound fine at up to about half a second, which is typical for arcade-game sound effects.) If you want to repeatedly mix a single clip, there are two significant options (and one other unlikely option):
Load the sound file into multiple
Clipobjects (such as an array), and then play each one in order. Whenever you need to play this specific sound, just iterate through the array and locate a clip that has finished playing, and then start playing it again.Load the sound file into a single
Clipobject, then copy the sample bytes into multipleClipobjects in an array, and then follow the general technique described in the first option for playback. This saves time from loading the clip multiple times.Write a threaded sound playback class that creates a new thread for every sound that is played. The thread will terminate when the sound has completed playing. This requires some pretty complex code, and there is a lot of overhead involved in creating and destroying a thread for every single sound that is played. One way to get around this overhead is to create a thread pool at the start of the program and then reuse threads in the pool. Again, this is some very advanced code, but it is how professional Java games handle sound playback. If you write a great Java game suitable for publishing (such as Galactic War, which you will start in the next chapter and develop throughout the book), I would recommend one of the first two options as good choices for a simple game. You don’t want to deal with the overhead (or weighty coding requirements) of a threaded solution, and an array of five or so duplicates of a sound clip can be played to good effect—with mixing.
The SoundClip class encapsulates the AudioSystem, AudioInputStream, and Clip classes, making it much easier to load and play an audio file in your programs. On the chapter’s resources there is a project called SoundClass that demonstrates this class. This class simply includes all of the code we’ve covered in the last few pages, combined into a single entity. Note the key portions of code that I’ve discussed in this section, which are highlighted in bold.
Tip
A complete project demonstrating this class is available in the chapter’s resource files (www.courseptr.com/downloads) in the chapter09SoundClass folder.
import javax.sound.sampled.*;
import java.io.*;
import java.net.*;

public class SoundClip {
    //the source for audio data
    private AudioInputStream sample;

    //sound clip property is read-only here
    private Clip clip;
    public Clip getClip() { return clip; }

    //looping property for continuous playback
    private boolean looping = false;
    public void setLooping(boolean _looping) { looping = _looping; }
    public boolean getLooping() { return looping; }

    //repeat property used to play sound multiple times
    private int repeat = 0;
    public void setRepeat(int _repeat) { repeat = _repeat; }
    public int getRepeat() { return repeat; }
    //filename property
    private String filename = "";
    public void setFilename(String _filename) { filename = _filename; }
    public String getFilename() { return filename; }

    //property to verify when sample is ready
    public boolean isLoaded() {
        return (boolean)(sample != null);
    }

    //constructor
    public SoundClip() {
        try {
            //create a sound buffer
            clip = AudioSystem.getClip();
        } catch (LineUnavailableException e) { }
    }

    //this overloaded constructor takes a sound file as a parameter
    public SoundClip(String audiofile) {
        this(); //call default constructor first
        load(audiofile); //now load the audio file
    }

    private URL getURL(String filename) {
        URL url = null;
        try {
            url = this.getClass().getResource(filename);
        }
        catch (Exception e) { }
        return url;
    }
    //load sound file
    public boolean load(String audiofile) {
        try {

            //prepare the input stream for an audio file
            setFilename(audiofile);
            //set the audio stream source
            sample = AudioSystem.getAudioInputStream(getURL(filename));
            //load the audio file
            clip.open(sample);
            return true;

        } catch (IOException e) {
            return false;
        } catch (UnsupportedAudioFileException e) {
            return false;
        } catch (LineUnavailableException e) {
            return false;
        }
    }

    public void play() {
        //exit if the sample hasn't been loaded
        if (!isLoaded()) return;

        //reset the sound clip
        clip.setFramePosition(0);

        //play sample with optional looping
        if (looping)
            clip.loop(Clip.LOOP_CONTINUOUSLY);
        else
            clip.loop(repeat);
    }

    public void stop() {
        clip.stop();
    }
}
The MidiSequence class is another custom class that makes it easier to work with the Java sound code. This class encapsulates the MidiSystem, Sequencer, and Sequence classes, making it much easier to load and play a MIDI file with just two lines of code instead of many. Take note of the key portions of code, which have been highlighted in bold.
Tip
A complete project demonstrating this class is available in the chapter’s resource files in the chapter09MidiSequence folder.
import java.io.*;
import java.net.*;
import javax.sound.midi.*;

public class MidiSequence {
    //primary midi sequencer object
    private Sequencer sequencer;

    //provide Sequence as a read-only property
    private Sequence song;
    public Sequence getSong() { return song; }

    //filename property is read-only
    private String filename;
    public String getFilename() { return filename; }

    //looping property for looping continuously
    private boolean looping = false;
    public boolean getLooping() { return looping; }
    public void setLooping(boolean _looping) { looping = _looping; }

    //repeat property for looping a fixed number of times
    private int repeat = 0;
    public void setRepeat(int _repeat) { repeat = _repeat; }
    public int getRepeat() { return repeat; }

    //returns whether the sequence is ready for action
    public boolean isLoaded() {
        return (boolean)(sequencer.isOpen());
    }

    //primary constructor
    public MidiSequence() {
        try {
            //fire up the sequencer
            sequencer = MidiSystem.getSequencer();
        } catch (MidiUnavailableException e) { }
    }
    //overloaded constructor accepts midi filename
    public MidiSequence(String midifile) {
        this(); //call default constructor first
        load(midifile); //load the midi file
    }

    private URL getURL(String filename) {
         URL url = null;
         try {
             url = this.getClass().getResource(filename);
         }
         catch (Exception e) { }
         return url;
    }

    //load a midi file into a sequence
    public boolean load(String midifile) {
        try {
            //load the midi file into the sequencer
            filename = midifile;
            song = MidiSystem.getSequence(getURL(filename));
            sequencer.setSequence(song);
            sequencer.open();
            return true;
        } catch (InvalidMidiDataException e) {
            return false;
        } catch (MidiUnavailableException e) {
            return false;
        } catch (IOException e) {
            return false;
        }
    }

    //play the midi sequence
    public void play() {
        if (!sequencer.isOpen()) return;
        if (looping) {
            sequencer.setLoopCount(Sequencer.LOOP_CONTINUOUSLY);
            sequencer.start();
        } else {
            sequencer.setLoopCount(repeat);
            sequencer.start();
        }
    }

    //stop the midi sequence
    public void stop() {
        sequencer.stop();
    }

}
This chapter explained how to incorporate sound clips and MIDI sequences into your Java programs. Game audio is a very important subject because a game is just no fun without sound. You learned:
How to load and play a digital sound file
How to load and play a MIDI sequence file
How to encapsulate reusable code inside a class
The following questions will help you to determine how well you have learned the subjects discussed in this chapter. The answers are provided in Appendix A, “Chapter Quiz Answers.”
Use the following exercises to test your grasp of the material covered in this chapter. Are you ready to put sound and music to the test in a real game yet? These exercises will challenge your understanding of this chapter.
Write your own sound-effects generating program to try out a large list of sound files. You can acquire sound files of various types by searching the web. Have the program play a specific sound file by pressing keys on the keyboard.