
Java has a robust and feature-rich set of classes for working with 2D bitmap-based graphics (also known as raster graphics), allowing you to load and draw bitmaps very easily. Bitmaps are the keys to building a good 2D game with images rather than vector shapes.
Here are the key topics in this chapter:
Loading and drawing bitmap images
Applying transformations to bitmap images
Drawing opaque and transparent images
I mentioned before that there are many methods for drawing bitmap images in Java. Actually, most of those methods are found in the base Graphics class, while several more are found in Graphics2D. I think you will find the Graphics2D methods more useful, so we won’t spend any time working with the legacy versions. The great thing about the Graphics2D class is how its methods for manipulating 2D graphics work equally well with vectors and bitmaps. This means you will be able to translate, rotate, and scale bitmap images just as easily as you have manipulated vector graphics thus far. This awesome functionality will translate well into the subsequent chapters on sprite and animation programming. The real difference when working with images is that you will need to create a separate AffineTransform class to manipulate the Image object, rather than going directly through Graphics2D. This strangely named class allows us to rotate, scale, and move bitmaps.
Note
The online documentation for the Java API can be found at this website: http://download.oracle.com/javase/6/docs/api.
To load an image from a file, we have to use a helper class called Toolkit:
Toolkit tk = Toolkit.getDefaultToolkit();
Toolkit includes a method called getImage() that can load a bitmap file (the most common format for Java is PNG, the Portable Network Graphics format). This method is found in Toolkit, which is why we have to create a Toolkit object to load the artwork for a game. The method for drawing a bitmap is found in Graphics2D and is similarly easy to use: just call drawImage() with the appropriate parameters.
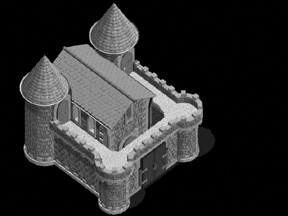
Let’s write a program that demonstrates how to load and draw a bitmap image. We can use the getImage() method to load an image file, and then use draw-Image() to draw it onto the applet window. Figure 5.1 shows the output from the DrawImage program. I have highlighted the important lines of code.
Note
This high-quality castle image was rendered by Reiner Prokein using Caligari trueSpace. He offers a large amount of royalty-free game artwork, such as this castle, at his website, www.reinerstileset.de (a German site with an English version).
// DrawImage program
import java.awt.*;
import java.util.*;
import javax.swing.*;
import java.net.*;

public class DrawImage extends JFrame {
    private Image image;
public static void main(String[] args) {
    new DrawImage();
}

public DrawImage() {
    super("DrawImage");
    setSize(600,600);
    setVisible(true);
    setDefaultCloseOperation(JFrame.EXIT_ON_CLOSE);
    Toolkit tk = Toolkit.getDefaultToolkit();
    image = tk.getImage(getURL("castle.png"));
}

private URL getURL(String filename) {
    URL url = null;
    try {
        url = this.getClass().getResource(filename);
    }
    catch (Exception e) { }
    return url;
}
    public void paint(Graphics g) {
        //create an instance of Graphics2D
        Graphics2D g2d = (Graphics2D) g;

        //fill the background with black
        g2d.setColor(Color.BLACK);
        g2d.fillRect(0, 0, getSize().width, getSize().height);

        //draw the image
        g2d.drawImage(image, 0, 40, this);
    }
}
Now I’ll demonstrate how to apply a transform to a simple bitmap image. Remember, a transform affects the position, rotation, or scale. Transforms will make our sprite code in the upcoming chapters really fun because the sprite images will be manipulated with these transforms as well. Since this code is similar to the code for transforming vectors, it should look at least somewhat familiar even if you don’t fully understand it. One difference when working with an image is that you must define a separate AffineTransform object for manipulating the Image object because the Graphics2D transforms are designed to work only with vectors. Figure 5.2 shows the output of the RandomImages program, showing a spaceship image being moved, rotated, and scaled.
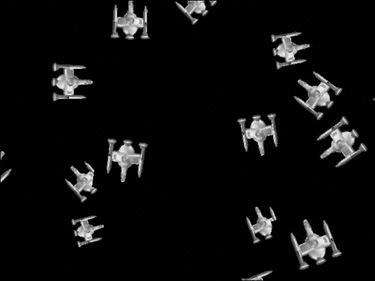
Figure 5.2. The RandomImages program draws images at random locations, with random rotation and scaling.
// RandomImages program
import java.awt.*;
import javax.swing.*;
import java.util.*;
import java.awt.geom.*;
import java.net.*;

public class RandomImages extends JFrame {
    private Image image;

    public static void main(String[] args) {
        new RandomImages();
    }
//applet init event
public RandomImages() {
    super("RandomImages");
    setSize(600,500);
    setVisible(true);
    setDefaultCloseOperation(JFrame.EXIT_ON_CLOSE);

    Toolkit tk = Toolkit.getDefaultToolkit();
    image = tk.getImage(getURL("spaceship.png"));
}

//identity transformation
AffineTransform identity = new AffineTransform();

private URL getURL(String filename) {
    URL url = null;
    try {
        url = this.getClass().getResource(filename);
    }
        catch (Exception e) { }
        return url;
    }

    //applet paint event
    public void paint(Graphics g) {
        //create an instance of Graphics2D
        Graphics2D g2d = (Graphics2D) g;

        //working transform object
        AffineTransform trans = new AffineTransform();

        //random number generator
        Random rand = new Random();

        //applet window width/height
        int width = getSize().width;
        int height = getSize().height;

        //fill the background with black
        g2d.setColor(Color.BLACK);
        g2d.fillRect(0, 0, getSize().width, getSize().height);

        //draw the image multiple times
        for (int n = 0; n < 50; n++) {
            trans.setTransform(identity);
            //move, rotate, scale the image randomly
            trans.translate(rand.nextInt()%width, rand.nextInt()%height);
            trans.rotate(Math.toRadians(360 * rand.nextDouble()));
            double scale = rand.nextDouble()+1;
            trans.scale(scale, scale);

            //draw the image
            g2d.drawImage(image, trans, this);
        }
    }
}
Although you can load and draw a bitmap at this point, the code you’ve seen so far is very limited. For one thing, the getImage() method can’t load a bitmap file out of a Java Archive (JAR) file. JAR files will become very important later in Part III, when we build the Galactic War game. Since the game is so large, with so many bitmap and sound files, it takes a long time for the game to load over the web (unless you have a broadband connection). You’ll learn how to create and use a JAR file soon enough. All I’m concerned about right now is that we are using code that will be compatible with a JAR, so that Java can read files out of the JAR as easily as it reads the raw files from the web server (or the directory in which your program is located if you are running it locally).
The Abstract Window Toolkit, known as AWT, provides a class called Toolkit that knows how to load a bitmap file. It’s smart enough to look in the current URL path where the applet is located (something that you must pass to the getImage() method). You can use Toolkit in your own programs or you can instantiate a global Toolkit object and then use it throughout the game; there are many options. Let’s take a look at how this class works:
Toolkit tk = Toolkit.getDefaultToolkit();
Image ship = tk.getImage("star_destroyer.png");
First, I created a Toolkit object by returning the object passed back from Toolkit.getDefaultToolkit(). This method returns a Toolkit object that represents the state of the Java program or applet. You can then use this Toolkit object’s getImage() method to load a bitmap file. Since we want our applets to be JAR-friendly so games will run on the web as efficiently as possible, I will use the getURL() method again:
Image ship = tk.getImage(getURL("star_destroyer.png"));
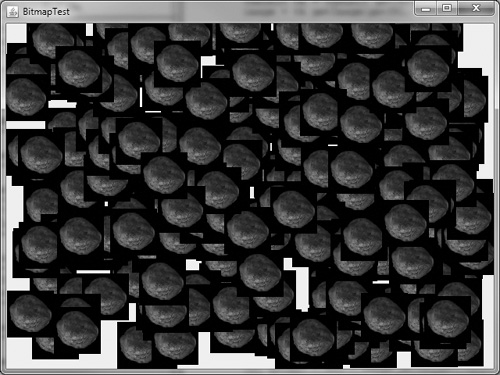
Let’s start with what you have already learned up to this point—how to load and draw a bitmap without any transparency. At this point, it doesn’t matter whether you use the Applet or the Toolkit to load a bitmap file because the end result will be the same. I leave it to you to decide which method you prefer, and I will use them both interchangeably. Let’s write a short program to serve as a basis for discussing this topic. The output from the BitmapTest program is shown in Figure 5.3. I have highlighted the key portions of code in bold in the listing that follows.
// BitmapTest program
import java.awt.*;
import java.util.*;
import java.net.*;
import javax.swing.*;

public class BitmapTest extends JFrame implements Runnable {
    Image image;
    Thread gameloop;
    Random rand = new Random();

    public static void main(String[] args) {
        new BitmapTest();
    }

    public BitmapTest() {
        super("Opaque Bitmap Test");
        setSize(640,480);
    setVisible(true);
    setDefaultCloseOperation(JFrame.EXIT_ON_CLOSE);
    Toolkit tk = Toolkit.getDefaultToolkit();
    image = tk.getImage(getURL("asteroid2.png"));
    gameloop = new Thread(this);
    gameloop.start();
}

private URL getURL(String filename) {
    URL url = null;
    try {
        url = this.getClass().getResource(filename);
    }
    catch (Exception e) { }
    return url;
}

public void run() {
    Thread t = Thread.currentThread();
    while (t == gameloop) {
        try {
            Thread.sleep(20);
        }
        catch (InterruptedException e) {
            e.printStackTrace();
        }
        repaint();
    }
}

public void update(Graphics g) {
    paint(g);
}

public void paint(Graphics g) {
    Graphics2D g2d = (Graphics2D) g;
int width = 640 - image.getWidth(this);
int height = 480 - image.getHeight(this);
g2d.drawImage(image, rand.nextInt(width), rand.nextInt(height), this);
}
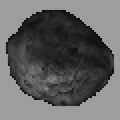
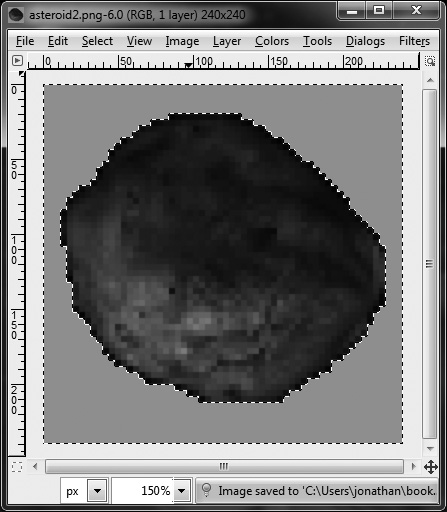
This short program loads the bitmap image shown in Figure 5.4. In many programming languages and graphics libraries, you must specify a transparent pixel color to be used for transparency. In the example shown here, the black region around the edges of the asteroid would be considered the “tranparent zone” of the image. This transparent color is black in the example shown here (with an RGB value of 0,0,0), but other colors can be used for the transparent color too—the color pink (255,0,255) is often used for the transparent color because it stands out so well.
Java uses a more advanced method to handle transparency, as the next section explains.
Java is a smart language that handles a lot of things for the programmer automatically, including the drawing of transparent images. This really makes life easier for a Java game programmer because many game libraries use a transparent pixel for transparency instead of a mask layer. So instead of dealing with transparency in code, it’s handled in the source artwork. If you supply Java with a transparent bitmap file, it will draw that image transparently.
Most Java programs use the PNG format because it offers decent compression and transparency information without sacrificing image quality. You will need to use a graphics editor such as GIMP to convert images from whatever source format they are in (most likely the BMP format) to the PNG format, along with the mask layer that makes transparency possible.
Tip
I have used many graphic editors, including Paint Shop Pro, GIMP, and Photoshop. Although they are functionally different, they all share a similar toolset, including the ability to create an alpha channel. The instructions given here for GIMP will be similar to the steps in most other graphic editors.
Let’s take the same program you just typed in for BitmapTest and run it again. Only this time, it will load up a new version of the asteroid1.png file that has been edited to support transparency. Figure 5.5 shows the output from the TransparentTest program. The source code has not changed (refer earlier to the BitmapTest program listing), but the PNG file has changed, which accounts for the difference!

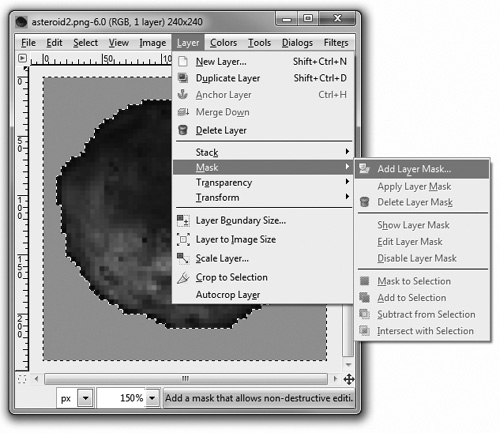
Let’s take a look at how you actually create a masked PNG image. I’m using GIMP because it’s very easy to use and free. If you want to use this program, you can download it from www.gimp.org. To add a transparency layer to an image, you need to locate the Magic Wand tool available in most graphics editors. After selecting the Magic Wand icon with your mouse, click somewhere in the black region (or on any pixel that isn’t part of the game object). This should locate the edges of the game object and highlight everything around it (see Figure 5.6). Another more precise way to select a background is with the Color Picker or Select By Color tool.
Now that you have a selection available, you can create a Layer Mask to invert it because this selection will exclude the image. Click on the Selections menu and choose Invert (see Figure 5.7). This brings up the dialog shown in Figure 5.8. Choose the Selection option and check the Invert mask option.

Tip
If you have a complex image and would like to exclude many portions of it in order to select the boundary of the real image, you can hold down the Shift key while clicking with the Fuzzy Select (or Magic Wand) tool inside portions of the image to add new selections.
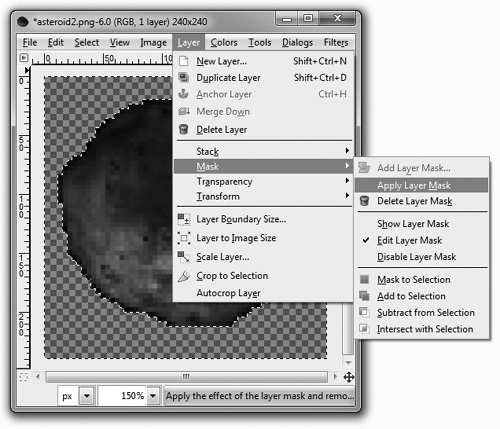
The next step is to create a new mask layer in the image to represent the transparent portion. You can tell GIMP to generate a mask based on the selection you’ve made in the image. To do this, open the Layers menu, select Apply Layer Mask, and then Show Selection, as shown in Figure 5.9.
Tip
GIMP is a freeware graphic editor for multiple platforms with many good features found in costly commercial graphic editors. Download GIMP (GNU Image Manipulation Program) from www.gimp.org.
In Figure 5.10, the alpha channel has been created based on the masked selection. The checkerboard background behind the asteroid image shows the transparent region. The result looks very nice; this asteroid is ready for rendering! You can load this image into your Java applet and draw it, and it will automatically be drawn with transparency so the outer edges of the image (where the black pixels used to be) will not overwrite the background of the screen.

We will continue to work with transparent images from this point forward, so you have learned a very important tool in this chapter that will make it possible to create extremely attractive games. Specifically, you learned:
How to draw bitmap images
How to translate, rotate, and scale bitmap images
How to draw bitmaps with transparency
The following questions will help you to determine how well you have learned the subjects discussed in this chapter. The answers are provided in Appendix A, “Chapter Quiz Answers.”
Use the following exercises to test your grasp of the material covered in this chapter.
There are many example programs in this chapter that could be modified and experimented upon. Tweak the RandomImages program. Modify the program so that it loads and draws two different images randomly instead of just a single image.