
This chapter will give you a glimpse of what’s coming in the next few chapters while teaching you some of the basics of game creation. The game featured here was inspired by the classic Atari game of Asteroids. My first video game system was an Atari 2600, and I spent many hours with it. In this chapter, you’ll learn how to create a variation of this classic game, which will be the basis of a more advanced game later on when we get to Part III. This will also be our first really big applet chapter—learning how to build a Java applet-based game, and the specific source code features of an applet. We will return to using JFrame as well in upcoming chapters rather than focusing on just one or the other.
Here are the key topics in this chapter:
Creating an Asteroids-style game
Writing key classes:
BaseVectorShape, Ship, Asteroid,andBulletWriting the main source code
Calculating velocities on the fly
Our game project in this chapter will run in a web browser window with a resolution of 640 × 480 and will be done entirely using vector graphics. It will have some features that you have not yet learned about, but the exposure to this code will be helpful to you. I want to introduce you to some of the concepts early on, before you have learned all of the prerequisites (otherwise, we wouldn’t be able to create a game until about halfway through the book!). You may not understand everything in the source code for the game at this point, but you will learn how it works in time. Figure 3.1 shows the completed game you will build in this chapter.
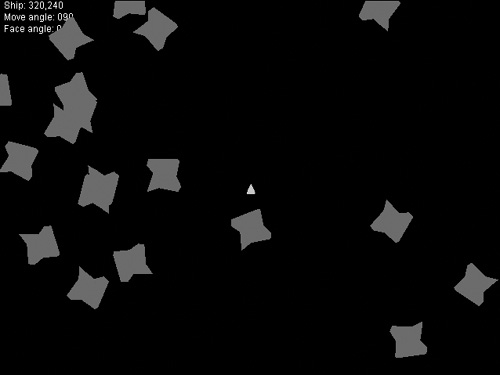
As mentioned, the game is entirely based on vector graphics. The player’s ship, the asteroids, and the bullets are all rendered as polygons, as shown in Figure 3.2.
Definition
Vector graphic displays are different from our modern monitors in that they draw shapes based on entire lines. On the other hand, our modern displays draw raster graphics based on pixels.
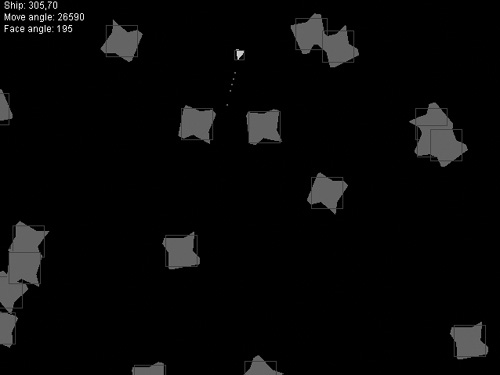
All of the objects in the game are moved using an algorithm that calculates the X and Y velocity values, which are used to update the object’s position on the screen. All of these values use floating-point math, and the result is fluid 2D rotation animation and realistic movement. Each of the vector shapes in the game has a built-in bounding rectangle that is used to simplify collision testing, which is a crucial aspect of the game (see Figure 3.3). Without it, the bullets would not destroy the asteroids, and the ship would be invulnerable! Collision testing is what makes gameplay possible in a game.
The goal is to modify this game concept later on to come up with a high-quality, polished game with a lot of interesting gameplay features (such as power-ups) by the time you’ve finished the book. The final version of Galactic War is an arcade-style game with many different types of asteroids, animated explosions, and power-ups for the player’s ship. When we start working in earnest on Galactic War, we’ll make a transition from vector graphics (based on polygons) to rasterized graphics (based on bitmaps). But before you can run, as the old saying goes, you have to learn how to walk. This chapter teaches you how to walk, and you will gradually improve the game a little at a time, starting with the next chapter.
This game is divided into five classes. Does that seem like a lot of classes for just your first game? I thought about that for a while, considering this might be too much code all at once. But I think you will enjoy it. This is a complete game, for the most part, so you can examine it—pore over the lines of code in Holmesian style (with a magnifying glass, if you wish)—to learn the secrets of how a game is made. You are presented with a mystery of sorts—a complete game. Your task is to reverse engineer the situation to determine, step by step, what events led up to the complete game. The main class, Asteroids, contains the main source code for the game. Four additional classes are used:
BaseVectorShapeShipBulletAsteroid
You can type in the code for each of the classes (and the main source code file, Asteroids.java) and then compile each file into a .class file using the Java Development Kit (JDK) command-line tools. The compiler is called javac.exe. You can compile a file by simply typing:
and likewise for the other source code files. I recommend using TextPad if you are a Windows user because of its very convenient support for the JDK, where you can compile your Java program with Ctrl+1 and run it with Ctrl+3.
The three main objects in the game (the asteroids, the bullets, and the player’s ship) are all derived from the BaseVectorShape class. I originally wrote this game without the base class, and in the end, all three of the game objects (the player’s ship, the bullets, and the asteroids) ended up sharing most of their properties and methods, so the BaseVectorShape class was a way to clean up the code. In the end, I put a lot of useful methods in this class for handling the needs of this vector graphics game. By doing this, I have used the object-oriented feature called inheritance. The Asteroid, Ship, and Bullet classes are all derived from BaseVectorShape, which contains code that is shared by all three. As a result, the code for the three subclasses is quite short in each case.
This game detects collisions between the asteroids, bullets, and player’s ship, so each vector shape in the game includes its own bounding rectangle. While the getBounds() method is not found in the BaseVectorShape class for reasons I’ll explain in a moment, this method does use the getX() and getY() methods from the base class to calculate the bounding rectangle. This class basically contains all the variables that will be used to move the objects around on the screen, such as the X and Y position, the velocity, the facing and moving angles, and the shape itself (which is a polygon).
Tip
What is bounding rectangle collision detection? This phrase describes the process of detecting when objects collide with each other in the game (such as a bullet hitting an asteroid) using rectangular shapes that surround or contain the shape. As a result, the shape is bound within that rectangle, so to speak.
import java.awt.Shape;
// Base vector shape class for for polygonal shapes
public class BaseVectorShape {
    //variables
    private Shape shape;
    private boolean alive;

    private double x,y;
    private double velX, velY;
    private double moveAngle, faceAngle;

    //accessor methods
    public Shape getShape() { return shape; }
    public boolean isAlive() { return alive; }
    public double getX() { return x; }
    public double getY() { return y; }
    public double getVelX() { return velX; }
    public double getVelY() { return velY; }
    public double getMoveAngle() { return moveAngle; }
    public double getFaceAngle() { return faceAngle; }

    //mutator and helper methods
    public void setShape(Shape shape) { this.shape = shape; }
    public void setAlive(boolean alive) { this.alive = alive; }
    public void setX(double x) { this.x = x; }
    public void incX(double i) { this.x += i; }
    public void setY(double y) { this.y = y; }
    public void incY(double i) { this.y += i; }
    public void setVelX(double velX) { this.velX = velX; }
    public void incVelX(double i) { this.velX += i; }
    public void setVelY(double velY) { this.velY = velY; }
    public void incVelY(double i) { this.velY += i; }
    public void setFaceAngle(double angle) { this.faceAngle = angle; }
    public void incFaceAngle(double i) { this.faceAngle += i; }
    public void setMoveAngle(double angle) { this.moveAngle = angle; }
    public void incMoveAngle(double i) { this.moveAngle += i; }

    //default constructor
    BaseVectorShape() {
        setShape(null);
        setAlive(false);
        setX(0.0);
        setY(0.0);
        setVelX(0.0);
        setVelY(0.0);
        setMoveAngle(0.0);
        setFaceAngle(0.0);
    }
}
The Ship class handles the shape, position, and velocity of the player’s ship in the game. It includes its own bounding rectangle, which is calculated based on the custom polygon shape for the ship. The Ship class inherits all of the public properties and methods from the BaseVectorShape class.
import java.awt.Polygon;
import java.awt.Rectangle;
// Ship class - polygonal shape of the player's ship
public class Ship extends BaseVectorShape {
    //define the ship polygon
    private int[] shipx = { -6, -3, 0, 3, 6, 0 };
    private int[] shipy = { 6, 7, 7, 7, 6, -7 };

    //bounding rectangle
    public Rectangle getBounds() {
        Rectangle r;
        r = new Rectangle((int)getX() - 6, (int) getY() - 6, 12,12);
        return r;
    }

    Ship() {
        setShape(new Polygon(shipx, shipy, shipx.length));
        setAlive(true);
    }
}
The Bullet class defines the bullets fired from the ship. It is also derived from the BaseVectorShape class, so most of the functionality of this class is provided by the base class. All we really need to do for bullets in this game is to define a rectangle that is one pixel in width and height to create a tiny rectangle. This small shape is used to calculate the bounding rectangle returned in the getBounds() method. While we’re only drawing a rectangle the size of a single pixel, we will still treat it as a rectangle, but when it’s time to check to see whether the bullet has hit an asteroid (using collision detection), then we’ll do it slightly differently than the way in which we compare collisions between the player’s ship and the asteroids. Instead of checking for an intersection, we’ll see whether the bullet is “contained within” an asteroid.
import java.awt.*;
import java.awt.Rectangle;

// Bullet class - polygonal shape of a bullet
public class Bullet extends BaseVectorShape {

    //bounding rectangle
    public Rectangle getBounds() {
        Rectangle r;
        r = new Rectangle((int)getX(), (int) getY(), 1, 1);
        return r;
    }

    Bullet() {
        //create the bullet shape
        setShape(new Rectangle(0, 0, 1, 1));
        setAlive(false);
    }
}
The Asteroid class also inherits from BaseVectorShape and provides three of its own new methods: getRotationVelocity, setRotationVelocity, and getBounds. The rotation velocity value is used to rotate the asteroids (which is a cool effect in the game). The getBounds method returns the bounding rectangle for the asteroid and is similar to the same method found in the Ship and Bullet classes.
import java.awt.Polygon;
import java.awt.Rectangle;

// Asteroid class - for polygonal asteroid shapes
public class Asteroid extends BaseVectorShape {
    //define the asteroid polygon shape
    private int[] astx = {-20,-13, 0,20,22, 20, 12, 2,-10,-22,-16};
    private int[] asty = { 20, 23,17,20,16,-20,-22,-14,-17,-20, -5};

    //rotation speed
    protected double rotVel;
    public double getRotationVelocity() { return rotVel; }
    public void setRotationVelocity(double v) { rotVel = v; }

    //bounding rectangle
    public Rectangle getBounds() {
        Rectangle r;
        r = new Rectangle((int)getX() - 20, (int) getY() - 20, 40, 40);
        return r;
    }

    //default constructor
    Asteroid() {
        setShape(new Polygon(astx, asty, astx.length));
        setAlive(true);
        setRotationVelocity(0.0);
    }
}
The main source code file for this game is found in a file called Asteroids.java. I am providing the complete source code listing here so you can examine it in detail while reading my explanations of each method along the way. The first thing you’ll notice with the main source code for our Asteroids clone is the implements keywords. This program implements two interfaces: Runnable and KeyListener. Runnable gives us an extremely powerful new capability—threads! With a thread, our program can run in real time, with things moving on the screen automatically. This really brings the game to life compared to prior examples! The next interface is pretty obvious: KeyListener “listens” for key presses, and notifies us when a key is pressed. The next major feature of this game over previous examples is that it’s double buffered, which is a second buffer representing the dimensions of the game window, giving the game a very smooth refresh without any flicker or artifacts. Without the second buffer, the window would flicker like crazy as the window is cleared and the graphics are drawn over and over again. Everything else in the code is just support for these three major concepts.
import java.applet.*;
import java.awt.*;
import java.awt.event.*;
import java.awt.geom.*;
import java.awt.image.*;
import java.util.*;

//Primary class for the game
public class Asteroids extends Applet implements Runnable, KeyListener {
    //the main thread becomes the game loop
    Thread gameloop;

    //use this as a double buffer
    BufferedImage backbuffer;

    //the main drawing object for the back buffer
    Graphics2D g2d;

    //toggle for drawing bounding boxes
    boolean showBounds = false;

    //create the asteroid array
    int ASTEROIDS = 20;
    Asteroid[] ast = new Asteroid[ASTEROIDS];

    //create the bullet array
    int BULLETS = 10;
    Bullet[] bullet = new Bullet[BULLETS];
    int currentBullet = 0;

    //the player's ship
    Ship ship = new Ship();

    //create the identity transform (0,0)
    AffineTransform identity = new AffineTransform();

    //create a random number generator
    Random rand = new Random();
The applet init() event is run when the applet first starts up and is used to initialize the game. The code first creates a double buffer, upon which all graphics will be rendered in order to produce a smooth screen refresh without flicker. The player’s ship and the asteroids are initialized, and then the key listener is started.
   // applet init event
   public void init() {
       //create the back buffer for smooth graphics
       backbuffer = new BufferedImage(640, 480,
           BufferedImage.TYPE_INT_RGB);
       g2d = backbuffer.createGraphics();

       //set up the ship
       ship.setX(320);
       ship.setY(240);

       //set up the bullets
       for (int n = 0; n<BULLETS; n++) {
           bullet[n] = new Bullet();
       }

       //create the asteroids
       for (int n = 0; n<ASTEROIDS; n++) {
           ast[n] = new Asteroid();
           ast[n].setRotationVelocity(rand.nextInt(3)+1);
           ast[n].setX((double)rand.nextInt(600)+20);
           ast[n].setY((double)rand.nextInt(440)+20);
           ast[n].setMoveAngle(rand.nextInt(360));
           double ang = ast[n].getMoveAngle() - 90;
           ast[n].setVelX(calcAngleMoveX(ang));
           ast[n].setVelY(calcAngleMoveY(ang));
       }

       //start the user input listener
       addKeyListener(this);
   }
The applet’s update() event is triggered whenever the screen needs to be refreshed. This game does not call the update() method from the game loop yet, although a future version of the game will make this change, which provides better control over the screen refresh process. This method does all of the drawing to the applet window by first drawing graphics to the back buffer. This buffer is then copied to the applet window during the paint() event.
The identity transform is the starting point of a vector-based transform that allows vector-based shapes to be rotated and moved around in the game. First, you start at the identity and then move the shape and rotate it from there. If you don’t start off with the identity before manipulating a shape, then it will be moved with the previous shape rather than on its own.
   // applet update event to redraw the screen
   public void update(Graphics g) {
       //start off transforms at identity
       g2d.setTransform(identity);

       //erase the background
       g2d.setPaint(Color.BLACK);
       g2d.fillRect(0, 0, getSize().width, getSize().height);

       //print some status information
       g2d.setColor(Color.WHITE);
       g2d.drawString("Ship: " + Math.round(ship.getX()) + "," +
           Math.round(ship.getY()) , 5, 10);
       g2d.drawString("Move angle: " + Math.round(
           ship.getMoveAngle())+90, 5, 25);
       g2d.drawString("Face angle: " + Math.round(
           ship.getFaceAngle()), 5, 40);

       //draw the game graphics
       drawShip();
       drawBullets();
       drawAsteroids();

       //repaint the applet window
       paint(g);
   }
The drawShip() method is called by the update() event to draw the player’s ship onto the back buffer at the correct X and Y location. Before drawing, the identity transform is set so that the ship’s local coordinate system is used, rather than the previous vector’s coordinates. Remember, a transform effects an object’s X and Y position. The identity is the starting point (0,0).
When the ship is first drawn, it is actually centered at the origin, with the shape of the ship being drawn from —6 to + 6 in the X and Y axes. So the ship is about 12 pixels square in size. If you don’t draw a vector around the origin, then rotation will not work at all, because rotations occur at the origin—or rather, at the identity location.
   // drawShip called by applet update event
   public void drawShip() {
       g2d.setTransform(identity);
       g2d.translate(ship.getX(), ship.getY());
       g2d.rotate(Math.toRadians(ship.getFaceAngle()));
       g2d.setColor(Color.ORANGE);
       g2d.fill(ship.getShape());
   }
The drawBullets() method goes through the array of bullets and draws any bullets that need to be drawn. This only occurs if a bullet is alive using the isAlive() method. Then the bullet is transformed to its position on the screen, and the shape is drawn (which is a tiny rectangle).
   // drawBullets called by applet update event
   public void drawBullets() {
       //iterate through the array of bullets
       for (int n = 0; n < BULLETS; n++) {
           //is this bullet currently in use?
           if (bullet[n].isAlive()) {
               //draw the bullet
               g2d.setTransform(identity);
               g2d.translate(bullet[n].getX(), bullet[n].getY());
               g2d.setColor(Color.MAGENTA);
               g2d.draw(bullet[n].getShape());
          }
       }
   }
The drawAsteroids() method draws all of the asteroids in the ast[] array, depending on whether they are alive. When the player fires a bullet and it hits an asteroid, that asteroid’s alive variable is set to false, so the asteroid is no longer drawn to the screen—and it is also ignored by the bullets after that. An interesting option in this method will draw the bounding rectangle around the asteroids if you have toggled bounding on by pressing the B key.
   // drawAsteroids called by applet update event
   public void drawAsteroids() {
       //iterate through the asteroids array
       for (int n = 0; n < ASTEROIDS; n++) {
           //is this asteroid being used?
           if (ast[n].isAlive()) {
               //draw the asteroid
               g2d.setTransform(identity);
               g2d.translate(ast[n].getX(), ast[n].getY());
               g2d.rotate(Math.toRadians(ast[n].getMoveAngle()));
               g2d.setColor(Color.DARK_GRAY);
               g2d.fill(ast[n].getShape());
           }
       }
   }
The paint() event occurs when the applet window needs to be refreshed. This method is called by the update() method and simply serves the purpose of drawing the back buffer to the applet window.
   // applet window repaint event- -draw the back buffer
   public void paint(Graphics g) {
       //draw the back buffer onto the applet window
       g.drawImage(backbuffer, 0, 0, this);
   }
There are three thread events that are part of a program when you implement the Runnable interface in a Java applet. Runnable tells Java that your applet will support more than one thread. A thread is sort of a mini program that can run on its own. You create a new thread in the start() event, and then destroy that thread in the stop() event to keep things running smoothly.
The most interesting thread event is called run(). This event method contains the code for the game loop, which is a while loop that sort of powers the game and keeps it running at a consistent frame rate. This event calls the gameUpdate() method, which processes the current frame of the game by moving objects around on the screen, testing for collisions, and so on.
   // thread start event - start the game loop running
   public void start() {
       //create the gameloop thread for real-time updates
       gameloop = new Thread(this);
       gameloop.start();
   }

   // thread run event (game loop)
   public void run() {
       //acquire the current thread
       Thread t = Thread.currentThread();

       //keep going as long as the thread is alive
       while (t == gameloop) {
           try {
               //update the game loop
               gameUpdate();

               //target framerate is 50 fps
               Thread.sleep(20);
           }
           catch(InterruptedException e) {
               e.printStackTrace();
           }
           repaint();
       }
   }
   // thread stop event
   public void stop() {
       //kill the gameloop thread
       gameloop = null;
   }
The gameUpdate() method is called by the game loop thread when it’s time to process the game for the next applet window refresh. The game loop is timed to hit around 50 frames per second (fps), and the window refresh occurs after gameUpdate is run. Normally the game loop will run as fast as possible and only the screen refresh will be tied to a specific frame rate, but in this first game, that difference is not important.
   // move and animate the objects in the game
   private void gameUpdate() {
       updateShip();
       updateBullets();
       updateAsteroids();
       checkCollisions();
   }
The updateShip() method updates the ship’s X and Y position using the velocity variables. This method also “warps” the ship around when it crosses an edge of the screen (in which case the shape is moved to the opposite side of the screen). This is a technique used in many classic arcade games.
   // Update the ship position based on velocity
   public void updateShip() {
       //update ship's X position
       ship.incX(ship.getVelX());

       //wrap around left/right
       if (ship.getX() < -10)
           ship.setX(getSize().width + 10);
       else if (ship.getX() > getSize().width + 10)
           ship.setX(-10);
       //update ship's Y position
       ship.incY(ship.getVelY());

       //wrap around top/bottom
       if (ship.getY() < -10)
           ship.setY(getSize().height + 10);
       else if (ship.getY() > getSize().height + 10)
           ship.setY(-10);
   }
The updateBullets() method updates the X and Y position for each bullet that is currently alive using the velocity variables. When a bullet hits the edge of the screen, it is disabled.
   // Update the bullets based on velocity
   public void updateBullets() {
       //move each of the bullets
       for (int n = 0; n < BULLETS; n++) {

           //is this bullet being used?
           if (bullet[n].isAlive()) {

               //update bullet's x position
               bullet[n].incX(bullet[n].getVelX());

               //bullet disappears at left/right edge
               if (bullet[n].getX() < 0 ||
                   bullet[n].getX() > getSize().width)
               {
                   bullet[n].setAlive(false);
               }


               //update bullet's y position
               bullet[n].incY(bullet[n].getVelY());

               //bullet disappears at top/bottom edge
               if (bullet[n].getY() < 0 ||
                   bullet[n].getY() > getSize().height)
               {
                   bullet[n].setAlive(false);
               }
           }
       }
   }
The updateAsteroids() method updates the X and Y position of each asteroid that is currently alive based on the velocity variables. These X and Y values and velocities are all set to random values when the game starts up. The asteroids are warped around the edges of the screen. One interesting thing about the asteroids that differs from the ship and bullets is that the asteroids are rotated by a random number of degrees each frame, causing them to spin on the screen. This is a pretty nice effect that adds to the quality of the game.
// Update the asteroids based on velocity
public void updateAsteroids() {
    //move and rotate the asteroids
    for (int n = 0; n < ASTEROIDS; n++) {

        //is this asteroid being used?
        if (ast[n].isAlive()) {

            //update the asteroid's X value
            ast[n].incX(ast[n].getVelX());

            //warp the asteroid at screen edges
            if (ast[n].getX() < -20)
                ast[n].setX(getSize().width + 20);
            else if (ast[n].getX() > getSize().width + 20)
                ast[n].setX(-20);

            //update the asteroid's Y value
            ast[n].incY(ast[n].getVelY());

            //warp the asteroid at screen edges
            if (ast[n].getY() < -20)
                ast[n].setY(getSize().height + 20);
            else if (ast[n].getY() > getSize().height + 20)
                ast[n].setY(-20);
            //update the asteroid's rotation
            ast[n].incMoveAngle(ast[n].getRotationVelocity());

            //keep the angle within 0-359 degrees
            if (ast[n].getMoveAngle() < 0)
                ast[n].setMoveAngle(360 - ast[n].getRotationVelocity());
            else if (ast[n].getMoveAngle() > 360)
                ast[n].setMoveAngle(ast[n].getRotationVelocity());
        }
    }
}
We haven’t discussed collision detection yet, but I think you will get the hang of it here because this checkCollisions() method is straightforward. First, there is a loop that goes through the asteroid array (ast[]). Inside this loop, if an asteroid is alive, it is tested for collisions with any active bullets, then it is tested for a collision with the ship. If a collision occurs, then an explosion sound effect is played, and the asteroid is disabled. If it collided with a bullet, the bullet is also disabled. When the player’s ship is hit, it is reset at the center of the screen with zero velocity. A collision occurs when one shape overlaps another shape, which is why we use the intersects() and contains() methods to determine when a collision occurs. Specifically, contains() is used to see whether the bullet has hit an asteroid, while intersects() is used to see whether an asteroid has hit the ship.
The key to the collision code here is a method in the Shape object called contains() that accepts a Rectangle or a Point and returns true if there is an overlap. This method makes it possible to perform bounding rectangle collision detection with just a few lines of code because the shapes already have built-in getBounds() methods available.
   // Test asteroids for collisions with ship or bullets
   public void checkCollisions() {

       //iterate through the asteroids array
       for (int m = 0; m<ASTEROIDS; m++) {
           //is this asteroid being used?
           if (ast[m].isAlive()) {

               // check for collision with bullet
               for (int n = 0; n < BULLETS; n++) {

                   //is this bullet being used?
                   if (bullet[n].isAlive()) {

                      //perform the collision test
                      if (ast[m].getBounds().contains(
                          bullet[n].getX(), bullet[n].getY()))
                      {
                          bullet[n].setAlive(false);
                          ast[m].setAlive(false);
                          continue;
                      }
                   }
               }

               // check for collision with ship
               if (ast[m].getBounds().intersects(ship.getBounds())) {
                   ast[m].setAlive(false);
                   ship.setX(320);
                   ship.setY(240);
                   ship.setFaceAngle(0);
                   ship.setVelX(0);
                   ship.setVelY(0);
                   continue;
               }
           }
       }
   }
This game only uses the keyPressed() event to detect key presses, while keyReleased() and keyTyped() are ignored (although they must be in the source code listing because of the KeyListener interface). The most important parts of this method are found in the code following the thrust and fire keys, which are mapped to the Up arrow and Ctrl keys. (The Enter key and spacebar can also be used to fire.) When the Up arrow is pressed, this adds thrust to the ship, causing it to move.
Definition
An algorithm is a mathematical expression that causes one of the variables in the expression to change in a consistent way. A movement algorithm, for instance, causes the x variable on an x-y coordinate plane to change so that it consistently increases in value, moving whatever object it represents horizontally across the screen.
An advanced movement algorithm is used to move the objects in the game, which is covered in the next section. Moving the ship must look as realistic as possible—so you can apply thrust to the ship, rotate to a new direction, then apply thrust, and that new angle of movement is added to the current velocity values. The result is a very realistic zero-gravity motion for the ship. Some programmers like to use a mass/acceleration algorithm to move a spaceship. That is a good method, where the mass (or weight) of the ship affects how fast it can move. I have simulated this effect using a velocity algorithm instead, which, again, is covered in the next section.
// key listener events
public void keyReleased(KeyEvent k) { }
public void keyTyped(KeyEvent k) { }
public void keyPressed(KeyEvent k) {
    int keyCode = k.getKeyCode();
    switch (keyCode) {
    case KeyEvent.VK_LEFT:
        //left arrow rotates ship left 5 degrees
        ship.incFaceAngle(-5);
        if (ship.getFaceAngle() < 0) ship.setFaceAngle(360-5);
        break;
    case KeyEvent.VK_RIGHT:
        //right arrow rotates ship right 5 degrees
        ship.incFaceAngle(5);
        if (ship.getFaceAngle() > 360) ship.setFaceAngle(5);
        break;
    case KeyEvent.VK_UP:
        //up arrow adds thrust to ship (1/10 normal speed)
        ship.setMoveAngle(ship.getFaceAngle() - 90);
        ship.incVelX(calcAngleMoveX(ship.getMoveAngle()) * 0.1);
        ship.incVelY(calcAngleMoveY(ship.getMoveAngle()) * 0.1);
        break;
    //Ctrl, Enter, or Space can be used to fire weapon
    case KeyEvent.VK_CONTROL:
    case KeyEvent.VK_ENTER:
    case KeyEvent.VK_SPACE:
        //fire a bullet
        currentBullet++;
        if (currentBullet > BULLETS - 1) currentBullet = 0;
        bullet[currentBullet].setAlive(true);

        //point bullet in same direction ship is facing
        bullet[currentBullet].setX(ship.getX());
        bullet[currentBullet].setY(ship.getY());
        bullet[currentBullet].setMoveAngle(ship.getFaceAngle() - 90);

        //fire bullet at angle of the ship
        double angle = bullet[currentBullet].getMoveAngle();
        double svx = ship.getVelX();
        double svy = ship.getVelY();
        bullet[currentBullet].setVelX(svx + calcAngleMoveX(angle) * 2);
        bullet[currentBullet].setVelY(svy + calcAngleMoveY(angle) * 2);
        break;
    }
}
The most fascinating part of this game is how the movement of the player’s ship, the bullets, and the asteroids are all controlled by two methods that return floating-point values for the X and Y update for the object. In order to move an object in any direction, we need to calculate it’s linear velocity at the given angle.
The calcAngleMoveX() method uses cosine to calculate the update value for X, returned as a double. The calcAngleMoveY() method uses sine to calculate the update value for Y, also returned as a double. These small methods accept a single parameter (the angle that a game object is facing) and return an estimated X and Y update value in pixels based on that angle. I can’t stress enough how wonderful these two methods are! In the past, I have relied mainly on the brute force (and imprecise) method to move game objects (usually called sprites) on the screen. I would set the velocityX to 1 and velocityY to 0 to cause an object to move to the right. Or, I would set velocityX to 0 and velocityY to —1 to cause the game object to move up on the screen. These velocity variables, along with an object’s X and Y values, would cause the object to move around on the screen in a certain way.
I have written many games that used this type of movement code. Invariably, these games include a lot of switch statements to account for each of the directions that an object might be facing. For instance, if a spaceship sprite has eight directions of travel, then I would write a switch statement that considered the case for each direction (0 to 7, where 0 is north and 4 is south), and then update the X and Y values based on the ship’s direction.
No longer! These wonderful methods now calculate the velocity for X and Y based on an object’s orientation as an angle (from 0 to 360). Not only does this result in a more realistic game, but the source code is actually cleaner and shorter! As far as realism goes, this code supports every angle from 0 to 359 (where a circle is composed of 360 degrees). You can point the spaceship in this game at an angle of 1, then fire a weapon, and that bullet will travel just slightly off from due north.
The biggest difference between this new method of sprite movement from my previous game is that I previously used integers, but now I am using floating point variables (doubles). This allows the velocityX and velocityY variables to reflect any of the 360 degrees of movement. For an angle of 45 degrees, velocityX is set to 1 pixel, while velocityY is set to 0. The cardinal directions (north, south, east, and west) are similarly predictable. But when dealing with an angle such as 17 degrees, the velocity variables will be set to some very unusual numbers. For instance, velocityX might be set to something like 0.01, while velocityY is set to something like 1.57. These numbers don’t equate to actual pixel-level movements on the screen in a single frame, but when you consider that the game is running at 50 fps or more, then these values add up, and the ship or other game object is moved over time in the correct direction. Since the vector transform method expects floating-point values for X and Y, these velocity values work just fine with the part of the program that draws things on the screen. It is fascinating to watch, and we will be using this technique throughout the book.
Now, without further ado, here are the velocity calculation methods in all their simplistic glory:
    // calculate X movement value based on direction angle
       public double calcAngleMoveX(double angle) {
           return (double) (Math.cos(angle * Math.PI / 180));
       }

       // calculate Y movement value based on direction angle
       public double calcAngleMoveY(double angle) {
           return (double) (Math.sin(angle * Math.PI / 180));
       }
   }
This chapter threw a lot of new concepts your way without fully explaining all of them, but with the goal of giving you an opportunity to examine a nearly complete game to see how it was created from start to finish. This Asteroids-style game will be enhanced in subsequent chapters into an exciting arcade-style game with a scrolling background. Specifically, you learned:
How to use the
Graphics2DclassHow to use a thread as a game loop
How to draw vector graphics to make game objects
How to move an object based on its velocity
How to test for collisions between game objects
The following questions will help you to determine how well you have learned the subjects discussed in this chapter. The answers are provided in Appendix A, “Chapter Quiz Answers.”
Although this game will be enhanced in future chapters, you will learn a lot by making changes to the source code to add some of your own ideas to the game right now. Use the following exercises to test your grasp of the material covered in this chapter.
If you apply a lot of thrust to the ship so that it is moving very quickly across the screen, and then rotate around backward and fire a bullet, that bullet will seem to stand still or move very slowly. This is because the bullet is based on the ship’s velocity. This isn’t very realistic. Modify the weapon firing code in the keyPressed event method to fire bullets at a fixed rate regardless of the ship’s velocity.
The ship tends to rotate rather slowly when you press the Left or Right arrow keys, making it difficult to hit asteroids that are closing in on the ship from all directions. The rotation angle is adjusted by 5 degrees each time the keys are pressed. Modify the game so that the ship rotates much more quickly without changing this 5-degree value. In other words, you want it to rotate by the same value, but do these rotations more quickly.