
This chapter adds a significant new feature to your Java toolbox—the ability to load and draw animated sprites and apply that knowledge to an enhanced new sprite class. You will learn about the different ways to store a sprite animation and how to access a single frame in an animation strip, and you will see a new class called AnimatedSprite with some serious new functionality that greatly extends the base Sprite class.
Here are the key topics we’ll cover in this chapter:
Sprite animation techniques
Drawing individual sprite frames
Keeping track of animation frames
Encapsulating sprite animation in a class
Over the years I have seen many techniques for sprite animation. Of the many algorithms and implementations I’ve studied, I believe there are two essential ways to animate a graphic object on the screen—1) Loading individual frames, each stored in its own bitmap file (in sequence); or 2) Loading a single bitmap containing rows and columns of animation frames (as tiles).
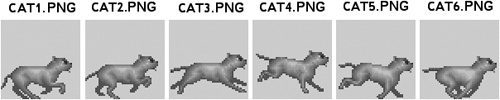
First, there is the sequence method. This type of animation involves loading a bitmap image for each frame of the animation in sequence, and then animating them on the screen by drawing each image in order. This technique tends to take a long time to load all of the animation frames, especially in a large game with many sprites. There is also the system overhead required to maintain so many images in memory, even if they are small. Figure 7.1 shows an example.
Drawing an animation sequence is somewhat of a challenge when loading individual frames because of the logistics of it. How should you store the images—in an array or a linked list? I’ve seen some implementations using both methods, and neither is very friendly, so to speak, because the code is so complicated.
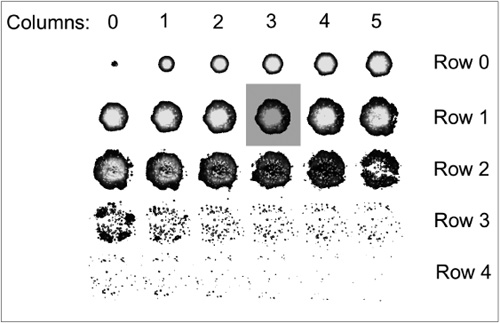
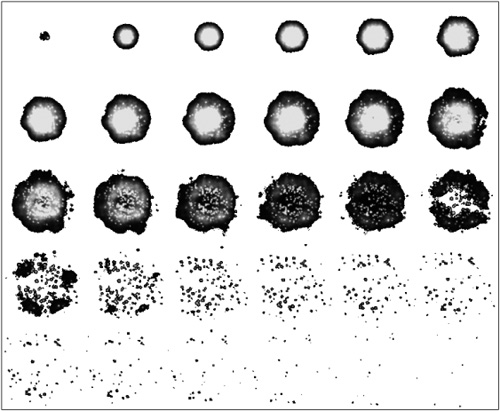
The second sprite animation technique is the tiled method. This type of animation involves storing an entire animation sequence inside a single bitmap file, also known as an animation strip. Inside this bitmap file are the many frames of the animation laid out in a single row or with many columns and rows. Figure 7.2 shows an animation strip on a single row, while Figure 7.3 shows a larger animation with multiple columns and rows.


The key to drawing a single frame from an animation sequence stored in a tiled bitmap is to figure out where each frame is located algorithmically. It’s impossible to manually code the X and Y position for each frame in the image; the very thought of it gives me hives. Not only would it take hours to jot down the X,Y position of every frame, but the bitmap file could easily be modified, thus rendering the manually calculated points irrelevant. This is computer science, after all, so there is an algorithm for almost everything.
You can calculate the column (that is, the number of frames across) by dividing the frame number by the number of columns and multiplying that by the height of each frame. This calculation focuses on the quotient as the answer we want.
frameY = (frameNumber / columns) * height;
This will give you the correct row down into the image where your desired frame is located, but it will not provide you with the actual column, or X value. For that, you need a similar solution. Instead of dividing the frame number by columns, we will use modulus. This calculation focuses on the remainder as the answer we want.
frameX = (frameNumber % columns) * width;
As you might have noticed, this looks almost exactly like the formula for calculating frameY. Now we’re multiplying by width and using the modulus character instead of the division character. Modulus returns the remainder of a division, rather than the quotient itself. If you want the Y value, you look at the division quotient; if you want the X value, you look at the division remainder. Figure 7.4 illustrates how a desired frame is at a certain column and row position in the sprite sheet. See if you can use the division and modulus calculations to figure out where any random frame is located on the sheet on your own!
Here is a complete method that draws a single frame out of an animation sequence. There are a lot of parameters in this method! Fortunately, they are all clearly labeled with descriptive names. It’s obvious that we pass it the source Image, the destination Graphics2D object (which does the real drawing), the destination location (X and Y), the number of columns across, the frame number you want to draw, and then the width and height of a single frame. What you get in return is the desired animation frame on the destination surface (which can be your back buffer or the applet window).
public void drawFrame(Image source, Graphics2D dest,
    int destX, int destY, int cols, int frame, int width, int height)
{
    int frameX = (frame % cols) * width;
    int frameY = (frame / cols) * height;
    dest.drawImage(source, destX, destY, destX+width, destY+height,
        frameX, frameY, frameX+width, frameY+height, this);
}
Acquiring the desired animation frame is just the first step toward building an animated sprite in Java. After you have figured out how to grab a single frame, you must then decide what to do with it! For instance, how do you tell your program which frame to draw, and how does the program update the current frame each time through the game loop? I’ve found that the easiest way to do this is with a simple update method that increments the animation frame and then tests it against the bounds of the animation sequence. For instance:
currentFrame += 1;
if (currentFrame > 7) {
    currentFrame = 0;
}
else if (currentFrame < 0) {
    currentFrame = 7;
}
Take a close look at what’s going on in the code here. First, the current frame is incremented by the value 1. To animate in the reverse order, this would be -1. Then, the next line checks the upper boundary (7) and loops back to 0 if the boundary is crossed. Similarly, the lower boundary is checked, setting currentFrame to the upper boundary value if necessary. Making this code reusable, we would need three variables:
currentFrametotalFramesanimationDirection
You would want to call this update code from the thread’s run() event method. But, speaking of the thread, that does bring up an important issue—timing. Obviously, you don’t want every sprite in the game to animate at exactly the same rate! Some sprites will move very slowly, while others will have fast animations. This is really an issue of fine-tuning the gameplay, but you must have some sort of mechanism in place for implementing timing for each animated sprite separately.
You can accomplish this by adding a couple more variables to the mix. First, you will need to increment a counter each time through the game loop. If that counter reaches a certain threshold value, then you reset the counter and go through the process of updating the animation frame as before. Let’s use variables called frameCount and frameDelay. The frame delay is usually a smaller value than you would expect—such as 5 to 10, but usually not much more. A delay of 10 in a game loop running at 50 fps means that the object only animates at 5 fps, which is very slow indeed. I often use values of 1 to 5 for the frame delay. Here is the updated animation code with a delay in place:
frameCount++;
if (frameCount > frameDelay) {
    frameCount=0;
    currentFrame += animationDirection;
    if (currentFrame > totalFrames-1) {
        currentFrame = 0;
    }
    else if (currentFrame < 0) {
        currentFrame = totalFrames-1;
    }
}
The end result is a much simplified form of timed animation that assumes the update is taking place within a certain timed function already. If we did not call on this animation code from inside an already-timed function, then the animation would go too fast, and we would need to insert built-in timing into every sprite. We can get away with somewhat lazy timing code like this as long as we can assume timing is already handled.
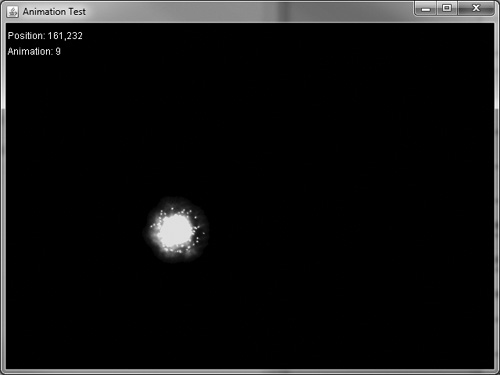
I’d like to go through a complete example with you so these concepts will feel more real to you, and so that you can see the dramatic result when a sprite is animated. The AnimationTest program loads a sprite sheet containing 30 frames of an explosion animation (shown in Figure 7.5) and animates it on the screen. Since we are sticking to the subject of animation in this chapter, the program doesn’t attempt to do any transforms, such as rotation. But can you imagine the result of an animated sprite that can also be rotated? This program will help to determine what we need to do in the animation class coming up next.
The output from the program is shown in Figure 7.6, where the single animated sprite is being drawn over a background image. Following is the code listing for the AnimationTest program. I have highlighted key portions of code that are new to this chapter in bold text.
// AnimationTest program
import java.awt.*;
import javax.swing.*;
import java.util.*;
import java.awt.image.*;
import java.net.*;

public class AnimationTest extends JFrame implements Runnable {
    static int ScreenWidth = 640;
    static int ScreenHeight = 480;
    Thread gameloop;
    Random rand = new Random();
    //double buffer objects
    BufferedImage backbuffer;
    Graphics2D g2d;

    //sprite variables
    Image image;
    Point pos = new Point(300,200);

    //animation variables
    int currentFrame = 0;
    int totalFrames = 30;
    int animationDirection = 1;
    int frameCount = 0;
    int frameDelay = 10;

    public static void main(String[] args) {
        new AnimationTest();
    }
    public AnimationTest() {
        super("Animation Test");
        setSize(ScreenWidth,ScreenHeight);
        setVisible(true);
        setDefaultCloseOperation(JFrame.EXIT_ON_CLOSE);

        //create the back buffer for smooth graphics
        backbuffer = new BufferedImage(ScreenWidth, ScreenHeight,
            BufferedImage.TYPE_INT_RGB);
        g2d = backbuffer.createGraphics();

        //load the ball animation strip
        Toolkit tk = Toolkit.getDefaultToolkit();
        image = tk.getImage(getURL("explosion.png"));

        gameloop = new Thread(this);
        gameloop.start();
    }

    private URL getURL(String filename) {
        URL url = null;
        try {
            url = this.getClass().getResource(filename);
        }
        catch (Exception e) {}
        return url;
    }

    public void run() {
        Thread t = Thread.currentThread();
        while (t == gameloop) {
            try {
                Thread.sleep(5);
            }
            catch (InterruptedException e) {
                e.printStackTrace();
            }
            gameUpdate();
        }
    }
    public void gameUpdate() {
        //clear the background
        g2d.setColor(Color.BLACK);
        g2d.fill( new Rectangle(0, 0, ScreenWidth-1, ScreenHeight-1) );

        //draw the current frame of animation
        drawFrame(image, g2d, pos.x, pos.y, 6, currentFrame, 128, 128);

        g2d.setColor(Color.WHITE);
        g2d.drawString("Position: " + pos.x + "," + pos.y, 10, 50);
        g2d.drawString("Animation: " + currentFrame, 10, 70);

        //see if it's time to animate
        frameCount++;
        if (frameCount > frameDelay) {
            frameCount=0;
            //update the animation frame
            currentFrame += animationDirection;
            if (currentFrame > totalFrames - 1) {
                currentFrame = 0;
                pos.x = rand.nextInt(ScreenWidth-128);
                pos.y = rand.nextInt(ScreenHeight-128);
            }
            else if (currentFrame < 0) {
                currentFrame = totalFrames - 1;
            }
        }
        repaint();
    }

    public void paint(Graphics g) {
        //draw the back buffer to the screen
        g.drawImage(backbuffer, 0, 0, this);
    }

    //draw a single frame of animation
    public void drawFrame(Image source, Graphics2D dest,
        int x, int y, int cols, int frame, int width, int height)
    {
        int fx = (frame % cols) * width;
        int fy = (frame / cols) * height;
        dest.drawImage(source, x, y, x+width, y+height,
            fx, fy, fx+width, fy+height, this);
    }
}
Now, after reviewing this code, you might be wondering why we aren’t using the ImageEntity and Sprite classes from the previous chapter, since they would cut down on so much of this code. That’s a good question! While learning how to do animation, a single, self-contained example is helpful before we get into a class. Coming up next, we will do that.
There are some significant new pieces of code in the AnimationTest program that we’ll definitely need for the upcoming Galactic War project (in Part III). All of the properties can be stuffed (that’s slang for encapsulated or wrapped) into a class, and we can reuse that beautiful drawFrame() method as well. One really great thing about moving drawFrame() into a class is that most of the parameters can be eliminated, as they will be pulled out of the class internally. Setting up an animation will require a few steps up front when the game starts up, but after that, drawing an animated sprite will be an automatic process with just one or two method calls.
This new AnimatedSprite class will be completely self-contained. Now that we’ve seen how inheritance works and how useful it is for reusing code, and it works well for the existing Sprite class, we don’t need to continue adding new levels to drive the point home. At this time, we will condense everything into just one class to cut down on any confusion that may arise as a result of using the three classes that have been written up to this point: BaseGameEntity, ImageEntity, and Sprite. The properties and methods in these three will be combined into the single AnimatedSprite class.
To improve performance, the AnimatedSprite class will not support affine transforms! This is because of a limitation in the Graphics2D.drawImage() function, which can either do animation or a transform, but not both in the same function call. So, there are two choices and we can only make one without writing a ton of code: 1) We can draw the current animation frame onto a scratch image and then apply the transforms to it before drawing it; or 2) We can draw frames of animation directly, but without the benefit of transforms. Since the Sprite class in the previous chapter works already with transforms, a good compromise is this: If you want transforms, use Sprite; otherwise, if you need animation, use AnimatedSprite (but without transforms). A compromise certainly could involve rendering each frame to a scratch image and then applying transforms to it, and perhaps more advanced sprite code would do just that.
Tip
The Sprite class supports transforms (rotation and scaling) and manual animation. The AnimatedSprite class does automatic animation but cannot do any transforms.
Here’s the new source code listing for the AnimatedSprite class, which is completely self-contained. Probably the most obvious thing about this class is that most variables are declared as public, which exposes them to any program that uses the class without any get or set methods. In a game project, often those get and set methods just hurt productivity. The important thing is that the class works and is versatile, with variables that are used by the embedded methods in the class. This is not pure object-oriented programming (OOP) by any means—we give up some security for versatility and just count on programmers who use the class to know what they’re doing. Getting the job done while writing good, clean code is often the rule in a programming team!
// AnimatedSprite class
import java.awt.*;
import java.awt.geom.*;
import java.awt.image.*;
import javax.swing.*;
import java.net.*;

public class AnimatedSprite {
    protected JFrame frame;
    protected Graphics2D g2d;
    public Image image;
    public boolean alive;
    public Point position;
    public Point velocity;
    public double rotationRate;
    public int currentState;
    public int currentFrame, totalFrames;
    public int animationDirection;
    public int frameCount, frameDelay;
    public int frameWidth, frameHeight, columns;
    public double moveAngle, faceAngle;

    public AnimatedSprite(JFrame _frame, Graphics2D _g2d) {
        frame = _frame;
        g2d = _g2d;
        image = null;
        alive = true;
        position = new Point(0, 0);
        velocity = new Point(0, 0);
        rotationRate = 0.0;
        currentState = 0;
        currentFrame = 0;
        totalFrames = 1;
        animationDirection = 1;
        frameCount = 0;
        frameDelay = 0;
        frameWidth = 0;
        frameHeight = 0;
        columns = 1;
        moveAngle = 0.0;
        faceAngle = 0.0;
    }

    public JFrame getJFrame() { return frame; }
    public Graphics2D getGraphics() { return g2d; }
    public void setGraphics(Graphics2D _g2d) { g2d = _g2d; }

    public void setImage(Image _image) { image = _image; }

    public int getWidth() {
        if (image != null)
            return image.getWidth(frame);
        else
            return 0;
    }
    public int getHeight() {
        if (image != null)
            return image.getHeight(frame);
        else
            return 0;
    }

    public double getCenterX() {
        return position.x + getWidth() / 2;
    }
    public double getCenterY() {
        return position.y + getHeight() / 2;
    }
    public Point getCenter() {
        int x = (int)getCenterX();
        int y = (int)getCenterY();
        return(new Point(x,y));
    }

    private URL getURL(String filename) {
        URL url = null;
        try {
            url = this.getClass().getResource(filename);
        }
        catch (Exception e) { }
        return url;
    }

    public Rectangle getBounds() {
        return (new Rectangle((int)position.x, (int)position.y, _
            getWidth(), getHeight()));
    }

    public void load(String filename, int _columns, int _totalFrames,
        int _width, int _height)
    {
        Toolkit tk = Toolkit.getDefaultToolkit();
        image = tk.getImage(getURL(filename));
        while(image.getWidth(frame) <= 0);
        columns = _columns;
        totalFrames = _totalFrames;
        frameWidth = _width;
        frameHeight = _height;
    }

    protected void update() {
        //update position
        position.x += velocity.x;
        position.y += velocity.y;

        //update rotation
        if (rotationRate > 0.0) {
            faceAngle += rotationRate;
            if (faceAngle < 0)
                faceAngle = 360 - rotationRate;
            else if (faceAngle > 360)
                faceAngle = rotationRate;
        }

        //update animation
        if (total Frames > 1) {
            frameCount++;
            if (frameCount > frameDelay) {
                frameCount = 0;
                currentFrame += animationDirection;
                if (currentFrame > totalFrames - 1) {
                    currentFrame = 0;
                }
                else if (currentFrame < 0) {
                    currentFrame = totalFrames - 1;
                }
            }
        }
    }

    //draw bounding rectangle around sprite
    public void drawBounds(Color c) {
        g2d.setColor(c);
        g2d.draw(getBounds());
    }
    public void draw() {
        update();
        //get the current frame
        int frameX = (currentFrame % columns) * frameWidth;
        int frameY = (currentFrame / columns) * frameHeight;
        //draw the frame
        g2d.drawImage(image, position.x, position.y,
            position.x+frameWidth, position.y+frameHeight,
            frameX, frameY, frameX+frameWidth, frameY+frameHeight,
            getJFrame());
    }

    //check for collision with a rectangular shape
    public boolean collidesWith(Rectangle rect) {
        return (rect.intersects(getBounds()));
    }
    //check for collision with another sprite
    public boolean collidesWith(AnimatedSprite sprite) {
        return (getBounds().intersects(sprite.getBounds()));
    }
    //check for collision with a point
    public boolean collidesWith(Point point) {
        return (getBounds().contains(point.x, point.y));
    }
}
Figure 7.7 shows the output of the program, which you can open up and run from the chapter’s resource files if you wish (www.courseptr.com/downloads). Thanks to our new AnimatedSprite class, the source code here is quite short compared to previous sprite projects!

import java.awt.*;
import javax.swing.*;
import java.util.*;
import java.awt.image.*;
import java.net.*;

public class AnimationClassDemo extends JFrame implements Runnable {
    static int ScreenWidth = 640;
    static int ScreenHeight = 480;
    Thread gameloop;
    Random rand = new Random();

    //double buffer objects
    BufferedImage backbuffer;
    Graphics2D g2d;

    //sprite variables
    AnimatedSprite sprite;

    public static void main(String[] args) {
        new AnimationClassDemo();
    }

    public AnimationClassDemo() {
        super("Animation Class Demo");
        setSize(ScreenWidth,ScreenHeight);
        setVisible(true);
        setDefaultCloseOperation(JFrame.EXIT_ON_CLOSE);
        //create the back buffer for smooth graphics
        backbuffer = new BufferedImage(ScreenWidth, ScreenHeight,
            BufferedImage.TYPE_INT_RGB);
        g2d = backbuffer.createGraphics();

        //load the explosion animation
        sprite = new AnimatedSprite(this, g2d);
        sprite.load("explosion.png", 6, 5, 128, 128);
        sprite.position = new Point(300,200);
        sprite.frameDelay = 10;
        sprite.totalFrames = 30;
        sprite.velocity = new Point(1,1);
        sprite.rotationRate = 1.0;

        gameloop = new Thread(this);
        gameloop.start();
    }

    public void run() {
        Thread t = Thread.currentThread();
        while (t == gameloop) {
           try { Thread.sleep(5); }
            catch (InterruptedException e)
            { e.printStackTrace(); }
            gameUpdate();
        }
    }

    public void gameUpdate() {
        //draw the background
        g2d.setColor(Color.BLACK);
        g2d.fill( new Rectangle(0, 0, ScreenWidth-1, ScreenHeight-1) );

        //draw the sprite
        sprite.draw();

        //keep the sprite in the screen boundary
        if (sprite.position.x < 0 || sprite.position.x>ScreenWidth-128)
            sprite.velocity.x *= -1;
        if (sprite.position.y < 0 || sprite.position.y>ScreenHeight-128)
            sprite.velocity.y *= -1;
        g2d.setColor(Color.WHITE);
        g2d.drawString("Position: " + sprite.position.x + "," +
            sprite.position.y, 10, 40);
        g2d.drawString("Velocity: " + sprite.velocity.x + "," +
            sprite.velocity.y, 10, 60);
        g2d.drawString("Animation: " + sprite.currentFrame, 10, 80);

        repaint();
    }

    public void paint(Graphics g) {
        //draw the back buffer to the screen
        g.drawImage(backbuffer, 0, 0, this);
    }
}
This chapter tackled the difficult subject of sprite animation. Adding support for animation is not an easy undertaking, but this chapter provided you with the knowledge and a new class called AnimatedSprite that will make it possible for you to write your own games without reinventing the wheel every time you need to load an image and draw it. Here are the key topics you learned:
How an animation is stored in a bitmap file
How to load and draw an animation strip from a single bitmap file
How to animate a sprite with timing
How to put it all together into a reusable class
The following questions will help you to determine how well you have learned the subjects discussed in this chapter. The answers are provided in Appendix A, “Chapter Quiz Answers.”
The following exercises will help you to determine how well you have understood the new material introduced in this chapter.
Modify the AnimationTest program so that it draws 10 sprites, each with its own animation rate and random position on the screen. You can use a list or an array if you wish.
Now that you can do full-blown animation, it’s time to combine that awesome new capability with time-proven collision detection in order to add some actual functionality to the last project. Modify the program so that many sprites are moving on the screen and then cause the sprites to destroy each other when they collide.