
![]()
Graphical User Interfaces
This chapter will explain the basic components of a graphical user interface (GUI) and how to use them in Java applications. We will begin to explore the different types of relationships between classes and document both the classes and their relationships using the Unified Modeling Language (UML).
After finishing this chapter, you should understand:
After finishing this chapter, you should be able to:
Introduction to GUI, AWT, Swing, and SWT
Let’s face it, you didn’t get into Java to enter commands at the command prompt and see the results in black-and-white text. You want Java applications with a full-color GUI (graphical user interface). A GUI is comprised of components such as frames, dialog boxes, buttons, labels, and so on. Fortunately, the JRE comes with classes that define all these components. In RAD, a programmer can create “Visual classes” that use these GUI components or create classes that are unique versions of these GUI components.
For instance, inside of the JRE there are two packages: java.awt (Abstract Window Toolkit) and javax.swing. Both of these packages contain classes for frames, buttons, labels, and so on. The main difference between the two is that the appearance of an AWT component depends on the operating system that the Java application is run on. In other words, AWT uses the operating systems windows, buttons, and so on. Swing has its own set of components that will look the same on all operating systems. In addition, the Swing components provide more functionality than AWT components. However, applications using Swing components will not look the same as other applications on that computer. In addition, because Swing does not use the operating system components, Swing applications are not as efficient as applications that use AWT. Because of these issues, a third GUI set was developed called the Standard Widget Toolkit (SWT). SWT makes use of the native operating system components as much as possible, and offers all of Swing’s bells and whistles. SWT is open source (i.e., free) but it is not included in the JRE. When creating a GUI using RAD, the SWT components are always offered as an option. When you choose a SWT component, RAD makes the SWT library available to the project. The library has many jar files that contain all the SWT classes.
In general, all the components work similarly but they often do have different options, commands, and/or syntax to perform the same functions. As mentioned, the Swing and SWT components often have extra features and an added level of complexity that make them just a little harder to work with. Because of this, the examples in this chapter will use the AWT components and in later chapters, we will show some Swing examples.
One way to look at a class/object is that they are composed of many other classes/objects. To summarize the first chapter:
Classes are made up of class variables and methods. Methods contain method variables and executable statements. Variables (class or method) are defined as a class type and associated with an object of that class type.
For example, when an Employee is created a String object and a String variable named empName are created. Then the String object is assigned to the variable. Therefore, the String object assigned to empName is one component of the Employee object.
Objects, like Employee, are composed of many different objects. These objects have unique methods and information that can be utilized by Employee. Therefore, it is said that a class like Employee acquires the functionality of other classes through composition.
This explanation of composition may seem overly long (and painful) but it is necessary because the capabilities of frames and labels can be accessed in a different manner called specialization. Later in the chapter, we will explain specialization and contrast it with composition.
We want to create some GUI objects in the Employee class so that the employee name looks “pretty” when displayed. We will do this by defining a frame and label in the Employee class. In other words, just as we created a String object to hold the employee name, we want to create a Frame object and a Label object to display the employee name.
A label is used to display text and labels are often used in tandem with entry fields. For example, when entering a phone number on a Web page, there is an entry field to hold the information and a label (usually to the left of the entry field) with a short description of the data to be entered (e.g., the text “Phone:”).
Labels must be assigned to a container. So, to create and use a label you need a container. Frame, Dialog, and Panel are all examples of container classes. Our container of choice will be a Frame.
Label and Frame objects can be created just like String objects - create an instance of the appropriate class and assign it to a variable. Said another way, create an object of the class type and assign it to a variable. If the explanation is unfamiliar, the syntax should not be:
Label empNameLbl = new Label();
Just like a String, text can be assigned when the Label is defined, as in the following:
Label empNameLbl = new Label("My First Label");
The value of the label can be changed. However, changing the text of a label is not as easy as changing the text of a string. For instance, the following will generate an error:
empNameLbl = "New Text";
As mentioned in the first chapter, the String class has all sorts of shortcuts that other classes do not. The Label class (like most classes) has “setter” and “getter” methods to access and change an object property, like a label’s text. Of course, this begs the question, what is a property? A property is a private variable that represents some aspect of a class that the class user (called the client) should have control over—like the size of a label or the text that appears on the label. However, direct access to the variable that controls a property could prove disastrous. For instance, what do you think would happen if a programmer created a label and then specified the size as 16 feet? That’s right, the biggest, fattest error you ever saw, and the JVM would end the entire application.
Because of this, most setter methods check the supplied property values and ensure it is valid. If a value is invalid, the setter generates an exception that the application/client (i.e., the user of the setter) should “catch.” Catching the exception stops the JVM from ending the application. However, we are getting several chapters ahead of ourselves. For now, accept that you will use (and eventually create) getter and setter methods to access and control object properties.
With labels, the programmer usually specifies the text, size, and location properties. There are three setter methods to do this—setText, setSize, and setLocation. However, we can define the text when the label is created and there is another method called setBounds that allows the programmer to define both the size and location. For instance, the following:
Label empNameLbl = new Label("My First Label");
empNameLbl.setBounds(100, 200, 75, 20);
will create a Label object with the text “My First Label” and position the start of the empNameLbl 100 pixels from the left and 200 pixels from the top of the upper, left corner of the container to which it belongs. Lastly, the label will be 75 pixels wide and 20 pixels high. You may be asking, “How big is a pixel?” The size of a pixel depends on the computer screen’s resolution setting. Earlier, we showed that many aspects of Windows’ appearance are controllable. One of these aspects is the number of pixels that will be displayed on the screen (i.e., the resolution). The screens seen in all of the previous figures are set to 1024 by 768. Contrary to intuition, fewer pixels mean the GUI components will appear larger. For instance, if we changed the screen resolution to 800 × 600, one pixel would take up more of the screen; therefore, a label would look larger.
We have a label. Now we need a frame to put it on. A frame has a white content area, surrounded by a border and a title bar across the top. In Windows 7, the border and title will be light blue. As with the label, we need to create the Frame object and set several of its properties. Let’s explore the statements needed to create a basic frame and add empNameLbl to the frame.
Frame empFrame = new Frame("My First Frame");
The first statement creates a Frame object and defines title text (“My First Frame”) for the frame. A Frame variable named empFrame is created and the Frame object is assigned to empFrame. Notice that the syntax is the same as creating a String or Label object.
empFrame.setBounds(10,10,300,300);
This statement sets the location and size of the frame. As with a label, the first two numbers (10, 10) control the number of pixels from the left and top of the screen where the upper left corner of the frame will be placed. The second set of numbers (300, 300) defines the width and height of the frame (in pixels).
empFrame.setLayout( null );
This third statement sets the frame’s layout property to null. Layouts are predefined formats that control where visual components will appear in a container. Layouts make it simpler to add and format components but impose limits on the programmer’s control of the components, so we will “turn off” the property. When there is no layout defined, the programmer must define each component’s location (which we already did when we defined the empNameLbl).
empFrame.add(empNameLbl);
This fourth statement adds the empNameLbl Label to the Frame. Pretty simple. Then you need:
empFrame.setVisible( true );
This last statement sets the empFrame property visible to true. The default value is false, meaning the frame will not appear on the screen. Try to remember that to see the frame you must change this property to true.
Notice that the Frame class has many setters (setBounds, setLayout, setVisible, etc.) to control the frame properties. In addition, there are useful methods, such as add, to build the frame with other components. Earlier we mentioned that the JRE contains all sorts of useful classes. Certainly all of these GUI classes can be included in that category.
Some beginning programmers are concerned that they really don’t know how the Frame class works and that therefore they don’t understand Java. The beauty and power of Java (and all object-oriented languages) is that programmers use predefined components (classes) and assemble them into unique applications. Because the programmer uses common, well-tested components, applications can be assembled quickly, will be more reliable, and are easier to change in the future. For instance, a mason doesn’t know the chemical composition of a cinderblock or how cinderblocks are manufactured. He does know their properties—how much they weigh, their dimensions, how much weight they can bear. In addition, the mason can change some properties. For instance, cinderblocks can be cut down in size. The mason uses the cinderblocks (possibly changing some of their dimensions) to build a house according to the specifications of the customer.
You are doing the same thing with the Java classes. You learn the properties of the Label and Frame classes and then change the properties of individual objects to create an application that fits the customer’s needs and specifications. Therefore, you really don’t need to know how the Frame class works. Simply use the class.
Another example would be driving. Do you really need to know how the brake system works? All you need to know are the properties of the brake pedal. In other words, all you need to know is where the brake pedal is and that when you step on the brake pedal very quickly, you will stop very quickly.
Tutorial: Creating a GUI with RAD
You are going to create a new project and package, and then copy the Employee application into it. You will then modify the Employee application so that a frame and label are used to display the employee name.
Let’s begin:
- 1. Start RAD.
- 2. If needed, switch to the Java perspective.
- 3. Create a new Java project called Tutorials and within src, a package named c3.
- 4. In the Navigation tree, expand MyFirstProject, src, and myFirstPackage.
- 5. Click on Employee.java to select it, then hold the Ctrl key and click on EmployeeApp.java to select it also.
- 6. Click Edit, then Copy.
- 7. Click on the c3 package in Tutorials to select it.
- 8. Click Edit, then Paste.
- 9. In c3, double-click Employee to display the source code.
Notice that RAD has changed the package statement to show that the class is in c3.
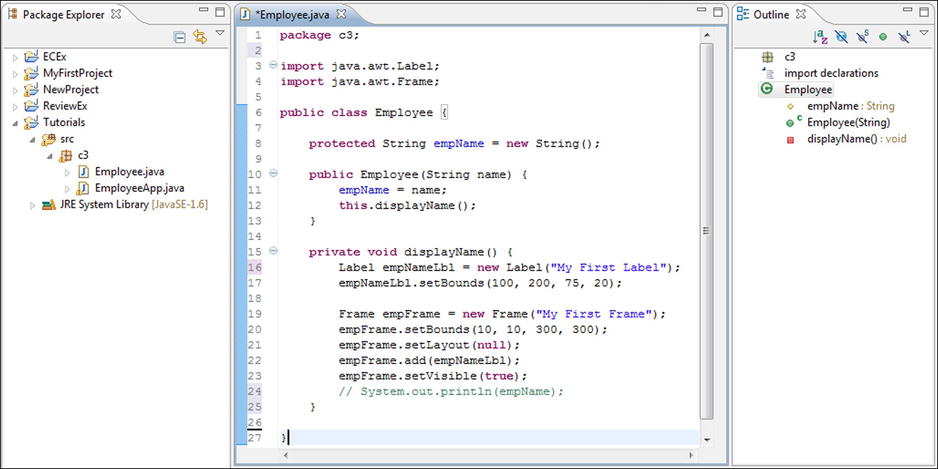
- 10. After the package statement, add the following two import statements:
import java.awt.Label;
import java.awt.Frame;
The import statements tell the JVM where to find the Label and Frame classes. As mentioned earlier, the JVM automatically looks in the java.lang package. However, if you use classes stored in any other package (even packages with the JRE), you must use an import statement to specify where the class is located. In this case, each class we identified individually; however, you can identify all the classes in a package (for example, the awt package) with the following statement:
import java.awt.*;
The * is a wild card symbol that indicates all classes in java.awt. This statement is easier for the programmer to code but it does make the program a little less efficient. By not specifying a class name, the JVM will search the package to find the class.
- 11. After the displayName method header, enter the following two statements:
Label empNameLbl = new Label("My First Label");
empNameLbl.setBounds(100, 200, 75, 20);
As explained earlier, these two statements create the Label object, assign the object to empNameLbl, define text to appear in the label, and define the label’s size and location.
- 12. Add 2 blank lines after the setBounds statement.
- 13. On the second blank line, enter the following code to define the variable empFrame, define and assign a Frame object to the variable, and add the label to the Employee frame.
Frame empFrame = new Frame("My First Frame");
empFrame.setBounds(10, 10, 300, 300);
empFrame.setLayout( null );
empFrame.add(empNameLbl);
empFrame.setVisible(true ); - 14. Click on the System.out.println statement (to select it), then press and hold the Ctrl key, and then press the / key (Ctrl-/) to comment the line out.
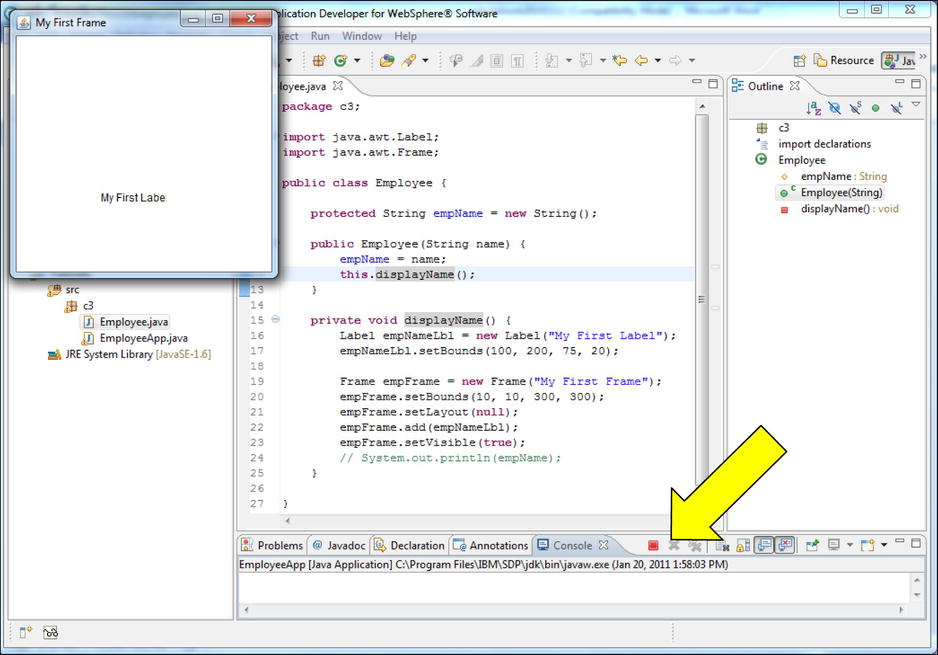
- 15. Format and save the source code, then verify that there are no errors. The code should look like Figure 3-1.
Tutorial: Running a New Application
There are a couple of common pitfalls at this point regarding running a new application. The inclination is to simply click the Run button. However, this will run the last application, which was EmployeeApp in MyFirstProject.
- 1. Display the Run menu by clicking on the down arrow to the right of the Run button.
The Run menu shows the previously defined “launches” and three menu options: Run As, Run Configurations... and Organize Favorites.... Choosing EmployeeApp from the menu will also execute EmployeeApp in myFirstPackage—again, this is not what we want. Choosing Run As… tells RAD to run the currently active Java source code. In this case, that would be c3.Employee. Running Employee as a Java application would result in an error since Employee does not have a main method. Ouch, again! (Fortunately RAD won’t even let you do that.)
Because we want to run the EmployeeApp in Tutorials/c3, we can define a new launch or change the already defined EmployeeApp launch. We will change the existing EmployeeApp launch to run EmployeeApp in project Tutorials and package c3.
- 2. From the drop down menu, select Run Configurations....
The Run Configuration frame will be displayed. Any previously defined launches can be found (grouped by type of configuration) in the pane on the left. If EmployeeApp is not selected, select it now. The launch’s definition will be displayed as in Figure 3-2.
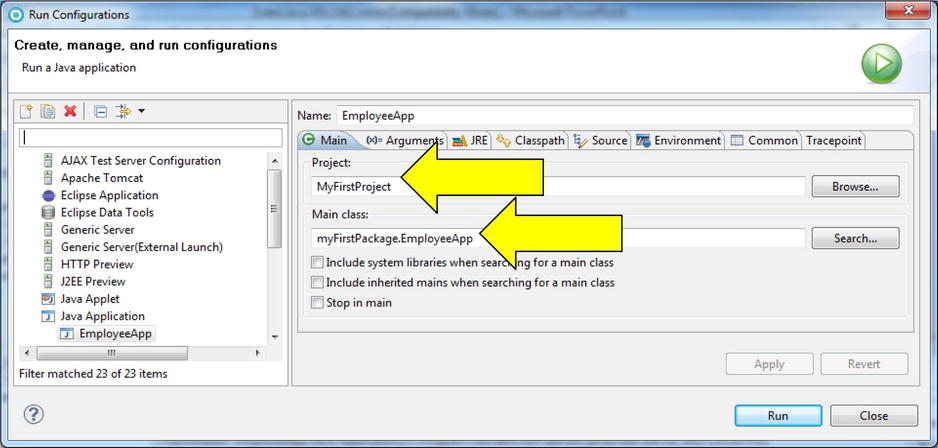
- 3. Where indicated by the arrows in Figure 3-2, change the text in the project name field to Tutorials and the application name to c3.EmployeeApp so that is appears as in Figure 3-3.
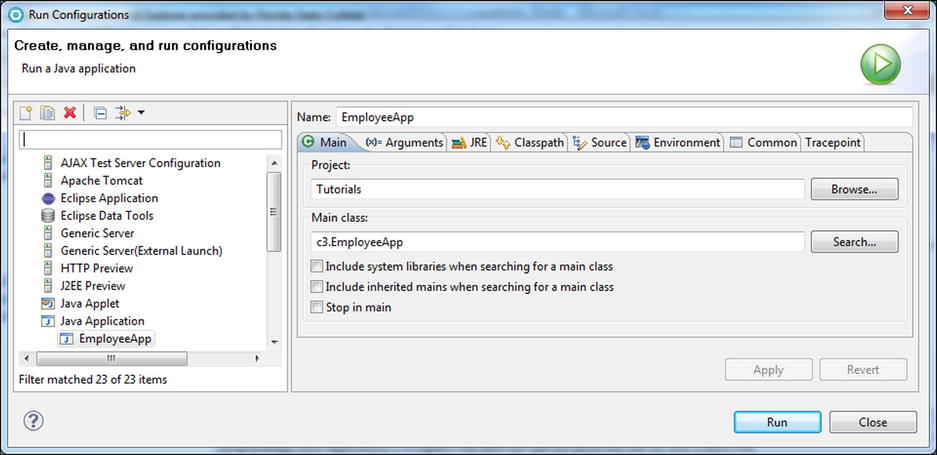
- 4. Click the Run button.
This will save the new launch information and run c3.EmployeeApp. The result should look like Figure 3-4. Notice anything not quite right?
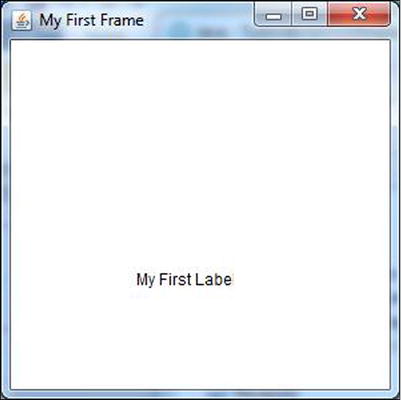
The text in the label is cut off (the last letter is missing). We’ll have to increase the width of the label to fit the text.
- 5. Click the maximize button (in the upper right corner of the frame, to the left of the close button. The close button is the red button with a white x).
The Employee frame expands to take up the entire visible screen area and the maximize button is replaced with a restore down button. How did that happen? You didn’t code anything to do that. This is the power of using the Frame class. All these functions were already defined in the Frame class. When the Employee frame was instantiated (created), it automatically got those functions.
- 6. Click the restore down button.
The Employee frame returns to its defined size.
- 7. Click the close button.
Uh-oh.
A lot of functionality was acquired by the Employee Frame object (from the Frame class), but control of the close button was not. This is a function that the programmer has to add to the frame object (in the future). Before that, however, we have to end the program manually using RAD. When an application is running in RAD, there is a very easy way to terminate the program from the console pane.
- 8. If the console pane is not displayed, click Window, Show View, and then Console to display the console.
On occasion, you will find that certain views are not displayed (whether you inadvertently closed them or not is not the issue). Simply go to the Show View menu and select the view you would like to see. The views can be moved to different locations on the window by simply clicking and dragging on the view tab.
- 9. On the far left of the Console view tool bar, click the Terminate button (the button has a red box as an icon; see the arrow in Figure 3-5).
The application will be ended and the Employee frame will disappear.
Specialization
Are you rested? This is going to get a little complicated, so you should be fresh and ready for some new, big concepts.
Besides relating many classes through composition (i.e., Employee is comprised of String, Frame, and Label objects), a class can be related to another class through specialization (also referred to as “extending a class”). What this means is that when you create a class, you define it as a specialized version of an already existing class.
For example, we could create a new class called EmpFrame and define it as an extension of the Frame class. EmpFrame is now called a subclass of Frame, and Frame is called EmpFrame’s superclass. The beauty and power of specialization is that subclasses inherit all the capabilities (i.e., variables and methods) of their superclass.
Whoa, that was a mouthful. How do you feel? Do you need a glass of water?
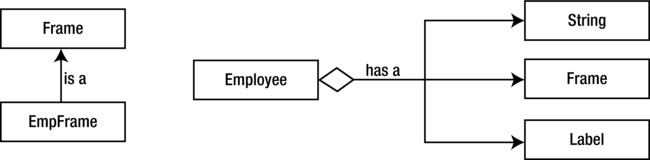
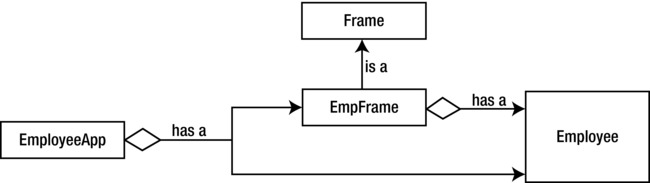
Another way to distinguish between a composition and specialization relationship is to say whether one class “has a” class, or whether one class “is a” class. For example, EmpFrame is a kind of Frame but Employee has a Frame. So in the first case, EmpFrame and Frame are related through specialization. To say it another way, EmpFrame is an extension of the Frame class. Or, even more simply, EmpFrame “is a” Frame. In the original example, Employee and Frame are related through composition. You can say that the Frame object is part of Employee or Employee “has a” Frame.
Figure 3-6 is a UML (Unified Modeling Language) diagram. UML provides a standard way of graphically showing class relationships. For instance, each class is represented by a rectangle with the class name. A line between classes represents a relationship. A line with a diamond on one end and an arrowhead on the other end means the classes are related through composition (“has a”). A line with an open triangle at one end means the classes are related through specialization. The open triangle indicates the superclass.
Ready for another big concept? Ready or not, here it comes. The classes in the JRE are related through composition and specialization.
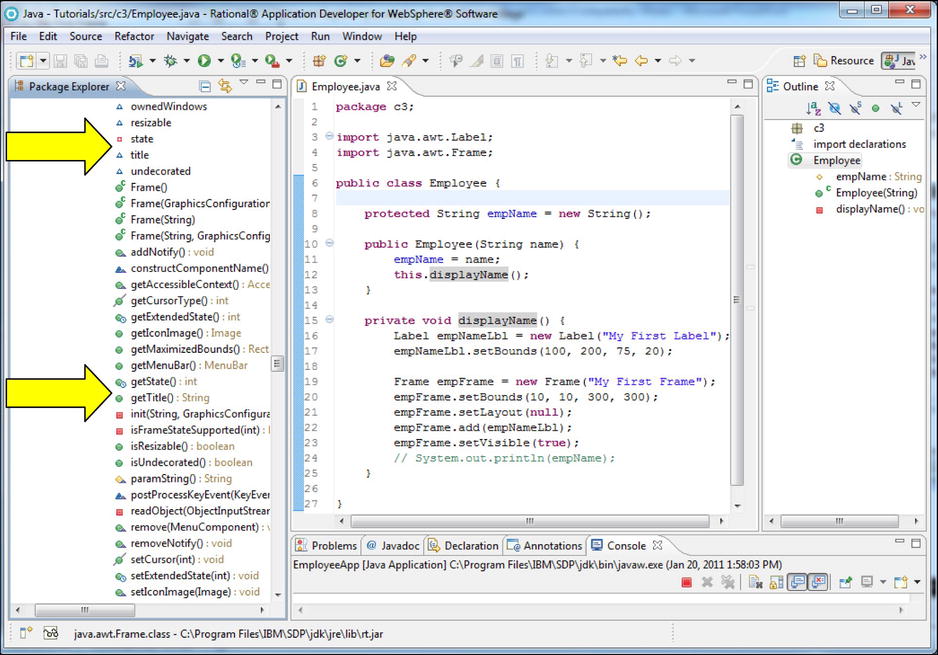
For instance, if we use the Package Explorer and expand the JRE System Library, rt.jar, graphics.jar, java.awt, and then Frame.class, all the Frame components will be displayed. Scrolling down in the Package Explorer would show a String component called title (see the first arrow in Figure 3-7). This means that one of the Frame class’s components is a String variable named title. Notice that the Package Explorer also shows the getTitle method (the second arrow in Figure 3-7) and, if you scroll down, you can see that there is also a setTitle method. These two methods are used to access the Frame class’s title property. As mentioned earlier, when a variable has setters and getters, the variable is not only a component of the class but it is considered a class property. So, title is a property of Frame—which you already knew!
More important, we have proven that the JRE classes are composed of many other classes/objects. In fact, every JRE class is involved in a superclass/subclass relationship and the JRE classes inherit many of their capabilities from specialization (i.e., from their superclasses). For example, Figure 3-8 shows how several of the GUI classes are related in a hierarchy. Notice that Frame is a type of Window and that a Label is a type of Component.
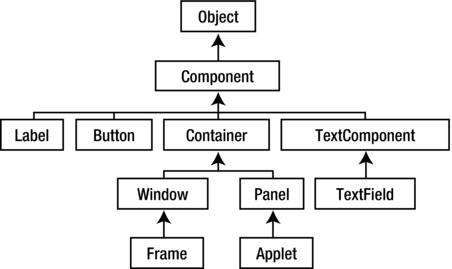
At the top of the diagram is the Object class. It is the ultimate superclass. If a class is created and no superclass is specified, Object is automatically defined as the superclass. Because we never defined a superclass for Employee and EmployeeApp, both were defined as subclasses of Object.
The online Java documentation shows the class hierarchy. For instance, at the top of the Frame page (Figure 3-9) notice that the superclasses are listed (first arrow) and match Figure 3-8. The second arrow points to any Frame subclasses. In this case, there is only one—the Swing component JFrame (which is not shown in Figure 3-8).
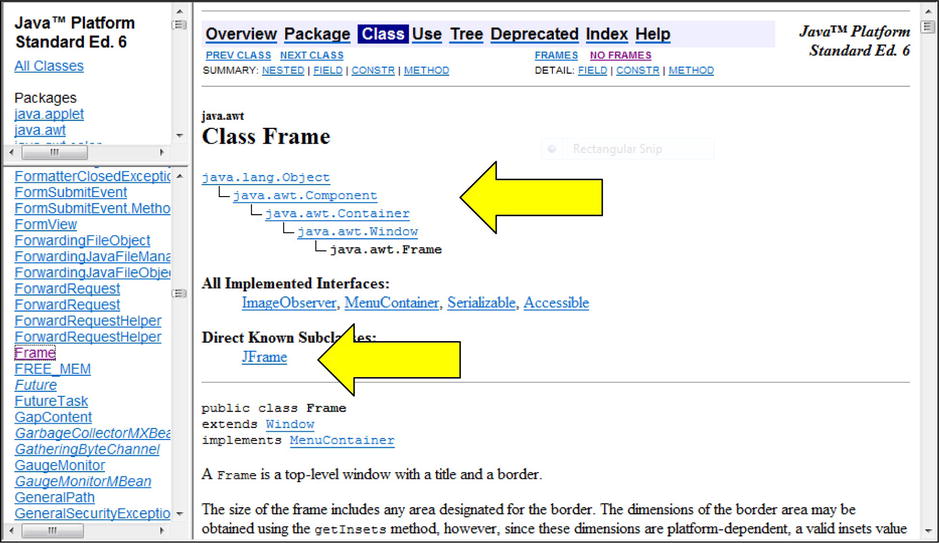
In addition, the online documentation shows all methods inherited from the superclasses (this information follows the class method listing, see Figure 3-10). Notice that the setBounds method is inherited from the Window class. (If you scroll back to the Frame method list, you will see that there is no entry for setBounds. This list only includes those methods explicitly defined in the Frame class.) As a matter of fact, every subclass of the Window class inherits this method. Can you feel the power of inheritance yet?

If not, think about the options the Java programmers had when creating these classes. They could have defined a setBounds method for every visual class. When the setBounds method had to be changed, they would have to change the setBounds method in each class. Alternatively, they could create a superclass for all of the visual classes and define the setBounds method once in this superclass. All of the visual classes would be defined as extensions of the superclass and, therefore inherit the method. Not only would the programmers only write the setBounds source code once, but also any changes to the method would be made once, in one class: the superclass.
Assuming that you are now sold on the superclass/subclass relationship, maybe you would like to know how to define a superclass/subclass relationship? A class is defined as a subclass by inserting the extends keyword in the class header followed by the superclass name. For instance, the following would define a new class called EmpFrame as a subclass of Frame:
public class EmpFrame extends Frame {}
This is a tough question to answer simply. The short answer is the programmer has more control over a subclass than an object. Now, unfortunately, comes the long answer.
When we used a frame earlier, we:
- A. Instantiated a Frame object
- B. Modified the Frame object’s properties (for instance, set visible to true)
- C. Added components (like a label) to the object and modified its properties
As that worked well for our need to display some text, why bother with this superclass/subclass thing? The reason is that often you will want a JRE supplied class to “do more” than setting properties and adding components can provide. For instance, our frame needs source code to make the Close button work. You can’t add a “close button” function to the Frame object. In addition, if an extensively “tailored” object will be useful to many other classes, it is better to specify the “tailoring” commands once in a subclass than to duplicate the commands in multiple classes. Finally, classes are often created to hold common functions that many classes will use. This repository of common functions is then used as a superclass so that many subclasses can inherit these functions. This not only saves on the amount of coding but any changes to these common functions are made once in the superclass rather than in many classes.
This does not mean that you should always create subclasses. If a class exists:
- 1. Whose property values can be set to meet your needs and
- 2. This particular set of property values will not be needed by other classes
simply instantiate an object of that class type. Notice that in previous examples String objects were created rather than subclasses. The reason objects were used is that the String class has all the functions and properties that we needed. Also, any String properties we did specify (like the employee name) would not be reused in other classes. In other words, the strings we created had a limited scope of use, therefore; there was no benefit in creating a subclass.
Frames, however, often need to be customized and reused to such an extent that subclasses are the best choice.
Tutorial: Creating a Frame Subclass
We will create an EmpFrame class to perform the display function and remove that function from the Employee class. We will also change the Employee class to hold more information about an employee and store the information in properties.
The following summarizes the statements used to create and define a Frame object in the earlier example:
- A. Import the java.awt.Frame class
- B. Create a Frame variable and object then assign the object to the variable
- C. Define a title
- D. Set the layout property to null
- E. Define the size
- F. Define the location
- G. Make the frame visible
This time we are going to create a Frame subclass called EmpFrame instead of instantiating a Frame object. Inside the EmpFrame class, we will define all the properties thereby eliminating the need to perform steps C through G for any class that uses EmpFrame. When another class wants to use EmpFrame, they will only have to import the EmpFrame class and create an EmpFrame object (statements A and B).
- Select c3 in Tutorials and click File, New, and then Class.
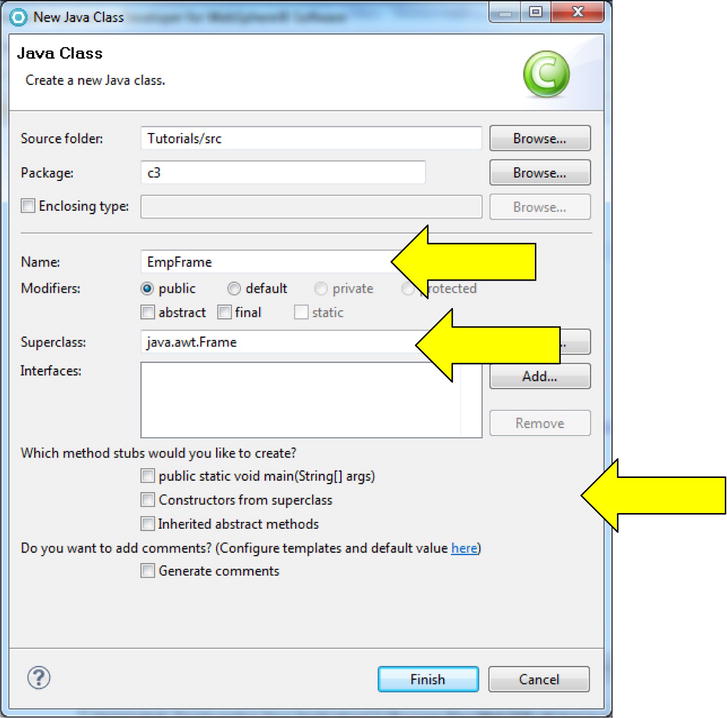
The New Java Class frame will be displayed (see Figure 3-11).
- Specify EmpFrame as the class name and java.awt.Frame as the superclass (as indicated by the first two arrows).
- Make sure none of the method stub checkboxes are selected (as indicated by the third arrow), and then click the Finish button.
In addition to the comments, RAD generates the following code:
package c3;

import java.awt.Frame;

public class EmpFrame extends Frame {

}
Notice that RAD included the correct import statement and placed the extends keyword in the header to define EmpFrame as a subclass of Frame.
Congratulations; you have defined EmpFrame as a subclass of Frame. Of course, EmpFrame doesn’t do anything, but it will after we set the properties, and add some components and methods.
Tutorial: Defining and Adding a Label
We need to create a label (to display the employee name) and add it to EmpFrame. The following statements will do that:
- A. Import the java.awt.Label class
- B. Create a Label object and variable and assign the object to the variable
- C. Define the label text
- D. Define the label size
- E. Define the label location
- F. Add the label to the frame
- 1. Add the following import statement after the already existing import statement:
import java.awt.Label;
We will create a label and assign it to a class variable called empNameLbl.
- 2. Inside of the EmpFrame class, enter the following statement:
Label empNameLbl = new Label("My First Label");
This statement does three things:
- A. Creates a Label object with the text “My First Label”
- B. Creates a Label variable called empNameLbl
- C. Assigns the object to the variable
- D. Insert the following code after the label statement:
public EmpFrame(Employee emp) {
}
This statement defines a constructor method. The primary purpose of the constructor is to "initialize" the object or said another way “to make the object useful”. For EmpFrame, this means adding source code to the constructor to define the frame and its component’s properties.
Notice that the constructor expects an Employee object. As mentioned, we will be changing the Employee class to hold more employee information. Passing an object, instead of individual variables, is an easy way to transfer a lot of information between two classes.
- 3. Inside the constructor, enter the following statement:
empNameLbl.setBounds(100, 150, 150, 20);
Notice that the length of the label was set to 150 so that all the text will be displayed. The label was also centered on the frame (100 pixels from the left and 150 from the top).
- 4. Add the following after the setBounds statement:
this .add(empNameLbl);
Adding the label to the frame was the last step we needed to perform. In our earlier example, the label was added to the empFrame object with the following statement:
empFrame.add(empNameLbl);
In this example, however, we do not have a frame object to manipulate. We must add the label to the EmpFrame class we are defining. The keyword this is used to refer to the current object/class. For example, notice that the syntax to add the labels was the same except we substituted this for empFrame.
You have created and added a label to EmpFrame.
The following summarizes how to create a label and which steps (that you just performed) did the required functions:
- A. Import the java.awt.Label class—step 1
- B. Create a Label object and variable and assign the object to the variable—step 2
- C. Define the label text—step 2
- D. Define the label size—step 4
- E. Define the label location—step 4
- F. Add the label to the frame—step 5
Tutorial: Defining a Functional Frame
To review, we still need to perform the following steps to create a functioning frame:
- A. Define a title
- B. Set layout property to null
- C. Define the size
- D. Define the location
- E. Make the frame visible
- 1. Add the following statements after the this.add statement:
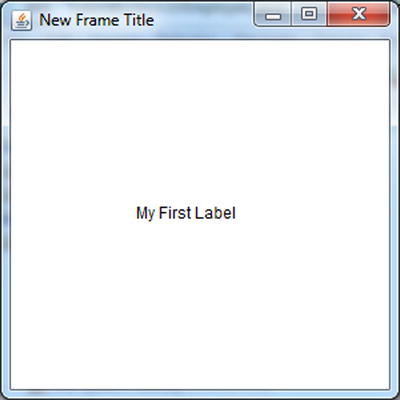
this .setTitle("New Frame Title");
this .setLayout( null );
this .setBounds(10, 10, 300, 300);
this .setVisible(true );
Notice that setter methods are used to define all the frame properties (Title, Bounds, etc.).
- 2. Format and save the EmpFrame source, then verify that there are no errors.
The executable code should look as follows:
package c3;

import java.awt.Frame;
import java.awt.Label;

public class EmpFrame extends Frame {
       Label empNameLbl = new Label("My First Label");

       public EmpFrame(Employee emp) {
              empNameLbl.setBounds(100, 150, 150, 20);
              this .add(empNameLbl);
              this .setTitle("New Frame Title");
              this .setLayout( null );
              this .setBounds(10, 10, 300, 300);
              this .setVisible(true );

       }

}
- 3. Run EmployeeApp.
Notice that the same old frame (empFrame) with the cut off label is displayed. This is because EmployeeApp still creates an Employee object and Employee creates the Frame object empFrame. We need to change EmployeeApp so that it creates an EmpFrame object and change Employee so that it does not create a Frame object.
- 4. End EmployeeApp by clicking the Terminate button.
Tutorial: Using a Frame
Now let’s use the frame:
- 1. In EmployeeApp, add the following statement after the Employee object emp is instantiated:
EmpFrame ef = new EmpFrame(emp);
This statement:
- A. Creates an EmpFrame object
- B. Passes the Employee variable (emp) to EmpFrame’s constructor
- C. Creates an EmpFrame variable called ef
- D. Assigns the EmpFrame object to ef
EmployeeApp’s executable statements should look like the following:
package c3;
public class EmployeeApp {

    public static void main(String[] args) {
        Employee emp = new Employee( new String("Mary Worker"));
        EmpFrame ef = new EmpFrame(emp);
    }
}
- 2. Save the EmployeeApp source code and verify there are no errors.
The following steps all concern changes to the Employee class source code:
- 3. Delete the two import statements.
- 4. Remove the following statement from the Employee constructor:
this .displayName(); - 5. Delete the displayName method.
We want to define the String empName as a property. As a reminder, the steps for defining a property are:
- A. Create a private variable
- B. Define a getter method to return the private variable value
- C. Define a setter method to:
accept a value for the private variable
validate the value
if the value is valid, set the private variable to the value passed to the setter method
For simplicity’s sake, we will not define any edits to validate the data.
- 6. Change the String empName to a private variable.
- 7. Add a public setName method that:
- A. Returns void
- B. Accepts a String variable called name as a parameter
- C. Sets the private variable empName to name
- 8. Specify a getName method header so that the method is:
- A. Public
- B. Returns a String variable
- C. Accepts nothing
- 9. In the getName method body, enter the following statement:
return empName;
The keyword return actually passes the variable (specified after the return keyword) to the class that invokes the getName method. In this case, the variable empName will be sent back.
- 10. Change the constructor so that the setName method is invoked to assign the value to empName.
- 11. Format and save the Employee source code and verify there are no errors.
The executable statements should look like the following:
package c3;

public class Employee {

       private String empName = new String();

       public Employee(String name) {
              this .setName(name);
       }

       public void setName(String name) {
              empName = name;
       }

       public String getName() {
              return empName;
       }
}
- 12. Run EmployeeApp.
The EmpFrame should be displayed as in Figure 3-12.
Unfortunately, we still have not solved the close button problem.
- 13. From the console, terminate EmployeeApp.
Figure 3-13 shows the relationships between our three classes and the Frame class.
Tutorial: Creating UML Diagrams with RAD
RAD can generate UML diagrams. There is some “diversity” regarding the symbols and line styles used in UML diagrams. Although diversity is usually a good thing, when it comes to programming, standards and uniformity are the rule because they enhance efficiency. If everyone uses the same symbols, then everyone can understand the diagrams. However, the real world is never so simple. There are a couple reasons for differences. First, there are disagreements between professionals regarding which is the best way to diagram the classes. Second, there is no way to enforce a standard. Diagramming is not like the syntax of a programming language (which has to be followed exactly) for the JVM to work. With that said, we will show (very briefly) RAD’s interpretation of a basic UML diagram. Once you start developing complex applications, you will really appreciate that RAD automatically generates the UML.
- 1. Click c3 in the navigation tree to select it, and then click File, New, and Class Diagram.
The New Class Diagram window will be displayed (see Figure 3-14).
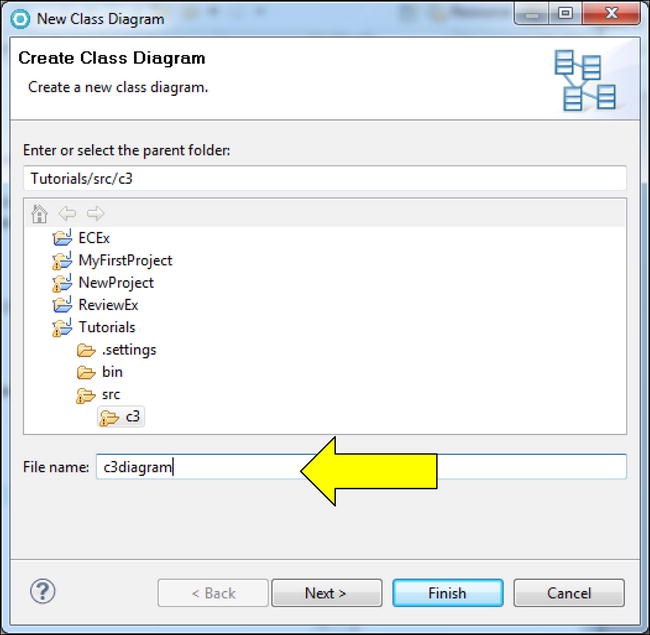
- 2. Specify c3diagram in the file name field and click the Finish button.
A file named c3diagram.dnx will be added to c3 in the navigation tree and a blank diagram will be displayed in the content pane. The diagram is blank because the classes to include in the diagram must to be specified.
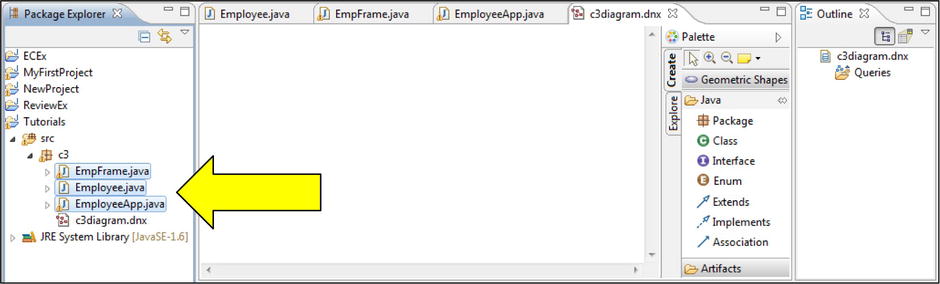
- 3. In the navigation tree, select the three classes by clicking on EmpFrame.java, press and hold the Shift key, then click on the EmployeeApp.java file.
All three files should be selected (see Figure 3-15).
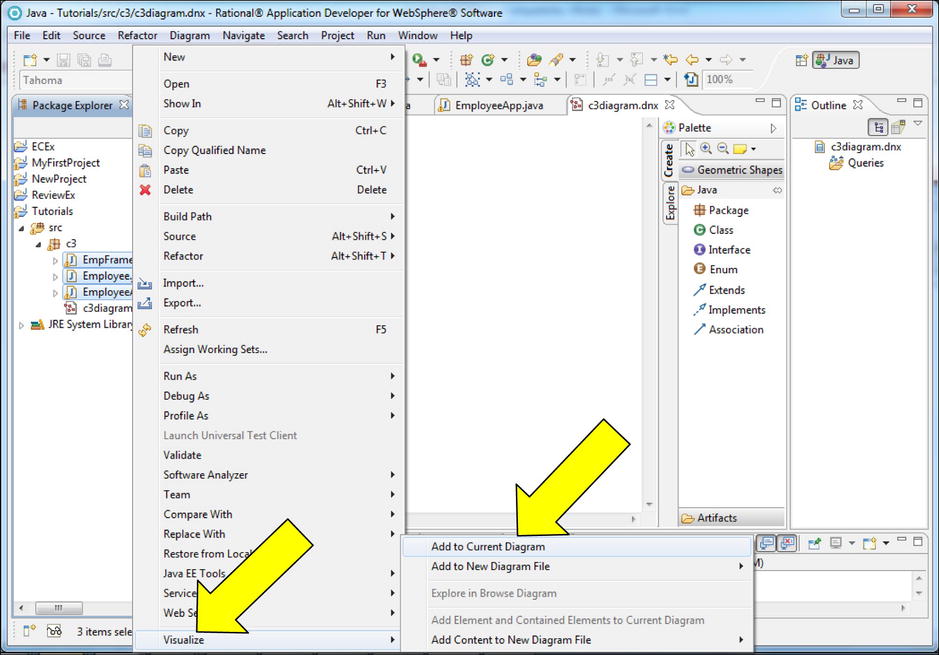
- 4. Right-click on any of the selected file names in the navigation tree and from the shortcut menu, select Visualize, then Add to Current Diagram (see Figure 3-16).
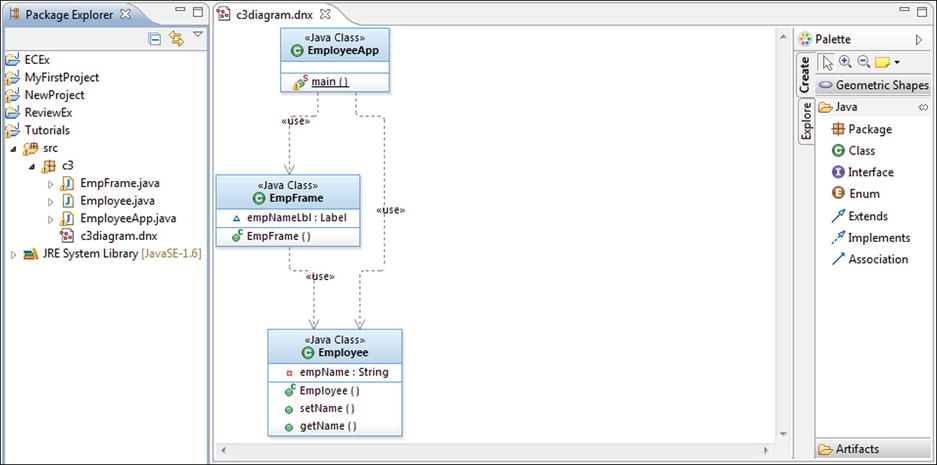
The three classes will be added to the diagram (as rectangles). The lines connecting the rectangles indicate “has a” or composition relationships between the classes (see Figure 3-17).
Tutorial: Modifying UML Diagrams with RAD
Any of the diagram components (lines, rectangles, etc.) can be repositioned by clicking and dragging. Notice also that there is more information in each rectangle than we have shown in earlier diagrams. UML diagrams are much more extensive than you have been led to believe. As an example, we will add the Frame class to show a superclass-subclass (i.e., “is a”) relationship and the Label class. Then we will simplify the class diagram by hiding some of the information and edit the diagram to make it more understandable.
- 1. In the Package Explorer, expand the JRE System Library, then rt.jar, and java.awt.
- 2. Scroll down the java.awt subtree and add Frame.class and Label.class to the diagram.
Of course, this makes the diagram so large it cannot all be displayed in the content window, so we will hide this detailed information.
- 3. On any blank area of the diagram, right-click to display the shortcut menu and choose Select, then All Shapes.
This will select all the class rectangles in the diagram.
- 4. In the command bar, click Diagram, Filters, Show/Hide Compartment, and then Name Compartment Only.
The class rectangles will only contain the class name (and are therefore much smaller). However, the diagram is still spread over the same area as earlier and cannot be viewed in its entirety.
- 5. Right-click on any class’s name text and select Format, Arrange, then All.
The entire diagram will now be displayed in the content pane (see Figure 3-18).
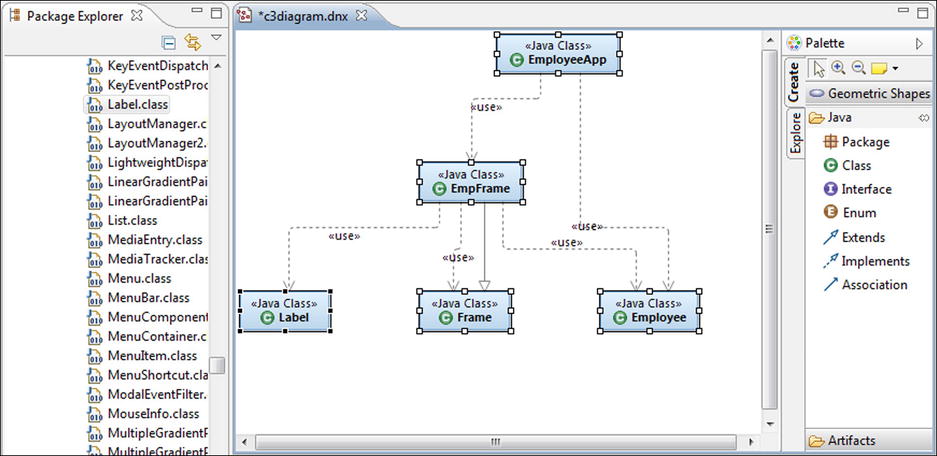
RAD does a pretty good job arranging the diagram but sometimes you have to get in there and do it yourself. As mentioned, all of the diagram elements (i.e., the class rectangles, relationship lines, text, etc.) can be move and resized by clicking and dragging. In addition, any element can be deleted and the text can be modified. We will delete, move, align, and resize the class rectangles to make the diagram easier to read.
- 6. Click the EmployeeApp rectangle to select it.
- 7. Press and hold Ctrl then click the EmpFrame rectangle.
The order in which the rectangles are clicked is important. The last element clicked becomes the anchor. (The anchor is indicated with solid black resize handles.) When alignment functions are performed, the anchor stays in the same location and all other selected elements are moved to align with its location.
- 8. Right-click on the EmployeeApp rectangle and select Format, Align, and then Middle.
The EmployeeApp rectangle was moved down and is now horizontally aligned with EmpFrame but the two class rectangles overlap. As mentioned, the rectangles and lines can be resized and repositioned by clicking and dragging. We will move the EmployeeApp rectangle to avoid the overlapping.
- 9. Click and drag the EmployeeApp rectangle so that it is horizontally moved to the right and vertically centered over the Employee rectangle.
- 10. Click and drag the Frame rectangle so that it is centered above EmpFrame.
- 11. Drag Label and Employee rectangles under the EmpFrame.
- 12. Increase the Employee rectangle’s width so that it is also under EmployeeApp.
- 13. Click and drag all the connector lines so that they are straight.
The diagram should look like Figure 3-19.
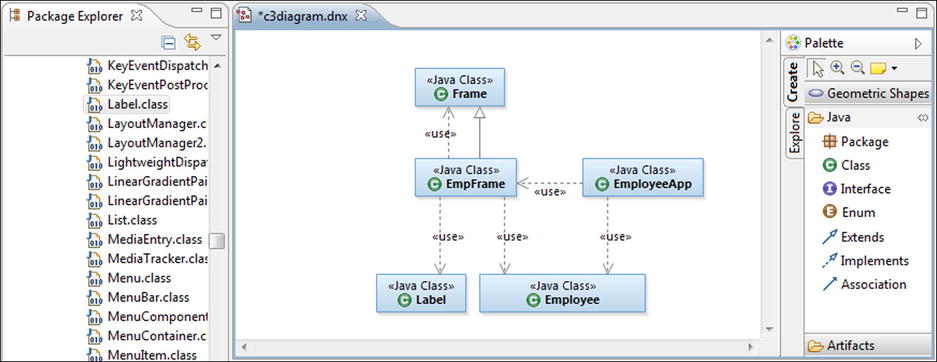
By resizing and moving the rectangles, we decreased the number of crossed lines and straightening the lines made the diagram much more readable.
Because the different relationships are indicated by different types of lines, the “use” text is redundant. Being redundant is not so bad but it does tend to clutter the diagram. So, to make the diagram even better, let’s delete these text boxes.
- 14. Select all five of the textboxes so that the diagram looks like Figure 3-20.
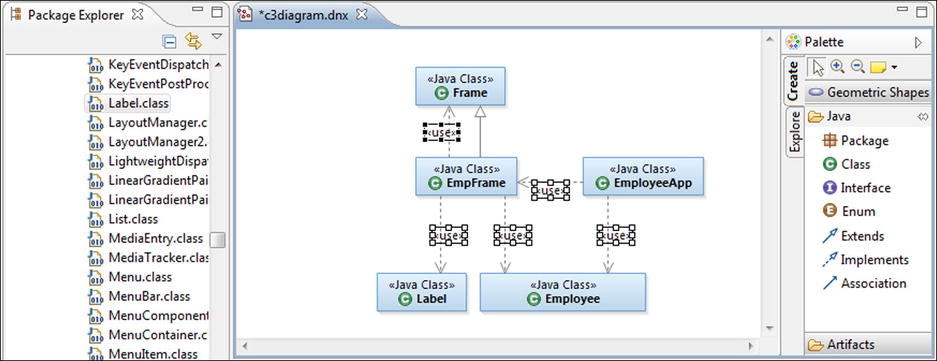
- 15. Press the Delete key and save the diagram.
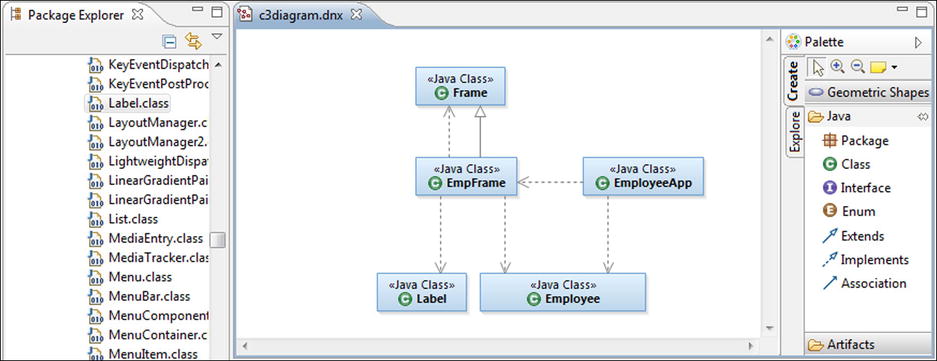
All of the text boxes are removed from the diagram leaving you with a very clean and crisp diagram that shows that EmpFrame is a Frame, EmpFrame has a Label and an Employee, and the EmployeeApp has an EmpFrame and Employee.
Figure 3-21 shows the final diagram.
Tutorial: Generating Getters and Setters
Currently, as shown in the following Diagram 3-1, EmployeeApp creates an Employee object and sets the one property to “Mary Worker.” It also creates an Employee variable (emp) and assigns the object to the variable. The Employee variable (emp) is then passed to the EmpFrame object’s constructor and the text “My First Label” is displayed.

We want to enhance the Employee class with additional properties to hold the employee mailing address. This means that EmployeeApp has to be modified to set values for these new properties and EmpFrame must be changed to display the new property values. Diagram 3-2 shows the changes that we want to make.

Unfortunately, the close button problem is too complicated for right now, so we will hold off until the next chapter to explain and solve that problem.
- 1. Display the Employee source code and define four new private String variables called empStreet, empCity, empState, empZip.
- 2. Right-click anywhere in the content pane and from the shortcut menu, select Source, then Generate Getters and Setters.
- 3. Click the Select All button (see Figure 3-22) then the OK button.
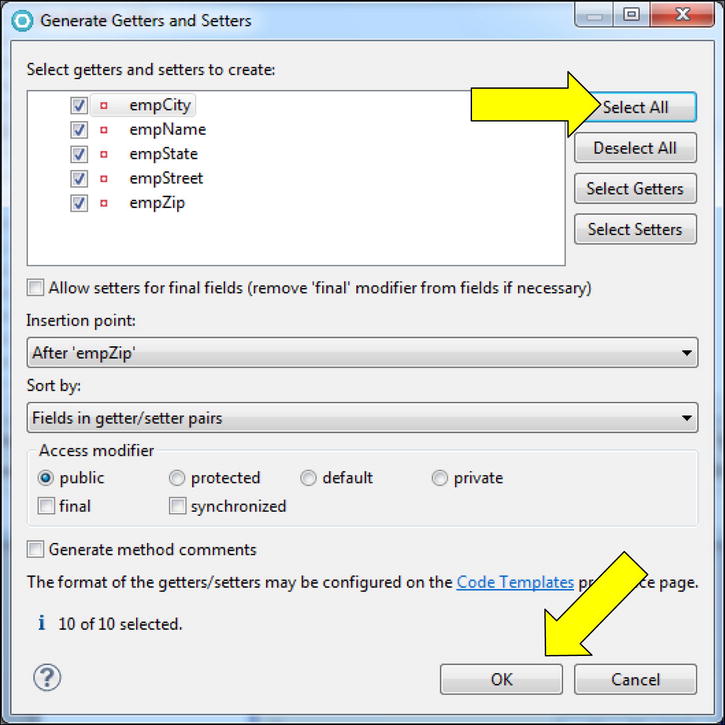
RAD generates all ten getter/setter methods after the last class variable definition. Now, you may not be impressed because the generated code is very simple. However, the beauty and power of this feature is that it relieves the programmer of tedious and error-prone coding. Also, notice how RAD knew that private class level variables are eligible to be properties and only generated getters and setters for them.
We still must change the Employee constructor to accept all five pieces of information.
- 4. In Employee, change the constructor header to the following:
public Employee(String name, String street,
String city, String state, String zip) { - 5. Replace the constructor body with the following code:
this .setEmpName(name);
this .setEmpStreet(street);
this .setEmpCity(city);
this .setEmpState(state);
this .setEmpZip(zip);
This code will use the setters to put the passed data into the private variables.
Finally, we need to delete the setName and getName methods we created earlier.
- 6. In the outline pane (far right), right-click setName and, from the shortcut menu, click Delete.
- 7. At the “Confirm Delete” window, click the OK button.
- 8. Delete the getName method, just as you deleted setName in steps 6 and 7.
- 9. Format and save the source code.
The executable code should look similar to the following:
package c3;

public class Employee {

        private String empName = new String();
        private String empStreet, empCity, empState, empZip;

        public String getEmpName() {
                return empName;
        }

        public void setEmpName(String empName) {
                this.empName = empName;
        }

        public String getEmpStreet() {
                return empStreet;
        }

        public void setEmpStreet(String empStreet) {
                this.empStreet = empStreet;
        }

        public String getEmpCity() {
                return empCity;
        }

        public void setEmpCity(String empCity) {
                this.empCity = empCity;
        }
        public String getEmpState() {
                return empState;
        }

        public void setEmpState(String empState) {
                this.empState = empState;
        }

        public String getEmpZip() {
                return empZip;
        }

        public void setEmpZip(String empZip) {
                this.empZip = empZip;
        }

public Employee(String name, String street, String city,
        String state, String zip) {
                this.setEmpName(name);
                this.setEmpStreet(street);
                this.setEmpCity(city);
                this.setEmpState(state);
                this.setEmpZip(zip);
        }
}
In the Package Explorer pane, notice the error icons. If you display the EmployeeApp source and then the error, it will read, “The constructor Employee(String) is undefined.” The Employee source code has no errors; however, the changes to Employee are causing an error in EmployeeApp, because we no longer have an Employee constructor that accepts a single string as a parameter. This is another great feature of RAD—after a class (e.g., Employee) is changed, RAD verifies that any other classes that use the class (Employee) will still work.
- 10. Display the EmployeeApp source code and change the main method’s first executable statement to the following:
Employee emp = new Employee("Mary Worker", "1 Main St.",
"Enid", "OK", "77777"); - 11. Save the EmployeeApp source code.
EmpFrame needs to be modified so that all the Employee information is displayed. Perform the following steps to the EmpFrame source code.
- 1. After the statement that creates empNameLbl, add two new statements to create labels called empStreetLbl and empCSZLbl with the text “New label.”
We will change the label’s text later with the information in the Employee object.
- 2. In the EmpFrame constructor, before the statement that adds empNameLbl to the frame, define the two labels so that:
- A. They are the same length and height as empNameLbl
- B. empStreetLbl is 40 pixels beneath empNameLbl
- C. empCSZLbl is 80 pixels beneath empNameLbl
If you are unsure how to do this, see the earlier discussion of the setBounds statement.
- 3. After the statement that adds empNameLbl to the frame, enter two statements to add the two new labels to the frame.
The executable source code should look like the following:
package c3;

import java.awt.Frame;
import java.awt.Label;

public class EmpFrame extends Frame {
       Label empNameLbl = new Label("My First Label");
       Label empStreetLbl = new Label("New label");
       Label empCSZLbl = new Label("New label");

       public EmpFrame(Employee emp) {
              empNameLbl.setBounds(100, 150, 150, 20);
              empStreetLbl.setBounds(100, 190, 150, 20);
              empCSZLbl.setBounds(100, 230, 150, 20);
              this .add(empNameLbl);
              this .add(empStreetLbl);
              this .add(empCSZLbl);

              this .setTitle("New Frame Title");
              this .setLayout( null );
              this .setBounds(10, 10, 300, 300);
              this .setVisible(true );
       }
}
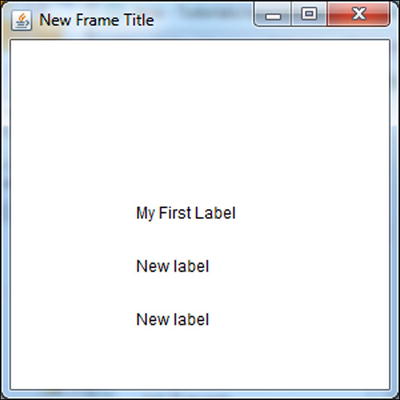
- 4. Save the source code and verify that there are no errors.
Just because RAD is not displaying any error messages does not mean that the code is correct. You really need to test that the correct results will be produced and, if the results are not correct, find the errors. The best/easiest way to find errors is to follow the “code a little, test a little” (CALTAL) style of programming. Many beginning programmers try to enter all the source code at one time and are often then overwhelmed by all the errors. An easy way to avoid that is to test frequently after adding or changing code. Therefore, at this point, we will run the code and verify that it works correctly.
- 5. Run EmployeeApp.
The EmpFrame should be displayed and appear as in Figure 3-23.
- 6. From the Console view, end EmployeeApp.
Tutorial: Displaying the Employee Information
EmpFrame needs to be modified so that the employee information is retrieved from the Employee object and placed in the labels. The information will be retrieved by using the object’s getters (via the variable emp that was passed by EmployeeApp) and each label will be modified using its setText method.
- 1. Change the frame title text from “New Frame Title” to “Employee Information.”
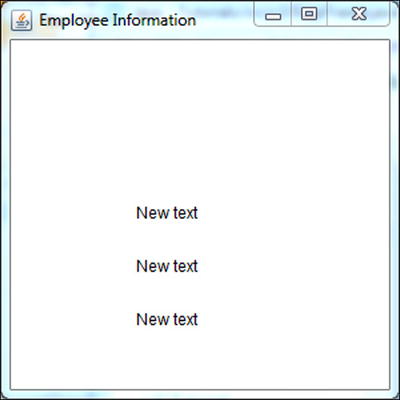
- 2. After the label’s setBounds statements, use each label’s setText method to define the label’s text as “New text.”
We will follow the CALTAL rules and verify that our setText statements are working.
- 3. Save the code and run EmployeeApp.
The frame should look like Figure 3-24.
- 4. Replace “New Text” in the empNameLbl.setText statement with emp.getEmpName().
The statement should look like the following:
empNameLbl.setText(emp.getEmpName());
Remember, getters return property values. These values can be used just like a variable. So, instead of “New Text”, “Mary Worker” (which is returned by the getEmpName method) is used in the setText method. Notice that the methods are executed from “inside out.” This means when one statement is embedded inside another, the embedded statement is executed first. In other words, the returned value of the embedded method is used as input to the outer method.
- 5. Save the code and run EmployeeApp.
Verify that “Mary Worker” appears in the name label.
- 6. Change the empStreetLbl.setText statement to retrieve and display the employee’s street address.
- 7. Save the code and run EmployeeApp.
Verify that “1 Main St.” appears in the street label.
Now the tricky part: we need to retrieve three pieces of information, format the data (i.e., between city and state we need to add a comma, between state and zip we need to insert several spaces), and then place the final string into empCSZLbl. There are many ways to do this, but we will do it all in one statement.
- 8. Change the empCSZLbl.setText statement so that the following replaces “New Text”:
emp.getEmpCity() + ", " + emp.getEmpState() + " " + emp.getEmpZip()
Notice that the three getters for the employee city, state and zip are embedded in the setText method. The tricky part is how they are linked together. A plus sign between String variables acts as a concatenation function. Concatenation between two (or more) strings results in one string. The resulting string is comprised of the first string followed by the second string. For instance, the following concatenation, “ABC” + “DEF”, results in a single string of “ABCDEF.”
In our example, we are concatenating five strings: the three strings returned by the getters and the two fixed constant strings “, ” (comma and a space) and “ ” (four spaces).
The executable code should look like the following:
package c3;
import java.awt.Frame;
import java.awt.Label;

public class EmpFrame extends Frame {
       Label empNameLbl = new Label("My First Label");
       Label empStreetLbl = new Label("New label");
       Label empCSZLbl = new Label("New label");

       public EmpFrame(Employee emp) {
              empNameLbl.setBounds(100, 150, 150, 20);
              empStreetLbl.setBounds(100, 190, 150, 20);
              empCSZLbl.setBounds(100, 230, 150, 20);
              empNameLbl.setText(emp.getEmpName());
              empStreetLbl.setText(emp.getEmpStreet());
              empCSZLbl.setText(emp.getEmpCity() + ", " + emp.getEmpState() + " " + emp.getEmpZip());
              this .add(empNameLbl);
              this .add(empStreetLbl);
              this .add(empCSZLbl);

              this .setTitle("Employee Information");
              this .setLayout( null );
              this .setBounds(10, 10, 300, 300);
              this .setVisible(true );
       }
}
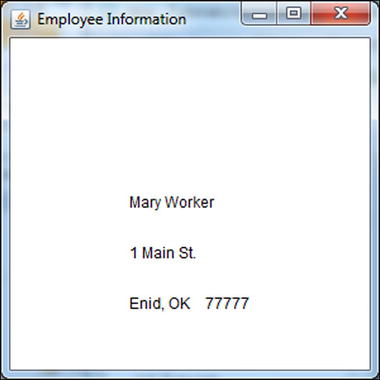
- 9. Save the code and run EmployeeApp.
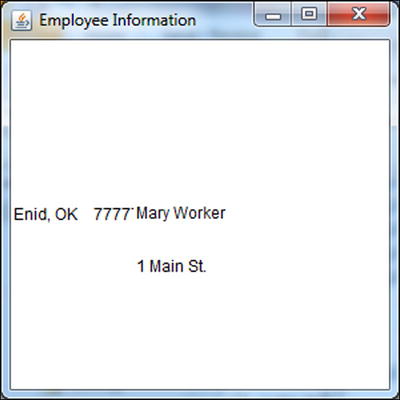
The frame should look like Figure 3-25.
Now, if you haven’t been terminating each launch of EmployeeApp, there should be several Employee Information frames. If you go to the console and click the terminate button only the last launch will be ended.
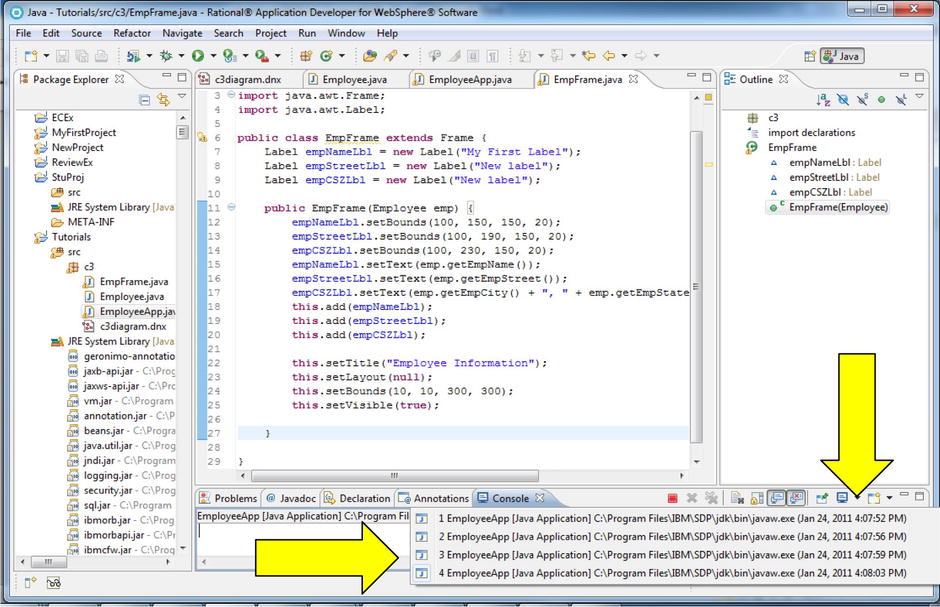
To terminate the other frames, you must click the drop down button next to the Display Selected Console button (see the vertical yellow arrow in Figure 3-26). The currently running applications will be displayed in a drop down menu (see the horizontal yellow arrow in Figure 3-26). Simply click any of the listed items to switch the console view to that application and then click the terminate button.
- 10. End all running EmployeeApp applications.
Tutorial: Breaking the Frame Code
- 1. Click on the setLayout statement and comment it out by pressing Ctrl and /.
- 2. Save EmpFrame and run EmployeeApp.
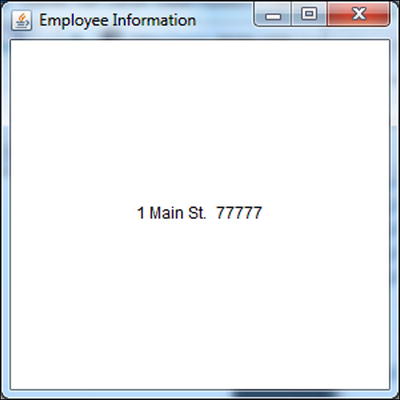
The data should appear as in Figure 3-27.
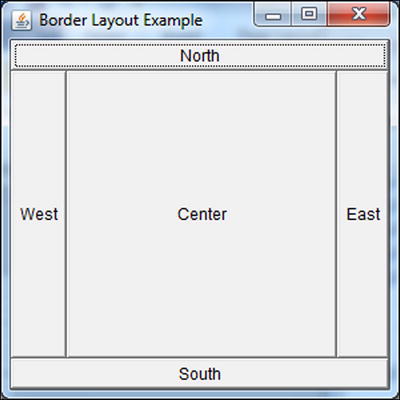
When a layout method is not specified, the JVM assumes BorderLayout. BorderLayout divides the frame into 5 areas (see Figure 3-28).
Locations are specified as North, East, and so on, and the default is Center. However, combining component absolute locations (e.g., 100, 150) and a layout will yield unexpected results (Figure 3-27). Therefore, programmers must do one of the following:
- A. Accept the BorderLayout defaults
- B. Specify a layout
- C. Specify layout as null and define an absolute location for each component.
- 3. End EmployeApp.
- 4. Click on the setLayout statement and uncomment the statement by pressing Ctrl and /.
For now, we will place the components manually. As you will see, this is time-consuming and error-prone.
- 5. Change the setBounds statement to the following (changes are in bold):
empNameLbl.setBounds(100, 150, 30 , 20);
empStreetLbl.setBounds(100, 150 , 60 , 20);
empCSZLbl.setBounds(100, 150 , 150, 20); - 6. Save EmpFrame and run EmployeeApp.
The data should appear as in Figure 3-29. (To say the data is poorly formatted is a vast understatement.)

Often when programmers are creating many components, they will simply copy another component definition and then modify the properties (i.e., change the name, size, etc.). It is very common to miss a property or two. Step 4 defined all the labels in the same location (e.g., 100, 150). In other words, the labels overlay each other. The result of this, however, is counterintuitive. The labels are added as follows: empName first, then Street, then CSZ. You would expect the CSZ label to be displayed since it is the last label added. In actuality, the first label (empName) overlays the other two. In other words, when a label is added, it “underlays” or goes “under” any existing labels. (Just to make things a little harder, this is not true when a layout is specified. For instance, in BorderLayout, labels do overlay each other, as you would expect.)
In step 4, the label lengths were modified to demonstrate the “underlaying.” The empName label is only 30 pixels long, so only the first name of the employee, Mary, can be displayed. Notice how Mary overlays the other two labels text. After Mary, the text “n St.” is displayed. This text resides in pixels 31 through 60 of the empStreet label. empStreet was changed to 60 pixels in length, of which, the first 30 pixels are overlaid by empName. In other words, when empStreet was added it went “under” empName, so only pixels 31 through 60 (“n St. ”) are displayed. Finally, “77777” is displayed. This text resides in pixels 61 through 150 of empCSZ. empCSZ went under both empName and empStreet. Therefore, the first 30 pixels of empCSZ are overlaid by empName and pixels 31 through 60 are overlaid by empStreet, leaving only pixels 61 through 150 showing.
- 7. Move the add empNameLbl statement after the add empCSZLbl statement.
Can you figure out how the data will appear?
- 8. Save EmpFrame and run EmployeeApp.
The data should appear as in Figure 3-30. Can you explain why the data appears as in Figure 3-30?
In step 6, the add statements were changed such that empStreet was the first and, therefore, primary label. In other words, the empStreet text will overlay any other label. Next, empCSZ was added under empStreet. Since empStreet is 60 pixels long, only empCSZ’s pixels 61 through 150 are displayed (i.e., “77777”). Lastly, empName is added beneath both empStreet and empCSZ. Because empName is only 30 pixels in length, none of empName appears.
- 9. End EmployeeApp.
- 10. Move the add empName statement before the add empStreet and set the label locations and lengths back to the original values as follows:
empNameLbl.setBounds(100, 150, 150 , 20);
empStreetLbl.setBounds(100, 190 , 150 , 20);
empCSZLbl.setBounds(100, 230 , 150, 20); - 11. Test that it is correct, by saving the source and running the application.
- 12. Comment out the Label import statement.
Notice that 12 errors were generated. Every statement that references a label is in error because the JVM cannot find the Label class. It is very common error to forget to include the import statement.
- 13. Uncomment the import statement and save the source.
Tutorial: Breaking the Getter/Setter Code
In Employee:
- 1. In the getEmpCity method, comment out the return statement.
The error message will be “This method must return a result of type String.” For methods that return a result, the type of data returned must be specified in the method header and the return statement must specify the particular variable to return. In this case, the header specifies that a String variable will be returned and the return statement identifies empCity. If either of these is missing, the other will be in error.
- 2. Uncomment the return statement and delete “String” in the getEmpCity method header.
The error message will be “Return type for the method is missing.” Remember, to return a value, the return variable type must be specified in the method header and the variable name must be specified in the return statement.
- 3. Type the text “String” before the keyword public in the getEmpCity method header.
Notice that the return type is still incorrect and now both the keyword String and the method name are highlighted as errors. The syntax for specifying the return type requires that it appear after the access modifier and before the method name. In this case, placing it before the access modifier (public) causes an error.
- 4. Delete the access modifier public in the getEmpCity method header.
This is a valid method header definition. An access modifier is not required because a default access modifier will be used.
- 5. Type the text “public ” before the text “String” in the getEmpCity method header.
- 6. Go to the setEmpCity method and delete the keyword void from the method header.
The error message will say, “Return type for the method is missing.” All methods except constructors must specify a return type. If a method returns nothing, then the keyword void must be specified as the return type.
- 7. Put the void keyword back in the method header.
- 8. Change the name of setEmpCity method to petEmpCity and save the source code.
Because setEmpCity is invoked in the constructor, this causes an error in the Employee class.
- 9. Change the name of the method back to setEmpCity.
- 10. Change the getter getEmpCity name to petEmpCity and save the source code.
There are no errors flagged in Employee; however, the Navigation tree shows an error in EmpFrame. It’s important to realize that even though RAD says the error is in EmpFrame, in this case the error is in Employee. RAD is good at identifying errors but not so good at assigning responsibility. Do not follow the error messages and their suggestions blindly. Many times errors are caused by mismatches between classes, and the programmer will have to determine which needs to be changed.
- 11. Change the getter name back to getEmpCity and save the source code.
Results of the Tutorials
- A new project called Tutorials.
- In Tutorials, a new package called c3.
- In c3, three new classes called EmployeeApp, Employee, and EmpFrame and a class diagram called c3diagram.
- 1. What does a frame’s constructor method do?
- 2. What is a property?
- 3. Given the following label definitions and placements (and assuming all the code is correct for defining and displaying a frame with these labels):
Label lbl1 = new Label
("Col. Mustard in the library with the wrench");
Label lbl2 = new Label
("Mrs. White in the lounge with the knife");
Label lbl3 = new Label
("Prof. Plum in the kitchen with the gun");
       public ClueFrame() {
              lbl1.setBounds(10, 150, 75, 20);
              lbl2.setBounds(10, 150, 150, 20);
              lbl3.setBounds(10, 150, 250, 20);
              this .add(lbl2);
              this .add(lbl1);
              this .add(lbl3);
which of the following is the correct result, and why?
A. Col. Mustard in the lounge with the gun
B. Prof. Plum in the kitchen with the gun
C. Mrs. White in the library with the knife
D. Mrs. White in the lounge with the gun
E. Prof. Plum in the kitchen with the gun - 4. Given the above label definitions and placements (and assuming all the code is correct for defining and displaying a frame with these labels) and with the following add statements replacing those above, which of the answers above is the correct result, and why?
this .add(lbl1);
this .add(lbl2);
this .add(lbl3); - 5. List the following steps in order to create a frame such that an error message will not be generated:
- A. Add the Frames’ components
- B. Create a Frame object and assign it to a variable
- C. Define the location
- D. Define the size
- E. Define the title
- F. Import the java.awt.Frame class
- G. Make the Frame visible
- H. Set layout property to null
- 6. What are AWT and Swing?
- 7. What are setters and getters?
- 8. Explain inheritance and why it is a benefit.
- 9. Would a frame and a label most likely be related through specialization or composition?
Review Exercise
In this exercise, you will modify the Shipment application to display the shipment information in a frame. Like the Employee application, you will create a new frame and have ShipmentApp pass a Shipment object with all the pertinent information.
- In the ReviewEx project, create a new package called c3.
- Select the ShipmentApp and Shipment classes in ReviewEx.c2, then copy and paste them into c3.
In c3/Shipment:
- Change the five String variables to private.
- Delete the display method.
- Save the code and verify that there are no errors.
- Using RAD, generate setters and getters for the five private variables.
- Change the Shipment constructor so that the five setters are used to set the values of the five private variables to the parameter values.
- Save the Shipment source and verify that there are no errors on the Shipment class.
- Create a new class in c3 called ShipFrame, identify its superclass as java.awt.Frame, and do not have RAD generate any stubs.
The executable code should look like the following:
package c3;

import java.awt.Frame;

public class ShipFrame extends Frame {

} - Define the ShipFrame constructor such that a Shipment object must be passed and assigned to a variable called ship.
- Define the ShipFrame title as Shipment Information, the size as 400 by 400, and position the frame 50 pixels from the left and top of the screen.
- Create three labels and assign them to class variables called empLbl, dateTimeLbl, and shipLbl.
- Define the labels’ sizes and locations such that they will look like Figure 3-31 when displayed.
- Change the ShipFrame constructor such that the data is retrieved from the Shipment object and formatted to appear in the labels as in Figure 3-31.
- Change ShipmentApp so that it does not invoke the display method but instead creates an instance of ShipFrame and passes the Shipment variable shipObj to ShipFrame’s constructor.

Results of the Review Exercise
Here are the results:
- One new package called c3 in ReviewEx project with three classes.
- One new class called ShipFrame in c3 created as defined above.
- Shipment and ShipmentApp modified as defined above.
Check that the Exercise Was Done Correctly
Finally, let’s check the results:
- Using RAD, verify that the new project c3 and class ShipFrame were created in the Review Exercise project.
- Run ShipmentApp.
- Verify that the frame is positioned and the contents displayed as in Figure 3-31.