![]()
More GUI and the Visual Editor
This chapter will explore GUI components in more depth. We will introduce the concepts behind listeners and event driven programming. We will then, show how to implement listeners, use them to solve the “window closing” problem (from the previous chapter), and enable buttons to perform functions. In addition, we will show, in more detail, the advantages of inheritance (i.e., specialization), especially how it decreases the amount of source code that must be written by the programmer. Finally, we will introduce RAD’s Visual Editor (VE). VE is a very productive tool for generating GUI classes. Through an extensive tool bar and drag and drop, VE provides a GUI for defining GUIs!
At the end of the chapter, you should understand:
- Window listeners and action listeners
- How to tie listeners to GUI components
- How and when to use specialization and composition
- The Visual Editor’s coding standards
At the end of the chapter, you should be able to:
- Efficiently use superclass/subclass relationships
- Use the Visual Editor to build a GUI
- Enable the close button
- Use buttons to perform functions within an application
We still have a big problem with our application: the close button does not work. If we installed the application on a PC, we would have to work with the Task Manager to shut the application down! This is very poor programming. There must be a better way, and there is—a listener.
Listeners are classes that implement a listener interface and that are added to visual components. In other words, just as a label is added to a frame, listeners (nonvisual classes) can be added to visual objects like a Frame or Button. You can think of a listener as a sentry. If someone approaches, the sentry asks for their ID. When the sentry hears a sound in the distance, he shouts, “Who goes there?” If no one responds, he fires a round in the air. Notice that the sentry performs different functions based on different events (or actions).
In our case, when the user performs a certain action, a specific method in the listener class will be invoked. In other words, specific methods will be called when the user clicks the close window button, when the window is opened, when a radio button is clicked, and so on. There are two catches:
- The programmer must write these methods.
- There are different types of listeners for different GUI components.
Window listeners can be added to a window (and many of the Window subclasses like Frame). A window listener is on the alert for a user clicking the close window button and six other actions. For each of these possible “events” the programmer must code a unique method to handle the event. Just as the main method’s header must be coded in a very specific way (name, number, and type of parameters, return value, etc.), these method headers have a specific syntax that must be followed. Another requirement is that all seven methods must be coded; if not, the JVM will return an error.
Think of the requirement in terms of the sentry example: you must tell the sentry what to do when all the possible events (in this case, seven) occur.
The following four steps must be performed to create a WindowListener:
- Import the WindowListener and WindowEvent classes
- Implement the WindowListener
- Code the seven required methods
- Add the window listener to the frame
A window listener can be created as separate class, however, a Frame subclass can also be defined as a window listener (i.e., it can “implement the window listener interface”). Putting the code to do this into every Frame subclass we create (like EmpFrame) would be very inefficient. Instead we will create a new class called UsefulFrame to hold all the “window listener code” and then make EmpFrame (and all our future frames) subclasses of UsefulFrame. In this way, all our frames inherit the window listener functionality. Sound like a good idea? I hope you said yes, because that’s what we are going to do.
Tutorial: Creating a Superclass
Have you noticed that a superclass is simply a class like any other class? It’s the extends statement (in the subclass header) that actually identifies a class as a superclass. To say it another way, it’s the extends statement that establishes the superclass/subclass relationship.
- 1. In RAD, create a new package called c4 in the Tutorials project.
- 2. Copy the three Employee classes from c3 into c4.
- 3. In the Navigation Tree, click on c4.
- 4. On the Menu bar, click File, New, and then Class.
- 5. At the “New Java Class” window:
- Specify the class name as UsefulFrame.
- Specify the superclass as java.awt.Frame.
- Do not have any other methods or stubs generated.
- 6. Click the Add button to begin implementing a window listener.
The “Implemented Interfaces Selection” window will be displayed. Because listeners control what happens when the user interacts with the program, the listeners are referred to as “interfaces.” Instead of explicitly creating a listener object and then adding it to the GUI component (like a frame), a listener interface can be “implemented” by the GUI component class (i.e., EmpFrame). When the GUI component (EmpFrame) object is created, it is also considered a listener object. Oddly, though, you still have to add the GUI component to itself.
- 7. At the “Implemented Interfaces Selection” window, start typing Window.
RAD will display a list of matching interface names.
- 8. Click on WindowListener in the list and then the OK button.
In the “New Java Class” window, java.awt.event.WindowListener will be displayed in the Interfaces pane.
- 9. On the “New Java Class” window, click the Finish button.
The source code will be redisplayed and the executable code should look like the following:
package c4;

import java.awt.Frame;
import java.awt.event.WindowListener;

public class UsefulFrameextends Frame implements WindowListener {
}
So far, RAD has done part of step 1 and all of step 2 (of the four steps needed to enable the window listener). However, an error message is generated because step 3 has not been done. Just as we must tell the sentry what to do before he can go on guard duty, we must tell the WindowListener what to do by coding the seven methods. Each method that is not coded results in a syntax error message saying that the method must be implemented.
- 10. Insert the following code before the closing brace in the class’s body:
public void windowClosing(WindowEvent e) {
       this .dispose();
}
public void windowClosed(WindowEvent e) {}
public void windowDeiconified(WindowEvent e) {}
public void windowIconified(WindowEvent e) {}
public void windowOpened(WindowEvent e) {}
public void windowActivated(WindowEvent e) {}
public void windowDeactivated(WindowEvent e) {}
Ouch, now there is an error on every line. Can you figure out the problem and solution?
As mentioned, the seven methods must be included in the class for the window listener to work. However, that doesn’t mean they have to do anything. As a matter of fact, only the first method, windowClosing, does anything. To use our analogy (for the last time, I promise), we are telling the sentry/window listener to do nothing for the other six events. However, when someone clicks the close button, the frame’s dispose method will be executed. The dispose method destroys (i.e., removes from main memory) the frame and all its components.
Did you figure out the cause of the error messages? Notice that the window listener passes a WindowEvent object to the seven methods. (Event objects contain information that can be very useful. We will use event information later when we implement multiple buttons.) The problem is that the JVM can’t find the WindowEvent class. We must include an import statement for the WindowEvent.
- 11. Add the following after the existing import statements (you may have to expand the code to see both import statements):
import java.awt.event.WindowEvent;
So far, we have completed steps 1 through 3. In the constructor method, we will now add the WindowListener (UsefulFrame) to itself. You may be wondering why we do this in the constructor. Another nuance of Java is that whenever an object is created, the object’s superclass constructor is automatically called by the JVM. In other words, when an EmpFrame is created, the Frame class’s constructor method is called. We will use this feature so that all UsefulFrame subclasses automatically add the window listener and define a default size and location.
- 12. Add the following constructor after the class header but before the seven methods:
public UsefulFrame () {
             this .setBounds(350, 200, 400, 400);
             this .addWindowListener( this );
}
Notice the default size is defined as 400 by 400, and the frame has been positioned at X = 350 and Y = 200 pixels, which centers it on the screen that is set at a resolution of 1024 by 768.
- 13. Save the UsefulFrame source code.
Because UsefulFrame has all sorts of nifty code that we want included in EmpFrame, we need to define EmpFrame as a subclass of UsefulFrame.
- 1. In EmpFrame, change the extends clause from Frame to UsefulFrame.
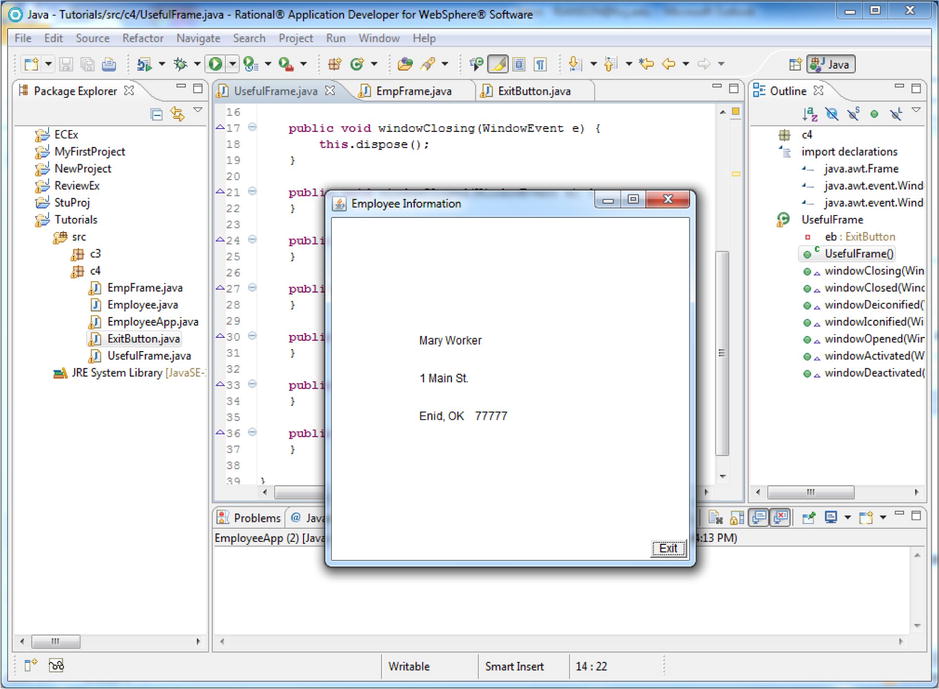
- 2. Save the EmpFrame source code and run EmployeeApp.
- 3. Click the close button.
Pretty cool! The listener/sentry was on the job!
- 4. Run EmployeeApp again.
Notice that EmpFrame is not centered on the screen and does not seem to be 400 by 400. This is because EmpFrame sets the bounds as 10, 10, 300, 300. This highlights a second characteristic of the superclass/subclass relationship: subclass values and methods override inherited superclass values and methods. In other words, the EmpFrame setBounds statement overrode the superclass’s setBounds statement. Let’s prove that the subclass overrides the superclass.
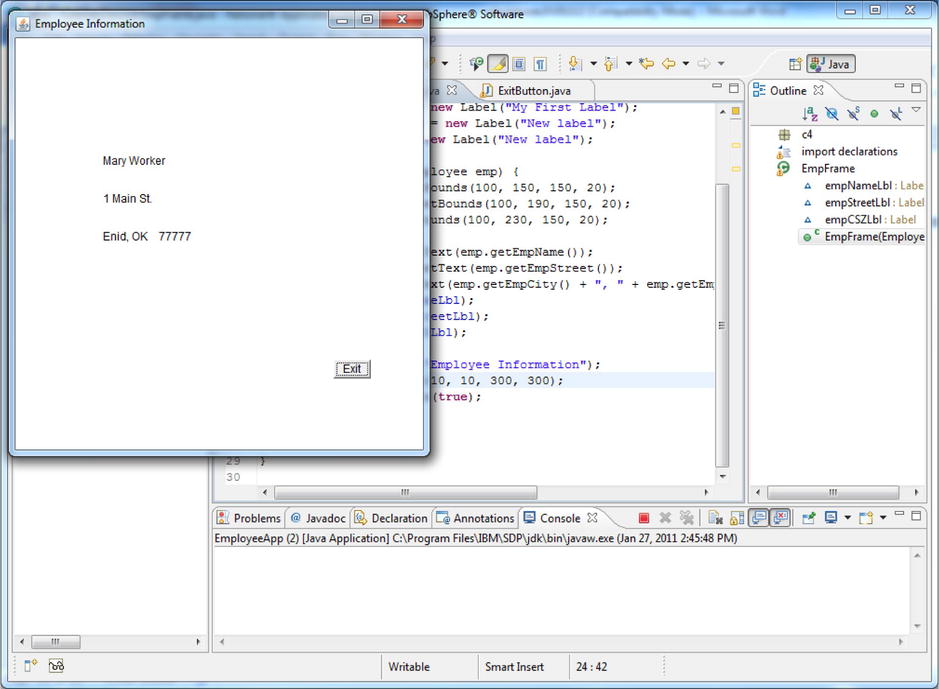
- 5. In EmpFrame, comment out the frame’s setBounds statement, save the source code, and run EmployeeApp.
The screen should look like Figure 4-1.
EmpFrame inherited the size (400, 400) and location (350, 250) of UsefulFrame. Can you see how useful the superclass/subclass relationship can be? For instance, do you see any other code in EmpFrame that could go into the superclass UsefulFrame?
- 6. Of course, it’s the setLayout statement, so add the following to UsefulFrame after the setBounds statement:
this .setLayout( null );
- 7. Save the UsefulFrame source code.
- 8. In EmpFrame, delete the setLayout statement.
- 9. Save the EmpFrame source code.
Specialization vs. Composition
How do you decide whether to modify the properties of a component object or create a subclass with unique properties? Unfortunately, it is not clear-cut and many times the programmer makes the decision on a case-by-case basis. For instance, should you create a Frame subclass or simply create a Frame object and modify its properties? In the case of EmpFrame, modifying the properties of a Frame object would not meet our requirements, so we had to define a specialized frame (EmpFrame).
We then created another Frame subclass (UsefulFrame) to hold all our default frame properties and methods. When we establish an “is a” (superclass/subclass) relationship between UsefulFrame and our other frames, we will cut down on the amount of programming needed and ensure consistency across all our frames. Both of these benefits are important goals of object-oriented programming.
To reiterate, we created UsefulFrame (as a Frame subclass) to act as a repository of source code because:
- A Frame object could not be modified to perform those functions
- The functions and properties defined in UsefulFrame need to be applied to all frames in the application
Have you noticed that UsefulFrame, despite its name, really doesn’t do anything? It is simply a class that has the common attributes we want in all our frames. No UsefulFrame object will ever be created or displayed. Classes like UsefulFrame are known as abstract classes.
Unlike frames, most other GUI components (buttons, labels, etc.) are specific enough that we simply create instances, modify their properties, and add them to a frame (composition). However, there are instances where you might want to create subclasses of these components. For example, creating an ExitButton class that always appears in the lower right corner of every frame would be a useful subclass of Button. Why, you ask? Well, instead of defining an exit button’s text, function, and location for every frame, we could define it once in a subclass. Then, instead of adding an exit button to every frame, we will add it to UsefulFrame. This way every UsefulFrame subclass will have an exit button and we don’t have to enter the code many times.
Tutorial: Creating the ExitButton Class
Let’s get started:
- 1. Create a new class in Tutorials/c4 called ExitButton. Define the superclass as java.awt.Button, and do not have any other methods or stubs generated.
The code should look like the following:
package c4;
import java.awt.Button;
public class ExitButtonextends Button {
}
Like most visual classes, a button’s location and size are set by the setBounds statement. To define the text that will appear on the button, the setLabel method is used.
- 2. Add the following statements to create a constructor and initialize the button:
public ExitButton() {
             this .setBounds(350, 370, 40, 20);
             this .setLabel("Exit");
} - 3. Save the ExitButton source code.
To add the ExitButton to UsefulFrame (i.e., to relate them through composition), we must create an ExitButton object in UsefulFrame and then add it to UsefulFrame.
- 4. Add the following statement immediately after the UsefulFrame class header:
private ExitButton eb = new ExitButton();
This creates an ExitButton class variable called eb and assigns an ExitButton object to eb.
- 5. Add the following statement to the constructor, then format, and save the source code.
this .add(eb);
This statement adds the ExitButton object to UsefulFrame. The UsefulFrame executable source code should look like the following:
package c4;

import java.awt.Frame;
import java.awt.event.WindowListener;
import java.awt.event.WindowEvent;

public class UsefulFrameextends Frame implements WindowListener {
       private ExitButton eb = new ExitButton();
       public UsefulFrame () {
                     this .setBounds(350, 200, 400, 400);
                     this .setLayout( null );
                     this .addWindowListener( this );
                     this .add(eb);
       }
       public void windowClosing(WindowEvent e) {
                     this .dispose();
       }
       public void windowClosed(WindowEvent e) {}
       public void windowDeiconified(WindowEvent e) {}
       public void windowIconified(WindowEvent e) {}
       public void windowOpened(WindowEvent e) {}
       public void windowActivated(WindowEvent e) {}
       public void windowDeactivated(WindowEvent e) {}
}
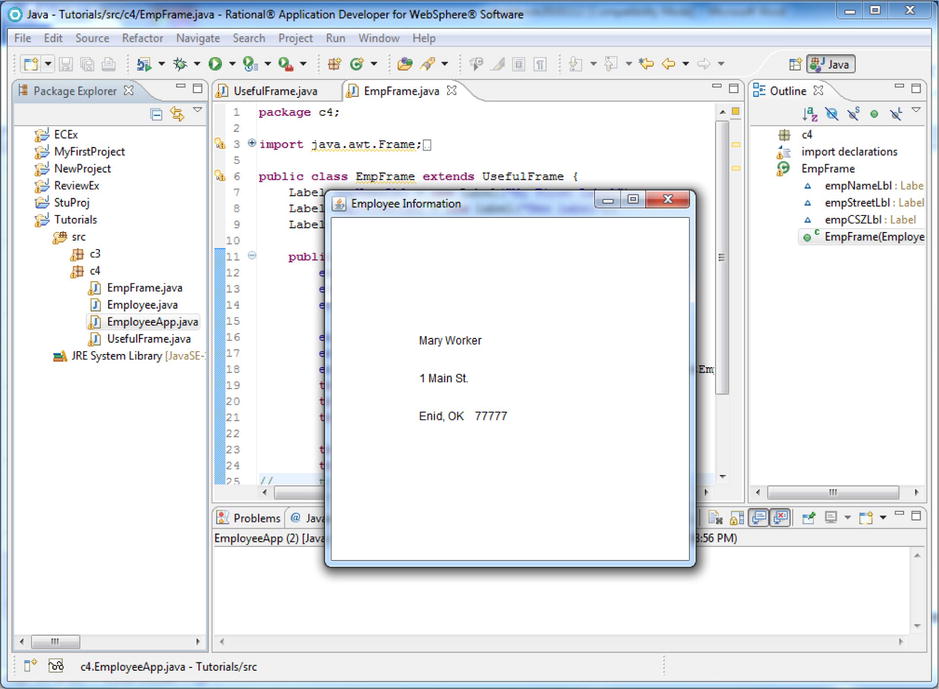
- 6. Run EmployeeApp.
The frame should look like Figure 4-2.
Lookin’ good, but there are some potential problems. Let’s find them.
Tutorial: Making the Superclass More Flexible
Now we have to find the problems with the current code:
- 1. In EmpFrame, uncomment the setBounds statement.
- 2. Save the EmpFrame source code and run EmployeeApp.
Notice anything missing? That’s right, no exit button.
- 3. Click and drag the lower right corner of EmpFrame to make it larger.
Notice that when the frame is enlarged, the exit button is shown (see Figure 4-3).
So what happened? Because EmpFrame set the frame size to 300 by 300 and the button was placed at 350 and 370, the button was not visible. We need a method (setExitButtonLocation) to change the location of the ExitButton based on the size of each UsefulFrame subclass.
The width and height of a frame are properties (that we have set and reset many times in the examples). If a property can be set, it can also be retrieved. Can you guess the names of the methods that will return the width and height of the frame? Our new method, setExitButtonLocation, will retrieve the width and height of the frame and calculate the exit button’s location as 50 pixels from the right side of the frame (the width) and 30 pixels from the bottom of the frame (the height).
- 4. After the UsefulFrame constructor, add the following and then save the source:
public void setExitButtonLocation() {
eb.setLocation( this .getWidth()-50, this .getHeight()-30);
}
Notice that eb’s (the exit button’s) location is defined with a setLocation method (which eb inherited from the Button class). Within the setLocation statement, we want to use the UsefulFrame subclass’s size to calculate the location (instead of specifying a fixed location as we did in all past examples). This means that the setExitButtonLocation method must be executed in the UsefulFrame subclasses (so that this will refer to the subclass). In other words, by making the subclass execute the setExitButtonLocation method, the this.getWidth() and this.get Height() statements will retrieve the subclass frame’s width and height not the Useful-Frame’s width and height.
Sorry, if this seems complicated, but it is. The good news is that, as you use superclasses and subclasses more often, it will become easier and more familiar.
Now we need to have EmpFrame (a UsefulFrame subclass) invoke the setExitButtonLocation method.
- 5. In EmpFrame, after the this .setBounds statement, add the following statement:
this .setExitButtonLocation();
We have to set the exit button’s location after the setBounds statement because that statement resizes the frame to 300 by 300. If we place it before the setBounds statement, the default size from UsefulFrame would be used to calculate the location.
- 6. Save the EmpFrame source code and run EmployeeApp.
Notice that the exit button now appears in the corner of the 300 by 300 frame.
- 7. In the source code, change the size of the EmpFrame to 500 by 600, then save and run EmployeeApp.
Notice the exit button is again placed in the lower-right-hand corner.
- 8. In EmpFrame, comment out the this .setBounds statement and save the source code.
Can you figure out what size the frame will be now? If not, run EmployeeApp and see.
The exit button is pretty cool but it doesn’t do anything! (I guess it’s not that cool after all.) However, like frames, buttons can have listeners assigned to them. A button is tied to an action listener and, fortunately, an action listener only requires one method.
Tutorial: Adding an Action Listener to a Button
The following steps (which should look very familiar) must be performed to enable an action listener:
- Import the ActionListener and ActionEvent classes
- Implement the action listener
- Code an actionPerformed method
- Add the action listener to the button
This time we will perform the steps in the order of 1, 3, 2, 4. This will prevent any error messages from being generated as we enter the code. Why? When the implements keyword is entered (step 2), the syntax checker automatically looks for the required import statements and actionPerformed method. Therefore, we will add these statements (steps 1 and 3) before we insert the implements keyword (step 2).
- 1. In ExitButton, add the following statements:
import java.awt.event.ActionListener;
import java.awt.event.ActionEvent; - 2. After the ExitButton constructor, add the following:
public void actionPerformed(ActionEvent e){
} - 3. In the ExitButton header after extends Button, add the following:
implements ActionListener
Notice no error messages were generated because we already coded the actionPerformed method!
- 4. In the ExitButton constructor, enter the following statement:
this .addActionListener( this );
At this point, you have defined and assigned an action listener to the exit button. Now we need to define what should be done when the exit button is clicked. Can you figure out where to add that code?
- 5. In the actionPerformed method, add the following statement:
System.exit(0);
You may not remember, but earlier we availed ourselves of the very useful System class. The System class had an object (out) whose method (println) was used to display text in the console. The System class also has an exit method that ends the JVM. The result of the exit method (the frame disappears) seems the same as the result of the dispose method; however, this is because our application is relatively simple. If multiple frames in the application had been displayed, exit would destroy all of them (plus any nonvisual objects). The dispose method only destroys the object it is used in.
- 6. Save the ExitButton source code and run EmployeeApp.
- 7. Click the Exit button.
Yay, a working button!
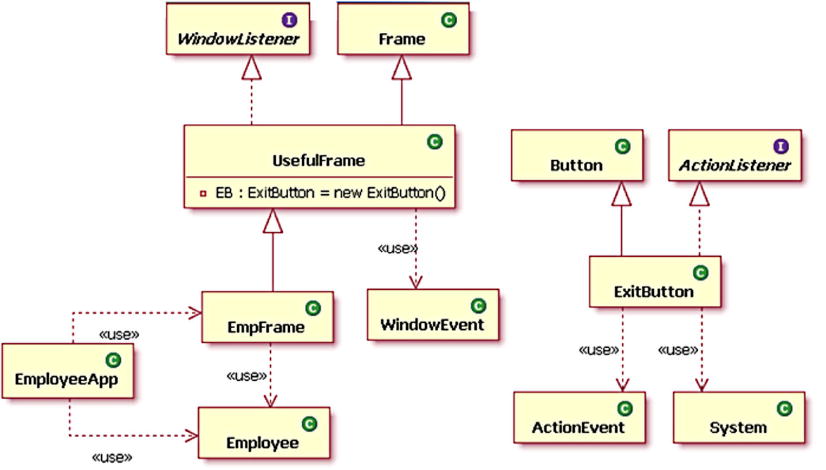
Figure 4-4 shows the Employee classes, their relationships to each other, and their relationships to some of the JRE classes. Notice the new implements relationship, shown as a dotted line and an open triangle arrowhead (e.g., between UsefulFrame and WindowListener and ExitButton and ActionListener).
You have done well, Grasshopper. For all your hard work, we will now use something fun, the Visual Editor (VE). In addition to being fun, VE will save you from a lot of coding and let you create GUIs faster and with fewer errors.
The Visual Editor (VE) is a GUI tool that makes it much easier to define visual classes. VE will automatically be invoked when creating a visual class. You can also use VE to edit any class by right-clicking on the class in the navigation tree and selecting Open With, then Visual Editor. However, source code that does not follow VE coding standards is not easy to change with VE. So, the bottom line is that when using VE, it is best to start with a new class. In addition, VE’s source code may seem very confusing at first. As with any “source code generator,” the source code is more complex than is usually necessary. (For instance, if you generate a Web page using page generator, the HTML source is unbelievably complex and bewildering.) Generators do this so that the most complex enhancements can be added to the source code. So be aware that there is a downside when dealing with VE or any tool that generates source code.
Tutorial: Creating a Visual Class with VE
Let’s use VE to create a new frame with some added bells and whistles.
- 1. Select c4 in the navigation tree, and then click File, New, and Visual Class.
The “New Java Visual Class” window will be displayed. It has all the options as the “New Java Class” window (that we have used previously) plus a Style pane in the lower left. The Style pane allows you to choose the superclass from a navigation tree. The navigation tree contains all the visual components in the three GUI sets. In this case, however, we want our new frame to be a subclass of UsefulFrame.
- 2. First, specify EmployeeFrame as the class name.
- 3. In the Style navigation tree, click Other and then click the Browse button.
- 4. In the Choose a type field type c4. over the default value of java.lang.Object and when the UsefulFrame item is displayed, double click UsefulFrame.
- 5. Click the Finish button.
VE crams a lot into the content pane. (You may have to resize the content pane to get it to look like Figure 4-5.) Essentially, VE divides the content pane into three areas: a palette of components (on the right), the Design area (at the top), and the source code (on the bottom). These areas can be resized by clicking and dragging the dividing borders or minimized and maximized by clicking the small arrowheads (indicated by the big arrows in Figure 4-5).
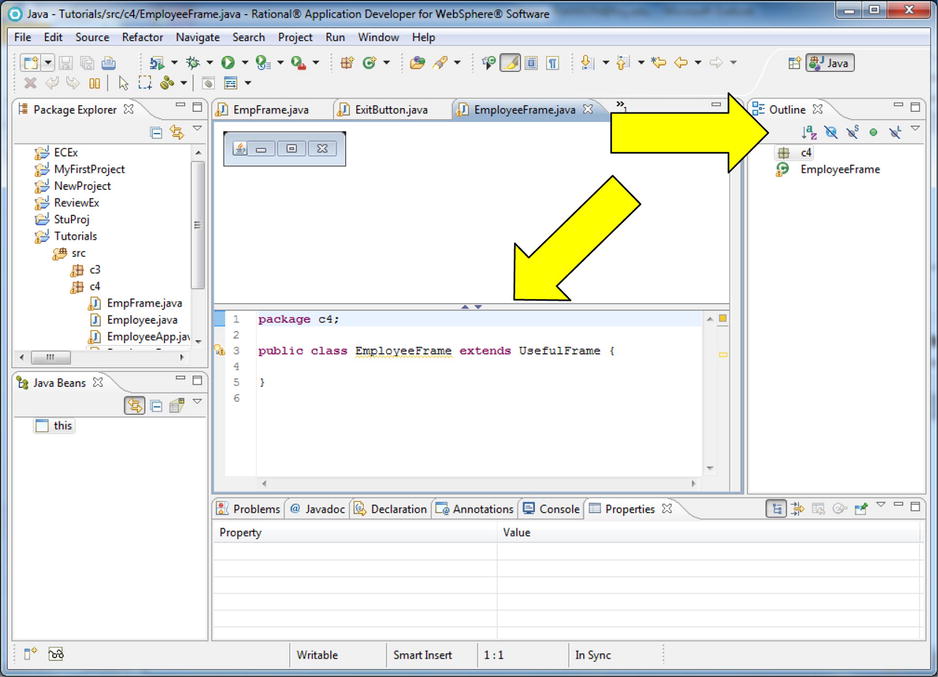
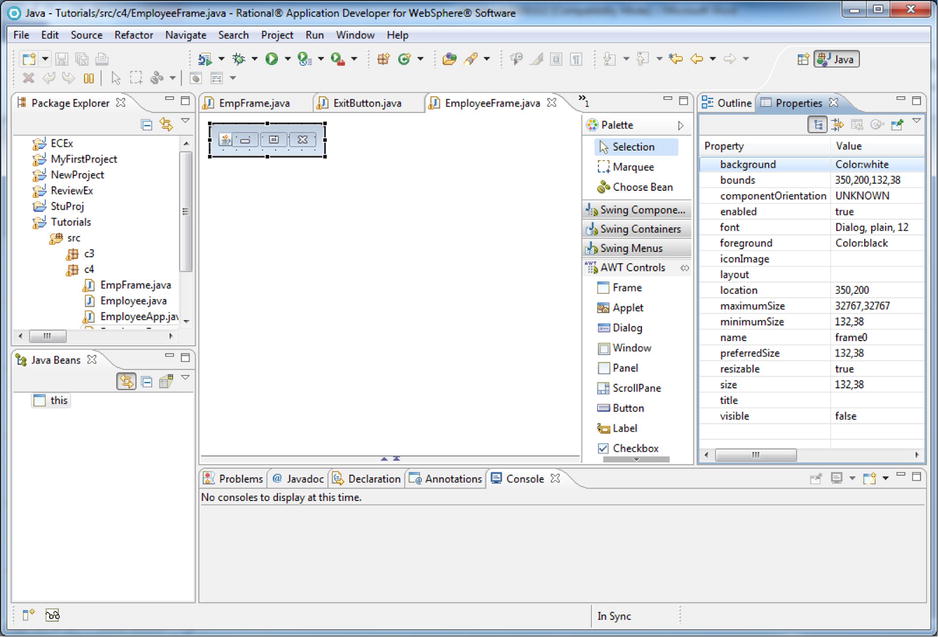
- 6. Click the source code minimize arrow and the palette maximize arrow so the content area looks like Figure 4-6.
In the component palette, there are four trays of classes indicated by a button with the name of the components (Swing Components, Swing Containers, Swing Menus, AWT Controls). Initially, the Swing Components tray is open. The various component trays can be opened and closed by clicking on the component title buttons.

- 7. Click the Swing Components button to close the tray, and then click the AWT Controls button to display the AWT components.
Notice that the Label class is listed, as well as many other components. Clicking a listed component and then clicking in the Design area will create and place the component on the frame. But, before we do that, we need to specify some EmployeeFrame properties.
- 8. In the Design area, click on the frame title bar to select it.
Notice that the Properties view (at the bottom of the screen) becomes active. The Properties view is very useful. We will move it where the Outline view is currently displayed so that we can easily access it.
- 9. Click and drag the Properties tab view to where the Outline view is currently displayed (the far right of the screen).
The Properties view displays all of the selected components properties and values. Currently you have to scroll quite a bit to the right to see the values column. The width of any column can be adjusted by clicking and dragging the column title separator (at the top of the column).
- 10. Adjust the Property column and the width of the Properties view so that the property names and values can be seen in Figure 4-7.
Property values can be easily changed either by entering new values in the Properties view or by manipulating the frame in the Design area. You should be aware that the values displayed are a little misleading because VE does not capture the properties that are set in the superclass (UsefulFrame) constructor. Notice that the Properties view shows the EmployeeFrame size is 123 by 34 (this is the amount of space needed to display a minimal frame title bar). If an EmployeeFrame object were created, the size specified in UsefulFrame would override this default size. The point is that VE Design pane does not always show how the object will appear when instantiated.
Tutorial: Modifying Properties
Let’s look at modifying properties:
Notice that the value for the size property is no longer 132, 38.
Look what shows up: the Exit button. VE does realize that EmployeeFrame will inherit the Exit button from UsefulFrame; however, the button isn’t in the correct location. We will have to add the setExitButtonLocation statement.
Also, notice the greater than sign (>) is placed before the size property name. This indicates that the property has been modified.
A button with three periods (the value button) will be displayed in the value area.
- 4. Click the background property’s value button.
The Java Property Editor is displayed for the background property. There are several ways to specify a color. Java actually recognizes some colors by name and the operating system (in this case Windows) also recognizes some colors by name. The two panes list these color names and display a small color sample of each. Clicking on a color will select it and a more detailed sample will be displayed in the Preview area at the bottom of the window.
- 5. Scroll up in Basic Colors and click on Cyan.
Notice the more detailed sample in the Preview area.
Colors can also be defined as some combination of Red, Green, and Blue. The amount of each of these primary colors is represented by a number from 0 to 255. (0 represents none of the color and 255 is the most that can be specified for a color.)
- 6. Click on the RGB tab.
The RGB pane shows the RGB definition of the color Cyan. You can specify new numbers by either typing in values or using the slide bars. Either way, the sample will change based on your specifications.
- 7. Enter 211 for Red, 204 for Green, and 92 for Blue.
- 8. Click the OK button.
Notice that the background property value has been changed to 211, 204, 92. That is not a very attractive color, is it?
The other color tabs on the Java Property Editor window allow you to pick from a larger set of samples (Swatches) or specify the color by clicking on an “infinite” color palette (HSB).
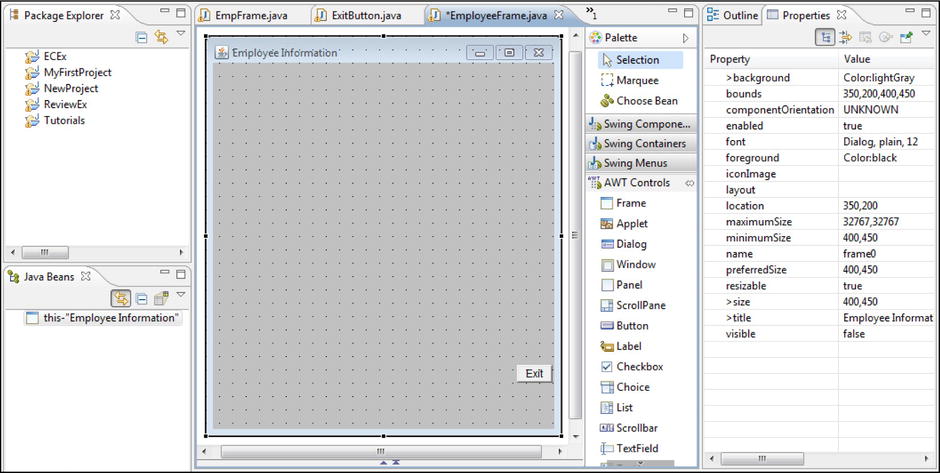
- 9. Change the background property to lightGray, the title property to Employee Information and save the code.
The frame should look like Figure 4-8.
Tutorial: Adding Visual Components
It’s now time to look at adding visual components:
- 1. In the AWT Controls list, click on Label, and then click anywhere on the frame content area.
- 2. At the name window, specify nameLbl as the label name and click the OK button.
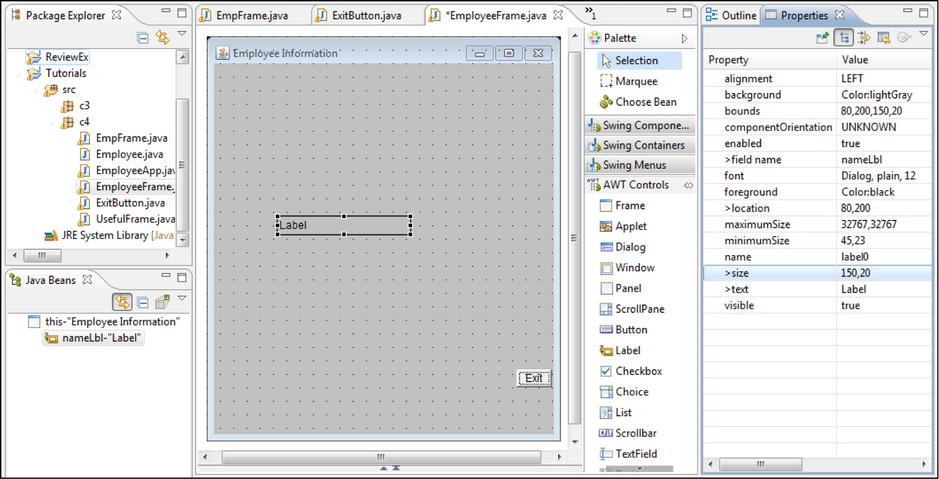
A small label will be placed on the frame (outlined, with resize handles, and the text Label). You can manipulate the size of the label by clicking and dragging the resize handles. The location can be changed by clicking and dragging on the label outline.
- 3. In the Properties view, change the label location to 80 by 200 and the size to 150 by 20.
The frame should look like Figure 4-9.
- 4. At the bottom of the Design pane, click the maximize pane arrow (the arrowhead with a line across the top) to display the source code.
VE generated some comments but the following is the generated source code:
package c4;

import java.awt.Dimension;
import java.awt.Color;
import java.awt.Label;
import java.awt.Rectangle;
import java.awt.Point;
public class EmployeeFrameextends UsefulFrame {

       private Label nameLbl = null ;

       public EmployeeFrame() {
              super ();
              initialize();
       }

       private void initialize() {
nameLbl = new Label();
nameLbl.setText("Label");
nameLbl.setLocation( new Point(80, 200));
nameLbl.setSize( new Dimension(150, 20));
this .setSize( new Dimension(400, 450));
this .setTitle("Employee Information");
this .setBackground(Color. lightGray );
this .add(nameLbl, null );
       }

}
Let’s examine some of the VE coding standards.
Inside the constructor, VE explicitly calls the superclass’s constructor (super();). We mentioned earlier that the JVM does this automatically. However, it is slightly more efficient to call it explicitly, so that’s what VE does.
VE creates a method called initialize that sets the frame’s property values and adds the components. Notice the new setter setBackground. VE added this statement when we defined the background property. The color name (Color.lightGray) brings up an interesting point regarding importing. Normally we have imported classes (e.g., Label, Frame) and then created objects of these classes. In this case, we imported the class Color but specified (used) a specific variable (lightGray) within the class. Obviously, lightGray is a public variable!
In the constructor, the initialize method is invoked by its name alone. We have been using the prefix “this” before all class methods (for instance, this.add or this.setSize) to clearly define what object the method belongs to. In actuality, the JVM assumes any unqualified method (or variable) names belong to the current object. So, setSize or setTitle can be used (instead of this.setSize or this.setTitle) and work correctly.
VE also uses Point and Dimension objects to hold the x, y coordinates for locations, and sizes rather then simply specify the coordinates. Lastly, notice that when adding the label component a value of null is also passed. When using layout managers, you can specify where components are added with an index value (e.g., in Border layout you could specify East, West, North, South, or Center). Because EmployeeFrame does not use a layout manager, RAD explicitly specifies null, even though null is assumed.
To sum up, sometimes VE is overly explicit (i.e., VE doesn’t use short cuts). But, as VE is typing the code, the programmer should be able to accept RAD’s little eccentricities.
- 5. Minimize the source code pane to redisplay the Design area.
We now need to add the frame:
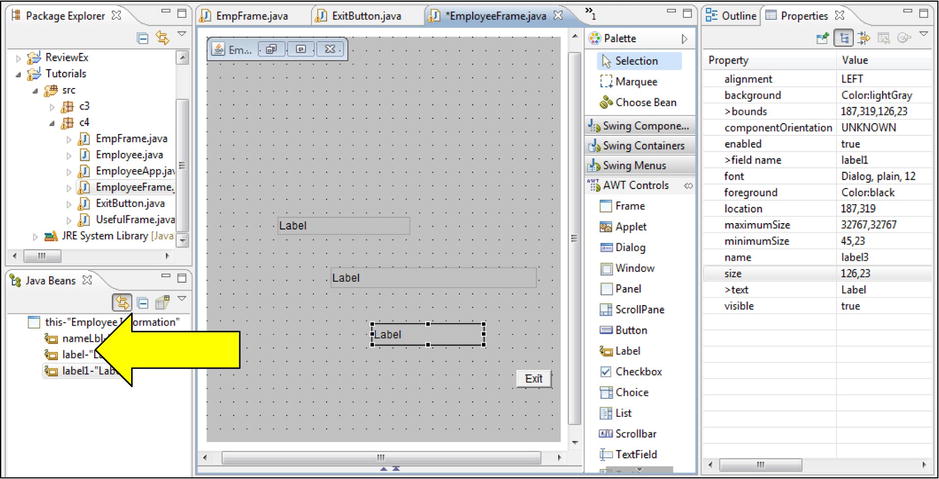
- 1. Add two more labels and accept the default names.
- 2. Move and resize the labels so that they look similar to Figure 4-10.
Notice the label names assigned by VE (see the arrow in Figure 4-10).
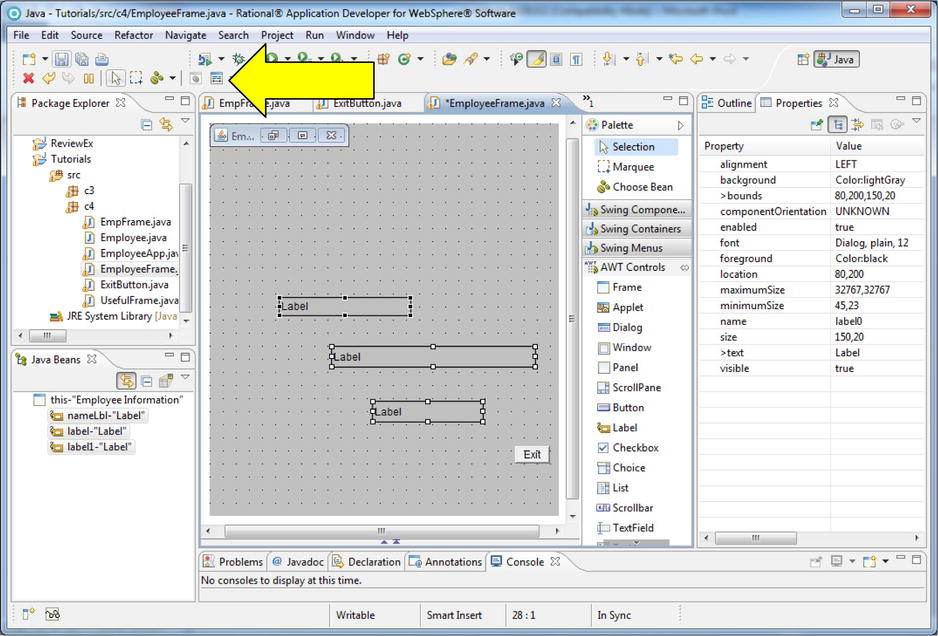
- 3. Press and hold the Ctrl key, then click on each label in order from bottom to top.
The labels should all be selected and nameLbl (the top label) should be the anchor (indicated with the solid black resize handles as in Figure 4-11).
- 4. Click on the Show customize layout window button (indicated by the arrow in Figure 4-11).
The Customize Layout window will be displayed (see Figure 4-12).
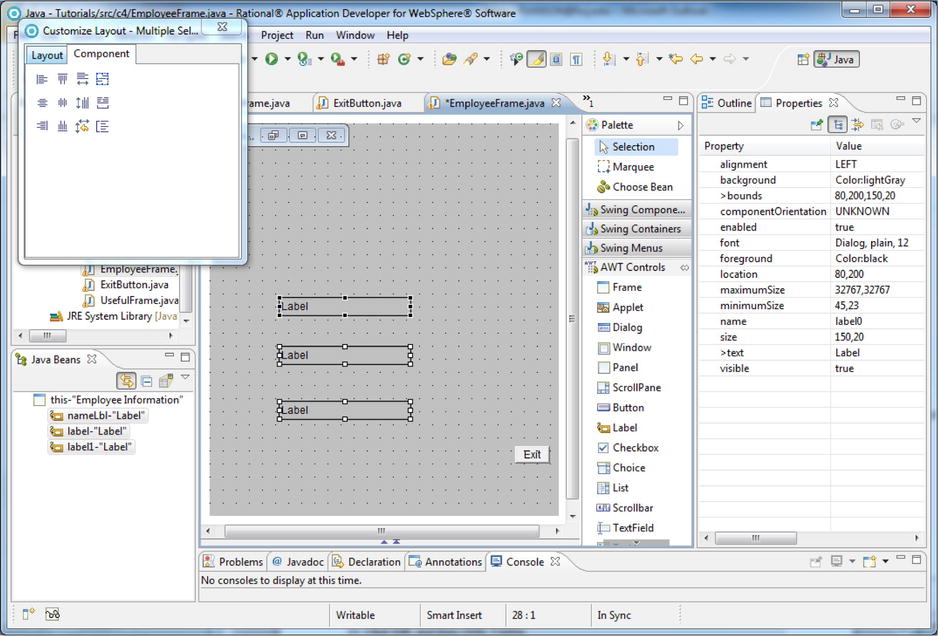
- 5. If the Component options are not displayed in the Customize Layout window, click the Component tab.
Components can be quickly aligned (both horizontally and vertically) and resized by clicking on the various buttons in the Customize Layout window. For instance, we will left align all three labels, make them the same size, and evenly distribute them vertically.
- 6. Click on Align left (the button in the first row and first column of the Alignment window).
The two new labels will move left to align with nameLbl (the anchor).
- 7. Click on Match width (the button in the first row, third column).
The two new labels will be resized to match nameLbl in length.
- 8. Click on Match height (second row, third column).
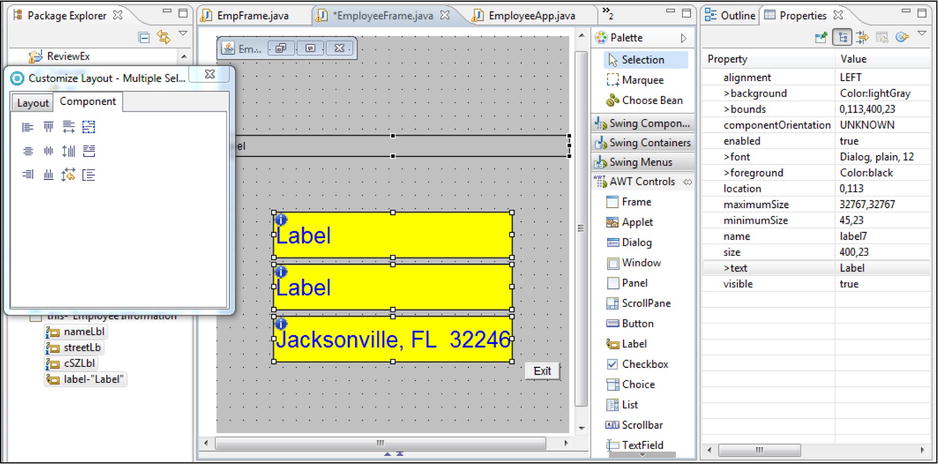
The labels will be resized to match nameLbl in height and should look like Figure 4-12. Finally, we would like to have the same amount of vertical space between the labels.
- 9. Click on Distribute vertically (third row, fourth column).
Although this option does put an equal distance between the labels, it also distributes them over the entire frame. Instead, we want to spread the labels evenly over the area where they were originally defined.
- 10. If needed, drag the Customize Layout window out of the upper-left-hand corner of the screen, so that the Menu bar Edit option is shown.
- 11. Click Edit, and then Undo Typing.
The labels will be returned to their previous locations. (By the way, don’t forget about Undo while working through the Tutorials. If you make a mistake on a step or several steps, simply keep selecting Undo until you are back in sync with the Tutorial.)
- 12. In the Customize Layout window, click the Show distribute box button (first row, fourth column).
This selects the current area occupied by the selected components as the area of distribution. The area of distribution can be changed by clicking and dragging the blue resize handles. In this case, we want to keep this default area, so we will not make any adjustments.
This time, the labels are evenly spread over the originally defined area.
- 14. Close the Customize Layout window.
- 15. Click on the white area outside the frame to deselect all components.
We need to give the new labels meaningful names. VE provides a very easy way to rename components.
- 16. Right-click on the second label and select “Rename field” from the shortcut menu.
- 17. Specify streetLbl as the new name and click the OK button.
Displaying the source code would show that the label has been renamed throughout the class. (By the way, this is much easier than using the Find/Replace function in the source code.)
- 18. Change the bottom label’s name to cSZLbl and save EmployeeFrame.
Tutorial: Finishing the Application
VE’s GUI can only do so much. Eventually programmers have to work directly with the source code. In EmployeeFrame, we have to change the constructor to accept an Employee variable. In addition, we have to:
- Create a class level Employee variable
- Assign the method Employee variable to the class Employee variable
- Add code to move the Employee object’s information to the labels
- Make the frame visible
- Fix the location of the Exit button
- Change EmployeeApp to create an EmployeeFrame object (instead of EmpFrame)
- Display the source code and modify the EmployeeFrame constructor to accept an Employee variable called employee.
If you are unsure of how to do this, refer to the EmpFrame constructor as an example.
- 1. Create a private class Employee variable called emp.
- 2. In the constructor, assign employee to emp so that the initialize method will be able to access the Employee object.
- 3. In the initialize method, change the three label’s setText statements so that the appropriate property values from the Employee object are displayed.
Again, if you are unsure of how to do this, refer to the EmpFrame constructor. (Note that the names of the labels in EmpFrame are different from EmployeeFrame.)
- 4. At the end of the initialize method, invoke the method that recalculates the exit button location.
If you are unsure of the statement syntax, refer to the EmpFrame constructor.
- 5. Switch back to the design pane, select the frame, and in the Properties view, change the visible property value to true.
Note where VE places the setVisible statement.
- 6. Save the EmployeeFrame source code.
Now we need to change the application to use EmployeeFrame instead of EmpFrame.
- 7. In EmployeeApp, change the last statement so that an EmployeeFrame object is created, not an EmpFrame object.
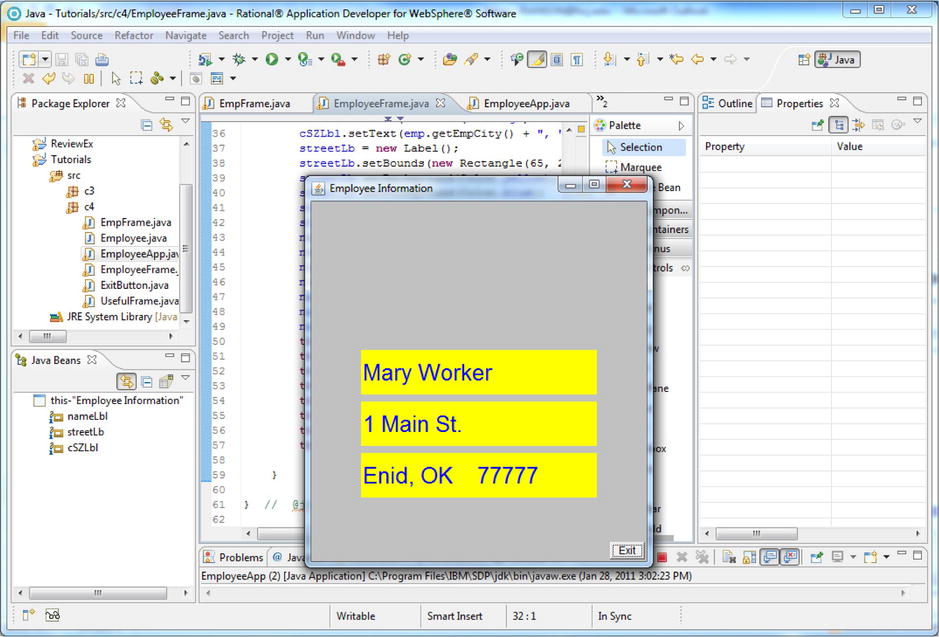
- 8. Format and save the EmployeeApp source code then run EmployeeApp.
The frame should look like Figure 4-13.

- 9. Click the Exit button to shut down the application.
The EmployeeFrame executable source code should look like the following:
package c4;

import java.awt.Dimension;
import java.awt.Color;
import java.awt.Label;
import java.awt.Rectangle;
import java.awt.Point;

public class EmployeeFrameextends UsefulFrame {

       private Label nameLbl = null ;
       private Label streetLbl = null ;
       private Label cSZLbl = null ;
       private Employee emp;

       public EmployeeFrame(Employee employee) {
              super ();
              this.emp = employee;
              initialize();
       }

       private void initialize() {
cSZLbl = new Label();
cSZLbl.setBounds( new Rectangle(80, 318, 150, 20));
cSZLbl.setText(     emp.getEmpCity() + ", " +
       emp.getEmpState() + " " +
       emp.getEmpZip());
streetLbl = new Label();
streetLbl.setBounds( new Rectangle(80, 263, 150, 20));
streetLbl.setText(emp.getEmpStreet());
nameLbl = new Label();
nameLbl.setText(emp.getEmpName());
nameLbl.setLocation( new Point(80, 200));
nameLbl.setSize( new Dimension(150, 20));
this .setSize( new Dimension(400, 450));
this .setTitle("Employee Information");
this .setBackground(Color. lightGray );
this .setVisible( true );
this .add(nameLbl, null );
this .add(streetLbl, null );
this .add(cSZLbl, null );
        this .setExitButtonLocation();
       }
}
The EmployeeApp executable code should look like the following:
package c4;

public class EmployeeApp {

public static void main(String[] args) {
Employee emp = new Employee("Mary Worker", "1 Main
St.", "Enid", "OK", "77777");
       EmployeeFrame ef = new EmployeeFrame(emp);
}
}
Tutorial: Breaking the Code with VE
Not only does VE make building a GUI very easy, but because the GUI is displayed while being defined, the programmer is much less likely to make mistakes. For instance, in VE the programmer can easily see when labels overlap. When specifying locations in the source, it is very difficult for a programmer to “see” where all components are in relation to one another. In addition, it usually takes the programmer many attempts to define the component sizes and spacing so that they are visually appealing. However, even with all of VE’s wonderful features, the programmer can still screw up.
- 1. In the EmployeeFrame Design view, drag the second label (streetLbl) so that it overlaps the first label (nameLbl) and save the source code.
Notice that VE lets you define overlapping components and doesn’t even generate an error message.
- 2. Click Edit, and then Undo Typing.
Notice that Undo lets you reverse changes even after the source code has been saved. However, because Undo made a new change (the reversal), the code needs to be saved again.
- 3. Select all three labels. (The order does not matter this time.)
The style, size, and color of text can be specified for many visual components. In this case, we will change the size and color of all three labels at once.
- 4. In the Properties view, click on the background property to display the property value button, and then display the Java Property Editor by clicking on the value button.
- 5. Select Yellow and then click the OK button.
- 6. Display the Java Property Editor for the foreground property.
- 7. Select Blue and then click the OK button.
- 8. Display the Java Property Editor for the font property.
- 9. In the Size pane, select 36 for the text size and click OK.
EmployeeFrame should look like Figure 4-14. Notice anything wrong?
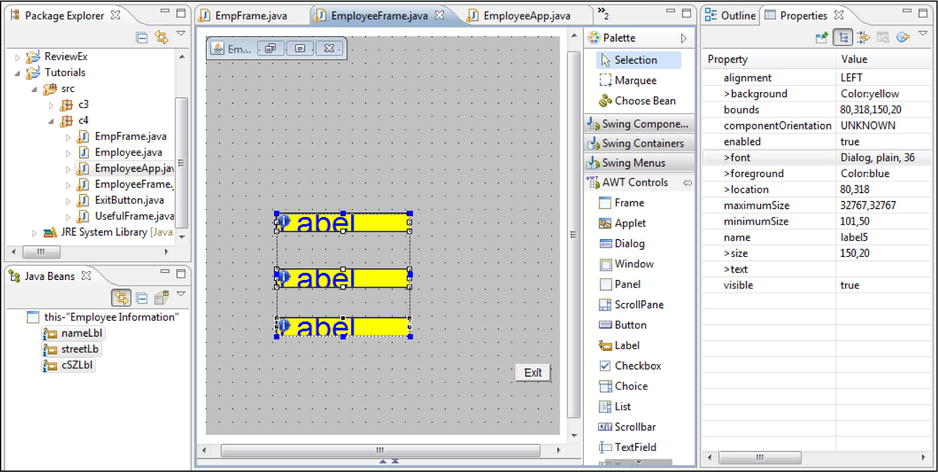
Fortunately, we never changed the initial text (Label) in the labels, so we are able to see that the text size is too large to be entirely displayed.
- 10. Run EmployeeApp.
Notice that the labels are now not long enough to fit all the text either.
- 11. Click the Exit button to shut down the application.
- 12. In the EmployeeFrame design view, redisplay the Customize layout window and click the Hide Distribution Box button (first row, fourth column) so that the distribution box is no longer displayed.
- 13. Click and drag cSZLbl’s right side middle resize handle so that the right edge of the label lines up with the left edge of the Exit button, see Figure 4-15.
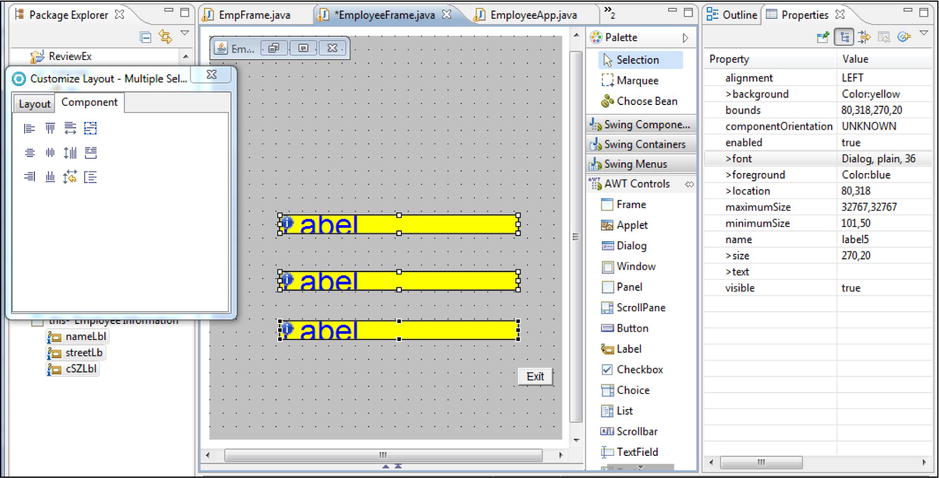
Because all three labels are selected, all of the labels are resized.
- 14. On cSZLbl’s the bottom edge, click the middle resize handle and drag so that the label’s bottom edge almost touches the top of the Exit button (see Figure 4-16).
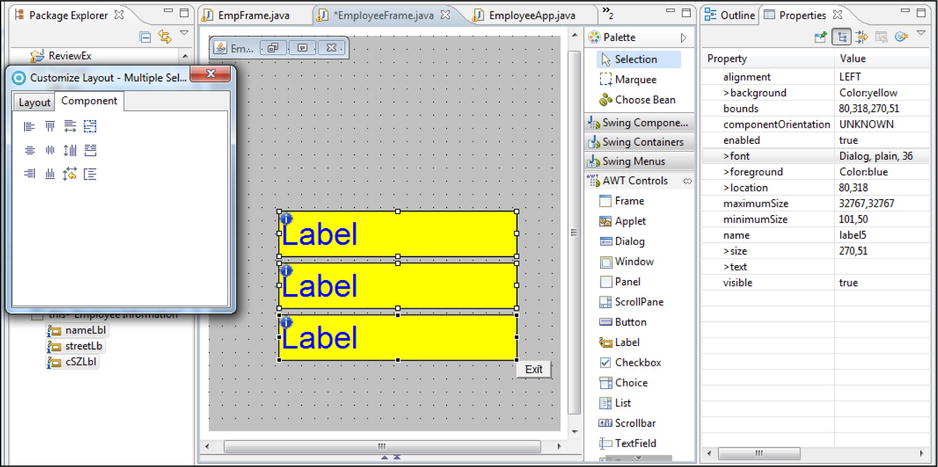
Don’t worry that the third label is so close to the Exit button. VE displays the frame according to the property values specified in the initialization method. The Exit button’s location will be reset to the lower-right-hand corner of the frame in the constructor.
Now we’ll test to see if the new labels are long enough.
- 15. Close the Customize Layout window.
- 16. Run EmployeeApp.
The zip text almost fits in the labels. Should we resize the labels again?
Enid is only a four-letter city. What if we tried to display Jacksonville? It probably would not fit. So really we need to decrease the font size—but by how much? Usually, a programmer would determine the largest value that must fit in the label and use that value to select the correct font size.
- 17. In the Design view of EmployeeFrame, click the cSZLbl label to select it and then click the label again.
An input text box will be displayed where new label text can be specified.
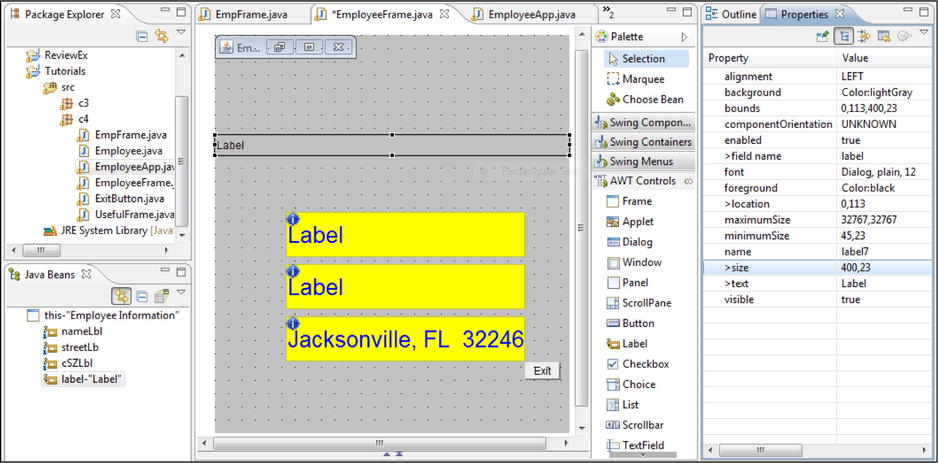
- 18. Enter “Jacksonville, FL 32246” (as seen in Figure 4-17) and press Enter.
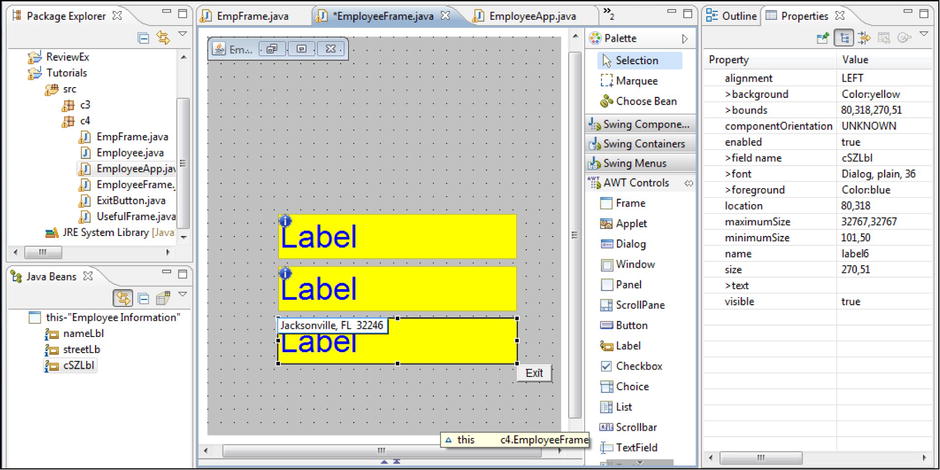
Because none of the zip code can fit in the label, we will change the font size. This time instead of selecting a size, we will specify a size.
- 19. Select all three labels, display the Java Property Editor for the font property, and in the Size field type 26 over the current value of 36.
Notice that sizes not listed can be specified. This is not true for all properties. For example, for Name and Style you can only choose among the listed options.
Notice that VE selected SimSun as the Font Name. Because there is no Font called Sims, VE chooses the first valid Font Name that would alphabetically follow the characters specified. In this case, SimSun is alphabetically the first Font Name that follows the characters Sims.
- 21. Click Undo.
Notice that VE resets both the font name and the size.
We still have a little problem. If you look at the source code, notice that the setText statement for cSZLbl defines the static text of “Jacksonville, FL 32246” for the field. We need to change that back so the employee information is displayed.
- 22. Click Undo Typing until the original setText statement for cSZLbl is inserted.
- 23. Specify 26 as the font size of all three labels and save the source code.
“Jacksonville, FL 32246” will now fit, but there is one more problem. Notice that the labels are not centered horizontally on the frame. When we aligned the labels, it was in relation to each other. The labels need to be aligned in relation to the frame. It would be nice if we could include the frame in our component selection and then realign. Unfortunately, the Customize Layout window does not offer any options when a frame is selected as a component. So, we will do a little “end run" around VE.
- 24. Create a label on the frame that spans the entire width of the frame (see Figure 4-18).
- 25. Select all four labels with the newest label as the anchor.
- 26. Display the Customize Layout window and click on the Align center button (first column, second row).
Because the label was the same width as the frame, the labels will be centered on the frame (see Figure 4-19). Notice that the labels no longer align with the edge of the Exit button.
- 27. Delete the new label and save the source code.
In the source code, notice that all the new setter methods that are invoked to control the appearance of the labels.
The executable code for EmployeeFrame should be the following (if your source code does not match, modify it so that it does):
package c4;

import java.awt.Dimension;
import java.awt.Color;
import java.awt.Label;
import java.awt.Rectangle;
import java.awt.Point;
import java.awt.Font;

public class EmployeeFrameextends UsefulFrame {

       private Label nameLbl = null ;
       private Label streetLbl = null ;
       private Label cSZLbl = null ;
       private Employee emp;

       public EmployeeFrame(Employee employee) {
              super ();
              this .emp = employee;
              initialize();
       }

       private void initialize() {
cSZLbl = new Label();
cSZLbl.setBounds( new Rectangle(64, 318, 270, 51));
cSZLbl.setBackground(Color. yellow );
cSZLbl.setForeground(Color. blue );
cSZLbl.setFont( new Font("Dialog", Font. PLAIN , 26));
cSZLbl.setText(emp.getEmpCity() + ", " +
                            emp.getEmpState() + " " +
                            emp.getEmpZip());
streetLbl = new Label();
streetLbl.setBounds( new Rectangle(65, 259, 270, 51));
streetLbl.setBackground(Color. yellow );
streetLbl.setForeground(Color. blue );
streetLbl.setFont( new Font("Dialog", Font. PLAIN , 26));
streetLbl.setText(emp.getEmpStreet());
nameLbl = new Label();
nameLbl.setText(emp.getEmpName());
nameLbl.setLocation( new Point(64, 200));
nameLbl.setBackground(Color. yellow );
nameLbl.setForeground(Color. blue );
nameLbl.setFont( new Font("Dialog", Font. PLAIN , 26));
nameLbl.setSize( new Dimension(270, 51));
this .setSize( new Dimension(400, 450));
this .setTitle("Employee Information");
this .setBackground(Color. lightGray );
this .setVisible( true );
this .add(nameLbl, null );
this .add(streetLbl, null );
this .add(cSZLbl, null );
this .setExitButtonLocation();

       }

}
Here is what we have as a result of the tutorial:
- A new package called c4, with six java files.
- EmployeeApp changed as specified in the Tutorial.
- UsefulFrame, ExitButton, and EmployeeFrame defined as specified in Tutorial.
To verify that the tutorial was done correctly:
- Run EmployeeApp and verify the EmployeeFrame is displayed as in Figure 4-20.
- Click the Exit button and verify the EmployeeFrame is no longer displayed.
- Run EmployeeApp, click the Close button, and verify the EmployeeFrame is no longer displayed.
- How does a window listener work? What other objects, methods, and/or variables does the WindowListener work with?
- What does the VE-generated initialize method do?
- What are the four steps for adding a listener?
- Name at least two ways that a property value can be defined in VE.
- What is the RGB pane?
- What are the three VE work areas?
- In VE, what is an anchor?
In this exercise, you will use VE to create a better-looking frame for the Shipment application. In addition, a display button will be added, and instead of immediately displaying the shipment information, the user will be required to click the display button to see the information.
- Using RAD, create a new package called c4 in the ReviewEx/src.
- Select all three classes in c3 then copy and paste them into c4.
- Copy the UsefulFrame and ExitButton classes from Tutorial/src/c4 to ReviewEx/src/c4.
- In ReviewEx/src/c4, create a new visual Class called ShipmentFrame, specifying:
- Frame as the superclass
- public for the class access modifier
- Create Inherited abstract methods
- An ActionListener interface
Notice in the source code that RAD created a constructor, an initialize, and an actionPerformed method.
In c4/ShipmentFrame using the VE design pane:
- 1. Select the frame and display the Properties view.
- 2. In the Properties view, change the frame title to Shipment Information, layout to null, and the size to 400 by 350.
- 3. Create a label called headerLbl that has the following properties:
- 300 by 40 in size
- Background color is red
- Located just below the frame title bar (38 pixels from the top) and centered horizontally
- Contains the text “TNT Salvage”
- The text is centered within the label
- The text is Arial and 24 in size
- 4. In the source code, change the superclass to UsefulFrame and delete the Frame import statement.
- 5. Create and add a button called displayButton to the frame. The button’s properties should be as follows:
- 60 by 20 in size
- Centered horizontally
- Its bottom edge should align with the Exit button’s bottom edge
- Have the text “Display” appear on the button
- 6. Add three labels called shipLbl, empLbl, and dateTimeLbl to the bottom half of the frame with the following properties:
- 300 by 20 in size
- Centered horizontally on the frame
- Separated from each other vertically by 10 pixels
- The last label should be separated from the displayButton by 15 pixels
- The label text color should be defined with RGB values of 0, 0, 153 and be centered
within the label
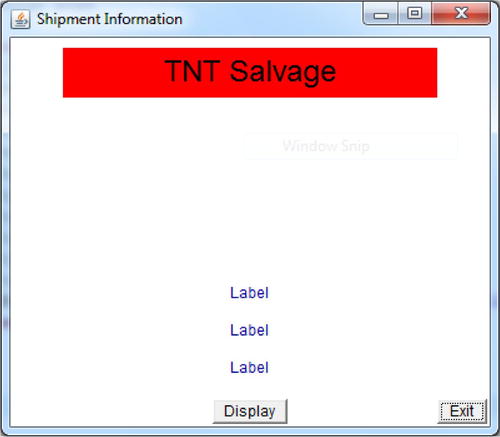
In VE, the frame should look like Figure 4-21.
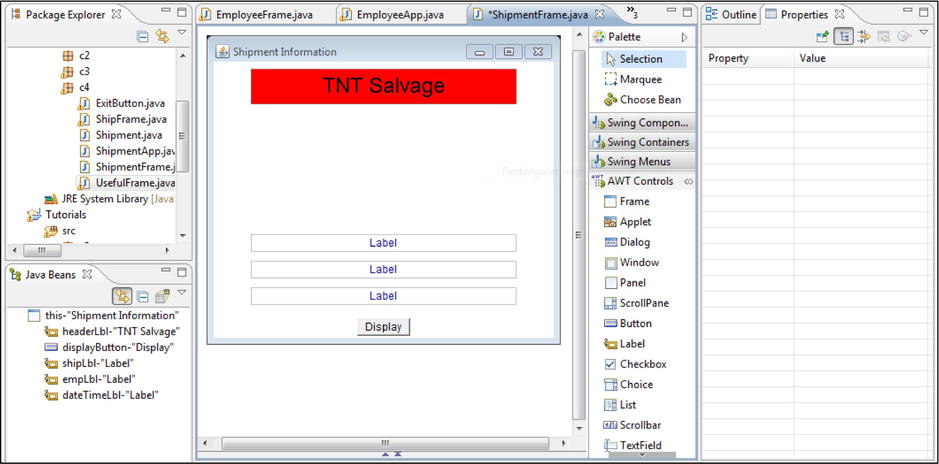
In the ShipmentFrame source code:
- Create a public class variable of type Shipment called ship.
- Change the constructor so that it receives a Shipment object called s.
- In the constructor, after the initialization method is run set ship equal to s.
- Make the frame visible.
- In the initialize method, recalculate the location of the Exit button.
- Add the ActionListener to displayButton by inserting the following statement in the getDisplayButton method after the size is set:
displayButton.addActionListener( this );
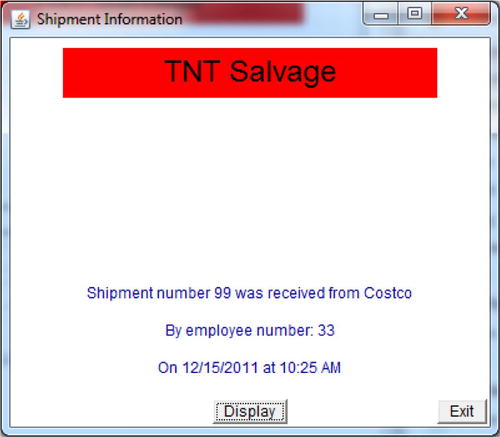
- Change the actionPerformed method to move the data from ship to the three labels (just as ShipFrame did).
In the ShipmentApp source code:
- Change ShipmentApp so that a ShipmentFrame object is created, not ShipFrame.
Results of the Review Exercise
Now we have:
- In the ReviewEx project, one new package called c4 with six classes.
- One new visual class called ShipmentFrame specified as above.
- ShipmentApp modified as specified above.
Check that the Exercise Was Done Correctly
Finally, let’s check that it all worked:
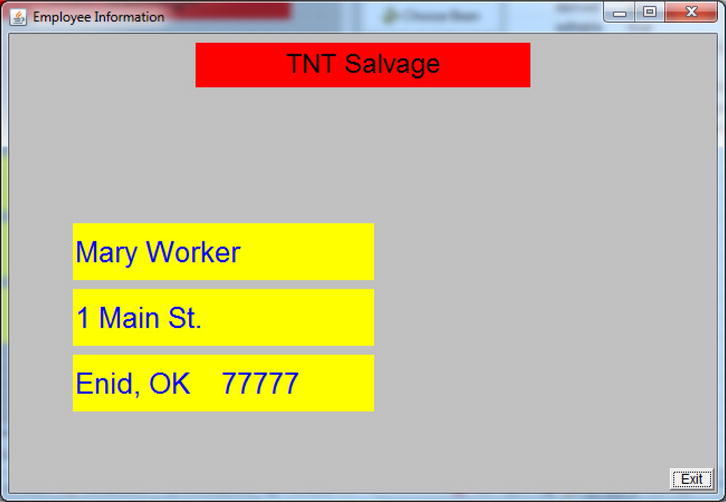
- Run c4 ShipmentApp. The results should appear as in Figure 4-22.
- Click the display button. The results should appear as in Figure 4-23.
The ExitButton class was an example of a useful, specialized GUI component subclass. In this exercise, you will create another specialized class.
- 1. Create a new Java project called CE and a package called c4.
- 2. Copy all the classes in Tutorial/c4 and ReviewEx/c4 into CE/c4.
Don’t worry about the overwrite message. The ExitButton and UsefulFrame classes were in both packages, so overwriting one with the other is not a problem here.
- 3. Create a new class called HeaderLabel that is a subclass of Label and has all the characteristics of the headerLbl (which was created in ShipmentFrame).
- 4. Change UsefulFrame to include a HeaderLabel component and assign it to variable hl.
- 5. In UsefulFrame, create a method called setHeaderLabelLocation that calculates the horizontal location of the header such that the header is centered regardless of the width of the frame.
Here’s some help with that:
To calculate the horizontal position, subtract the HeaderLabel width (300) from the width of the frame and divide the result by 2. For instance, if the width of the frame is 400, the starting location is 50 or (400 – 300) / 2. If the width of the frame was 700 the starting location is 200 or (700 – 300) / 2.
OK, here’s a lot of help with that. The actual method should be:
public void setHeaderLabelLocation() {
             hl.setLocation(( this .getWidth()-300)/2, 38); }
- 6. Change all the subclasses of UsefulFrame so that the setHeaderLabelLocation method is executed.
- 7. Remove all source code in ShipmentFrame that dealt with headerLbl.
Results of the Challenge Exercise
Let’s check it worked:
- One new project called CE with a package called c4.
- CE/src/c4 should have eleven classes, one of which is HeaderLabel, defined as specified above.
- UsefulFrame, EmployeeFrame, and ShipmentFrame modified to display the TNT header label horizontally centered on the frame.
Check that the Exercise Was Done Correctly
To finish the chapter, let’s see everything:
- Run both EmployeeApp and ShipmentApp and confirm that the TNT header label appears.
- Change the width of either EmployeeFrame or ShipmentFrame, run the application, and confirm that the TNT header label is centered on the frame.
For instance, changing EmployeeFrame to 650 in width would result in Figure 4-24.