
![]()
In this chapter, we will introduce primitive variables and compare/contrast them to reference variables. We will demonstrate how to perform math and logic functions using both primitive and String variables. A new GUI component, text field (which enables a user to input information to an application), will be demonstrated and we will revisit inheritance in more detail.
At the end of this chapter, you should understand:
- Primitive versus reference variables
- How to convert between variable types
- Wrapper classes
- Text fields
- Inheritance
After completing the chapter, you should be able to:
- Use text fields to retrieve and display information
- Perform calculations
- Convert between numeric and string information
- Override inherited methods
Reference versus Primitive Variables
We have hidden the full explanation of reference variables from you as long as possible. Reference variables are necessarily complex and, unfortunately, you cannot continue without understanding them.
All of the variables we have used have been reference variables and, often, we have talked about the variable and the object (assigned to the variable) as if they were the same thing. In actuality, they are two different entities. For example, we have said, “have the program pass an Employee object” or “have the method accept on Employee object” when, in actuality, an Employee variable is being passed or accepted.
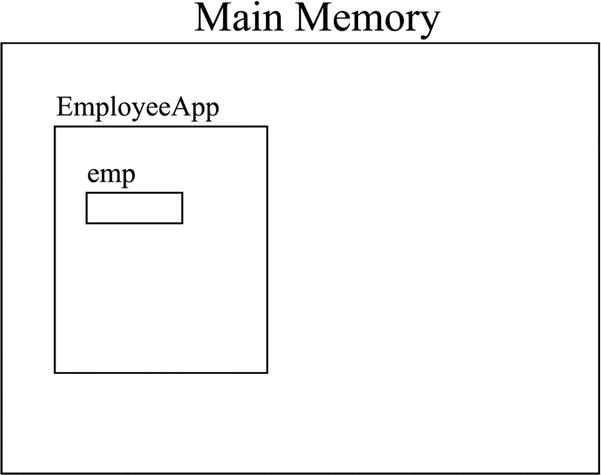
When a reference variable, such as emp in EmployeeApp, is created, a small, fixed amount of space is reserved in the computer’s main memory. However, when an object is created (i.e., an Employee object is instantiated), a copy of the entire class is moved into main memory. When the object is assigned to the reference variable, the storage location (address in main memory) of the object is moved into the reference variable.
Let’s try a diagram. When you run EmployeeApp, the class’s main method is loaded into the computer’s main memory and the main method statements are executed. When the variable emp is created (Employee emp;), main memory space is allocated for that variable but the space is empty (see Figure 5-1).
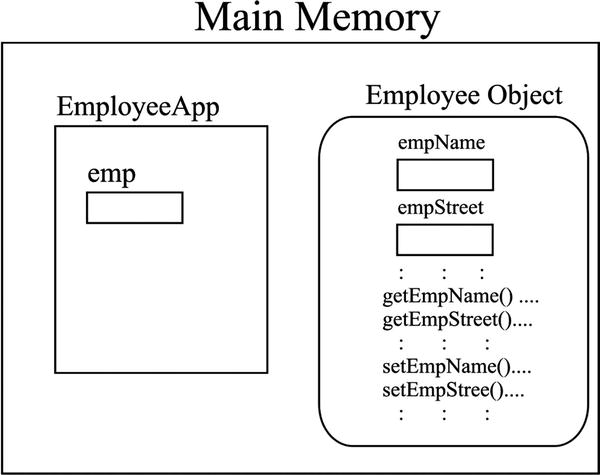
When the object is created (new Employee();), the machine language version of the Employee class is moved into main memory and executed. This means the class variables are created and the Employee constructor is executed. After the constructor finishes, all of the Employee class methods and variables remain in main memory (see Figure 5-2).
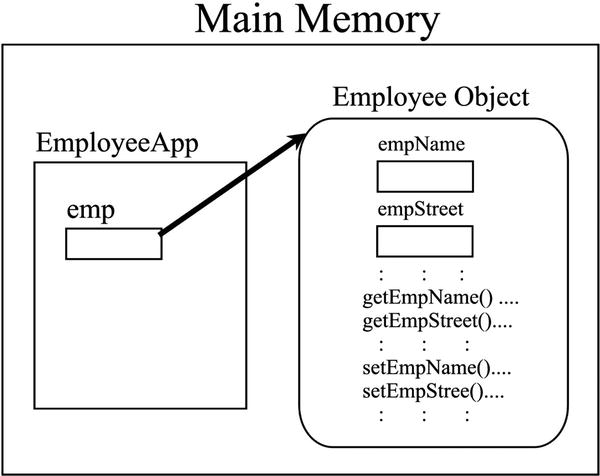
When you assign the Employee object to emp (the equal sign in the statement emp = new Employee(); does this) the main memory address of the Employee object is loaded into the variable emp. (In actuality, a number called a hash code, which is used by the computer to calculate the memory address, is loaded into emp. For simplicity’s sake, we will refer to this simply as the main memory address.) The address acts as a pointer to the Employee object (see Figure 5-3). This is where the term reference variable comes from. The variable does not contain the object; the variable references the object.
You may be wondering why Java works like this. Well, complex objects such as Employee require varying amounts of space. For instance, when an Employee method is executed, new method variables and associated objects may be created. This means more space must be allocated for the object. In addition, the values assigned to the variables can be changed. For instance, earlier we changed the city value from Enid to Jacksonville. This type of change may also require more space for the object. Notice that the space allocated for the variable (which holds the storage location of the object); however, is a fixed amount.
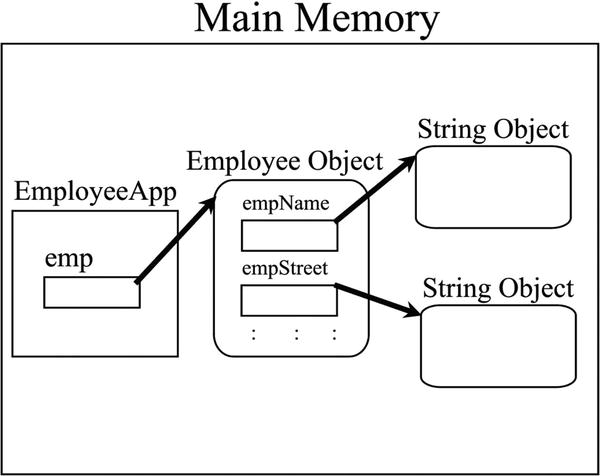
For instance, the class variables empName and empStreet in Employee are reference variables. When you created these variables, (i.e., String empName = new String();), String objects were also created and assigned to the variables. A String object contains many methods and private variables. (To verify this, go to the Java online documentation and look at all the methods that comprise a String.) The String variable (empName) simply points to the String object (see Figure 5-4).
This explanation of reference variables was necessary because there is another category of variables called primitive variables. A primitive variable actually holds the value assigned to it. One of the reasons a primitive variable holds the assigned value is because each primitive variable type is fixed in size (unlike complex objects such as a String or Employee, which can vary in size). Java stores numeric information, single characters, and Boolean values (true or false) in primitive variables. Within the numeric types, the variables store either whole numbers (integers) or floating points (numbers with decimals). A list of primitive variable types and their characteristics can be seen in Table 5-1.
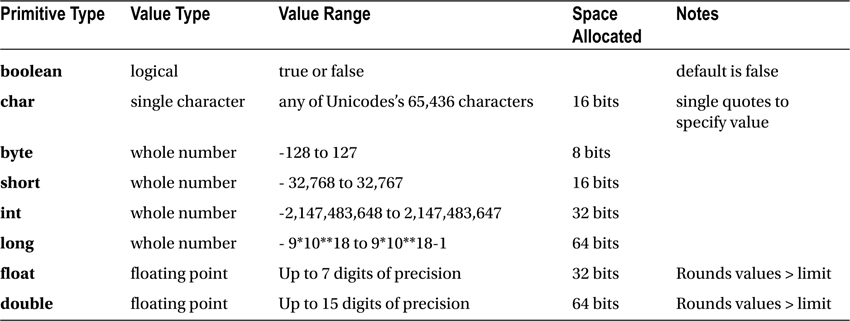
Most business applications only need boolean variables and the numeric types of int and double. In addition, most organizations try to limit the number of variable types used because working with and converting between the different types can be tricky. For instance, converting a double with a value of 3.75 to an int would result in a value of 3 for the int variable. Now you may say, “Big deal, .75 of something can’t be that important.” But, what if it were your GPA?
We will explain how to work with primitives later in the chapter. Right now, let’s investigate the difference between primitives and reference variables.
Tutorial: Displaying Reference Variable Values
We will use EmployeeApp to show some of the differences between primitive and reference variables. In addition, pay attention to how EmployeeApp’s main method is used as a testing tool. Main methods will often be added to classes for testing purposes. In future examples, we will quickly check the progress of our application development by using this technique.
- 1. Create a new package called c5 in the Tutorials project.
- 2. Copy the six Employee classes from c4 to c5.
In the c5.EmployeeApp source code:
- 3. Comment out the two statements in the main method.
We are going to substitute two statements for the first statement so that we clearly separate the creation of the Employee variable from the creation of the Employee object.
- 4. After the main method header, insert the following:
Employee emp = null ;
emp = new Employee("Mary Worker", "1 Main St.",
              "Enid", "OK", "77777");
The first statement sets the reference variable emp to null. This means that emp does not reference any object. We will now insert a statement to display the value of emp after each statement.
- 5. Enter the following after the first statement in the main method:
System.out.println("emp value before the object is assigned: " +
emp); - 6. Enter the following statement after the last (i.e., now the third) statement in the main method and run c5.EmployeeApp:
System.out.println("emp value after the object is assigned: " +
       emp);
Running EmployeeApp would result in the following messages in the console:
emp value before the object is assigned: null
emp value after the object is assigned: c5.Employee@7a627a62
The location value you get will probably be different from 7a627a62. Notice that the second message also displays the object type—which is the package name and class name separated by a period. (The package name is part of the class/object identifier.)
Why does it work like this? The answer is, “How could it work any other way?” How could the JVM print out an object? Should the source code be printed? Or, all the variable values? Or, only the class variable values? Is there really a correct way to print an object?
In addition, don’t forget that the println statements specify that the reference variable emp should be displayed, not the Employee object. Because the reference variable contains the location of the object (not the object), the JVM is actually being helpful. The JVM displays not only the location but also what the location contains (a c5.Employee object). You can interpret the text “c5.Employee@125e69d4” as “There is a c5.Employee object at main memory location 125e69 d4.”
Tutorial: Working with Primitive Variables
Let’s have a go at working with primitive variables:
- 1. In EmployeeApp, at the end of the main method, add the following statement:
int intTest = 2109876543;
A primitive variable is created just like any other variable: first the type (int) is specified, and then the name of the variable (intTest). Notice that an equal sign is used to assign a value, just like a reference variable. However, on the right side of the assignment things are quite different: no object is instantiated, a value is simply assigned.
- 2. Change the 0 (in the intTest value) to 4.
The error message will be, “The literal 2149876543 of type int is out of range.” This number is too large to store as an int. Remember, whole number values greater than 2.1 billion (give or take a few million) must be stored in a larger primitive type such as a long variable.
- 3. Change intTest’s value back to 2109876543.
- 4. At the end of the main method add the following statement and run EmployeeApp:
System.out.println("The value of intTest is " + intTest);
The result of the new println statement will be:
The value of intTest is 2109876543
No storage location is displayed because the value stored in the variable intTest is 2109876543 not a storage location, as with the reference variable emp.
- 5. At the end of the main method, add the following statement:
double doubleTest = 3210.12345678901234567890;
Notice that the value of doubleTest is more precise than a double variable can hold, yet there is no error message. This is because the JVM rounds the number so that it will fit in the variable. We’ll prove this by printing out the value.
- 6. At the end of the main method add the following statement and run EmployeeApp:
System.out.println("The value of doubleTest is " + doubleTest);
The result of the new println statement will be:
The value of doubleTest is 3210.1234567890124
Notice that the remaining fractional value 34567890 was rounded up to 4.
- 7. Change the value of doubleTest to 12345678901234567890.
Notice that now there is an “out of range” error and that there is a huge difference regarding how the JVM handles a value that is too big versus a value that is too precise. (These are the kind of differences that drive new programmers crazy, so hang in there!)
- 8. Undo the change.
Let’s drive the point home.
- 9. Uncomment the statement that creates the reference variable ef and add the following statement immediately after:
System.out.println("The value of ef is " + ef);
What do you think the result will be?
- 10. Run EmployeeApp and close the Employee Information frame.
The console should display something like the following:
The value of ef is c5.EmployeeFrame[frame0,350,200,400x450, invalid,title=Employee Information,resizable,normal]
Are you surprised by the results? You probably thought that a storage location would be displayed (because ef is a reference variable and that is what happened when you tried to display emp).
When println is used to display a reference variable, the JVM actually calls a method named toString within the referenced object. An Employee object’s (emp’s) toString method returns the object’s storage location. However, not all JRE classes’ toString methods do that. Some JRE classes’ toString methods return different information. For instance, the Frame class’s toString method returns properties such as the size, location, and title (that the JVM then displays as in step 10). “Why does this happen?” you ask? The answer is inheritance.
To help explain inheritance, let’s explore the toString method further.
To reiterate: when a reference variable is displayed with the println statement, the JVM searches for the reference variable’s assigned object’s toString method. The toString method returns values to the JVMthat are then displayed. Now, the Great-Grandpappy of all classes, Object, has a toString method. This method specifies that the variable type will be displayed, followed by the “at sign” (@), and then the storage location. We have proven that this is what occurs (for example, with the Employee reference variable emp). However, the Object class documentation suggests that the toString method should be overridden by all subclasses.
The Component class (of which the Frame class is a subclass) does override the toString method. The Component class’ toString method specifies that a Component object’s size, title, and so on should be displayed, not the hash code. In other words, all Component subclasses that do not override the toString method will display this information.
Tutorial: Overriding the toString Method
Let’s prove that the toString method controls what is displayed by overriding the inherited Component toString method in several of our classes.
- 1. Display the Employee source code.
- 2. Click on Source, Override/Implement Methods... to display the “Override/Implement Methods” window (Figure 5-5.)
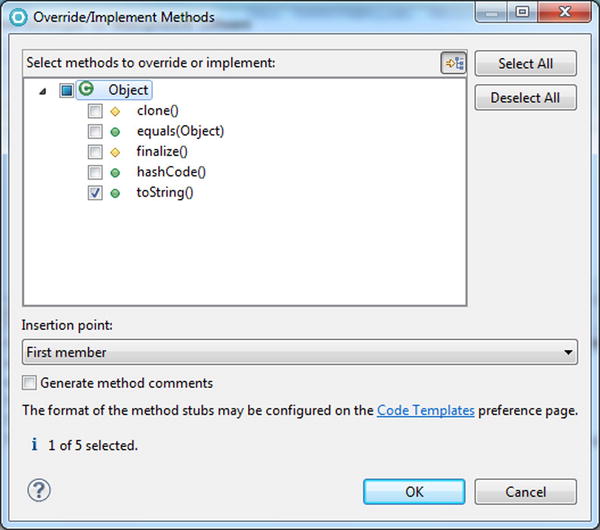
The “Override/Implement Methods” window displays all the methods Employee inherited. Because Employee is a direct subclass of Object, only the methods inherited from Object are displayed. (Other classes, such as EmployeeFrame, will show many more superclasses and inherited methods.)
- 3. Click on the toString() check box as in Figure 5-5, and then click the OK button.
RAD will insert the following toString method (referred to as a stub method).
public String toString() {
       return super.toString();
}
- 4. Change the return statement to the following so that the toString method returns the EmpName.
return getEmpName();
Notice that we didn’t fully identify the getEmpName method as this.getEmpName. Remember that the JVM assumes that a called method is for this object.
- 5. Save the Employee source code and run EmployeeApp.
- 6. Close EmployeeFrame by clicking on the Exit button.
In the console pane, notice that the memory location for emp is no longer displayed. Instead, the emp value appears as follows:
emp value after the object is assigned: Mary Worker
- 7. Display the UsefulFrame source code, click Source, then Override/Implement Methods....
Look at all the inherited methods! (The Oracle online class documentation also lists all inherited methods.)
- 8. Scroll down the list and expand Component.
Even more inherited methods!
- 9. Scroll down the list until toString appears, select it, and click the OK button.
- 10. Change the toString stub to display the frame title followed by the word “Frame” as follows:
return this .getTitle() + " Frame";
This time we fully qualified the getTitle method with the keyword this (even though we did not have to). Notice also how concatenation was used inside the return statement to build the returned string value.
- 11. Save the source code and run EmployeeApp.
- 12. Close EmployeeFrame by clicking on the Exit button.
In the console pane, the value of ef should appear as follows:
The value of ef is Employee Information Frame
In case you haven’t guessed, the String class also overrides the toString method it inherited from Object. String.toString() returns the text value assigned to the String object, not the memory location. So using println to display String variables will display the assigned text (as you would hope), not the memory location. Wasn’t this nice of the Java developers?
- 13. In EmployeeApp, comment out all the println statements and the statements defining intTest and doubleTest.
The executable code should look like the following:
package c5;

public class EmployeeApp {

       public static void main(String[] args) {
              Employee emp = null ;
              emp = new Employee("Mary Worker", "1 Main St.",
                     "Enid", "OK", "77777");
              EmployeeFrame ef = new EmployeeFrame(emp);
       }
}
Manipulating Numeric Primitives
The standard mathematical operators are used to manipulate primitive variables. Table 5-2 shows the mathematical symbols and examples.
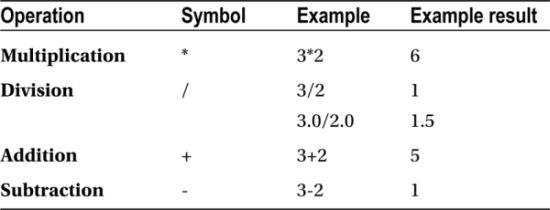
What is going on with that first division example? No, it is not a typo. If two integers are divided, any fractional remainder is truncated (i.e., discarded). Notice that if floating point numbers (e.g., 3.0, 2.0) are specified, the fractional result is retained. Looks like a source of many future errors. The Java developers have not done anything nice here!
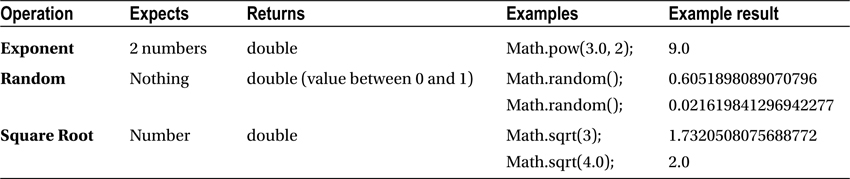
In addition to the standard math operations, there is a Math class that has many “higher level” mathematical functions (with a heavy emphasis on trigonometric functions such as sine, cosine, tangent, etc.). The Math class methods can be “called directly.” “Called directly” means that you do not have to create a Math object to use the Math class methods. This is because the Math class methods have been defined as static. You may remember the keyword static from the main method definition. Just as the main method can be “called directly” (i.e., no object needs to be created), any static method can be called by simply specifying the class and method name. Of course, each method has a unique signature (meaning each method expects one or more specific variable types) and will return a specific variable type. Table 5-3 contains some of the more common Math class methods and examples.
Two other math operations that you should be aware of are increment (++) and decrement (--). Increment and decrement are specified with numeric primitive variables (e.g., intTest++; or --doubleTest;) and will increase or decrease a numeric primitive by 1. You cannot specify a different value, like 3, to increment or decrement by. For instance, assuming intTest has a value of 2, intTest++; would result in a value of 3. If intTest has a value of 2, intTest--; would result in a value of 1.
The increment and decrement operations could also be done with formulas such as intTest = intTest + 1 and intTest = intTest - 1. So, essentially, increment and decrement simply offer a shorthand method for coding these formulas. Now this may not sound like a big deal, but incrementing by one is used extensively when using loops. We will explore looping in a later chapter and you will come to appreciate this shortcut more.
The increment and decrement operation can be specified before or after the variable. For instance, if an increment is specified before the variable (++intTest), it is called a pre-increment. If the increment is specified after the variable (intTest++), it is called a post-increment. Whether the operation is a pre or post does not make a difference when the operation is specified by itself (as in the above examples). However, if the operation is embedded in another statement the results may differ.
For instance, pre operations are done before the “owning” operation is performed. In the following statement:
System.out.println(++intTest);
the pre-increment is embedded in the println operation and the println operation is considered the “owning” operation. Embedded operations are usually performed first (and the pre-increment is not an exception), then the owning operation (the println) is performed. So assuming that intTest is equal to 2, first the value of intTest is changed to 3, and then the value of intTest is displayed in the console as 3.
In the following println statement, we imbedded a post-increment:
System.out.println(intTest++);
Post-operations are performed after the owning operation. In this case, it means that first the println function is performed and then the post-increment. Again, assuming that intTest is equal to 2, the above statement will first display the value of intTest as 2 in the console and then the value of intTest will be incremented to 3.
Yikes! Isn’t math fun? The only words of advice I can offer are, “If you don’t like pre and post operations, don’t use them.” (Nevertheless, you should be able to read them in case another programmer does use them.)
Finally, when combining mathematical operations, the standard order of precedence is followed:
- Multiplication and division first, from left to right
- Then addition and subtraction, from left to right
So, the following statement would result in the value 16:
System.out.println(4.0+3.0/2.0*8.0);
Are you asking, “How the heck does that equal 16?”. If you think like the machine and follow the rules, the above formula is equivalent to 4.0 + (( 3.0 / 2.0 ) * 8.0 ) . Why? Because multiplication and division are done first, from left to right. So the addition operation is ignored even though it is the first operation in the formula. The JVM goes from left to right and runs into the division (3.0 / 2.0 ) first. The division is performed, resulting in 1.5. As far as the JVM is concerned, the formula now looks like the following: 4.0 + 1.5 * 8.0. So what happens next? That’s right the multiplication (1.5 * 8.0) is performed, resulting in 12. Now the JVM thinks the formula is 4.0 + 12.0. Since the addition is the only operation left, the JVM performs the addition, and the result is displayed as 16 in the console.
You can control the order in which operations are performed with parentheses. Anything enclosed in parentheses is done first, and then the normal order of precedence is followed. For instance, changing the formula to the following:
System.out.println((4.0+3.0)/(2.0*8.0));
results in the value 0.4375 being displayed. Why? Because the addition (in the leftmost parentheses) is done first, resulting in 7. Next the multiplication is done (because it is also in parentheses), resulting in 16. That leaves 7 divided by 16, which equals 0.4375.
Tutorial: Using Primitive Variables
For each of these tests, try to determine what the result will be (and why) before entering and executing the source code. The answer and explanation for each test will appear after the tutorial.
- Create a new Java class in c5 called MathTestApp with a main method.
- In the main method, define an int variable called intTest and set its value to 3, and define a double variable called doubleTest with a value of 2.0.
- Add the following two statements after the variable definitions and run MathTestApp:
System.out.println(++intTest);
System.out.println(intTest++); - Comment out the previous println statements, add the following statements, and run MathTestApp:
System.out.println(intTest/2);
System.out.println(intTest/2.0);
System.out.println(intTest/doubleTest); - Comment out the previous println statements, add the following statements, and run MathTestApp:
System.out.println(Math.pow(doubleTest, intTest)/(2.0*3.0)); - Comment out the previous println statements, add the following statements, and run MathTestApp:
System.out.println(Math.pow(doubleTest, intTest)*3/2);
System.out.println(Math.pow(doubleTest, intTest)*(3/2)); - Comment out the previous println statements, add the following statements, and run MathTestApp:
System.out.println(intTest);
System.out.println(intTest++/2);
System.out.println(intTest);
System.out.println(++intTest/2);
System.out.println(intTest); - Comment out the previous println statements, add the following statements, and run MathTestApp:
System.out.println(doubleTest++ + ++intTest);
System.out.println(doubleTest + " " + intTest); - Comment out the previous println statements, add the following statements, and run MathTestApp:
System.out.println(" " + Math.pow(doubleTest++,
       ++intTest) + doubleTest++);
System.out.println(doubleTest); - Print out a copy of the MathTestApp source code.
Using Primitive Variables Tutorial Answers and Explanation
The first println statement:
System.out.println(++intTest);
contains a pre-increment for intTest. The pre-increment is performed before the println operation and the value of intTest is increased from 3 to 4. The println is then performed, resulting in a 4 appearing in the console.
The second println statement:
System.out.println(intTest++);
contains a post-increment. This means the println is performed first, resulting in the value of intTest being displayed as 4 again, and then the value of intTest is incremented to 5. Result:
4
4
The next println contains a formula that divides two integers and, as mentioned earlier, any fractional result is truncated.
System.out.println(intTest/2);
So, 3 divided by 2 results in 1.5, but the .5 is dropped. The other formulas:
System.out.println(intTest/2.0);
System.out.println(intTest/doubleTest);
divide an integer by a double. When an integer is divided by a double, the integer is promoted to a double. In other words, the JVM converts the integer (2) into a double (2.0) then performs the operation. Division between two doubles will retain any fractional result, so the .5 is retained for both results. Result:
1
1.5
1.5
Now let’s consider the following line:
System.out.println(Math.pow(doubleTest, intTest)/(2.0*3.0));
The multiplication is done first (because it is enclosed in parentheses, (2.0*3.0)) resulting in 6.0. The JVM now “sees” the formula as Math.pow(doubleTest, intTest)/6.0 and performs the remaining operations from left to right: Math.pow raises doubleTest (2.0) by the power of intTest (3) resulting in 8.0. Then 8.0 is divided by 6.0. Result:
1.3333333333333333
The next statement’s math operations are simply executed from left to right.
System.out.println(Math.pow(doubleTest, intTest) * 3/2);
doubleTest (2.0) is raised to the third (intTest) power, resulting in 8.0. 8.0 is multiplied by the int value 3, resulting in 24.0. Next 24.0 is divided by the int value 2. The 2 is promoted to a double (2.0), and the division result is 12.0.
The second formula’s division (3/2) is in parentheses; therefore, it is performed first.
System.out.println(Math.pow(doubleTest, intTest) * (3/2));
These are both int values, so the result is an int value of 1. (Remember: the fractional result is truncated in division between int values.) The Math.pow method is performed, raising doubleTest (2.0) to the third (intTest) power resulting in 8.0. 8.0 is then multiplied by the int 1, resulting in 8.0. Tricky, tricky, tricky! Result:
12.0
8.0
Now the following simply prints the initialized value of intTest (3).
System.out.println(intTest);
Next intTest (3) is divided by 2, the result (1) is printed, and then the intTest post-increment is performed, increasing intTest to 4.
System.out.println(intTest++/2);
The third of this group simply prints the value of intTest (4).
System.out.println(intTest);
Next intTest is pre-incremented, resulting in intTest being set to 5. Then intTest (5) is divided by 2, and the result (2) is printed.
System.out.println(++intTest/2);
Finally, the value of intTest (5) is printed.
System.out.println(intTest);
Result:
3
1
4
2
5
The next example has both a pre- and post-increment.
System.out.println(doubleTest++ + ++intTest);
The pre-increment is done first, setting intTest to 4. The addition of doubleTest and intTest is then performed, resulting in the value 6.0. Next, println displays the result (6.0) and, lastly, doubleTest is incremented by 1, resulting in a value of 3.0.
Next, the plus signs represent the concatenation function, because they appear between numeric values and strings.
System.out.println(doubleTest + " " + intTest);
The JVM converts the numeric to a string and concatenates the two strings. In this case, the value of doubleTest (increased to 3.0 in the previous println) is converted to a string and concatenated to a space resulting in the text “3.0”. The second plus sign is also between text (“3.0”) and a numeric value (intTest), so intTest is converted to a string (“4”) and concatenated to “3.0”, resulting in the text “3.0 4”, which is then displayed in the console. Result:
6.0
3.0 4
We’re onto the last group now. Notice in the first statement of this group that there are two post-increments and one pre-increment.
System.out.println(" " + Math.pow(double Test++, ++intTest) + doubleTest++);
The Math.pow operation will be performed before the concatenations. Inside of Math.pow is one pre-increment that is performed first, resulting in intTest being set to 4. The value in doubleTest (2) is then raised to the fourth power, resulting in 16.0. The post-increment is then performed on doubleTest, changing its value to 3.0. You may be confused that the post-increment is performed before the println. Post increments are done after the owning instruction is executed. In this case, the post-increment is embedded in the Math.pow instruction. Therefore, once Math.pow completes, the increment is performed. The second doubleTest post increment is not done until its owning operation (the println) is performed. Concatenations are done next (from left to right), resulting in a space being concatenated to the result of the Math.pow function (16.0). The text “16.0” is then concatenated to the value of doubleTest (3.0) resulting in the text “16.03.0”. Now that the println has completed, doubleTest is incremented to 4.0.
The next println simply prints the value of doubleTest as 4.0 and proves that the first statement really did change the value of doubleTest to 4.0.
System.out.println(doubleTest);
Result:
16.03.0
4.0
The purpose of this exercise was to impress upon you the complicated nature of combining many numeric and String operations. Many programmers strive to write compact, dense instructions that use the smallest amount of source code. The small benefits of source code compactness are usually greatly outweighed by the increased testing time and errors that this hard-to-understand, complicated code generates. It is best to err on the side of simplicity and clarity when coding, even if this does result in more source code.
Converting Between Primitive Types
Working with the various numeric primitives is confusing enough; however, converting between primitives and strings adds yet another layer of complexity. Unfortunately, strings have to be discussed, because GUI components only work with text. This means any numeric data that you want to display (on a frame, window, etc.) must be converted to text. In addition, any information retrieved from a GUI component is a string. If you want to perform mathematical functions on that data, a conversion from string to a numeric primitive must be performed. First, we will deal with converting between primitives, and then bring strings into the mix.
Converting a numeric value from a smaller numeric type to a larger type is easy: simply assign the smaller type to the larger type. For example:
doubleTest = intTest;
This works for all the numeric types from smallest to largest. Assuming the following:
byte byteTest = 1;
short shortTest = 2;
int intTest = 3;
long longTest = 4;
float floatTest= 5;
double doubleTest = 6;
Running the following:
System.out.println(" " + byteTest + shortTest +
        intTest + longTest + floatTest + doubleTest);
Would result in:
12345.06.0
If we then assigned the values as follows:
doubleTest=floatTest=longTest=intTest=shortTest=byteTest;
and displayed the values as follows:
System.out.println(" " + byteTest + shortTest + intTest +
        longTest + floatTest + doubleTest);
the result would be:
11111.01.0
Notice that the assignments are made from right to left. In other words, the byte variable byteTest (with a value of 1) was promoted to the larger type of short first and then assigned to shortTest, and then shortTest was converted to int and assigned to intTest, and so on.
Going from a larger primitive variable to a smaller primitive type requires castingand is a little more complicated. The syntax for casting is: the smaller primitive variable, the equal sign, the smaller variable type in parentheses, then the larger primitive variable. For instance, assuming doubleTest equals 6.0, the following statement:
intTest = (int)doubleTest;
would set intTest to the value 6.
Casting is relatively simple until a value is too large for the smaller type. For instance, changing doubleTest’s value to 9876543210987.99 and then casting to each of the smaller types yields a variety of values. For instance, the float variable value would be 9876543000000. Because float only supports 7 digits of precision, only the seven highest digits (9876543) are saved and all finer precision is lost. (This float value would actually display in scientific notation. Controlling the appearance of numbers is a whole other can of worms that we will cover later.)
Converting the new doubleTest value to a long variable would result in a value of 9876543210987. Long variables can handle very large whole numbers, so most of the value is saved but the fractional value (.99) is truncated.
Converting to an int variable would result in a value of 2147483647, the largest value an int variable can hold. This is really bad because the int value is not even close to the original double value. The short and byte values are equally bad at -1 and -1.
In summary, the syntax for casting is a little complicated; however, the real complication comes from trying to fit larger values into smaller variable types. Be very careful when casting because of the possibly unexpected results of moving from larger to smaller types.
Strings to Primitives and Vice Versa
The String class has a very nice set of static toString methods that will convert primitive types to strings. Again, a static method can simply be invoked without creating a String object. For instance, the following are all valid statements:
String byteString = String.valueOf(byteTest);
String shortString = String.valueOf(shortTest);
String intString = String.valueOf(intTest);
String longString = String.valueOf(longTest);
String floatString = String.valueOf(floatTest);
String doubleString = String.valueOf(doubleTest);
Converting from a string to a primitive is a little more complicated. Unlike String, primitives are not classes and do not have useful methods such as valueOf. However, the Java developers have created a series of classes for each of the primitive types that contain many useful methods. These classes are called wrapper classes.
Each wrapper class has the same name as the primitive type (except int), but the wrapper class name begins with a capital letter. For example, the wrapper class associated with double is Double, the long wrapper class is Long, but the int wrapper class is Integer.
You can think of the wrapper classes as helper classes: they have methods that help programmers work with primitive variables. For example, each wrapper class has a parse method that will convert a String variable to the associated primitive type. Each parse method has a unique name that begins with the text “parse” and then is followed by the primitive variable type. For instance, the following are all valid statements:
byteTest = Byte.parseByte(byteString);
shortTest = Short.parseShort(shortString);
intTest = Integer.parseInt(intString);
longTest = Long.parseLong(longString);
floatTest = Float.parseFloat(floatString);
doubleTest = Double.parseDouble(doubleString);
Notice that the Integer parse method is called parseInt,not parseInteger. In addition, the wrapper classes have static toString methods that perform the same function as the String valueOf methods (i.e., convert from primitive to string). The syntax would be as follows:
byteString = Byte.toString(byteTest);
shortString = Short.toString(shortTest);
intString = Integer.toString(intTest);
longString = Long.toString(longTest);
floatString = Float.toString(floatTest);
doubleString = Double.toString(doubleTest);
Don’t forget that the JVM often does the conversion from primitive to string automatically (for instance, when displaying primitives with the println method).
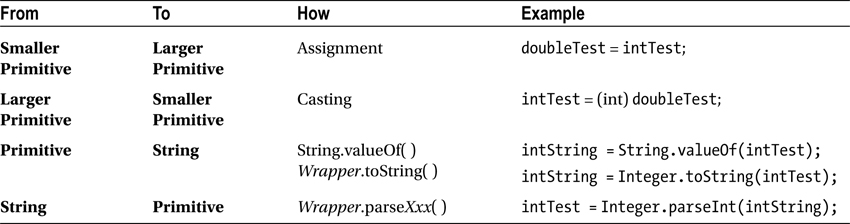
Table 5-4 summarizes the conversion methods between primitive types and strings and gives an example of each.
TextField
Sorry for all this pain, but the parse method will be required to retrieve and manipulate numeric information from a GUI component. Speaking of which, our next new GUI component is a text field. A text field looks like a rectangle. Users can enter information into a text field and, like a label, information can also be displayed in a text field. You can probably guess the syntax for creating a TextField object, but here it is anyway:
TextField empNameTF = new TextField();
Of course, the text field must be sized and placed on the frame (like our other GUI components) and we will need to retrieve the text from the text field. Like the other GUI components, TextField objects have getters and setters for manipulating properties. One of a text field’s properties is its text. The getText method returns the contents of the text field as characters, and the setText method places text in the text field. We will use these methods to modify EmployeeApp so that it can accept input from a user.
Until now, EmployeeApp has simply displayed “hard-coded” employee information. We will modify the application to accept employee information using a new frame called EnterEmpInfo. We will also perform a gross salary calculation and display the results.
Truly, the EnterEmpInfo frame is not the correct place for the salary calculation method. EnterEmpInfo should only have methods that pertain to entering employee information. Calculating an employee’s gross salary really belongs in the Employee class. For right now, it is simply easier to put it in the frame. Later we will move it to Employee.
Tutorial: Inputting Data
Let’s do a little data input:
- 1. In c5, create a visual class called EnterEmpInfo that is a subclass of Frame, implements an action listener, and has a main method.
- 2. In the source code, change the superclass from Frame to UsefulFrame.
You may be wondering why we originally defined the superclass as Frame and then changed it to UsefulFrame. As mentioned earlier, VE has coding standards. If a class does not follow these standards, VE does not “play well” with that class. For example, UsefulFrame was not created as a Visual class therefore, it does not follow the VE standards (i.e., it doesn’t have an initialize method, a long variable called serialVersionUID, etc.) Because of this, if we define a new class as a subclass of UsefulFrame, VE cannot display the class in the Design pane. This means you cannot drag and drop components, use the Properties view, etc. and will only be able to modify the class by changing the source.
- 3. In the Design pane, click on the frame to activate the Properties view.
- 4. In the Properties view, define the frame size as 400 by 400 and place it 100 pixels from the top and left of the screen.
- 5. Set the frame’s visible property to true and layout to null.
- 6. In the main method, add the following to create an EnterEmpInfo object:
EnterEmpInfo eei = new EnterEmpInfo();
- 7. Create five labels called empNumLbl, empNameLbl, empStreetLbl, empCSZLbl, empPRLbl with the following text:
- Employee Number
- Name
- Street Address
- City, State, and Zip
- Hourly Pay Rate
- 8. Create five text fields called empNumTF, empNameTF, empStreetTF, empCSZTF, and empPRTF.
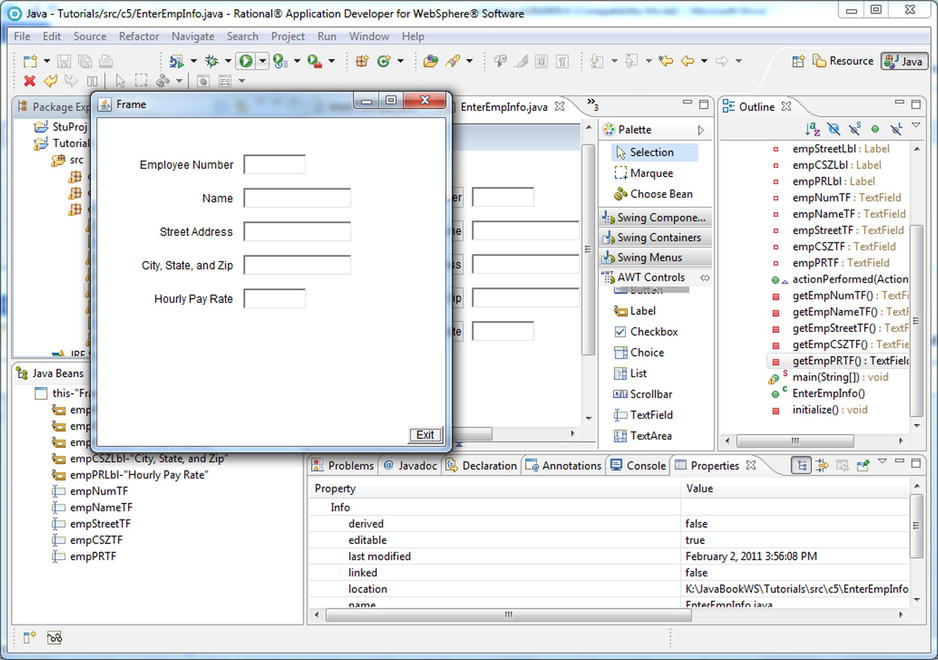
- 9. Size, position, and align the text fields and labels on the frame such that when the class is run as a Java application, the frame appears as in Figure 5-6.
- 10. Click on empCSZTF.
- 11. In the Properties view, define the text as “Jacksonville, FL 322”.
This will set up a default value for the employee’s city and state information. Because most of the company’s employees come from the greater Jacksonville area, this will cut down on the typing needed to enter the employee’s information. We defined the zip as 322 because all Jacksonville zip codes begin with 322. This will save three keystrokes when entering most employees’ zip codes.
Notice that in the getEmpCSZTF() method, the following statement was added:
empCSZTF.setText("Jacksonville, FL 322");
- 12. Add a button called grossBtn that:
- Displays the text Gross
- Is centered horizontally on the frame
- Aligns horizontally with the Exit button
- 13. In the getGrossBtn method, add the following statement:
grossBtn.addActionListener( this );
This will tie the Gross button to the actionPerformed method.
We now need to change the actionPerformed methodso that it reads the hourly pay rate and calculates the gross pay for the employee by multiplying the hourly pay rate by 40 (the number of hours in a work week).
- 14. In the actionPerformed method, add the following statement:
String empPayRate = empPRTF.getText();
Ok, that’s plenty of coding, let’s do a little testing.
Tutorial: Testing EnterEmpInfo
Before we try to do the calculation and display the result, let’s prove that we are actually retrieving the text field information.
- 1. In the actionPerformed method, add the following println statement (after the statement entered in step 14 above) to prove that pay rate has been successfully placed in the variable empPayRate:
System.out.println(empPayRate); - 2. Run EnterEmpInfo as a Java application.
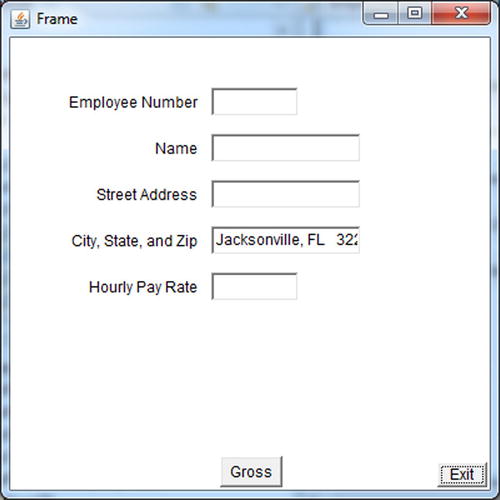
The frame should look like Figure 5-7. Dang! Even before we test, there is trouble. Notice that the city, state, zip text field isn’t big enough to display the information. Also, the Gross and Exit buttons are different sizes: we obviously need to define some button standards.
- 3. Increase the length of empCSZTF to 150.
- 4. In c5, create a new visual class called TNTButton, and define its superclass as java.awt.Button.
- 5. Define TNTButton’s properties as follows and save the class:
Size: 50, 25 Font: Tahoma, 14 - 6. In c5, change the ExitButton class so it is a subclass of TNTButton and comment out the setBounds statement.
This will ensure that the Exit button inherits the size from TNTButton.
- grossBtn is defined as a new TNTButton, not as a java.awt.Button
- grossBtn does not have a setBounds or setSize statement
- grossBtn has a setLocation statement that defines the location as 177, 365
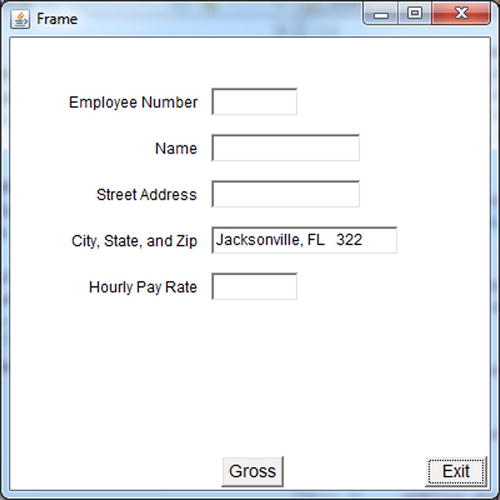
- 8. Save all the changes and run EnterEmpInfo as a Java application.
The frame should look like Figure 5-8.

Dang, another problem! Because we commented out the Exit button’s setBounds statement, the default location was never set and the exit button isn’t placed on the frame.
- 9. In EnterEmpInfo’s initialize method, add the following to place the exit button on the frame.
this .setExitButtonLocation(); - 10. Save all the changes and run EnterEmpInfo as a Java application.
Double dang! Because we changed the size of the Exit Button, its location on the frame is calculated incorrectly.
- 11. In UsefulFrame, change the location calculation so that the button is placed 60 and 35 pixels from the right and bottom of the frame and save the class.
- 12. Run EnterEmpInfo as a Java application.
The frame should look like Figure 5-9.
Okay, now we’re getting somewhere. We can finally test to see if the hourly rate is correctly retrieved.
- 13. Type 14.25 in the hourly pay rate text field and click the Gross button.
14.25 should be displayed in the console. At this point, the executable source code for TNTButton should be:
package c5;

import java.awt.Button;
import java.awt.Dimension;
import java.awt.Font;

public class TNTButton extends Button {

       public TNTButton() {
              super ();
              initialize();
       }

       private void initialize() {
              this .setSize( new Dimension(50, 25));
              this .setFont( new Font("Tahoma", Font. PLAIN , 14));}
}
Notice that the size and font properties are set as specified in step 5. The calculation in UsefulFrame (changed in step 9) should look like the following:
eb.setLocation( this .getWidth() - 60, this .getHeight() - 35);
The getGrossBtn method in EnterEmpInfo should look like the following:
private Button getGrossBtn() {
       if (grossBtn == null ) {
              grossBtn = new TNTButton();
              grossBtn.setLabel("Gross");
              grossBtn.setLocation( new Point(177, 365));
              grossBtn.addActionListener( this );}
       return grossBtn;
}
Notice that the changes specified in step 7 were implemented in the source code. (I.e., GrossBtn is defined as a new TNTButton and only the location, not the size, of GrossBtn is specified.)
The constructor in EnterEmpInfo should look like the following:
public EnterEmpInfo() {
       super ();
       initialize();
}
Note also the setExitButtonLocation statement that was added to the initialize method. The ExitButton class should look like the following:
package c5;

import java.awt.Button;
import java.awt.event.ActionListener;
import java.awt.event.ActionEvent;

public class ExitButton extends TNTButton implements
       ActionListener{

       public ExitButton () {
//            this.setBounds(350, 370, 40, 20);
              this .setLabel("Exit");
              addActionListener( this );
       }

       public void actionPerformed(ActionEvent e) {
              System.exit(0);
       }
}
Notice that the step 6 changes are reflected in the source code (i.e., the extends clause was changed and the setBounds statement was commented out).
Did you see that there is a warning indicated for the import java.awt.Button statement? Because we made ExitButton a subclass of TNTButton, there is no need to import the Button class. Although this isn’t an error, it is slightly inefficient so RAD flags the statement. This warning is also in the EmpFrame class (from when we made it a subclass of UsefulFrame instead of Frame). You may have noticed that RAD displays many warnings (such as the no serialVersionUID field which, by the way, is used for version control). These are actually generated by the Java compiler, so don’t shoot RAD, it’s just the messenger. You can either ignore the warnings, give in to the compiler’s nagging and add the field, or change your preferences to ignore the “problem.”
- 14. Delete the import statements and generate a default serialVersionUID field (using RAD’s first suggested fix) in both classes.
In the Package Explorer, the warnings icons are removed from the two classes. However, many of the other classes still are flagged with warnings.
- 15. Click Window and then Preferences.
- 16. In the Preferences windows, expand Java then Compiler (in the options tree) and select Errors/Warnings.
- 17. On the right of the Preferences window, close Code style and expand Potential programming problems.
Notice that the first potential problem is Serializable class without serialVersionUID and that the selected RAD option is to generate a warning.
- 18. Click on the option menu button, select Ignore (see Figure 5-10), and then click the OK button.
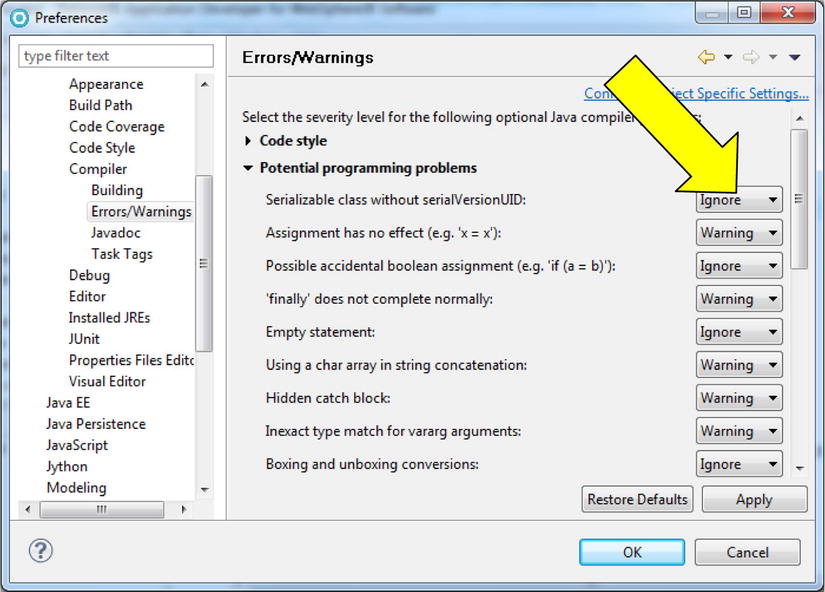
- 19. At the Error/Warning Settings Changed window, click the Yes button.
Notice that the warning icon is removed from the EmployeeFrame, TNT button, and UsefulFrame classes.
Tutorial: Converting and Calculating
To calculate the gross salary of the employee, EnterEmpInfo must:
- Convert the text in empPayRate to a numeric primitive
- Multiply the numeric primitive pay rate by 40
- Display the result
Inside of the EnterEmpInfo’s actionPerformed method:
- Create two double method variables called doubleEmpPR and doubleGross.
- Use the wrapper class Double to convert empPayRate to double and then assign it to double-EmpPR as follows:
doubleEmpPR = Double.parseDouble(empPayRate); - Insert the following formula to calculate the gross salary:
doubleGross = doubleEmpPR * 40; - Change the println statement so that doubleGross is printed, not empPayRate.
- Save the source and run EnterEmpInfo as a Java application.
- Enter 6.50 in the Pay Rate text field and click the Gross button.
The value 260.0 should be displayed in the console. Notice that you (the programmer) have to explicitly convert the text to a double (i.e., define a double variable, parse the text, and assign it to the double variable). However, to display the double value as text, the println statement automatically converts the double to a string.
Now, the console is not the best way to display information to a user. We should create a new label on the frame to display the results.
Tutorial: Adding a Result Label
We will create a new label called resultLbl that is:
- 250 pixels in length
- Centered horizontally on the frame
- Vertically 10 pixels above the Gross button
- Not initially added to the frame
and when the Gross button is clicked:
- The label is added to the frame
- The label text shows the value of doubleGross as follows:
The Gross Salary is: $260.00
Let’s get started:
- 1. In the design pane, add a label and set its name to resultLbl.
Notice that a resultLbl variable has been added and that an add statement was inserted in the initialize method.
- 2. In the Properties view, define the label’s length as 250, location as 75, 332, and alignment as CENTER.
- 3. In the initialize method, cut out the add label statement (that puts the resultLbl on the frame) and paste it into the actionPerformed method (after the calculation is performed).
This means that the label is added to the frame after the Gross button is clicked. Notice in the design pane that resultLbl now appears outside of the frame. This means the component is part of the class but initially is not on the frame.
- 4. In the actionPerformed method after the add label statement, add the following setText statement:
resultLbl.setText("Gross Salary is: $" +
       doubleGross + "0");
This statement defines the resultLbl’s text as “Gross Salary is: $”, concatenated to doubleGross, concatenated to the character zero (0).
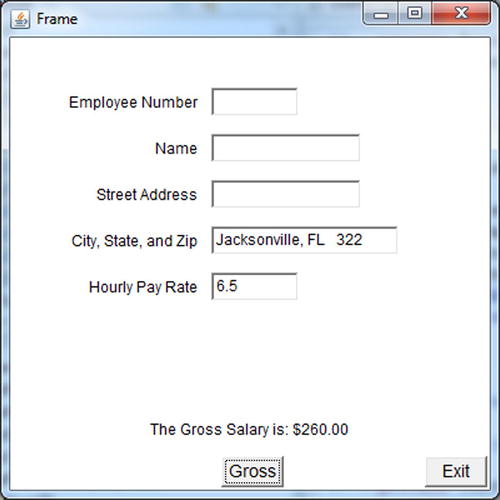
- 5. Save the source and run EnterEmpInfo as a Java application.
- 6. Enter 6.5 in the Pay Rate text field and click the Gross button.
The frame should look like Figure 5-11.
You should note a couple of things about this tutorial. The EnterEmpInfo’s main method has been used as a means to test the frame. Currently there is still no way to access the frame from the Employee application. Second, the formatting of the gross salary value was very “coarse.” By this, we mean that manipulating a String object is very limited, and only simple formatting can be done easily. For instance, if the number had been over a thousand dollars, inserting the comma would have been much more difficult. Later in the text, we will cover some easier methods for formatting common numeric information such as currency, dates, and times.
The “resultLbl code” in the initialize method should look like the following:
resultLbl = new Label();
resultLbl.setText("Label");
resultLbl.setAlignment(Label. CENTER );
resultLbl.setBounds( new Rectangle(75, 332, 250, 23));
The actionPerformed method should look like the following:
public void actionPerformed(ActionEvent e) {
       String empPayRate = empPRTF.getText();
       double doubleEmpPR, doubleGross;
       doubleEmpPR = Double. parseDouble (empPayRate);
       doubleGross = doubleEmpPR * 40;
       this .add(resultLbl, null );
       resultLbl.setText("The Gross Salary is: $" +
                     doubleGross + "0");
       System. out .println(doubleGross);
}
Results of the Tutorial
Let’s review what we have:
- In the Tutorials project, a new package called c5 with three new .java files called MathTestApp, EnterEmpInfo and TNTButton.
- A printout of the MathTestApp source code.
- The source code in the three files should match the tutorials.
- Running EnterEmpInfo should generate the same results as the “Adding a Result Label” tutorial steps 5 and 6.
Review Questions
- What is casting?
- What is a wrapper class? Give an example.
- What is concatenation?
- What do concatenation and addition have in common?
- Explain “pre-” and “post-” increments.
- Describe the appearance and function of a text field.
- Explain the difference between primitive and reference variables and give an example of each.
In this exercise, you will create an Enter Shipment Information frame re-using much of the code in ShipmentFrame.
- 1. In the ReviewEx/src, create a new package called c5.
- 2. Select all six classes in ReviewEx.c4, then copy and paste them into c5.
- 3. In c5, right-click on ShipmentFrame and select copy.
- 4. Right-click on ShipmentFrame again and select paste.
- 5. At the Name Conflict window, specify EnterShipInfo as the new name.
In the c5.EnterShipInfo source code:
- 6. Change the constructor to receive no parameters (instead of a Shipment object).
- 7. Delete the statement that assigns s to ship.
Using VE, change c5.EnterShipInfo as follows:
- 8. Add two more labels (above the three existing labels), and change their foreground colors to blue.
- 9. From top to bottom, name the five labels to empNumLbl, shipNumLbl, dateLbl, timeLbl, supplLbl.
- 10. Change all five labels so that:
- They are 120 in length
- Their text is right justified
- They are right aligned to each other
- They are distributed evenly vertically between the header and the button
- They are 74 pixels from the left
- 11. Change the text for each label to the following:
- Employee Number:
- Shipment Number:
- Date Received:
- Time Received:
- Supplier Name:
- 12. Add five text fields called: empNumTF, shipNumTF, dateTF, timeTF, supplTF with lengths of 50, 50, 75, 75, and 150, then left-align them to each other.
- 13. Align each text field horizontally with the appropriate label and separate them by 10 pixels.
- 14. Rename the button enterBTN and change the button label to Enter.
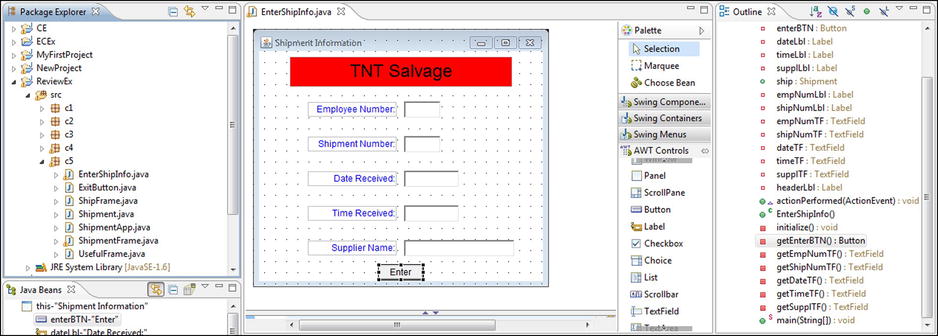
The design pane should look like Figure 5-12.
In the source code, change the initialize method to:
- 15. Create a Shipment object with blanks for all the properties and assign it to the class variable ship.
In the source code, change the actionPerformed method to:
- 16. Read each text field and set the appropriate Shipment object property.
- 17. Create a new ShipmentFrame object and assign it to a variable called sf.
In ShipmentApp:
- 18. Comment out the two statements in the main method.
- 19. Add a statement to create a new EnterShipInfo object and assign it to a variable called esi.
Results of the Review Exercise
Here’s what we’ve got after the review exercise:
- In the ReviewEx project, one new package called c5.
- One new visual class called EnterShipInfo specified as above.
- ShipmentApp modified to create an EnterShipInfo object.
Check that the Exercise Was Done Correctly
Now we can test:
- Run ShipmentApp and verify the Enter Ship Information frame appears.
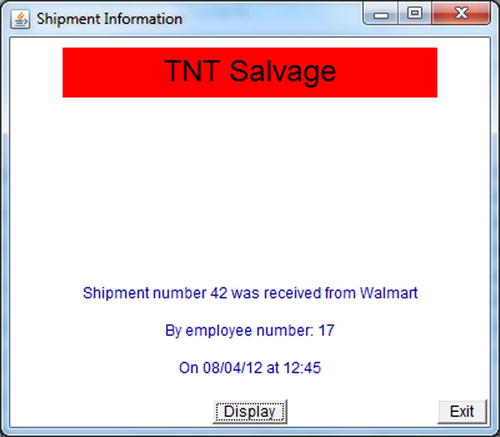
- Enter information into the text fields and click the Enter button.
- The Shipment frame should be displayed.
- Click the Display button, and the information entered on the Enter Ship Information frame should be displayed in the three labels with the appropriate text. As an example, see Figure 5-13.
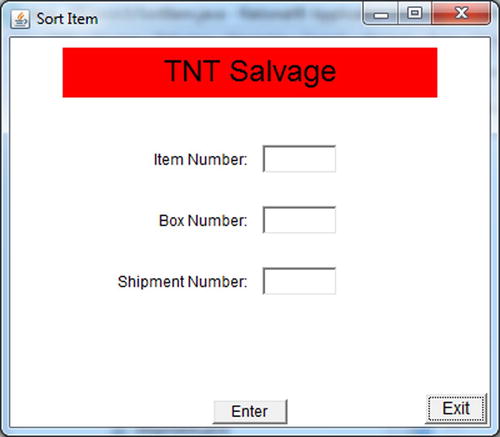
After a shipment is received, each individual item in the shipment needs to be recorded and placed into a sorted box/carton. The box/carton will hold many items of the same product type and, eventually, will be put into the inventory stockroom. For now, we will create a Sort Item frame to identify which shipment the item came from and the box number the item is placed in. In addition, the frame will keep a running total of the number of items in the shipment.
- 1. In the CE/src, create a new package called c5.
- 2. Copy the following into CE/c5 and overwrite any duplicate classes:
- All the classes in CE/c4
- ReviewEx/c5.EnterShipInfo
- ReviewEx/c5.ShipmentApp
- Tutorial/c5.EnterEmpInfo
- Tutorial/c5.TNTButton
- Tutorial/c5.ExitButton
- 3. In CE/c5, change the UsefulFrame exit button location calculation as you did in the tutorial.
- 4. Create a new visual class called SortItem that is a subclass of UsefulFrame and looks like Figure 5-14 when first displayed.
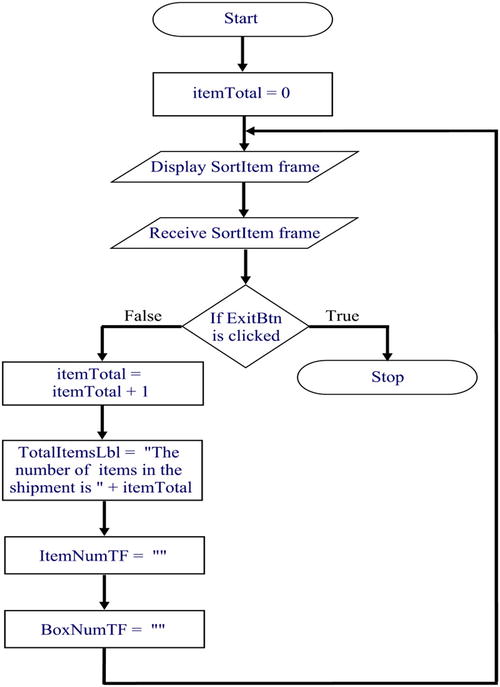
- 5. Write the source code so that after entering information and pressing the Enter button, the Item Number and Box Number text fields are blank and a message saying how many items have been specified are displayed.
The application logic should correspond to Figure 5-15.
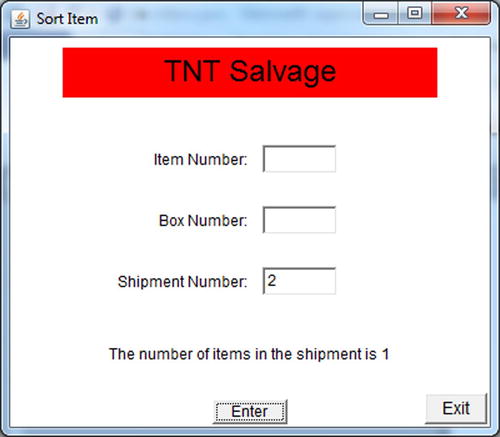
For instance, entering 99 for item number, 1 for box number, 2 for shipment, and clicking the Enter button should result in a frame that looks like Figure 5-16.
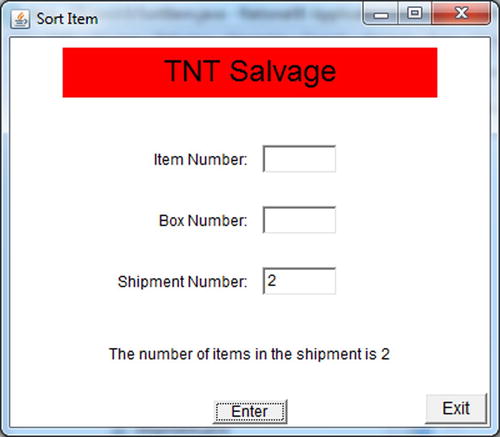
Then, entering 47 for item number, 8 for box number, and clicking the Enter button should result in a frame that looks like Figure 5-17.
- 6. Ensure that clicking the Exit button closes the frame.
Results of the Challenge Exercise
Here is what we have after the challenge exercise:
- UsefulFrame modified to correctly position the Exit button.
- CE/c5 should contain 15 classes, one of which SortItem is defined as specified above.
Check that the Exercise Was Done Correctly
Run SortItem and verify that the frames displayed match Figures 5-16 and 5-17.