
![]()
So far, we have focused on client-based (desktop) applications. In this chapter, server-side (Web-based) applications are introduced, and the advantages and disadvantages of client versus server-based applications will be explained. There will be a short tutorial on HTML (Hypertext Markup Language) and then we will show how easy it is to create Web pages using RAD’s Page Designer rather than entering HTML. We will then explain and create a Java servlet (i.e., a Web-based Java class), demonstrate how to tie a Web page to a servlet, and show how to pass information from a Web page to a servlet using a form.
In this chapter, you will learn about:
After this chapter, you should be able to:
- Create a Web page with a form
- Create a servlet that retrieves and displays information from a Web page
- Run Web pages and servlets on RAD’s application server
What is a Server?
A server, of course, is a computer. However, that simple definition is like saying a coin is metal. True, a coin is metal, but a coin is much more than metal. Saying that a server is a computer describes only one aspect of a server (and not a very illuminating aspect), because not every computer is a server. What makes a computer a server is software, specifically, server software. Of course, the computer has to be “connected” to the Internet and to add a server to the Internet; the “Internet overseers” must be paid. However, we will leave a detailed discussion of how to set up a server for a different text and instead concentrate on how to create Java programs for a server.
To make things a little more confusing, there are many different types of Internet servers. For instance, email servers, Web page servers, and application servers are three different types of servers. What makes each server different is the type of information that is transferred and the protocol (or rules) that are followed to transfer the information. As a matter of fact, the Internet is really just a collection of protocols that specify how to send information. The Internet is not some specific network; rather, the Internet is comprised of those communications that follow an Internet protocol over any network. In other words, the network hardware used to transmit information does not define the Internet.
Is this hurting your brain? Maybe an alternative look at the Internet is needed.
The majority of Internet users don’t clearly understand what the Internet is. For example, it is a common misconception that the World Wide Web (WWW, or the Web) and the Internet are the same thing. The Internet actually encompasses many methods of communicating over a network, and the WWW is only one of these communication methods. In other words, the WWW is just one piece of the Internet.
For instance, using a telephone to call someone is not communicating over the Internet. But, if you hook the phone line into a computer and send an e-mail message, you are communicating over the Internet. The same is true if you have a cable or satellite television connection. Hook the cable to your TV and you are receiving communications over the TV network. However, if you order Internet access from a cable or satellite company and connect the cable to a PC, you will be able to access Web pages. Notice that the network hardware (phone lines, coaxial cable, or satellite dish) does not determine whether the network is part of the Internet. Rather, it is the type of communication that determines if it is an Internet communication.
Of course, communicating over the Internet is not quite as easy as attaching a phone line or cable to the computer. You actually need software to communicate over the Internet, and there are separate software applications to support the different types of communication. For instance, communications over the WWW follow the rules called HTTP (Hypertext Transfer Protocol). Or, said another way, HTTP dictates how information in the form of Web pages is transferred over the Internet. Some other examples of Internet protocols are POP (Post Office Protocol) and SMTP (Simple Mail Transfer Protocol), both of which define the rules for transferring information as e-mail; and FTP (File Transfer Protocol), which defines the rules for transferring files between computers. If you use the Internet frequently, you may be bewildered because you have never heard these terms before (even though you can probably send e-mail and look at Web pages with the best of them!). This is because people use software applications that format the information according to the various protocol rules. In other words, the software does all the heavy lifting.
To communicate over the WWW, there are two primary pieces of software involved: the browser and the server software. The browser (such as Microsoft Explorer, Firefox, Chrome, etc.) is on the client computer. The server software (such as IBM’s WebSphere Application Server, Apache Tomcat, and Microsoft’s Internet Information Services) resides on the server (the computer that manages the Web pages).
One of the “rules” of HTTP is that every Web page is identified with a unique “address.” Also, every server is assigned a unique address called an IP (Internet Protocol) address. IP addresses consist of a very long number broken up into four parts, with each part separated by a period (e.g., 123.218.76.4). This is not a very user-friendly way to locate information on the WWW. Therefore, URL (Uniform Resource Locator) addresses were created.” URLs consist of at least a server (host) address—a series of words separated by periods such as www.spam.com. Sometimes the server address is followed by a directory path and the file name of a specific Web page (web.fccj.org/∼rjanson/cgs1062/JIorderpage.html).
When you specify a WWW address (either IP or URL) and press Enter, the browser builds a Web page request and formats the request so that it is routed (sent) to the correct server. You can compare this to writing a letter (building the Web page request) and then addressing an envelope to send the letter in (formatting the request). In the case of a Web page request, the address follows the rules of HTTP.
The server receives the request, retrieves the appropriate Web page, packages the Web page (again, think of it as addressing an envelope), and sends the page to the browser. The browser receives and displays the Web page.
Wow, there’s a lot going on! Just like the telephone system, communications over the WWW are very complex and do not happen by magic. It is the browser and server software that makes the WWW seem simple.
E-mail works very similarly. The user has client e-mail software (Microsoft’s Outlook) that requests mail from the e-mail server software. When you send an e-mail, Outlook formats the note according to the rules of SMTP and, through the magic of the Internet; the e-mail is routed to the correct mail server. FTP, the other protocol listed earlier, also requires client and server software.
Fortunately, there is server software that supports many protocols. Therefore, instead of installing many different server software applications, companies purchase a single application (like WebSphere) that supports all of these protocols.
In addition to the browser and server software, another important part of the WWW is Web pages. (All that software is not much use if there aren’t any pages to look at!) Simple Web pages are defined with a language called HTML (Hypertext Markup Language). HTML “tags” define the content and appearance of a Web page. Many HTML tags are paired. This means that there is one tag that marks the beginning of a page area and another tag that marks the end of the area. In addition, most tags start with a < and end with a >. For instance, a Web page begins with the “start HTML” tag (<HTML>) and ends with an “end HTML” tag (</HTML>). In addition, each Web page is usually broken up into a header area and the Web page body. The header section contains information about the page and the body contains the actual content of the page. These sections are also defined by start and end tags.
Tutorial: Using HTML to Create a Web Page
We will now go through the pain of entering HTML code to define a Web page so that you will appreciate RAD’s Page Designer later.
- 1. In the Tutorials/src, create a new package called c8.
- 2. In the Navigation pane, click on c8 to select the package.
- 3. To create a file to hold the HTML, click File, New, and then Other.
The New frame will be displayed.
- 4. Scroll down the list and expand the Web item.
- 5. Scroll down the list and select Web Page (as in Figure 8-1).

- 6. Click the Next button.
The New Web Page frame will be displayed (see Figure 8-2).
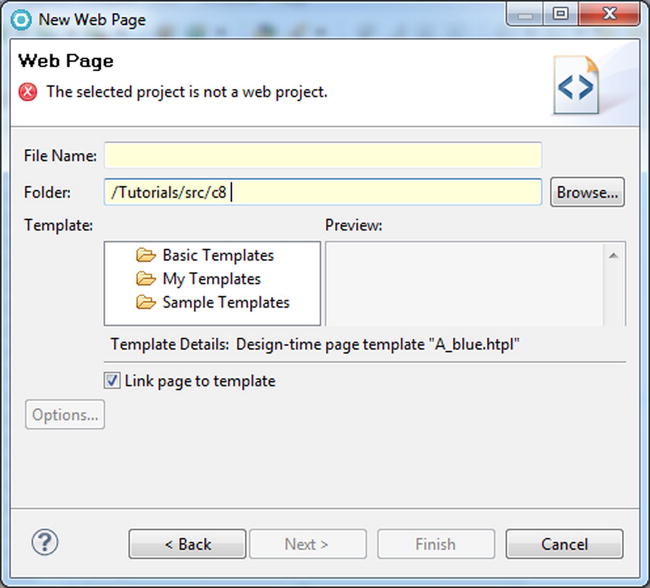
- 7. Specify /Tutorials/src/c8 as the folder name.
Notice that RAD displays an error message, saying that Tutorials is not a Web project. This is true, Tutorials is a Java project. This means the project contains files that run on a client. To create or display a Web page (or create a Java class to run on a server), the files cannot be in a Java project. There are several types of projects that support server based files; the easiest to work with is a Web project.
- 8. Close the New Web Page frame.
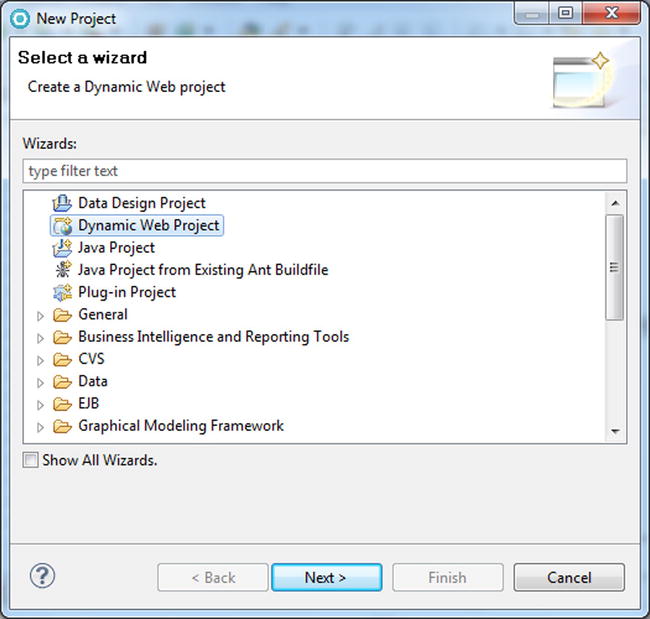
- 9. Click File, New, and then Project.
- 10. At the New Project frame, select Dynamic Web Project (see Figure 8-3), and then click the Next button.
The New Dynamic Web Project frame will be displayed (see Figure 8-4). At this screen, you can specify what type of server the application will run on. Notice that RAD has identified the latest WebSphere Application Server version, in this case 6.1, as the target. Also, RAD assumes you want to package this project in an EAR (Enterprise ARchive file). Just as JARs provide an easy way to package client-based applications, EARs hold applications that have both server and client-based components. The EAR contains JARs that contain the client components and WARs (Web ARchive files) that hold the server-based components (Web pages, servlets, JSPs, etc.). If you don’t want RAD to generate an EAR, simply uncheck the option.
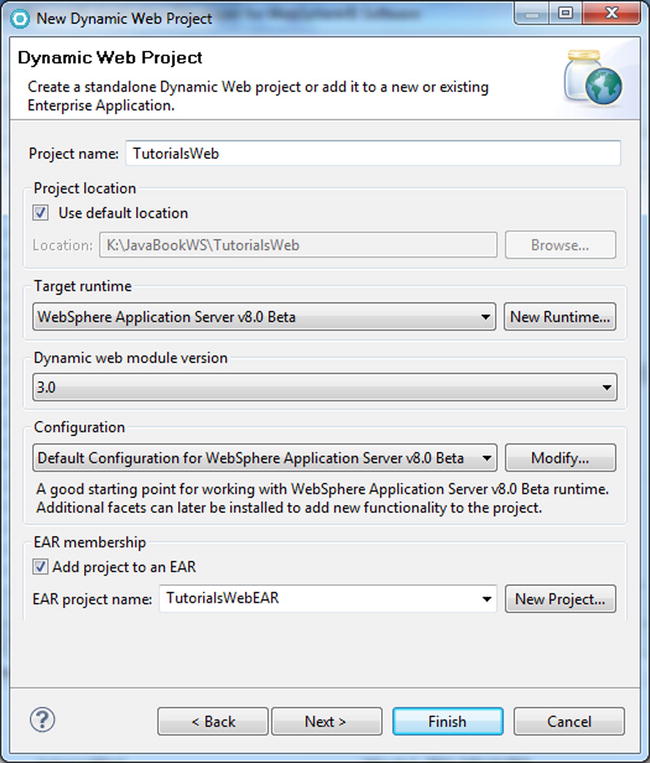
- 11. At the New Dynamic Web Project frame, specify TutorialsWeb as the project name (see Figure 8-4) and click the Finish button.
You will be prompted to switch to the Web Perspective.
- 12. Click the Yes button.
Notice the new Web Perspective icon (a globe) in upper right hand of the RAD frame.
- 13. In the Navigation pane, display the contents of the TutorialsWeb project by clicking on its expansion icon.
Dynamic Web projects work differently than Java projects. Servers require that a server-based application’s components (Web pages, java classes, etc.) be stored in specific folders. For instance, html files must reside in the WebContent folder. Generally, you don’t have to worry about this, because:
- A. RAD automatically builds the correct folders when the Web project is created.
- B. When you create a file in a Web project, RAD will put the file in the correct folder based on the file type.
Let’s prove it.
- 14. Select TutorialsWeb and then perform steps 3 through 6 from above.
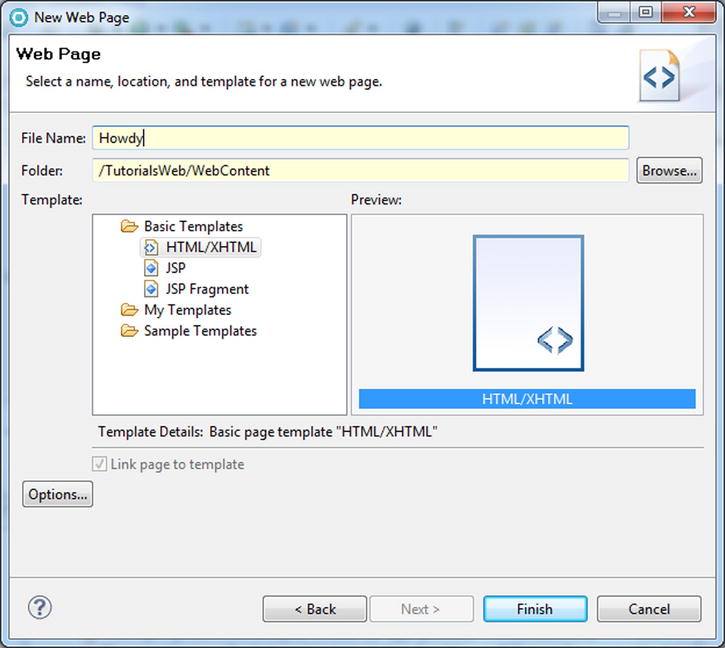
Notice that RAD has already specified WebContent as the folder to hold the file.
- 15. At the New Web Page frame, select HTML/XHTML (beneath Basic Templates), specify Howdy as the File Name (see Figure 8-5), and click Finish.
A blank Web page is created and displayed. What this means is that RAD created the Howdy.html file in the WebContent folder then generated and stored the HTML that defines the Howdy Web page in the file. RAD then started Page Designer and displayed the Howdy page in the Page Designer Design view.
Page Designer has four views for Web pages: Design, Source, Split (the default view), and Preview. The view can be changed by clicking the view tabs at the bottom left of the content pane (see Figure 8-6). We will demonstrate the tools available in Design view later. Right now, we will simply enter the HTML code in the Source view.
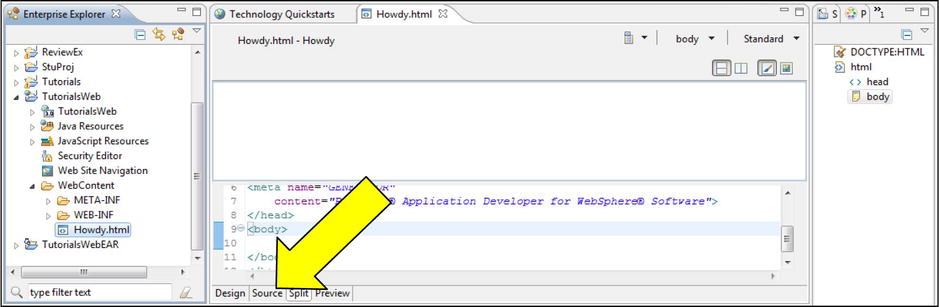
- 16. Click the Source tab (as seen in figure 8-6). Replace the RAD generated body HTML tags in Howdy with the following:
<body>
Howdy from the WWW!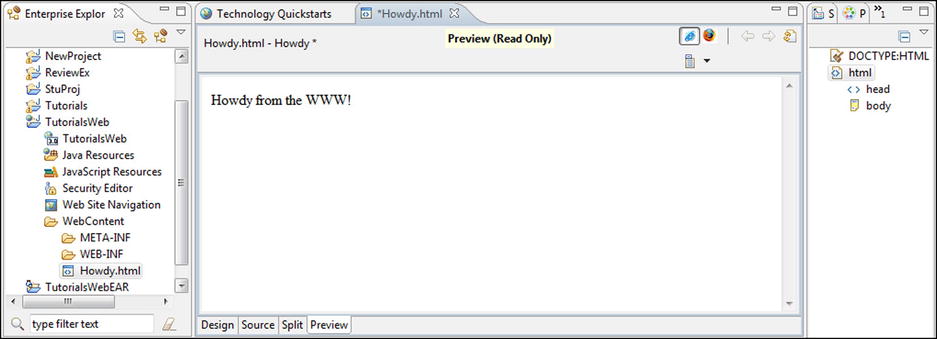
</body> - 17. Click on the Preview tab, to display the Web page.
RAD should look like Figure 8-7. Of course, the phrase “Howdy from the WWW!” is a lie. The Web page is not on the WWW, it is in RAD.
- 18. Save Howdy.
- 19. Click File, then Export.
- 20. At the Export frame, expand General, select File System, and then click the Next button.
- 21. In the Export frame’s right pane, make sure that the Howdy file’s check box has been selected (see figure 8-8).
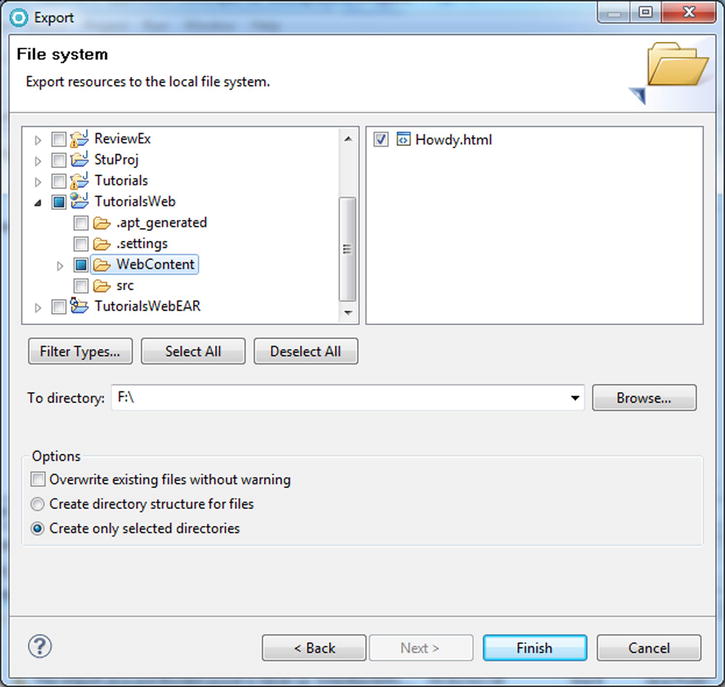
- 22. Specify a secondary storage drive (e.g., C: or F:).
- 23. Make sure the “Create only selected directories” option is selected and click the Finish button.
- 24. Using “My Computer” in Windows, display the contents of the drive that Howdy was exported to in step 23.
- 25. Double-click the Howdy file.
Windows will automatically start the PC’s default browser and display the Howdy file as in Figure 8-9. You might not have known this, but in addition to looking at Web pages on the Internet, browsers can be used to view local files (i.e., files that are stored on your PC).
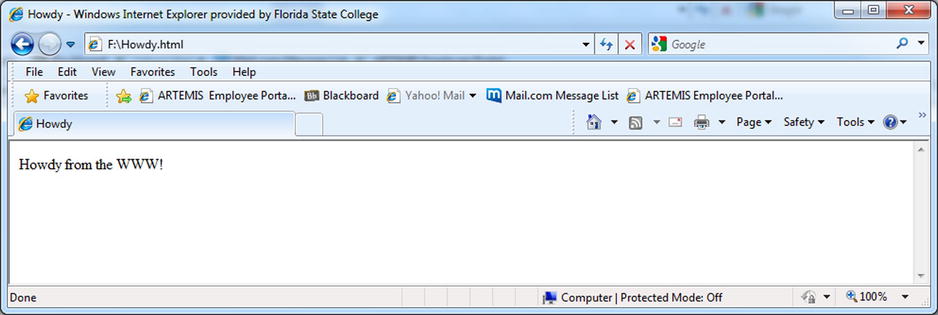
Of course, Figure 8-9 is just another lie! The Web page is not on the Web, it is in the PC’s secondary storage. For instance, if you went to another computer, you could not access the Howdy page. To get the Howdy page on the World Wide Web, you must move the Howdy file to a server. This is also true for a server-based application: it must be installed on a server.
Installing an application on a server is not easy, but it is not exceptionally difficult either. (It’s actually easier than installing a client-based application.) The real problem is the time it takes. You must export the files out of RAD, install them on the server, and then start the application on the server. When you are creating, testing, and making changes to a server-based application, this has to be done many times, and consumes a lot of valuable time. That is why RAD has a built-in server: to make testing easier and faster.
Tutorial: Using the RAD Server
As mentioned, RAD provides a server that can be used to test server-based applications. One of the reasons that RAD takes up so much PC disk space is because of the server software. In this case, it is definitely space well spent. You will now use the RAD server to display the Howdy page.
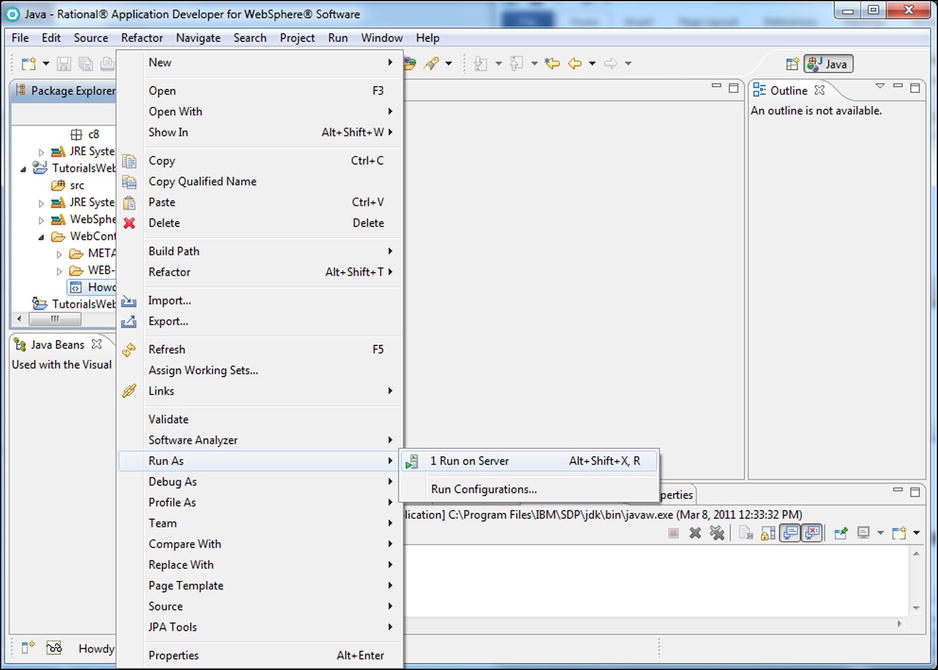
- In the Navigation pane, right-click the Howdy file (in TutorialsWeb) to display the shortcut menu.
- From the shortcut menu, select Run as, and then Run on Server (see Figure 8-10).
If a server has already been created, the Run On Server frame will be displayed with the “Choose an existing server” radio button checked and a default server already selected. Simply click the Finish button and the server will be started.
If this is the first time the RAD server has been used, the Server Selection frame will be displayed with the “Manually define a new server” option selected (see Figure 8-11). A server must be created before it can be run. RAD offers several different server types and versions. Make sure the latest WebSphere version’s Test Environment server is selected (i.e., 8.0) and then click the Finish button. After being successfully created, the server will be started.

Starting the server may take some time (depending on the speed of your computer) and many messages will be generated in the console. After the final message is displayed in the console, a browser pane with the Howdy Web page will be displayed (see Figure 8-12).

Servlets
Servlets are Java classes that reside on a server and can be accessed with a browser. Servlets can perform any Java command but, more importantly, servlets can send HTML back to a browser. To explain how the servlet does this we need to go into a little more detail about how the browser and server work.
Up until now, we have only used the browser to view a Web page. However, instead of specifying a Web page URL (i.e., http://My.Website.com/Howdy.html) a servlet URL can be specified. The servlet URL consists of the RAD server’s (i.e., the host’s) address, which resides on the PC you are working on and is identified in the URL as http://localhost:9080. Then, after the host address, specify the project name (/TutorialsWeb) and the name of the servlet (i.e., /MyFirstServlet) separated by forward slashes. The ability to access servlets also highlights why Web addresses are called Uniform Resource Locators, not Uniform Web Page Locators: URLs can identify more than just HTML files.
Rather than specifying a servlet’s URL, servlets can also be invoked from a form. A form is an area of a Web page that contains a submit button and components where information can be entered. (If you have ever bought anything on the Internet, you have filled out a form that has at least “name,” “address,” and “credit card number” text fields.)
When you specify a Web page (e.g., you enter a URL and press Enter or you click on a hyperlink), the browser sends a request to the server for that Web page. This type of request is called a Get request. If you are using a form and click the submit button, the same thing happens—a request is created and sent to the server. However, in this case a Post request is created and sent, not a Get request. A Post request contains the form information and, like a Get request, asks the server for a particular resource. The resource in a Post request can be a servlet.
Just to be perfectly clear: there are two types of requests, Gets and Posts. Get requests are browser requests for a particular Web resource (e.g., Web page, servlet). Post requests also request a resource (e.g., Web page, servlet) but, in addition, contain the form information. A Post request (with the form information) is created and sent when a form submit button is clicked.
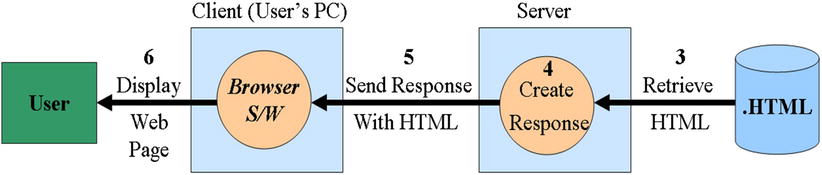
Figure 8-13 shows (1) the user supplying a URL to the browser. (The URL could have been entered in the browser’s address field or be specified in a form.) The browser creates a request and, based on the URL, sends it to the correct server (2).

If the request is for a Web page, the server retrieves the HTML file from secondary storage (step 3 in Figure 8-14). The server then creates a response and embeds the web page (i.e., the HTML) along with communication information needed to route the response back to the browser (4). The server sends the response (5). The browser receives the response, retrieves the HTML from the response, and displays the Web page to the user (6).
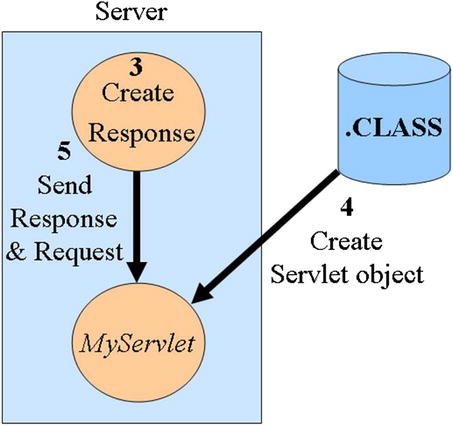
If, instead, the request is for a servlet, the server creates a response object but does not embed any HTML (see step 3 in Figure 8-15). The servlet class file is retrieved from storage, and an object of that class type is instantiated (4). Then either the servlet’s doGet or doPost method is executed. (Can you guess what decides which method is executed? Yes, if the browser’s request was a Get, the servlet’s doGet method is invoked. If the request was a Post, the servlet’s doPost method is executed.) The Server passes both the request (actually a HTTPServletRequest) object and the just created response (HTTPServletResponse) object to the doPost or doGet methods (5).
A servlet can do many things. For instance, a servlet can embed HTML into the response object. When the servlet ends, the server will send the response object back to the browser, and the browser will display the HTML created by the servlet. However, the servlet does not have to echo back static HTML. A servlet can perform any function a Java class can perform. For instance, the servlet could run other Java object methods, redirect the browser to a different Web page, or pass the request and response objects to other objects for processing. In addition, if a Post request was passed, the servlet can retrieve and process the form information.
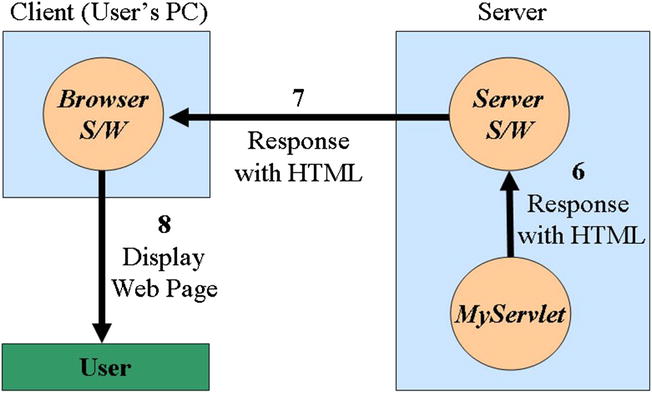
Figure 8-16 depicts a servlet embedding HTML into the response object and passing the response back to the server (6). The server then sends the response back to the browser (7). The browser then retrieves the html from the response and displays it (8).
Wow, there sure is a lot going on at the server!
We will create a simple servlet with a doGet method that processes a Get request. Then we’ll expand your Web page knowledge and create a form. Lastly, we’ll tie the form to a servlet and code the servlet’s doPost method to process the form information.
Tutorial: Creating a Simple Servlet
Let’s have a go at a servlet.
- 1. In the Enterprise Explorer pane, click on the TutorialsWeb project to select it (if necessary).
- 2. Click File, New, Other, expand the Web folder, select Servlet then click the Next button.
- 3. Specify MyServlet as the class name.
Notice that RAD has specified the folder to hold the Java source code (src) and defined the class as a subclass of HttpServlet (see Figure 8-17). (If the Next and Finish buttons aren’t active, click the Java package’s Browse button and select the default package.)
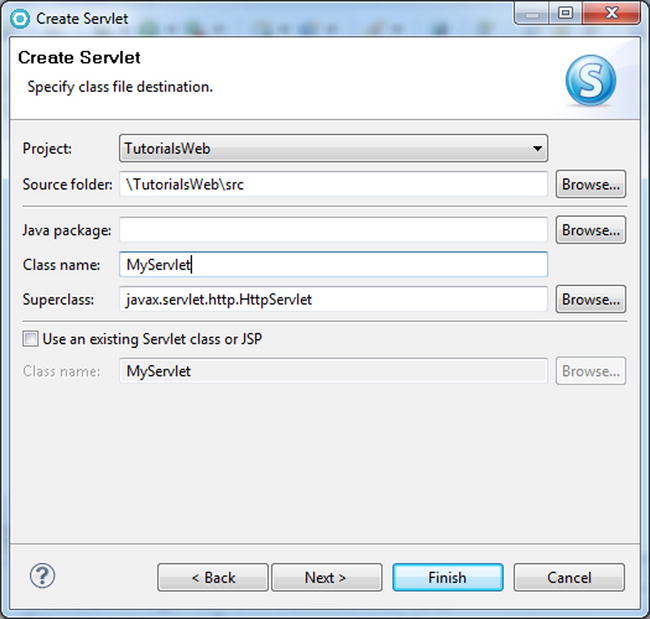
- 4. Click the Finish button.
The servlet source code will be displayed in the Editor.
- 5. In TutorialsWeb, expand Java Resources/src/(default package) to show where MyServlet.java was placed in the project.
In the source, notice that RAD has generated import statements (for the classes the servlet needs) and there are constructor, doGet, and doPost method stubs. Note that the doGet and doPost methods expect both request and response objects.
- 6. In the body of the doGet method, insert the following statement:
System.out.println("Howdy from MyServlet"); - 7. Save the source code.
When the source code is saved, RAD automatically generates the servlet class file. However, the RAD server does not have this new resource. In other words, the servlet has to be installed on the server. There are several ways to do this however restarting the server is easy to do and forces the entire project (all the Web pages, servlets, etc.) to be loaded onto the server.
- 8. Click the Servers tab, (to the left of the Console tab, see the first arrow in Figure 8-18).

The Servers view displays all defined RAD servers and their status. In the upper right of the Servers pane are buttons that allow you to perform a variety of server functions. For example, you can stop, start, or restart a server. (To activate the buttons, select a server by clicking on it.) The Restart button is the second button (see the second arrow in Figure 8-18).
- 9. Make sure the correct server is selected in the server pane, and then click the Restart button.
The server will be stopped and then started. This may take a minute or two.
- 10. In the Enterprise Explorer pane, expand the new TutorialsWeb folder (within the TutorialsWeb project) and then the Servlets folder to display the MyServlet.class file.
- 11. Right-click MyServlet to display the shortcut menu, then choose Run As, and then Run on Server.
- 12. On the Run On Server frame, click the Finish button.
The Console should show the message, “Howdy from MyServlet,” as seen in Figure 8-19. (If nothing appears in the console, click the Refresh button in the Browser window; see the arrow in Figure 8-19.)
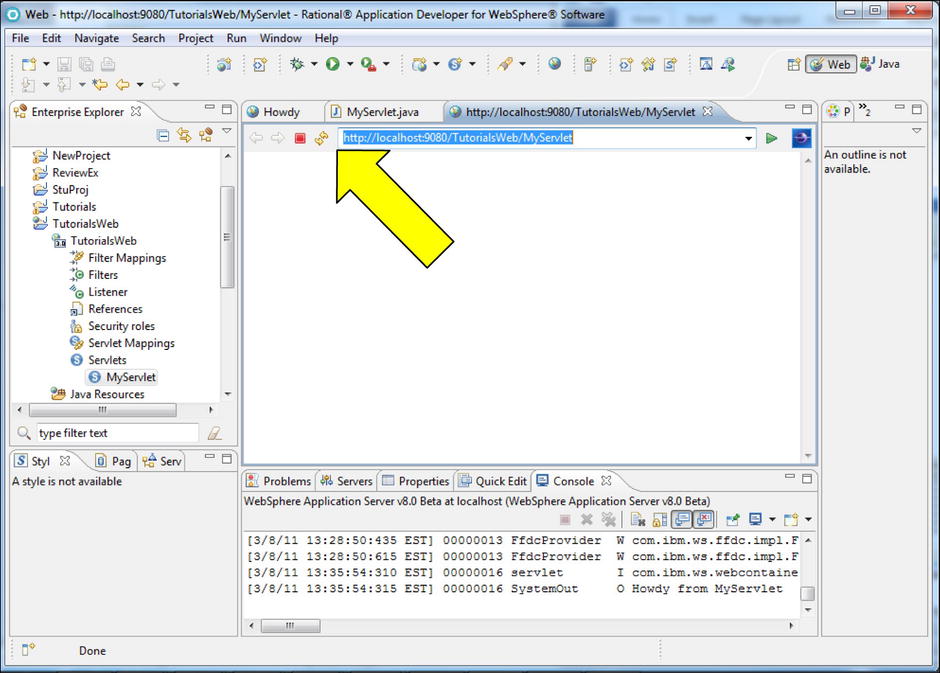
This example proves that the doGet is called when the servlet is requested by the browser. However, the servlet did not insert any HTML into the response object; therefore, the RAD browser window displays a blank page. Our next step is to change MyServlet to insert HTML into the response object.
As mentioned, response objects can hold HTML. However, there are syntax rules that must be followed and we will need several objects to change the response object. Fortunately, we can import one of the Java classes we’ll need and the response object comes with several useful methods that will help us with the other requirements.
Response objects have a property called content type. Content type is used by the browser to determine how to handle the response. For instance, if the content type indicates that the response contains HTML, the browser will read the HTML and display it. If the response’s content type specified an Access database file, the browser would prompt to see if the user wanted to display or download the file.
So, for our example, the servlet needs to set the content type to indicate HTML. The content type property is modified by the response object’s setContentType method. The correct syntax is: responseVariable.setContentType("text/html");
Once the content type has been specified, we can start writing the HTML to the response object. We will need two objects to do this: a PrintWriter and an OutputStream. A print writer converts primitives and reference variables into text. For example, a String variable points to a String object. If you pass a String variable to a print writer,the print writer will extract the text from the String object. Similarly, the print writer will convert primitive variables to text values (see Figure 8-20). Getting the information into text format is only half the battle. The text has to be converted into a binary stream (i.e., a set of zeros and ones that the browser can recognize). An OutputStream object converts the text to a binary stream and this binary stream is written to the response object.
Now, the tricky part.

When a print writer is created, an OutputStream objectmust be passed to the print writer. This means that an output stream must be created before the print writer. Response objects have a getOutputStream method that creates an output stream that is already associated with the response object (i.e., the output stream will automatically write to that particular response object). In other words, you don’t have to create an output stream and then tie it to the response object. The following statement:
PrintWriter out = new PrintWriter(resp.getOutputStream());
will:
- Get an output stream from the response object
- Create a PrintWriter object
- Pass the output stream to the print writer
- Assign the print writer to a PrintWriter variable called “out”
Of course, we must also import the PrintWriter class with the following statement.
import java.io.PrintWriter;
That was the hard part. All you need to do now is write the HTML to the response object using out’s (the print writer’s) println method.
Tutorial: Working with a Response Object
Let’s look at the Response object:
- 1. In MyServlet.java, add the following import statement:
import java.io.PrintWriter; - 2. In the doGet header, select the variable request, right-click on it, choose Refactor, and then Rename.
- 3. Specify req as the new name and press Enter.
- 4. In the doGet header, rename response as resp.
- 5. In the doPost header, rename the variables to req and resp also.
- 6. In the doGet method, replace the System.out.println statement with the following statements:
resp.setContentType("text/html");
PrintWriter out = new PrintWriter(resp.getOutputStream());
As explained earlier, these statements set the content type, create a print writer object, and assign it to a variable called out.
- 7. At the end of the doGet method, add the following statements to define a Web page’s header and title:
out.println("<HTML>");
out.println("<HEAD>");
out.println("<Title>MyServlet Get Response</Title>");
out.println("</HEAD>"); - 8. At the end of the doGet method, add the following statements that define a Web page’s body and content:
out.println("<BODY>");
out.println("Howdy from MyServlet's doGet method!");
out.println("</BODY>");
out.println("</HTML>");
out.close();
Notice that the print writer’s close method is called. The close method “flushes” the output stream and releases any resources allocated to the output stream. Essentially, flushing ensures that the binary stream is written to the response. (If you do not close the print writer, the response may not contain the HTML and a blank page would be displayed.)
- 9. Save the source code and run MyServlet on the RAD server.
The browser should look like Figure 8-21. If it doesn’t, click the refresh button.

- 10. In the browser’s address field, replace MyServlet with Howdy.html and press Enter.
The Howdy page will be displayed.
- 11. In the browser’s address field, replace Howdy.html with MyServlet and press Enter.
The browser should again look like Figure 8-21. Notice that you were able to run the servlet from the browser. The point being: browsers can be used to access more than just Web pages and, as described, the application server finds and executes class files, and then sends the response back to the browser. In addition, notice that the file extension (.class) did not have to be specified in the servlet’s URL. (With most Web pages, the extension .html must be included.)
Of course, using servlets to display static text is way too much work for the programmer. Simple Web pages can do this with much less effort. However, retrieving user-specified information and then displaying it would be worthy of a servlet.
Tutorial: Defining Form Components
To retrieve user information, we will create a form for data entry and then code the servlet’s doPost method to retrieve and display the information.
- 1. In the Enterprise Explorer pane, click on TutorialsWeb project to select it.
- 2. To create a file to hold the form, click File, New, and then Other.
- 3. On the New window, expand the Web item, select Web Page, and click the Next button.
- 4. On the New Web Page window, select HTML/XHTML, specify EnterEmpInfoForm as the File Name, and click the Finish button.
A blank page will be displayed in the Split view. We will use the Design view’s GUI to build the Web page this time instead of typing the HTML code.
HTML supports many of the same GUI components as Java but, unfortunately, has different names for many of the components. A form is similar to a Java frame in that it is usually comprised of many GUI components. The two major differences with a form are that a form must include a submit button and the form components are defined before the form is defined.
Adding form components is similar to adding Java frame components: select the component then click on the Web page location to paste it onto the page. However, a Web page is more text-oriented than a Java frame. The Web page is more like a word processing document, so manipulation through click and drag is very limited. For instance, to move a component lower on the Web page you must press the Enter key and insert blank lines.
Heck, let’s get to it instead of talking about it.
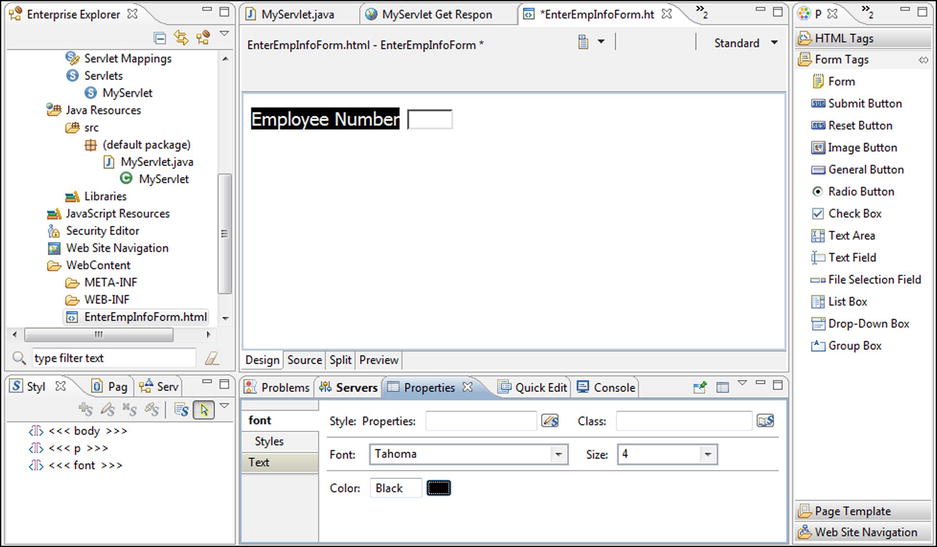
- 5. Make sure the Design view is selected and then type the text Employee Name.
- 6. In the far right pane, change from the Outline view to the Palette view.
- 7. Expand the Form Tags tray, click Text Field, and then click to the right of Employee Name text.
The Insert Text Field window will be displayed. This is used to specify the text field attributes. Notice that a default size (20) for the field is already specified. There is also a maximum length parameter that can be specified, a password option (which means that entered text will not be displayed), and an initial value can be defined.
- 8. Specify the Name as empNameTF and accept the other defaults by clicking the OK button.
Notice that a text field is inserted right next to the text.
- 9. Press the left arrow key to move the cursor between the text and the text field.
- 10. Press the spacebar once to insert a space.
Pressing the spacebar a second time will not insert another space.
The text field can be dragged to the next line by clicking on the border and dragging, but this is the extent of the click and drag capability (at this time). There are also resize handles on the text field but they will only control the field’s length not its height.
- 12. Change the text “Employee Name” to “Employee Number.”
- 13. Display the text field’s properties by right-clicking on the text field then select Properties.
- 14. In the Properties view, change the field Name to empNumTF and the size (Columns) to 6.
- 15. Select the text “Employee Number.”
Notice that the properties view now displays the text’s properties.
- 16. In the Properties view, click on the font tab (on the left side) and specify the font properties as seen in Figure 8-22.
- 17. Click anywhere on the Design page to deselect the text field.
As mentioned earlier, Web pages are much more text oriented than frames. For example, specific location coordinates can be specified for frame components. Web page components can be aligned (on a particular line) but to position a component vertically, blank lines must be inserted or deleted. One of the secrets to Web page design, however, is using an invisible table to control the location of page components.
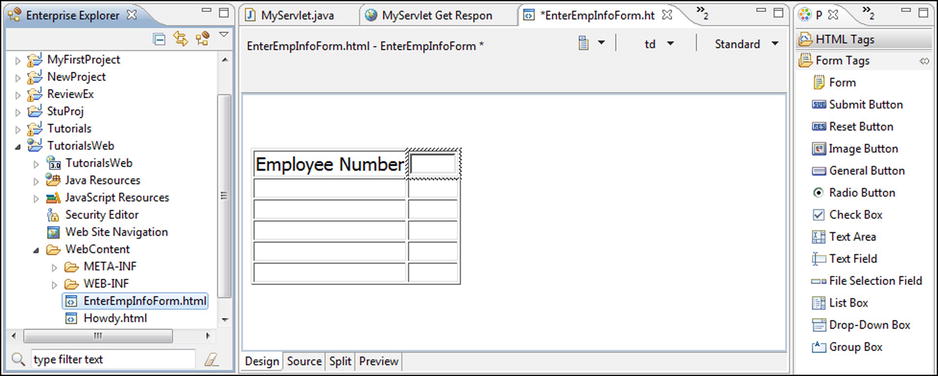
- 18. Move the cursor after the Text Field component and click Table, then Insert Table.
- 19. At the Insert Table frame, specify 6 rows and 2 columns and click the OK button.
- 20. Cut and paste the text into the table’s first cell in the first row.
- 21. Cut and paste the text field into the table’s second cell in the first row.
The page should look like Figure 8-23.
- 22. Cut and paste the “Employee Number” from the first cell into the first cells in the other rows.
This ensures that the text formatting will be the same for all the text.
- 23. Change the text in the other rows to Employee Name, Street Address, City, State, Zip and Hourly Pay Rate.
Oops, we’re one row short.
- 24. Move the cursor to the last row and click Table, and then Add Row Below.
A new row will be inserted at the end of the table.
- 25. Paste the original text into the new row’s first cell, then change to “Hourly Pay Rate.”
- 26. Select all the cells in the first column.
- 27. In the Properties view, select right for the align Attribute (as in Figure 8-24).
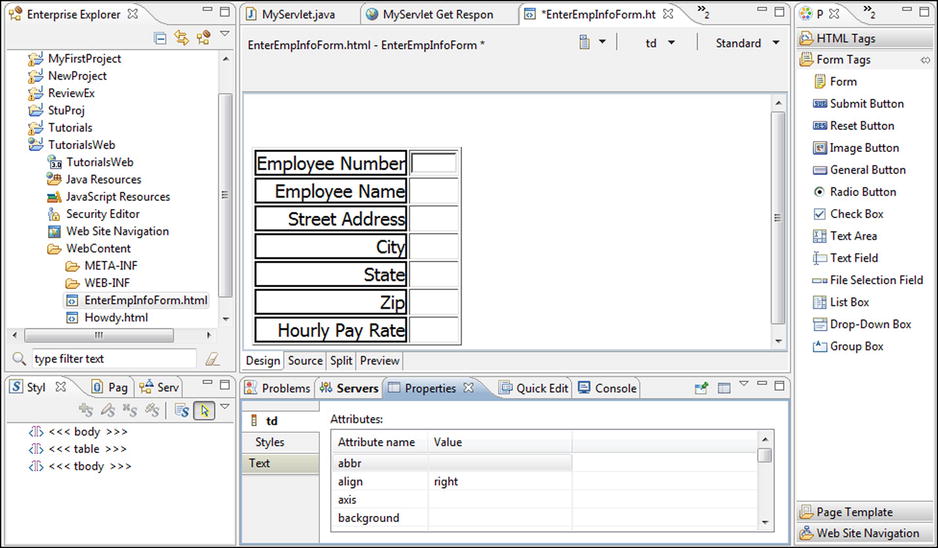
All the text in the first column will be right justified within the cells.
- 28. Insert text fields into the other six cells with the following names and lengths:
empNameTF                20
streetAddrTF             20
cityTF                   13
stateTF                  13
zipTF                     6
hPRTF 8 - 29. Select the table by clicking anywhere to the right of the table in the Design area.
The table and the Properties view should appear as in Figure 8-25.
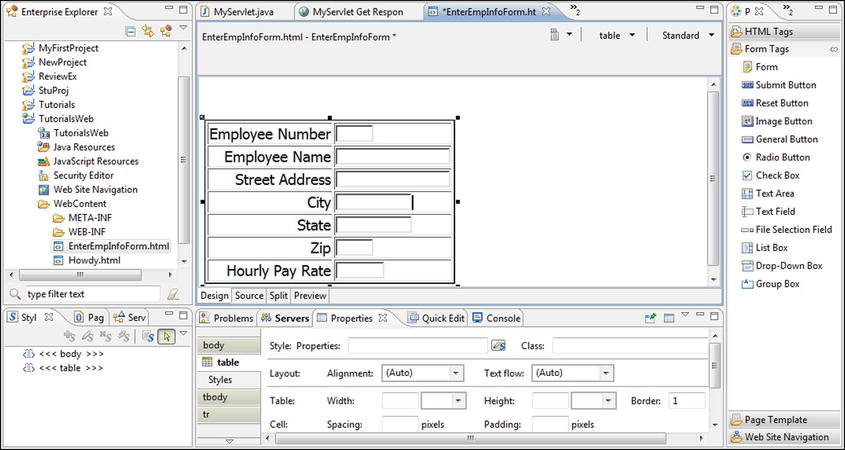
- 30. Change the Alignment property to Center and Border to 0.
Setting the Border to 0 makes the table grid lines invisible when displayed in a browser.
- 31. In the content pane, click the Preview tab.
The Web page should appear as in Figure 8-26.

There are many other Web page formatting functions and good design practices; however, they are not within the scope of this text. So, we will leave behind Web page formatting and get down to business: defining a form and tying the form to a servlet.
As mentioned earlier, a form must have a submit button. So we will add a submit button and then define a form.
- 1. Change back to Design view.
- 2. In the Forms Tag tray, click Submit Button then, in the Design view, click on the line after the table.
- 3. At the Insert Submit Button window, specify submitBtn as the name, Submit as the label text, and click the OK button.
The submit button will be inserted beneath the table.
- 4. Click to the right of the submit button.
This selects the entire line. Now we will center the button on the page.
- 5. In the Properties view, change the alignment property to center.
Adding components from a tool bar is an alternative to the adding from the palette. To define the form this way, we must first display the “Form and Input Fields” toolbar.
- 6. Click Toolbar and then Form and Input Fields.
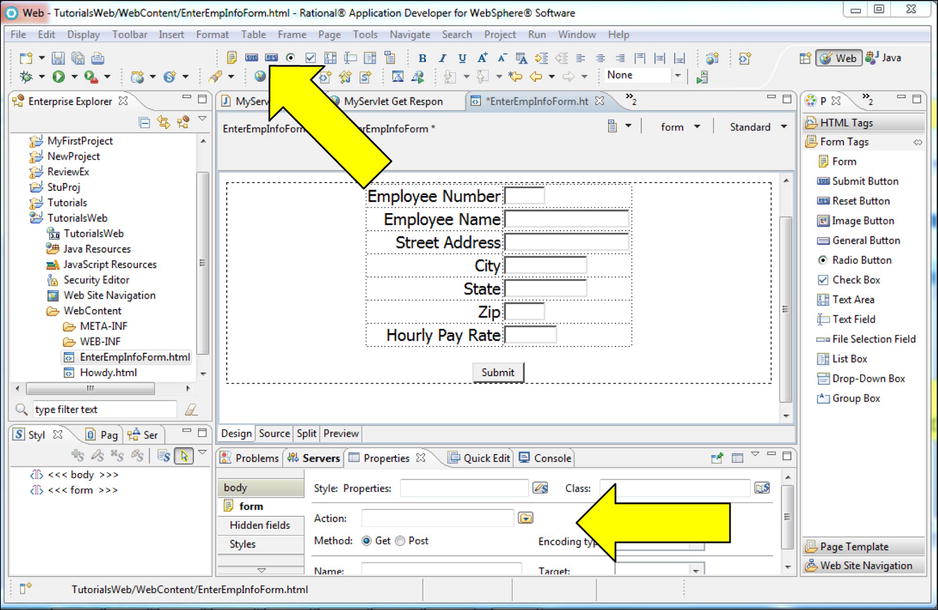
Buttons representing the most commonly used components from the Form Tags tray will be added to the right of the toolbar print button. The first new button is the Insert Form button (see Figure 8-27).
- 7. Select all the components on the page (i.e., the table and submit button).
- 8. Click the Insert Form button.
The table and submit button will be enclosed in a dashed line box. The box indicates the form. In the Properties view, the form tab is selected and its attributes/properties are displayed.
- 9. In the Attribute pane, click the Action Browse button and select servlet from the shortcut menu (see Figure 8-27).
- 10. At the Select Servlet window, select MyServlet and click the OK button.
The Properties view will display /TutorialsWeb/MyServlet in the Action field.
- 11. In the Properties view, click the Post method checkbox to ensure that a Post request is generated when the submit button is clicked.
- 12. Save the source code.
The Web page is now tied to the servlet. Let’s prove it. We’ll put some code in the doPost method, run the page on the server and submit the form. If the doPost code is executed, then everything is good.
- 13. In MyServlet, copy all the statements from the doGet method into the doPost method.
- 14. In doPost, change the title to “MyServlet Post Response” and the page content to “Howdy from MyServlet's doPost method!”
- 15. Run the EnterEmpInfoForm Web page on the server.
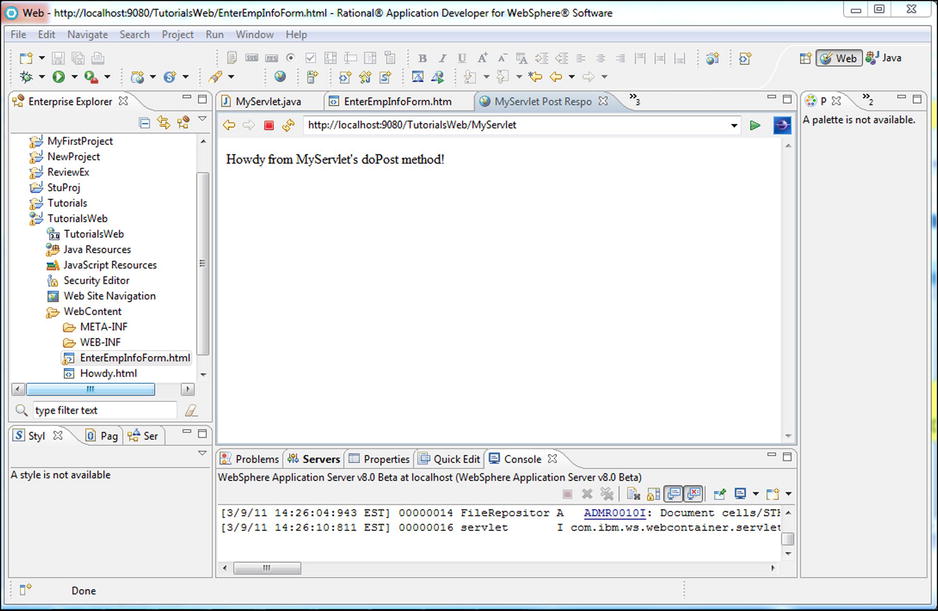
- 16. In the browser window, click the submit button.
The RAD browser should look like Figure 8-28.
Although this proves that the EnterEmpInfoForm Post request does invoke the doPost method, doPost doesn’t really do much. Let’s modify doPost so that the form information is retrieved and then redisplayed.
Tutorial: Retrieving Form Information
In addition to enhancing the function of the servlet, we will also improve its structure. Notice that there is duplication in MyServlet. For example, both do methods create print writer variables and set the response context. Couldn’t the context be set once and shouldn’t we use one class print writer variable instead of two method variables? We will create a new printer writer class variable and a new method called getStarted that will perform the common functions.
- 1. Create a new method at the end of the class as follows:
       public void getStarted(HttpServletResponse resp) throws
IOException {
        }
The header must throw an IOException because the getOutputStream method (which we will use in this method) can throw an IOException. Notice that the method also requires that the response be passed.
- 2. Copy the first 4 statements from the doPost method into getStarted method.
- 3. Change the second statement so that a new out variable is not created. The getStarted source should look like the following:
       public void getStarted(HttpServletResponse resp) throws
IOException {
                resp.setContentType("text/html");
                out = new PrintWriter(resp.getOutputStream());
                out.println("<HTML>");
                out.println("<HEAD>");
        }
Errors will be displayed saying that out cannot be resolved. We need to create out as a class variable.
- 4. At the beginning of the class, add the following statement to create out as a class variable:
PrintWriter out; - 5. In doPost and doGet, replace the first four statements with the following statement:
getStarted(resp);
That’s enough coding, let’s test a little.
- 6. Close the any browser windows that are open and run MyServlet on the server.
The text showing that the doGet was executed will be displayed.
- 7. In the browser address field, specify EnterEmpInfoForm.html and press the Enter key.
- 8. On the EnterEmpInfoForm Web page, click the submit button.
In the console, the text indicating that the doPost was executed will be displayed. This means that you successfully tidied up the class. Now, we’ll add code to retrieve and display the form data. The request (passed to the servlet) contains the form’s text field values as parameters. The values can be retrieved (as strings) using the request’s getParameter method. The getParameter method simply requires that you specify which component’s text to retrieve.
- 9. In doPost, replace the statement that displays the static text with the following:
out.println("Employee Number " + req.getParameter("empNumTF")); - 10. Save the source code and run the EnterEmpInfoForm page on the server.
- 11. On EnterEmpInfoForm, enter 123 as the employee number and click the submit button.
The text “Employee Number 123” will be displayed in the browser.
Think of the implications to our application! If the servlet created an employee object and the Web page offered options to calculate gross salary, tax amounts, and so on, then:
- A. All of the employee functions could be available from any computer that had access to the Web.
- B. We would not have to install the application on multiple (thousands? millions?) of PCs, thereby saving a good deal of time, effort, and confusion.
- C. Modifications would be made to a single set of programs on the server, not to multiple copies of the programs on each PC.
Of course, if a computer’s Internet connection isn’t working, the Web page and servlet can’t be accessed and, if the server malfunctions, no one can access the functions. So, there are some disadvantages to server-based applications.
Notice that to display results, servlets require the programmer to enter the HTML; there is no GUI to generate the HTML. For professional looking Web pages, this is not a trivial amount of coding. Fortunately, there is an alternative to servlets called Java Server Pages. JSPs make defining a result page much easier. We will cover JSPs in the next chapter.
Results of the Tutorial
Time to go over the results:
- 1. In Tutorials, a new package called c8.
- 2. A new project called TutorialsWeb, with the following four files (that you created):
MyServlet.java           MyServlet.class
Howdy.html EnterEmpInfoForm.html - 3. A copy of the Howdy.html file on one of the secondary storage drives (e.g., C: or G:)
- 4. When run on the server:
- Howdy.html will display static text
- EnterEmpInfoForm.html displays fields to enter employee information and, when the submit button is pressed, invokes MyServlet
- 5. When specified in the browser address field, MyServlet will display static text.
- 6. When invoked from EnterEmpInfoForm, MyServlet will display static text and the employee number from EnterEmpInfoForm.
- 7. MyServlet’s source code should look like the following:
import java.io.IOException;
import javax.servlet.ServletException;
import javax.servlet.annotation.WebServlet;
import javax.servlet.http.HttpServlet;
import javax.servlet.http.HttpServletRequest;
import javax.servlet.http.HttpServletResponse;
import java.io.PrintWriter;

public class MyServlet extends HttpServlet {
        PrintWriter out;
        private static final long serialVersionUID = 1L;

        public MyServlet() {
                super ();
        }

        protected void doGet(HttpServletRequest req,
                    HttpServletResponse resp)
                    throws ServletException, IOException {
                getStarted(resp);
                out.println("<Title>MyServlet Get Response</Title>");
                out.println("</HEAD>");
                out.println("<BODY>");
                out.println("Howdy from MyServlet's doGet method!");
                out.println("</BODY>");
                out.println("</HTML>");
                out.close();
        }

        protected void doPost(HttpServletRequest req,
                    HttpServletResponse resp)
                    throws ServletException, IOException {
                getStarted(resp);
                out.println("<Title>MyServlet Post Response</Title>");
                out.println("</HEAD>");
                out.println("<BODY>");
                out.println("Employee Number " +
                req.getParameter("empNumTF"));
                out.println("</BODY>");
                out.println("</HTML>");
                out.close();
        }

        public void getStarted(HttpServletResponse resp)
                    throws IOException {
                resp.setContentType("text/html");
                out = new PrintWriter(resp.getOutputStream());
                out.println("<HTML>");
                out.println("<HEAD>");
        }
}
Review Questions
- What is a servlet?
- What is a server?
- What is a protocol?
- What is HTTP?
- How are the Internet and the World Wide Web related?
- What are the advantages of server-based applications over client-based applications?
- What does a server pass to a servlet?
- What are the two primary methods in a servlet?
- What is the relationship between a form and a servlet?
- What are HTML tags?
In this exercise, you will create a Web page and servlet to enter and display shipment information (probably not a big surprise).
- Create a Dynamic Web project called ReviewExWeb and an EAR called ReviewExWebEAR.
- Create a Web page called ShipInfoForm that looks like Figure 8-29 and name the input text fields empNumTF, shipNumTF, dateRcvdTF, timeRcvdTF, and suppNameTF.
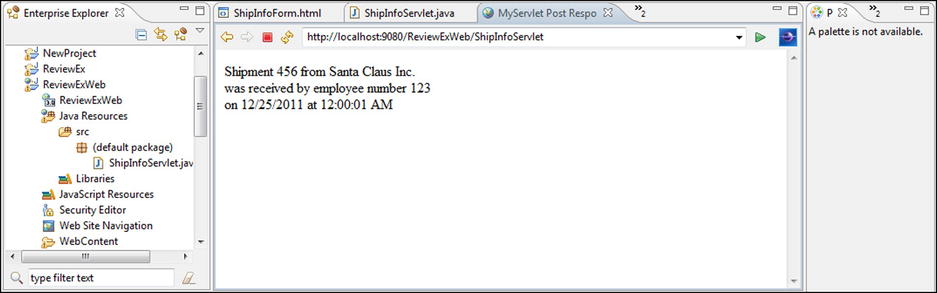
- Create a servlet called ShipInfoServlet that will read the shipment information from a request and display that data, as seen in Figure 8-30.
- In ShipInfoForm, create a form that will invoke the servlet ShipInfoServlet and pass the text field data.

Results of the Review Exercise
Here are the results:
- A new project called ReviewExWeb and ReviewExWebEAR.
- In ReviewExWeb, one Web page called ShipInfoForm and one servlet called ShipInfoServlet.
- ShipInfoForm invokes ShipInfoServlet.
- ShipInfoServlet retrieves and displays the shipment information entered on ShipInfoForm, as seen in Figure 8-30.
Check that the Exercise Was Done Correctly
Finally, let’s check that it was done correctly:
- Run ShipInfoForm on the server.
- Verify that ShipInfoForm appears as specified above.
- Enter Shipment information into ShipInfoForm, click the submit button, and verify that the information appears as shown in Figure 8-30.