
It would be nice if we could just plug the Kinect in, hash out a quick script on Vim, and execute it on a command line, but, alas, seeing as the Kinect for Windows SDK 2.0 is deeply integrated into the Microsoft developer stack and as there are good development tools available for the Kinect, we’ll make a short initial time investment to set up our Kinect properly.
Hardware Requirements
The exact hardware setup required to make use of the Kinect for Windows v2 varies greatly depending on what exactly you want to do. If you want to make use of heavy image processing, it would pay to have a souped-up machine, but for basic usage such as you would find with the Kinect samples’ code, the following minimum specs should suffice. All examples in this book have been tested on a Surface Pro 2 (W10, i5, 4GB RAM) and a Surface Book (W10, i5, 8GB RAM, dGPU).
Required Specs
64-bit (x64) processor
Physical dual-core 3.1 GHz processor or faster (recommended i7)
4GB of RAM or more
USB 3.0 controller (recommended built-in Intel or Renesas chipset)
Graphics adapter with DX 11 support (as always, have the latest drivers installed)
Windows 8 or 8.1, Windows 8 or 8.1 Embedded Standard, or Windows 10
Kinect for Windows v2 sensor or Kinect for Xbox One with the Kinect Adapter for Windows and associated USB cabling. It is also recommended that you have the power hub.
If you do not have a dedicated USB 3.0 port available and are using a USB 3.0 host adapter (PCIe), ensure that it supports Gen 2. You might have to disconnect other USB devices, as they may restrict bandwidth on the controller for the Kinect. In fact, this is a very common issue with the Kinect 2. The Kinect transmits a lot of data, and even if your USB appears to be 3.0, in reality it might not be capable of providing enough bandwidth to support your applications.
The Kinect should work with tablet devices as well, as long as they meet the aforementioned criteria. This means you could use it for something like a booth with a keyboard-less Surface Pro type device .
Tip
If you want to quickly identify whether a machine supports the Kinect 2 for Windows, use Microsoft’s Kinect Configuration Verifier tool, which will check your system for any known issues (Figure 1-1). You can download it at http://go.microsoft.com/fwlink/p/?LinkID=513889 .
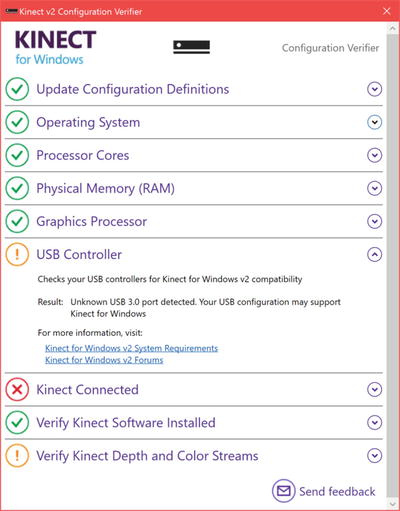
Figure 1-1. Kinect Configuration Verifier tool
Note
The Kinect Configuration Verifier can be misleading at times, specifically in regards to the USB controller. Even if it shows a warning for the USB controller, it is worth testing the Kinect with an actual application before writing the hardware off as unusable.
Software Requirements
You will need Visual Studio 2012 or newer. This includes the Express and Community flavors. This does not include Visual Studio Code. I personally use Visual Studio Enterprise 2015 (with Update 2), and the examples have been tested with such. You can download a free copy of Visual Studio at https://www.visualstudio.com/en-us/products/visual-studio-community-vs.aspx .
You will need the Kinect for Windows SDK 2.0. You can download it at https://developer.microsoft.com/en-us/windows/kinect .
Optional: The speech samples require the Microsoft Speech Platform SDK Version 11 in order to compile. You can find it at https://www.microsoft.com/en-us/download/details.aspx?id=27226 .
Optional: The DirectX samples require the DirectX SDK in order to compile, which you can grab at https://www.microsoft.com/en-us/download/details.aspx?id=6812 .
Installing and Setting Up the Kinect
Regardless of whether you purchased a Kinect for Windows v2 or repurposed a Kinect from your daughter’s Xbox One, the setup instructions are roughly the same. The key difference is that if you have a Kinect for Xbox One, you will need a Kinect Adapter for Windows (Figure 1-2), which you can purchase on the Microsoft Store at http://www.microsoftstore.com/store/msusa/en_US/pdp/Kinect-Adapter-for-Windows/productID.308803600 .
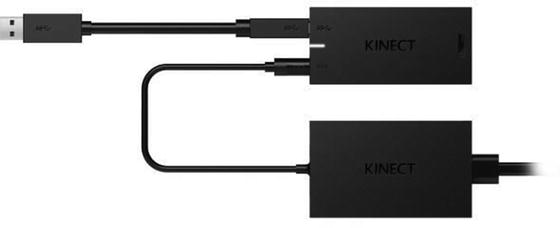
Figure 1-2. Kinect Adapter for Windows
Most developers should be able to plug in all the cables of the Kinect on their own without frying anything, but seeing as I very nearly stuck the power code into a USB port, a bit of verbosity in the setup instructions would not be amiss. Before you assemble the hardware, it would be sensible to take care of the software side of things. If you have any other Kinect SDKs and drivers installed on your PC, uninstall them now. This includes open source SDKs such as libfreenect2 and also any Kinect for Windows v2 Developer Previews that you might have installed at a hackathon or through an insider program. Conflicts are not guaranteed between SDKs, but they have not been tested together, so your mileage might vary.
The next step would be to install the Kinect for Windows v2 SDK, if you have not already. Make sure your Kinect is not connected to your computer and that Visual Studio is not open. Run the installer, accept the terms, and click Install. Usually, this will be fairly quick .
Caution
The technical reviewer felt that it was especially necessary for me to reiterate that you should not plug in your Kinect first, and I have to agree. The automated plug and play behavior of Windows can mess with your Kinect and cause you a lot of pain in trying to uninstall and reinstall different drivers and software until you get it right.
To assemble the Kinect, start by attaching the power cord (A in Figure 1-3) to the AC adapter (B). Of the two black bricks that make up the Kinect kit, the adapter is the one that conveniently says “Microsoft AC Adapter” underneath and has a permanently attached power cable. Connect the AC adapter’s permanent cable to the designated port on the Kinect for Windows Hub (C). The power port is the one beside the blue Type-B SuperSpeed USB connector port on the Hub. Attach the Kinect’s proprietary cable (D) to the other end of the Hub. Finally, attach the USB cable’s Type-B connector to the Hub and the other end of the cable to a USB 3.0 port on your PC.
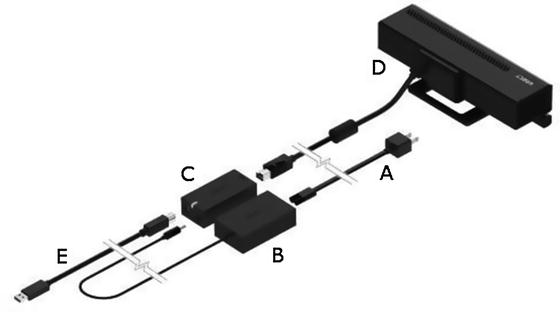
Figure 1-3. Kinect cabling diagram
Note
Your Kinect may have come packaged with two power cords. Normally, this is not a mistake. They are actually two different power cords. One of them is polarized. You can distinguish the polarized cord by the fact that one of its prongs is slightly wider than the other.
Plug the power cord into a socket, and your PC should start installing the Kinect’s drivers. If an unrecognized driver error pops up, reconnect the USB to your PC, preferably to a different port, right-click on the Windows icon on the bottom left of your screen, and navigate to the Device Manager option on the popup. In the Device Manager window, look for Kinect sensor devices, right-click, and then click Scan for hardware changes. The drivers should now be installed properly. If this fails, you might not have the proper USB chipset required to support the Kinect. You can take consolation, however, in the fact that I had to attempt this two or three times to get it working with my Surface Book .
Verifying That the Kinect Driver Is Installed Correctly
Start out by checking that the KinectMonitor.exe service is running on your machine. Right-click on the Windows icon on the bottom left of your screen (if you are running Windows 8 and have no icon, right-click the bottom left corner of the taskbar) and select Task Manager from the drop-down. If there is a More details button on the bottom left of the Task Manager window, click it. Scroll down on the Background Processes section and check to see that KinectMonitor.exe (Figure 1-4) is one of the entries. You might also notice services such as KinectService.exe and KStudioHostService.exe. These are actually legacy services that were included in the preview version of the SDK. They have been folded into KinectMonitor.exe and are individually no longer required for the Kinect to operate. You can keep them for backward compatibility, but otherwise you can go ahead and remove them.
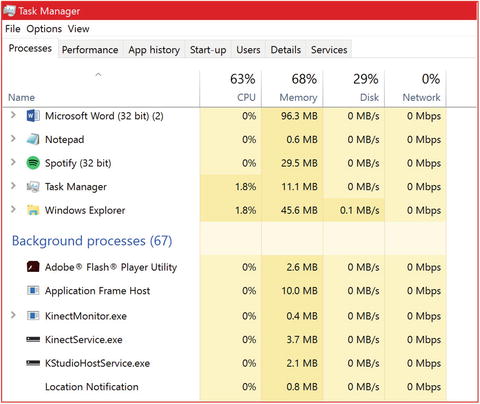
Figure 1-4. Kinect services in Task Manager, notably KinectService.exe
Next, take a look at your Kinect sensor. Whenever you turn on a Kinect application, there should be a white light turned on at the right end of the device. This white light is the privacy light that indicates that the Kinect is potentially recording. Additionally, if your application requires the services of the Kinect’s depth camera or skeletal detection, there should be three red LEDs illuminated at the center of the device, as shown in Figure 1-5 .
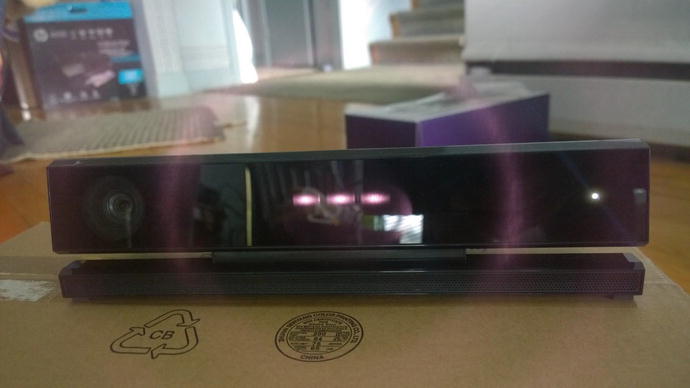
Figure 1-5. The Kinect’s three red LEDs and white power light. In Xbox One versions, the white light will be shaped liked the Xbox One logo
Finally, confirm that the Kinect hardware shows up in Device Manager (Figure 1-6). Right-click the Windows icon on the bottom left of your screen on the taskbar and select Device Manager. Confirm that the following entries are all present:
Under Audio inputs and outputs, you should see Microphone Array (Xbox NUI Sensor).
Under Kinect sensor devices, you should see WDF KinectSensor Interface 0.
Under Sound, video and game controllers, you should see Xbox NUI Sensor.
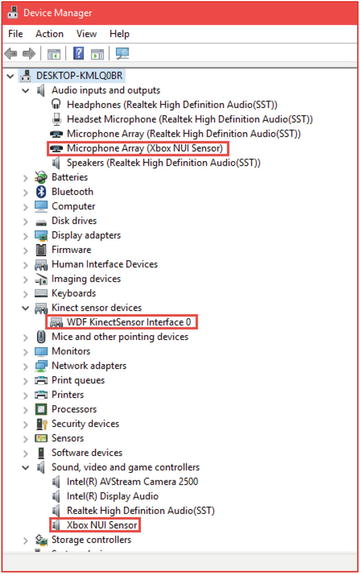
Figure 1-6. Kinect hardware entries in Device Manager
Do not fret if the entries are not spelled exactly as shown here; they only need to be similar. If any of the aforementioned criterions failed to manifest, uninstall the Kinect for Windows SDK 2.0 and reinstall it, then restart your machine. Sometimes things just don’t fall into place, for undocumented reasons. This might have happened because the Kinect’s firmware was being updated or for some other reason along this line .
Positioning the Kinect, and Other Considerations
While the Kinect is relatively versatile, you want to set it up so that it acquires the most accurate representation of the environment surrounding it. The better it can see you, the less data it has to computationally infer about your position and gestures, and the more seamless the resulting user experience is. If I could summarize the content found in this section in one instruction, it would be to position the Kinect in such a way that it can consistently see your whole body and listen to you without interference.
You should strive to have the Kinect positioned in a way similar to what you would see in Microsoft’s marketing materials. This means 0.6m to 1.8m (2 to 6 feet) off the ground and ideally (but not necessarily) 15cm (6 inches) from the screen. Have the Kinect centered and on the edge of whatever flat, solid platform it is sitting on and tilted downward so that it can see the floor (see Figure 1-7). Any users need to be within 0.5m to 4.5m (1.6 to 14.7 feet) of the Kinect, but should ideally be within 0.8m to 3.5m (2.6 to 11.5 feet). The Kinect detects audio input from ± 50 degrees from the center of the device and visual input from ± 35 degrees horizontally, thus you should keep any users of the device within this range. The Gen 1 Kinect had a tilt motor, but the Kinect for Windows v2 needs to be adjusted manually. Simply hold the base of the Kinect with one hand and the back of its body with the other, then lightly tilt the base to make any adjustments. This is not necessary from the get-go, but you can use this to calibrate the vertical field of view once you start streaming the Kinect’s camera.

Figure 1-7. One of my development Kinect setups, positioned above my monitor, tilted downward
While using the Kinect, avoid wearing black and baggy clothes and avoid putting the Kinect directly in front of sunlight. Never touch the face of the Kinect. Always handle the Kinect by holding the sides. The Kinect tries to keep its internal temperature within a narrow range for optimal operation, and you can help it by not covering any of its vents and by keeping the area around it relatively empty. The Kinect should be able to detect bodies in a dark room, but you should keep the room well-lit to make use of its RGB data (read: color camera) .
Note
Since the Kinect can have issues with black clothes, it would not be out of the question for us to think that it could potentially have difficulty with certain dark skin pigments. There have been claims that the Kinect does not detect darker-skinned individuals properly. This myth has little merit to it and has been conclusively debunked by the likes of Consumer Reports and the New York Times, among others. The Kinect uses infrared to detect individuals rather than visible light, so skin color has no effect on whether it can detect a person. So, why does black clothing affect the Kinect? Certain black clothing dyes tend to absorb infrared light, hampering the Kinect’s ability to properly track a user.
The Kinect sits well on any hard, flat, stable surface such as a TV stand, but seeing as you are building desktop apps with the Kinect, it is likely that you are using it in a situation where you need it to be hovering over a booth screen or a projector. Fortunately, the Kinect v2, unlike its predecessor, comes with a 1/4-20 UNC thumbscrew–compatible receptacle, the kind you find on a camera in order to mate with tripods. This means you can use the Kinect with a tripod or any other instrument meant to stabilize and elevate cameras and other photographic equipment. There is an official Kinect mount made by a third party that you can check out on the Microsoft Store at http://www.microsoftstore.com/store/msusa/en_US/pdp/Kinect-TV-Mount-for-Xbox-One/productID.295240200 . Note that the Xbox 360 Kinect mount won’t work on the Kinect for Xbox One.
A final word on the topic: as developers, it is more than likely that we will simply have the Kinect strewn on the desk, shelf, or bed next to where we are hacking. Mine is currently sitting on a sofa. To be completely honest, this will work. Just make sure to test your solutions with a proper setup before you commercialize them or give them to others to use. Also, avoid carelessly dropping the Kinect. The Kinect has sensitive parts that will give erroneous measurements if they have been compromised in any way. Fortunately, Microsoft spent quite of time drop-testing the Kinect and putting it through shock tests to make sure these parts refrain from budging .
Starting a Kinect Project in Visual Studio
If you have developed on the Microsoft platform before (WPF, WinForms, UWP, . . . err, MFC?), you could probably skip through to the “Completing & Launching Your Kinect Project in Visual Studio” section. Just know to add the Microsoft.Kinect reference to your Visual Studio project through the DLL installed on your computer by the SDK or through NuGet. Seeing as many Kinect developers tend to be students, hobbyists, and researchers who do not typically get to play with the Microsoft stack (for better or for worse), I will take the time to spell out the steps properly.
The Kinect has three APIs : a native C++ API, a managed .NET API, and a WinRT API. There is strong parity between the three APIs, so we will mainly focus on the .NET API, though you can also use C++, HTML/JavaScript, Python, and other languages as well, should you use third-party Kinect SDKs. I will be using C# throughout this book, and I suggest you do too if you are new to development on the Microsoft platform. It is syntactically similar to Java and conceptually to an extent as well.
If you have not downloaded and installed Visual Studio (and not Visual Studio Code) on your computer yet, go do so now, as Kinect development revolves around Visual Studio (though you could probably pull it off with MonoDevelop and its ilk). When that is done, open Visual Studio and click on New Project on the Visual Studio Start page, as shown in Figure 1-8. Alternatively, you can click on File ➤ New ➤ Project. . . through the top-left menus. In the New Project dialog , select Visual C# templates in the tree menu found to the left. The center column of the New Project dialog will list several C# project types that Visual Studio is configured to support. Choose WPF Application from this list. At the bottom of the dialog, you can set a name for your project, as well as a folder location. Once you are satisfied with these options, click OK.
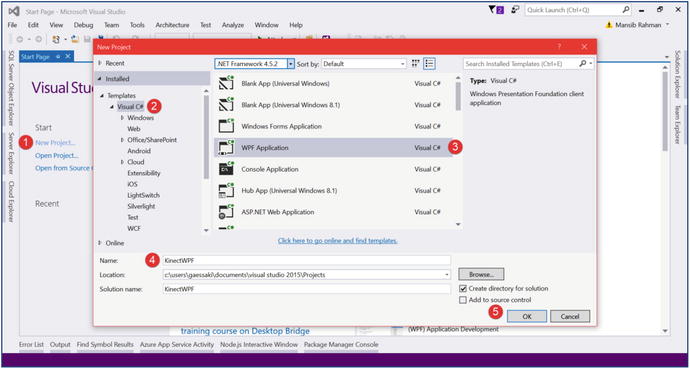
Figure 1-8. Steps to create a new Kinect project
Tip
WPF, or Windows Presentation Foundation, applications are the typical desktop apps we have seen on Windows systems for many years now. It consists of a graphical subsystem for rendering UIs on Windows and utilizes DirectX (the implementation of which is abstracted from developers). The UI is designed using an XML-based language called XAML. The other major desktop app technology for .NET apps, WinForms (think of AWT in Java), is currently in maintenance mode, and it is recommended that beginners start with WPF or the similar, but more recent Universal Windows Platform (UWP).
After you have created a new project, the next step is to add Kinect references to your project. This ensures that your code has access to the Kinect API that Microsoft built, and it must be done every time you create a new Kinect project. There are two different methods for adding the references to your project. You can browse for DLLs installed on your computer and reference them, or you can add the references through NuGet, a package manager for the Microsoft development platform (think npm for Node.js). The method recommended by the Kinect team is NuGet. This is advantageous if you are working with a team, as you can keep your binary data out of source control, but for most amateurs, either method should suffice. I will go over them both.
Adding the Kinect Reference Through a Local Reference
To add the Kinect reference, repeat the following steps:
Find the References entry in Solution Explorer (Figure 1-9). Right-click and choose Add Reference. . . . If you accidentally closed Solution Explorer, you can bring it up again by pressing Ctrl + W, followed by the S key. Alternatively, you can click on the View menu at the top-left corner of the window to find it.
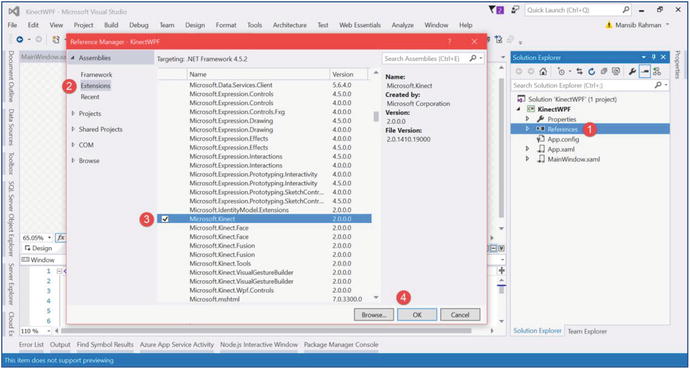
Figure 1-9. Steps to add the Kinect reference to a Visual Studio project
In the Reference Manager dialog, click Extensions under the Assemblies tree menu on the left.
Scroll across the center column of the Reference Manager dialog until you find the Microsoft.Kinect entry. Make sure it is checked. Note the other Kinect entries underneath. You do not need them at the moment, but you may need them later, and the method to add them is the same.
Click OK.
Adding the Kinect Reference Through NuGet
To add the Kinect reference, do the following:
Find the Tools menu at the top left of your Visual Studio window, select NuGet Package Manager from the drop-down, and click Package Manager Console.
In the NuGet console window that appears, type Install-Package Microsoft.Kinect and press Enter (Figure 1-10).
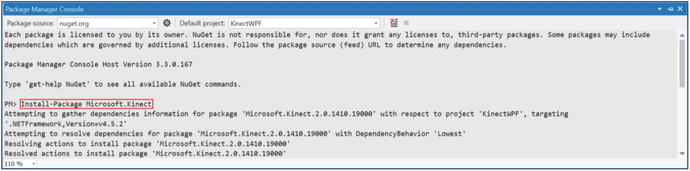
Figure 1-10. Installing the Kinect reference through NuGet
The Kinect API should now be referenced. If you encounter an error, check to make sure you are connected to the Internet.
Completing and Launching Your Kinect Project in Visual Studio
Now that we have referenced the Kinect API in our project, we can utilize it to interface with the Kinect. Let us start with a trivially simple project. We will create a program that detects whether the Kinect is connected to our computer and operational and, if so, displays “Hello World! Kinect is Ready!”
Start off by navigating to the Solution Explorer and opening the MainWindow.xaml.cs file, which should be found under MainWindow.xaml. These are not the same files. The former is the code-behind, whereas the latter contains the user interface.
I will give you the source code for our app right off the bat in Listing 1-1, but no need to worry—I will go over the code line by line. The following code will end up replacing the stock code given to us by Visual Studio in MainWindow.xaml.cs. Once again, I will indulge in some verbosity for the sake of amateur developers or readers unfamiliar with C#/.NET. More experienced .NET developers can probably skim through this section.
Listing 1-1. MainWindow.xaml.cs
using System.Windows;using Microsoft.Kinect;using System.ComponentModel;namespace KinectWPF{/// <summary>/// Interaction logic for MainWindow.xaml/// </summary>public partial class MainWindow : Window, INotifyPropertyChanged{private KinectSensor kinect = null;private string statusText = null;public MainWindow(){this.kinect = KinectSensor.GetDefault();this.kinect.IsAvailableChanged += this.Sensor_IsAvailableChanged;this.StatusText = this.kinect.IsAvailable ? "Hello World! Kinect is Ready!" : "Goodbye World! Kinect is Unavailable!";this.DataContext = this;InitializeComponent();this.kinect.Open();}public event PropertyChangedEventHandler PropertyChanged;private void Sensor_IsAvailableChanged(object sender, IsAvailableChangedEventArgs e){this.StatusText = this.kinect.IsAvailable ? "Hello World! Kinect is Ready!" : "Goodbye World! Kinect is Unavailable!";}public string StatusText{get{return this.statusText;}set{if (this.statusText != value){this.statusText = value;if (this.PropertyChanged != null){this.PropertyChanged(this, new PropertyChangedEventArgs("StatusText"));}}}}private void MainWindow_Closing(object sender, CancelEventArgs e){if (this.kinect != null){this.kinect.Close();this.kinect = null;}}}}
First, we remove all the using System Windows.*; statements, except for using System.Windows ; itself, as we will not need those libraries. After our only using statement, we add using Microsoft.Kinect; followed by using System.ComponentModel ; on the next line (Listing 1-2). This tells the compiler that we will be using the Kinect API namespace in this class along with the System.ComponentModel namespace, which I will discuss momentarily.
Listing 1-2. MainWindow.xaml.cs Using Statements
using System.Windows;using Microsoft.Kinect;using System.ComponentModel;
Next, we declare our own namespace, KinectWPF, and our class, MainWindow, as shown in Listing 1-3. This code should have already been generated by Visual Studio with whatever name you gave to your project, and you should not change it to KinectWPF. The namespace organizes our code under one scope. It is not too important for our little project, but it is used extensively in large projects to reduce naming conflicts.
The triple slashes are just comments that do not affect the code. Typically, you would write comments with double slashes, but the triple slashes generated by Visual Studio here are XML comments for use with IntelliSense.
We will make a small addition to our class declaration . We will add the INotifyPropertyChanged interface at the end, which we access from the System.ComponentModel namespace mentioned earlier. This lets our UI elements know that they can subscribe to the PropertyChanged event and update themselves accordingly. In our app’s case, we will trigger an event whenever the computer detects that the Kinect has been plugged in or unplugged that will pass a string for our UI to print.
Listing 1-3. MainWindow.xaml.cs Namespace and Class Declaration
namespace KinectWPF{/// <summary>/// Interaction logic for MainWindow.xaml/// </summary>public partial class MainWindow : Window, INotifyPropertyChanged{//... rest of the code will go here}}
Inside our class declaration (Listing 1-4), we will initialize two variables. KinectSensor kinect represents any Kinect sensor; we will soon set it as the Kinect attached to our computer. statusText is a string we will use internally to store the status of our Kinect (either “Hello World! Kinect is Ready!” or “Goodbye World! Kinect is Unavailable!”).
Listing 1-4. MainWindow.xaml.cs Class Constructor and Variable Initialization
private KinectSensor kinect = null;private string statusText = null;public MainWindow(){this.kinect = KinectSensor.GetDefault();this.kinect.IsAvailableChanged += this.Sensor_IsAvailableChanged;this.kinect.Open();this.StatusText = this.kinect.IsAvailable ? "Hello World! Kinect is Ready!" : "Goodbye World! Kinect is Unavailable!";this.DataContext = this;InitializeComponent();}public event PropertyChangedEventHandler PropertyChanged;
In our class constructor, public MainWindow(), we start by calling the GetDefault() method of KinectSensor. This assigns any available Kinect sensor as the Kinect from which we will be streaming data. We have an event on kinect called isAvailableChanged that is raised whenever our computer detects that our Kinect’s availability has changed. We assign it (with the += operator) an event handler method called Sensor_IsAvailableChanged. This method will let our program know what to do when an isAvailableChanged event is raised by the machine. We will define it later.
IsAvailable is a property that tells us whether the Kinect is available. We are setting the initial status of the Kinect with this line. If it returns true, we assign “Hello World! Kinect is Ready!” to StatusText, and otherwise we set it to “Goodbye World! Kinect is Unavailable!” StatusText is a public getter and setter for our statusText string.
The Open() method of our kinect object physically starts our real-world Kinect. As shown in Figure 1-5, the Kinect’s privacy light should turn on when the device is in operation. This method is responsible for turning on that light.
DataContext is a WPF property that allows our data in the code-behind to interact with our user interface. I will not go too deeply into how exactly it is used, as it would be more appropriate in a book about WPF. In our case, we are declaring that our UI may use the properties of our MainWindow class.
InitializeComponent() is a Visual Studio–generated piece of code used to bootstrap the UI.
PropertyChanged is an event we will raise whenever the computer raises its own event saying that our Kinect’s availability has changed. We will raise this event to execute a method to alter our UI.
The rest of our back-end code consists of a couple of methods and a property (Listing 1-5). Our first method, Sensor_IsAvailableChanged, is the one we configured earlier to be called whenever the Kinect’s availability changes, and it raises an event. In the method body, we have a line similar to one seen earlier that sets the statusText based on the Kinect’s availability.
Listing 1-5. MainWindow.xaml.cs Method Definitions
private void Sensor_IsAvailableChanged(object sender, IsAvailableChangedEventArgs e){this.StatusText = this.kinect.IsAvailable ? "Hello World! Kinect is Ready!" : "Goodbye World! Kinect is Unavailable!";}public string StatusText{get{return this.statusText;}set{if (this.statusText != value){this.statusText = value;if (this.PropertyChanged != null){this.PropertyChanged(this, new PropertyChangedEventArgs("StatusText"));}}}}private void MainWindow_Closing(object sender, CancelEventArgs e){if (this.kinect != null){this.kinect.Close();this.kinect = null;}}}
The getter for our statusText string is simple, but the setter is slightly more involved. First, we assign its value if it is different from the incumbent (value is a reserved C# keyword for the data assigned to a setter). Then, we proceed to raise our own event, letting the UI know that it should change the text of any UI element (otherwise referred to as a control) bound to the StatusText property.
Our final method, MainWindow_Closing, is a bit of good practice. All we are doing here is turning off our Kinect by calling Close() and disassociating from Close() by declaring the kinect object as null. This method will be called by our UI whenever we decide to exit our program.
Creating the User Interface
Are we done? Not quite—just one last bit. Switch over to MainWindow.xaml in Solution Explorer. You should see our UI in a designer window, as well as a bit of XAML code on the bottom. We are going to make some adjustments so that the UI can display the Kinect’s status with some text. The final product for the XAML code should look like Listing 1-6.
Listing 1-6. MainWindow.xaml User Interface
<Window x:Class="KinectWPF.MainWindow"xmlns="http://schemas.microsoft.com/winfx/2006/xaml/presentation"xmlns:x="http://schemas.microsoft.com/winfx/2006/xaml"xmlns:d="http://schemas.microsoft.com/expression/blend/2008"xmlns:mc="http://schemas.openxmlformats.org/markup-compatibility/2006"xmlns:local="clr-namespace:KinectWPF"mc:Ignorable="d"Title="MainWindow" Height="350" Width="525"Closing="MainWindow_Closing"><Grid><TextBlock x:Name="textBlock" Text="{Binding StatusText}" HorizontalAlignment="Left" Margin="100,100,0,0" TextWrapping="Wrap" VerticalAlignment="Top" FontSize="36"/></Grid></Window>
We are only making two changes to the stock Visual Studio XAML. First, we are adding the Closing="MainWindow_Closing" attribute to the <Window .../> tag. If you recall from our code-behind, MainWindow_Closing is a method that we call when closing the app to properly turn off our Kinect. Here, we are letting the UI know to call it when the user exits the application.
In the <Grid> element, we have added a TextBlock element. This element will simply display text as per our customizations. Its only essential attribute is Text="{Binding StatusText}. Earlier, we set up a DataContext, and here all we are doing is letting the Text property of TextBlock be bound to the StatusText property in MainWindow.xaml.cs so that it is updated whenever the property changes in the back end.
Keep in mind that as in our back-end code, if you named your project something other than KinectWPF, you should keep those names as they appear in the XAML (e.g., in <Window x:Class="KinectWPF.MainWindow").
Whew. If you have not programmed much in your life, this might have been a boatload for you to swallow and if you are an experienced .NET dev, you might have been rolling your eyes throughout (or perhaps it is the other way around?). Regardless, I hope the point you will take away from this is that programming for the Kinect is not conceptually difficult. The rest of the Kinect’s sensors actually work in a way similar to its availability detector. If the Kinect has data of any kind, it raises an event, which triggers the associated event handlers, and then you can do what you want with the data. We will see this pattern throughout this book .
Firing Up the Kinect and Taking It for a Spin
As long as your Kinect is plugged in and connected to your computer, any application that wants to use it will be able to access it directly, so you do not have to worry about turning it on or having the user perform any laborious tasks to make use of it. In our case, we will simply run the program in Visual Studio to get started. Press the Start button in Visual Studio, as shown in Figure 1-11. Alternatively, simply press the F5 key.

Figure 1-11. Typical location for the Start button in Visual Studio
Ready? Get set . . . GO! Ermm, not too many fireworks yet, eh? Do not fret; we will get to all the fun stuff shortly. For now, you should have a little white window on your desktop that displays “Hello World! Kinect is Ready!” as in Figure 1-12. Of course, this is only if your Kinect is connected. Otherwise, it should say “Goodbye World! Kinect is Unavailable!” Go ahead and pull the Kinect’s USB cable out of your PC. Nothing happened? Patience is key here. Your computer takes a few seconds to realize that the Kinect has been disconnected. At this point, the “Hello” should change to “Goodbye.”

Figure 1-12. Our barebones Kinect Hello World! app
Now, of course, you should never yank your Kinect’s USB like that. At least, not while it is in use. There are no documented ill effects, as the Kinect does support hot swapping and disconnecting, but, depending on your computer hardware, you may get the rare Blue Screen of Death. The Kinect’s cable will get yanked out in the normal course of things, however. Maybe a client at your booth will accidently trip on it from the excitement of getting to try your game out. Maybe you will pull it out in frustration. Either way, you need to know how to deal with such a situation programmatically, the basis for which we demonstrated here.
Kinect Evolution
Before we start programming an entire Kinect app from the ground up with lasers and all (did someone say lasers? Oh, just the infrared lasers in the Kinect), let us take some cues from one of Microsoft’s Kinect samples. The new samples are not as creative as the ones they had for the Kinect for Windows v1, but they get the job done. We will take a look at the Kinect Evolution sample. You can find it by searching for SDK Browser (Kinect for Windows) v2.0 on your PC. Once you open it, scroll all the way to Kinect Evolution-XAML on the list, as shown in Figure 1-13, and click the Install From Web button. Download the project and extract it to a location of your choice. Compile the project and run it.

Figure 1-13. Kinect Evolution in the SDK browser
Note
If you get an error about missing Windows 8.1 Tools, you can choose to install them, or, alternatively, you can download the Kinect Evolution app from the Windows Store for free and run that instead.
Once the app is running, you should see a summary of all the different sensor streams from the Kinect (Figure 1-14). There’s a fair chance that your Kinect is positioned awkwardly because you have it attached to your desktop or laptop and thus you do not have enough space, but if you give the camera some distance, you should be able to see the Body Joints and Block Man streams as well. If you click the large left window, you can cycle through the raw visual streams of the Kinect (e.g., infrared and color). The audio stream should show you from which direction the loudest noise is coming, as well as its intensity.
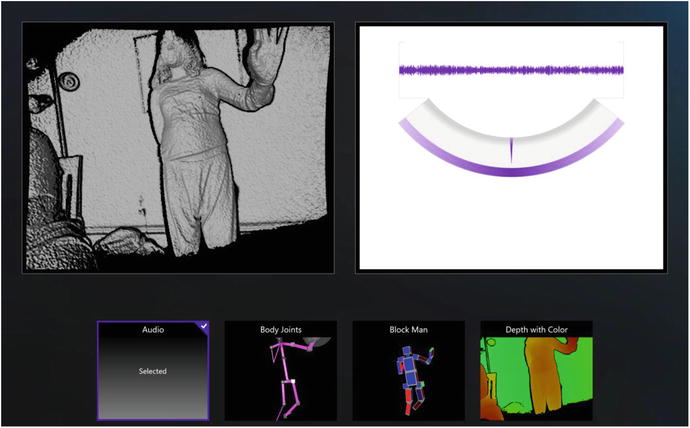
Figure 1-14. Kinect Evolution: A summary of the Kinect’s various sensor streams
All the streams are interpretations of data coming from the Kinect rather than a direct stream. For example, in the Depth with Color stream, we are programmatically coloring the depth pixels from the regular depth stream to our specifications. The Kinect API does not naturally provide this rendered stream in a one-liner. In the Block Man stream, we are rendering meshes with DirectX based on the joint locations and orientations. Again, the Kinect does not provide much more than raw data from which we must build our worlds. It is interesting to note that the red boxes represent interpolations the Kinect has made about the user’s joint locations, as they are obstructed or otherwise not very distinguishable through the Kinect’s camera.
Summary
In this chapter, you learned how to install your Kinect and deploy a very basic app. We have not explored Kinect data sources in depth, but an overarching pattern for working with them was introduced. All of Kinect’s sensory data comes in data sources, and we manipulate them by raising events and giving instructions via event handlers. In the next chapter, we will uncover exactly what data sources the Kinect has to offer, along with what other features the Kinect has available.