
WHAT YOU WILL LEARN IN THIS CHAPTER
How SharePoint stores and organizes your data
How to create lists and document libraries
How to use views to filter, sort and group the content of lists and libraries
How to create content types to apply a well-defined structure to your data and documents
SharePoint stores its information in lists. A list is a like a database table with columns and rows. When you create a list in SharePoint, you have the option to create a list with predefined columns or a completely custom list. There are two main types of lists. The first is the generic list. The rows in a generic list are called items. The other type of list is the document library. The rows in a document library represent files.
The focus of a list item is its fields whereas the focus of an item in a document library is the file itself. Most list items can have attachments but they are optional. A document library on the other hand must have files in order to have items. The files in a document library can also have fields but they are considered properties or metadata for those files.
Depending on the template or site definition used to create a SharePoint site, certain lists are automatically created. Additional lists can be created by anyone with sufficient permissions. The list types available depend mainly on the edition of SharePoint installed (SharePoint Foundation versus SharePoint Server) and the features activated. You can also add additional list types by installing extensions to SharePoint created by yourself or third-parties.
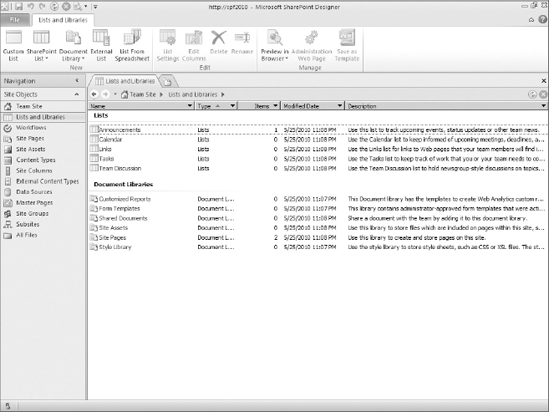
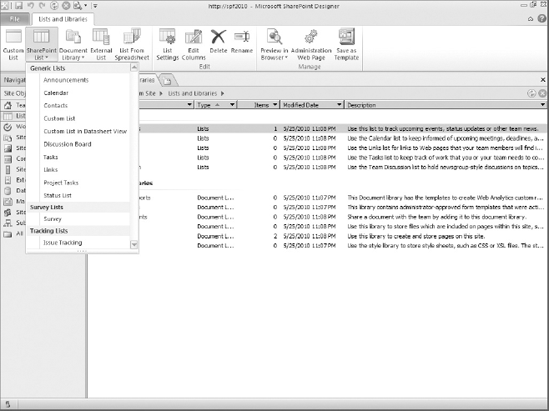
To see the lists and libraries in your site, click Lists and Libraries in the Navigation bar on the left. In Figure 6-1, you can see the lists automatically created for the Team Site template. You can create additional lists by clicking the buttons in the New section of the ribbon. To create a list based on a template from your site, select the SharePoint List button from the ribbon and a dropdown list containing the list templates in your site will appear as shown in Figure 6-2. You can also select Custom List from the ribbon to create a brand new list with only the columns you want. This is recommended if one of the existing templates does not meet your needs. If you want to create a document library, select Document Library from the ribbon instead. The following table describes several of the common list and library templates.
TYPE | PRINCIPAL CHARACTERISTICS |
|---|---|
Contains files such as Word documents. It provides easy access to version control, folders, and check out/in. This library can be e-mail-enabled. Fields in this library can be derived from and written to embedded-file metadata in supported formats. | |
Designed to hold XML files, each file representing the data in a single instance of a form, such as InfoPath. | |
Wiki Page Library | Wiki libraries form the basis of SharePoint's Wiki functionality. They support pages, images, and automatic generation of new pages from Wiki links. |
Picture Library | Picture libraries contain picture files and contain predefined views, which include thumbnail images, slideshows, and bulk download options. |
Slide libraries are unique to SharePoint Server, and therefore not available in SharePoint Foundation. They are used in conjunction with Microsoft PowerPoint to store individual slides for reuse. | |
Asset libraries are designed to store and manage rich media files, including images, audio clips, and videos. | |
Designed to hold web pages and documents to track metrics, key performance indicators, and other business intelligence information. | |
Announcements | Announcements lists are designed to show time-critical information on the home page of a site. Announcement items can be set to expire. This list can be e-mail-enabled. |
Contacts | Contacts lists have predefined fields that are suitable for holding information about people. In addition, functions are provided for synchronizing contact information with SharePoint-compatible applications such as Microsoft Outlook. |
Discussion Board | A discussion board provides the ability to host persistent communications on a SharePoint site. It includes facilities for thread management, post approval, and e-mail enabling. |
Links | Links lists automatically display their items as hyperlinks to the specified locations, rather than list items. Although you can sort most lists, you can also order items in links lists explicitly. |
Calendar | Calendar lists have features convenient for maintaining schedules, and can be synchronized with SharePoint-aware applications such as Microsoft Outlook. |
Tasks | Tasks lists include fields for due dates and status and can be assigned to individual site users. |
Project Tasks | Project tasks lists include all Tasks functions listed in the preceding, plus Gantt chart views and the ability to be opened in SharePoint-aware applications. |
Issue Tracking | Issue tracking lists are similar to Tasks lists, but also maintain a revision history to track changes to the issue's status. |
Survey | Survey lists are designed for streamlined handling of large sets of response data. |
External List | Allows the user to interact with external content types (covered in Chapter 6, Data Sources & External Content Types). |
Status List | Specifically designed to contain goals, which are also known as key performance indicators. Items in the Status list are configured to perform calculations on data from any combination of SharePoint sites, Excel files (via Excel Services), and SQL Server Analysis Server cubes. The calculations are compared against the item's thresholds and the item will display a green, yellow, or red icon whenever the calculation crosses a threshold. |
You can define Custom lists to contain arbitrary information and present it in various ways. They can be displayed as a static text table, or as an editable datasheet, by default. You can also import the contents of simple Excel worksheets into a custom list and have the fields defined automatically from the columns present in the workbook. |
Other list and library types may be available in your particular installation of SharePoint.
Note
You are not stuck with the lists and libraries created by default in a site. New lists and libraries can be created, and those existing deleted, at any time. In addition, you can display information from diverse sources both inside and outside of your enterprise with such features as data views and Business Data Services (you'll see more about these in Chapters 6, Data Sources & External Content Types and 7, XSLT Data Views & Forms). When creating a new list or library, you can choose from several standard and custom types.
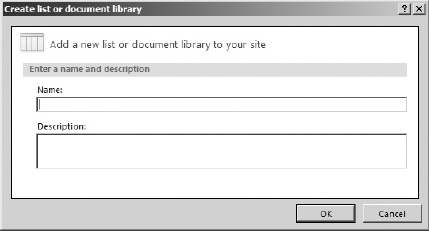
When you select Custom List from the ribbon, the dialog in Figure 6-3 appears. In this dialog, you can enter a name and description for your list. The same dialog appears when you select SharePoint List or Document Library from the ribbon and choose a list template from the dropdown list as shown in Figure 6-2. Once you have entered at least the name of the list, click OK and the list will be created and be visible in the list in Figure 6-1.
Create a List Using the Browser
In this exercise, you create a list using the browser.
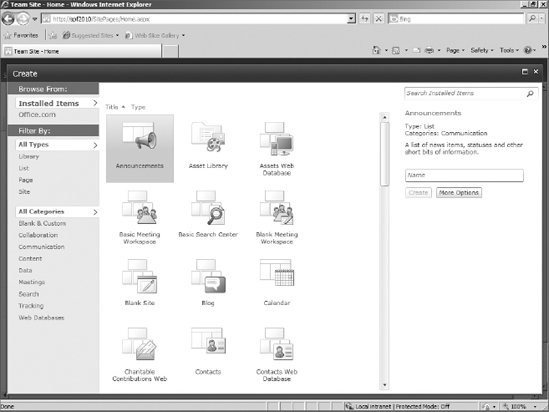
Navigate your browser to your SharePoint site.
Click Site Actions

When the Create dialog loads, choose the Tasks list type.
In the Name textbox, enter MyTasks and click the Create button.
After the list has been created, your browser automatically redirects to the newly created list.
How It Works
When the list is created, SharePoint reads the list template you chose and creates the default columns, forms and views for the list. If the list is a document library, it may also create a document template that would be used when creating a new document in the library. Finally, the virtual file system of the site is updated to reflect the new list's root folder and built-in forms.
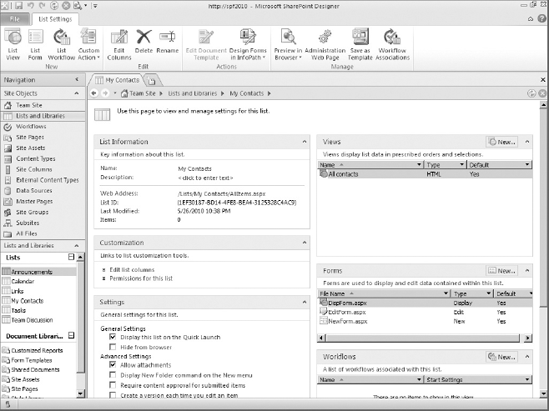
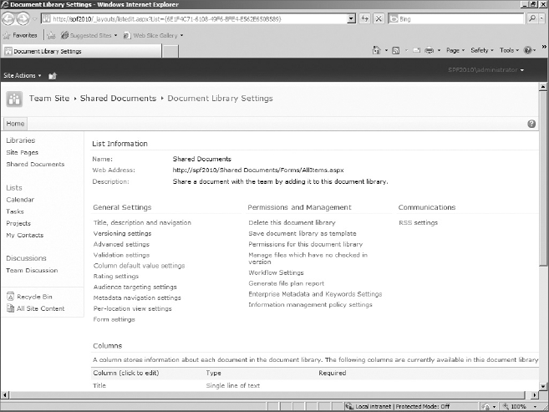
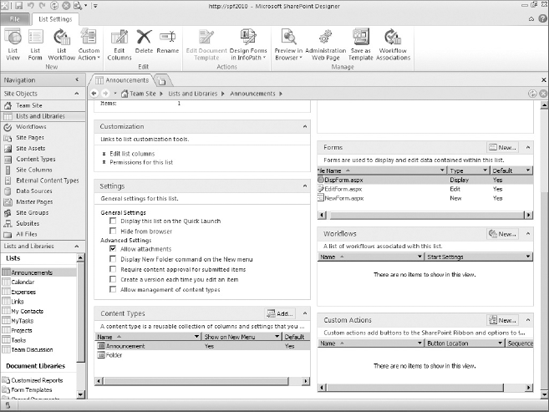
To modify your list's settings, select your list and choose List Settings from the ribbon. A tab with your list's settings will be appear as shown in Figure 6-4. On this tab, you can change the list's settings and manage the list's content types, views, forms, workflows, and custom actions. More about these will be covered later in the book.
When you want to change the settings of your list, select or unselect the appropriate checkboxes and click the Save button on the Quick Access toolbar at the top of the screen. The following table lists the settings and their effects on your list.
SETTING | EFFECT |
|---|---|
Display this list on the Quick Launch | Adds the list to the Quick Launch bar on the left side of the screen in the browser. |
Hide from browser | Removes any links to the list from the Quick Launch bar and View All Site Content page. |
Allows users to attach files to list items. This applies only to lists, not document libraries. | |
Display New Folder command on the New menu | Allows the user to create subfolders in the list or library to organize its contents. |
Require content approval for submitted items | Prevents new and changed items and documents from being accessed by users until approved. |
Create a version each time you edit an item | Saves previous versions of items and documents when they are changed. |
Allow management of content types | Allows users to add and remove content types from the list by using the browser. |
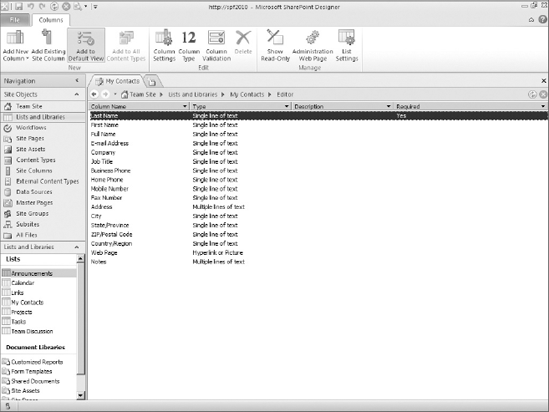
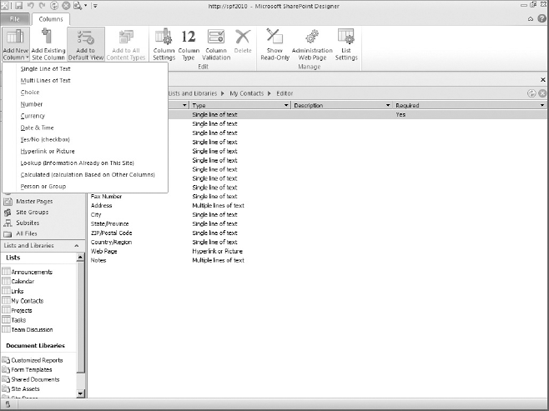
To view your list's columns, select Edit Columns from the ribbon. The tab in Figure 6-5 will appear. The tab shows the list's columns along with their data type, description and if they are required. You can add a column by selecting Add New Column or Add Existing Site Column from the ribbon. When you select Add New Column, the dropdown list containing data types will appear as shown in Figure 6-6.
After you select a data type, a new column will be added to the list. The name of the column will be similar to "NewColumn1." But you can change it by pressing F2. If you selected Choice, Lookup or Calculated, a dialog will appear allowing you to configure the column before it is added to the list. When you need to change the settings of a column, select the column in the list and choose Column Settings from the ribbon. To remove a column, select Delete from the ribbon instead.
Note
You cannot remove key identity columns, such as ID and Title (Name in some lists), and administrative columns, such as Modified By, from a list or library.
The Calculated column type allows you to create a column whose value is the result of a formula based on Excel-like functions and the other columns in the list. If you have trouble figuring out how to use the built-in functions, you can test your formula in a Microsoft Excel spreadsheet.
Add a Field Using SharePoint Designer
In this exercise, you use SharePoint Designer to add a field to the MyTasks list you created in an earlier Try It Out in this chapter.
Open SharePoint Designer from your start menu.
Click the Open Site button.
When the Open Site dialog appears, enter the URL to your site in the Site name textbox and click the OK button.
If a Windows Security dialog appears, enter your username and password for the SharePoint site and click the OK button.
After the site opens, click Lists and Libraries in the Navigation bar on the left.
Click the MyTasks list in the Lists and Libraries tab.
From the ribbon, select Edit Columns.
From the ribbon, select Add New Column
Choose Projects from the List or document library drop-down list.
Choose Title from the Field drop-down list.
Ensure the following checkboxes are unselected:
Allow blank values?
Allow multiple values?
Click the OK button.
After the column is added to the list, it will have a name like NewColumn1. Rename this column to "Project" by right-clicking the column, entering Project, and pressing Enter.
To save the list, click the Save button in the Quick Access Toolbar at the top of the screen.
How It Works
After you chose to add a new lookup column to the list, a dialog appeared for you to configure the list to pull values from and the column to display when the user made their selection. When a user adds an item to the list, they will be presented with a dropdown list for the Project column containing a list of projects from the Projects list. Clicking Save committed your changes to SharePoint.
You should know about a few other column features, too. One is that you can enforce unique values. Choose Yes for the Enforce unique values radio button on the column's new or edit page to ensure that users only enter unique values for the column. This feature can only be configured in the browser. If you are working in SharePoint Designer, click your column and select Administration Web Page from the ribbon. If you make any changes in the browser at this point, be sure to press F5 to refresh your list of columns before you continue making modifications.
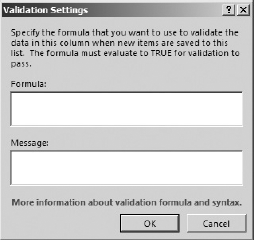
You can also add validation for the values entered for the column. To add validation to a column, click the column and select Column Validation from the ribbon. The Figure in 6-7 will appear and you can enter a formula to validate the column's value in the Formula textbox. You can also enter a message for users should the value they enter be deemed invalid by your formula.
Metadata is data about data. If a Microsoft Word document is considered data, the properties of the document, including Author, Comments, and Title, would be considered metadata because they are data about the document (data). This distinction only applies to documents because the document is the central focus and its metadata is stored separately from it.
Normal fields are fields that you can add to any list or document library. Promoted fields can only be added to document libraries because their values are "promoted" or read from the document itself. Examples of built-in promoted fields are Author, Comments, and Date Picture Taken. Whenever a document is saved to a library, SharePoint examines the document and pulls out the values for any promoted fields in the library. This functionality is very useful because it allows users to sort, filter, group, and search for documents based on those promoted fields. Additionally, because the values of those fields are "cached" inside SharePoint, any operation involving those promoted fields run much faster than if the document had to be opened every time someone ran a search. Chapter 9, InfoPath Integration, shows you how to promote your own fields from InfoPath forms saved to a SharePoint library.
By default, lists and document libraries "inherit" their permissions from the site in which they are located. In general, if a user has Read access to a site, he would in turn have Read access to all the lists and document libraries inside that site. Permissions can only be set in the browser so click the Permissions for this list hyperlink on the list settings page to open the browser and display the screen in Figure 6-8. This screen shows the permissions page for a document library, which looks the same as the one for a list.
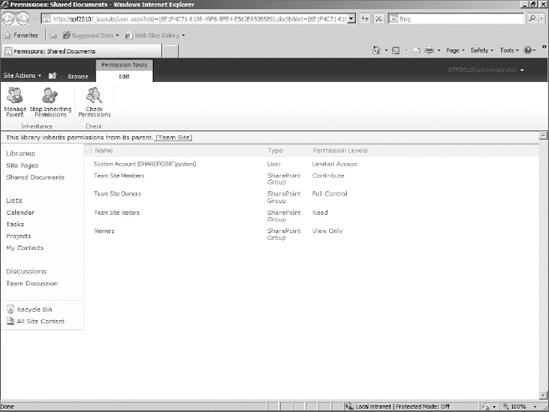
Whenever you want to assign different permissions for a list or library from the permissions it inherits from its parent site, you must click the Edit tab on the ribbon and choose Stop Inheriting Permissions, as shown in Figure 6-8. If you want to change the list back to inheriting its permission from the site, select Inherit Permissions from the ribbon and any custom permissions that you previously configured will be removed.
Warning
Do not take changing permissions lightly. Whenever you choose to stop inheriting permissions, any changes to the parent site will not affect the list or library. Additionally, the more places you change permissions, the more difficult managing the site effectively will be for you and your SharePoint administrators.
Out of the box, SharePoint comes with the following permission levels:
PERMISSION LEVEL | DESCRIPTION |
|---|---|
Full Control | Can do anything to the list/library and its contents, including modify permissions |
Design | Can modify the configuration of the list/library and includes Contribute rights |
Contribute | Can read, modify, and delete items and documents |
Read | Can read items and documents |
Limited Access | Can read items and documents only when given specific permissions; is only assigned at the site level |
Approve | Can approve items and documents; only applies to lists and libraries configured to require approval of new and updated items and documents |
Manage Hierarchy | For lists and libraries; is the same as the Contribute permission level |
Restricted Read | Can read items and documents, but cannot view previous versions of items and documents or view user permissions |
View Only | Can read items, but can only read documents when the document is configured to be rendered as HTML in the browser |
Depending on your edition of SharePoint and the template used to create your site, you may have fewer permission levels.
Do not assign multiple users the same permissions for a list individually. Creating a SharePoint group that contains those users and then assigning the permission to the new SharePoint group is better. This best practice helps reduce the time required to manage your site.
SharePoint lists and libraries support the retention of previous versions. When versioning is enabled, any changes to items and documents will cause SharePoint to keep the old version in history. To enable versioning for a list or document library, select Create a version each time you edit an item on the list settings screen in Figure 6-4 and major versioning will be enabled. If you need to enable minor versioning or want to limit the number of versions kept, select Administration Web Page from the ribbon and the browser will open the screen in Figure 6-9. Next, click Versioning settings under the General Settings section.
On the Versioning Settings screen (see Figure 6-10), you can enable content approval, enable and configure versioning, and require checkout of items and documents before they can be edited. The two levels of versioning are major and minor. With major versions, only published/approved copies of items and documents are kept in history. With minor versions, even draft versions are kept. Minor versioning is useful when many changes will be made over time or by several people.
Note
Minor versions are only supported for document libraries, not ordinary lists.
Limiting the number of versions you retain is a good idea. SharePoint stores full copies of your items and documents in version history. If you have documents with many images, the size of those documents and their versions can take up a great deal of space over time.
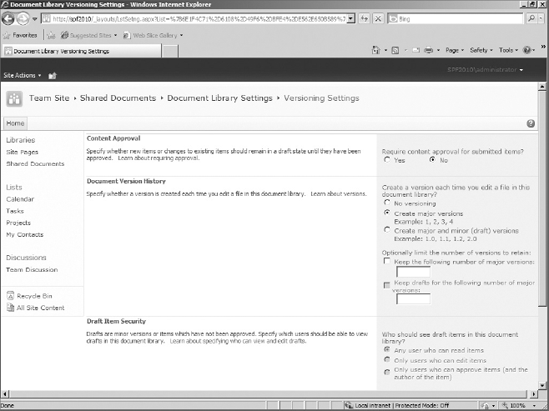
In addition to versioning, you can enable content approval for the list or library. When content approval is enabled, changes to an item or document in the list or library is saved in Draft mode that only the author and users with the Approval permission can view and edit. Users with Approval permission can reject or approve the change. An additional field named Approval Status is also added to the list or library to show the status of the item or document. Changes to items or documents start with "Pending" as their approval status.
Note
You can configure which users can view drafts by selecting a different option in the Draft Item Security section on the Versioning Settings screen (refer to Figure 6-10).
After the changes are approved, the status of the item or document becomes "Approved." Otherwise, the status will be "Rejected." Optionally, the approver can enter comments when she approves or rejects the status of the item or document.
Note
Be sure to write helpful comments whenever you decide to reject a pending change. This saves a lot of time and e-mail when communicating with the item's author.
Enabling checkout for libraries is helpful when documents are routinely modified by multiple people. Once an document is checked out, only the person who checked out the document is allowed to modify it. Additionally, any changes to a checked-out document are not viewable by anyone else until the document is checked in.
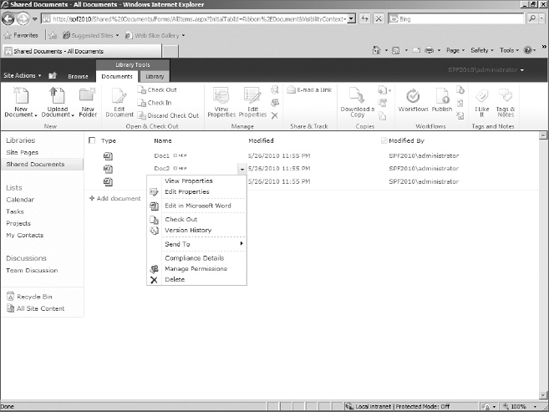
After versioning is enabled and you have added and modified some items or documents, you can take a look at the version history for an item or document. To view the older versions of an item or document, click the item or document's drop-down menu and click Version History. The drop-down arrow for the menu will not appear unless you hover the cursor over top of the item or document. Figure 6-11 shows the menu in action.
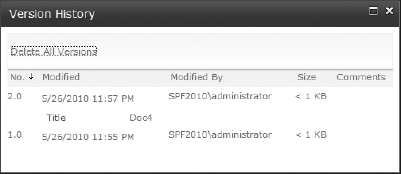
After you click the Version History option, a screen similar to Figure 6-12 appears. The previous versions of the document are listed in descending order. For each version of the document, the version number, the date and time of the modification, the person who modified the document, the size of the document, and any comments entered during the approval process are listed. Additionally, if any fields were changed, each field's name and its new value are displayed. Clicking the link under the Modified column opens that version of the item or document.
After your lists and libraries are created, you can save them as list templates. A list template is a file containing the columns for a list or library and other configuration elements to create another copy of the list. When you create a list template, you can optionally include the data in the list as a part of the template so that when the template is used, the data in the template will be automatically applied to the list or library.
List templates are stored in the List Template Gallery located at Site Actions
Note
Only one List Template Gallery exists per site collection. When you want to use a list template you have created, you only need to upload it to the new site if the site is in a different site collection. All the sites in the same site collection can use the list template automatically.
Create and Use List Templates
In this exercise, you create a list template for the Projects list you created earlier and use it in the same site and another site in a different site collection.
Populating the Projects List
Navigate your browser to your SharePoint site.
Click the Projects list in the Quick Launch bar on the left side of the screen.
When the Projects list screen loads, click Add new item.
In the Projects – New Item dialog, enter these values and click the Save button:
NAME
VALUE
Title
SharePoint Implementation
Project Type
Billable
Add these other items by repeating step 4:
TITLE
PROJECT TYPE
Internal SharePoint Upgrade to 2010
Non-billable
End-user training
Non-billable
Creating the Template
From the ribbon, click the List tab and choose List Settings.
Under the Permissions and Management section, click Save list as template.
Enter the following values and click the OK button:
NAME
VALUE
File name
Projects
Template name
Projects
Include Content
Checked
After the template has been created, the Operation Completed Successfully dialog should appear. Click the link to navigate to the List Templates Gallery.
Notice that the new template is now present in the list.
Reusing the Template in a Site in the Same Site Collection
To reuse the list template you just created, choose Site Actions
In the Create dialog, choose the Projects list type and enter Projects2 in the Name textbox.
Click the Create button to create the list and navigate the browser to the newly created list.
Notice the new list has the three items you entered in step 3 and the additional Project Type column. Also, notice the Projects2 link in the Quick Launch bar on the left.
Reusing the Template in a Site in a Different Site Collection
To reuse the list template in a site in a different site collection, you must save the list template locally and then upload it to the other site. Navigate to the List Templates Gallery again by choosing Site Actions
Click the List Templates link under the Galleries section on the Site Settings page.
Click the name of the list template and when prompted, save it to your desktop.
Navigate your browser to the other site.
Navigate to the List Templates Gallery again by choosing Site Actions
Click the List Templates link under the Galleries section on the Site Settings page.
Click the Documents tab on the ribbon and click the Upload Document button.
Click the Browse button to select the template file you saved earlier and click the Open button to return to the Upload Template dialog.
Click the OK button to upload the template.
When the Edit Item dialog appears, click the Save button.
Now that the template has been uploaded you can use it to create a list.
Choose Site Actions
In the Create dialog, choose the Projects list type and enter Projects in the Name textbox.
Click the Create button to create the list and navigate the browser to the newly created list.
Notice the new list has the three items you entered in step 3 and the additional Project Type column. Also, notice the Projects link in the Quick Launch bar on the left.
How It Works
When you save a list as a template, SharePoint makes a copy of the list and optionally its content. This copy is compressed into a template file and stored in the List Templates gallery. You can download this file and upload it for use in other site collections. Once the template has been added to the List Templates gallery, the template can be used to create a new list that is a duplicate of the original list. If you selected the option to include content, the new list will contain the same items or files as the original list.
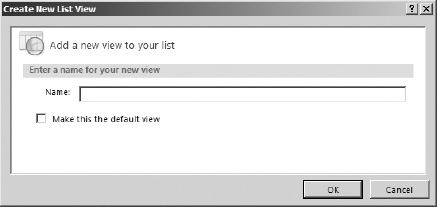
To display the existing views for a list, open the list's settings tab in SharePoint Designer. The list of views will appear in the top right-hand corner of the screen as shown in Figure 6-4. Every list and library has at least one view and you can create new ones by clicking the New button just above the list of views. When you click the New button, the dialog in Figure 6-14 appears. This dialog allows you to enter the name for the view and make it the default view for the list or library. Making a view the default view will cause that view to be displayed first whenever you access the list or library in the browser. You can still select a different view afterwards.
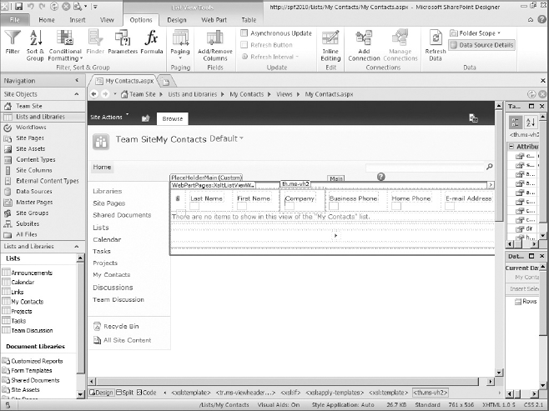
Once you click OK, the view is added to the list of views. You can edit the columns displayed in the view by clicking the view and selecting Open from the ribbon. Opening a view will display a screen similar to that in Figure 6-15. If you do not see the same tabs as shown in Figure 6-15, click the view in the page and the tabs should appear.
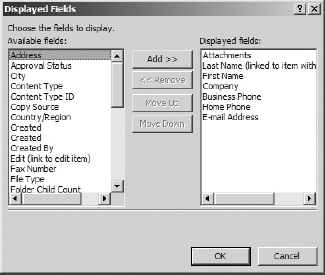
By selecting Add/Remove Columns from the ribbon, you can change the columns displayed in the view and their order by configuring the dialog in Figure 6-16. Once you click OK, the view will be updated to reflect your changes. You can also change the number of rows displayed in the view. This is helpful when you have a large number of items or documents and do not want the user to scroll down in their browser to see them all. You can change the paging of the view by selecting Paging from the ribbon and selecting one of the available options. By default, views will show 30 items or documents on each page.
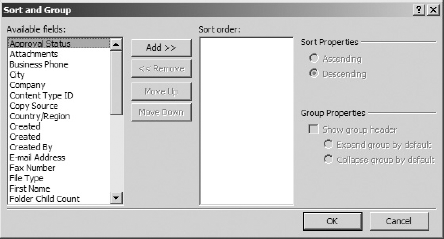
To sort the data in your view, select Sort & Group from the ribbon and the dialog in Figure 6-17 will appear. From the available fields, you can select the fields to sort and group by. After you select the fields and add them to the Sort order listbox, clicking each field will give you the option to sort it in ascending or descending order and to use it to group the data together by that column's value. Figure 6-18 shows a view that is grouping its data by state and then by city.
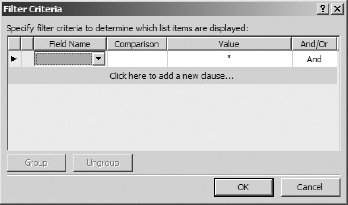
To filter the values displayed in a view, select Filter from the ribbon. The dialog in Figure 6-19 will appear and allow you to build the criteria that will be applied to the data in the list or library to determine which items or documents will be shown. If you need to change the order in which the criteria will be evaluated due to having both And and Or in the filter, highlight two or more rows by holding the shift key down and clicking with the mouse. Finally, click the Group button.

Views also allow you to group the items in a list together. This feature is helpful when you want to add totals at the bottom of your columns. To configure grouping for your view, select Sort & Group from the ribbon and the dialog in Figure 6-17 will appear. Select the columns you want to group by and add them to the Sort order list box. Next, click each column and select the Show group header checkbox. Finally, you can choose to show the group expanded or collapsed by selecting the appropriate radio button. Once you have made your changes, click the OK button to return to the view.
Note
You can only group by two columns using the Sort and Group dialog. If you want to group by more than two columns, you must change the view to use an XSL data view instead. XSL data views are covered in the next chapter.
You can also configure aggregations for your view. For instance, if you are creating a view for a list that stores the amount of time that employees spend on projects, you could add aggregation to sum the hours of the list items that appear in the view which would display at the top of the list. If you group by the project column, running totals of the hours for each project would also be displayed. The data type of the column determines which aggregation functions are available. The following table lists the available functions and when they can be used:
FUNCTION | DESCRIPTION | WHEN AVAILABLE |
|---|---|---|
Count | Returns a count of the rows | Available for every column type |
Average | Returns an average of the column | Available for currency, number, and date and time columns |
Maximum | Returns the maximum value of the column | Available for currency, number, and date and time columns |
Returns the minimum value of the column | Available for currency, number, and date and time columns | |
Sum | Returns the sum of the values in the column | Available for currency and number columns |
Std Deviation | Returns the standard deviation of the values in the column | Available for currency and number columns |
Variance | Returns the variance of the values in the column | Available for currency and number columns |
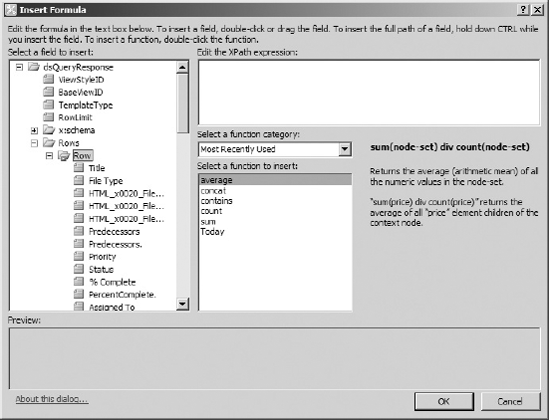
To add an aggregation for your view, click somewhere inside your view and the Formula button should become available on the ribbon. Clicking the Formula button will display the dialog in Figure 6-20. In this dialog, you select the aggregation by double-clicking one of the functions in the Select a function to insert list box which will add it to the XPath textbox. Immediately after the function is added to the textbox, a dropdown list will appear with a variety of functions and XPath variables. You can select an option from the list or double-click one of the list columns in the left-hand list box. Afterwards, your column will be added to the XPath textbox.
Add Grouping and Aggregations Using the Browser
In this exercise, you add grouping and subtotals to a view using the browser.
Navigate your browser to your SharePoint site.
Click Site Actions
Choose the Custom List type and enter Expenses in the Name textbox.
Click the Create button to create the list.
After the browser navigates to the new list, create these columns in the list using what you have learned so far:
NAME
TYPE
REQUIRED
NOTES
Amount
Currency
Yes
Set min value to .01
Project
Lookup
Yes
Choose the Projects list
Click the Modify View button in the ribbon.
In the Group By section of the View Settings page, choose Project for the first drop-down list and Created By for the second drop-down list.
Choose the option to show the grouping Expanded.
In the Totals section, choose Sum from the drop-down list next to the Amount column.
Click the OK button at the bottom of the screen to save the view.
How It Works
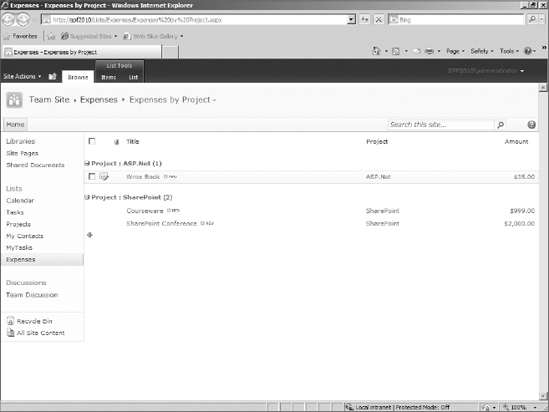
After you click OK, SharePoint updates the view's page with the new grouping and aggregation. Navigating to the view in the browser will display the projects in the list and the expenses for each project just after the project's name. Additionally, the Amount column will contain the sum total of the values for that column aggregated at the project level and a grand total for all of the items visible in the view.
There are a few more settings you should know since they can greatly increase the usability of your view. The first is the Inline Editing. When Inline Editing is enabled for a view, hovering over a list item will display an edit icon as shown in Figure 6-21. Clicking the icon will place the row in edit mode and allow you to edit the list item's values in the row itself instead of in a dialog. There is also a green plus icon at the bottom left of the list that will add a new row in edit mode for adding new items to the list. To enable Inline Editing, select Inline Editing from the ribbon and save your view.
Views can also display their data asynchronously. This means the view can refresh its contents on the page without reloading the browser. To enable this option, select the Asynchronous Update checkbox from the ribbon. Afterwards, the refresh options below the checkbox become available. If you select the checkbox for Refresh Button, the view will display a refresh icon in the page when viewed in the browser. Clicking the icon will cause the view to update the page without reloading the browser. You can also cause the page to refresh periodically by selecting Refresh Interval from the ribbon and choosing the time period in which the view should refresh its data.
Content types allow you to apply an entire set of columns to your list and libraries at once. When you add a content type to a list or library, the columns from the content type are automatically added to the list. The content types available in your site is dependent on the site template used to create the site and the activated features. Figure 6-22 shows the content types created from the Team Site template. In addition to predefined columns, content types can have their own entry forms and workflows associated with them.
Content types are particularly important in Publishing Portal sites. In a publishing site, your pages are stored in a single library, and you associate different layout pages with particular content types, such as press releases, executive biographies, and so on.
To view the list of content types for the site, select Content Types from the Navigation bar on left as shown in Figure 6-22. Content types are arranged in groups, and you can filter the list to show only the content types in a select group by using the Show Group drop-down list.
To view the content types for a list, scroll down to the bottom of the list's settings page as displayed in Figure 6-23. Figure 6-23 shows the settings page for the announcements list which has two content types: announcement and folder. The list must be configured to allow management of content types before the content types can be displayed or managed for the list using the browser, but SharePoint Designer can always manage these content types regardless of that setting.
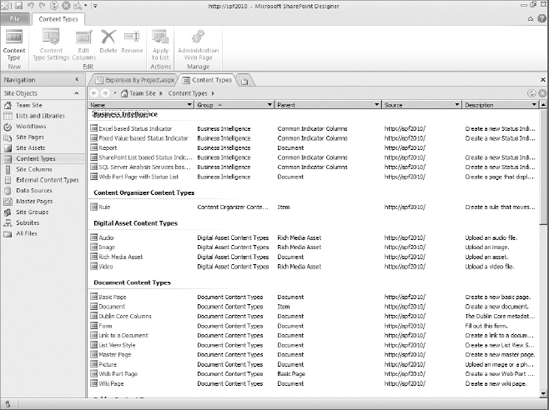
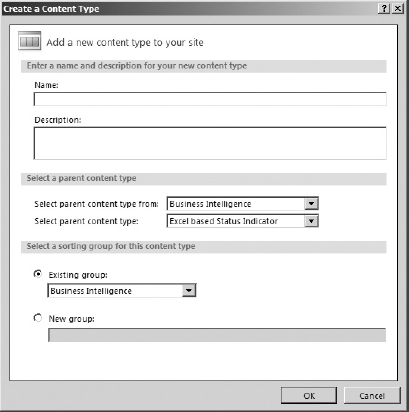
To create a new content type, select Content Type from the ribbon in Figure 6-22 and the dialog in Figure 6-24 will appear. The dialog allows you to specify a name and description for your content type. You can also select the parent for the new content type. The parent you select for the new content type is important because it determines whether the content type is for lists versus libraries. Additionally, the new content type will "inherit" columns from its parent, which can save time. Any changes to the parent content type will also be applied automatically by default to all the content types inheriting from it. Finally, you can select a group for the content type to keep it organized. It is recommended that you create at least one group to keep your content types separate from the built-in ones.
At the most basic level, all content types meant for lists inherit directly or indirectly from the Item content type and all content types meant for libraries inherit from the Document content type. Because a library is a special list for documents, the Document content type inherits from the Item content type, too.
The Item content type has only one column named Title, which is required. The Document content type has the Title column it inherited from Item and has the additional column Name to store the name of the document.
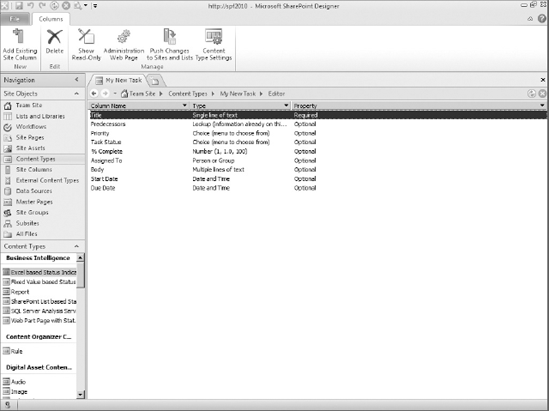
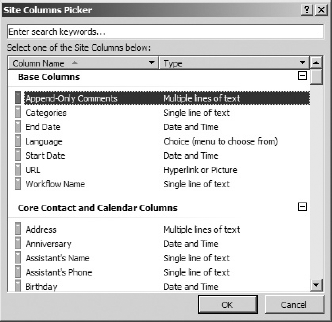
Once you click OK in the dialog in Figure 6-24, the content type will be created and the list in Figure 6-22 will be updated. To manage the columns in your content type, select it from the list and choose Edit Columns from the ribbon. Figure 6-25 shows the screen for editing the columns of a content type. You can add a column to the content type by selecting Add Existing Site Column from the ribbon. Afterwards, the dialog in Figure 6-26 will display a list of the available columns in the site.
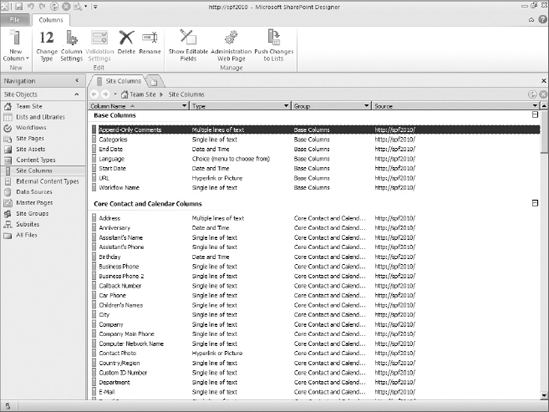
You can only add site columns to a content type. Site columns are preconfigured columns that can be added to any list, library or content type. To see the site columns in your site, select Site Columns from the Navigation bar. Figure 6-27 shows the site columns created from the Team Site template. Site columns are grouped together just like content types. You can add your own site column by choosing New Column from the ribbon and selecting a data type. You must add custom site columns if you want to add custom columns to a content type.
After you select a data type for the column, the dialog in Figure 6-28 appears. This dialog allows you to specify the site column's name and description. You can also select the group in which it should appear in the list of site columns. Again, it is recommended that you create at least one group for your site columns to keep them separate from the built-in groups.
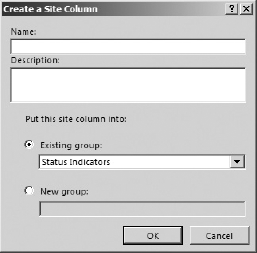
Once you complete the dialog in Figure 6-28, the list of site columns will be refreshed with your new site column. To change the settings of the site column, choose one of the options in the Edit section of the ribbon. If you change a site column, you can propagate the change to all lists and libraries using that site column by selecting Push Changes to Lists from the ribbon.
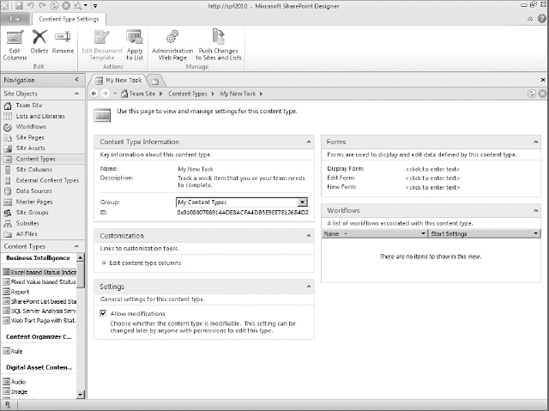
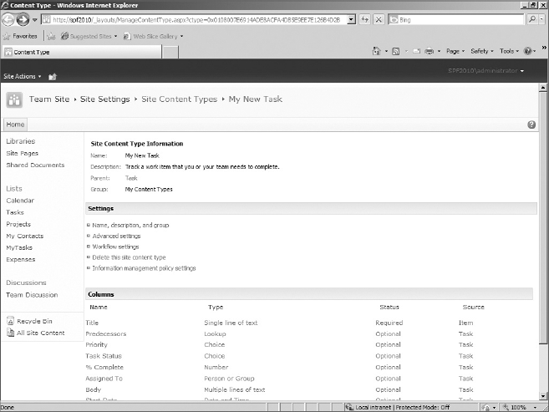
To edit the settings of your content type, select the content type from the list in Figure 6-22 and the screen in Figure 6-29 will appear. On this page, you can change the name and description of the view, the view's forms, and make the content read-only. You can also see the workflows associated with the content type. Content types can be associated with workflows, which will execute whenever an item or document with that content type is added or updated. Chapters 11, Workflow Basics, and 12, Advanced Workflows, cover more about workflows.
Not everything about a content type can be configured from SharePoint Designer. If you select Administration Web Page from the ribbon, the browser will open and show the page in Figure 6-30. Clicking the Workflow settings hyperlink will allow you to associate a workflow with the content type. Finally, the Information management policy settings link allows you to enable item and document tracking features as described in the following tables:
Table 6.1. TRACKING INSIDE SHAREPOINT
Retention | Expired items and documents can be destroyed, recycled, moved, or sent to a workflow |
Auditing | Any actions to an item or document are tracked including viewing, editing, check-in/check-out, moving, copying, and delete operations |
Whenever a content type is added toDepending on your requirements, you may want to make some columns hidden or required. Though SharePoint Designer can show whether the columns in your content type are required, optionally or hidden as shown in Figure 6-25. You must use the browser to change those settings.
Figure 6-30 also shows the list of fields in the content type. If you click the name of a column, the Change Content Type Column screen in Figure 6-31 appears. On this screen, you can make a column required, optional, or hidden. The following list describes these columns settings:
Required — The user must enter data in the column before the item or document can be saved.
Optional — The user can optionally enter data in the column.
Hidden — The column will not appear on item new, edit, and display forms but can be updated via workflows and custom code. Use this option to store data that is necessary but would not make sense to the user.
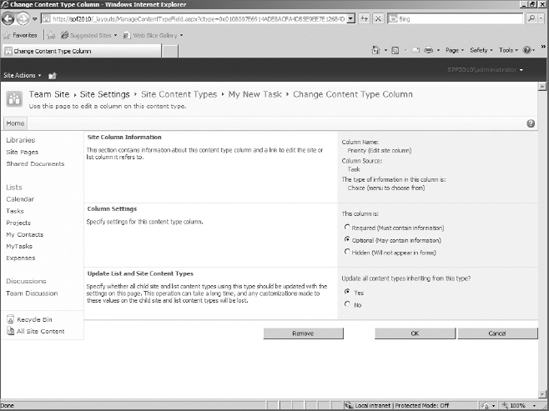
After you make your changes, you can apply the change to all content types that inherit from this content type by selecting Yes in the Update List and Site Content Types section.
Note
Whenever a content type is added to a list or library, SharePoint creates a copy of the content type and adds it to the list or library. That allows the list to function correctly even if the content type is removed from the site. If you update a content type directly in the list or library, your changes will not be applied to the original content type. Only update content types from the Site Content Types screen and choose the option to update child types, or your SharePoint site could become unmanageable.
Create and Use Content Types Using the Browser
In this exercise, you create a custom content type with custom site columns using the browser.
Navigate your browser to your SharePoint site.
Click Site Actions
Click the Site Content Types link under the Galleries section.
Click the Create button.
On the New Site Content Type screen, enter the following values and click the OK button
NAME
VALUE
Name
Employee
Select parent content type from
List Content Types
Parent Content Type
Contact
Click the Add From New Site Column link at the bottom of the page.
Enter the following values in the New Site Column screen and click the OK button:
NAME
VALUE
Column Name
SSN
Maximum number of characters
9
Create a Contacts list by clicking Site Actions
Choose the Contacts type and enter Department Roster in the Name textbox.
Click the Create button.
When the list loads in the browser, in the ribbon click the List tab and choose List Settings.
Click the Advanced Settings link in the General Settings section of the list settings page.
Choose Yes for Allow management of content types in the Content Types section and click the OK button.
Click the Contact content type in the Content Types section.
Click the Delete This Content Type link in the Settings section.
Click the OK button to confirm the deletion.
Click the Add From Existing Content Types link.
Add the Employee content type to the Content types to add list box and click the OK button.
Click Department Roster in the breadcrumb trail at the top of the screen to return to the list.
Notice the columns are the same as the Contact content type except the new SSN column at the bottom of the dialog.
Click the Cancel button to close the dialog.
How It Works
Creating the site column allows you to add a custom column to your content type. You can also reuse the site column in other lists and content types. When you create the content type, SharePoint saves whether each of the columns are required, optional or hidden. When the content type is added to the list, the columns of the content type and the columns of its ancestors are added to the list. Remember that the list effectively saves a copy of the content type and any modifications to the list's copy will not appear in the site content type.
This chapter explained how SharePoint stores and organizes your data and documents. Using a combination of lists and libraries, you can quickly create an application that includes the raw power of a database engine with the flexibility of a document management system. The next chapter further explains SharePoint's capabilities to access your data outside of SharePoint and across your enterprise.