In this exercise you create a custom activity that will become available in SharePoint Designer. The activity will accept an employee number as input and call a REST-based endpoint to retrieve additional employee information. The retrieved data will be stored in a dictionary object. Note: This Try It Out can only be developed against a test SharePoint 2013 server on-premises setup. Visual Studio 2012 does not support remote development of SharePoint solutions. These sandboxed or farm-level solutions can only be developed against locally installed versions of SharePoint Foundation or SharePoint Server. Remote development is supported only for Apps for SharePoint 2013.
1. Run Visual Studio 2012 as Administrator. Select New Project.
2. In the New Project dialog, expand the Templates ⇒ Visual C# ⇒ Office/SharePoint ⇒ SharePoint Solutions nodes. Select SharePoint 2013 ⇒ Empty Project and provide the name CustomActionGetEmployeeInfo. Click OK.
3. In the Specify the site and security level for debugging dialog, set the SharePoint site URL to your local test SharePoint site and select Deploy as a sandboxed solution. Click Finish.
4. In Solution Explorer, right-click the project, and select Add ⇒ New item. In the Add New Item dialog, select Workflow Custom Activity, name it GetEmployeeInfoActivity, and click OK.
5. The Workflow Designer opens with the initial status of your workflow and an empty Sequence activity on the page. To design your custom activity to be generic, where it can be hosted in any workflow at run time, take in any employee number passed in by a host workflow, and output a consumable object for the host workflow, you need to define some arguments. At the bottom of the design canvas are three tabs: Variables, Arguments, and Imports. Click the Arguments tab.
6. To create the input parameter, click the Create Argument text box, type
EmployeeID for the Name and complete the following fields as indicated:
- Direction: In
- Argument type: Int32
- Do not provide a default value.
7. For the output parameter, click the Create Argument text box, type
JsonODataResponse for the Name and complete the following fields as indicated:
- Direction: Out
- Argument type: Click the drop-down menu and select Browse for Types. In the Browse and Select a .NET Type dialog, type DynamicValue. In the selection list, locate Microsoft.Activities, select DynamicValue.
- Do not provide a default value.
Click OK.
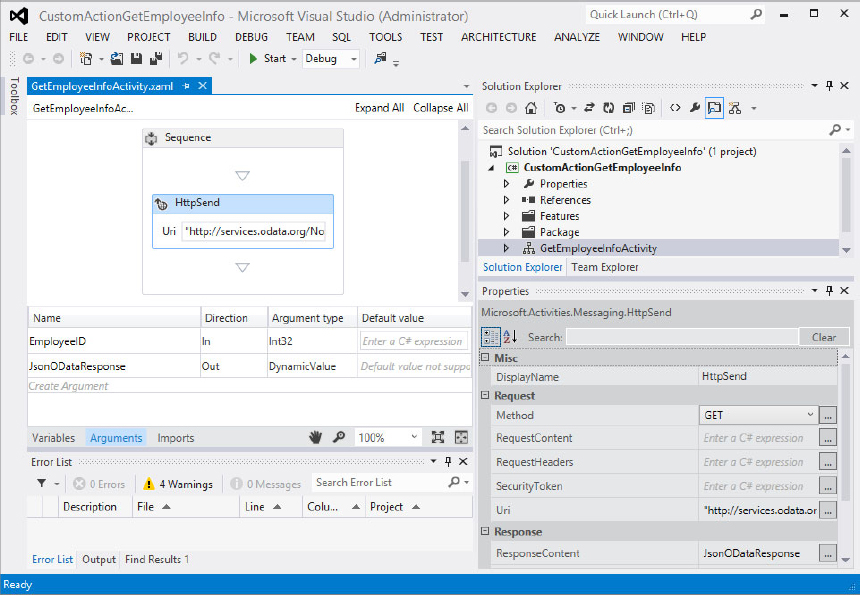
8. Using the Visual Studio View menu, make sure the Toolbox is open and pinned for convenience. In the Toolbox, expand the Messaging node. Select HttpSend in the Toolbox and drag and drop it inside the Sequence.
9. Click on
HttpSend. In the Properties pane complete the following fields as indicated:
- Request Method: GET
- Request URI: "http://services.odata.org/Northwind/Northwind.svc/Employees(" + EmployeeID + ")?$select=EmployeeID,LastName,FirstName,HomePhone,ReportsTo&$format=json" You’ll notice that you are dynamically providing your EmployeeID argument at run time to retrieve only the information for the employee number that is passed into this activity.
- Response: ResponseContent: JsonODataResponse
Figure 15-9 shows what your custom action should look like:
10. In the Solution Explorer, expand the workflow node and double-click the
.actions4 file. A designer is not available for configuring this file so you need to build it manually by typing in the XML. The
.actions4 file defines the visual appearance of your custom action when deployed to SharePoint. This is what the workflow designers will interact with in the Visual and Text-based Designer views. To construct the action sentence and identify and map the corresponding input and output arguments to it accordingly, delete the
<RuleDesigner>...</RuleDesigner> elements currently in the file and in their place add the following:
  <RuleDesigner Sentence="Get employee data for %1 (output to %2)">
    <FieldBind Field="EmployeeID"
               Text="Employee Number"
               Id="1"
               DesignerType="TextArea"
               DisplayName="Get Employee Info"
               />
    <FieldBind Field="JsonODataResponse"
               Text="JsonODataResponse"
               Id="2"
               DesignerType="ParameterNames"
               DisplayName="JsonODataResponse"
               />
  </RuleDesigner>
  <Parameters>
    <Parameter Name="EmployeeID"
               Type="System.Int32, mscorlib"
               Direction="In"
               DesignerType="TextArea"
               Description="The employee number"
               />
    <Parameter Name="JsonODataResponse"
              Type="Microsoft.Activities.DynamicValue,
Microsoft.Activities,
              Culture=neutral, PublicKeyToken=null"
              Direction="Out"
              DesignerType="ParameterNames"
              Description="Output variable to store the contents
of the HTTP request."
               />
  </Parameters>
11. Build the project to make sure there are no errors, right-click the project node, and select Deploy to deploy the .WSP file to your test SharePoint site. You will now have a workflow action available in SPD that, when given an employee ID, will make a REST call to the employee data source and return information about the employee that can be used in workflow processing.
12. After the deployment is complete, in SharePoint, navigate to the site collection to which you deployed the file. Select Site Contents, click the Add an app tile, and click the Custom List tile. Name the list Employee's Manager.
13. Click the Employee's Manager tile, click the List tab, and click List Settings in the ribbon.
14. On the Settings page click Create column link and complete the following fields as indicated:
- Column name: EmpID
- Type: Number
- Require: Yes
- Number of decimal places: 0
Click OK.
15. Click Create column link and complete the following fields as indicated:
- Column name: EmpFName
- Type: Single line of text
Click OK.
16. Click Create column link and complete the following fields as indicated:
- Column name: EmpLName
- Type: Single line of text
Click OK.
17. Click Create column link and complete the following fields as indicated:
- Column name: ManagerFName
- Type: Single line of text
Click OK.
18. Click Create column link and complete the following fields as indicated:
- Column name: ManagerLName
- Type: Single line of text
Click OK.
19. Return to the Employee's Manager list, and click New item. For the Title type Test 1, and for the EmpID type 1. Leave the other columns empty; the workflow will fill those in. Click Save.
20. Start SharePoint Designer 2013 and open the site collection where you deployed the custom action. When the site opens, in the left navigation pane select Workflows.
21. In the ribbon, click the List Workflow drop-down menu and select Employee’s Manager.
22. In the Create List Workflow dialog, for the name, type Get Employee Manager. Click OK.
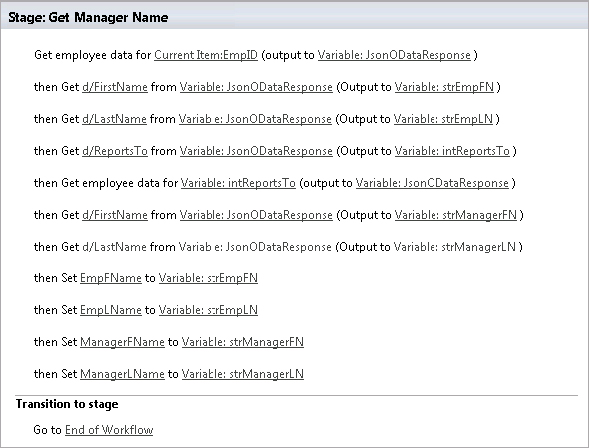
23. Here you use the Text-based Designer to build the workflow. Click on Stage 1 and type the name Get Manager Name.
24. Click directly under the phrase, “Start typing or use the Insert group on the Ribbon.” Type Get and press Enter. Your new GetEmployeeInfoActivity appears; select it. (This activity is also available in the Actions in the ribbon.)
25. Click the Employee Number link, and click
fx. In the Lookup for Integer dialog, select Current Item and select EmpID from the field source. Click OK.
You don’t need to change the second link in the sentence; SPD automatically creates a dictionary variable Variable: JsonODataResponse for you for the returned JSON object from the REST call. SPD makes this default selection based on the JSON object you built into the custom action.
26. Click just under your first sentence, type
Get, and press Enter. Select Get an Item from a Dictionary. A number of data values were returned from the REST call and you now need to select which ones are important to your processing. It’s best to first think about how the data lays out in the returned object. The following is the returned JSON object for the employee with the
EmployeeID of 1. To identify a specific data element, you use the notation
object/field, so
d/FirstName will retrieve the value “
Nancy” and so on.
{
"d" : {
"__metadata": {
"uri": "http://services.odata.org/Northwind/Northwind.svc/Employees(1)",
"type": "NorthwindModel.Employee"
},
"EmployeeID": 1,
"LastName": "Davolio",
"FirstName": "Nancy",
"HomePhone": "(206) 555-9857",
"ReportsTo": 2
}
}
27. To configure the Get an Item from a Directory action, click the item by name or path link, type d/FirstName, click the dictionary link, select Variable: JsonODataResponse, click the item link, and select Create a new variable. In the Edit Variable dialog, type strEmpFN for the Name and select String for the Type.
28. Hover over the end of the just configured sentence, click the drop-down arrow, and select Copy Action.
29. Click right below the sentence and click Paste in the ribbon. Delete d/FirstName and type d/LastName and create a new String output variable strEmpLN, following the pattern you used in step 27 for creating a new variable.
30. Copy and paste the action again, delete d/LastName and type d/ReportsTo, and create a new output Integer variable intReportsTo, following the pattern you used in step 27 for creating a new variable.
31. Now retrieve the employee’s manager information: Copy the first line of the workflow, which is your custom action line, and paste it following the last line you just completed in step 30. Click the CurrentItem:EmpID link. In the Lookup for Integer dialog, select Workflow Variables and Parameters for the Data source and select, Variable: intReportsTo for the Field source. Click OK.
32. You can now copy the lines that retrieve the first and last names from the response object and paste them right after the last line from step 31. However, both of these lines should each create a new String variable: one for strManagerFN and another for strManagerLN. Follow the pattern you used in step 27 for creating a new variable for each of these.
33. The last thing to do is use the data values you have collected in the variables to set the values in the columns on your list for this employee. Below the last line from step 32, type Set and press Enter. Select Set Field in Current Item.
34. Click the field link, and select EmpFName. Click the values link and click fx. In the Define Workflow Lookup, select Workflow Variables and Parameters for the Data source and select Variable: intReportsTo for the field source.
35. Repeat step 34 for each of the current item columns EmpLName, ManagerFName, and ManagerLName, and configure each of their respective variables as in step 34.
36. To finalize the workflow, click the Transition to stage area, type Go, and press Enter. Click a stage and select End of Workflow.
37. In the ribbon, click Save to save your workflow. You can also click Check for errors to validate your code. Your completed workflow should look like
Figure 15-10.
38. In the ribbon, click Publish.
39. In the browser, navigate to your Employee’s Manager site. On the first item you created in step 19, click the ellipsis (...) and select Workflows.
40. On the Start a New Workflow page, click the Get Employee Manager link to start the workflow. When the workflow starts you will be returned to the Employee's Manager list. You can keep refreshing the page until you see the additional columns filled with data via your custom action!
In this Try It Out you saw the pattern for how to create a custom activity that can be surfaced in SharePoint Designer and reused across any number of workflows that you choose. In this case you created a reusable activity that, when handed an employee identification number, will retrieve a set of data about that employee. Although the implementation within this example was elementary, you could potentially navigate up the ReportsTo hierarchy by adding a looping structure to the workflow until the logical top of the organization structure is reached. You could also use the ReportTo to determine an employee’s manager to make a manager’s approval process more dynamic because any employee’s manager can now be retrieved on demand.
In this exercise you also experienced using one of the very useful capabilities within the workflow: the dictionary object. The ability to have a complex data object handled seamlessly for you, so that all you need to do is know the path to the data elements helps you focus on solving the business problem at hand and eliminates the need to write the plumbing code, too.