DEVELOPING SHAREPOINT APPLICATIONS USING NAPA
For those of you who are not new to SharePoint development, you know that getting your development environment set up can take a little time. In SharePoint 2010, you had to locally install a number of software applications, such as SharePoint, SQL Server, Visual Studio, and so on, and configure your environment for use. You were then relegated to debug on your locally installed SharePoint instance. Fast-forward to SharePoint 2013, and the development story has evolved quite a bit. For example, you can set up a cloud-based version of SharePoint (Office 365) and develop remotely against that instance; you can have a locally installed version of SharePoint and have your tools locally installed; and you also have browser-based options for quicker, lightweight application development — which you can export to Visual Studio. Enter Napa.
Napa enables you to very quickly build and deploy solutions into SharePoint using a rich browser-based approach. It allows developers to get started quickly developing for SharePoint, and if you desire, to migrate the code you write in Napa to run and debug in Visual Studio as well.
As you’ve seen, SharePoint 2013 has evolved towards the “App” model. Interestingly, Napa is really just another rich app that you can use to develop for SharePoint. So, you install it and use it just like any other app; start at the developer site and proceed from there. Figure 3-18 illustrates the live tiles that are by default available to you when you first create your SharePoint developer site. You can see the “Get tools to build apps” link in the first tile on the left.

Clicking this link redirects you to the install location for Napa, where you can follow the instructions to download and trust the Napa app within your Office 365 tenancy. (Installing the Napa development tools app is similar to installing other apps.)
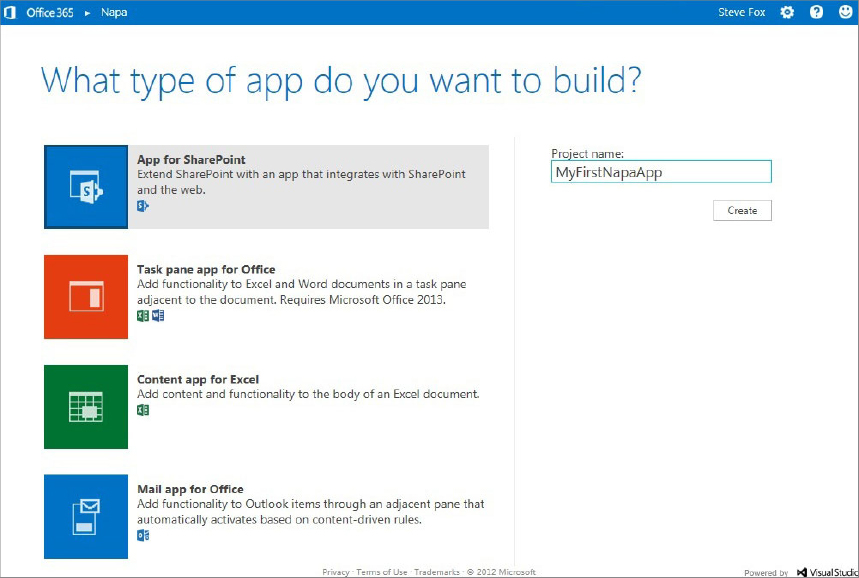
After you install Napa, you can then go ahead and launch it and use it to build apps for SharePoint 2013. For example, in Figure 3-19 you can see the default Napa experience. The main window offers the code view. This is where you add your client-side code. Note to the left of the main window the folders (for example, Content, Images, Pages, and Scripts) with files within them. You can navigate and use these different folders to add your code to build out your app. The left-hand portion of the screen contains another set of important options for running the project, removing the app, viewing the properties of the app, opening the app in Visual Studio, and sharing the project.

Napa doesn’t have all the features of Visual Studio; however, you can get started very quickly with your coding efforts and, of course, open the project in Visual Studio to leverage all the options within a fully featured development IDE.
Use the following steps to go ahead and build a simple app using Napa.
<%-- The markup and script in the following Content element will be placed in
the <body> of the page --%>
<asp:Content ContentPlaceHolderId="PlaceHolderMain" runat="server">

    <div>
        <p id="message">
            <!-- The following content will be replaced with the user name
when you run the app - see App.js -->
            initializing...
        </p>
    </div>

   <div>
    <select id='dropdiv' onchange="getBookInfo(this)">
      <option value='1'>Beginning SharePoint 2013 Development</option>
      <option value='2'>Beginning ASP.NET 4.0</option>
      <option value='3'>Professional SharePoint Development using Silverlight</option>
    </select>
 </div>

</asp:Content>
// This function is executed if one of the choices is selected in the table.
function getBookInfo(object)
  {
     var selected = object.options[object.selectedIndex].value;
     var ISBN;
     var Price;
     var Message;
       if (selected == '1')
        {
          ISBN = "091283900129";
          Price = "$39.99";
          Message = "Book Info: " + ISBN + " | " + Price;
          alert(Message);
        }
          else if (selected == '2')
         {
           ISBN = "298734689102";
           Price = "$42.99";
           Message = "Book Info: " + ISBN + " | " + Price;
           alert(Message);
         }
else if (selected == '3')
          {
            ISBN = "948302381002";
            Price = "$36.99";
            Message = "Book Info: " + ISBN + " | " + Price;
            alert(Message);
          }
  }


JavaScript is a dynamic language that runs on the client. What that means is when the client loads the browser and subsequently the page, it runs the script that you’ve embedded within the page within your Napa app. However, one of the key things you need to be aware of when using JavaScript to develop for SharePoint is that it doesn’t maintain state, so you have to incorporate it into the design of your applications.
As you can see from the code in the preceding Try it Out, JavaScript events are encapsulated within the script tag and live in the page within which they are called. This is not the only way to call JavaScript code — you can also store the code in a separate file (for example, foo.js) that is further stored within SharePoint as a site asset. If you were to store the JavaScript separately, you would not encapsulate the script in script tags — you would merely add the methods and any helper functions to that .JS (.js) file so they execute when called from the page.
<script language="javascript" type="text/javascript">
function foo()
{
...

}
 </script>
With the example using inline JavaScript, the getBookInfo method call triggers when the user changes her selection within the list box. You can see in the following code that the event that triggers is the onChange event.
<select id='dropdiv' onchange="getBookInfo(this)">
 <option value='1'>
Professional SharePoint 2007 Development
 </option>
 <option value='2'>
Beginning ASP.NET 3.5
 </option>
 <option value='3'>
Professional SharePoint Development using Silverlight
 </option>
</select>
Depending on what the user selects, you can see that the object (that is, the selected item) is passed with the call to getBookInfo. The variable called selected then gets the value of the selected item, which further enables the code to run a conditional check against the selected item. So, if the selected item is the first item, other variables are set and then subsequently concatenated and pushed out in an alert event to the user.
As you can see, Napa is an exciting evolution in the SharePoint development story. Lightweight apps can be simple to build and easy to deploy. However, in some cases you might require a more rigorous and powerful set of capabilities such as those offered by IntelliSense, ALM options, rich debugging, and so on. For these types of features, you’ll likely want to use Visual Studio, covered next.