DEVELOPING SHAREPOINT APPLICATIONS USING VISUAL STUDIO 2012
Visual Studio 2012 ships with a standard set of project-level and item-level templates that make SharePoint development much easier and more powerful than in previous versions. With SharePoint 2010, you could leverage Visual Studio 2010 to do a lot of your development, and with Visual Studio 2012 you now have many new features and options.
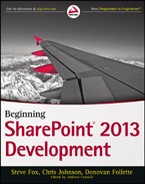
To help with your development efforts, Microsoft ships a standard set of project templates out of the box with an additional set of project item templates. For example, you can create a SharePoint 2013 Project and then add any number of SharePoint project items to that project using the template options. (You do require a local instance of SharePoint to be installed to use these options.) Figure 3-24 illustrates the different project-level options for you.
The following project-level templates are available by default in a Visual Studio project:
- SharePoint 2010 Project/SharePoint 2013 Project: An empty SharePoint project that enables you to add one or more item-level templates to build out a solution
- SharePoint 2010 Silverlight Web Part/SharePoint 2013 Silverlight Web Part: Rich media Web part that uses Silverlight as the rendering engine
- SharePoint 2010 Visual Web Part/SharePoint 2013 Visual Web Part: Web part that provides designer capabilities so you can drag and drop ASP.NET UI controls and then add code-behind
- Import SharePoint 2010 Solution Package/Import SharePoint 2013 Solution Package: Template that enables you to import and then redistribute packaged solutions to your SharePoint farm
- Import Reusable SharePoint 2010 Workflow/Import Reusable SharePoint 2013 Workflow: Template that enables you to import and then redistribute and deploy existing workflow solutions to your SharePoint farm
These project-level templates provide a wide array of functionality, ranging from an empty SharePoint project to different types of Web parts to workflow applications, or the importation of legacy applications that you want to run in SharePoint 2013.
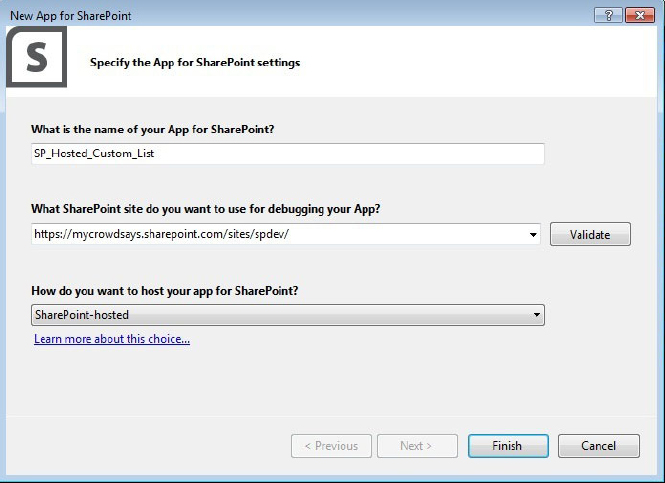
In addition to project-level templates, a set of options is available for the item level. An item is something you add to a project, such as a list or event receiver (see Figure 3-25).

The item-level templates available in Visual Studio are as follows:
- List: Provides a list designer experience for you to quickly design, build, and deploy lists to SharePoint.
- Remote Event Receiver: Enables you to build event-driven applications (for example, an event fires when a new list item is added to a list) that respond to specific user or site actions.
- Content Type: Enables you to create custom content types that derive from existing SharePoint content types such as documents, announcements lists, columns, fields, and so on, that can be reused across your SharePoint site.
- Workflow: Supports application code that manages activities defined within a business process (for example, multi-tiered approval process).
- Empty Element: Provides a way for you to leverage Visual Studio to build SharePoint artifacts that don’t have project- or item-level templates associated with them.
- Site Column: A column that can be reused across your SharePoint site.
- Module: Container that you can use to deploy files or dependency assets (for example, JavaScript source) to your SharePoint site.
- Client Web Part (Host Web): Type of Web part that is a container that loads external assets or apps (could be external to the SharePoint site such as a Bing map or an asset or Web page within the SharePoint site).
- UI Custom Action (Host Web): Represents a method to host buttons, links, or menus that support a customized path for the user.
- Task Pane App: A new type of App for Office artifact that can surface HTML/CSS/JavaScript apps within parts of SharePoint (for example, a task pane within Outlook in O365).
- Content App: A new type of App for Office that is surfaced within the doc itself (for example, a floating app that links Excel Web access data to Bing maps).
You’ll come across other templates as you leverage the Visual Studio tools — and as you engage with the SharePoint community that built a number of Visual Studio add-ins for SharePoint. The goal for these project- and item-level templates is to make the tasks of building, debugging, and deploying a range of application types and artifacts to SharePoint easy. In SharePoint 2013, a range of new features exist that have been added to Visual Studio 2012. The following are a sampling of these new feature areas:
- Designers for lists and content types
- Ability to create site columns
- Silverlight Web part options
- Ability to publish SharePoint solutions to remote SharePoint servers
- Test SharePoint performance by using profiling tools
- Create sandboxed Visual Web parts
- Improved support for sandboxed solutions
- Support for JavaScript debugging and IntelliSense for JavaScript
Each of the preceding is important in different ways. For example, if you look at the underlying structure of lists, you’re into heavy XML structures, so having a designer experience is a much more efficient way to lay out, build, and deploy custom list templates to SharePoint. Further, remote development and debugging is a huge leap forward. In SharePoint 2010, you were relegated to debugging against your local instance. This is especially important when trying to discover ill-performing code artifacts, and the profiling tools help you to identify those performance sore spots such that code on your SharePoint site doesn’t slow down overall use and load times. You could package and deploy remotely, but debugging was limited. Also, with the increased focus on JavaScript, having the right tools to debug and leverage IntelliSense is important to increase your developer productivity.
Beyond the wealth of available templates, Visual Studio supports even more great features. For example, the Server Explorer provides you with the capability to visualize the key artifacts within your SharePoint site such as lists, list items, workflows, and so on. Visual Studio also has standard ways to build, package, and publish applications using right-click menu options, as shown in Figure 3-26. Using these menu options, you can build and deploy through the Build menu and then right-click your project to Retract it; Visual Studio does all the cleanup for you — exactly what you would expect when cleaning your solutions and apps from the SharePoint instances.

Given the different types of available templates, the developer now has more options than ever to structure and deploy an application to SharePoint in a more productive and manageable way. Whether you’re building a SharePoint solution (that is, .WSP) or a new App for SharePoint (that is, .APP), you have the right options for your development needs.
Another work item that returns in Visual Studio 2012 is source-code control (often discussed within the context of application life-cycle management or ALM). With the ALM features built into Team Foundation Server (TFS), you have ample opportunity to manage your source code in a streamlined way. For example, when you create a new project you can right-click the project in Solution Explorer, select Add Solution to Source Control (see Figure 3-27), and then configure a TFS server for your application code.

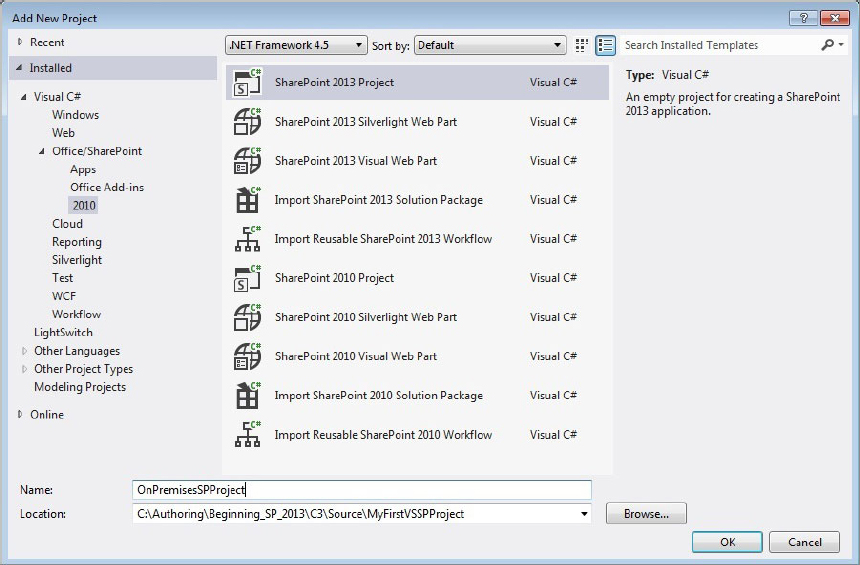
Because there are so many features Visual Studio offers to help develop applications in SharePoint, it is helpful to familiarize yourself with them in greater detail. Use the steps in the following Try It Out to explore some of the Visual Studio 2012 features through the creation of a SharePoint-hosted app.

<asp:Content ContentPlaceHolderId="PlaceHolderAdditionalPageHead"
runat="server">
    <script type="text/javascript" src="../Scripts/jquery-1.6.2.min.js">
</script>

    <link rel="Stylesheet" type="text/css" href="../Content/App.css" />

    <script type="text/javascript" src="../Scripts/App.js"></script>

    <script type="text/javascript">
        $(document).ready(function () {
            SP.SOD.executeFunc('sp.js', 'SP.ClientContext', function ()
{ sharePointReady(); });
        });
    </script>
</asp:Content>

<%-- The markup and script in the following Content element will be placed in
the <body> of the page --%>
<asp:Content ContentPlaceHolderId="PlaceHolderMain" runat="server">

<WebPartPages:WebPartZone
    runat="server"
    FrameType="TitleBarOnly"
    ID="full"
    Title="loc:full" >
<WebPartPages:XsltListViewWebPart
    ID="XsltListViewEmployeeWebPart"
    runat="server"
    ListUrl="Lists/Employees"
    IsIncluded="True"
    NoDefaultStyle="TRUE"
    Title="Employees"
    PageType="PAGE_NORMALVIEW"
    Default="False"
    ViewContentTypeId="0x">
</WebPartPages:XsltListViewWebPart>
</WebPartPages:WebPartZone>

</asp:Content>
<?xml version="1.0" encoding="utf-8"?>
<Elements xmlns="http://schemas.microsoft.com/sharepoint/">
    <ListTemplate
        Name="Employees"
        Type="10000"
        BaseType="0"
        OnQuickLaunch="TRUE"
        SecurityBits="11"
        Sequence="410"
        DisplayName="Employees"
        Description="My List Definition"
        Image="/_layouts/15/images/itgen.png"/>
 </Elements>
You’re going to leverage more than just JavaScript and simple ASP.NET code when building Apps for SharePoint using Visual Studio 2012. For example, those familiar with SharePoint 2010 will remember the client-side object model (CSOM); you’ll find that you use this API within the different hosted model apps (across JavaScript, Silverlight, and .NET). The following code snippet walks through setting the context for a SharePoint site, integrating the OAuth accessToken object within the context which is new to SharePoint 2013 and facilitates cross-domain app authentication. It then creates a Collaborative Application Markup Language (CAML) query, which is an XML language that enables you to build raw queries against SharePoint lists. The code also creates a query against a list and returns the items from the list. You can see a custom Customer object that is used to transpose the returned list items and bind them to a Listbox.
...
ClientContext clientContext =
              TokenHelper.GetClientContextWithAccessToken(sharepointUrl.ToString(),
 accessToken);
            Web web = clientContext.Web;
            clientContext.Load(web);
            List list = clientContext.Web.Lists.GetByTitle("Customers");
            CamlQuery camlQuery = new CamlQuery();
            camlQuery.ViewXml = "<View/>";
            ListItemCollection listItems = list.GetItems(camlQuery);
            clientContext.Load(list);
            clientContext.Load(listItems);
            clientContext.ExecuteQuery();

            foreach (ListItem listItem in listItems)
            {
                Customer tempCustomer = new Customer();
                tempCustomer.Name = listItem["Title"].ToString();
                tempCustomer.Company = listItem["Company"].ToString();
                listOfCustomers.Add(tempCustomer);
            }

            lstbxCustomerData.DataSource = listOfCustomers;
            lstbxCustomerData.DataBind();
OData is useful in a very similar way. You can use a REST URI to access data within lists and then cycle through the XML or JSON feed and integrate within your application. The following URI returns the list items in the Customers list.
https://me.sharepoint.com/sites/sp/_api/web/lists/getbytitle('Customers')/items