COMMON DEVELOPER TASKS
Although everything is technically an “app” in SharePoint 2013, you will find yourself building different types of apps, and when doing so, you will run into several of the same tasks many times over. It is helpful to identify these familiar tasks so that you can hone the skills associated with them, as you’ll be using them often. Some of the more common tasks you’ll likely find yourself doing are as follows:
- Creating Web Parts
- Creating SharePoint-hosted apps
- Accessing and managing data
- Creating cloud-hosted apps
- Creating event receivers
- Creating ASPX pages
- Creating master pages
Let’s walk through each of these tasks and explore what they are and the skills required for your success in completing them.
Creating Web Parts
One of the most common developer tasks you’ll likely engage in is the creation and deployment of a Web Part. This historically has been the key artifact that a developer develops and deploys to SharePoint.
In SharePoint 2013, you work primarily with three different types of Web Parts: Standard, Visual, and Silverlight. Many other SharePoint artifacts might feel like a Web Part, but in many cases these are ASP.NET objects, containers, or IFRAMEs that provide dynamic client-side code rendering and pass-through capabilities to other Web Parts or applications, or views to list data. Because of the rich designer capabilities, the Visual and Silverlight Web Parts will likely be your first choice; however, this section covers all three.
Standard Web Parts
A Standard Web Part provides the plumbing for you to create a Web Part and deploy it to SharePoint. When you create a Standard Web Part, you are creating most objects from scratch and assembling the Web Part without the aid of a designer. This can be good and bad. If you’re a skilled developer and are familiar with the ASP.NET/SharePoint APIs and object model, then this won’t be too much trouble. However, you do gain some advantage when using more designer-driven Web Parts, if nothing more than to improve your productivity around creating a user interface for your Web Part.
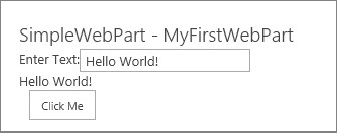
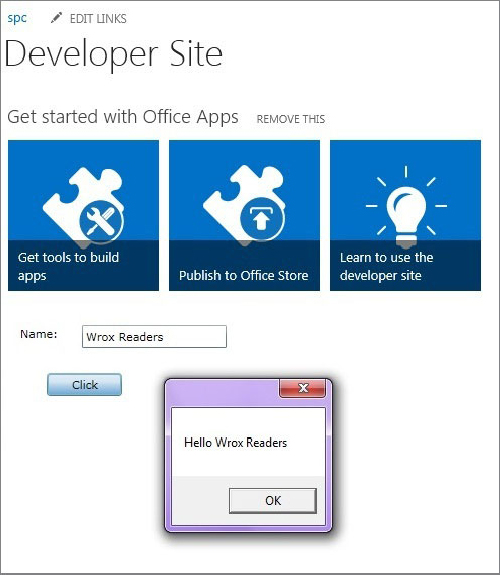
To follow is a short code snippet that includes a text box, label, and button control that are being instantiated, properties set, and a Click event that corresponds to the button control. In this code snippet, you can see that the four controls are declared at the class level, and then in the CreateChildControls method the properties for those objects are set, the Add method is called to add the controls to the Controls collection (to display them in the Web Part), and the myButton_Click event is called to render the user’s entry as text in one of the labels. If you have not coded Web Parts before, this is pretty standard; that is, creating the controls, setting the properties for those controls, adding the controls to the Controls collection, and also adding any event handlers for those controls. This code illustrates the explicit code you need to write to generate the UI through ASP.NET objects:
namespace MyFirstDevTask.TaskOneWebPart
{
    [ToolboxItemAttribute(false)]
    public class TaskOneWebPart : WebPart
    {
        Label myLabel = new Label();
        TextBox myTextbox = new TextBox();
        Label myResponse = new Label();
        Button myButton = new Button();

        protected override void CreateChildControls()
        {
            myLabel.Text = "Enter Text:";
            myResponse.Text = "";
            myTextbox.Enabled = true;
            myTextbox.Text = "";
            myButton.Text = "Click Me";
            this.Controls.Add(myLabel);
            this.Controls.Add(myTextbox);
            this.Controls.Add(new LiteralControl("<br/>"));
            this.Controls.Add(myResponse);
            this.Controls.Add(new LiteralControl("<br/>"));
            this.Controls.Add(myButton);

            myButton.Click += new EventHandler(myButton_Click);
        }

        void myButton_Click(object sender, EventArgs e)
        {
            string userResponse = myTextbox.Text;
            myResponse.Text = userResponse;
        }
    }
}
Figure 4-1 shows the end result if you were to deploy this Web Part to SharePoint.
Visual Web Parts
The Visual Web Part is different from the Standard Web Part in that you have a designer experience for creating the user interface (UI) for the Web Part. This makes it very easy to add controls and code-behind for this type of Web Part. Because SharePoint is built on ASP.NET, you have many of the same underlying constructs and objects that you might have learned through ASP.NET for the creation of a Standard Web Part. You can create and apply many of the same objects and events when building out a Visual Web Part that you might have used when building out an older ASP.NET Web Part.
Using the designer experience in Visual Studio to create the Web Part UI, you can drag and drop a wide array of library controls from the toolbox onto the designer surface. Where you would manually write the code in the Standard Web Part to create controls or events, in the Visual Web Part you use a method with which you’re likely familiar: drag and drop the control and then double-click the control in the designer to add the code-behind. For example, if you were to take the same functionality shown earlier in the Standard Web Part and implement it in the Visual Web Part, then you would have an ASP.NET user control (ASCX file) that represents the UI with a code-behind file. The ASCX user control code would look like the following:
<asp:Label ID="myLabel" runat="server" Text="Enter Text:"></asp:Label>
 <asp:TextBox ID="myTextbox" runat="server"></asp:TextBox>
<p>
    <asp:Label ID="myResponse" runat="server" Text="Label"></asp:Label>
</p>
<asp:Button ID="myButton" runat="server" onclick="myButton_Click"
    Text="Click Me" />
The code-behind for the ASCX user control would look like the following:
using System;
using System.Web.UI;
using System.Web.UI.WebControls;
using System.Web.UI.WebControls.WebParts;

namespace MyFirstDevTask.TaskTwoWebPart
{
    public partial class TaskTwoWebPartUserControl : UserControl
    {
        ...

        protected void myButton_Click(object sender, EventArgs e)
        {
            string userResponse = myTextbox.Text;
            myResponse.Text = userResponse;
        }

    }
}
Note that the control declarations do not appear in this specific ASCX code-behind (ASCX is the file extension for the ASP.NET user control file); however, a reference exists to the ASCX control in the core Web Part class that loads the user control you build with the designer experience at runtime. The following shows the code that represents this reference inside of the core Web Part class. Note that the _ascxPath object simply represents a filesystem path to the location of the ASCX file you created using the designer.
public class TaskTwoWebPart : WebPart
    {
        private const string _ascxPath =
@"~/_CONTROLTEMPLATES/MyFirstDevTask/TaskTwoWebPart/TaskTwoWebPartUserControl.ascx";

        protected override void CreateChildControls()
        {
            Control control = Page.LoadControl(_ascxPath);
            Controls.Add(control);
        }
     }
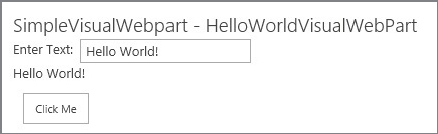
Figure 4-2 shows what this Visual Web Part looks like.
Now that you’ve seen a bit of code behind both a Standard and Visual Web Part, let’s walk through an exercise to create a new Visual Web Part. This exercise assumes that you’ve created a SharePoint site (a developer site).


using System;
using System.Collections.Generic;
using System.Linq;
using System.Text;
using System.Threading.Tasks;

namespace MyFirstSPProj
{
    class Sales
    {
        public int ID { get; set; }
        public string Quarter { get; set; }
        public string TotalSales { get; set; }
    }
}
<%@ Assembly Name="$SharePoint.Project.AssemblyFullName$" %>
<%@ Assembly Name="Microsoft.Web.CommandUI, Version=15.0.0.0, Culture=neutral,
PublicKeyToken=71e9bce111e9429c" %>
...

<p style="font-family: calibri">
    My First Visual Web Part</p>
<asp:GridView ID="salesGridView" runat="server" CellPadding="4"
Font-Names="Calibri" Font-Size="Small" ForeColor="#333333" GridLines="None">
    <AlternatingRowStyle BackColor="White" ForeColor="#284775" />
    <EditRowStyle BackColor="#999999" />
    <FooterStyle BackColor="#5D7B9D" Font-Bold="True" ForeColor="White" />
    <HeaderStyle BackColor="#5D7B9D" Font-Bold="True" ForeColor="White" />
    <PagerStyle BackColor="#284775" ForeColor="White" HorizontalAlign="Center" />
    <RowStyle BackColor="#F7F6F3" ForeColor="#333333" />
    <SelectedRowStyle BackColor="#E2DED6" Font-Bold="True" ForeColor="#333333" />
    <sortedascendingcellstyle backcolor="#E9E7E2" />
    <sortedascendingheaderstyle backcolor="#506C8C" />
    <sorteddescendingcellstyle backcolor="#FFFDF8" />
    <sorteddescendingheaderstyle backcolor="#6F8DAE" />
</asp:GridView>
<br />
<asp:LinkButton ID="lnkGetSalesData" runat="server" Font-Names="Calibri"
Font-Size="Small">Get Sales</asp:LinkButton>
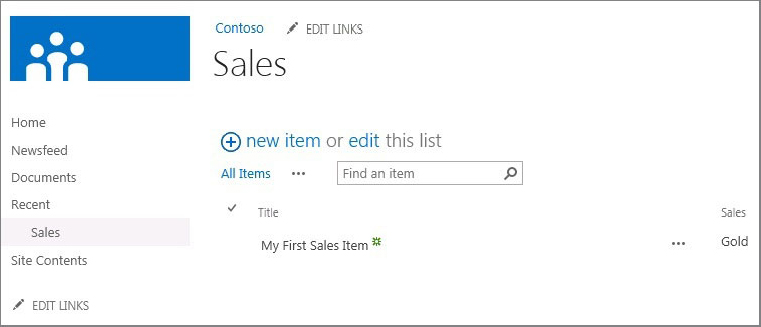
using System;
using System.ComponentModel;
using System.Web.UI.WebControls.WebParts;
using System.Collections.Generic;

namespace MyFirstSPProj.MyNewVisualWebPart
{
    [ToolboxItemAttribute(false)]
    public partial class MyNewVisualWebPart : WebPart
    {

        List<Sales> mySalesData = new List<Sales>();
        Sales FY11 = new Sales();
        Sales FY12 = new Sales();
        Sales FY13 = new Sales();

        public MyNewVisualWebPart()
        {
        }

        protected override void OnInit(EventArgs e)
        {
            base.OnInit(e);
            InitializeControl();
        }

        protected void Page_Load(object sender, EventArgs e)
        {
        }

        protected void lnkGetSalesData_Click(object sender, EventArgs e)
        {
            FY11.ID = 1;
            FY11.Quarter = "FY11";
            FY11.TotalSales = "$2,002,102.00";
            mySalesData.Add(FY11);

            FY12.ID = 2;
            FY12.Quarter = "FY12";
            FY12.TotalSales = "$2,500,201.00";
            mySalesData.Add(FY12);

            FY13.ID = 3;
            FY13.Quarter = "FY13";
            FY13.TotalSales = "$2,902,211.00";
            mySalesData.Add(FY13);

            salesGridView.DataSource = mySalesData;
            salesGridView.DataBind();
        }
    }
}

Class Sales
{
     public int ID {get; set;}
     public string Quarter {get; set;}
     public string TotalSales {get; set;}
}
Silverlight Web Part
Beyond the Standard and Visual Web Parts, you can also use the Silverlight Web Part. The Silverlight Web Part provides a way to deploy rich media applications to SharePoint. The Silverlight Web Part combines a Web Part and Silverlight application into one project (so it uses the Web Part infrastructure to deploy the Silverlight application) that it then deploys to SharePoint. Behind the scenes, the Web Part represents a container that points to a Silverlight application that it deploys to SharePoint. Similar to the Visual Web Part, you can use a designer experience to build rich Web Parts (also ones that can leverage the CSOM API to interact with SharePoint data). Use the Silverlight Web Part for rich media applications, data-bound applications, and applications that you want to use across all versions of SharePoint.
Figure 4-7 shows a simple Silverlight Web Part that has been deployed to SharePoint.
Creating SharePoint-Hosted Apps
SharePoint-hosted apps are a newer breed of app in SharePoint 2013 and are generally a good fit across many developers’ needs. This is because many SharePoint applications can be lightweight in nature, they leverage only client-side code, and they don’t require heavy back-end processing elements. SharePoint-hosted apps are by far the easiest app to create and deploy; the contents of the app are deployed to a single SharePoint site.
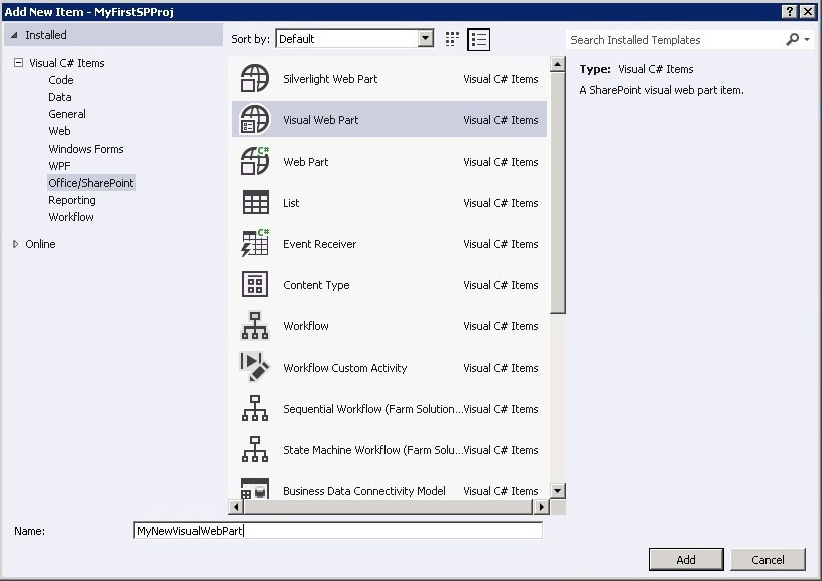
A number of different elements can make up a SharePoint-hosted app. For example, in Figure 4-8 note the range of available options, such as Content Type, Workflow, or even App for Office.

Another reason that SharePoint-hosted apps are popular is that you can create some of the more common SharePoint artifacts you use on a regular basis; that is, lists, content types, and site columns, and then deploy them to a cloud-hosted or on-premises instance of SharePoint.
Lists are a core part of SharePoint and have a rich object model that you can use to code against them. As a potential part of lists, site columns are reusable column definitions that you can create and then repurpose across the SharePoint site. For example, if you need a very specific site column called Tax Rate that has a calculation embedded within it, you can use that site column to enforce some level of consistency across your lists and sites. Content types are also a reusable object that you can repurpose across your SharePoint site. Content types can come in different shapes and sizes; for example, you might define a content type as a set of columns or as a custom document template. One common use of content types is for custom documents (for example, a legal contract with boilerplate text).You create the content type and bind that content type to a document library. You can create site columns, content types, and lists in a variety of ways. For example, you can create each one of these objects through the SharePoint Web interface. You can also leverage SharePoint Designer to create all of these objects or even Visual Studio to create content types and list definitions. Using Visual Studio makes it possible to begin integrating list definitions into other applications or redeploying a custom list definition across multiple SharePoint sites.
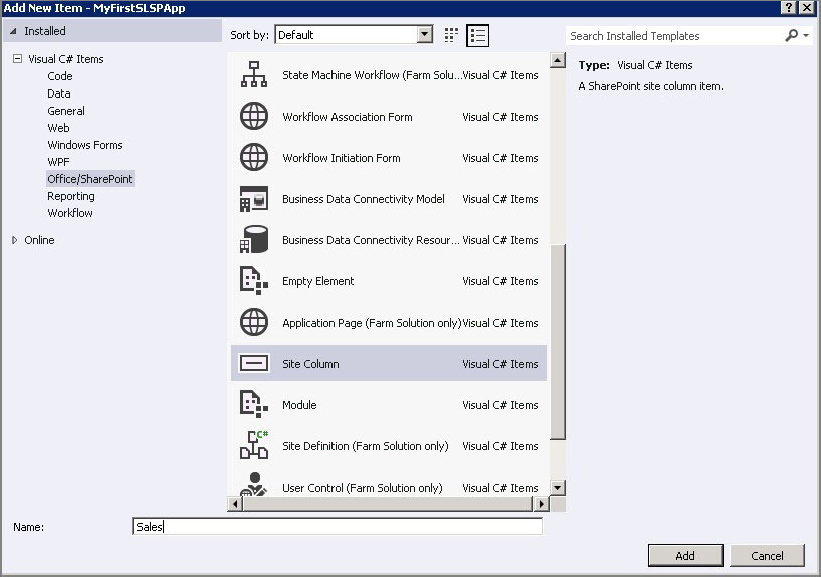
In the following Try It Out you take a look at how to use Visual Studio to build custom site columns for lists.
<?xml version="1.0" encoding="utf-8"?>
<Elements xmlns="http://schemas.microsoft.com/sharepoint/">
  <Field
       ID="{4c3a41d4-366d-44c7-910c-74716019ae75}"
       Name="Sales"
       DisplayName="Sales"
       Type="Choice"
       Required="FALSE"
       Group="Sales Levels">
    <CHOICES>
      <CHOICE>Premier</CHOICE>
      <CHOICE>Gold</CHOICE>
      <CHOICE>Silver</CHOICE>
      <CHOICE>Bronze</CHOICE>
      <CHOICE>Non-Affiliated</CHOICE>
    </CHOICES>
    <Default>Bronze</Default>
  </Field>
</Elements>

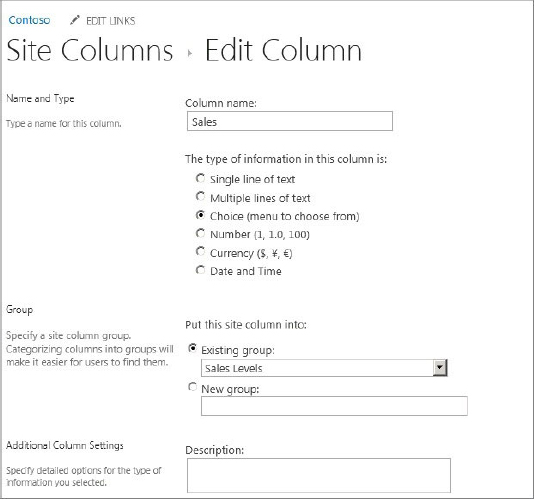
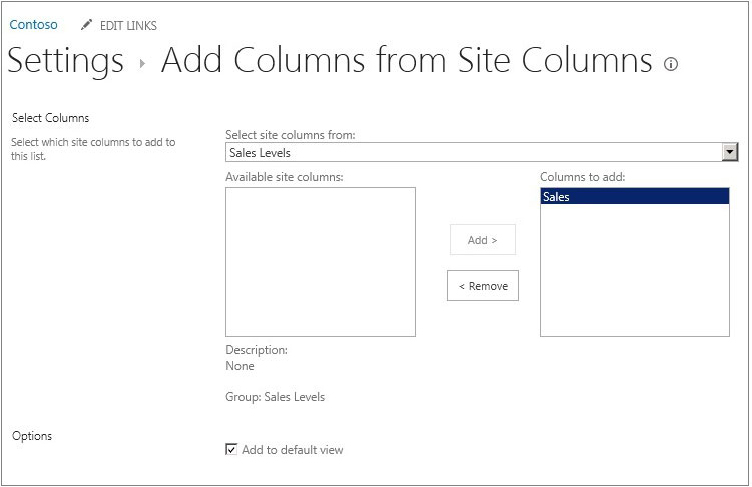
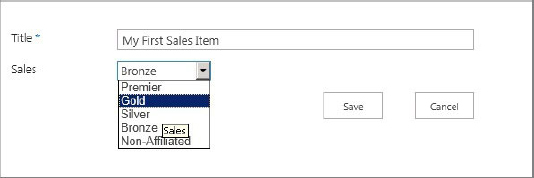
Although you can create lists manually through the browser or in SharePoint Designer, you might have the need to create a site column, list definition, or content type using Visual Studio (for example, you want to package and distribute a content type with a larger solution). Using the out-of-the-box project templates, these objects are much easier to create than in past versions of SharePoint. When you do create objects such as site columns, list definitions, or content types using Visual Studio, you need to be familiar with the Collaborative Application Markup Language (CAML) syntax and structure for the objects you’re trying to create (CAML is an XML syntax specific to SharePoint). For example, the following XML defines a site column that you can deploy to a SharePoint site and then reuse across the site. The site column defines a reusable list of Sales types for a program a company is running; it does this through the XML definition of the site column.
<?xml version="1.0" encoding="utf-8"?>
<Elements xmlns="http://schemas.microsoft.com/sharepoint/">
     <Field ID="{4c3a41d4-366d-44c7-910c-74716019ae75}"
       Type= "Choice"
       FillInChoice="TRUE"
       Name="Sales"
       DisplayName="Sales"
       Group="Sales Levels">
      <CHOICES>
        <CHOICE>Premier</CHOICE>
        <CHOICE>Gold</CHOICE>
        <CHOICE>Silver</CHOICE>
        <CHOICE>Bronze</CHOICE>
        <CHOICE>Non-Affiliated</CHOICE>
      </CHOICES>
      <Default>Bronze</Default>
     </Field>
</Elements>
You can create a site column manually in SharePoint Designer or in Visual Studio. In this exercise, you used Visual Studio, which treats the site column like any other SharePoint project; it creates a feature and then deploys the XML elements file (which represents the definition of the site column) to the appropriate place within SharePoint.
Working with SharePoint Data
One of the most common tasks when working with SharePoint is interacting with the various data sources such as lists or document libraries. The great thing about SharePoint is that you have a number of different options for interacting with this data. For example, you have the Server Object Model, the Client-Side Object Model (which has become more powerful since SharePoint 2010), REST (or OData) services, SharePoint Services (which ship out-of-the-box and cover a wide array of scenarios), and Business Connectivity Services or BCS (which provide a rich set of APIs for working with external data systems such as SAP, Microsoft Dynamics CRM, or PeopleSoft). You’ll see each of these methods of working with data discussed throughout the book, but this section introduces you to a couple of select examples of tasks that you’ll likely do on a daily basis across some of these services and APIs.
Before you can do anything with SharePoint programmatically, you need to establish a connection and context with your SharePoint site. For the most part, this means using (or adding) a reference in your project to Microsoft.SharePoint.dll or Microsoft.SharePoint.Client.dll. With the appropriate references added to your project, you can then begin to set the context and code within that context. For example, you can set the context for a SharePoint site using the Server Object Model by adding the Microsoft.SharePoint.dll to your project reference and then use the following using statements to wrap your code. In this code snippet, you set the site collection context and can either call the OpenWeb method on that site context, or use the RootWeb property to set the context of the SPSite object (that is, mySiteCollection). You would then add your code where the comment is marked.
using (SPSite mySiteCollection = new SPSite(mySiteUrl))
         {
             using (SPWeb mySPSite = mySiteCollection.RootWeb)
                   {
//Code here.
                   }
         }
The SharePoint Client-Side Object Model is a way to read and write data from SharePoint lists (and enables you to do it through remote client apps). After adding the Microsoft.SharePoint.Client.Runtime.dll and Microsoft.SharePoint.Client.dll references, you can use the following code to set the context with your SharePoint site. When you’ve created your application code, you then call the ExecuteQuery method to batch-process that code. The final statement (the Close method) disposes of the context from memory.
String mySiteUrl = "http://fabrikamhockey/acme";
ClientContext mySPSiteContext = new ClientContext(mySiteUrl);

//Code here.

mySPSiteContext.ExecuteQuery();
mySPSiteContext.Close();
You will find yourself using both the Server and Client-Side Object Model in different scenarios; for server-side only applications you can use the Server Object Model, and for remote client or cloud-hosted apps you can use the SharePoint Client-Side Object Model.
In SharePoint 2013, your options for interacting with lists expand to include REST. To use REST, which supports full create, read, update, and delete (CRUD) operations, you construct a RESTful HTTP request using the Open Data Protocol (OData) standard. This enables you to perform, for example, GET or POST operations against your SharePoint lists. The following REST URI retrieves all the items in the Customers list:
https://me.sharepoint.com/sites/sp/_api/web/lists/getbytitle('Customers')/items
The REST URI is quite versatile as well; you can use it in JavaScript or .NET apps to interact with your list data. The REST interface is efficient because it exposes all the SharePoint entities and operations — some of which are not available in the other APIs, and you can also manage the returned data through XML or through JSON, so programming your client apps is flexible (you can use client-side script or .NET apps against the REST URIs). The following code illustrates how you can make a GET request that returns a JSON representation of all of your site’s lists by using jQuery:
$.ajax({
      url:http://myspsite/_api/web/lists,
      type: "GET",
      contentType: "application/json;odata=verbose",
      headers: {
                 "ACCEPT","application/json;odata=verbose",
                 "Authorization","Bearer" + accessToken
               },
       })
After you’ve obtained context with the SharePoint object model, you can interact with data that resides on SharePoint. For example, you can iterate over every list in SharePoint and get the title of the list, you can retrieve views of specific lists, or you can update properties or list items in lists programmatically. The following code snippet shows the use of the Server Object Model to obtain the SharePoint site context, but now you’re iterating through the lists (see bolded code) on the SharePoint site and adding each list title to a list box.
string mySiteUrl = "http://intranet.contoso.com/acme/";
string myListItemInfo = "";

using (SPSite mySiteCollection = new SPSite(mySiteUrl))
    {
         using (SPWeb mySPSite = mySiteCollection.RootWeb)
              {
                 foreach (SPList mySPList in mySPSite.Lists)
                    {
                       myListItemInfo = mySPList.Title.ToString();
                       lstbxListTitles.Items.Add(myListItemInfo);
                    }
               }
    }
Again, you can do similar types of list interaction by using the SharePoint Client-Side Object Model. The following code snippet shows the setting of the site context again but the bolded code retrieves a list called Inventory from SharePoint and then loads it with a query to filter on the Salmon field.
String spURL = "http://fabrikamhockey/acme";
ClientContext spSiteContext = new ClientContext(spURL);
List myProducts = spSiteContext.Web.Lists.GetByTitle("Inventory");
spSiteContext.Load(spSiteContext.Web);
spSiteContext.Load(myProducts,
list => list.Fields.Where(field => field.Title == "Salmon"));
spSiteContext.ExecuteQuery();
spSiteContext.Close();
When updating list data, you can choose between using the Server Object Model, CSOM, or REST services). One example is to use the Server Object Model and then call the Update method to update items on a SharePoint list. For example, the following code takes the same site context code shown earlier, but instead of iterating through the list, it now creates an instance of a specific list and then adds a record to the list comprising two fields (Product_Name and Product_SKU). You can see the final call in this case is the Update method to add the new item (newListItem) to the SharePoint site.
using (SPSite mySPSite = new SPSite("http://fabrikamhockey/acme"))
      {
          using (SPWeb mySPWeb = mySPSite.OpenWeb())
              {
      SPList productsList = mySPWeb.Lists["Products"];
      SPListItem newListItem = productsList.Items.Add();
      newListItem["Product_Name"] = "Salmon";
      newListItem["Product_SKU"] = "SLM-30989";
      newListItem.Update();
               }
       }
Depending on what API you use, you might come across the need to use Collaborative Application Markup Language (CAML) constructs, which can get a bit hairy. In essence, CAML enables you to build an XML-based query to return data from a SharePoint list. The following illustrates a CAML query that returns all the results (up to 100). You can construct CAML queries across any of the SharePoint APIs.
    var camlQuery = new SP.CamlQuery();
    camlQuery.set_viewXml('<View><RowLimit>100</RowLimit></View>'),
    this.collListItem = oList.getItems(camlQuery);
Beyond CAML queries, you can also use Language Integrated Query (LINQ) statements to query SharePoint list data. LINQ is a very effective way to query data, which is supported in SharePoint 2013. For example, the following LINQ statement retrieves the list item (from a list represented through the myCustomerList object) where the customer name (represented as c) is Acme.
var customers =
     from c in myCustomerList
     where c == "Acme"
     select c;
You’ll find many different ways to interact with SharePoint lists. Becoming familiar with both a server-side and client-side way to do this is best.
Creating Cloud-hosted Apps
Chapter 2 covered cloud-hosted apps, so this section does not go into too much detail other than to say that you will be using this type of app quite a bit. A couple of things to call out here, though, are that you have the flexibility to use the CSOM and REST APIs within these apps. You must also manage OAuth (when your app calls back into SharePoint) and app permissions, which beyond moving to a more cloud-hosted model, is one of the key changes in SharePoint 2013.
Creating Event Receivers
SharePoint supports a wide array of event receivers, which are events that are triggered through a system or user action such as updating a list or adding a new document to a document library. You can create event receivers for a wide variety of objects such as lists, list items, sites, and so on. For instance, suppose you want to load external data as additional company metadata (such as company or national holidays) when a user creates a new calendar item. This requires a Web service call to load the data and an event receiver to load the data when the user creates a new list item. You might also want to log a transaction when certain lists are updated; this is another effective way to use event receivers. You can also build event receivers against feature activations or deactivations if you want. This can be particularly handy when you need to clean up dependent features or assemblies when a feature is activated or deactivated. The event receiver can help remove any ancillary files or dependent Web Parts from the Web Part gallery or the filesystem.
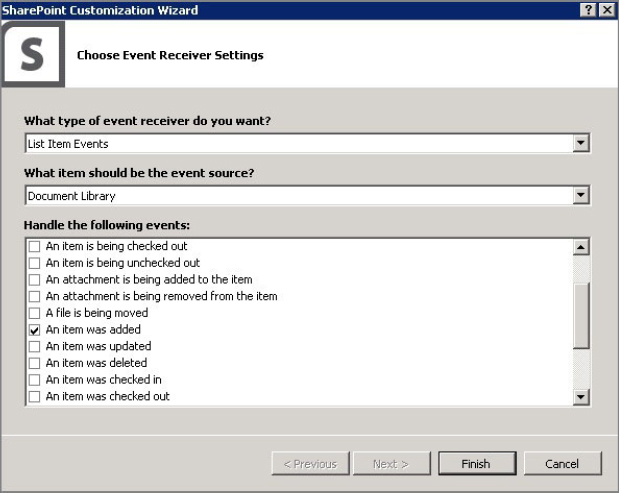
Event receivers are very easy to build and deploy to SharePoint: you create event receivers using the Visual Studio Event Receiver project or item template. Let’s go ahead and create a simple event receiver in the following Try It Out to get you familiar with the process.
using System;
using System.Security.Permissions;
using Microsoft.SharePoint;
using Microsoft.SharePoint.Utilities;
using Microsoft.SharePoint.Workflow;
namespace MyFirstEventReceiver.SPEventReceiver
{
public class SPEventReceiver : SPItemEventReceiver
{
public override void ItemAdded(SPItemEventProperties properties)
{
base.ItemAdded(properties);
logAnAnnouncementEvent(properties);
}
private void logAnAnnouncementEvent(SPItemEventProperties properties)
{
string eventTitle = properties.ListTitle;
string mySiteUrl = "http://w15-sp/";
using (SPSite mySiteCollection = new SPSite(mySiteUrl))
{
using (SPWeb mySPSite = mySiteCollection.RootWeb)
{
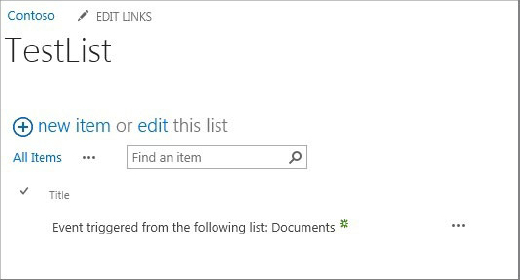
SPList mySPList = mySPSite.Lists["TestList"];
SPListItem newListItem = mySPList.Items.Add();
newListItem["Title"] =
"Event triggered from the following list: " + eventTitle;
newListItem.Update();
}
}
}
}
}

public override void ItemAdding(SPItemEventProperties properties)
{
    base.ItemAdding(properties);
    logAnAnnouncementEvent(properties);
}
private void logAnAnnouncementEvent(SPItemEventProperties properties)
{
    string eventTitle = properties.Title;
    string mySiteUrl = "http://intranet.contoso.com/";

    using (SPSite mySiteCollection = new SPSite(mySiteUrl))
    {
        using (SPWeb mySPSite = mySiteCollection.RootWeb)
        {
            SPList mySPList = mySPSite.Lists["TestList"];
            SPListItem newListItem = mySPList.Items.Add();
            newListItem["Title"] = "Event triggered from the following list:
             " + eventTitle;
            newListItem.Update();
        }
    }
}
Most of the other code will now be familiar to you because you’ve already seen how you add an item to a list. As you explore event receivers, be sure to try out some other types of events that are more complex and involve other parts of the SharePoint site — or external data that you can leverage within your SharePoint site.
Creating ASPX Pages
Those of you familiar with ASP.NET might recognize the .ASPX extension; this is the core ASP.NET Web page. Because SharePoint is built on ASP.NET, the individual pages within SharePoint are of this specific type. What sets SharePoint ASPX pages apart from other ASP.NET sites is that you get a lot of native capabilities built into an ASPX page when you create it. For example, SharePoint ships with a number of capabilities such as edit functionality and Web Part capabilities, and when you create a new ASPX page it derives parent features and loads and registers dependent assemblies that are required to render the page and controls on that page correctly. If you examine the following code in the default Web Part ASPX page you can see that a number of directives exist that register specific assemblies to the page. SharePoint requires that these directives exist. Don’t worry; you won’t have to memorize what all of them are. SharePoint Designer creates many of them for you by default, so you can focus on page creation and customization.
<%@ Page language="C#" MasterPageFile="~masterurl/default.master"
Inherits="Microsoft.SharePoint.WebPartPages.WebPartPage,
Microsoft.SharePoint,Version=15.0.0.0,Culture=neutral,
PublicKeyToken=71e9bce111e9429c"
meta:webpartpageexpansion="full"
meta:progid="SharePoint.WebPartPage.Document"  %>
<%@ Register Tagprefix="SharePoint" Namespace="Microsoft.SharePoint.WebControls"
Assembly="Microsoft.SharePoint, Version=15.0.0.0,
Culture=neutral, PublicKeyToken=71e9bce111e9429c" %>
<%@ Register Tagprefix="Utilities" Namespace="Microsoft.SharePoint.Utilities"
Assembly="Microsoft.SharePoint, Version=15.0.0.0,
Culture=neutral, PublicKeyToken=71e9bce111e9429c" %>
<%@ Import Namespace="Microsoft.SharePoint" %>
<%@ Assembly Name="Microsoft.Web.CommandUI, Version=15.0.0.0,
Culture=neutral, PublicKeyToken=71e9bce111e9429c" %>
<%@ Register Tagprefix="WebPartPages" Namespace="Microsoft.SharePoint.WebPartPages"
Assembly="Microsoft.SharePoint, Version=15.0.0.0,
Culture=neutral, PublicKeyToken=71e9bce111e9429c" %>
You can create a simple ASPX page for SharePoint without any of the frills that the Web Part pages deliver and the code for this type of page would look more readable (see the following). However, note that this page would not contain any of the standard SharePoint controls and would not inherit the structure and style that is laid out by the master page.
<!DOCTYPE html PUBLIC "-//W3C//DTD XHTML 1.0 Strict//EN"
 "http://www.w3.org/TR/xhtml1/DTD/xhtml1-strict.dtd">
<%@ Page Language="C#" %>
<html dir="ltr" xmlns="http://www.w3.org/1999/xhtml">
<head runat="server">
<meta name="WebPartPageExpansion" content="full" />
<meta http-equiv="Content-Type" content="text/html; charset=utf-8" />
<title>Untitled 1</title>
</head>
<body><form id="form1" runat="server">
</form>
</body>
</html>
Although a couple of different paths exist for creating ASPX pages for SharePoint, using SharePoint Designer 2013 is the easiest. This is because not only is code like the preceding created for you, but you can also use templates to create Web Part pages — a special type of ASPX page that has Web Parts located in specific ways on the page. You could alternatively use Visual Studio 2012 to create ASPX pages, but you would have to manually add the preceding namespace registration directives and then manually add the page to the appropriate page on the site. By default, SharePoint Designer can save the ASPX pages you create in a number of places (for example, the Site Assets library).
Beyond the assemblies that are registered through the directives, you also have HTML markup interlaced with ContentPlaceHolder controls and ASP.NET controls. Again, if you’re familiar with ASP.NET, then these concepts won’t be new to you. If you’re not, ContentPlaceHolder controls and ASP.NET controls are how you render functional controls or applications on the ASPX page. For example, one of the default ContentPlaceHolder controls is the search control, which is expressed in the following code:
<asp:Content ContentPlaceHolderId="PlaceHolderSearchArea" runat="server">
      <SharePoint:DelegateControl runat="server" ControlId="SmallSearchInputBox"/>
</asp:Content>
Depending on the level of complexity of your ASPX page, you might have more or fewer of the preceding controls — some that work independently of one another or others that work hand-in-glove with one another.
Creating Master Pages
Master pages are an ASP.NET creation that SharePoint inherits from being built on ASP.NET. SharePoint uses master pages to provide a consistent structure and layout for each of the pages in a SharePoint site. Similar to a single CSS file providing structure for many Web pages, a single master page can serve multiple sites and define the look, feel, and behavior that you want for all the pages of that site. Using the master page as the structural foundation of your site, you can then add other content or custom applications or Web Parts to your SharePoint site.
When you install SharePoint, it installs a single master page to your SharePoint site by default. You can then create a copy of the default.master master page and customize it to your liking or add a new, custom master page that provides the branding and behavior you want for your SharePoint site. SharePoint Designer provides some great capabilities for managing, creating, and editing master pages; for example, you can edit and view your changes from within SharePoint Designer and then check it in for approval to your SharePoint site.
When a user navigates to a SharePoint site, the site or content page references a master page, which is then merged with the page. This produces an output that combines the layout of the master page with the content from the site page. The following bolded code shows a token reference (the token being ~masterurl/default.master) to the master page that was used for that site:
<%@ Page language="C#" MasterPageFile="~masterurl/default.master"
Inherits="Microsoft.SharePoint.WebPartPages.WebPartPage,
Microsoft.SharePoint,Version=15.0.0.0,Culture=neutral,
PublicKeyToken=71e9bce111e9429c"
meta:webpartpageexpansion="full" meta:progid="SharePoint.WebPartPage.Document"  %>
A master page is characterized by the .master file extension. The master page itself can contain an array of objects. For example, the master page can contain HTML, JavaScript, CSS, and ASP.NET server controls. When you examine the syntax of the master page, you’ll see text and controls that render a look and feel that is specific to SharePoint. This is especially true when you look at the default.master master page, which includes all the breadcrumbs and default menu and navigation options that are specific to SharePoint.
However, you’ll also see a series of ContentPlaceHolder objects (discussed earlier) within a master page, which define regions where content or controls can appear. When you’re customizing SharePoint master pages, you need to have a set of ContentPlaceHolder controls on the page, for example, global breadcrumb, top-level navigation, search, and title. You can add more ContentPlaceHolder controls than are required by default; however, you cannot remove the ones that are required or else your content or site pages might fail to render.
The following code snippet shows some of the different types of text and controls that you can find within a SharePoint master page. Note that these are taken from the default.master, which ships with all versions of SharePoint, so you can explore the full set of code and controls that ship with this master page by reviewing the file from within SharePoint Designer.
<title id="onetidTitle"><asp:ContentPlaceHolder id="PlaceHolderPageTitle"
runat="server"/>
</title>
<SharePoint:CssLink runat="server" Alternate="true"/>
<SharePoint:Theme runat="server"/>
<SharePoint:CssRegistration Name="minimalv4.css" runat="server"/>
<SharePoint:CssRegistration Name="layouts.css" runat="server"/>
<SharePoint:ULSClientConfig runat="server"/>
<span class="s4-notdlg">
<a href="javascript:;" onclick="javascript:this.href='#mainContent';"
class="ms-SkiptoMainContent" accesskey="<%$Resources:wss,maincontent_accesskey%>"
 runat="server">
<SharePoint:EncodedLiteral runat="server"
text="<%$Resources:wss,mainContentLink%>" EncodeMethod="HtmlEncode"/>
</a>
</span>
...
<asp:ContentPlaceHolder id="PlaceHolderWelcomeMenu" runat="server">
<div class="lb ms-mini-trcMenu">
<wssuc:Welcome id="IdWelcome" runat="server" EnableViewState="false">
</wssuc:Welcome>
<wssuc:MUISelector runat="server"/>
</div>
</asp:ContentPlaceHolder>
...
<div>
<asp:ContentPlaceHolder id="PlaceHolderTitleBreadcrumb" runat="server" />
</div>
...
<div id="DeveloperDashboard" class="ms-developerdashboard">
<SharePoint:DeveloperDashboard runat="server"/>
</div>
...
</body>
</html>
When managing your master pages, be mindful of any changes you make to the existing master pages. In fact, avoid at all costs editing any of the default master pages that ship with SharePoint and always copy and edit alternate, renamed copies so you never lose a snapshot to which you can safely return. If you’re going to be doing a lot of master page customization in the future, start with a minimal master page (which contains the bare minimum set of controls necessary for a SharePoint site) and add onto that as practice to get familiar with how they work.