
Modeling for 3D printing is the same as any other modeling in Blender. But there are no cheats. You have to be precise and orderly. Using the Mesh Analysis panel hinted at the kinds of things we are looking to eliminate, such as intersecting polygons, holes in the model, sharp edges, polygons that aren't flat, and details that are too small or too delicate. We are making objects for the real world and must always consider that. We have to remember what material we are going to make the part with, how large it is, and how precisely we have to fit it together with other objects.
3D printing is an art, not a science. Many times, the only thing to do is to try something and see if it works. A file that works with one printer or material may fail with another. But there are considerations that are universal. The two big words for 3D printing are watertight and manifold.
With 3D printing, we are trying to bring our Blender objects into the real world. Real objects are solid. They have height, width, and depth. So, an object modeled in Blender for 3D printing has to be solid as well. There can't be any gaps between polygons. The polygons of an object must enclose a volume of space completely. When they do, the object is called watertight.
Consider a beach ball, as seen on the left of the following screenshot. It surrounds a volume of air completely. There are no gaps in the surface. If you throw it in the water, it will float because the water cannot get inside. It's watertight.
If you cut the top off the beach ball, as in the center of the screenshot, then throw it in the water, it does not completely surround a volume of air. There's a big gap in the surface. Water can get in and it will sink. It's not watertight.
But, if you give the beach ball a second inner wall, as seen on the right, and then make sure that the inner wall and outer wall are sealed to each other, then they completely surround a volume of air between the walls. No water can get inside these walls, so it will float. It is watertight:

You should also remember that you cannot control how well people will be able to see your model. They can get up close with a magnifying glass if they like. You can't cut corners the way you might if you are only rendering an object. So, you want to make your model tight and pretty anyway.
Manifold is a more mysterious term. The word doesn't come up in regular conversation.
There are two conditions for being manifold:
This may seem rather restrictive at first, but it's not. Non-manifold edges are edges that have any other number of polygons associated with them. This would include edges with zero polygons, one polygon, three polygons, four, five, six, and more. They would be very confusing to a printer.
Think about it. How could a printer print an edge without a polygon? There is nothing to print. An edge that is associated only with one polygon can't be printed either. A single polygon does not surround any volume. When you have an edge with three or more polygons, the outermost polygons will define a volume and any other edges will be within the volume, as shown in the following screenshot. On the right-hand side of the screenshot is a manifold edge attached to two polygons. There are no conflicts and the polygons can contain a volume:

This next exercise will give you some practice in identifying manifold edges. You will get a number of objects to inspect. See what you think:
- Go back to Blender and open the
4597_03_Distorted Cube.blendfile again. Press Z to set the display mode to wireframe. Look at it closely. Can you find the edge that is shared by three polygons? Can you find the two edges associated with only a single polygon? The distorted cube is not manifold. - Press Tab to get into object mode. Press X to delete the distorted cube.
- Press Shift + A. Select Mesh | UV Sphere. Press Tab to get into edit mode. Look at it closely. Observe that all edges share exactly two polygons, no more, no less, even at the top and bottom. It is a nice solid object, manifold, and can be 3D printed.
- Look at the Mesh objects, Cube, Torus, and Cone; they are manifold as well.
Now that you've had a quick example of manifold and non-manifold edges, it's time to use the Print3D Toolbox panel to find non-manifold edges. You may use the file of the dragon that you made in Chapter 2, Measuring and Texturing Techniques for 3D Printing, or you can use 4597_03_Dragon.blend from your download directory and perform the following steps:
- Load the file and make sure you are in Object mode.
- Scroll down in the 3D View toolbox to the Print3D subpanel. Click on the Solid button.
- In the Output section of the subpanel, it says that there are 56 non-manifold edges. Get in to Edit mode. Click on the Non Manifold Edges button in the Output section of the Print3D subpanel to display the problem areas.
- Press Z to set the 3D View shading to Wireframe. You may want to temporarily turn off the Mirror and Subsurface modifiers to make it easier to see the non-manifold edges. The controls are in the Properties panel on the right. Click on the wrench symbol in the header to get the modifiers panel. Then, toggle the eye symbols for the Mirror and Subsurface modifiers so they are a light grey.
- Most of the non-manifold edges are because of the Mirror modifier and lie on the YZ axis plane. There are 39 of them. Don't worry about them. They will resolve themselves when you apply the Mirror modifier in the next chapter. But there are seven other problems with the dragon. The problem edges are displayed in orange.
These problems are typical of small errors that can happen in models. They won't bother you if you animate in Blender, but will affect the 3D printer. They are as follows:
- A non-manifold vertex without an edge (this will not show up on the count of non-manifold edges but might cause problems printing)
- A non-manifold edge without any polygon
- A non-manifold edge from a polygon to a single vertex
- A non-manifold edge between vertices of two different polygons, but not associated with any polygon
- Four non-manifold edges surrounding a polygon (the polygon may be unneeded)
- Two vertices that are very, very close together and have separate edges when they should be in the same location and share edges, so they leave a tiny hole in the surface
- A missing polygon causing a hole in the surface
Now you will begin to prepare the dragon for printing by eliminating the non-manifold parts of the model. Compare the list to the problem areas highlighted when you click on the Non Manifold Edges: button and one by one eliminate the problems:
- Open up a Text Editor window below the Blender Properties panel, click on the button with the image of the spiral notebook to find a text named Non Manifold Text. It has a list of the items you are to find. You can use this to keep track of which problems you have found.
- Find them and fix them. Every time you find one of the errors and fix it, press the Solid button in the Print3D subpanel again to refresh the list of non-manifold edges. Then, click on the Non Manifold Edges: button to display what is still to be found. You'll see the count go down to 39 as you remove problems. It is easiest if you work on problems with edges first.
- You can also use the command Ctrl + Alt + Shift + M to display non-manifold edges.
If you have searched and have not found the non-manifold vertex without an edge, click on the Isolated button in the Cleanup section of the Print3D subpanel. It removes any isolated edges and vertices. In the Output: section, it will tell you Verts Removed: 1.
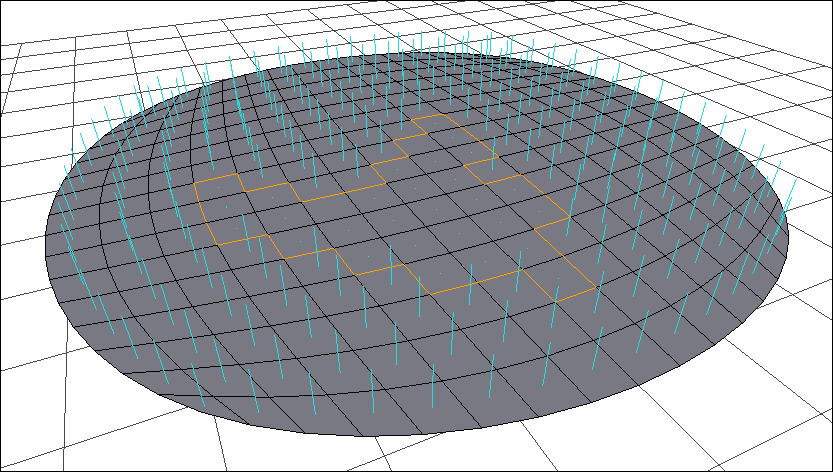
Below the Non Manifold Edge: button, there is a button labeled Bad Contig. Edges:. This is short for bad contiguous edges. It identifies polygons that share an edge but do not make a smooth surface. The following screenshot shows what this looks like. Most of the normals on this surface are facing up as shown by the thin blue lines. A few of the polygons have normals facing down. Their blue lines point away and are hidden by the solid polygons.
The Bad Contig. Edges: function identifies adjoining polygons which have normals facing in different directions by drawing the edge between them in orange.
Now we will check the dragon for bad contiguous edges and eliminate the problem. If this is not fixed, the solidify modifier in the next chapter will not work properly:
- Click on the Solid button again. Select the Bad Contig. Edges: button and see orange lines snaking around the dragon. This means that some of the normals on the dragon are pointing in the wrong direction. These polygons are facing towards the inside of the dragon, not the outside.
- You can display all the normals by going to the Mesh Display subpanel of the 3D View Properties panel. Click on the polygon symbol under the label Normals: so that it is darkened. Set the Size: to 0.1mm. If you set the 3D View shading to Solid and set the limit selection to visible button, it will be easier to see which way the normals point. You can see that the polygons within the edges identified by the Bad Contig. Edges: point a different way than the ones outside the edges.
- Press A to select all the polygons.
- Scroll up in the 3D View toolbox and find the buttons under the Normals: heading. Click on Recalculate.
- Click on the Solid button in the Print3D subpanel.
Look at the results for Bad Contig. Edges:. It should be 0 now. When you finally apply the Mirror modifier, the dragon will be watertight and manifold. Well done.