In addition to the Mapbox mapping SDK for iOS, Mapbox offers a turn-by-turn navigation user interface SDK for iOS as well. Typically, this style of navigation would be used for an app that provides built-in driving directions, such as a rideshare service or a package delivery service.
We will build a simple navigation app in this chapter that routes from the user’s current location to a destination. We will use the standard turn-by-turn user interface that Mapbox provides, known as the Mapbox Navigation framework. If you would like to build your own user interface, you can use the Mapbox Core Navigation framework to power that user interface with route updates. The Mapbox Navigation framework is built on top of the Mapbox Core Navigation framework.
In either case, your application uses the Mapbox Directions API to create routes between origins and destinations. As with other Mapbox APIs, check the pricing for the Directions API before building it into your application, to make sure that you understand how the free tier and tiered pricing works.
Setting up your app project
Before we can dive into the Mapbox Navigation framework, we will need to create a new iOS application project, set it up with CocoaPods, and then add some capabilities and Info.plist entries.
Start by creating a new iOS Single View Application in Xcode. Name the app MapboxNavigationApp. Choose the same defaults as we have used in previous projects, to use storyboard/UIKit and Swift.
Setting up CocoaPods
Podfile for app that uses the Mapbox Navigation framework
After you install the CocoaPods, you need to open the MapboxNavigationApp.xcworkspace workspace in Xcode, not the Xcode project.
Adding entries to Info.plist
MGLMapboxAccessToken
Privacy - Location When In Use Usage Description
The access token entry can be the same access token you have already used in previous Mapbox chapters (see Chapter 11 for instructions). The location usage description will appear to the user the first time the app accesses their location. A sample description might be “This app will use your location to provide in-app navigation and to improve the map”.
This takes care of the Info.plist file settings. We also need to add capabilities to the application so that the app works in background mode.
Adding required capabilities
The Mapbox Navigation framework requires two different background mode capabilities. If you don’t set the background audio mode, the app will crash immediately and tell you to add it. While you can add these background modes through the Info.plist file, you can also add them as capabilities through the Xcode project.

Adding background mode capability to app target

Selecting background modes for navigation
Now we have everything set up to use the Mapbox Navigation framework. Let’s move on to the Mapbox Directions API.
Using the Mapbox Directions API
Your app needs to calculate a route between two or more different waypoints, using the Mapbox Directions API. While you can make HTTPS calls to the Directions API directly, it’s much easier to use the helper classes in the MapboxDirections framework.
The key classes that you need to get started with the Mapbox Directions API are Waypoint, RouteOptions, Directions, and Route.
Waypoints are the places on the route. You can have up to 25 waypoints for directions when cycling or walking. You may also have up to 25 waypoints if you are driving, but don’t want the route to consider traffic. If you do want to consider traffic conditions, you can only have two or three waypoints.
Route options consist of the waypoints along with the type of transportation used – walking, cycling, driving, or driving considering traffic. This also includes any settings to consider when planning the route, such as avoiding toll roads or ferries or avoiding U-turns. You can also ask for the individual steps within each leg of the route.
When we use the turn-by-turn navigation user interface in the MapboxNavigation framework, we will use a subclass of RouteOptions named NavigationRouteOptions.
The Directions class represents the Directions API. Using a shared single instance of the class, you can call the API asynchronously using the calculate(_:completionHandler:) method. Pass the route options as the first argument and a closure as the second argument.
Last, a successful directions call will pass at least one route as argument to the completion handler. A route will have one leg (a RouteLeg object) if it has two waypoints and one leg for every additional waypoint.
Putting all of this together, we can write two simple methods that will create the waypoints for our directions request and then make the call to the directions API.
Create waypoints for Mapbox directions
Add that createWaypoints() method to your ViewController class. You can also see that constructing a waypoint is fairly straightforward.
Getting directions from the Mapbox Directions API
Try this function out by calling getDirections() from your viewDidLoad() method and then looking for output in the console.
You could build on top of the preceding function yourself to add the coordinates from the route onto your Mapbox map as a polyline. Instead, we are going to use the much simpler approach of using the prebuilt turn-by-turn navigation user interface in the MapboxNavigation framework.
Displaying the navigation user interface
To display the default navigation user interface, we need to create a NavigationViewController and then present it modally from our ViewController class. We can either do this completely programmatically or add a storyboard reference for the navigation view controller and then configure it in the prepareForSegue method of our view controller. We won’t use the storyboard on this project. Also, just for clarity, this is a different class and serves a different purpose than the UINavigationController class from Apple’s UIKit framework.
We are going to build on the code we discussed earlier, but make a few changes. For instance, we can keep the way that we create waypoints, but we are going to use the NavigationRouteOptions class instead of RouteOptions – the navigation route options comes with configuration optimized for turn-by-turn navigation. Instead of printing out some of the route properties, we are going to create an instance of the NavigationViewController class with the route as an argument. After we create that instance, we present it modally as a full-screen view controller. There is a built-in dismiss button at the bottom of the navigation view controller that would return the user to our original view controller.
We also take the opportunity to add a feature to our route request, which is to avoid toll roads. You can also choose to avoid ferries, motorways, restricted roads, or tunnels. All of these are enumerated on the MBRoadClasses class. Only one of these may be avoided, not a combination, even though the API allows for an array of road classes.
Start navigation with turn-by-turn directions in a user interface

Turn-by-turn navigation in the app
Now that you have the user interface up and running, explore how it works – you can swipe left and right at the top to navigate between different steps in the route. Press the x button in the lower right to dismiss the navigation view controller when you are finished.
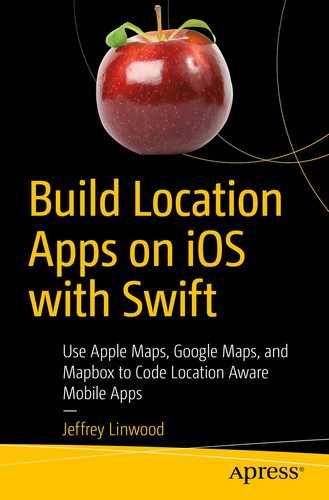
Using the Mapbox simulated navigation
Simulating navigation, sped up to nine times normal speed
To use simulation with Mapbox, you will need to modify the startNavigation() method. Rather than creating the NavigationViewController with just the route, you will need to create a navigation service, use that to populate navigation options, and then pass that to the NavigationViewController.
Starting navigation with a simulated drive
After you replace your startNavigation() method with the Swift code in Listing 14-5, run your project. You should expect to see a sped-up drive through the route between your start and finish.
Customizing the navigation experience
If you don’t like the display of the app, you can create custom styles for the user interface, including day and night variants. These styles can use your Mapbox map styles for tiles, and they can also use the UIAppearance protocol to style individual user interface elements. For instance, you could use this to match the colors you use for your brand, so the navigation looks like it belongs with the app.
There are many other features built into the Navigation SDK as well, such as CarPlay support, spoken voice options, and determining which side of the road to use for a waypoint (useful for rideshare or delivery apps).
If you like, you can create your own navigation user interface using the MapboxCoreNavigation framework. You would need to listen for routeControllerProgressDidChange notifications. These notifications contain location updates in the form of a RouteProgress class that you would use to update your user interface. You can get information about the distance traveled, distance remaining, remaining legs and steps, and other information. You can also get more granular information about progress in the current leg and the current step. The current step progress provides information about the next intersection, the distance to the next intersection, the distance until the next maneuver a user makes, and other information you could use for a user interface.
Conclusion
If the turn-by-turn navigation user experience helps your application, using Mapbox’s prebuilt components makes this very easy. Compared to building your own solution on top of another directions API, you can have a simpler experience for the user and less code to maintain within your application.
In Chapter 15, we look at Mapbox’s offline map capabilities – this is one of the areas where Mapbox provides a technology solution that other mapping SDKs don’t replicate.